
The goal of the Microsoft Office working environment is to make working with Office documents as intuitive as possible. You work with an Office file and its contents by giving commands to the program in which the document is open. All Office 2010 programs organize commands on a horizontal bar called the ribbon, which appears across the top of an application’s program window.

Commands are organized on task-specific tabs of the ribbon, and in feature-specific groups on each tab. Commands generally take the form of buttons and lists. Some appear in galleries. Some groups have related dialog boxes or task panes that contain additional commands.
Tip
Some older commands no longer appear on the ribbon but are still available in the program. You can make these commands available by adding them to the Quick Access Toolbar.
The appearance of commands on the ribbon changes as the width of the ribbon changes. A command might be displayed on the ribbon in the form of a large button, a small button, a small labeled button, or a list entry. As the width of the ribbon decreases, the size, shape, and presence of buttons on the ribbon adapt to the available space. For example, if you decrease the width of the ribbon, small button labels disappear and entire groups of buttons are hidden under one button that represents the group. Click the group button to display a list of the commands available in that group. When the window becomes too narrow to display all the groups, a scroll arrow appears at its right end. Click the scroll arrow to display hidden groups.
You can customize the ribbon or the Quick Access Toolbar to suit your working style and to make commands you use frequently easily available. To add a command to the Quick Access Toolbar, right-click the command on the ribbon and then choose Add to Quick Access Toolbar.
Tip
The screen images shown in the procedures in this book were captured at a screen resolution of 1024 x 768, at 100 percent magnification, and with the default text size (96 dpi). If any of your settings are different, the ribbon on your screen might not look the same as the one shown in the book. If differences between your display settings and ours cause a button on your screen to look different from the one mentioned in this book, you can adapt the procedures to locate the command. First, click the specified tab. Then locate the specified group. If a group has been collapsed into a group list or group button, click the list or button to display the group’s commands. Finally, look for a button that features the same icon in a larger or smaller size than that shown in the book. If necessary, point to buttons in the group to display their names in ScreenTips.
To add your own tabs and groups to the ribbon, right-click the ribbon and choose Customize the Ribbon. In the program’s Options dialog box (the one shown here is for Word), click New Tab to add a tab to the ribbon. The new tab will include a new group as well. Use the New Group button to add another group to the custom tab or to any of the built-in tabs show in the Main Tabs list. You can add commands only to custom groups, not to any of the built-in groups.
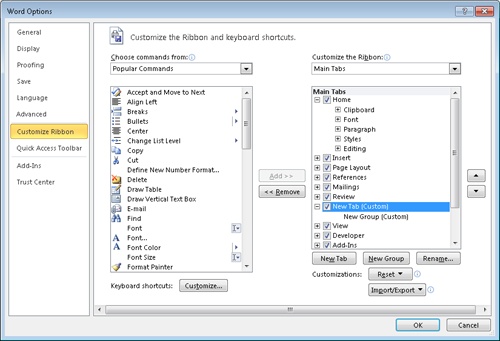
The Choose Commands From list provides options for displaying popular commands, commands not included on the ribbon, as well as all commands or commands on specific tabs. Select the command you want to add to a custom group, and then click Add. Click Remove if you want to remove a command from a custom group.
The Rename button opens a dialog box in which you can type a name for a custom tab or a custom group. For a custom group, you can also select an symbol to associate with the group.
If you want to return the ribbon and the Quick Access Toolbar to the default state, you can click Reset, Reset All Customizations.