
OneNote 2010 provides many features that support sharing notebooks—notebooks that you need to use yourself on more than one computer, and notebooks that two or more people work on together.
OneNote automatically synchronizes changes to a shared notebook so that the version you are working with on your local computer is current. OneNote also provides a set of tools you can use when you work on a notebook collaboratively. These tools help you locate notes by a specific author or notes that were written last week, since the beginning of last month, or over other periods of time. OneNote also highlights notes you haven’t read so that you can see at a glance how the content of a shared notebook has changed.
As you learned in Chapter 1, you have the option to share a notebook when you create it. You can choose to share a notebook on the web in a Windows Live SkyDrive folder or in a network location such as a shared folder or a Microsoft SharePoint site. You can also share a notebook later, after you have started to work with it, by using the Settings button on the Info tab in Backstage view.
Note
See Also For more information, see 1.3 Create OneNote Notebooks and 1.2 Configure Backstage View in OneNote in Chapter 1.
Another way to share a notebook is to go directly to the Share page in Backstage view, which you can display by clicking File on the ribbon and then clicking Share or by clicking Share This Notebook on the OneNote ribbon’s Share tab. (You can also display the Share page by pressing the keyboard combination Alt, F, E.) In the Share On area, use the Web option to share a notebook on Windows Live SkyDrive. If you want to share a notebook on a Microsoft SharePoint site or in a network location, select Network.
Tip
Click New Shared Notebook on the Share tab to display the New page in Backstage view, where you can define a new notebook you want to share.

Tip
By sharing a notebook on the web or in a network location, you can access the notebook from more than one computer. For example, you can work with a notebook stored on Windows Live SkyDrive from any computer that can connect to the Internet.
Sharing a notebook on Windows Live SkyDrive requires four steps (assuming that you have a Windows Live ID, which you need to log on to Windows Live and gain access to Windows Live SkyDrive).
Note
See Also For information about obtaining a Windows Live ID, see www.live.com. You can also find information about other Windows Live services on this site.
In most cases, you won’t need to change the setting under Select Notebook, but you can select a notebook from this list if you aren’t sharing the current notebook. Select Web under Share On, and then click Sign In to log on to SkyDrive. OneNote then displays the folders already defined on the SkyDrive that you logged on to. Select a folder under Shared Folders, or click New Shared Folder to define a folder specifically for this notebook. If you click New Shared Folder, the Windows Live SkyDrive sign-in page opens in your browser. Log on with your Windows Live ID, and then you’ll see the Create A Folder page. After typing a name for the folder, click Change to set up the folder so that the users you designate have access to it. You can sign out of Windows Live at this point, and return to OneNote.
Important
The services in Windows Live, including Windows Live SkyDrive, are updated from time to time, so the steps described here for working on the Create A Folder page might not apply in every case.
On the Share page in Backstage view, click Refresh to see the updated list of folders. Select the folder you want to use, and then click Share Notebook to complete the process. If you want to send a link about the notebook to another user, click E-Mail A Link in the message box OneNote displays.
To share a notebook on Windows Live SkyDrive
On the Share tab, click Share This Notebook.
On the Share page, under Share On, click Web.
Under Network Location, click Sign In, and then sign in by using your Windows Live ID.
Click Share Notebook.
In the message box, click E-Mail A Link if you want to send a link to the notebook to other users, or click No, Thanks.
You follow essentially the same set of steps to place a notebook on a SharePoint site, where anyone who has access to the document library in which you save the notebook can open it and use it.
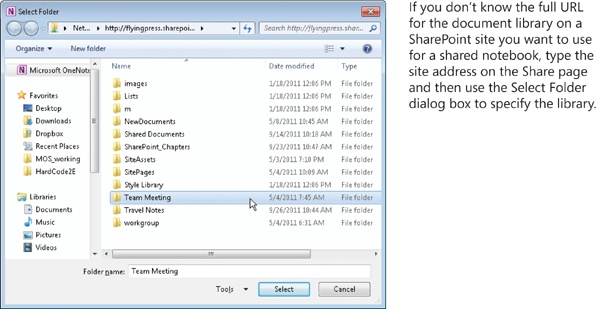
You need to know the address (URL) for the site and the name of the document library in which you want to store the notebook. You can type this information in the Location box when you share the notebook or use the Select Folder dialog box to navigate to the site.
You will probably need to enter the credentials required to log on to the SharePoint site. If you include the root site address in the Network Location box but do not include the name of a valid document library in the path, OneNote opens the Select Folder dialog box after you click Browse. You can use the dialog box to select the folder (library) in which to store the notebook.
OneNote displays a message box after you click Share Notebook. You can use this message box to send a link to the notebook to other users via e-mail.
Note
See Also For more information about notifying other users about a shared notebook via e-mail, see E-Mailing Others About the Notebook and Inviting Others to View a Notebook later in this chapter.
To share a notebook on a SharePoint site
On the Share tab, click Share This Notebook.
On the Share page, under Share On, click Network.
Under Network Location, type the path to the network location, or click Browse to open the Select Folder dialog box, select the folder in the dialog box, and then click Select. You might need to enter your user name and password for the SharePoint site before OneNote displays the dialog box.
Click Share Notebook.
In the message box, click E-Mail A Link if you want to send a link to the notebook to other users, or click No, Thanks.
When you want to share a notebook on a network drive, you first need to know the path to the location in which you want to locate the notebook. You must have permissions to access this site (at a level that grants you permission to store files in that location). Select Network under Share On, type the path in the Network Location box (or use the Browse button to select the location from the Select Folder dialog box). You can also select any of the recent locations that OneNote displays. Click Share Notebook to complete the process, and then use the message box that OneNote displays to send a link to the notebook to the people you want to share the notebook with.
Keep in mind that notifying people of a notebook’s location—inviting them to share the notebook—doesn’t automatically grant the recipients access to the network location in which you saved the notebook. Permissions to network locations are administered separately and must be updated if necessary to grant access to people who need to work with the notebook.
To share a notebook on a network drive
On the Share tab, click Share This Notebook.
On the Share page, under Share On, click Network.
Under Network Location, type the path to the network location, or click Browse to open the Select Folder dialog box, select the folder in the dialog box, and then click Select.
Click Share Notebook.
In the message box, click E-Mail A Link if you want to send a link to the notebook to other users, or click No, Thanks.
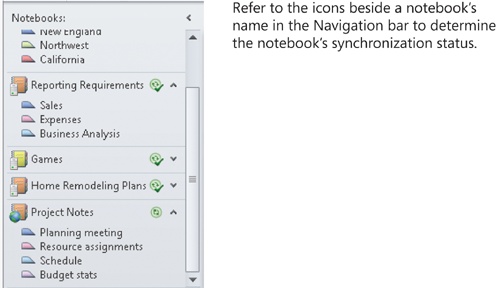
Shared notebooks are identified in the Navigation bar by a Sync Status icon. The icon displays a symbol to indicate the status of synchronization. For example, you’ll see a check mark when a notebook is up to date. You’ll see a warning exclamation mark when OneNote has encountered problems with the synchronization process (for example, if some sections are not available or in a location that is not accessible.) The icon shows arrows spinning in a circle when a notebook is being synchronized.
When you share a notebook on the web, on a SharePoint site, or in a network location, OneNote keeps a local copy of the shared notebook, which lets you work with the most up-to-date copy (the most recently synchronized version) when you are offline and away from the network. OneNote synchronizes changes to shared notebooks (made by you or by people with whom you share the notebook) when you connect to the network or the Internet (you might need to enter a user name and password), which makes the local copy and the shared copy the same.
To be sure that a shared notebook is current—that all the most recent changes are available to you to review—you can use the synchronization feature in OneNote. You can begin synchronization in a number of ways. You can right-click a notebook in the Navigation bar and click Sync This Notebook Now. You can also display the Info page in Backstage view, click Settings for the notebook you want to synchronize, and then click Sync. To start synchronizing a notebook by using the keyboard, select a section of the notebook in the Navigation bar and then press Shift+F9. You can also right-click a notebook, click Notebook Sync Status, select the notebook in the Shared Notebook Synchronization dialog box, and then click Sync Selected Notebook.

If you want to control when synchronization occurs (instead of having OneNote synchronize changes automatically), select the option Work Offline—Sync Only When I Click “Sync Now” at the top of the Shared Notebook Synchronization dialog box.
By knowing how to use e-mail to share information you store in OneNote, you can distribute that information to users who don’t have OneNote or aren’t familiar with how the application works. By issuing a single command, you can add the contents of a page to a Microsoft Outlook message window that you address and send to others. You can also share a page in other formats, including as a PDF file, or attach a page to a message as a separate file. You can change settings in the OneNote Options dialog box to control how OneNote content is distributed in e-mail.
In addition to using e-mail to share OneNote content, you use e-mail to invite other people to collaborate on a shared notebook and to send a link to other users when you set up a notebook for sharing.
In the sections that follow, you’ll learn how to share and manage the content in a OneNote notebook via e-mail.
At the end of the process you follow to share a notebook in OneNote, you see a message box that informs you that anyone who has permission to access the location you specified (a network location or a Windows Live SkyDrive folder) can now work with the notebook. The message box also provides a command button you can use to send an e-mail message with a link to the notebook’s location to people you want to share the notebook with.

Click the E-Mail A Link button, and OneNote opens a message window in Outlook, complete with a subject line (which reads Invitation to OneNote Notebook: <name of notebook>) and a hyperlink that recipients can use to open the notebook in OneNote.
Of course, click No, Thanks in the message box if you need to perform other tasks before you notify other people where the notebook is located or aren’t planning to share the notebook at all.
To e-mail others about a notebook
Follow the steps in the section 2.1 Share OneNote Notebooks to set up a shared notebook.
In the message box that OneNote displays after you click Share Notebook, click E-Mail A Link.
Address the e-mail message, and then click Send.
If you want to invite other people to share a notebook later—as an independent step instead of as a step in the process you follow to create or share a notebook—you can use the E-Mail Others About The Notebook link on the Share page in Backstage view. You can also click Invite People To This Notebook when you are working on the Info page, which takes you to the Share page.

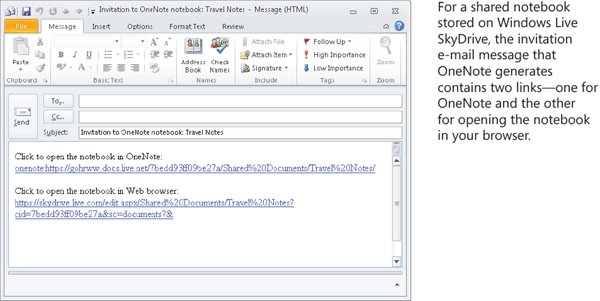
Clicking the E-Mail Others About The Notebook link opens an Outlook message window with a link to the notebook. If you are working with a notebook you have stored in a Windows Live SkyDrive folder, the message will contain two links, one that opens the notebook in OneNote and the second that opens the notebook from Windows Live SkyDrive using a web browser.
To invite others to view a notebook
On the ribbon, click File, and then click Share.
On the Share page, click E-Mail Others About The Notebook.
Address the e-mail message, and then click Send.
By using the E-Mail Page command in the E-Mail group on the Share tab (or in the Outlook group on the Home tab), you can send a OneNote page via e-mail to recipients you designate.
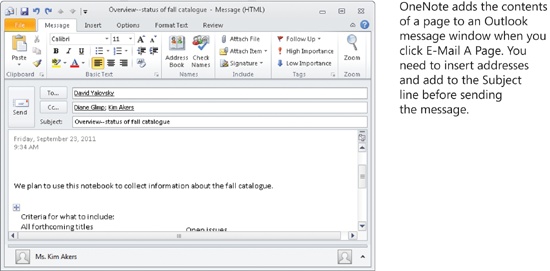
When you use the E-Mail Page command, OneNote adds the contents of the page, including the page title and the date and time stamp, to a message window in Outlook. OneNote inserts the page’s name in the message window’s Subject line. You need to add addresses for recipients, update the Subject line (if necessary), and then send the message. You can also edit the message’s body as necessary.
You can find other options for sharing the content of a notebook on the Send page in Backstage view.
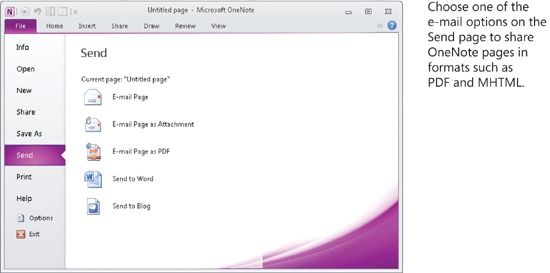
This page lists three options for the format in which you can send a notebook page to recipients. The Send page also includes commands you can use to send a page to a Microsoft Word document (which you could distribute as an attachment) or to a blog post that you publish through Word:
E-Mail Page This option produces the same result as when you click E-Mail Page on the Share tab or in the Outlook group on the Home tab. The content of the page appears in the message body. You need to complete the message by adding e-mail addresses for recipients and making any modifications to the subject line and message body.
E-Mail Page As Attachment When you select this option, OneNote attaches the page to the message in two different formats. The page is attached in the .one format as a OneNote section and also in the .mht format, which lets recipients who don’t have OneNote open the page in Internet Explorer, Microsoft Word, or the Word viewer application. (OneNote adds instructions about viewing the .mht file as a web page to the message’s body.)
Important
The .mht file name extension is associated with the MHTML format. (MHTML is an abbreviation for MIME HTML.) The page’s contents, including text and images, are saved along with formatting in a single file. You cannot directly open MHTML files in browsers other than Internet Explorer or Opera, but you can install an add-on to work with .mht files in browsers such as Firefox or Safari.
E-Mail Page As PDF To attach the current page as a PDF file (the Portable Document Format used by Adobe Acrobat and related applications), use this option. OneNote displays a progress bar to show that the page is being converted to PDF and then displays an Outlook message window with the attachment in place and the name of the page inserted in the Subject line. The page name is also used for the file name, with “as PDF” added to identify the format. You can use the E-Mail Page As PDF option to distribute pages to people who don’t have Microsoft Office installed, for example. Recipients do need at have Adobe Reader or another compatible application installed to open and read a PDF file.

The two other options on the Send page let you work with the content of a OneNote page in Word, either as a Word document or as the content of a blog post you create in Word. The option Send To Word inserts the content of a page in a Microsoft Word document. You can save the document to keep a record of the page, distribute the page via e-mail in Word format, or include the page in a longer document you are creating in Word. Choose the Send To Blog option to add the page’s content to a document in Word and display the Blog Post tab on the Word ribbon. You can then publish the page—as it comes in from OneNote or after making edits and additions—to a blog by using the tools provided by Word.
To e-mail OneNote pages in shareable formats
On the ribbon, click File, and then click Send.
On the Send page, select the option you want to use:
E-Mail Page
E-Mail Page As Attachment
E-Mail Page As PDF
Address the e-mail message in Outlook, and then click Send.
The OneNote Options dialog box includes several settings for how OneNote works with e-mail. You’ll find these settings on the Advanced page of the dialog box, in the area labeled E-Mail Sent From OneNote.
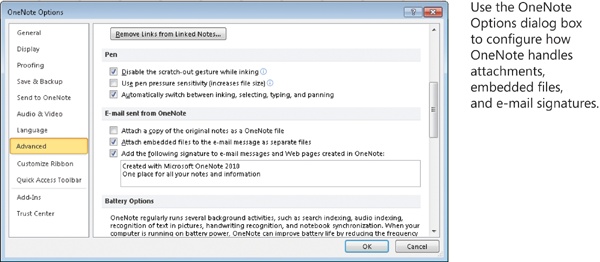
By default, OneNote inserts a page’s content into the body of an e-mail message when you select E-Mail A Page (from the Outlook group on the Home tab or in the E-Mail group on the Share tab). Select the option Attach A Copy Of The Original Notes As A OneNote File if you want to also include the page as an attachment in the .one file format. If you select this option, recipients of the message can save the attachment and add the page to notebooks of their own.
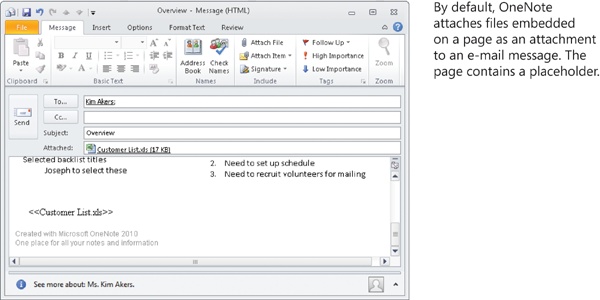
The second option in this area, Attach Embedded Files To The E-Mail Message As Separate Files, is selected by default. With this setting, any files you have added to a page (by using the Attach File command on the Insert tab, for example) are included in the e-mail message as a separate attachment, and the body of the e-mail message displays the file’s name as a placeholder.
If you clear this option, the embedded file is stripped from the page and not included as an attachment.
When you send a OneNote page via e-mail, OneNote by default adds a signature that reads “Created with Microsoft OneNote 2010 / One place for all your notes and information.” You can change the signature that OneNote includes (or clear the option to include no signature at all). Change the text for the signature OneNote adds, or clear the option Add The Following Signature To E-Mail Messages And Web Pages Created In OneNote.
To configure e-mail options in OneNote
On the ribbon, click File, and then click Options.
In the OneNote Options dialog box, click Advanced.
In the area E-Mail Sent From OneNote, select or clear the following options:
Attach A Copy Of The Original Notes As A OneNote File
Attach Embedded Files To The E-Mail Message As Separate Files
Add The Following Signature To E-Mail Messages And Web Pages Created In OneNote.
Modify or add to the text for the e-mail signature you want OneNote to insert.
Click OK.
As you saw in the previous sections of this chapter, you frequently work with commands on the Share tab when you collaborate with others on a notebook. In this section, you’ll learn about the commands on the Share tab that help you find notes by different authors, see recent changes to a notebook, hide author initials when you need to, and mark a note added by another of the notebook’s users so that you know whether you have read it.
When you open a shared notebook, notes added by other users since the last time you opened the notebook are highlighted. In addition, in the page tabs bar, OneNote displays the names of pages with unread notes in bold. You can use the commands in the Unread group on the Share tab to navigate to pages that contain unread notes and to mark notes as read or unread.
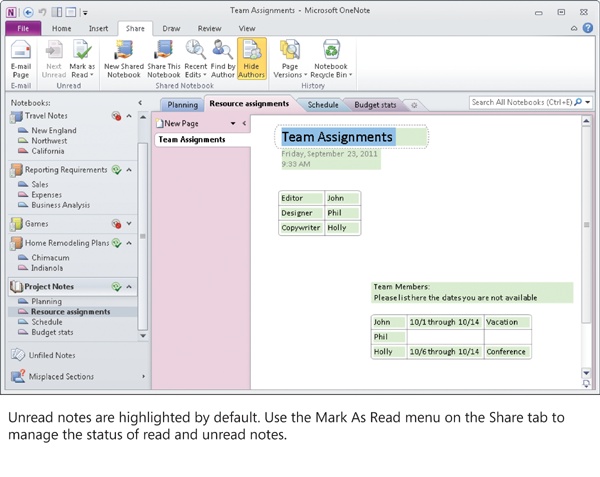
To move to the next page in a notebook with notes you haven’t read, go to the Share tab and click the Next Unread button. Using the Mark As Read menu, you can do the following to indicate you’ve read notes entered by others since the last time you opened a notebook:
Click Mark As Read (or press Ctrl+Q) to show you have read notes on a page. The notes on the page are no longer highlighted, and the page’s name in the page tabs bar is no longer shown in bold. You can choose Mark As Unread (or press Ctrl+Q again) if you want to revert to showing the highlighting.
Click Mark Notebook As Read to show you’ve read all new notes in a notebook.
Clear the check mark for the option Show Unread Changes In This Notebook if you don’t want to track the read/unread status of new notes.
To review unread notes in a shared notebook
Click the Share tab.
In the Unread group, click Next Unread to move to the next page in the notebook that contains unread notes.
Use the commands on the Mark As Read menu to do the following:
Choose Mark As Read to indicate you have read notes.
Choose Mark As Unread to indicate you have not read the notes on a page.
Choose Mark Notebook As Read to indicate you have read all the notes in a notebook.
Clear the check mark for Show Unread Changes In This Notebook to turn off this feature. (Select the option again to show unread notes.)
The Recent Edits menu, in the Shared Notebooks group on the Share tab, lets you choose an option for seeing the edits made to a notebook over a specific period of time. You can choose Today, for example, to see the most recent changes, or Since Yesterday to review any additions or changes made since the day before. You can also choose a period of time such as the last seven days or a span as long as the past six months. Choose the option All Pages Sorted By Date to see a list of pages organized by time period.
When you choose an option to view recent edits, OneNote opens that Search Results pane and lists sections and pages that match the option you selected.
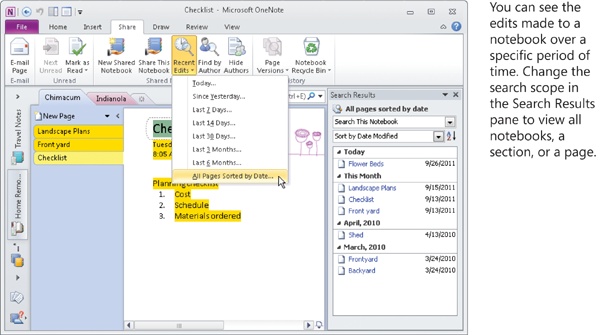
In the Search Results pane, the search scope is set to Search This Notebook. You can choose an alternative from the search scope list to search only the current section, search the current section group, or search all open notebooks. To switch to a different search scope by using the keyboard, press Ctrl+E, Tab, Space.
Note
See Also For detailed information about searching in OneNote, see 3.2 Search OneNote in Chapter 3.
Use the Sort button at the right of the Sort By list to change the order from ascending to descending. Choosing the Recent Edits command specifies that the Search Results pane is sorted by date modified. With the Search Results pane open, however, you can use the Sort By list to see results by section, title, and author, as well.
To view recent edits
On the Share tab, click Recent Edits, and then select the time period you want to apply.
In the Search Results pane, click the page you want to review.
To change the search scope, select the scope you want to use from the search scope list at the top of the Search Results pane.
Another use of the Search Results pane is to let you find notes added or changed by a specific author. Click Find By Author in the Shared Notebook group to display the Search Results pane with the option Sort By Author selected in the list of sorting options.
You can expand and collapse the entries for a particular author by using the arrow to the left of an author’s name. Click an entry in the list to jump to that page. Use the Sort button to sort the entries in ascending or descending order.
Tip
You can use the Search Results pane independently of the commands on the Shared Notebooks page. You can select a different sorting option, for example, or select a different search scope.

On the Share tab, click Find By Author.
In the Search Results pane, expand the section for the author whose notes you want to search.
Click the page you want to review. Notes by that author are highlighted on the screen.
To change the search scope, open the search scope list or use the keyboard.
In a shared notebook, OneNote identifies the person who inserted or edited a note by displaying that person’s initials next to the note. You can see more details—the person’s full name and the last modified date and time—by pointing to the initials to reveal a ScreenTip.

If you want to see the page without the identifying initials, click Hide Authors in the Shared Notebook group on the Share tab. To reveal the initials again, click Hide Authors a second time. OneNote doesn’t display initials next to the notes or other content that you add yourself.
To display or hide author initials
On the Share tab, click Hide Authors.
Before finishing this chapter, be sure you have mastered the following skills: