
Throughout this chapter, you’ll see examples of the features you can use to organize and find notes in OneNote notebooks. These capabilities include options for implementing the structure of a notebook—adding sections to section groups and subpages to pages when you need a detailed level of organization. You’ll also learn about how you conduct searches, view previous versions of a page, and work with the built-in recycle bin OneNote includes with each notebook. In addition, you’ll see how to save pages and notebooks in different formats, how to configure settings for where content from other applications ends up in OneNote, and how to apply and manage tags, which are a device you use to identify different types of notes.
Like conventional loose-leaf notebooks, OneNote notebooks are organized by sections, with each section containing one or more pages. No specific restriction applies to the number of sections you can define in a notebook—and when the number of sections increases, you can organize sections into section groups. Similarly, you can define subpages as child pages you associate with a parent page.
Other organizational tools are available as well, including the ability to merge sections, using color coding to identify notebooks and sections, and creating side notes, which let you jot down an idea as you work that you can later incorporate into a notebook.
When you want to combine the notes and content stored in separate sections, you can merge one section with the other. The sections can be in the same notebook or in different notebooks. After OneNote merges two sections, it prompts you to delete the original section. Choose this option if you don’t need a separate copy of what are now duplicate notes.
To start merging sections, choose Merge Into Another Section from the menu that appears when you right-click a section name in the Navigation bar or the section’s tab. In the Merge Section dialog box, select the section you want to merge with the first section or type the section’s name in the search box at the top of the dialog box to locate the section you want. The search option is especially useful when you have a large number of notebooks to scroll through.
Tip
OneNote filters the list of sections displayed in the Merge Section dialog box as you type each character of a section’s title.

When you click Merge, OneNote displays a message box in which you confirm the action. Note the warning that you cannot undo the merge. If you want to proceed, click Merge Sections. OneNote then displays another message box that tells you that the sections were merged successfully. Click Delete here if you want OneNote to remove the original section from its notebook.
Tip
You might want to rename the combined section to be sure the name now describes the merged content. Right-click the section name in the Navigation bar and choose Rename from the menu.
To merge sections
In the Navigation bar, right-click the section you want to merge with another, and then choose Merge Into Another Section.
In the Merge Section dialog box, select the section you want to merge with the first (or use the search box to locate the section).
Click Merge.
In the OneNote message box, click Merge Sections to confirm the operation.
In the next message box, click Delete if you want OneNote to delete the original section.
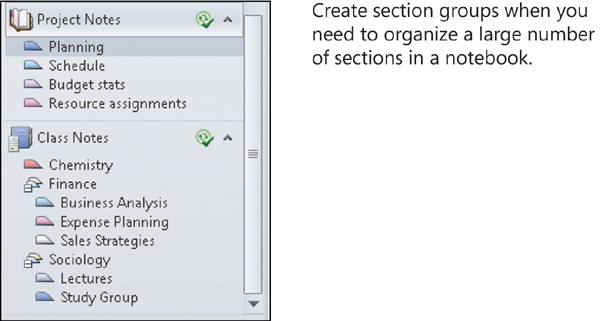
To help consolidate the sections in a notebook in which you have defined a large number of sections, you can create section groups. When you need even more detailed organization, you can nest a section group within another section group.
Like sections, section groups appear on the Navigation bar and with the section tabs at the top of the page. You can expand and collapse section groups in the Navigation bar to view or hide the sections they contain, and you can drag section groups in the Navigation bar to change the order in which they appear in a notebook.
Tip
Notebook sections that are not included in a section group always appear before section groups on the Navigation bar.
To create a section group, right-click the notebook name in the Navigation bar and then click New Section Group. Name the section group, and then add sections by dragging sections to it or by creating new sections for the group.
To create a section group
Right-click a notebook in the Navigation bar, and then choose New Section Group.
Type a name for the group.
Create new sections for the section group, or, on the Navigation bar, drag sections you’ve already defined into the new section group.
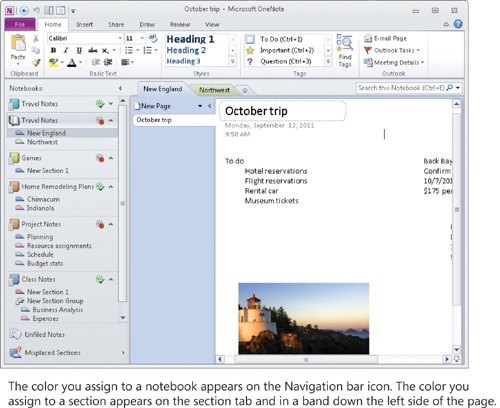
To help identify and organize notebooks, you can apply a specific color to notebook icons that appear on the Navigation bar and also to notebook sections. The color you select for a section is used as a background on the section tab and in the color band that OneNote displays along the left of each page in a section.
To assign the color you want to use for a notebook, right-click the notebook in the Navigation bar and then choose Properties. In the Notebook Properties dialog box, pick a color from the palette that appears when you click the down arrow beside the Color button. You can choose from a group of 16 colors.
Note
See Also For more information about using the Notebook Properties dialog box, see Configuring Notebook Settings and Properties in Chapter 1.
You can assign a color to a section by right-clicking a section in the Navigation bar or clicking the section tab at the top of the notebook window and then choosing Section Color. Here, too, you can choose from 16 colors or choose None to not apply a color to this section.
To color-code notebooks
In the Navigation bar, right-click the notebook and choose Properties.
In the Notebook Properties dialog box, click the Color button and choose the color you want to apply.
To color-code sections
In the Navigation bar, right-click the section, click Section Color, and then choose the color you want to apply.
If you use a section of a shared notebook to record and store personal or confidential information, you can apply a password to the section to control who can work with it. (If you want to assign a password to each section of a notebook, you need to do that in separate steps; you can’t assign a password to the notebook itself.)
To define a password and set options for how a section is protected, you use the Password Protection pane, which OneNote displays when you right-click a section in the Navigation bar and choose Password Protect This Section.
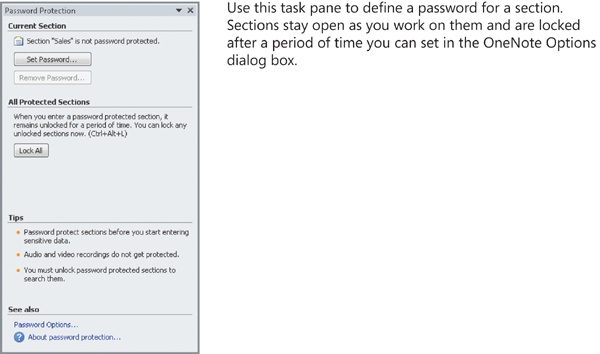
The Set Password button opens the Password Protection dialog box, which provides a text box in which you define the password and another you use to confirm it.
Tip
As the Password Protection dialog box warns you, you should be sure not to lose or forget the password. The password can’t be recovered, and you will lose your data.
After you define a password, OneNote replaces the Set Password button with the Change Password button and enables the Remove Password button. Of course, you need to know the section’s password to change it or to remove it.
After you define a section password, OneNote keeps the section unlocked as long as you work in it and then locks the section after the time period specified in the OneNote Options dialog box. To lock the section (so that the password is required to gain access to it), click Lock All in the Password Protection pane.
When you display a section that is protected with a password, OneNote indicates that the section is protected and instructs you to click the notice or press Enter to unlock the section. Enter the password to gain access to that section.

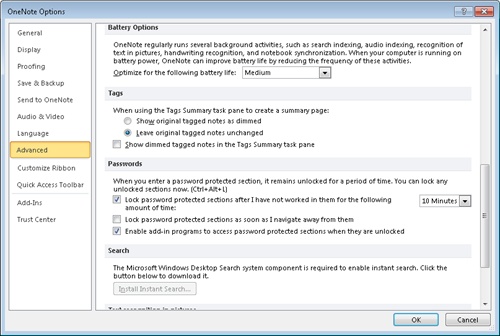
OneNote keeps a protected section unlocked for a specific period of time, which you can configure in the OneNote Options dialog box. Click Password Options in the Password Protection pane to display the Advanced page of the dialog box, and then scroll to the Passwords area. Two of the three settings in this area are selected by default. Adjust the time period after which OneNote locks a protected section. You can choose one of the intervals (between 1 minute and 1 day) that OneNote defines. You can also select the option by which OneNote locks sections immediately after you move to a different section. The third option in this group deals with add-in programs. The option enables add-ins to use protected sections when they are unlocked.
To protect a section with a password
In the Navigation bar, right-click the section and choose Password Protect This Section.
In the Password Protection pane, click Set Password.
In the Password Protection dialog box, type the password you want to use and then type the password again to confirm it.
To change a password for a password-protected section
In the Navigation bar, right-click the section and choose Password Protect This Section.
In the Password Protection pane, click Change Password.
In the Change Password dialog box, type the current password. Type the new password, and then type the new password again to confirm it.
To remove a password
In the Navigation bar, right-click the section and choose Password Protect This Section.
In the Password Protection pane, click Remove Password.
In the Remove Password dialog box, type the current password and then click OK.
To configure password options
In the Password Protection pane, click Password Options.
You can also click File, Options, and then click Advanced in the OneNote Options dialog box.
Scroll to the Passwords area of the OneNote Options dialog box.
Set the time interval after which OneNote locks protected sections. Clear or set other options as they apply to your use of OneNote.
You can create a subpage to add another level of organization to the structure of a notebook. You can nest subpages two levels below a main page.
To specify a page as a subpage, right-click the page in the page tabs bar and choose Make Subpage. Also, when you point to an existing subpage and then click the New Page icon that floats beside the page tabs bar, that action creates a subpage. The keyboard alternative for creating a subpage below the current page is to press Ctrl+Alt+Shift+N.
Tip
If you want to designate a group of pages as subpages, hold down the Ctrl key, select each page, and then right-click the group and choose Make Subpage.
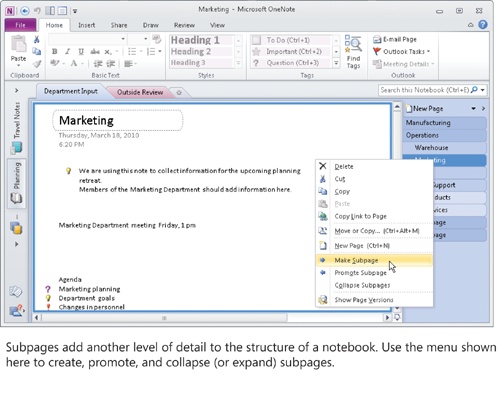
You can use a variety of menu commands and keyboard combinations to control whether subpages appear in the page tabs bar and to determine their level in the structure of a notebook. To hide subpages, right-click a subpage and choose Collapse Subpages. To display subpages, right-click the main page and choose Expand Subpages. Use the Promote Subpage command on the shortcut menu to make a subpage a main page (or to promote a subpage’s subpage to the current level). You can use the keyboard combinations Ctrl+Alt+] and Ctrl+Alt+[ to increase or decrease the indent level of the current page, or simply drag a page left or right to change its level of indentation.
To create a subpage
In the page tabs bar, right-click a page and choose Make Subpage.
To collapse subpages
In the page tabs bar, right-click a subpage and choose Collapse Subpages.
To expand subpages
In the page tabs bar, right-click a subpage and choose Expand Subpages.
To promote a subpage
In the page tabs bar, right-click a subpage and choose Promote Subpage.
Side notes enable you to record an idea—even make a quick sketch—without having OneNote open (although you can also create side notes from OneNote when it is running). You record a side note in a OneNote window that provides a subset of commands from the regular ribbon and does not display Navigation bar or page tabs.

When you set up OneNote, a OneNote icon is displayed by default in the notification area of the Windows taskbar. The default action that occurs when you click the icon is to open a side note window. You can also open a side note window by pressing the Windows logo key+N.
Tip
If you want to keep the side note window open and display it on top of other windows, click Keep On Top on the View tab of the side note window.
Note
See Also For information about setting options for the OneNote icon, see Configuring Display Settings in Chapter 1.
OneNote sends side notes to the Unfiled Notes section, which appears at the bottom of the Navigation bar. You can display unfiled notes and then drag the pages to the notebooks they relate to or create a notebook to house them.
When you are working in OneNote, you can display a side note window by clicking New Side Note on the ribbon’s View tab.
To create a side note
With the OneNote icon displayed in the Windows taskbar, press Windows logo key+N, or click the icon.
In OneNote, you can search on a page, within a section or a section group, within the current notebook, or in all open notebooks. OneNote’s search feature instantly filters results as you type information in the search box. If you want to work with results in a separate task pane, you can display the Search Results pane, where you can sort results by date or title, for example, and also change the scope of your search.
To search for a word or phrase on the current page, press Ctrl+F to activate the search box. Type the word you are looking for, and OneNote highlights each instance of the word. To the left of the search box, OneNote shows how many instances of the term appear on the page. Move from the first instance to the next (and back) by using the arrows, or use F3 and Shift+F3 to move through the page.

Tip
You can use the AND and OR operators (use the uppercase characters) to perform more complex searches. Use quotation marks around a term to restrict the results to a specific phrase.
When you want to find a note beyond the current page, press Ctrl+E to make the search box active. OneNote displays a list of open notebooks, and as you enter the text you want to locate, OneNote quickly filters the contents of the list to show you relevant notes.
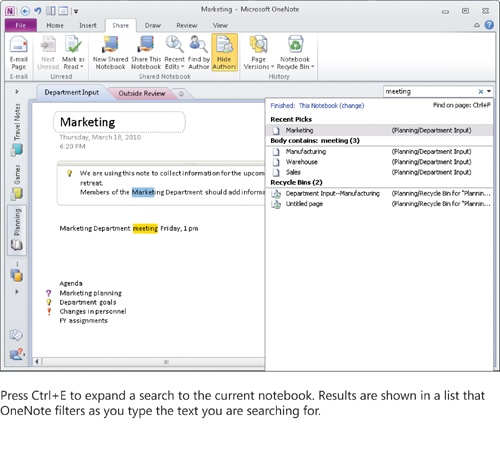
If you want to change the search scope, click the arrow at the right side of the search box and choose one of the options: This Section, This Section Group, This Notebook, All Notebooks. You can choose Set This Scope As The Default at the bottom of the menu to specify the current scope as the one you want OneNote to use each time you start a search.
OneNote provides a group of keyboard shortcuts you can use to conduct searches and move through results, summarized in the following table:
To do this | Press |
|---|---|
Move the insertion point to the search box to search all notebooks. | Ctrl+E |
While searching all notebooks, preview the next result. | Down Arrow |
While searching all notebooks, go to the selected result and dismiss search. | Enter |
Ctrl+E, Tab, Space | |
Alt+O after searching | |
Search only the current page. | Ctrl+F |
While searching the current page, move to the next result. | Enter or F3 |
While searching the current page, move to the previous result. | Shift+F3 |
Dismiss search and return to the page. | Esc |
Important
If you are using a computer that runs Microsoft Windows XP, you might need to install the Windows Desktop Search component to search OneNote most effectively. Click File, Options in OneNote, and then click the Install Instant Search button on the Advanced page of the OneNote Options dialog box.
To search notebooks, sections, and pages
Press Ctrl+F to activate the search box and search for text on the current page.
Press Ctrl+E to switch to searching all notebooks.
To change the search scope, click the arrow at the right side of the search box, and then choose an option for the search scope you want to use.
Instead of working in the results list, you can open the Search Results pane by clicking the link at the bottom of the results list or by pressing Alt+O. In this pane, search results are initially sorted by the date modified. You can also sort by section or by title, and you can use the sort order button to arrange results in ascending or descending order.
Note
See Also You also use the Search Results pane to locate recent edits and notes by specific authors in a shared notebook. For more information, see Viewing Recent Edits and Finding Notes by Author in Chapter 2.

By default, the Search Results pane shows search results for the current notebook. To change the scope of the results shown in the Search Results pane, open the list at the top of the pane, and choose Search This Section, Search This Section Group, or Search All Notebooks.
The Search pane updates results immediately when you make a change to the search scope or the sorting arrangement.
To work with the Search Results pane
Press Ctrl+E to active the search box. Start a search to view the results. Press Alt+O or click the link at the bottom of the results list to open the Search Results pane.
Use the sort list to sort results by section, title, or date modified.
Click the sort button to sort results in ascending or descending order.
Use the search scope list to change the search scope from all notebooks to the current section, the current section group, or the current notebook.
OneNote provides several features you can use to view and recover content from pages and notebooks that have changed or been deleted. Page versions show you earlier versions of a page and tell you who changed the page and when. You can also open backup copies that OneNote makes of notebooks and restore pages and sections, and you can recover material from OneNote’s built-in recycle bin.
OneNote maintains earlier versions of a page that has been changed by more than one user. To view these versions, display the Share tab, click the Page Versions button in the History group, and then choose Page Versions. An entry for each previous version, labeled with the modification date, is added to the page tabs bar.
Other options on the Page Versions menu let you delete all previous versions in the current section, section group, or notebook. You can also select the option Disable History For This Notebook if you have a reason that you don’t want OneNote to track previous versions.

When you click a previous version in the page tabs bar, OneNote displays a notification that indicates that the page is a previous version, that it will be deleted over time, and that you can click the notification if you want to restore that version to the notebook. The menu that appears when you click the notification includes the options available on the Page Versions menu and also provides options for deleting that version, copying the earlier version to another location in OneNote, and hiding the list of earlier versions.
To view page versions
Select the page you want to work with.
On the Share tab, in the History group, click Page Versions.
To delete page versions from a section or a notebook
On the Share tab, click the arrow next to Page Versions.
From the menu, select an option to delete page versions from the section, from the section group, or from the notebook.
To manage a previous version
Right-click the earlier version in the page tabs bar.
Click Restore Version to add this version to the notebook.
Click Delete Version to delete this earlier version of the page.
Click Copy Page To to create a copy of the earlier version in a different section or notebook.
Each notebook includes a built-in recycle bin where pages and sections are stored when you delete them. OneNote preserves content in the recycle bin for 60 days. The content in the recycle bin is read-only. You can’t edit notes or insert new content when you view pages in the recycle bin.
To view the recycle bin, right-click a notebook in the Navigation bar and choose Notebook Recycle Bin. You can also click this command in the History group on the Share tab. To restore a page or section, right-click the item in the recycle bin and choose Move Or Copy. In the Move Or Copy dialog box, select the location where you want to place it—in the current notebook or in a different one.
You can empty the recycle bin by clicking this command on the Notebook Recycle Bin menu on the Share tab. If you choose the command Disable History For This Notebook, OneNote displays a message box that prompts you to confirm whether you want to delete page versions and empty the recycle bin.
To work with a notebook’s recycle bin
OneNote maintains backup copies of your notebooks, which it stores in a hidden folder in your user profile. When you need to refer to a backup, click File and then click Open Backups on the Info tab in Backstage view.

In the Open Backup dialog box, notebooks are organized in folders. Within each folder, you can see the backed-up section files with the date the backup was made. Double-click a backup file to open a read-only copy of the page or section in OneNote. The page does not appear in the current notebook. Instead, it is included under Open Sections, an entry that OneNote adds to the Navigation bar. From the Open Sections area, you can drag sections to any open notebook or right-click a section tab or a page tab and use the Move Or Copy command to add the backed-up page to a notebook.
You control backup settings in the OneNote Options dialog box, on the Save & Backup page. You can clear the option to have OneNote make backups automatically—which means you run more of a risk of losing data—and also set the time period for when OneNote makes backups. The intervals range from 1 minute to 6 weeks. (All notebooks are affected by these settings.) Click the Backup Changed Files Now or Backup All Notebooks Now button to create backup copies you can refer to later when you need to.
To open a notebook backup
On the ribbon, click File. On the Info page, click Open Backups.
In the Open Backups dialog box, select the folder for the notebook you want to review and then click Open.
Select the section file you want to open, and then click Open again.
In the Open Sections area of the Navigation bar, right-click on the section you want to restore, choose Move Or Copy, and then use the Move Or Copy Section dialog box to select the location where you want to restore the backed-up section file.
In Chapters Chapter 1 and Chapter 2, you learned about several of the commands OneNote provides in Backstage view. In the following sections, you’ll learn about the operations you can perform by using the Save As command.
The Save page is organized in two areas: Save Current and Select Format. In the first list, you select the object you want to save—the current page, the current section, or the complete notebook. In the Select Format section, the choices depend on the object you select. The following sections provide details about saving the current page and saving a notebook. The options for saving the current section are the same as for saving a page.
You can choose from among seven file formats when you save the current page. The choices include the OneNote file format (.one) that is compatible with OneNote 2007 or the version used in OneNote 2010. Use the OneNote 2007 section format when you want to use the page in the earlier version of the program or make the page available to other users who work with OneNote 2007.
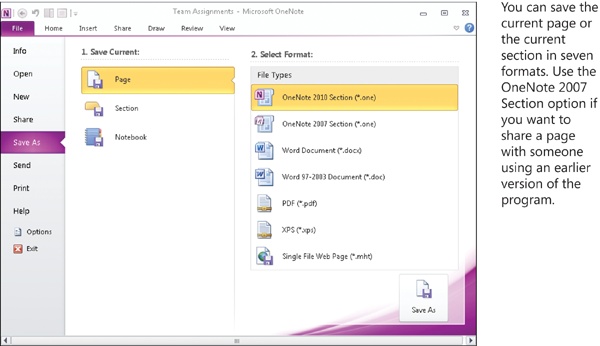
The other choices of formats are as follows:
Word Document (*.docx) The format for the XML-based standard supported by Word 2007 and Word 2010.
Word 97-2003 Document (*.doc) The file format supported by versions of Microsoft Word prior to Word 2007.
PDF (*.pdf) The Portable Document Format associated with Adobe Reader and Adobe Acrobat. You can save a page in this format if you need to make it available to someone who does not have Microsoft Office installed, for example.
XPS (*.xps) The XML Paper Specification format defined by Microsoft. You can open .xps files in web browsers or in the XPS Viewer available from Microsoft.
Single File Web Page (*.mht) The MIME HTML (MHTML) format supported in Internet Explorer and Opera (as well as in Microsoft Word). You need an add-in to work with .mht files in other browsers, including FireFox.
Note
See Also For information about sending pages in different formats via e-mail, see E-Mailing Pages in Shareable Formats in Chapter 2.
After you select a format and click Save As, OneNote displays the Save As dialog box. The folder selected in the dialog box is the location where the current notebook is stored. You can navigate to a different folder on your computer or on a network as necessary. You might need to provide your user name and password to save a file to a network location such as a Microsoft SharePoint site.
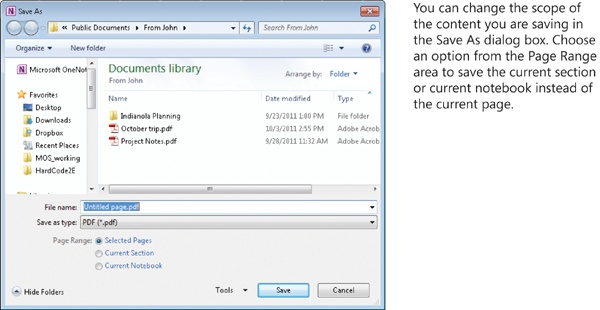
Notice the set of option buttons in the Save As dialog box that let you change from saving the current page to saving the current section or the notebook. Choose a different option under Page Range if you now decide to save more content than the current page.
To save the current page in a different format
Display the page you want to save.
Click File, and then click Save As.
Under Save Current, select Page.
Under Select Format, select the format you want to use.
Click Save As.
In the Save As dialog box, specify the location where you want to save the page and then click Save.
The formats in which you can save a complete notebook are more limited than for pages or sections. You can save a notebook as a PDF or XPS file or as a OneNote Package, which uses the file name extension (.onepkg).

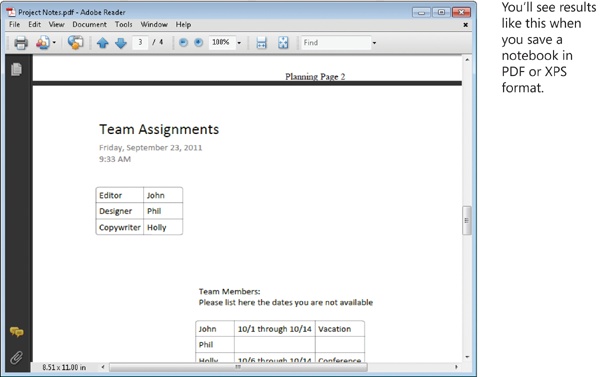
When you double-click PDF, for example, OneNote displays the Save As dialog box. By default, OneNote uses the name of the notebook to name the PDF file. In a PDF file that contains a complete notebook, you’ll see a layout similar to a OneNote page, with the page’s name and the date and time stamp in the top-left corner. The section names appear in a footer at the bottom of the page. The XPS option provides similarly formatted output.
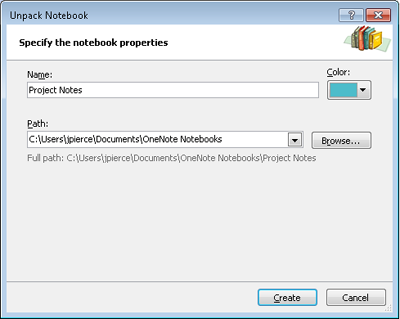
The option to create a OneNote package file is helpful when you need to move a notebook from one computer to another. Instead of copying the folder that contains the notebook’s section files, you can use the OneNote package format to work with a single file.
After you save a package file, you can double-click it to display the Unpack Notebook dialog box. In this dialog box, you can update the notebook’s name, select a color for its associated icon, and change the path where the notebook will be created (which initially points to the default location for OneNote notebooks on the local computer).
Tip
To import a package file into OneNote, click File and then click Open. Set the file type to OneNote Single File Package, select the saved file, and click Open.
To save the current notebook in a different format
Open the note you want to save.
Click File, and then click Save As.
Under Save Current, select Notebook.
Under Select Format, select the format you want to use.
Click Save As.
In the Save As dialog box, specify the location where you want to save the page and then click Save.
Many notebooks you create in OneNote contain a mix of elements, such as text notes, images, tables, and drawings. The frequency with which you integrate different types of content in a notebook is evident in how OneNote works directly with other applications, including Microsoft Outlook and Windows Internet Explorer.
Note
See Also In addition to integrating different types of content, you can link notes to applications such as Microsoft Word and Microsoft PowerPoint. For details, see Linking Notes to Other Applications in Chapter 4.
You can add different types of content to OneNote by using commands that are included in other applications (the OneNote button in Outlook, for example) or by using commands in OneNote itself. In the following sections, you’ll learn how to send an item such as an appointment from Outlook or a screen clipping from a website to a notebook. You’ll also learn how to manage the settings for where OneNote saves these items.
When you are reading e-mail in Outlook, you can use the OneNote command in the Move group on the Outlook ribbon’s Home tab to create a note in OneNote that contains details about a message. You can perform the same operation for appointments and meetings, contacts, and tasks.
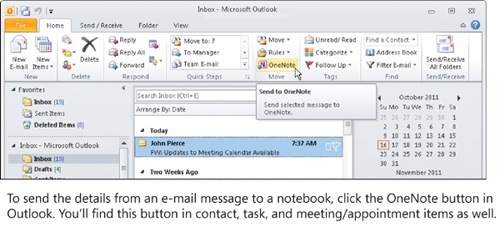
By default, when you send an item from Outlook to OneNote, OneNote displays the Select Location In OneNote dialog box. The dialog box lists recent locations to which you have sent items and a list of all notebooks (shared and local). For an e-mail message or a task, you can select a section or a page in which to insert the item’s details. For a calendar item or a contact, you can select only a section. OneNote adds the item to a new page in the section you choose.
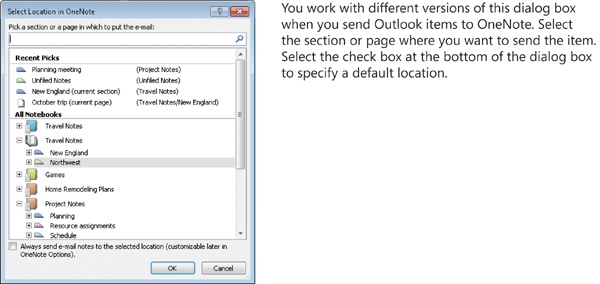
Notice the option at the bottom of the dialog box. You can select this check box to specify your current choice as the default location for sending items. You can set this option as well in the OneNote Options dialog box. You’ll learn more about options for specifying send-to locations later in the chapter.
To send an Outlook e-mail message to OneNote
Open Outlook and display the e-mail window.
In the Inbox or a different folder, select the message or messages you want to send.
In the Move group on the Home tab, click the OneNote button.
In the Select Location In OneNote dialog box, specify the section or page where you want to insert the message details.
To send an Outlook calendar item, task item, or contact item to OneNote
Open Outlook and display the calendar, task, or contact window.
Double-click the item you want to send to OneNote.
On the item’s ribbon, click the OneNote button. (You can find this button on the Appointment, Meeting, Task, or Contact tab, as applicable.)
In the Select Location In OneNote dialog box, specify the section or page where you want to insert the message details.
Three other types of content you can add to a OneNote notebook are web pages, screen clippings, and printouts. Internet Explorer has a built in Send To OneNote command that appears when you right-click a web page. When you work in another application, you have the option of printing a document or other file to OneNote, and you can add a screen clipping to a OneNote page when you want to preserve or distribute an image from your screen.
You can also send the content on a web page to OneNote by choosing Send To OneNote from the menu that appears when you right-click the web page in Internet Explorer. (The location of this command might vary depending on which version of Internet Explorer you are using.) You can send the entire page or elements (images or text) that you select on the page.
The default setting for web content is also for OneNote to display the Select Location In OneNote dialog box. Choose where you want the content to appear, and use the check box at the bottom of the dialog box if you want to specify the location as the default location.
To send web content to OneNote from Internet Explorer
On the web page, select the content you want to send to OneNote. (Skip this step if you want to send the entire page.)
Right-click, and choose Send To OneNote.
In the Select Location In OneNote dialog box, specify the location where you want the content to appear.
The Screen Clipping command appears on the Insert tab. Click this command in OneNote, and you’ll see that the OneNote window is minimized and the window behind OneNote appears, with the content in that window dimmed. Drag across the window to select the portion of the screen you want to add to the current page. When you release the mouse button, OneNote becomes the active window, and the screen clipping is added to the current page.
If OneNote isn’t running, press the Windows logo key+S to create a screen clipping. When you release the mouse button, OneNote displays the Select Location In OneNote dialog box, in which you can choose a section or page or use the Copy To Clipboard button to preserve the clipping for use in a separate application.
Tip
Screen clippings are tagged with the date and time they are taken. Web pages are also tagged with the page name and the site’s URL.
To add a screen clipping to OneNote
Position the window you want to take a clipping from behind OneNote.
On the Insert tab in OneNote, click Screen Clipping.
In the window that appears, drag to select the content you want to add, and then release the mouse button.
The screen clipping is added to the current page.
When you install OneNote, the program sets up a virtual printer named Send To OneNote 2010. You can use this option, for example, to print a PDF file or a PowerPoint slide to a OneNote page.
Open a presentation, an Excel worksheet, or a Word document (for example), display the Print page in Backstage view, and then select Send To OneNote 2010 from the list of printers. Set any other printing options. (In PowerPoint, you might choose to print the current slide or the full presentation and also select a layout—for example, nine slides to a page.) Click Print, and you’ll see another version of the Select Location In OneNote dialog box, this one prompting you to indicate where you want to place the printout. You can choose a page or a section in any of the notebooks listed.
For all of these methods of adding information to a notebook, the default setting is for OneNote to prompt you for the location before the content is added. You can change the settings for one or all of these methods on the Send To OneNote page in the OneNote Options dialog box.
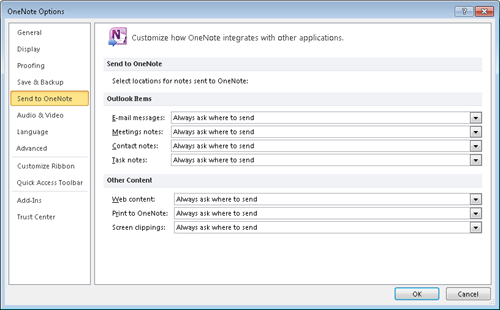
For the items on this page, you can choose from three or four options for how the type of content is sent to OneNote:
Always Ask Where To Send This is the default setting. With this setting selected, OneNote displays the Select Location In OneNote dialog box, where you can designate a specific section or page (depending on the type of content).
To Current Page This option is available for e-mail messages and task notes from Outlook and for web content and printing to OneNote.
To New Page In Current Section This option is available for all types of content.
Set Default Location When you choose this setting, OneNote displays the Select Location In OneNote dialog box. Select the section or page to which you want to send this type of content by default. For example, you might create a notebook named Tasks and send all task items to a section in that notebook.
To configure options for sending content to OneNote
Click File, Options.
In the OneNote Options dialog box, display the Send To OneNote page.
Choose the send-to option for the type of content you are configuring.
Many of the notes you add to a notebook have common attributes. By using the tags feature in OneNote, you can identify and categorize similar types of notes. You can, for example, apply a tag to identify each note you want to add to your to-do list, discuss with your manager, or forward in e-mail to one of your coworkers or a friend. The menu of built-in tags that OneNote provides gives you a wide range of choices, and you can add your own tags as well as modify the built-in ones.
Assigning a tag to a note is the first step you take in using tags as an organizational tool. With a set of tagged notes, you can then use commands in OneNote to create a summary of tagged notes and search for notes by tags.
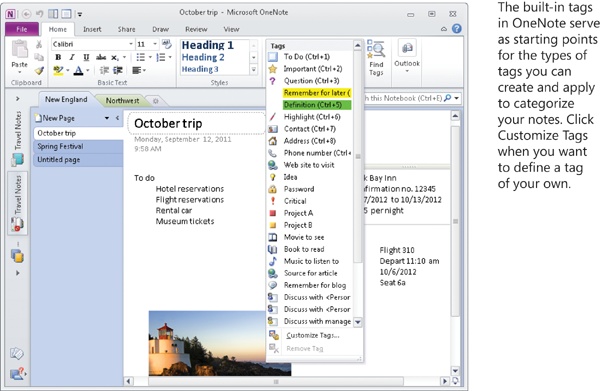
Tags are represented by symbols—a question mark, a check box for the To Do tag, a light bulb for an idea you record as part of a brainstorming session, for example—or, in two cases, by highlighting (the Remember For Later and Definition tags). When you create tags of your own, you can choose a symbol, a font color, and whether to apply colored highlighting.
In the following sections, you’ll learn the ins and outs of using tags to help organize your work in OneNote.
You can apply one or more tags (as many as nine) to each paragraph in a note container. (If you select a note container and apply a tag to it, the tag is applied to each paragraph in the container.) You can also apply a tag as the first step in creating a note. For example, click on a page, choose an applicable tag from the menu, and then type or write the note.
When you want to remove a tag from a paragraph, select the paragraph, open the Tags menu, and then click Remove Tag. You also have three alternatives: select the tagged paragraph and press Ctrl+0; right-click the tag and then choose Remove Tag from the shortcut menu; or right-click the tagged paragraph, click Tag, and then click Remove Tag.
To apply a tag
Click in the paragraph you want to assign a tag to.
On the Home tab, open the Tags menu and then select the tag you want to apply.
To remove a tag
Right-click the tag icon, and choose Remove Tag.
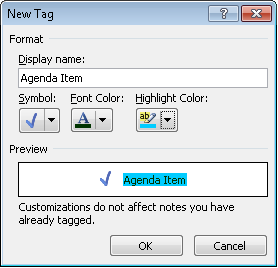
At the bottom of the Tags menu, click Customize Tags to begin the steps you follow to define a tag of your own. In the Customize Tags dialog box, click New Tag.
In the New Tag dialog box, enter a display name for the tag. Then, using the Symbol, Font Color, and Highlight Color controls, define the visual properties for the tag. Under Symbol, choose None or one of the many choices that OneNote provides. You can choose one of 40 font colors and from 15 options for a highlight. The selections you make are shown in the Preview area of the New Tag dialog box.
To create a custom tag
On the Home tab, open the Tags menu and then click Customize Tags.
In the Customize Tags dialog box, click New Tag.
In the New Tag dialog box, type a name for the tag.
Select the symbol, font color, and highlight you want to use to define the tag. (You don’t need to use each of these formatting options.)
To modify a tag—either a built-in tag or one you have defined—click Customize Tags in the Tags menu and then click Modify Tag in the Customize Tags dialog box. The Modify Tag dialog box appears next. This dialog box contains the same set of controls as the New Tag dialog box. You can update the display name for the tag you are modifying and also make changes to the symbol that represents the tag, font color, and highlight color.
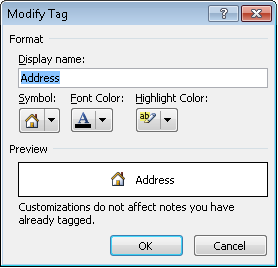
Important
Note the statement just above the OK and Cancel buttons in the Modify Tag dialog box. If you change the appearance of the built-in To Do tag, for example, the tag’s appearance doesn’t change for notes to which you’ve already applied the tag. You’ll see the modified tag when you apply the tag from this point forward.
When you click Find Tags in the Home tab’s Tags group, OneNote displays the Tags Summary pane and lists each tagged note in open notebooks under a heading for the tag—all To Do notes are grouped together, for example, as are all the notes tagged Important.
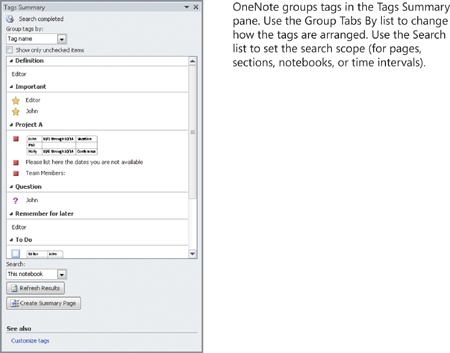
You can use the Tags Summary pane to locate notes in a particular category. The tag groups can be collapsed and expanded to make your view of the notes in a group more concise. To display the page that contains the tagged note, click its entry in the tag groupings.
You can also change the view and the results shown in the Tags Summary pane. Use the Group By list to change from Tag Name (the default view) to Section, Title, Date, or Note Text.
In the Search list below the tag groupings, you can select the scope and the time period you want to use to locate notes. For the search scope, you can choose from This Page Group, This Section, This Section Group, This Notebook, and All Notebooks. For time periods, you can choose from Today’s Notes, Yesterday’s Notes, This Week’s Notes, Last Week’s Notes, and Older Notes. Click Refresh Results after changing the setting in the Search list to update the results in the Tags Summary pane.
To find tags
On the Home tab, in the Tags group, click Find Tags.
In the Tags Summary pane, expand and collapse the tag groups if necessary to locate the type of tag you are looking for.
Use the Group Tags By list to change how tags are sorted.
Use the Search list to change the scope for the tag summary.
Click Refresh Results to update the Tags Summary pane.
A tags summary page displays all tagged notes in a section on their own page. Click Create Summary Page in the Tags Summary pane to collect tagged notes on this page. OneNote adds a page to the end of the current section (in a single note container) where you can check off to-do items, for example, or review notes with other types of tags.
The entries on the tag summary page are copies that are linked to the original notes. When you point to a tagged note on the summary page, a OneNote icon appears, and you can click the icon to display the original note. Although the summary notes are linked to the originals, they are not synchronized copies. This means that if you remove a tag on the summary page or select the check box for a tagged note, the action you take does not change the original note. In addition, notes you add to a section are not automatically added to the summary page.
Tip
Clicking Create Summary Page a second time creates a second summary page. It does not update a summary page already in the notebook.
To create a tag summary page
On the Home tab, click Find Tags in the Tags group.
In the Tags Summary pane, click Create Summary Page.
A few options for configuring tags appear on the Advanced page in the OneNote Options dialog box. The options relate to how OneNote displays original tags when you create a tag summary page.
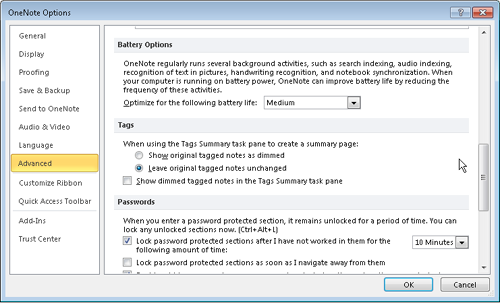
With the default settings (Leave Original Tagged Notes Unchanged), OneNote shows tagged notes as you see them when you first apply the tags—in other words, tagged notes are displayed the same on the tags summary page and on the pages that contain the original notes. If you select the option Show Original Tagged Notes As Dimmed, the tagged notes appear as they normally do on the tag summary page but are dimmed on the original pages.
Selecting the check box for the last option for configuring tags—Show Dimmed Tagged Notes In The Tags Summary Task Pane—causes OneNote to include dimmed tags from the original page and the normal tag from the tag summary page. By selecting this option, you essentially create duplicate entries for tags.
To configure options for tagged notes
Click File, Options.
In the OneNote Options dialog box, click the Advanced page.
Scroll to the Tags area, and then select the options you want to use for showing original and dimmed tags.
Before finishing this chapter, be sure you have mastered the following skills: