
12. Threads
—Some guy circa 1973
There was a time when computer programs ran from beginning to end with nary a surprise. If a program had 100 instructions, they would run in order, with the exception of loops and branches. No two instructions would execute at the same time. You could not be performing more than one task at the same time. Execution was serial; each command occurred one after the other.
The Macintosh operating system introduced us to the event driven programming model. A program's instructions would still occur in order, but this mechanism allowed the computer to spin its wheels until the user clicked the mouse or typed on the keyboard. When an event such as this occurred, the computer would react to it and draw text on the screen, make a window appear, and so on. However, the program managing all these events could still only do one thing at a time.
Enter threads. Conceptually, threads are flows of execution, which can span many functions or methods. Every process has at least one thread—every program you've seen in this book so far has used a single thread to run your code—but a process can spawn additional threads if necessary. Threads share the same address space as the process that spawned them; however, they are detached from the process and run independently. Most importantly, threads execute simultaneously, or asynchronously, and can share data with other threads in their process. Mind you, if your computer has only a single processor, only one instruction can actually execute at a time. Threads are most useful when multiple processors are available.
Note
Cocoa applications (and all processes) are made of threads. The main thread of an application is started when the application is launched. You can create other threads within the application using some simple methods of the NSThread class or the pthread API. You'll see how to work with threads using NSThread shortly.
Threads allow you to factor your application's functionality in order to provide a better user experience and performance, especially on multi-processor systems. By creating a thread of a time-consuming task, that task can be performed because time is available without blocking the rest of the program's execution. This is how the Finder copies files from disk to disk while you can simultaneously drag icons around and create folders.
Threads are also useful when you have a large task that would achieve better performance if it were divided into smaller tasks. This enables multi-processor systems to distribute the workload to achieve better efficiency. Because multiple threads can execute at the same time, more work can be accomplished in less time.
Threads do not come free, however. There is overhead associated with their use. On multi-processor systems, using threads for critical time-intensive tasks will usually yield favorable results. However, on a single-processor system, the results might be worse than if you hadn't used threads. You should carefully benchmark your application using threads—then you should measure the quality of your application without them. You will see how much of a difference they actually make.
Note
If you are simply interested in deferring execution of a time-intensive task to make your application seem faster, you might consider using an NSTimer instead of an NSThread. I discussed NSTimers in Chapter 3, “Cocoa Applications.” Sometimes, deferring execution is all that is needed to make an application feel snappier to the user. Timers can even allow you to perform tasks in the background while the user continues doing other things in your application. However, if your background activity or user actions can't be broken up into quick operations, threads might be the answer.
The Result
The project that we will be examining in this chapter shows you how to create and execute multiple threads. In the example, a thread will wait for the previous thread to complete before performing its job by use of an NSConditionLock. The threads will also access user interface elements during their execution.
Figure 12.1 shows the MyThread application before execution. Note the three progress indicators labeled as Thread 1 thru 3. The Start button is enabled, and the Stop button is disabled.
Figure 12.1. MyThread before execution.

Upon pressing the Start button, the threads are created and executed in order, serially. That is, Thread 2 will not begin until Thread 1 has completed, and Thread 3 will not begin until Thread 2 has completed. The Start button is disabled, and the Stop button is enabled. This is shown in Figure 12.2, where Thread 2 is currently executing.
Figure 12.2. MyThread during execution.
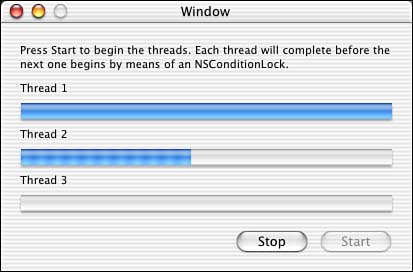
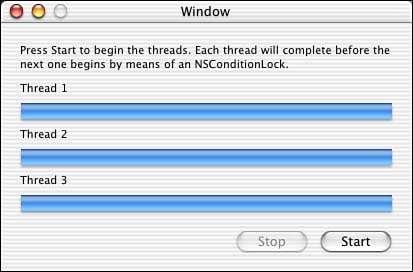
Figure 12.3 shows the application once all threads have completed execution. The Start button is once again enabled to allow the process to begin again.
Figure 12.3. MyThread after execution.
Let's look at the project.
The Project
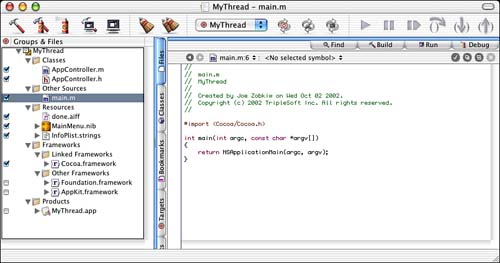
Figure 12.4 shows the MyThread project in Project Builder. The project is a simple Cocoa application. Note that we added an audio file to the project: done.aiff. You will see how to access that later; otherwise, there is nothing special about this project. All the code is in the AppController files that we will look at shortly.
Figure 12.4. The MyThread project.
The Project Settings
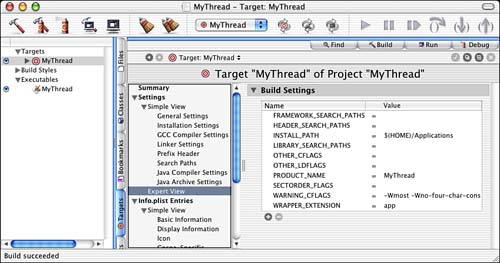
The Target settings in Figure 12.5 are straightforward.
Figure 12.5. The MyThread Target settings.
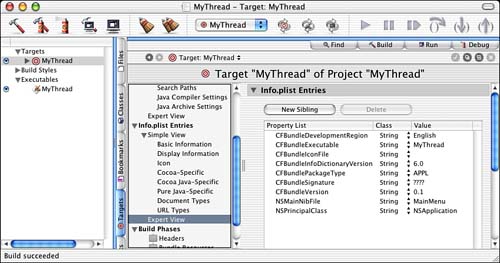
The InfoPlist entries in Figure 12.6 are also straightforward. Because this is a simple Cocoa application, there are no surprises here.
Figure 12.6. The MyThread InfoPlist entries.
The Nib File
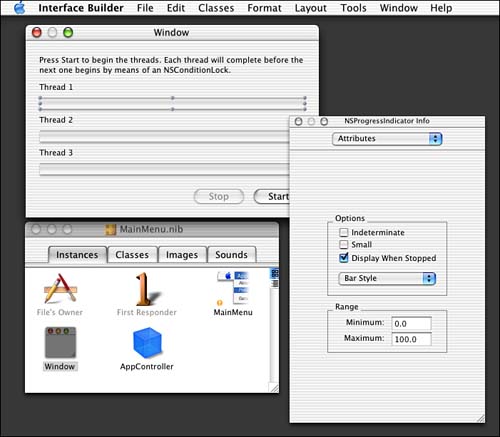
The MainMenu.nib file is shown in Interface Builder in Figure 12.7. The AppController has been instantiated and is the NSApplication's delegate, as you would expect. We placed our controller methods for the window in the AppController as well; although in a larger application, they would likely be in a separate controller object. The main application window contains three NSProgressIndicators that we use to display the status and progress of our threads. You will see that the threads do nothing more than increment the value of their associated NSProgressIndicator—in the real world, you would do something more exciting. The Start and Stop buttons are connected to two IBActions named -start: and -stop:, respectively.
Figure 12.7. The MyThread MainMenu.nib file.
Let's go on to the source code!
The Source Code
The AppController.m and AppController.h files contain all the source code for your application. The interface of the AppController is shown in Listing 12.1.
Listing 12.1. AppController Interface in AppController.h
#import <Cocoa/Cocoa.h>
@interface AppController : NSObject
{
IBOutlet NSButton *m_startButton;
IBOutlet NSButton *m_stopButton;
IBOutlet NSProgressIndicator *m_indicator1;
IBOutlet NSProgressIndicator *m_indicator2;
IBOutlet NSProgressIndicator *m_indicator3;
NSConditionLock *m_conditionLock;
BOOL m_stop;
}
- (IBAction)start:(id)sender;
- (IBAction)stop:(id)sender;
- (void)thread1:(id)owner;
- (void)thread2:(id)owner;
- (void)thread3:(id)owner;
- (void)cleanupThread:(id)owner;
@end
Our AppController manages the IBOutlets in the application's main window as well as the IBActions used to link to the Start and Stop buttons. We also define four methods that are used as thread entry points: -thread1:, -thread2:, -thread3:, and –cleanupThread:. You will see how these are created and executed next.
The –start: method in Listing 12.2 is called when the user presses the Start button in the main window of the application. Assuming that we are not already in the middle of an operation, m_conditionLock is not nil. We begin the process of creating the threads and kicking them off, which means to begin their execution. The first thing we do is create and initialize an NSConditionLock. This class allows you to define conditions that your threads can then adhere to such as the states of a state machine. Each thread can then use the NSConditionLock to validate that the state machine is in the proper state before performing its job. Note that we initialize the NSConditionLock with a condition, or state, of CONDITION_TASK_ONE, defined later in Listing 12.4.
Listing 12.2. AppController –start: Method in AppController.m
// This action is called when the Start button is pressed, it begins everything
- (IBAction)start:(id)sender
{
if (m_conditionLock == nil) {
// Start out in Condition 1 so things start up right away
m_conditionLock = [[NSConditionLock alloc]
initWithCondition:CONDITION_TASK_ONE];
// Set stop flag
m_stop = NO;
// Create all the threads that will eventually run based on Condition
[NSThread detachNewThreadSelector:@selector(thread1:)
toTarget:self withObject:self];
[NSThread detachNewThreadSelector:@selector(thread2:)
toTarget:self withObject:self];
[NSThread detachNewThreadSelector:@selector(thread3:)
toTarget:self withObject:self];
// Create a final, cleanup thread
[NSThread detachNewThreadSelector:@selector(cleanupThread:)
toTarget:self withObject:self];
[m_startButton setEnabled:NO];
[m_stopButton setEnabled:YES];
} else {
NSRunAlertPanel(@"Error", @"m_conditionLock is not nil",
@"OK", @"", @"");
}
}
Note
A state machine is a way of keeping track of multiple conditions and acting on them accordingly. An application goes through several states when it runs. First, it initializes itself, it opens any documents that need opening, it loops waiting for user input, and eventually it quits and cleans itself up. Each of these can be considered a state.
In many programs, especially when following a specific communications protocol, it is important to know what state you are in at any time. For example, when transferring a file via FTP, you must open a connection to a remote host, attempt to log in, choose a file, begin the transfer, and so on. Although the actual FTP protocol is much more complex, you can see that keeping track of the state is important.
Next, we initialize our stop flag to NO. We use this flag to know whether the user pressed the Stop button. The threads, shown later, will check the value of this flag during their execution.
We then create our NSThread objects using the +detachNewThreadSelector:toTarget:withObject: class method of NSThread. This method creates and detaches a thread selector method, which exists in the specified target, passing a single argument to it. The thread selector method itself must be defined as follows: -(void)aThread:(id)anArgument. We create four threads in this manner—the three that track progress and then the last, –cleanupThread:.
Note
As the threads are created using +detachNewThreadSelector:toTarget:withObject: they are kicked off and immediately begin their execution. When the first thread of an application is created, the method posts the NSWillBecomeMultiThreadedNotification with a nil object to the default notification center. This enables your application (or whatever object you desire) to know that it is using multiple threads.
Before exiting the method, we enable and disable the Start and Stop buttons appropriately. At this point, the job that the threads will perform has begun.
Before we look at the threads themselves, let's look at the –stop: action in Listing 12.3. If the user presses the Stop button, we disable it and set the stop flag to YES. The threads, shown shortly, will check the value of this flag during their execution.
Listing 12.3. AppController –stop: Method in AppController.m
// This action is called when the Stop button is pressed,
// it sets a flag that the threads check
- (IBAction)stop:(id)sender
{
[m_stopButton setEnabled:NO];
m_stop = YES;
}
Listing 12.4 defines our conditions. Each condition has an associated thread that executes during said condition. When the condition is CONDITION_TASK_ONE, -thread1: in Listing 12.5 will execute. –thread2: in Listing 12.6 will wait until the condition is CONDITION_TASK_TWO before it performs its job. This continues for all threads in the application. Let's look at a thread method in detail.
Listing 12.4. Condition Definitions in AppController.m
#define CONDITION_TASK_ONE 1
#define CONDITION_TASK_TWO 2
#define CONDITION_TASK_THREE 3
#define CONDITION_TASK_CLEANUP 4
Listing 12.5. AppController –thread1: Method in AppController.m
// This is the first thread to run, it starts as soon
// as the Start button is pressed
- (void)thread1:(id)owner
{
int x;
// Threads are responsible to manage their own autorelease pools
NSAutoreleasePool *thePool = [[NSAutoreleasePool alloc] init];
// Reset the progress indicator
[m_indicator1 setDoubleValue:0];
// Wait until Condition 1
[m_conditionLock lockWhenCondition:CONDITION_TASK_ONE];
// Loop, checking the stop flag
for (x=1; x<=100; ++x) {
if (m_stop) break;
[m_indicator1 setDoubleValue:x];
[NSThread sleepUntilDate:[NSDate
dateWithTimeIntervalSinceNow:(NSTimeInterval)0.05]];
}
// Change to Condition 2
[m_conditionLock unlockWithCondition:CONDITION_TASK_TWO];
// Release the autoreleasepool
[thePool release];
// Exit this thread
[NSThread exit];
}
Listing 12.5 shows –thread1: which is the first thread to be executed in our application besides the application itself. All of our threads are modeled similarly in this example. The first thing to know about a thread is that it is responsible for its own NSAutoReleasePool. The main application thread normally handles this for your application, allowing you to allocate memory, mark it autorelease, and not worry about it. When you are in a custom thread, however, you are responsible for managing that memory on your own although you are sharing memory space with the application that created you. The thread is a guest in the application's home, but the application is not going to clean up after the thread. Therefore, we +alloc and -init a local NSAutoReleasePool to manage this memory issue.
Note
NSApplication contains a class method +detachDrawingThread:toTarget:withObject: that creates a new thread and automatically creates its NSAutoReleasePool for you. This is a convenience wrapper for NSThread's +detachNewThreadSelector:toTarget:withObject:.
Next, we reset the progress indicator to zero and wait until the condition is CONDITION_TASK_ONE. Because the condition is initialized to CONDITION_TASK_ONE, as soon as this thread is called, the condition will match so that there will be no waiting to continue. By calling the –lockWhenCondition: method of NSConditionLock, we are taking control and saying, “We are using this lock now because our condition has been met—everyone else stay away!” You will see how the subsequent threads handle this situation shortly.
Note
You can also use NSLock instead of NSConditionLock if you are not concerned with multiple conditions as shown in this example. If you have only two conditions, an NSLock might suffice—it's locked, or it isn't.
We then loop 100 times to increment the value of our progress indicator user interface element. Note that we check the value of the m_stop instance variable. Remember, this is set to YES if the user presses the Stop button. In this case, we simply exit the loop and let the thread clean itself up. All subsequent threads exhibit this same behavior. Note also that we are using the NSThread –sleepUntilDate: method to pause the thread for a moment. If we didn't do this, the process would occur so quickly that it would make for a boring demo. Threads performing animation or other periodic tasks traditionally put themselves to sleep in order to conserve CPU time, battery life, and other sundries.
Note
Can you guess what thread the progress bar update is happening in? This background thread? No. When you increment the progress bar value, the control changes its internal state and marks itself as needing to be redisplayed. Later on, when the application is processing events on the main thread, the application will notice that the progress bar needs to be redisplayed, and it does so. In AppKit, most redisplay activity happens on the main thread. See the NSView documentation for more details.
After our loop is complete, our thread must notify the next thread awaiting execution. We do this by calling the –unlockWithCondition: method of NSConditionLock to not only unlock the lock, but also set the condition to the next state. This is saying, “We are done with this lock now and are setting it up for the next thread in line.” Finally, we release our NSAutoReleasePool and +exit the thread to terminate ourselves.
Note
Calling NSThread's +exit class method terminates the current thread. This is optional at the end of a thread, but could be called if a thread needed to be aborted prematurely. In either case, before exiting the thread, the NSThreadWillExitNotification notification is posted. The thread being exited is passed to the default notification center. All observers will receive this notification before the thread actually exits.
Now let's look at the next thread to execute. Listing 12.6 shows –thread2:. You will note that this method is the same as –thread1:—with the exception that the condition it locks with is CONDITION_TASK_TWO instead of CONDITION_TASK_ONE, and the condition it unlocks with is CONDITION_TASK_THREE instead of CONDITION_TASK_TWO. It also updates the second progress indicator instead of the first—makes sense!
Listing 12.6. AppController –thread2: Method in AppController.m
// This is the second thread to run, it starts as soon as the Start button is
// pressed,
// then waits until the first thread is finished
- (void)thread2:(id)owner
{
int x;
// Threads are responsible to manage their own autorelease pools
NSAutoreleasePool *thePool = [[NSAutoreleasePool alloc] init];
// Reset the progress indicator
[m_indicator2 setDoubleValue:0];
// Wait until Condition 2
[m_conditionLock lockWhenCondition:CONDITION_TASK_TWO];
// Loop, checking the stop flag
for (x=1; x<=100; ++x) {
if (m_stop) break;
[m_indicator2 setDoubleValue:x];
[NSThread sleepUntilDate:[NSDate
dateWithTimeIntervalSinceNow:(NSTimeInterval)0.05]];
}
// Change to Condition 3
[m_conditionLock unlockWithCondition:CONDITION_TASK_THREE];
// Release the autoreleasepool
[thePool release];
// Exit this thread
[NSThread exit];
}
One thing to also note is that when this thread is initially created and detached, it actually executes immediately up until the -lockWhenCondition: method call. It then is blocked at that point until the lock is available with the chosen condition. This is the key to our state machine. Threads will get set up and ready, but will then wait for the proper condition before they execute. When finished, they notify the next thread by setting the next condition.
Note
Although our implementation works well, there is a way to optimize things here. We chose to create our threads all at once, which uses kernel resources to hold the data structures for five threads simultaneously (main, thread1, thread2, thread3, and cleanup). Imagine if we were to spawn the next thread as each child thread terminated; you would only need data structures for three threads (main, the current thread, and the new thread). Taking it one step further, if you were to spawn the next thread from the main thread after the background thread terminated, you would only need data structures for two threads (main and the new thread). See the section on wired memory costs in “Inside Mac OS X: Performance” at http://www.apple.com/developer/ for more information on optimizations such as this.
Note that as soon as a thread calls -unlockWithCondition:, it is possible that the next thread picks it up and starts its work before the current thread even releases its NSAutoReleasePool.
Note
Imagine two threads attempting to read and write the same data without the benefit of locks. NSLock and NSConditionLock enable threads to work together, as a team, staying out of each other's way. Without them, threads accessing the same data source might step all over one another, attempting to read data that the other one hasn't even finished writing!
By using these classes, you are able to tell other threads, “Hey! I'm working on something here, so please let me finish unhindered. I will unlock when I'm through; then someone else can take over.”
Also, look at the other lock options, including NSRecursiveLock and NSDistributedLock.
Listing 12.7 is yet another thread, -thread3:. This thread is the same as –thread2:—with the exception of the conditions it locks and unlocks with and the progress indicator that it updates. Note that the unlock condition this time is CONDITION_TASK_CLEANUP. Let's see what the –cleanupThread: does.
Listing 12.7. AppController –thread3: Method in AppController.m
// This is the third thread to run, it starts as soon
// as the Start button is pressed,
// then waits until the second thread is finished
- (void)thread3:(id)owner
{
int x;
// Threads are responsible to manage their own autorelease pools
NSAutoreleasePool *thePool = [[NSAutoreleasePool alloc] init];
// Reset the progress indicator
[m_indicator3 setDoubleValue:0];
// Wait until Condition 3
[m_conditionLock lockWhenCondition:CONDITION_TASK_THREE];
// Loop, checking the stop flag
for (x=1; x<=100; ++x) {
if (m_stop) break;
[m_indicator3 setDoubleValue:x];
[NSThread sleepUntilDate:[NSDate
dateWithTimeIntervalSinceNow:(NSTimeInterval)0.05]];
}
// Change to Condition 4
[m_conditionLock unlockWithCondition:CONDITION_TASK_CLEANUP];
// Release the autoreleasepool
[thePool release];
// Exit this thread
[NSThread exit];
}
The –cleanupThread: method in Listing 12.8 is the last thread to execute in our example. Once again, the thread is responsible for the NSAutoReleasePool. In addition, because it is the last thread, it can –unlock and –release the NSConditionLock. Note that it does not have to -unlockWithCondition: because there are no further conditions to set, so it can simply -unlock. We then set the m_conditionLock instance variable to nil so that the –start: method will have an easier time of things.
Listing 12.8. AppController –cleanupThread: Method in AppController.m
// This is the cleanup thread, it starts as soon as the Start button is pressed,
// then waits until the third thread is finished
- (void)cleanupThread:(id)owner
{
// Threads are responsible for manage their own autorelease pools
NSAutoreleasePool *thePool = [[NSAutoreleasePool alloc] init];
// Wait until Condition 4
[m_conditionLock lockWhenCondition:CONDITION_TASK_CLEANUP];
// Last stop, clean up
[m_conditionLock unlock];
[m_conditionLock release];
m_conditionLock = nil;
// Update the UI
[m_stopButton setEnabled:NO];
[m_startButton setEnabled:YES];
// Play done sound if the user didn't stop prematurely
if (!m_stop)
[[NSSound soundNamed:@"done"] play];
// Release the autoreleasepool
[thePool release];
// Exit this thread
[NSThread exit];
}
We then update the buttons properly so that Stop is disabled and Start is once again enabled. What is this NSSound stuff? As a bonus to the user, if he waited for the entire process to complete, a little sound is played. Remember the AIFF file we added to the project? The NSSound +soundNamed: class method and the play method allow us to quickly and easily play any sound available with the given name.
Finally, we release the NSAutoReleasePool and +exit our thread.
One last notification method is –windowWillClose: in Listing 12.9. This is called when our window is about to close (that is; the user clicked the Close box on the window). By calling our own stop method, this gives the application a chance to clean up its threads, just as if the user clicked the Stop button first and then closed the window!
Listing 12.9. AppController –windowWillClose Method in AppController.m
- (void)windowWillClose:(NSNotification *)aNotification
{
[self stop:self];
}
What do you think of my threads? Let's review a couple more aspects of threads before you pass judgment!
Serial Versus Parallel
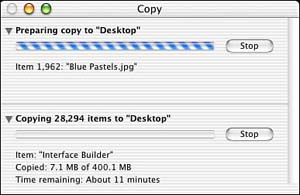
The example in this chapter shows how to use threads in a serial fashion. That is, they execute in order, one after the other. However, threads are also very useful in situations in which you have multiple tasks that must occur simultaneously. Consider the example of the Finder with multiple copy jobs occurring at the same time. Figure 12.8 shows the Finder in the midst of multiple copy jobs—each one is a thread!
Figure 12.8. The Finder making multiple copies.
Figures 12.9 and 12.10 illustrate threads being used in both serial and parallel mechanisms.
Figure 12.9. Threads being used serially.

Figure 12.10. Threads being used in parallel.
In Figure 12.9, the threads are all created and then executed one after the other, serially. Well, this is not completely true in our example. Remember, the threads are executed the moment they are created, prepare themselves, and then wait for the right condition before actually performing the bulk of their work. However, you get the general idea. The point of this illustration is that one thread does not perform its task until the thread before it has finished its task.
In Figure 12.10, the threads are all created and then execute at the same time, in parallel. Note also that although the threads are all running simultaneously, at any given time one or more of them might be sleeping or blocking on IO and not actually doing any work. Remember, sleeping threads give other threads a chance to work. The point of this illustration is that all threads can simultaneously perform their tasks as needed.
Thread Priority
Although all the threads in this example were of the same priority, there are times when you might need to set the priority of a thread above that of another in your application.
For example, assume that you have three threads running in parallel that perform certain tasks. One thread might check for the existence of a file in a certain location and then put itself to sleep for 30 seconds using the +sleepUntilDate: class method of NSThread. Another might run constantly waiting for specific data input via a USB device, sleeping only for a few milliseconds at a time. The last might run constantly processing the data input, also sleeping for only a few milliseconds at a time.
Of these last two threads, the input processor might be the most important and be given the highest priority—you don't want to miss any input from a hardware device. By using the +setThreadPriority: class method of NSThread, you can set the priority of any thread in relation to other threads throughout the operating system. The range of values is 0.0 to 1.0 for the priority, where 1.0 is the highest priority. The operating system manages the scheduling of these threads based on overall load. The +threadPriority class method will return the priority of any particular NSThread.
Note
Note that using notifications can also curb the need for this type of polling. Notifications enable your thread to be notified when data becomes available or some other condition is true. Threads register themselves as observers of a notification and simply wait for the notification to be delivered. This is similar to waiting for the phone to ring: You don't pick up the phone every minute to see whether someone is there for you; you wait for it to ring, and then you pick it up! See the NSNotification documentation for more information. Also see Chapter 13, “Terminal,” for more hints on using notifications.
Thread Data
The –threadDictionary instance method of NSThread returns the threads dictionary, an NSMutableDictionary. This dictionary can be used to store any data specific to the thread. Because the dictionary is available to anyone who has access to the NSThread instance itself, this can be a very useful way to pass information to and from a thread. One caveat is that accessing a thread's dictionary might be slightly slower than accessing an NSMutableDictionary that is not associated with a thread.
Try This
Here are some things to try to expand the project in this chapter:
Instead of creating all threads in the –start: method and using condition locks, try this: Create the first thread in the –start: method and have it create the second thread when it has completed execution. Then have the second thread create the third when it is complete, and so on. Using this mechanism, you can avoid the use of the NSConditionLock.
Add an indeterminate progress indicator to the user interface and create a thread that runs in parallel with the other threads running serially. This new thread should constantly call the NSProgressIndicator's -animate: method while the others are performing their tasks.
Conclusion
Congratulations for making it through this chapter. You can see that this technique isn't too complex, but it might take a bit of time to wrap your head around it. Using simple techniques such as this can really improve the structure and implementation of your application. Using condition locks to drive your state machine is a great way to manage a program's work load and the individual steps of a process—especially when they so closely depend on one another.
There is a world of threads beyond what is covered in this chapter. You should explore the documentation supplied by Apple for other techniques that can be used with them. Using threads is a very powerful technique that can make your application performance soar when used correctly.