
13. Terminal
—man help
A terminal is nothing more than a connection to a computer that allows you to type commands and have results displayed back to you. Terminals existed before the graphical user interface took hold. UNIX was originally a terminal-based operating system. DOS still is. Mac OS X offers the power of the terminal along with its elegant Aqua user interface allowing you to achieve greater control over your computer than you can with a graphical user interface alone.
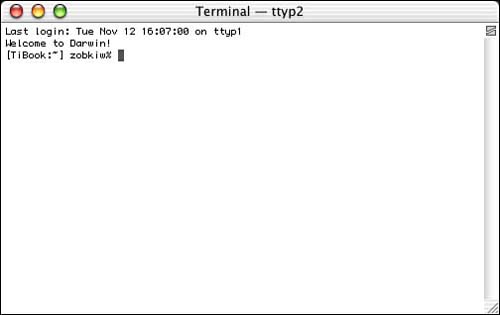
Figure 13.1 shows the Terminal application packaged with Mac OS X. This application gives you all the options you would expect from a standard UNIX terminal. Using the terminal, you can perform file manipulation, process control, remote computer control, execute shell scripts, and more. The terminal is your window to a world in which there is no menu bar and no cute icons. Enter if you dare, but behold and respect the power it possesses.
Figure 13.1. Terminal application in Mac OS X at login.
Note
Mac OS X is still a terminal-based operating system. Do this: In the System Preferences' Accounts' Login Options tab, switch to “Name and Password” and turn off auto-login in the Users tab. Now log out. Log in as >console with no password; note the use of the greater than sign here. You're looking at Mac OS X's console. Simply type logout to exit the console.
Let's look at some of the things you can do in the terminal.
You can easily copy files using wildcards. That is, instead of picking and choosing files one by one in the Finder, you can choose files by name or partial name. To find all files that end in .TIFF, you would represent that as *.TIFF in your command.
Note
In fact, you can even type multiline commands in the terminal. For example, the following command renames all files in the current directory that end in .TIFF to end in .TIF using the sed program.
foreach file ( *.TIFF )mv $file `echo $file | sed 's/.TIF/.TIFF/'`end
The sed program is a stream editor that modifies its input and writes it back out. This is a very powerful program. Grep is another powerful program that can be used on the command line as well. Type man sed or man grep in Terminal for more information about these programs.
You can log in to a remote computer and, if you have the proper permissions, perform any task you can on your local computer. The secure shell (ssh) is a popular mechanism to achieve an encrypted connection from one computer to another. You would simply type ssh some.computer.com to connect. You can then use secure copy (scp) to securely copy files between the two machines. This is a great (secure) alternative to FTP.
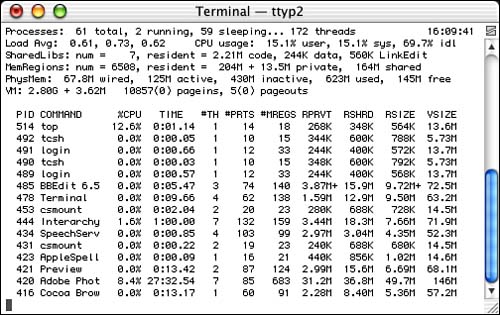
You can also execute shell scripts to handle everything from backups to cache file cleanup or from automatic Web site updating from your local computer to your Web server. These scripts can be executed manually or on a schedule via the cron application. Running top, as shown in Figure 13.2, you can track processor usage by application.
Figure 13.2. Terminal application in Mac OS X running top.
UNIX commands tend to be cryptic in nature and aren't written with novice users in mind. For example, the rm command removes files without warning or comment, and it's easy to delete more than you intended. In general, be wary of running commands without knowing what they do. You can learn what commands do using the man command. man is short for “manual,” and it contains a lot of documentation on the command line tools and POSIX C libraries available on Mac OS X.
As you can see, the terminal is a powerful tool. There are times, however, when you might want to leverage this power from within your Cocoa application. This chapter looks at an application that does exactly that.
The Result
MyTerminal, shown in Figure 13.3, accesses the power of the terminal in a few different ways using the NSTask and NSPipe classes.
Figure 13.3. The MyTerminal application.
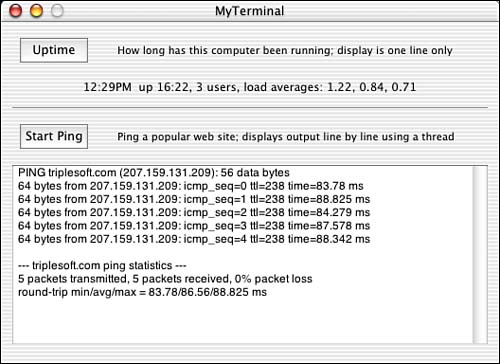
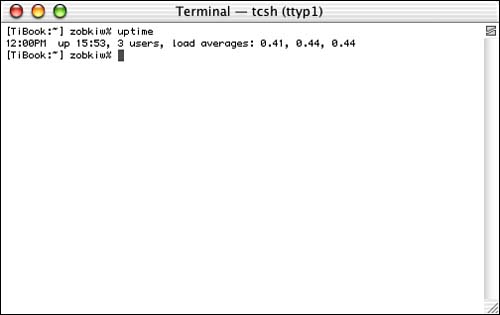
MyTerminal first interfaces with the uptime program. Uptime is a simple command-line application that takes no parameters and reports the current time, the length of time the system has been up, the number of users, and the load average of the system over the last 1, 5, and 15 minutes. In the example in Figure 13.3, it is currently 12:29 p.m., the system has been up for 16 hours and 22 minutes, 3 users are on the system, and the load average has increased from 0.71% 15 minutes ago to 1.22% 1 minute ago. Pressing the Uptime button calls the program and reports the results. Figure 13.4 shows what uptime looks like running in the terminal.
Figure 13.4. Uptime running the terminal.
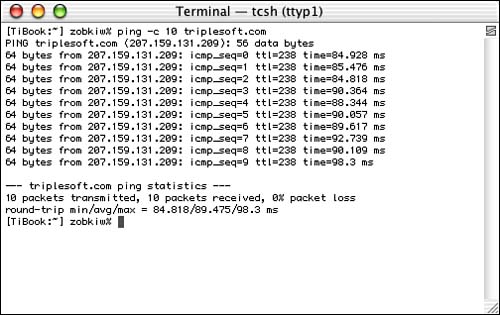
Second, MyTerminal interfaces with the ping program, as shown in Figure 13.3. Ping is a more complex command-line application that takes multiple parameters—most of them optional—sends a packet to a remote computer, and reports the response. This program is used in network debugging to tell if another computer is reachable. Ping sends an ECHO_REQUEST packet to the remote computer; if it receives it, the ECHO_RESPONSE packet will be returned. Ping then displays the time it took to receive the response. This can be a key indicator to the health of a network or portion thereof. Pressing the Start Ping button calls the program and reports the results. Figure 13.5 shows what ping looks like running in the terminal.
Figure 13.5. Ping running the terminal.
Let's look at the project to see what's going on here.
The Project
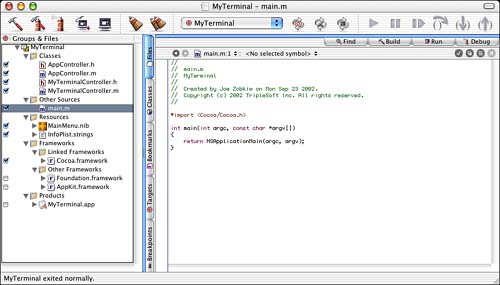
Figure 13.6 shows the MyTerminal project in Project Builder. The project is a simple Cocoa application. We use an AppController simply to implement the –applicationShouldTerminateAfterLastWindowClosed: delegate method. We've done this in previous examples, so I won't spend time talking about it again here. MyTerminalController is an NSObject subclass that manages the user interface objects in our main application window.
Figure 13.6. The MyTerminal project.
The Project Settings
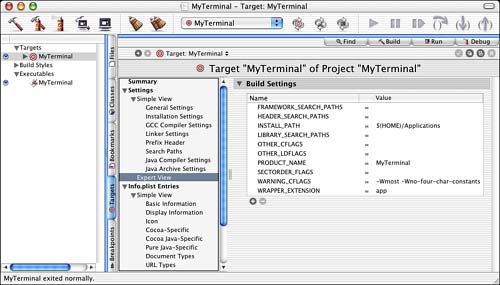
The Target settings in Figure 13.7 are straightforward for a simple Cocoa application.
Figure 13.7. The MyTerminal Target settings.
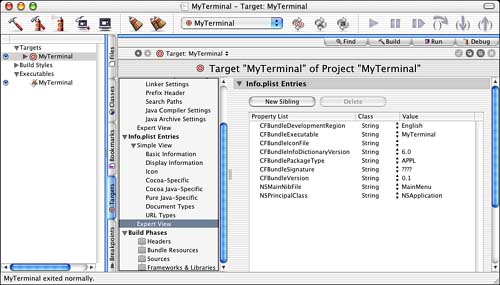
The InfoPlist entries in Figure 13.8 are also straightforward. Because this is a simple Cocoa application, there are no surprises here.
Figure 13.8. The MyTerminal InfoPlist entries.
The Nib File
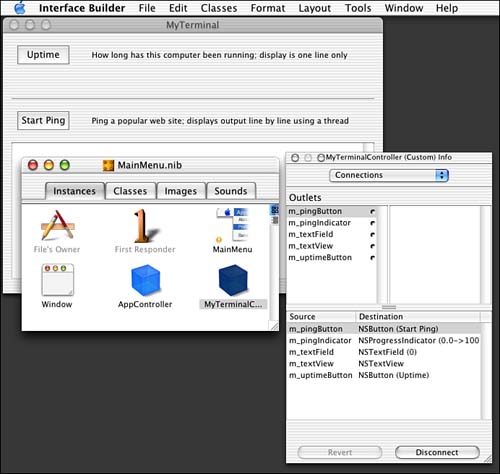
The MainMenu.nib file is shown in Interface Builder in Figure 13.9. The AppController has been instantiated and is the NSApplication's delegate, as you would expect. The IBOutlets and IBActions that control the items in our main application window are in the MyTerminalController custom class. Items you cannot see in this picture are the NSTextField below the Uptime area of the window and the NSProgressIndicator to the right of the Start Ping button. The Uptime and Start Ping buttons are connected to two IBActions named –uptime: and –ping:, respectively.
Figure 13.9. The MyTerminal MainMenu.nib file.
Let's look to the source code!
The Source Code
The interface of MyTerminalController is shown in Listing 13.1.
Listing 13.1. MyTerminalController Interface in MyTerminalController.h
#import <Cocoa/Cocoa.h>
@interface MyTerminalController : NSObject
{
IBOutlet NSTextView *m_textView;
IBOutlet NSButton *m_pingButton;
IBOutlet NSProgressIndicator *m_pingIndicator;
IBOutlet NSTextField *m_textField;
IBOutlet NSButton *m_uptimeButton;
NSTask *m_pingTask;
NSPipe *m_pingPipe;
BOOL m_pingIsRunning;
}
- (IBAction)ping:(id)sender;
- (IBAction)uptime:(id)sender;
- (void)displayPingData:(NSFileHandle*) theFileHandle;
@end
The MyTerminalController manages the IBOutlets of our user interface as well as the IBActions of the two buttons mentioned previously. We also define a method called –displayPingData: that is actually detached and executed as a thread. If you have yet to read Chapter 12, “Threads,” you might consider doing so before continuing.
Note the NSTask and NSPipe instance variables. NSTask enables our program to run another program as a sub process and monitor its execution. NSTask creates a separate executable entity that differs from NSThread in that it does not share the memory space of the process that created it. The NSPipe allows us a way to read the output of the task created with NSTask. Let's see how this all fits together.
Note
Both NSTask and NSPipe are complex classes that are documented fully by Apple. Be sure to review the documentation for these classes to see all the possible options associated with them.
The –init method in Listing 13.2 does little more than initialize our instance variables.
Listing 13.2. MyTerminalController –init Method in MyTerminalController.m
- (id)init
{
[super init];
if (self) {
m_pingIsRunning = FALSE;
m_pingPipe = nil;
m_pingTask = nil;
}
return self;
}
The –dealloc method in Listing 13.3 merely releases those instance variables that need it. These instance variables will be used when we discuss ping, but first, let's look at the simpler uptime.
Listing 13.3. MyTerminalController –dealloc Method in MyTerminalController.m
- (void)dealloc
{
if (m_pingPipe) { [m_pingPipe release]; m_pingPipe = nil; }
if (m_pingTask) { [m_pingTask release]; m_pingTask = nil; }
[super dealloc];
}
Uptime
Listing 13.4 shows the –uptime: method that is called when the Uptime button is pressed in the main application window.
Listing 13.4. MyTerminalController –uptime: Method in MyTerminalController.m
/*
uptime is a simple, fast command. It only
returns one line of text so we quickly
are able to execute it and read the results
from the pipe. No need for fancy threads
or multiple reads here.
*/
- (IBAction)uptime:(id)sender
{
// Allocate the task to execute and the pipe to send the output to
NSTask *theTask = [[NSTask alloc] init];
NSPipe *thePipe = [[NSPipe alloc] init];
// Get the file handle from the pipe (assumes thePipe was allocated!)
NSFileHandle *theFileHandle = [thePipe fileHandleForReading];
// Tell the task what command (program) to execute
[theTask setLaunchPath:@"/usr/bin/uptime"];
// Set thePipe as the standard output so we can see the results
[theTask setStandardOutput:thePipe];
// Launch the task
[theTask launch];
// Wait until the task exits, we know uptime exits immediately
[theTask waitUntilExit];
// Verify that the program completed without error
if ([theTask terminationStatus] == 0) {
NSString *theString;
// Extract a string from the data returned in the pipe's file handle
theString = [[NSString alloc]
initWithData:[theFileHandle readDataToEndOfFile]
encoding:NSASCIIStringEncoding];
// Set the text field to the value of the string
[m_textField setStringValue:theString];
// Release what we create, theFileHandle
// is automatically released by thePipe
[theString release];
} else {
// Set the text field to the value of the error
[m_textField setIntValue:[theTask terminationStatus]];
}
[thePipe release];
[theTask release];
}
The first thing you will note is that the method allocates local NSTask and NSPipe variables. Because the uptime program is so fast and straightforward, all the work will happen within this method. There is no need to work asynchronously with uptime. After allocating the NSPipe, we call its –fileHandleForReading method to return an NSFileHandle that we can then use to read the data returned by uptime.
Next, we must call NSTask's –setLaunchPath: method to set the path to the executable we want to launch. Uptime exists in /usr/bin/uptime, so we pass that string as the argument to the method. We then call NSTask's –setStandardOutput: method to ensure that the output is written to the NSPipe allocated earlier. At this point, we are ready to –launch the NSTask.
Note
You might also consider capturing STDERR using NSTask's –setStandardError: to catch any reported errors.
Because uptime executes so quickly, we merely call NSTask's –waitUntilExit method to wait for the task to finish. This method will suspend our program until uptime has terminated. Once this method returns, we check the –terminationStatus of the NSTask to ensure that the program completed without error. Assuming that all is well, we +alloc an NSString to display the data returned by the NSFileHandle –readDataToEndOfFile method, and then release the NSString. If there was an error, we simply display the –terminationStatus as an integer instead.
Note
We could have created that NSString differently. We could've made it -autorelease to avoid the -release method call. However, if you know you are done with an object, it's better to -release it directly than to have it be destroyed later via -autorelease.
Finally, we release both the NSPipe and the NSTask. The NSPipe will release the NSFileHandle that we received a reference to earlier.
As you can see, it's not too complex to launch a task and read its output.
Ping
Ping is a bit more complex than uptime. Whereas uptime returned within a split second, ping accesses the network and returns data over time. Because of this, we'll choose to use an NSThread to read the data from the ping's NSPipe. Therefore, we have two methods to look at—one is the IBAction, -ping: that is called when the user presses the Start Ping button. The second is the –displayPingData: thread method that is executed to watch ping's NSPipe (NSFileHandle of the NSPipe actually) for data and ultimately cleanup when the user presses the Stop Ping button or the ping program terminates on its own.
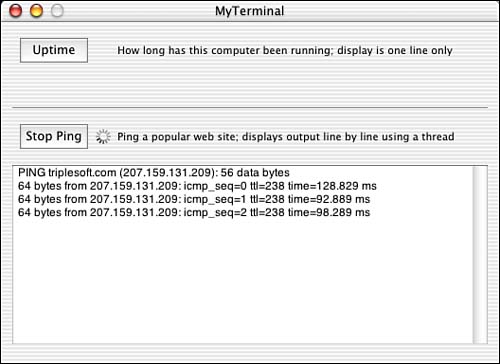
Note that once you press the Start Ping button, the name changes to Stop Ping while ping is running. Figure 13.10 shows this phenomenon. If the ping task is executing, the button will read Stop Ping.
Figure 13.10. The MyTerminal application in mid ping.
Listing 13.5 shows the –ping: method. This function behaves differently depending on the state of the m_pingIsRunning instance variable. Remember that the same physical button functions as a Stop Ping button when ping is running. Therefore, if ping is currently running, the method simply sets m_pingIsRunning to FALSE and disables said button. The value of m_pingIsRunning will be picked up in the –displayPingData: thread method below as well.
Listing 13.5. MyTerminalController –ping: Method in MyTerminalController.m
/*
ping is called when the Start Ping button is pressed.
It is also called to a ping in progress.
Essentially, this function sets things up for a
separate thread that handles reading the data.
When the users presses the Stop Ping button, the function sets a flag that
triggers the thread to deallocate the task and stop the pinging.
*/
- (IBAction)ping:(id)sender
{
if (m_pingIsRunning) {
// If we are currently running and this is called, we want to stop,
// so set a flag...
m_pingIsRunning = FALSE;
// ...and disable the button so it can't be clicked again until we
// have terminated the ping
[m_pingButton setEnabled:NO];
} else {
NSFileHandle *theFileHandle;
// Otherwise we are currently not pinging so we want to start...
// allocate a task, a pipe and the file handle
m_pingTask = [[NSTask alloc] init];
m_pingPipe = [[NSPipe alloc] init];
theFileHandle = [m_pingPipe fileHandleForReading];
if (m_pingTask && m_pingPipe && theFileHandle) {
// If we get this far we are pretty safe so we set the
// global flag that we are pinging...
m_pingIsRunning = TRUE;
// ...and begin some animation for the user to see activity
// on the screen
[m_pingIndicator startAnimation:self];
// Tell the task what command (program) to execute
[m_pingTask setLaunchPath:@"/sbin/ping"];
// Pass some arguments to the program, in this case the domain
// name to ping 5 times
[m_pingTask setArguments:[NSArray
arrayWithObjects:@"-c 5", @"triplesoft.com", nil]];
// Set m_pingPipe as the standard output so we can see the results
[m_pingTask setStandardOutput:m_pingPipe];
// Launch the task
[m_pingTask launch];
// Clear the text we placed in the text view in awakeFromNib
[m_textView setString:@""];
// Create the thread that will handle reading data from ping
// and pass theFileHandle from thePipe
[NSThread detachNewThreadSelector:@selector(displayPingData:)
toTarget:self withObject:theFileHandle];
// Change the title of the button to Stop Ping to reflect the
// change in state
[m_pingButton setTitle:@"Stop Ping"];
} else {
// If there was an error, tell the user
if (m_pingPipe) { [m_pingPipe release]; m_pingPipe = nil; }
if (m_pingTask) { [m_pingTask release]; m_pingTask = nil; }
NSRunAlertPanel(@"MyTerminal",
@"An error occurred trying to allocate the task, pipe or file handle.",
@"OK", @"", @"");
}
}
}
If ping is not currently running, this method is responsible for kicking it off. In that case, the first thing it must do is +alloc and –init the NSTask and NSPipe instance variables of MyTerminalController. These are made instance variables because they are used in the thread method below as well. Note that we also access the NSPipe's –fileHandleForReading method as we did in the uptime example.
Note
Note that you could also use NSThread's –threadDictionary method to access the thread's dictionary (that we are about to create) and store the NSTask, NSPipe, and NSFileHandle there.
Assuming that we have everything allocated and in order, we continue by setting m_pingIsRunning to TRUE. We also animate the progress indicator so that the user knows something is happening. NSTask's –setLaunchPath: is called to point to /sbin/ping. We then make use of its –setArguments: method to assign an array of arguments to be passed to ping. Although many arguments are available, we are passing in the –c argument to tell ping to ping the host triplesoft.com five times before automatically terminating. The user can still stop the ping before it completes, but this will limit the time the program will run.
We then call NSTask's –setStandardOutput: method to ensure that the output is written to the NSPipe allocated earlier. At this point, we are ready to –launch the NSTask. Just as we launch the task, we also clear the output text in the NSTextView so that we start with a fresh slate on the user interface side of the equation.
Next, we create and detach the thread that will read and display the output from ping to the user. Note that we are creating the –displayPingData: method of self as the thread. Note also that the withObject: parameter is theFileHandle. This allows easy access to the NSFileHandle written to by the ping task. As you will see shortly, the NSFileHandle is passed directly to the thread. We then set the Start Ping button to Stop Ping.
Note the last bit of code in this method is the else to handle the case in which the NSPipe or NSTask were not allocated properly. Just a little cleanup and an error is displayed should anything strange happen.
Now that the task has been set up and kicked off, let's take a look at the thread that maintains it.
Listing 13.6 contains the –displayPingData: thread method. This method begins execution the moment it is created in –ping:.
Listing 13.6. MyTerminalController –displayPingData: Method in MyTerminalController.m
/*
This is the thread that handles reading the data from the ping program
*/
- (void)displayPingData:(NSFileHandle*) theFileHandle
{
// Threads are responsible for manage their own autorelease pools
NSAutoreleasePool *thePool = [[NSAutoreleasePool alloc] init];
// While the flag is set (the user has yet to tell us to stop pinging)
while (m_pingIsRunning) {
// Read in any available data from the
// file handle passed into the thread
NSData *theData = [theFileHandle availableData];
// If there is data...
if ([theData length]) {
// Extract a string from the data
// returned in the pipe's file handle
NSString *theString = [[NSString alloc]
initWithData:theData encoding:NSASCIIStringEncoding];
// Append the text to the end of the
// text view and scroll it into view
NSRange theEnd = NSMakeRange([[m_textView string] length], 0);
[m_textView replaceCharactersInRange:theEnd withString:theString];
theEnd.location += [theString length];
[m_textView scrollRangeToVisible:theEnd];
// Release the string
[theString release];
}
// Sleep this thread for 100ms so as
// to allow other threads time (ie: UI)
[NSThread sleepUntilDate:[NSDate dateWithTimeIntervalSinceNow:(
NSTimeInterval)0.1]];
// Check if the task has completed and the data is gone
if (([m_pingTask isRunning] == NO) && ([theData length] == 0))
m_pingIsRunning = NO;
}
// Once the flag has been set to FALSE, we need to clean things up...
// Terminate the ping task and wait for it to exit
[m_pingTask terminate];
[m_pingTask waitUntilExit];
// Check the termination status of ping,
// 15 or 0 means it exited successfully
// 15 = user cancelled, 0 = normal termination
if (([m_pingTask terminationStatus] != 15) &&
([m_pingTask terminationStatus] != 0))
NSRunAlertPanel(@"MyTerminal",
@"An error occurred trying to quit the task. (%d)",
@"OK", @"", @"", [m_pingTask terminationStatus]);
// Release the pipe and task
if (m_pingPipe) { [m_pingPipe release]; m_pingPipe = nil; }
if (m_pingTask) { [m_pingTask release]; m_pingTask = nil; }
// Update the UI
[m_pingIndicator stopAnimation:self];
[m_pingButton setEnabled:YES];
[m_pingButton setTitle:@"Start Ping"];
// Release the autoreleasepool
[thePool release];
// Exit this thread
[NSThread exit];
}
First, the method allocates its NSAutoReleasePool since we've learned that threads are responsible for their own autorelease pools. Then, as long as the m_pingIsRunning flag is set, the thread loops looking for available data being passed back from ping. If the NSFileHandle –availableData method returns data, verified with the –length method, it is extracted into a string and appended to the NSTextView in the main application window.
The thread is then put to sleep using NSThread's +sleepUntilDate: class method to conserve CPU usage. When the thread wakes up, it checks to see if the ping task is still running using the NSTask method –isRunning—this is called polling. It also checks to see if any data is waiting to be processed. This allows us to verify whether the task completed on its own. If ping is not running and there is no data, the task stopped on its own and we have already read in all there is to read, so we set the m_pingIsRunning flag to NO. Otherwise, we will continue to loop to pick up any remaining data, such as the final summary that ping outputs.
Note
Here's a few words about polling. Why do I poll? I'm originally a Macintosh programmer. Macintosh programmers poll; it's what we've done for as long as I can remember—it's almost all we know. However, other ways can conserve CPU resources and deserve a mention.
By using tools such as mach port messaging, NSNotifications, and delegate messages to notify software of important state changes, you can avoid polling. NSFileHandle, for example, implements a notification named NSFileHandleDataAvailableNotification. By choosing to become an observer to this notification, you will be alerted when data is available to be read, as opposed to polling for the data.
See if you can retrofit this project to support notifications; see the “Try This” section for another hint as to how to do this.
At some point, the task will either exit on its own, after five pings, or the user will press the Stop Ping button. Either way, the m_pingIsRunning flag will be set to NO. When this occurs, the loop will exit and the thread will begin to clean things up. First, it will attempt to -terminate the task and –waitUntilExit. If the task completed on its own, these two methods will return immediately because the task will have already terminated.
Next, the –terminationStatus of the task will be checked to see how it was terminated. A value of 15 means that the user cancelled the task. A value of 0 means that the task completed on its own. Anything other than this means that some type of error occurred. We then -release the NSPipe and NSTask, update the user interface, -release the NSAutoReleasePool, and -exit the NSThread.
By using a thread, it's relatively easy to read the output from any command-line program that returns data over time. Be sure to read Chapter 12 for more information on threads.
Try This
Here are some ideas to expand the project in this chapter:
Add a view that plots the server load, as a bar chart, using the data returned by uptime beyond the 15-minute limit. Schedule an NSTimer to run the uptime program once every minute and keep track of the data returned to plot it for the user in a simple graph.
Add the ability for the user to set various ping options within the application user interface. You can type man ping in the terminal to see all the options and their potential values.
Pick another command-line–interface program and implement a graphical user interface for it as I've done here. Can't think of one? Try users, date, man, cal, du, or who.
Rewrite the ping program to work asynchronously without using NSThread. (Hint: use NSFileHandle's –readInBackgroundAndNotify method to get data out of STDERR and STDOUT as it arrives.)
Conclusion
You've learned a lot in this chapter. Using NSTask and NSPipe, you can leverage the power of proven applications that have existed for ages from within your Cocoa applications. Be sure to review the details of the NSTask and NSPipe classes because many options are associated with each of them. We've only scratched the surface in this chapter, but I hope that it has given you a spark to learn more about this powerful technique.