
Apple has always been at the forefront of authoring audio and video, so it should come as no surprise that the tool used to deliver audio and video media in Mac OS X Server is capable of similarly powerful results. Although it’s part of Mac OS X Server, the QuickTime Streaming Server (QTSS) can also be downloaded for free and can be installed on Mac OS X Client. It is provided under a different name—Darwin Streaming Server (DSS)—but make no mistake, it’s based on the exact same code. DSS can also be installed on other operating systems such as Red Hat Linux 9 and Windows 2000/2003 Server.
Mac OS X Server provides a suite of three applications focused on streaming. QTSS is the core server, capable of streaming QuickTime, MPEG-4, H.264, MP3, and even 3GPP (streaming to mobile phones) to viewers across cellular networks. QuickTime Broadcast (QTB) is a live encoder application that, when coupled with QTSS, allows for the delivery of live streaming events. Last but not least is QTSS Publisher, which handles media preparation, playlist development, and the creation of Web pages that contain streaming content. QTSS Publisher makes all these common tasks easier to accomplish. QTSS, QTB, and QTSS Publisher make for a terrific triple threat of streaming to help you get started. This chapter teaches you how to set up and run QTSS for your organization.
QTSS is an real-time media delivery server capable of streaming content such as your company’s quarterly financials, a video of a rock band’s release party for a brand-new album, new employee orientation materials, or training movies required by human resources. A community can even broadcast the unveiling of a new monument live over the Internet.
Beyond the powerful streaming tools, there is one more feature of note in QTSS. Whereas other streaming server solutions require you to pay licensing fees based on the number of viewers connecting to your server, QTSS and DSS apply no “server tax” and do not artificially limit the number of people viewing or listening to your content.
With the top-notch suite of streaming tools and a lack of per-stream or per-user license fees, you can turn your attention toward creating focused and compelling content as opposed to figuring out how to get your streaming server to work.
One note of caution: Please respect the rights of the owners of audio and video material. You should only stream content that you own or for which you have the appropriate copyright approvals. Also, in the case of music tracks from signed recording artists, you should abide by royalty guidelines set down by the American Society of Composers, Authors and Publishers, (ASCAP), Broadcast Musicians Incorporated (BMI), or the Society of Composers, Authors and Music Publishers of Canada (SOCAN).
Before you can begin streaming audio or video, you should understand the key units of measure related to media files and networks.
Computer files are measured in bytes. A byte consists of 8 bits. Generally, audio and video files tend to be large and are often measured in kilobytes (KB, or 1,024 bytes) and megabytes (MB, or 1,024 kilobytes).
When you connect your computer to a network (and by extension the Internet), you do so at a given speed. The speed is measured in bits, not bytes. More specifically, network speed is measured in bits per second (bps). Fast networks can be described in kilobits (Kbps, or 1,024 bits per second), megabits (Mbps, or 1,024 kilobits per second), and even gigabits (Gbps, or 1024 megabits). For example, a modem connection can try for 56 Kbps but usually only reaches approximately 46 Kbps. A connection through your high-speed Internet service provider (ISP) can be as fast as 3.5 megabits per second (Mbps), although most such connections top out at 1 Mbps.
Video content being streamed from your server must be properly prepared. For the best viewer experience, it is wise to create two to four versions of your content that match the various types of Internet connections from slow (56 Kbps modem) to fast (768 Mbps DSL/Cable or better). QTSS delivers media in real time. This means your media files must, during delivery, never exceed the maximum amount of data (i.e., Kbps) the client computer can receive at any one moment. Many QuickTime authoring tools provide preset export options for common Internet connection speeds to simplify this requirement.
Review the chart provided (Table 12.1) for each connection type (noted in Kbps) and the related media data rates (noted in KB/sec) you should target for that connection type. Also included is a conservative target data rate for problematic network connections.
Table 12.1. Bits and bytes
CONNECTION TYPE | CONNECTION SPEED | TYPICAL MEDIA DATA RATE | CONSERVATIVE MEDIA DATA RATE |
33.6 modem | 33.6 Kbps | 3 KB/sec | 2.5 KB/sec |
56K modem | 53 Kbps | 4.8 KB/sec | 4 KB/sec |
384 Kbps DSL/Cable | 384 Kbps | 35 KB/sec | 30 KB/sec |
512 Kbps DSL/Cable | 512 Kbps | 46 KB/sec | 40 KB/sec |
768 Kbps DSL/Cable | 768 Kbps | 70 KB/sec | 60 KB/sec |
1.5 Mbps T1/Intranet/LAN | 1500 Kbps | 150 KB/sec | 100 KB/sec |
You must consider not only the connection speeds of your viewers, but more important, the connection speed of your server. If your QTSS server has a 1.5 Mbps T1 connection to the Internet, you can figure out how many viewers at a particular connection speed you can serve simultaneously. If you are serving up an audio stream that requires a 56 Kbps connection, you can quickly calculate that your server can provide 21 listeners with the audio stream (1500 Kbps – 300 Kbps / 56 Kbps = 21 listeners). When calculating maximum server connections, you should allow approximately 20 percent of connection headroom (300 kbps in this case) to avoid overloading you server’s Internet connection.
From the previous example, you can see that doing some calculations and planning up front can ensure you have the appropriate media at the appropriate data rate and a server connected to the Internet at a speed ready to handle the challenge. If you don’t plan to stream to the Internet at large but are delivering content within your organization (likely using Ethernet or WiFi), the process is much easier. Since Ethernet speeds are much higher (i.e., 10 Mbps, 100 Mbps) than Internet connections, a QTSS server providing content within your organization can service hundreds of simultaneous streams without hitting a server connection speed limit. But even at Ethernet speeds, a balance needs to be struck between quality (i.e., higher data rates) and quantity. It’s best to attempt to author and deliver media that clearly gets your message across without requiring an excessively high data rate.
Hinting a media file prepares a video or audio file for streaming over a network. A hint track for each valid media is created that provides QTSS with instructions on how to break the media file into smaller parts to send over the network. Hinting a media file literally provides QTSS with a hint (hence the name) on how to best read and deliver a file over the network. Once a media file has been completely authored (captured, edited, compressed), the very last step before copying to a QTSS server is to add hint tracks.
You can hint using a few different tools, some from Apple and some from third-party companies. iMovie HD (which is part of Apple’s iLife software suite), for example, provides the ability to hint. QuickTime Pro unlocks QuickTime Player and enables powerful export features, one of which is hinting. QTSS Publisher also provides automatic hinting for media it handles. Apple’s Final Cut Pro and many software packages geared toward video compression also offer hinting options.
Open iMovie HD on any Mac OS X computer.
It is generally located in the /Applications directory, but as the administrator of your Mac OS X computer, you could have moved it anywhere on your system.
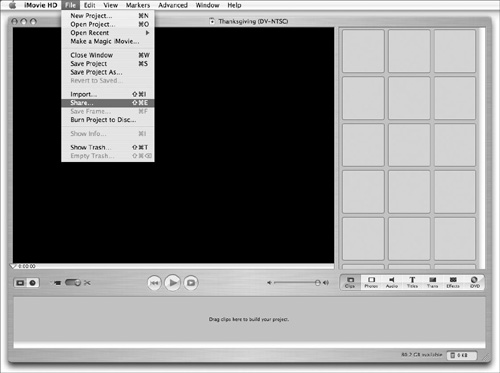
Open an iMovie HD project and choose File > Share (Figure 12.1).
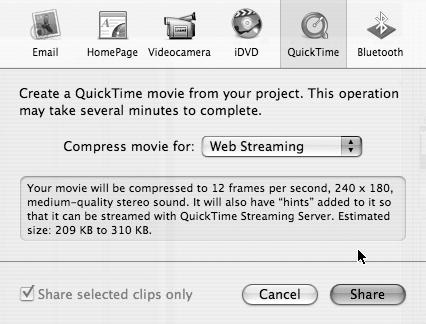
When the Share dialog appears, click QuickTime and choose Web Streaming from the Compress pop-up menu (Figure 12.2).
The first thing you’ll need to do when setting up the QTSS is make a few key decisions. These decisions can always be changed later, but you should always prepare for growth. A Mac OS X Server running other services like DHCP and file sharing and acting as an Open Directory Master isn’t the best possible solution for a full-blown QTSS setup. When you’re seriously considering multiple connections and high-quality video, you must decide if a separate Xserve running Mac OS X Server with at least 1 GB of RAM is within your budget. Less busy QTSS servers can be run alongside two or three other services with only 512 MB of RAM installed.
Taking a tour of the QTSS setup is easy; you can do so using the Server Admin tool or even a Web browser. After you’ve launched Server Admin and authenticated as an administrator, choose QuickTime Streaming Server from the Computers & Services list. From there, you have access to the following settings under the Settings tab:
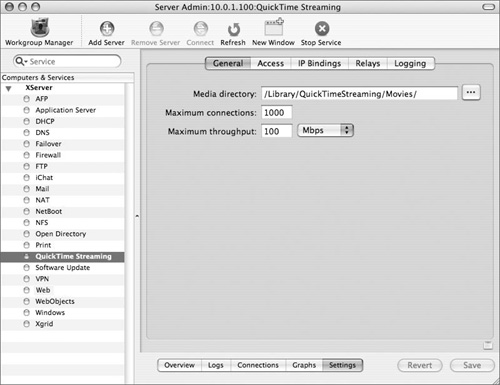
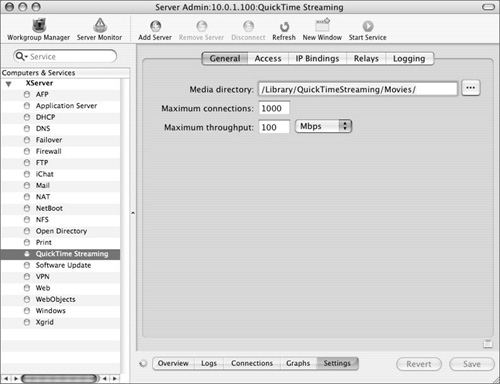
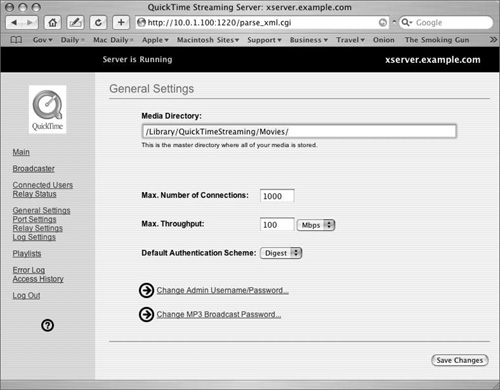
The General tab contains the settings for the streaming media directory, the maximum number of client connections, and the maximum network throughput. When preparing to deploy a QTSS server, make sure the maximum throughput setting is set no higher than the actual network connection speed of your server. The default settings are too high for all but streaming to clients on a local area network (LAN) (Figure 12.3).
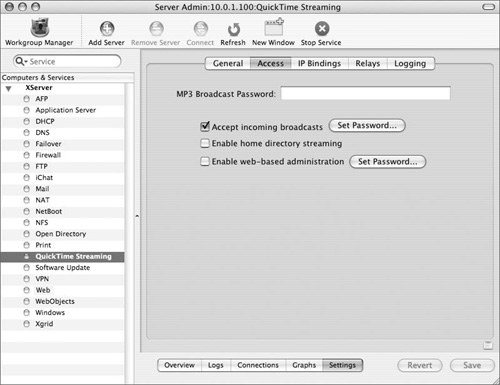
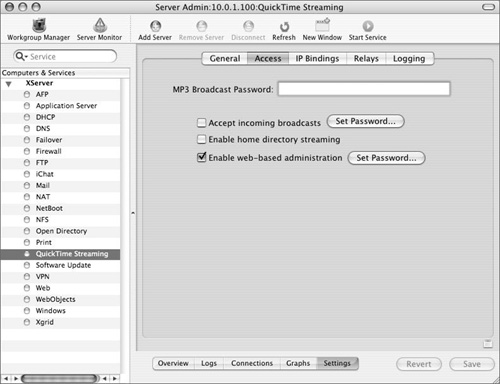
The Access tab lets you set a password to restrict who can use your server to broadcast MP3 streams (via the bundled Icecast server) or MPEG-4/QuickTime streams. This tab also lets you enable home directory streaming that provides users with accounts on the server the ability to stream files from within their home folder (/Users/<username>/Sites/Streaming). Here you can also enable Web-based administration, allowing you control QTSS from a remote Web browser (Figure 12.4).
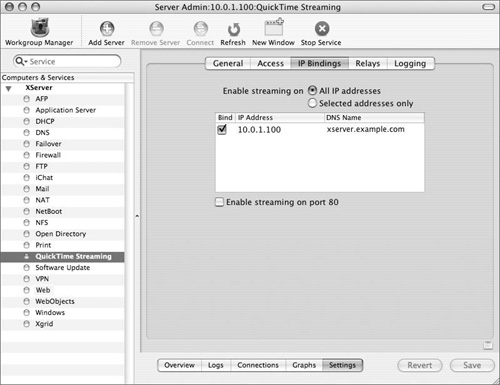
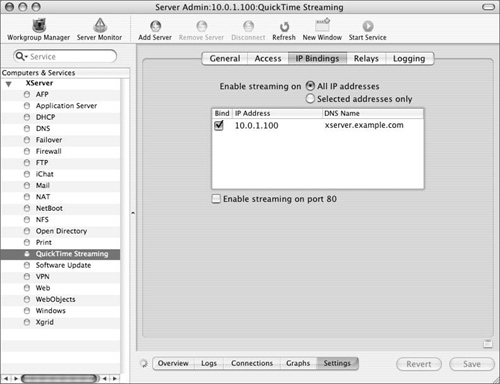
The IP Bindings tab provides control over which of your server’s IP addresses will be used to provide streaming services. Enabling port 80 streaming allows clients connecting from behind corporate firewalls to have the best opportunity to receive your stream (Figure 12.5).
Keep in mind that using port 80 to stream will interfere with any existing Web sites you may be hosting.
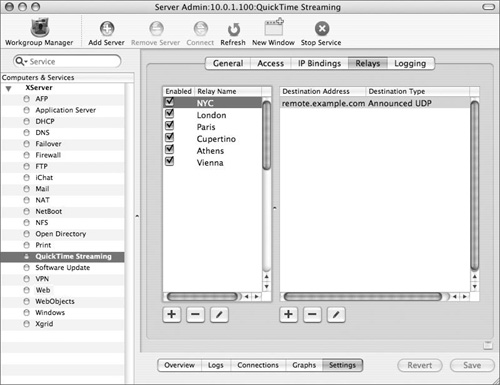
The Relays tab lets you create, configure, and delete relays. Relays allow streaming servers to pass a stream from one to another in order to assist with the propagation of that stream. Relays are often used to support streams with a great number of client connections, or to propagate a stream to a remote location that has a limited network connection (Figure 12.6).
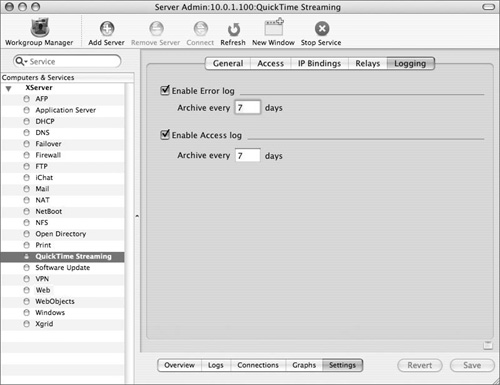
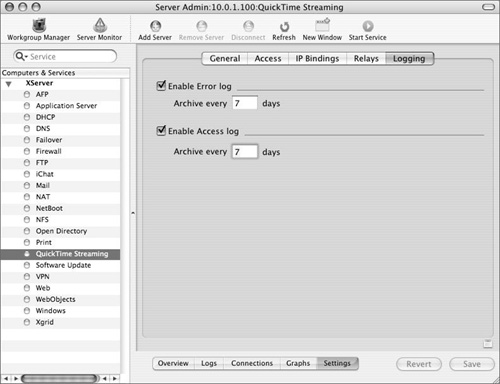
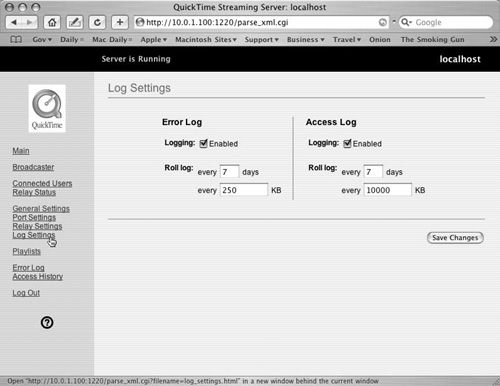
The Logging tab lets you enable both the Access and Error logs. It is recommended you have Access and Error logs enabled (Figure 12.7).
Once you understand the settings, you can perform the proper configuration to enable the QTSS.
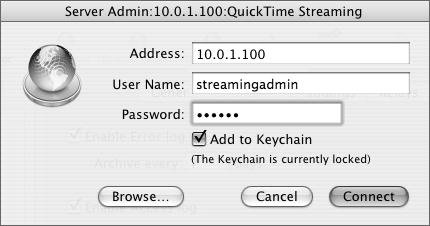
Launch the Server Admin tool from within /Applications/Server, and authenticate as the administrator (Figure 12.8).
Select the QuickTime Streaming service from the Computers & Services list.
Notice the five tabs at the bottom of the screen (Figure 12.9):
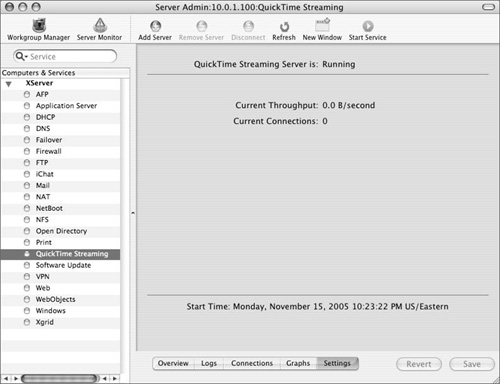
Overview shows whether the service is running, the current throughput, the current number of connections, and the last time the service was started.
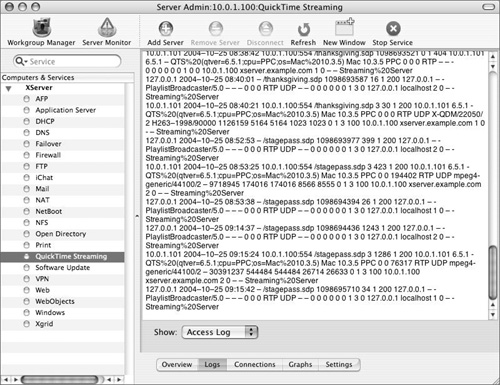
Logs displays both the Error and Access logs, assisting you in monitoring your QTSS server (Figure 12.10).
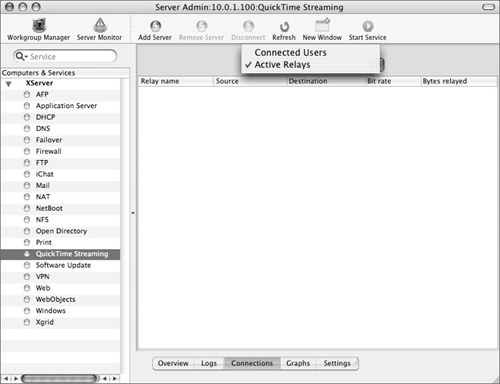
Connections shows, in list form, currently connected users as well as the status of any active relays (Figure 12.11).
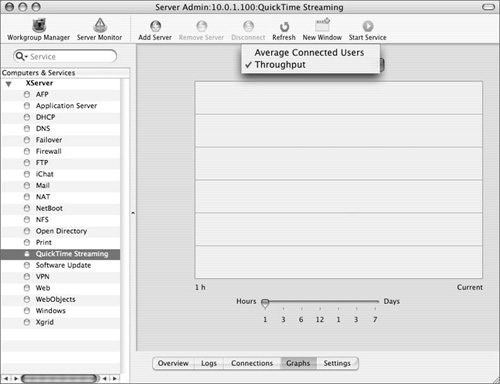
Graphs indicates both the throughput and the number of active users in a chart spanning up to the last seven days (Figure 12.12).
Settings displays five more tabs, discussed earlier (Figure 12.13).
Select the Settings tab and then the General tab.
Be sure the movies to be streamed are in the correct directory listed in the Media Directory field (Figure 12.13).
Select the IP Bindings tab, and be sure streaming is permitted on the IP address you want (Figure 12.14).
Select the Logging tab to enable both the Access and Error logs for later trouble-shooting and analysis (Figure 12.15).
Click Start Service in the Toolbar to start the QuickTime Streaming Server service (Figure 12.16).
View your QTSS’s status by clicking the Overview tab.

✓ Tips
There are two ways to do QTSS Administration: either through Server Admin or by using Web-based administration. It is wise to be familiar with both methods for administering your streaming server.
QTSS provides some sample media files in order to let you test your new server. They are located in the default media directory located at /Library/QuickTimeStreaming/Movies.
Once your QTSS service is running, you need to make sure it is functioning properly.
Open the QuickTime Player application in the Applications directory.
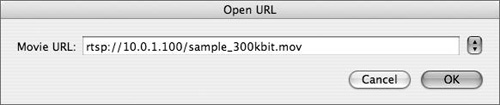
Select File > Open URL and enter a URL to a sample file on your server (Figure 12.17).
View your stream in the QuickTime Player window (Figure 12.18).

Another way to administer QTSS is through the use of a Web browser, such as Safari. Server Admin can be fine for the task of administration, but if you’ve installed the Darwin Streaming Server on another operating system or Mac OS X Client, you should be aware of Web-based administration.
When Web-based administration is enabled, you have access to the same settings found in Server Admin and QTSS Publisher combined.
Launch the Server Admin tool from within /Applications/Server, and authenticate as the administrator.
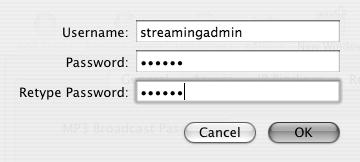
Click the QuickTime Streaming Service, click the Settings tab, and then click the Access tab (Figure 12.19).
Select the “Enable web-based administration” check box.
In the dialog that appears, set a username and password for this task (Figure 12.20).
You may need to click Set Password if this has been done once before.
When you’ve finished making changes, click Save.
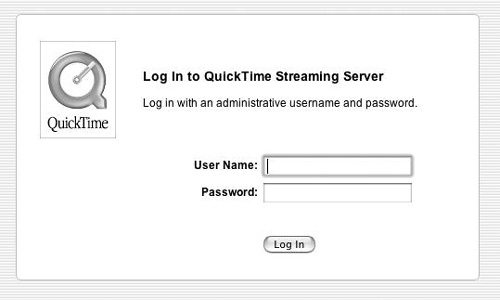
For security reasons discussed later in this chapter, launch a Web browser of your choice on the server, type in the IP address of the server followed by a colon and the number 1220, and press the Return key (Figure 12.21).
This represents the well-known port number over which the QTSS Web-based administration tool runs.
In the initial Web page that appears, enter the username and password that you entered in step 3, and click Log In (Figure 12.22).
Before proceeding to the main admin screens, you may be taken through a simple setup assistant. The options are the same as those available in Server Admin, which we described earlier in the chapter.
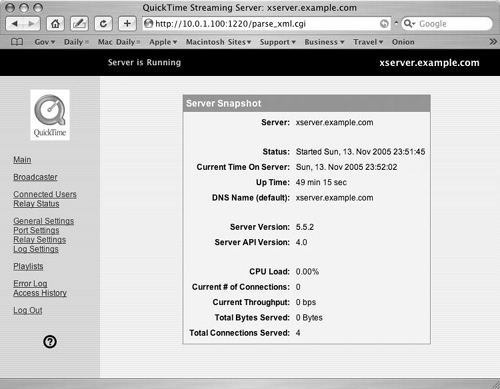
You can now manage the QTSS using the Web-based administration tool (Figure 12.23).
Click any link on the left to view various parameters of your QTSS (Figure 12.24).
Once you’ve finished changing settings, always log back out.

✓ Tip
It’s not a good idea to use the same username and password as your server administrator when you set up Web-based QTSS administration. The Web-based administration tool doesn’t currently store the password in the same secure format as other Mac OS X and Mac OS X Server passwords.
Administration Security
If you plan to use Web-based administration, you should be aware that no security is provided for the information exchanged between your Web browser and the QTSS server. Security is, however, employed for both Server Admin and QTSS Publisher. Consider using a more general session security technique; for example, when connecting remotely, access your network through a VPN server. Doing so prevents others from gathering information about your QTSS when you use Web-based administration (Figure 12.25). You can learn more about VPN in Chapter 10, “Security.”
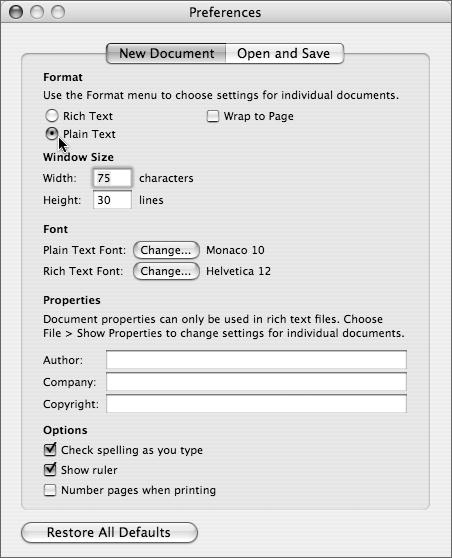
Launch TextEdit, and then select TextEdit > Preference, and click the New Document tab. In the format section, choose the Plain Text option (Figure 12.26).
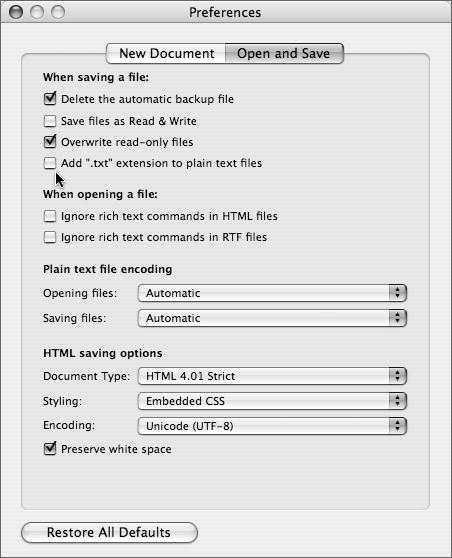
Click the Open and Save tab. In the “When saving a file” section, ensure “Add .txt” extension to plain text files” is unchecked, close the Preferences window, and quit TextEdit (Figure 12.27).
Relaunch TextEdit, create a new text file and enter the following text:
AuthName "QTSS Server"
AuthUserFile /Library/
→QuickTimeStreaming/Config/qtusers
AuthGroupFile /Library/
→QuickTimeStreaming/Config/qtgroups
require user viewer
require group secure-viewers
Select Save from the File menu.
Save the text file with the name qtaccess to /Library/QuickTimeStreaming/Movies.
Launch the Terminal application located in Applications/Utilities/.
Type sudo -s and press the Return key.
In the dialog that appears, enter your administrator’s password.
In Terminal, type the following command:
echo "secure-viewers:viewer" >>
→/Library/QuickTimeStreaming/
→Config/qtgroups
You have just added the secure-viewer group with one user, viewer, to QTSS.
Type the following command and press Return:
qtpasswd viewer
In the dialog that appears, enter the password of your choosing.
Type
exit, and quit Terminal.You have just added the user viewer to QTSS.
Launch QuickTime Player and select Applications > File > Open URL.
Enter the following URL:
rtsp://<hostname>/sample_300kbit.movwhere <hostname> is the hostname or IP address of your server.
A password dialog appears in QuickTime Player.
Enter
viewerfor username and the password you chose earlier.Click OK.
The stream will now appear.
Playlists are collections of audio or video files that you want to be streamed. Mac OS X Server includes a few sample files in the /Library/QuickTimeStreaming/Movies directory that you can work with prior to placing your own media files there.
There are two ways to add a playlist: one through the Web-based administration tool, and one using the QTSS Publisher tool. The QTSS Publisher tool will be examined here.
You can create two types of playlists:
MP3 playlists are audio only, based on MP3, and streamed using the Icecast format that can be received by players such as iTunes.
Media playlists can consist of audio, video, or both in either MPEG-4 or QuickTime format. Each playlist you create must contain media of the exact same type (example, all MPEG-4) and must have been encoded the same way (i.e., same data rate, and video frame size, etc). QTSS will review all files in a playlist to ensure they are the same before beginning a playlist stream.
Also, before you can create media playlists, the files in those playlists must be hinted. This includes Advanced Audio Coding (AAC) MPEG-4 files that are simply MPEG-4 files without video. Thankfully, when you add media to your streaming server using QTSS Publisher, the hinting process happens automatically!
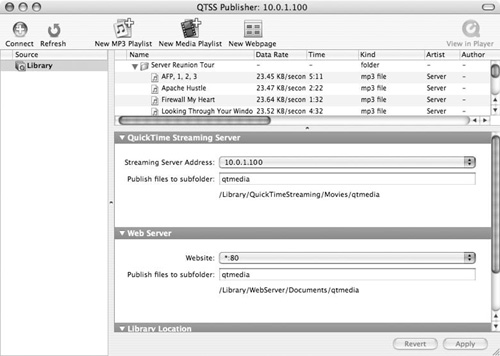
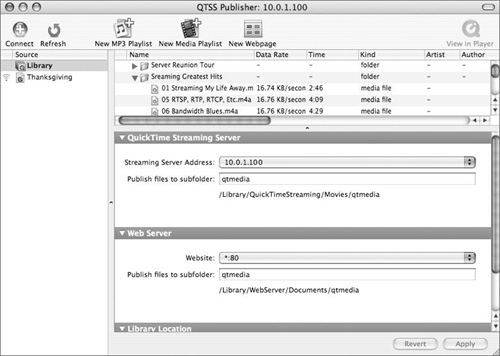
Launch the QTSS Publisher tool from /Applications/Server, and authenticate as the QTSS administrator (Figure 12.28).
Click the Media Library icon.
This window shows all your media files and permits you to sort them based on the column criteria.
Drag your video files into the Media Library window (Figure 12.29).
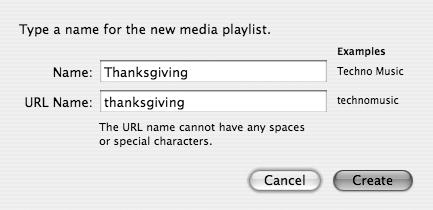
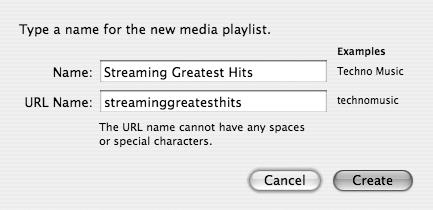
Click New Media Playlist in the Toolbar.
In the dialog that appears, enter the name of the playlist and the URL name (one is suggested for you), and then click Create (Figure 12.30).
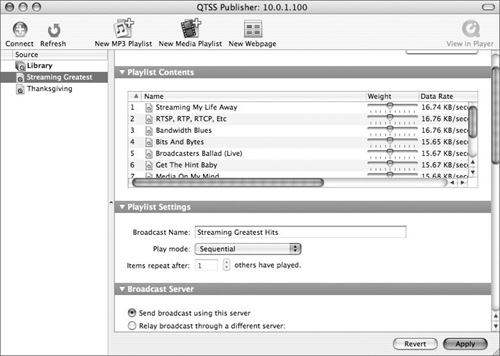
Drag the media file(s) you want to add to the playlist from the media files pane to the Playlist Contents pane and click Apply if necessary (Figure 12.31).
In the Playlist Settings section, you may choose to change the broadcast name and the play mode.
Click Apply to save any changes, and then click Start to start the stream.
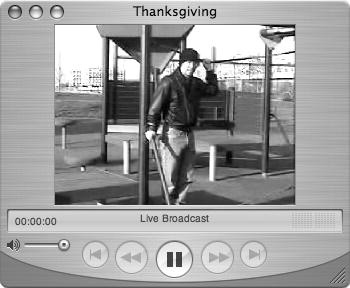
While you’re still working on your server, click View in Player in the Toolbar (see Figure 12.31).
This will launch the QuickTime Player to test the playlist stream you just created (Figure 12.32).
After a successful test from your server by using the QuickTime client running on your server, attempt to connect to the stream from another computer connected to the same network. (Perform the test on the same machine you’re serving from at first to isolate issues from being network related.)
The URL for direct access to the stream is provided in the Streaming Link section at the bottom of the current playlist.

✓ Tips
It’s possible to change the ending part of the URL when creating the playlist so others who have to access the playlist will reduce the chance they will make a typographical error when entering the playlist.
QTSS Publisher places media files it works with (as well as configuration files) in a special directory located at /Library/Application Support/Apple/QTSS Publisher/.
Audio files come in various formats. One format used by iTunes is AAC. An AAC file is simply an MPEG-4 file that contain only audio. With respect to playlists, QTSS Publisher considers them media files and as a result groups them with video MPEG-4 and QuickTime movie files. The end result, however, is the same great audio for your audience to enjoy.
When you’re creating files for playlists, you can rate the media in the playlist from 1 to 10 (presented in a slider format), with 10 being the highest rating a file can get. Rating media files in the Playlist Contents section lets media be streamed to the user in weighted random order (not in sequential order), based in part on the rating given each media file. A higher rating means that the media file is likely to be played more often; a lower rating, less often.
Launch the QTSS Publisher tool from /Applications/Server, and authenticate as the QTSS administrator.
Click the Media Library icon.
This window shows all your media files and permits you to sort them based on the column criteria. Drag your AAC audio files into the Media Library window (Figure 12.33).
Click New Media Playlist in the Toolbar.
In the dialog that appears, enter the name of the playlist and the URL name (one is suggested for you), and click Create (Figure 12.34).
Drag the AAC file(s) you want to be added to the playlist from the media files pane to the Playlist Contents pane and click Apply if necessary (Figure 12.35).
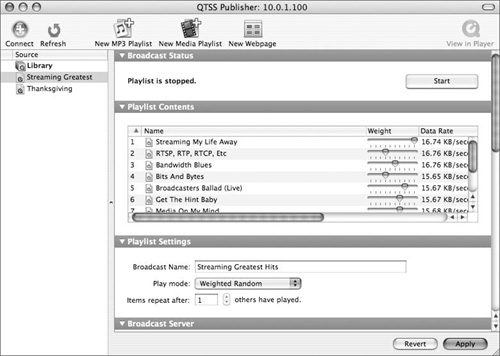
In the Playlist Contents section, select each file and drag the Weight sliders left or right to indicate a higher or lower preference for a file.
You’re rating your AAC files as you would in iTunes.
In the Playlist Settings section, select Weighted Random from the Play Mode pop-up menu.
Click Apply and click Start to start the broadcast (Figure 12.36).
While you’re still working on your server, click View in Player in the Toolbar to launch the QuickTime Player to test the playlist stream you just created (Figure 12.37).
After a successful test from your server to your server (to reduce troubleshooting to mostly non-networking issues, since the stream and the request are on the same computer), attempt to connect to the stream from another computer connected to the same network.
The URL for direct access to the stream is provided in the Streaming Link section at the bottom of the current playlist.
✓ Tips
It’s possible to change the ending part of the URL when creating the playlist so others who have to access the playlist will reduce the chance they will make a typographical error when entering the playlist.
You create MP3 playlists just like you do an AAC playlist except that you click New MP3 Playlist in the Toolbar instead of New Media Playlist.
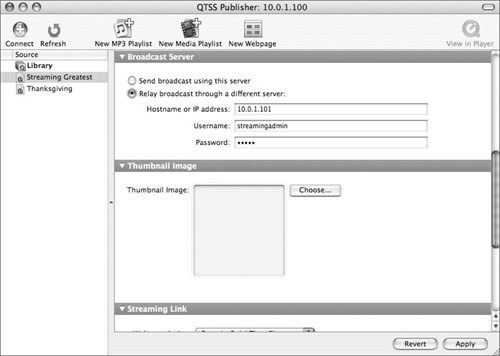
When you’re using QTSS Publisher to create playlists, you have a few options as to how you can announce the streams.
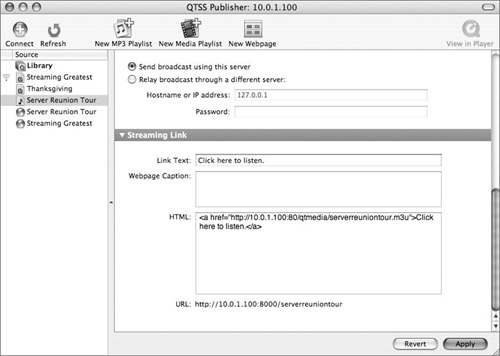
Open the QTSS Publisher application, and select the playlist you want to stream.
Navigate to the Broadcast Server section, and click the “Relay broadcast through a different server” radio button (Figure 12.38).
Fill in the IP address, username, and password of the QTSS or DSS server where you want to send the playlist. Then click Apply.
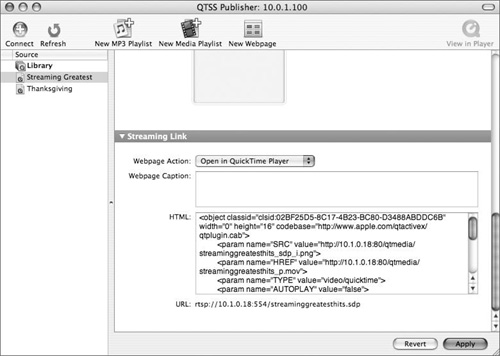
Another option is to use QTSS Publisher to create code that you can insert into Web pages you want others to visit. This code can be copied and pasted into the middle of other HTML (Web page) code.
Open the QTSS Publisher application, select the playlist you want to include in a Web page, and navigate to the Streaming Link section.
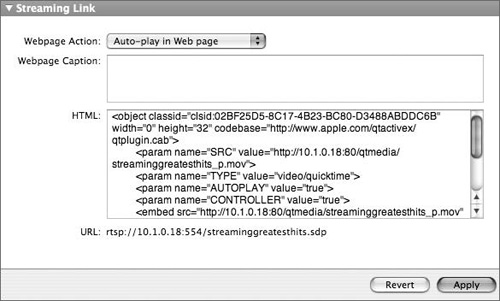
From the Webpage Action pop-up menu, select what behavior you want your HTML code to perform (Figure 12.39).
The first option will launch the QuickTime Player to stream the playlist, while the other two options will stream the playlist from within the Web page (either after clicking or automatically after the page loads).
Click inside the HTML window containing the code, select all the code, and copy it).
Switch to your HTML application and paste the code where you want it.
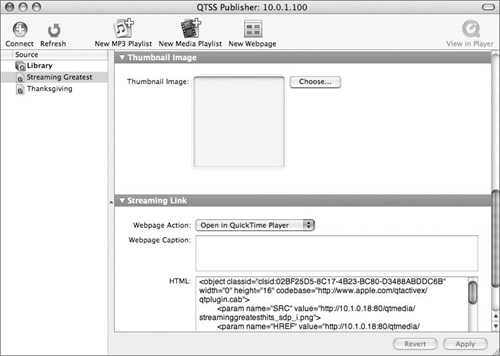
Launch the QTSS Publisher tool from /Applications/Server, and authenticate as the QuickTime Streaming Server administrator.
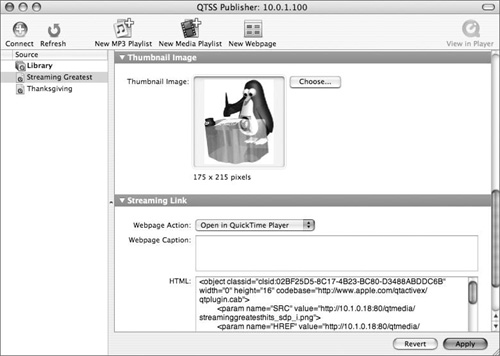
Select the playlist you want and navigate to the Thumbnail Image section (Figure 12.40).
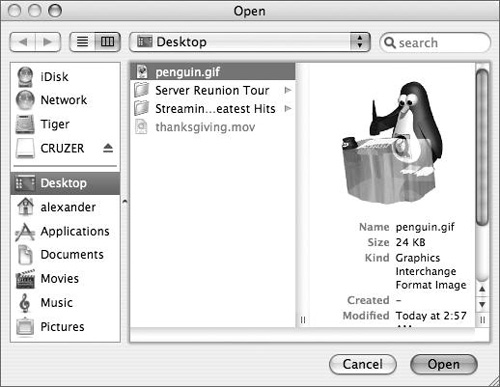
Click Choose and navigate to where the image exists on your server.
Select the image and click Open to place it inside the Thumbnail Image window (Figure 12.41).
Optionally, you can navigate to the Streaming Link section of the playlist and add a caption in the Webpage Caption field (Figure 12.42).
Click Apply to save the changes.
You have now added an image to your playlist.
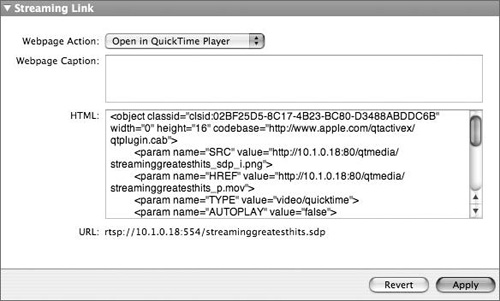
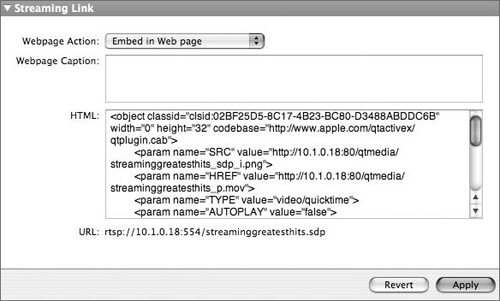
Once an image is added, you need to choose how it will be used. You have three options, each of which generates different HTML code for use in a Web page:
Open in QuickTime Player allows the image to be embedded so that when you’re viewing the stream from a QuickTime Player, the image will appear (Figure 12.43).
Embed in Web page places the image in a Web page and plays the stream when the user clicks the image (Figure 12.44).
Auto-play in Web page permits the stream to automatically begin playing when the user enters the Web page (Figure 12.45).
Remember, each option has different HTML code associate with it. If necessary, you need to copy that code and paste it into the HTML code of your Web page(s).
QTSS Publisher also lets you create preformatted Web pages. These pages include all the code necessary for a Web page to be built so that users can connect and view information about the playlist.
Enable your Web site, and start the Web service (see Chapter 9, “Web Technologies,” for instruction on starting your Web service).
Launch the QTSS Publisher tool from /Applications/Server, and authenticate as the QuickTime Streaming Server administrator.
Be sure the playlist you want to create a Web page for is broadcasting (see the “Creating weighted random AAC playlists” task earlier in this chapter).
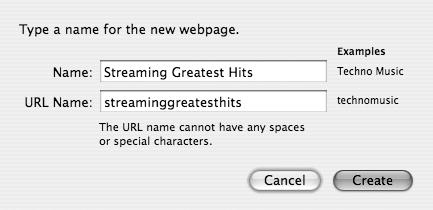
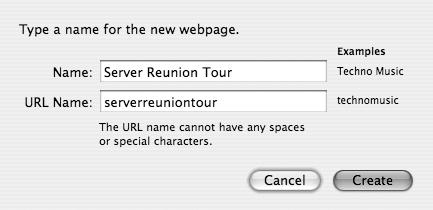
Click New Webpage in the Toolbar.
In the dialog that appears, enter the name of the Web page and the URL name (one is suggested for you), and click Create (Figure 12.46).
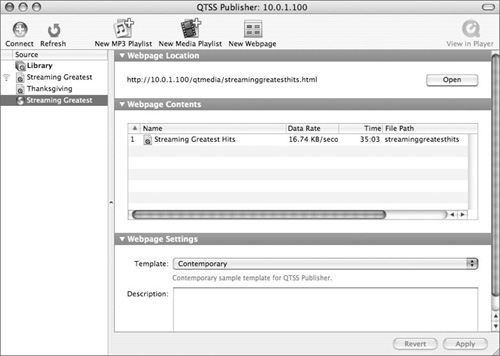
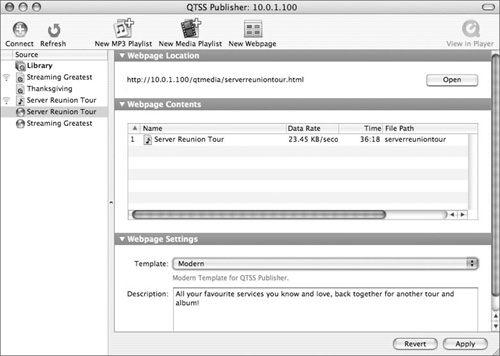
Select the Web page you just created from the Source list on the left.
Drag a playlist from the Source list to the Web page you just created, also located in the source list, and click Apply (Figure 12.47).
In the Webpage Settings section, select a Template (Modern is a good choice) and enter a description in the Description area.
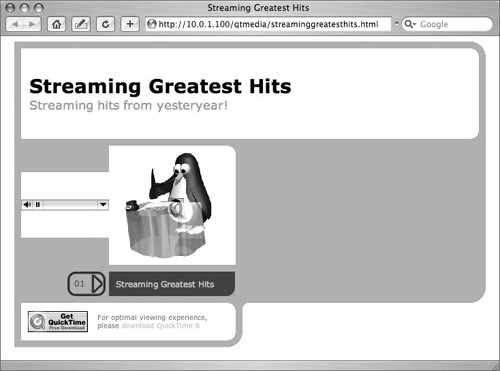
Click Apply and then click Open.
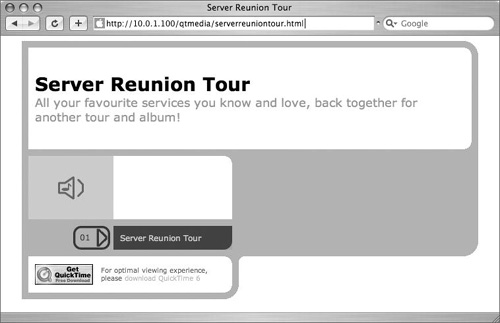
Your default Web browser opens and connects to the page you just created (Figure 12.48).
MP3 playlists can also be embedded in Web pages and, more important, streamed to iTunes. The setup is similar to that for AAC (.m4a) files and video files; however, there are no options for images in QTSS Publisher. You must edit the Web pages directly to insert album art or other images.
Launch the QTSS Publisher tool from /Applications/Server, and authenticate as the QuickTime Streaming Server administrator.
Make sure the MP3 playlist is broadcasting (see “Creating weighted random AAC playlists” for similar steps).
Click New Webpage in the Toolbar.
In the dialog that appears, enter the name of the Web page and the URL name (one is suggested for you), and click Create (Figure 12.49).
Select the Web page you just created from the Source list on the left.
Drag an MP3 playlist from the Source list to the Web page you just created, also located in the source list, and click Apply (Figure 12.50).
In the Webpage Location section of your Web page, click Open.
Your default Web browser opens and connects to the page you just created (Figure 12.51).
Click the link in the Web page to download the appropriate file (Figure 12.52), which iTunes opens automatically (Figure 12.53).

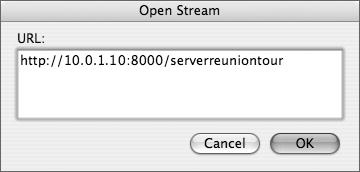
✓ Tip
To open iTunes directly, choose Advanced > Open Stream, type in the link to your stream, and click OK (Figure 12.54). The URL for direct access to the stream is available in the Streaming Link section of the MP3 playlist. Also provided is HTML code you can embed in a Web page (Figure 12.55).
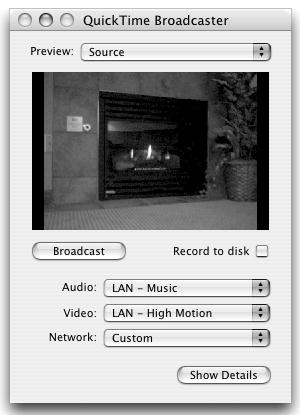
QuickTime Broadcaster (QTB) is included with Mac OS X Server, but exists outside Server Admin as a separate application that resides in the Applications directory. QTB is a live encoder application whose primary job is to capture and compress live audio and or video content to a streaming server via the Real-Time Streaming Protocol (RTSP). The Source options in both the Video and Audio tabs are the main considerations for this type of task.
QuickTime Broadcaster was covered briefly in Chapter 2, “Server Tools.” To learn how to set up a basic live broadcast, refer to the task “To set up a simple live broadcast” in Chapter 2. This chapter discusses using QuickTime Broadcaster with QTSS.
The following task assumes you’re running QuickTime Broadcaster and QTSS on the same Mac OS X Server. You should first have completed the earlier task “To enable a QTSS.” You should also have a camera, microphone, or some other supported AV input device connected. If iChat launches when you plug in the device, quit iChat.
Open QuickTime Broadcaster, which is located in your server’s Applications directory (Figure 12.56).
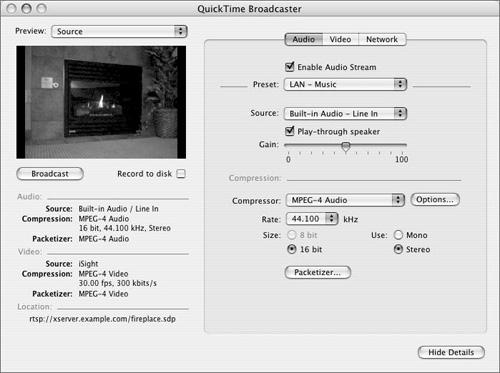
Click Show Details to expand the window.
Click the Network tab, and complete the following information (Figure 12.57):
Leave Transmission set at Automatic Unicast for the type of task being done here.
Host Name is automatically filled in with either the fully qualified domain name or the IP address of your server.
File is the name of the Session Description Protocol (SDP) file used to identify the stream. It’s a good idea to use only lowercase letters and numbers—no spaces or other characters.
Username and Password can be used to restrict access to the stream.
Buffer Delay allows for a buildup of data but causes a bigger delay in the delivery of live content.
Broadcast over TCP permits the stream to travel over the TCP protocol, guaranteeing the stream delivered by QTB arrives at the streaming server.
Annotations are used to further identify the broadcast stream. At a minimum, enter a title for your stream to clearly identify it to your viewers.
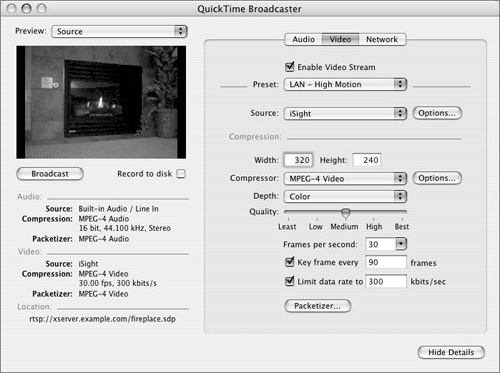
Click the Video tab, and tweak the video input Source details to match the broadcast (Figure 12.58).
Click the Audio tab, and tweak the audio input Source details to match the broadcast (Figure 12.59).
Choose File > Save Broadcast Settings in case you wish to use these settings for another broadcast session (Figure 12.60).
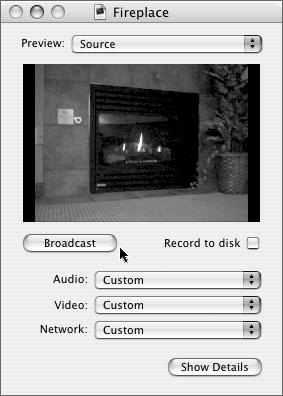
If you’ve finished tweaking the settings, click Hide Details to reduce the size of the window.
Click Broadcast under the video feed to begin the broadcast (Figure 12.61).


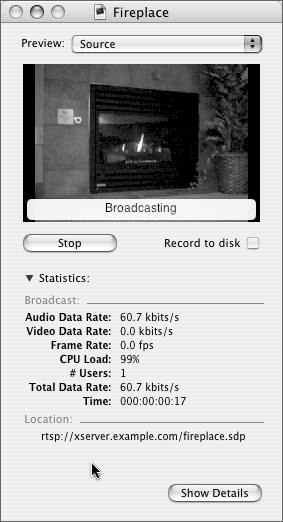
When your broadcast is set up, you should view it on as many machines as possible over different connection speeds to check for variances in quality. For the following task, QuickTime Broadcaster should already be running on your server and reporting audio, video, and CPU usage stats in its main window.
Locate the stream address in the QuickTime Broadcaster window under Location (Figure 12.62).
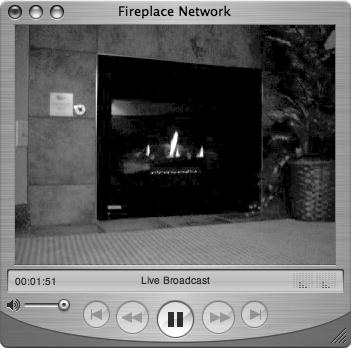
Open the QuickTime Player application in the Applications directory on another computer connected to the same network.
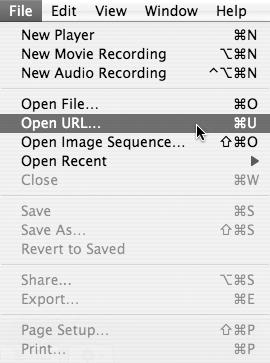
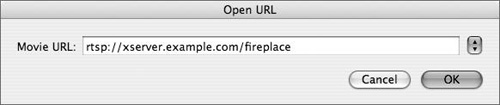
Select File > Open URL (Figure 12.63).
An Open URL dialog appears.
Type in the stream address from step 1, and click OK (Figure 12.64).
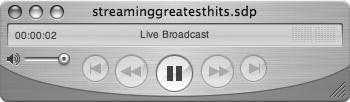
View your stream in the QuickTime Player window (Figure 12.65).
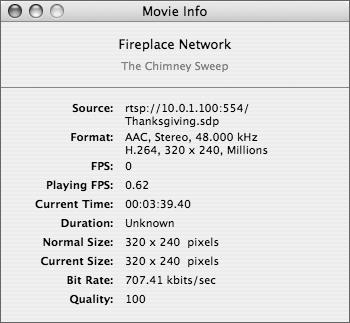
Choose Window > Show Movie Info to open the Movie Info window.
Any annotations you added before the broadcast will appear at the top of this window (Figure 12.66).
✓ Tip
The Compression settings for both audio and video can be very complex and require background knowledge about color, video, compression, audio and video codecs, and more. When you’re changing these settings, it’s generally best to test thoroughly on several machines receiving the stream to ensure a quality broadcast.