One of the biggest decisions you’re likely to make about Mac OS X Server 10.4 is how to use it to best serve the needs of your particular environment. Servers generally hold and distribute the crux of the information that flows throughout an organization. How many client machines will there be? What platforms must you support: Mac OS X? Windows? Linux? What services will you run? On what type of machine will you install Mac OS X Server? If you use Xserve (Apple’s rack-mountable server), will you be adding a hardware RAID card? How about Fibre Channel and an Xserve RAID? Will you be adding two or three servers to your mix? How should you divide the workload? Will this be an upgrade instead of a new install? What about DNS? Who’s the domain admin?
These questions and others are part of proper planning before you install Mac OS X Server. Knowing exactly what your requirements are will assist you in making the correct decisions. Once the planning is complete, it’s time to decide how to partition your disks, if necessary, and then format them using the style of your choice. After the formatting is finished, you can install the server software.
Installing Mac OS X Server 10.4 is easy—almost too easy. You’d think that a server system this powerful would require all day to install. But as long as you meet Apple’s hardware requirements, the installation should take place without a hitch in about 30 minutes, depending on the hardware configuration. You’ll need to decide where to install Mac OS X Server and whether to install it onsite or from a remote location. Apple’s Xserve mounts in a rack and doesn’t contain a video card (so you can’t connect a monitor to it, although you can purchase one separately), thus making remote installation, configuration, and management a necessity. Another option for the Xserve is an internal RAID card, allowing you to configure hardware RAID with your Xserve. You can also attach a separate RAID system to the Xserve. Apple’s foray into the RAID array is called Xserve RAID, a hardware RAID array system that can be used with Apple’s Xserve and other platforms as well. Regardless of the hardware, you’ll need a few things prior to installation.
Think about what Mac OS X Server can do—offer various services such as file sharing, storing user data, and running a Web server—and then think about what you want it to do. Table 1.1 lists the possible services that Mac OS X Server offers, to help you choose the ones you wish to implement.
Table 1.1. Major Mac OS X server services
DESCRIPTION | YOU MIGHT IMPLEMENT THIS SERVICE WHEN... | |
Application Server | Runs Java servlet or Tomcat applications directly from the server | You have qualified applications that must run from the server. |
AFP File Sharing | Shares files over the Apple Filing Protocol to other Macintosh computers | Users need to share files with both older and newer Macintosh operating systems. |
DHCP Server | Offers IP addresses and associated information to other computers and devices | Mac OS X Server is needed to offer addresses to all other devices, regardless of operating system. |
Domain Name Server | Directs requests for listed fully qualified domain names to be directed to given IP addresses | You want the server to have a fully qualified domain name, such as afp548.com. |
Firewall | Protects the server and network from possible attacks | Protection of the server is paramount. |
FTP File Sharing | Allows access to the server via the ubiquitous File Transfer Protocol | Users must transfer files to your server from a variety of operating systems and you aren’t too concerned about security. |
iChat server | Permits the running of a Jabber server | You want an internal iChat server to which iChat clients can connect. |
Kerberos Key Distribution Center | Allows authorization of services without sending the password across the network | The services you wish to offer allow Kerberized connections, thus increasing security. |
LDAP Directory Server | Holds user information such as long name, short name, user ID, and preference settings | You want greater management capabilities over all your users. |
Mail Server | Used to send and/or receive mail | Users need to send and receive mail. |
NetBoot Server | Allows qualified Macintosh computers on the network to boot from a disk image on the server | You have a lab setting and want to boot and/or reconfigure disks on several Macintosh computers at once. |
Network Address Translation Service | Acts as a router, sending information from one network to another | You have two network cards pointing to two different networks. |
NFS File Sharing | Facilitates sharing with Unix machines | You need to share files with Linux or other Unix machines. |
Printer Server | Creates and manages printer queues and quotas | Control over printers is required. |
QuickTime Streaming Server | Streams live or prerecorded audio and video content | Video/audio files need to be seen by others locally and over the Internet. |
SMB File Sharing | Shares files with Windows computers | Users need to share files with Windows computers. |
Software Update Server | Controls Apple Software Updates internally | You want users to have to connect to the internal Software Update server to reduce the load on the outside connection. |
Virtual Private Network Server | Permits the secure connection of remote clients | Remote clients need to log in to your server in a secure fashion. |
WebObjects | Deploys WebObjects applications | You want to run your custom-built WebObjects applications from this server. |
Web Server | Serves up Web sites | There is at least one Web site you want others to have access to. |
Xgrid Server | Controls distributed computing to Xgrid clients | Leverage idle computers’ CPU cycles to decrease time spent rendering or computing projects. |
Keep in mind that all these available services tax your RAM, CPU, and hard disk(s). If you have a newer computer, you could run several of these services on one machine; but with older computers, you’re more limited. Your budget may only allow for a single Mac OS X Server, or you may have been asked to install Mac OS X Server on a much older Macintosh with just the bare system requirements. In later chapters, we discuss which services tax server hardware the most and which are likely to work fine on older Macintosh computers.
As you saw in Table 1.1, a variety of services can be run on Mac OS X Server. Some of the more popular implementations of Mac OS X Server are as a Lightweight Directory Access Protocol (LDAP) directory server and Kerberos Key Distribution Center; as an Apple Filing Protocol (AFP), a Server Message Block (SMB), a File Transfer Protocol (FTP) file server; or possibly as a print and iChat server. Other, older, more entrenched servers handle the duties of Domain Name Server (DNS), Dynamic Host Configuration Protocol (DHCP), Web, and email services. It’s also likely that a separate server or other network device, such as a dedicated device designed just to protect your network, is providing security services, such as a firewall, network address translation, and/or a proxy service. Other servers probably provide secure remote logins and run as application servers. This doesn’t mean you’re limited in your deployment of Mac OS X Server. Should you wish to use your server in this fashion, an excellent tool called the Gateway Setup Assistant walks you through those options.
Before you go hog wild, decide carefully what you want to run on your server. Overloading a new server with several services at once makes troubleshooting difficult. Don’t misunderstand: Mac OS X Server on a multiprocessor G5 Xserve with 2 GB of RAM can handle just about anything thrown at it. But turning on services without proper planning can lead to a nonsecure server and possible conflicts later.
Throughout this book you’ll find discussions about which services demand more of the server than others. Should this server be elevated in the hierarchy of computers in your organization, you might want to utilize a second network card so that you can connect your server to another network, something that is standard on the G5 Xserve and was optional on the G4 Xserve. If you choose to have Mac OS X Server become your Domain Name Server, take great pains to understand the ramifications involved: Incorrectly implementing the DNS can cause many services not to function properly, as you’ll see in Chapters 3 (“Open Directory”) and 6 (“Network Services Options”). Often an existing DNS is present; making the Mac OS X Server a secondary DNS is an excellent idea in case the first one fails. Allowing your Mac OS X Server to be the path between your local area network inside and the brutally nonsecure and hostile world of the outside Internet requires some education about firewall rules, discussed in Chapter 10 (“Security”).
For some, this will be the first time you’ve installed a server of any kind. Others may be adding Mac OS X Server to a network with existing servers that run a variety of software. Let’s look at some popular scenarios that exist today.
The most common scenario is where one server—in this case, an Active Directory server—is already in place (we’ll discuss Active Directory in Chapter 3). The Active Directory server is the primary DNS and the directory data store for the organization. It may also be the application server, the DHCP server, and the print server. Mac OS X Server can fit perfectly into this network by providing file-sharing and chat services for both the Macintosh and Windows computers on the network. Mac OS X Server can also do the following:
Control how the Mac OS X client computer’s preferences are handled
Hold the folders where users store their data
Function as an internal Web server (possibly running WebDAV)
Run as a NetBoot server to allow the lab Macintosh computers to boot off an identical system disk every time
Utilize the Software Update Server service to permit Macintosh computers on your network to pull Apple software updates off the internal server, reducing throughput on your precious outside connection
See Table 1.1 for a brief explanation of the services in this list.
Another common scenario involves upgrading an AppleShare IP (ASIP) server to or replacing it with Mac OS X Server. In this case, the Mac OS X Server is king of the hill, responsible for the directory data store, domain name service, file and print services, DHCP, mail, software updates, and more. The server will likely have more services running than the ASIP server it’s replacing, and it will be busy handling requests for all sorts of data. In this case, a fast connection utilizing the Macintosh’s Gigabit Ethernet network card(s) will serve you best, because if you have a G5 Xserve, both network interfaces are probably active and can be joined together to provide even more aggregate bandwidth.
This scenario involves setting up a Mac OS X Server as a school’s NetBoot and Software Update Server to provide the initial startup image. It erases the internal hard disk on each machine in the school’s labs, and it copies customized, bootable images; each lab receives the appropriate image for its particular task that day.
The server also does double duty as a Software Update Server, providing Apple software updates internally. As an added bonus, this server may also act as the directory data store, allowing students to log in from anywhere in the school and see their home folder.
In this scenario, a server has been set up as a QuickTime Streaming Server and possibly a QuickTime Broadcaster Server. This server’s job is to take live input from a camera and stream it out to all employees, allowing them to watch the CEO’s latest company announcements. It also streams audio and video content stored as movie files (mandatory safety videos, human resource updates, and meetings recorded earlier so that attendees can gather information they missed) on the server to employees’ desktops. All these audio and video streams are, of course, logged to a file so that human resources can document who watched what video and when. The result is a reduction in the amount of time employees spend away from their desks engaging in such mandatory activities.
Each of these scenarios takes proper planning to set up, deploy, and install Mac OS X Server, and they are by no means the only uses of Mac OS X Server. Nor are you pigeonholed into a particular scenario, running only the configurations mentioned here. The bottom line is that you must carefully evaluate your needs, the role Mac OS X Server will play with respect to those needs, and how Mac OS X Server will grow and possibly take over the duties of some lesser servers.
The system requirements for Mac OS X Server 10.4 aren’t much different from those of Mac OS X Client 10.4. The reason is that Mac OS X Server is Mac OS X Client, with four extra packages:
QuickTimeStreamingServer.pkg
ServerAdminTools.pkg
ServerEssentials.pkg
ServerSetup.pkg
You can download and install the QuickTime Streaming Server from Apple’s Web site on your Mac OS X Client Macintosh. Called the Darwin Streaming Server, it’s identical to QuickTime Streaming Server without the trademark name QuickTime.
You can also install the Server Administration Software package on your client machine. It contains the Mac OS X Server Administration Tools discussed in Chapter 2, “Server Tools.” The Server Administration Software package also installs the Server Setup package, which contains the executables used when managing any Mac OS X Server(s) remotely.
That leaves one package. ServerEssentials.pkg is all that separates Mac OS X Client and Mac OS X Server. Inside that package, what makes Mac OS X Server tick?
Apache 2.0 (in case you want to use it instead of Apache 1.x)
Eight extra Apache modules
AppleShareIP Migration, RAID Admin, and Fibre Channel tools
Cyrus (POP and IMAP mail server)
FTP Server Directory
Jabber (iChat server) files
Mailman (mailing list manager)
MySQL Admin tool and associated files
QTSS template files
Server Manager Daemon files
SPAM Assassin and CLAM AV
Squirrel Mail (Web-based email interface)
A few migration files
Additional Startup items: NAT, IPFilter, IPFailover, IPAliases, Mailman, Watchdog, MySQL, Samba, Headless Startup, Serial Terminal Support, and Software Update Server
About 100 additional executables (processes or tools used to manage certain server-based processes)
About 70 edited configuration files for the new Startup items
As you can see, the only things absolutely necessary to make a Mac OS X Client a Mac OS X Server are the executables, the configuration files (almost all stored in the hidden /private/etc and /private/var directories), and the Startup items. The other items are needed to utilize some of the services that run on Mac OS X Server, but there is little difference between the two.
The hardware requirements for Mac OS X Server are listed in Table 1.2. Keep in mind that although Apple has a set of hardware requirements, this table includes a column of real-world requirements.
Table 1.2. Hardware requirements for Mac OS X Server 10.4
APPLE REQUIREMENTS | REAL-WORLD REQUIREMENTS | |
Macintosh type | MacMini, eMac, iMac, PowerMac G3, PowerMac G4, PowerMac G5, Xserve | PowerMac G4, PowerMac G5, or Xserve |
Hard disk size | 4 GB | 80 GB |
RAM | 128 minimum, 256 high demand | 1 GB minimum |
Other | Built-in FireWire | Built-in FireWire, Gigabit Ethernet |
Apple doesn’t support Mac OS X Server on PowerBooks or iBooks, although it works on those machines. If you just want to install Mac OS X Server and test the services with one or two client machines attached to a small network, running the server software on a portable Macintosh works fine. However, don’t assume that AppleCare will help you with any of your software problems if you’re running on a laptop.
You’ve planned the services to run on your Mac OS X Server and chosen the hardware on which the server will reside. It’s now time to decide whether you wish to partition the disk.
Partitioning your disk allows you to easily reformat one partition while keeping software or data on the other. However, partitioning may waste valuable disk space and be less secure, depending on the way the partitions are formatted. You might want to partition a disk to separate the data from the operating system. Or, you might want three partitions: one containing the operating system, one containing the data, and one to back up the data or the operating system. There is no right or wrong way to proceed when you’re dealing with partitions. However, with respect to Mac OS X Server, you undoubtedly know the value of backing up your data to another physical location; so, having a local partition for backup probably won’t be useful. Having a second local backup disk that you can boot from in case of hardware failure is a more likely scenario.
You have the option of partitioning the disk whether you’re installing Mac OS X Server on a Mac with a single disk or multiple disks, such as a RAID array. For example, you may have an Xserve RAID or an Xserve that supports hardware RAID (the G5 Xserve has an option to support hardware RAID via an optional internal hardware RAID card).
✓ Tips
Remember, partitioning a disk erases all the data on that disk!
Separating your boot volumes from your data volumes, if you have the luxury of enough space to do it, will make system recovery much easier and may improve your system’s speed.
It isn’t necessary to create several partitions from your disk. Many people run their server software on a nonpartitioned disk.
When you’re setting up Mac OS X Server for the very first time (not doing any sort of upgrade), you boot from the server DVD. Once you’ve booted off the Mac OS X Server DVD, you have access to the disk(s) via Disk Utility on the DVD and remotely via ssh. If partitioning is something you want to do, you’ll probably run Disk Utility and partition the disk(s) in this manner.
Boot from the Mac OS X Server DVD.
Choose Utilities > Disk Utility.
The Disk Utility window appears, showing all mounted volumes in the left pane’s disk and volume list.
Select your disk from the disk list menu. (Note the difference between the physical devices, which are flush on the left side of the pane, and the logical volumes that are contained on the devices, which are slightly indented underneath the physical devices.)
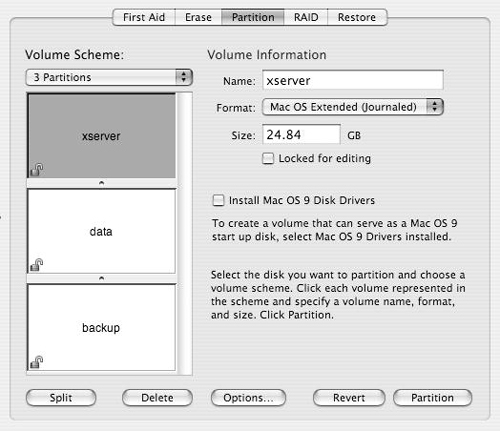
Click the Partition tab (Figure 1.1).
Choose the number of partitions (up to 16) you wish to create from the Volume Scheme pop-up menu.
Click each partition in the map below the pop-up menu, and give it a name, format, and size.
You can format the partitions in a variety of ways, depending on their final use:
Mac OS Extended (Journaled)
Mac OS Extended
Mac OS Extended (Case-sensitive Journaled)
Mac OS Extended (Case-sensitive)
UNIX File System
Free Space
Recall that the minimum disk space required to install Mac OS X Server 10.4 is 4 GB.
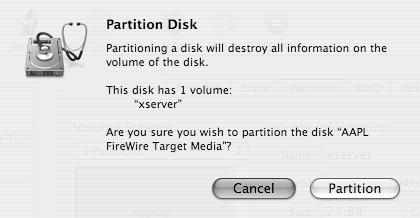
Click the Partition button, wait for the confirmation dialog, and then click the Partition button in the confirmation dialog (Figure 1.2).
Choose Disk Utility > Quit Disk Utility.
You have now partitioned your disk into individual volumes.
Disks and partitions can be formatted in a variety of ways depending on how you wish to use them (Table 1.5). Mac OS X Server prefers to format a disk as Mac OS X Extended (Journaled).
Table 1.5. Disk formatting options
FORMAT | USE |
Mac OS Extended (Journaled) | HFS+ with constant directory backup (journaling) |
Mac OS Extended (Journaled + Case Sensitive) | HFS+ with constant directory backup (journaling), plus added case sensitivity |
Mac OS Extended | Hierarchical File System Extended Format (HFS+) |
Mac OS Extended (Case Sensitive) | HFS+ with case sensitivity only |
Unix file system | Case sensitive, but can’t be a boot volume for Mac OS X Server; no support for resource forks |
Free space | Unformatted space used for Linux or some other operating system |
Mac OS Standard | HFS only; used for backward compatibility with older Macintosh operating systems |
DOS | Compatible with FAT (Windows) file systems |
Formatting as Mac OS X Extended (Journaled) is your best bet, because adding case sensitivity may cause problems with Classic and SMB mounts. Mac OS Extended (Journaled) adds built-in protection for the directory; the journaling process keeps track of which blocks on the disk were written to last. In the case of an unexpected shutdown or hard crash, the system only checks the integrity of the blocks listed in the journal instead of having to run a diagnosis of the entire disk.
✓ Tip
For more information about journaling, please refer to http://developer.apple.com/technotes/tn/tn1150.html#Journal.
If you aren’t partitioning the disk, you have the option of wiping, or zeroing, the disk using a variety of methods. Doing so erases the disk so that any data previously on the disk becomes essentially unrecoverable (although companies such as Drive Savers can attempt the recovery of data, albeit for a price). Zeroing a large disk increases the amount of time before an installation can take place, because you’ll have to write an amount of data equal to the size of the disk. The options when zeroing a disk are as follows:
Don’t Erase Data erases only the directory structure, not the actual data. Using this method allows for the potential recovery of the data. This is also the quickest option, taking only slightly longer than a nonzeroing erase.
Zero Out Data writes to every block on the disk, making recovery next to impossible.
7-Pass Erase writes random data over every block of the disk seven times. Many government organizations require this option.
35-Pass Erase takes substantially longer to perform but gives you that Totally Erased And Unrecoverable Data feeling.
Another important choice to make is how you name your disk(s). In days of old, Macintosh users named their disks whatever they wished. Because multiplatform functionality is paramount with Mac OS X Server, you may want to exclude spaces and other characters in the disk name. Although naming your disk “Tiger Server 10.4” is fine, you may find that “tigerserver” or “xserver” works better in the long run. Minimizing the length of the name also offers an advantage in certain areas, as you’ll see later.
Choose Utilities > Disk Utility.
Select your disk from the disk list menu.
Select the Erase tab.
Select a disk formatting structure from the Volume Format pop-up menu.
Choose a name for the disk.
Click the Options button near the bottom of the window.
The Secure Erase Options dialog opens (Figure 1.3).
Choose the erase options you wish to invoke and click the OK button.
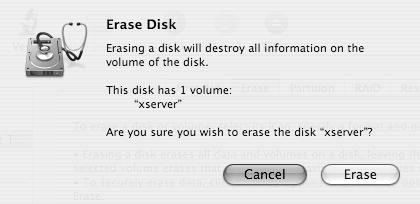
Click the Erase button, wait for the confirmation dialog, and then click the Erase button in the confirmation dialog (Figure 1.4).
When the erase and format are finished, you may wish to run Verify Disk
 from the First Aid tab
  on your newly formatted disk or volumes.
Choose Disk Utility > Quit Disk Utility.
Your disk has now been erased and formatted and is ready for the installation of Mac OS X Server.

✓ Tips
Using the diskutil command-line
utilityto format your disk(s) is perfectly acceptable and is an excellent way to format disks from a remote location on an Xserve booted from the Mac OS X Server DVD.You can erase free space on a disk or volume using Disk Utility or
diskutil. This is a great way to keep deleted information from being resurrected by unscrupulous others.
Once the disk has been partitioned (if necessary) and properly formatted, you can turn to the installation of software.
The Mac OS X Server software ships on one DVD. The install can be performed a few ways: You can install the software using the Installer GUI while sitting at the machine or remotely, or you can install it remotely via the command line. Unless the machine has been supplied with a public IP address, automatic discovery of servers is done via Bonjour (Apple’s term for its implementation of ZeroConf), as you’ll see later. Since most installs are on cleanly formatted disks, let’s begin there.
✓ Tip
You can “trade in” your DVD for CDs by contacting Apple via the company’s Web site, if you wish to install Mac OS X Server 10.4 on a computer that doesn’t have a DVD drive.
After you boot the machine off the DVD, you’re presented with Server Assistant’s initial setup screen. However, much more is going on behind the scenes.
First, if there is a DHCP server on the network, your Macintosh has probably picked up an address from it. If the server is doling out public IP addresses, the installation and configuration can start from halfway around the world. If the address is private, installation and configuration can take place from your network. If a DHCP server is absent, the Macintosh assigns itself an IP address in the 169.254.x.x range; this self-assigned address is a function of Bonjour. If this is the case, remote installation can take place from any Macintosh on the local subnet.
Second, the ssh daemon is running, meaning you can access the machine remotely via the command line. This only works via the built-in Ethernet (and serial on Xserve) interface on the Macintosh that is to become the server. If you wish to install the server software while sitting in front of the Macintosh that’s booted from the DVD, you’re all set to install and configure your server—you won’t need the information required next (except the server software serial number for configuration), although you should be aware of the remote install procedures.
Before you run away from your soon-to-be-server to do the remote installation, you need three things:
Server software serial number—. The 29-digit array that allows you to configure and use Mac OS X Server software. Note that unlike Mac OS X Server 10.3, Mac OS X Server 10.4 checks across the network for other servers running under the same serial number.
Ethernet address—. A unique, 12-digit address that is used, in this case, to identify the server when installing remotely. It can be found in several places, depending on the model of Macintosh involved. You may want to write down both Media Access Control (MAC) addresses when installing on a G5 Xserve (G5 Xserves have two Ethernet cards, hence two MAC addresses).
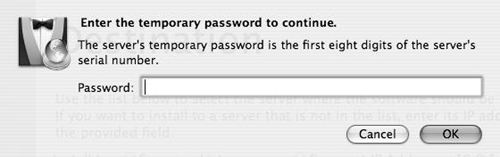
Hardware serial number—. The first eight digits of the hardware serial number are the root password used to authenticate your access to remotely install and configure that server. On older Macintosh computers, root’s password is 12345678 (yes, it’s typed correctly). This serial number can also be found in several locations, depending on the Macintosh model.
Prior to booting the server from the DVD, you should install the Server Administration Tools on the client machine from which the remote installation will take place; remote installation and administration can’t take place without this package being installed.
✓ Tip
You need to install the tools, not just copy over the Server folder from a machine where the tools are already installed—that approach won’t copy all the pieces you need in order to install Mac OS X Server.
Let’s examine three installation methods: local, remote GUI, and remote command line.
Boot the Macintosh from the Mac OS X Server DVD.
Choose the language appropriate for your installation and click the arrow button in the lower-right corner of the screen.
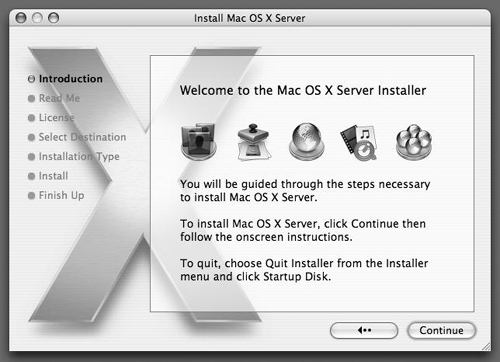
Click the Continue button
 on the Welcome window (Figure 1.5).
Scroll through and read the Important Information window for any additional information.
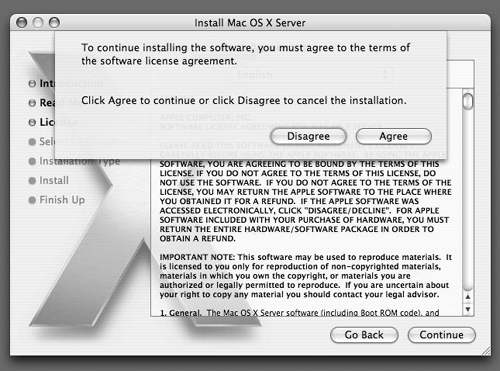
Scroll through the license agreement and click Agree to accept it (Figure 1.6).
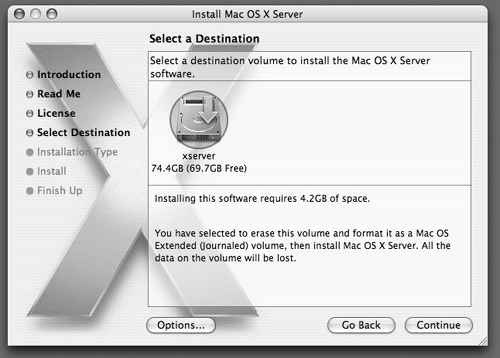
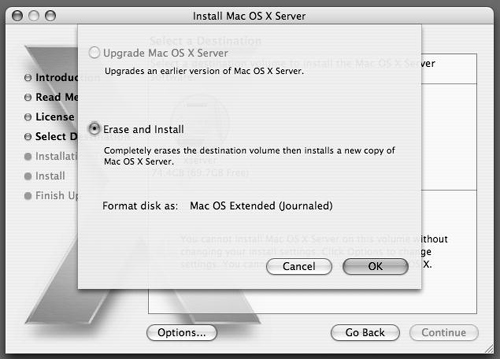
Choose the destination disk or volume, and click the Continue button (Figure 1.7).
or
By clicking the Options button, you can choose to Upgrade or Erase and Install (Figure 1.8).
Note that unlike on Mac OS X, you don’t have the option to archive the current installation and install a fresh copy of Mac OS X Server.
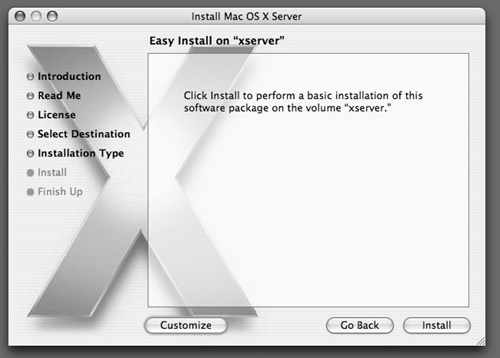
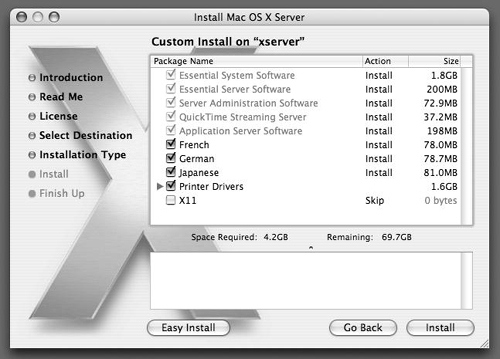
Click the Customize button to remove or change components to be installed (Figure 1.9).
You may wish to remove print drivers and additional languages here (Figure 1.10).
Click the Install button to begin the installation.
After installation is finished, Mac OS X Server is ready for the setup stage.
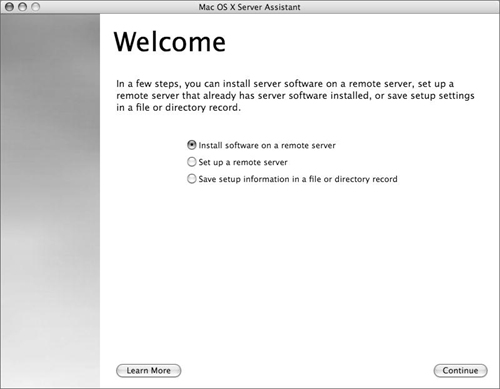
On your remote machine, navigate to and launch /Applications/Server/Server Assistant
 .
.The Welcome screen appears, with three options (Figure 1.11):
Install software on a remote server
Set up a remote server
Save setup information in a file or directory record
Choose “Install software on a remote server.”
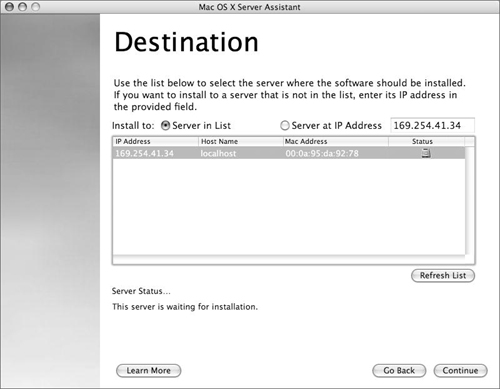
The Destination window opens (Figure 1.12).
Provided you’re on the same subnet, you’ll see your Mac OS X Server(s) listed with an IP address, hostname, Ethernet hardware address (commonly known as the MAC address), and status. If your network includes more servers, you may need to locate your server by identifying and matching its MAC or Ethernet address. The Status column indicates whether server software can be set up on that machine.
An authentication window opens, asking for the server’s password (Figure 1.13). Enter the password, click the OK button, and wait for authentication to take place
 .
.Click through the following screens:
The Language preference window.
The Important Information window. It’s a good idea to read all the information here before proceeding.
The License Agreement and Agree windows.
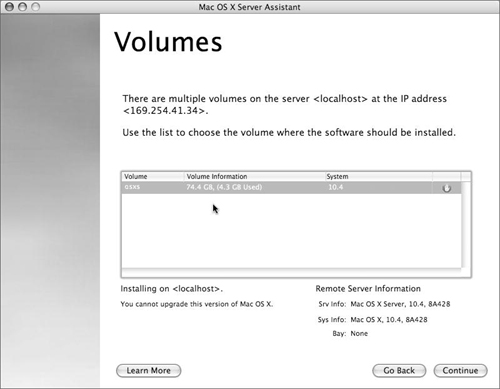
In the Volumes window, decide which volume to install the server software on (Figure 1.14).
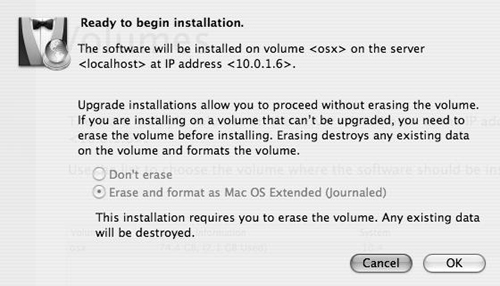
This window shows the name of the volume, the format of the volume (including space available), and the current system, if any. A system check is initiated automatically. Should incompatible software already exist on the disk or partition, a window appears (Figure 1.15). In most cases, the “Erase and format” option is already chosen for you.
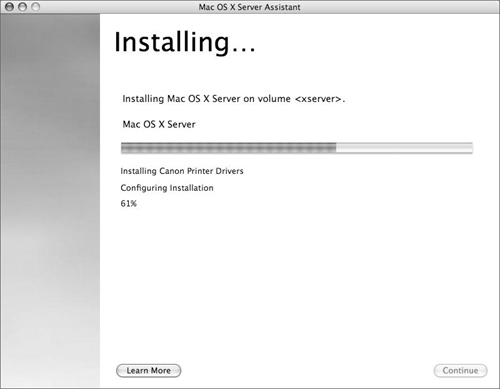
An Installing window indicates the software is being installed (Figure 1.16).
After installation is complete, a dialog signals a restart of the remote server off the disk or partition.
An Installation Status window indicates that the software has been successfully installed (if installed from DVD—if not, further installation from CD #2 must take place) and the administrator can proceed to setting up the server (Figure 1.17).

✓ Tips
Keep the server DVD in a safe place. If you’re managing a server remotely, it may be a good idea to keep the DVD in the tray and/or affix the server serial number stickers to the DVD cover.
Apple has provided almost every GUI tool with a command-line equivalent. If you wish to install via the command line, you can do so. Booting from the DVD runs the ssh daemon, so you can discover and connect to the Macintosh with a command-line interface. To do such an installation, you should install the Server Admin Tools on the Macintosh from which you wish to discover and install the server software.
Boot the Macintosh from the Mac OS X Server DVD.
Open the Terminal application on your remote Macintosh.
Run the command-line tool
sa_srchrby typing in/System/Library/ServerSetup/ sa_srchr 224.0.0.1.
This command searches out your local subnet and returns information about any Macintosh booted from a Mac OS X Server DVD.
Locate the IP address in the returned information.
Type in
ssh root@the-IP-address-you-saw-in-step-four, and authenticate using the Mac OS X Server’s hardware serial number or12345678as the password.Run the installer command by typing in
installer –pkg /System/Installation/Packages/OSInstall.mpkg –target /Volumes/name-of-your-volumeThe computer on which you’re installing Mac OS X Server will reboot after a successful installation.
Log files are a critical piece of the computer administration architecture. Mac OS X and Mac OS X Server keep log files in various locations:
/var/log/
/Library/Logs/
your-username/Library/Logs/
You can view these log files locally with the Console application located in /Applications/Utilities/. Currently, the Console application doesn’t allow remote viewing of log files; if you wish to view the log files on your server from a remote location, you must ssh into the server and read the files via the command line using a command like tail or cat after the installation.
Log files are especially useful during the installation process. When you’re installing locally, you have the option of viewing errors during installation or viewing everything taking place during the installation, from the mounting of disks to the cleaning up of temporary files (which takes place after all packages have been installed). To view the install log remotely, run the tail –f command on the system log after the installation. Doing so may show any errors that might have cropped up during the process.
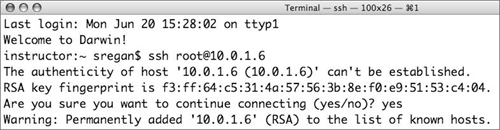
ssh into your server prior to clicking the Install button in the Server Assistant:
ssh root@your-server's-new-ip-address
The first time you do this you’ll receive a message asking if you want to create an ssh key pair. This is a standard part of ssh. Type yes and press Return to continue (Figure 1.18).
Type
tail –f /var/log/system.log.View the system log in the first Terminal window as the software is being installed on your server.
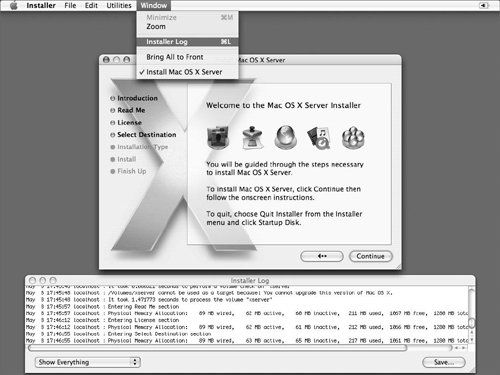
You can view the installation log file while installing Mac OS X Server locally by choosing Installer Log from the Window menu (Figure 1.19).