For many organizations, file sharing is the only reason they have a server. Although Mac OS X Server is accomplished at tasks other than file sharing, it stands out as a robust and reliable multiplatform file server by providing file-sharing capabilities via the four most common sharing protocols: Apple File Protocol (AFP) for Mac OS clients, Server Message Block (SMB) for Windows-compatible clients, File Transfer Protocol (FTP) for almost any client, and Network File System (NFS) for Unix-based clients.
For many administrators, the amount of time spent planning access to shared items outweighs the time spent configuring the server. Access to shared items is often a technical and political issue. As a server administrator, you’re charged with figuring out how to configure server resources so they fit with your organizational requirements. Therefore, it’s a good idea to plan access to your shared items before you try to implement sharing services on your server. You should also set up users and groups before you enable your shared items, because Mac OS X Server uses both Unix-style user and group permissions and access controls to control local and shared file access. (See Chapter 4, “User and Group Management,” for more on configuring users and groups.)
When you’re ready to configure share points, you have two main areas of concern: setting up and configuring the protocols over which users connect, and the actual share point. This chapter examines both.
When a directory, disk, or volume and its contents are shared via Mac OS X Server, it’s called a share point. You can also think of a share point as a mount point: When you make a folder a share point, you’re defining a shared folder that the user can select and mount on their computer. A user can access various items inside the share point, depending on file and folder permissions.
To make the most of share points, you should have a good understanding of file and folder permissions to facilitate proper access and security within each share point.
At the root level of Mac OS X Server, Apple has a directory called Shared Items. Since Mac OS X and Mac OS X Server are Unix based, you might want to rename this folder Shared_Items, by removing the space or putting an underscore (_) where the space was. (When using certain command-line tools to copy files, a space in the share point name can sometimes complicate matters. You can place your share points anywhere, but Shared_Items is as good a place as any.)
If the folder you wish to share doesn’t yet exist on the server, launch Workgroup Manager and click the Sharing icon in the Toolbar.
If you already have a folder on the server, you can now skip to step 3.
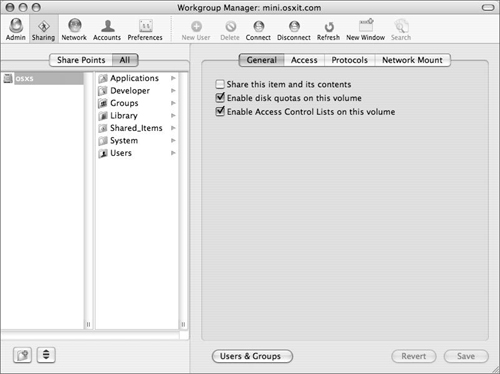
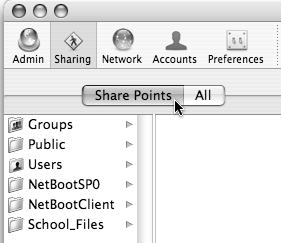
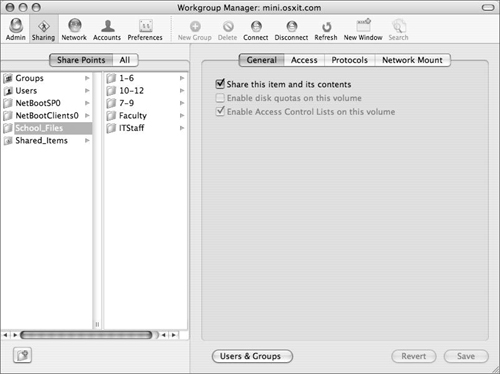
In the Sharing browser within Workgroup Manager that appears, click the All tab to display all the server’s local volumes and their contents (Figure 5.1).
The sharing browser works much like the Finder’s column view.
Select the folder, disk, or volume (in this case, your Mac OS X Server volume) that you want to assign as a share point.
If it isn’t already selected, click the “Enable disk quotas on this volume” and “Enable Access Control Lists on this volume” check boxes and click Save.
You will be using these options later in this chapter and throughout this book.
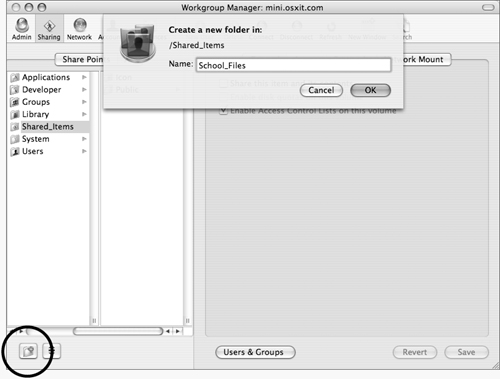
Click the Shared_Items folder and then click the New Folder button. In the new folder dialog that appears, name your new folder and click OK (Figure 5.2).
In the sharing browser, select the new folder.
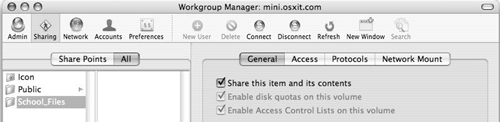
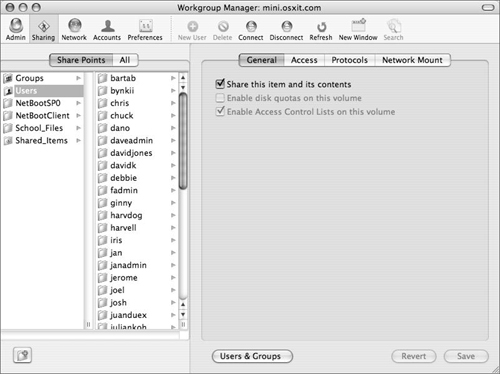
Click the General tab and then click the “Share this item and its contents” check box; click Save (Figure 5.3).
Click the Share Points tab.
Your newly created share point is shown on the list with the other share points (Figure 5.4). You may need to click Refresh in the Toolbar to update the shares shown.
Although the share point is now set, you’ll probably need to configure permissions and file-sharing protocol options (discussed in the following tasks) to fit your needs.
✓ Tips
It’s not a good idea to select an entire disk or volume as a share point because there are a number of files at the root of a volume that should not be user accessible as the system depends on them. These include temporary storage and trash folders.
You can expand the Workgroup Manager window and show more than just two columns when selecting share points by dragging the column bars at the bottom of each column.
Every file and folder on your Mac OS X Server is protected by Unix-style permissions, and/or access controls, sometimes called privileges. An entire book could be dedicated to the technology behind file and folder permissions, but they basically boil down to a few simple concepts:
All items are associated with one owner and one group.
Only the owner of the folder or file, or an administrative user, can change the permissions.
All items have permissions defined at three POSIX levels: owner, group, and everybody else (commonly referred to as User, Group, and Other) and access controls, which allow for a much more granular set of permission options (discussed later in this chapter).
At each POSIX level, you can have one of four basic access settings: none, read only, read and write, or (in the case of folders) write only.
The permissions most specific to the user attempting to access the file are enforced.
Permissions define access to an item’s contents, not to the item itself.
If you’re still confounded by the prospect of Unix-style permissions, you’re not alone. Many experienced administrators learned permissions through trial and error. Experimenting with various permissions settings is often the best way to learn, and right now is a good time to start.
Access Control Lists (ACLs) add to the complexity of permission permutations by allowing a larger set of options. They are mainly defined by “allow only” or “deny only.” For most purposes, you should not use “deny only,” because it will ignore any other permissions under that share point. Instead, simply don’t give a user or group access to a share point.
Additionally, ACLs will override POSIX controls. ACL permissions are as follows:
Read
Read/Write
Write
Full Control
Custom
There are two ACL permission levels (Full Control and Custom) that do not exist with standard POSIX level permissions:
Full Control of a share point permits the selected user to handle every aspect of read/write management.
The Custom setting allows a very granular set of permissions, which will be discussed later in this chapter.
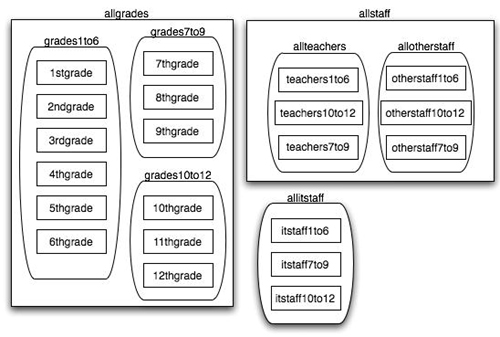
When enabling ACLs, planning plays the most critical role in the process. Since Mac OS X Server allows for nested groups, creating smaller groups and then nesting those groups to create levels of control allows for the easiest management of what can be very complex permissions sets.
You can apply ACLs to K–12 institutions, where each grade is a group, schools can be groups, and all students are in one group. Therefore, you have 12 basic groups within three nested groups within one larger group (Figure 5.5). Teachers, other staff, and IT staff can be separated in a similar fashion. This allows for some groups to have read-only access, others to have read/write, and still others to have full control.
Launch the Workgroup Manager tool located in /Applications/Server and authenticate as the administrator if necessary, and then click the Sharing icon and do one of the following:
Click the Share Points tab to configure a share point or its contents.
Click the All tab to configure any item on a local server volume.
From the sharing browser, select the item you wish to edit and click the Access tab.
Click the Users & Groups button.
An account list drawer appears to one side of the main Workgroup Manager window (Figure 5.6).
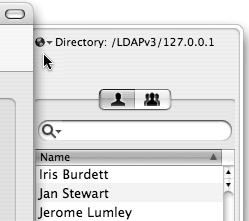
Click the directory authentication icon in the account list drawer and select the appropriate directory database from the pop-up menu (Figure 5.7):
If you’re working on the local directory, choose Local.
If you’re working on an Open Directory master, choose /LDAPv3/127.0.0.1.
If you’re connected to another database, select your database from there.
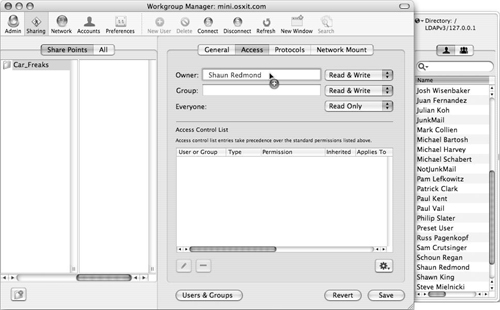
To define a new owner, click the Users tab and click-and-drag an account from the user list to the Owner field, or type in the short name of the user (Figure 5.8).
To define a new group, click the Groups tab at the top of the Users and Groups drawer, and click-and-drag an account from the group list to the Group field, or type in the name of the group (Figure 5.9).
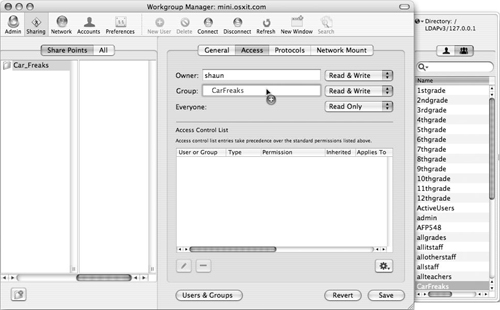
You can use the pop-up menus to the right of the Owner, Group, and Everyone fields to define access rights for any of the three fields (Figure 5.10).
When you’ve finished making changes, click Save.


✓ Tips
Although it’s not recommended, you can also change file and folder permissions by choosing Finder > Get Info. This approach may yield unexpected results, such as not retaining the permissions or ownership you set, so it’s always best to change file and folder permissions on Mac OS X Server using Workgroup Manager.
You do not need to have a shared (LDAP) domain to set up share points or change ownership and permissions of any share points.
Always test access to your item(s) before allowing clients access to them.
ACLs further define access to devices or folders by adding fine grain control over the way users and/or groups handle these share points. There is of course the standard read and write, but now additional options are available (Figure 5.11). To set these permissions, use the Custom option when selecting a user or group.

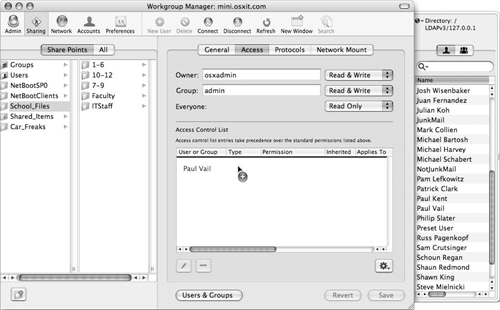
Click the Users folder at the top of the Users and Groups drawer and click-and-drag an account (or accounts) from the account list drawer to the Access Control List field (Figure 5.12).
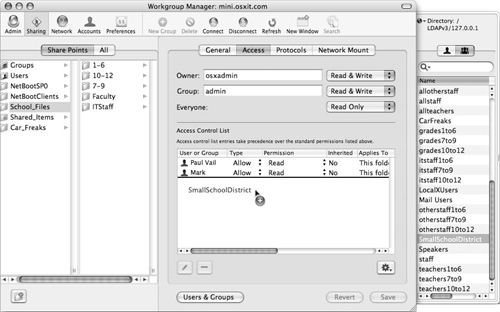
Click the Groups tab at the top of the Users and Groups drawer and click-and-drag a group (or groups) from the group list to the Access Control List field (Figure 5.13).
The use of nested groups immediately becomes useful here.
When you’ve finished making changes, click Save and keep Workgroup Manager open to this window.
Using Workgroup Manager, select the share point on which you wish to set ACLs.
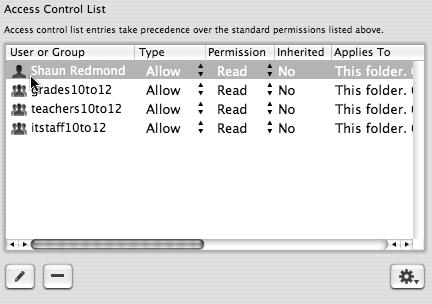
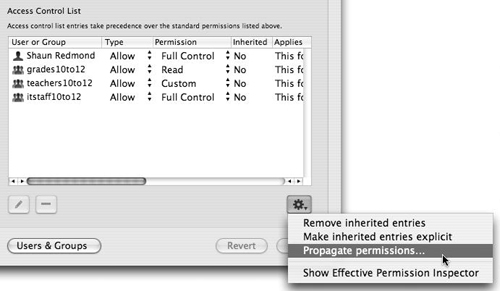
In the Access Control List field, select the user or group whose access you want to edit (Figure 5.14).
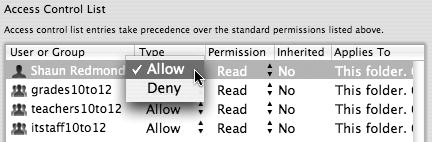
Click the Type tab to select a permission setting from the pull-down menu (Figure 5.15).
The default setting is Allow, and unless you have a very specific reason, you should not choose Deny.
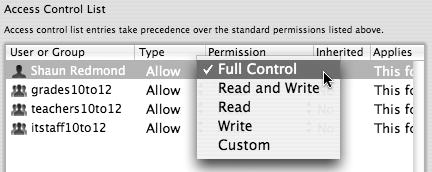
Click the Permission tab to select Full Control from the pull-down menu, since this user will be managing the share point (Figure 5.16).
Full Control allows the user or group total access to do anything to this share point.
or
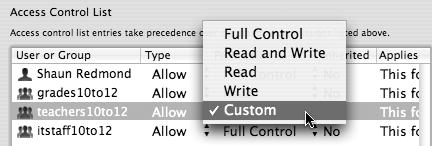
If the user or group needs specific permissions to the share point, select Custom (Figure 5.17).
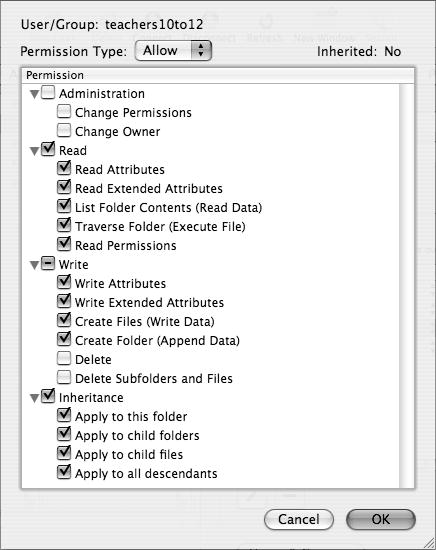
A dialog opens, showing the four main types of access control (Figure 5.18).
Select the appropriate check boxes that correspond to the permissions you want the user or group to have and click OK.
If the POSIX or access control settings need to be propagated down all folder levels, click the gear button and select Propagate permissions from the pull-down menu (Figure 5.19).
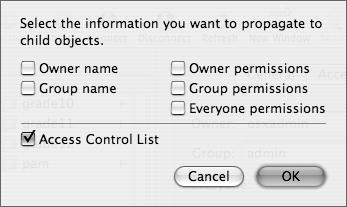
A dialog opens, allowing you to set the propagation with either POSIX or ACLs (Figure 5.20).
Click the permissions you want to set and when you’ve finished making changes, click Save.
Thoroughly test the permissions to avoid any conflict due to the fact a user may be in multiple groups.
Now that you have configured owner-ship and permissions on your share point(s), you’ll need to go over what protocols they are sharing and how to set up those protocols.
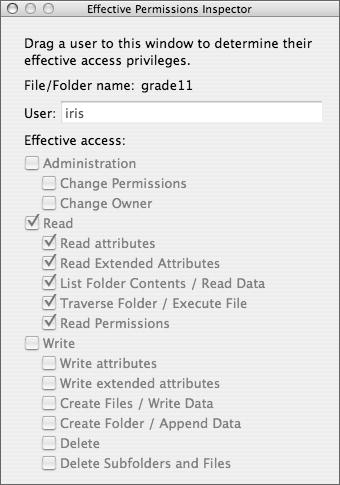
The Effective Permissions Inspector
The Effective Permissions Inspector is perhaps the best tool when learning about ACLs. When you have a share point selected within Workgroup Manager, click the gear button and choose Show Effective Permissions Inspector from the pull-down menu (see Figure 5.19). When the Inspector opens, simply drag a username into the Inspector to see the permissions on that given share point (Figure 5.21). It’s a good idea to view a user’s permissions on several share points throughout a folder structure to make sure each user has the proper access.
The primary file-sharing protocol for Macintosh computers is Apple File Protocol (AFP). AFP features file-system compatibility for both Mac OS X and legacy Mac OS 9 systems (although share points mounted by Mac OS 9 clients and earlier cannot take advantage of certain options that Mac OS X clients can). In addition to providing robust sharing services, AFP offers secure authentication and encrypted data transport. AFP share points can also be used for home and group network mounts.
The AFP service requires a bit of overhead to maintain persistent server/client connections: The overhead per connection is quite low, but when you have many connections simultaneously, this overhead can waste valuable server CPU and network resources. To remedy this situation, the server can automatically disconnect clients who are connected to your server but not actively using it. When this functionality is configured, idle disconnections on computers running software older than Mac OS X 10.3 should receive a message that they have been disconnected.
The following task shows you how to enable basic AFP file services. The remaining tasks in this section offer more advanced AFP options.
Launch Server Admin and select the AFP service for your server in the Computers & Services list.
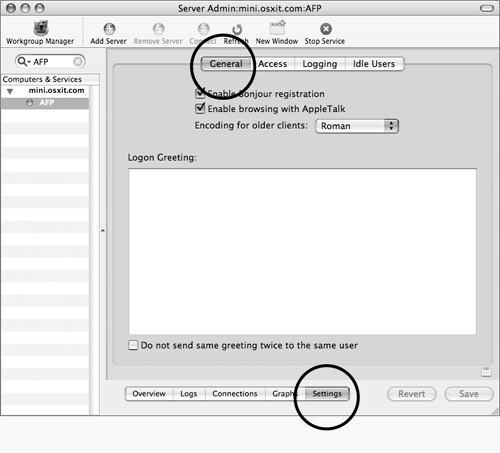
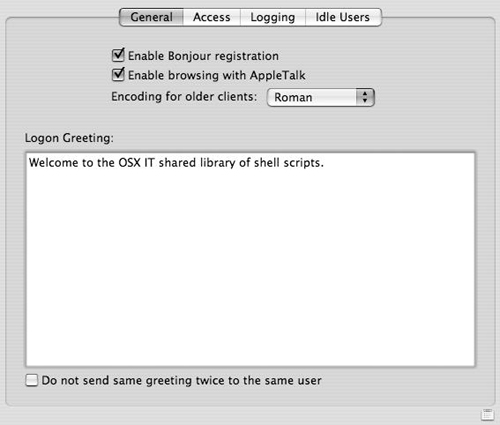
Click the Settings tab at the bottom of the screen and then the General tab at the top (Figure 5.22).
Click the appropriate check boxes:
Enable Bonjour registration allows Mac OS X 10.2 or newer systems to browse to your server on the local network (sometimes called the local subnet).
Enable browsing with AppleTalk allows pre-Mac OS X systems to browse to your server on the network using the older Chooser application.
In the Logon Greeting window, you may type a greeting that your users will see when they log in (see the “Logon Greeting” sidebar for more information) (Figure 5.23).
If you don’t want users to get the message more than once, click the check box below the Logon Greeting window.
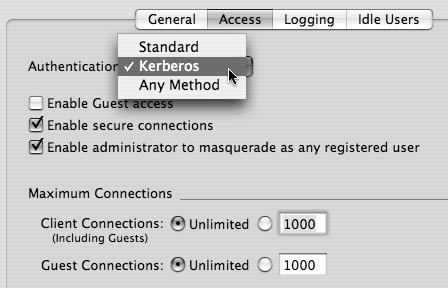
Click the Access tab and select an authentication type from the Authentication pop-up menu (Figure 5.24):
Standard uses the built-in AFP authentication.
Kerberos uses MIT’s Kerberos for authentication.
Any Method uses either of the two other methods of authentication, trying Kerberos first, then dropping to standard.
See Chapter 3, “Open Directory,” for more information about user authentication.
To choose AFP authentication options, click the check boxes below the Authentication menu:
Enable Guest access enables access for users without accounts on the server.
Enable secure connections enables AFP to be tunneled via an ssh connection (ssh must be turned on for this to work).
Enable administrator to masquerade as any registered user lets an administrator sign in to the server via AFP using a non-administrator’s username but their own administrator’s password. This is very useful for testing share points and permissions but should not typically be enabled unless needed.
In the Maximum Connections area, click the radio buttons and enter the necessary values to configure the maximum number of concurrent AFP client and guest connections (as seen in Figure 5.24).
You may have a limited number of AFP connections based on your server’s software license type.
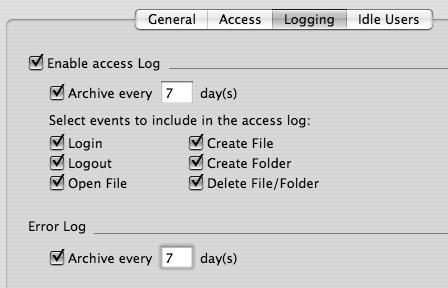
Select the Logging tab and then click the appropriate check boxes to enable both the access and error logs so you can monitor connected users (Figure 5.25).
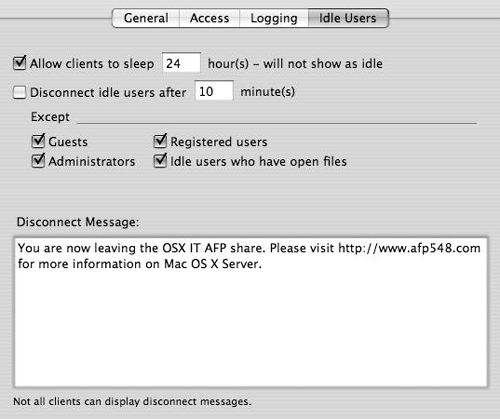
Select the Idle Users tab and then click the appropriate check boxes and enter the necessary values for disconnecting idle users (Figure 5.26):
Allow clients to sleep lets the client computers sleep without counting as an idle connection. Computers sleeping and connected don’t produce the extra overhead that running computers with idle connections do. You can set the number of hours you want to let clients to sleep by changing the numeric value.
Disconnect idle users lets you disconnect users who have been inactive for more than a set number of minutes. You can change the numeric value as necessary, but you should always click the check boxes (described below) underneath the Except line for idle users who have open files.
Guests are any users who didn’t authenticate as users to your server.
Registered users are any users who have an authenticated connection.
Administrators are any users who have an authenticated connection and are in the admin group.
Idle users who have open files are any users who have a file that resides on the server but is open in an application running on their local computer. Severing the server connection while a file is open on the client can corrupt the file—in other words, it’s a bad idea.
Selecting the check box next to an exception category allows that user type to remain connected regardless of the idle disconnect settings.
Enter a disconnect message, if you want, and when you’ve finished making changes, click Save.
✓ Tip
In order to allow guest access, you must also enable guest access for each share point, by checking the box allowing guest access for AFP connections, as seen in Figure 5.28.
When you create a share point on Mac OS X Server, it’s automatically shared via AFP (as well as FTP and SMB), assuming the AFP service is running. Share points are also automatically configured for both registered user and guest access via AFP. Settings like these are individually configurable for each share point within the Workgroup Manager tool. See the “Configuring Share Points” section earlier in this chapter for more information about creating share points.
Launch the Workgroup Manager tool located in /Applications/Server and authenticate as the administrator if necessary, and then click the Sharing icon and do one of the following:
Configure an existing share point by clicking the Share Points tab, and then select the share point you want to edit from the sharing browser (Figure 5.27).
Click the All tab to configure any item on a local server volume.
Configure a new share point and select it. See the “To configure new share points” task earlier in this chapter for instructions.
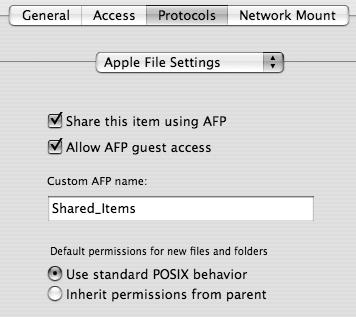
Click the Protocols tab and select Apple File Settings from the pull-down menu (Figure 5.28).
Click the check boxes to allow AFP sharing and guest access for this particular share point.
Enter a custom AFP share point name, which can be different from the original share point’s name (if necessary).
If ACLs are not enabled on the volume (Figure 5.28), you can then choose one of the following radio buttons based on your permissions requirements, and then click Save:
Use standard Unix behavior is the default behavior. New items created in this share point will be owned by the user who created the item, and the group will be set to that user’s primary group. See Chapter 4 for more information about primary groups.
Inherit permissions from parent is an optional behavior. New items created in this share point will have the same permissions as the share point itself. Refer to the “Configuring File and Folder Permissions” section earlier in this chapter.
✓ Tips
In order for guests to access a share point, its permissions must be set to give everyone read access.
Disabling guest access to the AFP service in Server Admin disables AFP guest access for every share point, regardless of individual share settings.
Changing the name of a share point can help disguise a disk as a folder name but can also backfire if the user is looking for the folder’s original share name.
In the Finder, click the Network icon to browse for your server.
Mac OS X can browse for AFP servers via the AppleTalk, SLP, or Bonjour protocol.
or
To connect directly, select Finder > Go > Connect to Server and enter an AFP address or press Command-K.
Authenticate to the server.
or
Click Options to configure client-side connection options.
Select the share point(s) to which you want to connect.
Default settings dictate that the share point’s icon will mount on the Finder’s desktop.
Mac OS X Server includes the open-source software Samba to provide Windows services. Your Mac OS X Server can provide a variety of services to Windows clients, including the following:
File sharing via the Server Message Block (SMB) protocol
Print sharing, also via the SMB protocol
Local network browsing via the Network Basic Input/Output System (NetBIOS) protocol
Network browsing and name/address resolution via the Windows Internet Naming Service (WINS) protocol
Network authentication and security services, by acting as a Primary Domain Controller (PDC) or a Backup Domain Controller (BDC) to a Samba PDC
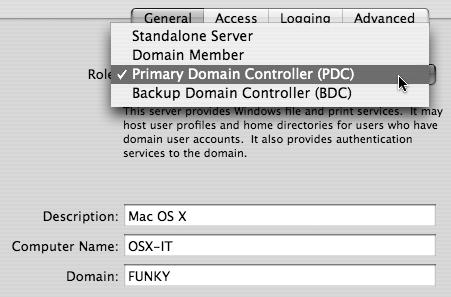
The possible roles of your Mac OS X Server, with regard to Windows services, are chosen by clicking the Settings tab, then the General tab in Server Admin (Figure 5.29). Initially, when you enable the Windows service, your Mac OS X Server acts as a stand-alone file server on the network. Windows and Mac OS X computers can discover your server on the local network via the NetBIOS protocol, and SMB handles the connectivity. The following task steps you through the process of enabling this basic configuration.

For more advanced Windows network configurations, see the remaining tasks in this section. For more information about Windows print sharing, refer to Chapter 7, “Printing Services.”
Launch Server Admin and select the Windows service for your server in the Computers & Services list.
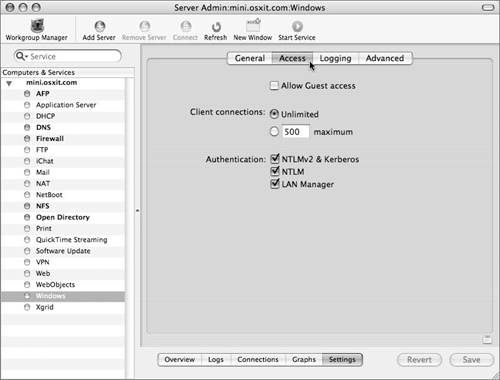
Click the Settings tab and then the Access tab and do one or more of the following and click Save (Figure 5.30):
Click the “Allow Guest access” check box if you want to enable Windows guest connections.
Select the total number of simultaneous Windows connections. Mac OS X Server doesn’t have any licensing restrictions on the number of simultaneous Windows connections.
Choose the various authentication mechanisms available for the Windows connections, which are NTLMv2 and Kerberos, NTLM (v1), and LAN Manager.
Click the Overview button at the bottom of the window (Figure 5.30).
Verify that the Windows service is running, and if it isn’t, click Start Service in the Toolbar to activate the Windows server.
✓ Tips
To allow guest access, you must also enable guest access for each share point. See the “To configure Windows share-point settings” task later in this chapter for more information about enabling guest access for individual share points.
More information about Samba is available at www.samba.org/.
In the Finder, click the Network icon to browse for your server. Mac OS X client can browse for SMB servers via the NetBIOS protocol.
or
To connect directly, select Finder > Go > Connect to Server or press Command-K and enter an SMB address.
When the SMB share point pop-up menu defaults to guest connection options, select a share from the menu and click OK.
or
Click Authenticate to gain availability to more share points.
Either button will bring you to the SMB authentication dialog. Default settings dictate that the share point’s icon will mount on the Finder’s desktop.
In Windows Explorer, browse to your server as if it were another Windows computer.
You can also manually add your server using the Add Network Place Wizard.
Authenticate using the authentication dialog as you would for any other Windows network connection.
All the share points appear in the Windows Browser.
Large SMB networks use an organizational unit known as a domain to segregate computers and services. You can restrict access to items inside each domain by enabling domain authentication. Mac OS X Server can join a domain, host a domain by becoming a Primary Domain Controller (PDC), or become a backup domain controller (BDC), all through using the Server Admin tool and managing the Windows service.
When you configure your server as a PDC or BDC, Windows clients can authenticate against your server for access to items inside the domain. Enabling your Mac OS X Server as a PDC or BDC also enables your Windows clients to change their passwords from their computers.
When hosting a PDC or BDC your server must also be hosting a shared (LDAP) database. Windows clients will use the same user accounts hosted in your shared database to log in to your domain. For more information about directory services and Open Directory, see Chapter 3.
By default, your server will act as a Standalone Server and create the workgroup you specify using the NetBIOS protocol. If your Windows domain is complete and does not require any other advanced configurations, enter the server’s Description, Computer Name, and Workgroup values.
Launch Server Admin and select the Windows service for your server in the Computers & Services list.
Click the Settings tab and then the General tab.
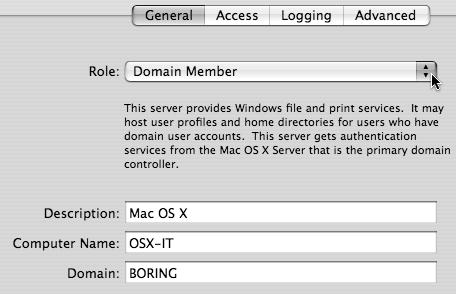
Select Domain Member from the Role menu (Figure 5.31).
Enter the Description, Computer Name, and Domain for your server in the appropriate fields and click Save.
Authenticate as a domain administrator for the Windows domain you’d like to be a member of.
Be sure you’re an Open Directory Master (see Chapter 3) when you launch Server Admin.
Select the Windows service for your server in the Computers & Services list and click the Settings tab and then the General tab.
Select Primary Domain Controller from the Role pop-up menu (Figure 5.32).
Enter the Description, Computer Name, and Domain for your server in the appropriate fields and click Save.
When you change SMB server roles, you must authenticate as an LDAP domain administrator for the PDC server.
✓ Tips
It’s best if your server’s computer name is the unqualified DNS hostname (xserver, instead of xserver.example.com).
Windows workgroup and domain names are typically capitalized and can’t exceed 15 characters.
On a Mac OS X (and Mac OS X Server) computer, you can configure SMB network settings, including a specific workgroup or domain for the client, in the Directory Access application.
Always verify client connectivity after you make SMB server role changes—especially from Windows clients, because domain authentication is vital.
Mac OS X Server provides a variety of advanced SMB features that your Windows users may need. These features include support for alternate languages, improved network browsing, and hosting Windows home folders.
You can also participate in the election of workgroup master and domain master browsers and enable Windows Internet Naming Service (WINS). WINS allows Windows browsing across subnets and facilitates more efficient browsing.
The other option is to enable virtual share points, which provides easier configuration for Windows home directories. If your server is a PDC, a user’s home folder automatically mounts when they log in to your domain from a Windows computer. In addition, users have the same home folder for both Windows and Mac OS X.
Launch Server Admin and select the Windows service for your server in the Computers & Services list.
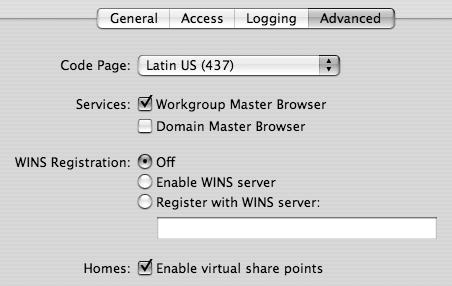
Click the Settings tab and then the Advanced tab (Figure 5.33).
To determine which language is used for Windows services, select a language option from the Code Page pull-down menu.
Select one or both of the Workgroup Master Browser and Domain Master Browser check boxes to have your server take part in the master browser elections (see the “Master Browser” sidebar).
Choose one of the following modes for WINS registration:
Off means that your server has nothing to do with WINS registration.
Enable WINS server means that your server is the WINS server with which other machines register.
Register with WINS server means that your server informs other WINS servers that you’re providing Windows services. You must enter the IP address(es) of your WINS server(s). You can enter more than one server by separating the addresses with a comma and a single space.
Choose whether to enable virtual share points and click Save.
✓ Tips
If your server is acting as a PDC, the Workgroup Master Browser and Domain Master Browser options aren’t available because a PDC must be the domain master browser for that particular domain.
On a Mac OS X (and Mac OS X Server) computer, you can configure SMB network settings in the Directory Access application, including the ability for a client to register with WINS servers.
You should test these settings thoroughly from both Windows and Mac OS X computers.
When you create a share point on Mac OS X Server, it’s automatically shared via SMB (as well as AFP and FTP), assuming the Windows service is running. Share points are also automatically configured for both registered user and guest access via SMB. You can configure such settings individually for each share point using the Workgroup Manager tool.
Launch the Workgroup Manager tool located in /Applications/Server, authenticate as the administrator if necessary, and click the Sharing icon.
In the sharing browser, click the All tab and do one of the following:
Configure an existing share point by clicking the Share Points tab, and then select the share point you wish to edit from the sharing browser.
Configure a new share point. See the “To configure new share points” task earlier in this chapter for detailed instructions.
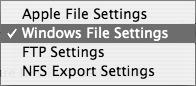
Click the Protocols tab and from the Protocols pull-down menu, select Windows File Settings (Figure 5.34).
In the Protocols tab, click the appropriate check boxes to configure SMB sharing and guest access and enter a custom SMB share point name that differs from the original folder’s name (Figure 5.35).
In the “Default permissions for new files and folders” section, click one of the following radio buttons, and then click Save:
Inherit permissions from parent will allow new items created within this share point to have the same permissions as the share point itself. See the “Configuring File and Folder Permissions” section earlier in this chapter.
Assign as follows is the default behavior, similar to inherited permissions in that the owner and group assigned to each item are the same as those of the parent share point when copied or moved into the share point (however, the owner of a file is still the creator of that file). But you can configure specific access for the user, group, or everyone from the menus.

✓ Tip
Keep in mind that the general Windows service settings may affect the settings you configure here. For instance, disabling guest access to the Windows service in Server Admin disables Windows guest access for every share point regardless of individual share settings. Remember to verify proper Windows service configuration in both Workgroup Manager and Server Admin.
The Windows file service offers a few unique features for managing files that reside on the server but are open on client computers. These file-locking options improve the performance and consistency of open files. You can configure these options individually for each share point.
Once configured, file locks are transparent to the users connected to the server. In addition, file-locking options don’t conflict with any Windows service configuration in Server Admin.
In Workgroup Manager, navigate to a specific share point’s Windows service settings.
See the previous task for instructions.
Choose one of the following Windows file-locking options and click Save (Figure 5.36):
Enable oplocks lets client computers cache changes to open files locally for improved performance. Opportunistic locking is disabled by default.
Enable strict locking allows only one user at a time to open a particular file to prevent the file corruption that occurs when applications attempt to edit files that are currently being edited by other users. Strict locking is enabled by default.

The File Transfer Protocol (FTP) service is by far the most ubiquitous file-sharing protocol available from Mac OS X Server. Almost anything with network access can connect to an FTP server, because FTP is a simple protocol to implement.
However, this simplicity is a double-edged sword. As a default, FTP is highly compatible and easy to implement because it uses clear-text passwords and unencrypted data—a potential security issue if any of your FTP traffic travels through unsecure networks. To compensate for this, Mac OS X Server supports using Kerberos for authentication, thus removing clear text passwords as a security issue. However, sending the data unencrypted is still a problem. A nefarious hacker can easily spot and intercept your FTP traffic. If security is an issue, then your alternative is to use the Secure FTP (SFTP) protocol. When you enable SSH on your Mac OS X Server, SFTP is automatically enabled. You don’t need to enable FTP for SFTP to be enabled.
Other limitations of FTP include file-handling issues. Standard FTP can’t handle folders because it only supports single file transfers. The FTP service also has problems with the forked files and Unicode filenames that are natively supported by Mac OS X.
You can easily overcome these limitations by using modern FTP client software that automatically archives and/or compresses requested files before they’re transferred via FTP. The FTP service provided by Mac OS X Server includes support for automatic file archival and/or compression.
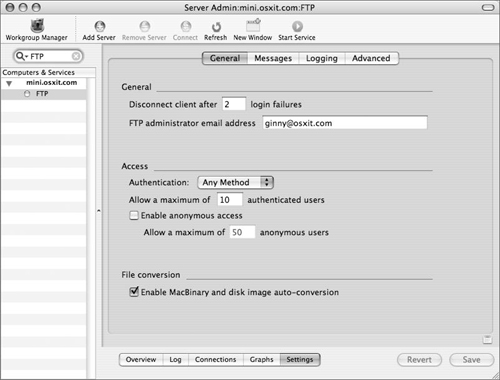
Launch Server Admin, select the FTP service for your server in the Computers & Services list, click the Settings tab, and click the General tab (Figure 5.37).
From the Authentication pop-up menu, choose an FTP authentication method (Figure 5.38):
Standard uses clear-text passwords.
Kerberos uses MIT’s Kerberos authentication.
Any method is enabled by default.
See Chapter 3 for more information about user authentication.
Select the “Enable anonymous access” check box to enable guest access via the FTP service and click Save.
For security reasons, anonymous FTP access is turned off by default. Anonymous access is another way of saying guest access.
If you make changes to the FTP service while it’s running, you’ll be prompted to restart the service; otherwise, when you’ve finished making changes, click Save.
Be sure to check for connected users before restarting the service, so you don’t kick them off.
Click the Overview button at the bottom of the window.
Verify that the FTP service is running and if it isn’t, click Start Service to activate the FTP server.

✓ Tips
In order to allow anonymous access, you must also enable guest access for each share point. Refer to the “To configure FTP share-point settings” task for more information about enabling guest access for individual share points.
You can limit the number of simultaneous authenticated and anonymous users by entering values in the associated fields. The default of 50 users is a good starting point, because FTP servers are susceptible to performance issues if too many users connect.
When FTP was initially developed, all server connections were done through the command-line environment. You didn’t just connect to a shared folder; you actually connected to an FTP command-line environment. Upon initially connecting to the FTP server, you were greeted with a banner message and then after authentication, you saw a welcome message.
These messages usually contained information regarding server usage, availability, disclosure agreements, or anything else the administrator wished to communicate to connected users. Although FTP banner and welcome messages are rarely used by modern graphical FTP clients, Mac OS X Server still supports them.
Launch Server Admin and select the FTP service for your server in the Computers & Services list.
Click the Settings tab and click the Messages tab (Figure 5.39).
Select the “Show welcome message” check box and enter the desired text string in the field below.
Select the “Show banner message” check box and enter the desired text string into the field below.
When you’ve finished making changes, click Save.
If you make changes to the FTP service while it’s running, you’ll be prompted to restart the service. Be sure to check for connected users first, so you don’t kick them off.
Test these messages via the command line by entering
ftp serveraddressand then authenticating to the server.

Typically, when an authenticated user connects to an FTP server, they don’t get to choose a share point; they’re dropped off in a predefined folder. Mac OS X Server lets you configure this aspect of the FTP user environment.
Launch Server Admin and select the FTP service for your server in the Computers & Services list.
Click the Settings tab and click the Advanced tab.
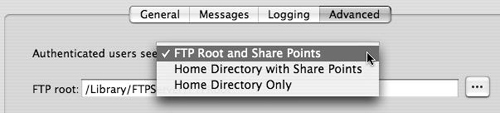
From the “Authenticated users see” menu, select one of the following options (Figure 5.40):
FTP Root and Share Points connects users to the FTP root folder (defined in step 4). In the FTP root folder, the system creates symbolic links to your other share points.
Home Directory with Share Points connects authenticated users to their home folder. They also have access to the other share points. If a user doesn’t have a home folder, they’re automatically connected to the FTP root folder.
Home Directory Only connects authenticated users only to their home directory. If a user doesn’t have a home folder, they’re automatically connected to the FTP root folder.
To specify a custom FTP root folder, enter a new path to the appropriate field and click Save.
By default, the predefined FTP root folder is /Library/FTPServer/FTPRoot. You can also click the ellipsis button to the right of the FTP root folder field to specify a new folder in a file browser dialog.
If you make changes to the FTP service while it’s running, you’ll be prompted to restart the service. Otherwise, when you’ve finished making changes, click Save.
First check for connected users so you don’t kick them off.
✓ Tips
See the “Connecting via FTP” sidebar earlier in this chapter for more information about various FTP clients.
Any administrative account always defaults to its home folder via FTP. However, folder permissions allow administrators to navigate outside their home folder.
Because FTP servers often fall victim to hackers, thoroughly test any access configurations you choose. You should also test access from various FTP clients so you know what to expect for your users.
When you create a share point on Mac OS X Server, it’s automatically shared via FTP (as well as AFP and SMB), assuming the FTP service is running. Share points are also automatically configured for both registered user and anonymous access via FTP. You can configure such settings individually for each share point using Workgroup Manager. See the “Configuring Share Points” section earlier in this chapter for more information about creating share points. To configure FTP share-point settings, simply follow steps 1-4 in the “To configure Windows share-point settings” task.
If you ever disable a share point, the symbolic link for FTP functionality may remain in the FTP root folder. You’ll have to delete this symbolic link manually after you disable the share point. To do so, move the original item, delete the link, and move the original back. Because FTP doesn’t natively support multiple share points, the system creates symbolic links in the FTP root folder that point to your other share points.
The Network File System (NFS) service is very different than all the other file services available. When using NFS, you don’t supply a username and password when connecting. Instead the client system determines what permissions a user has on the system.
It’s easiest to think of NFS as a locally attached hard drive, as it treats permissions in the same way.
For example, if a user has a UID of 501 on the client system, they will have all of the permissions of the user with the UID of 501 on the NFS server, regardless whether the short names, or even the accounts, are the same. For more information about UIDs, see Chapter 4.
To understand why NFS uses this type of authentication, you have to know where NFS comes from. The NFS service was first used by Unix terminals to access files on mainframe servers. Early Unix implementations relied on a unified directory service to authenticate users to any terminal computer. Because every user had to authenticate to the directory server before they had any computer access, it was safe to assume that once they were logged in to the terminal, they were who they said they were. Thus, NFS requested the UID from the terminal computer.
In today’s modern computing environment, which is rife with commodity personal computers, login authentication is often delegated to a local account. Even worse, on Mac OS X computers, the local administrator accounts (UID 501) and root accounts (UID 0) have the same UIDs on your Mac OS X Server. This section discusses a variety of options that let you properly configure NFS share points, called exports, and protect them from such security risks.
Follow steps 1-3 in the “To configure Windows share-point settings” task earlier in this chapter.
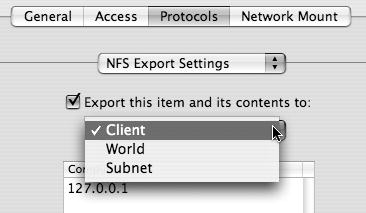
From the Protocols menu, select NFS Export Settings (Figure 5.41).
Select the “Export this item and its contents to” check box to enable NFS for this share point.
To specify via IP address which clients can mount this export, choose one of the following from the Export pop-up menu (Figure 5.42):
Client limits this NFS export to a list of specific clients. Click Add or Remove to manage this list.
World allows any client to access this NFS export.
Subnet limits this NFS export to a specific subnet of computers. Enter the subnet address and mask in the appropriate fields.
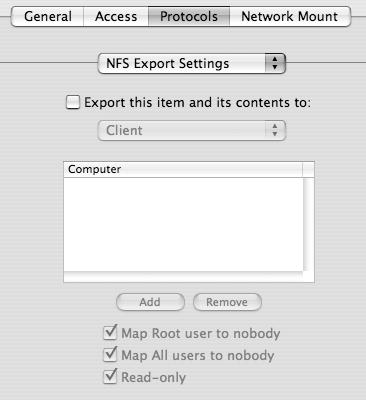
To further restrict access to this NFS export, click any of the following check boxes at the bottom of the window and click Save (Figure 5.43):
“Map Root user to nobody”
“Map All users to nobody”
“Read-only”
Nobody in this case is an actual user with the name “nobody.”
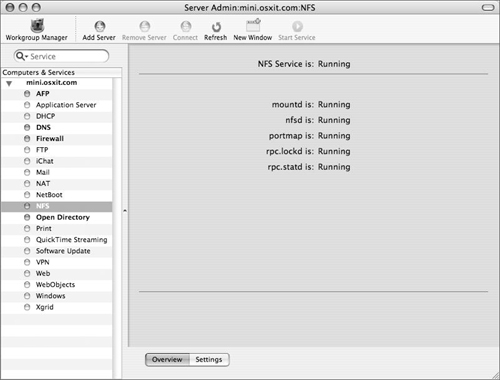
Launch Server Admin and select the NFS service for your server in the Computers & Services list (Figure 5.44).
Verify that the NFS service is running.
It should automatically start when you configure your first NFS export.

✓ Tips
Aside from what you’ve configured here, all access to this share point is granted based on file-system permissions. See “Configuring File and Folder Permissions” earlier in this chapter for more information.
To delete an NFS export, deselect the “Export this item and this contents to” check box, and then click Save.
Mac OS X Server provides a variety of statistics for monitoring sharing services. Using the Server Admin tool, you can monitor each file-sharing protocol in real time. The information provided by the monitoring tools is invaluable for troubleshooting connection problems and determining if resources are being properly used.
Launch Server Admin and select the file-sharing service you wish to monitor in the Computers & Services list.
You can choose to monitor service connections to AFP, FTP, and Windows services.
Click the Connections tab at the bottom of the window (Figure 5.45).
A connections frame appears, showing currently connected users for the selected service. AFP is the most extensive of all the file services. Note that idle connections appear grayed out compared to active connections.
Click Refresh to force Server Admin to refresh the connected user list immediately.
Click a user in the connected user list or Shift- or Command-click to select multiple users.
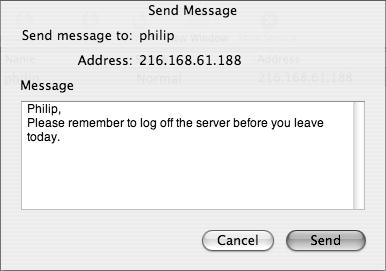
To send a message to a selected user in the AFP connections frame, click Send Message.
In the dialog that appears, enter a message to the user (Figure 5.46).
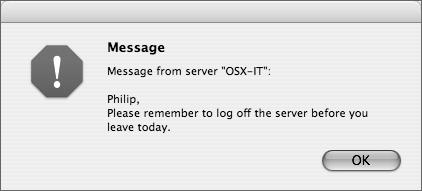
Click Send, and the user will be presented with a Message dialog (Figure 5.47).
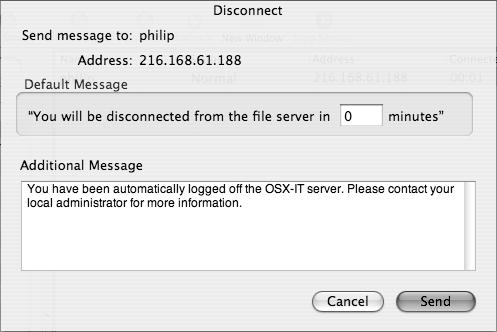
To disconnect a selected user, in both the AFP and SMB connections lists, click Disconnect.
In the dialog that appears, enter the amount of time before the user is disconnected along with a message to the user (Figure 5.48).
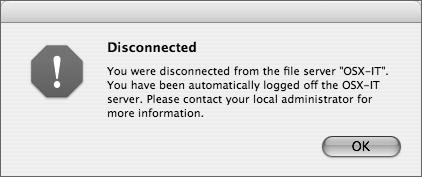
When you click Send, the user will see the message, and the server will disconnect after the allotted time (Figure 5.49).

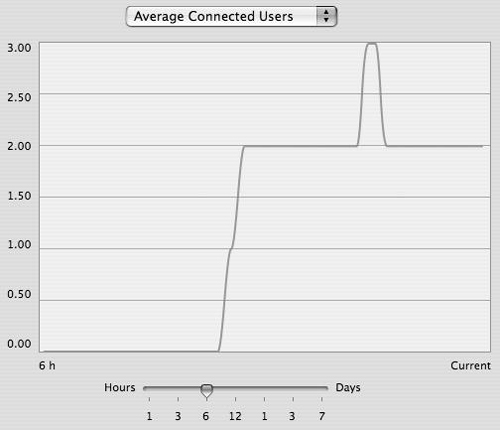
The Server Admin tool provides a graphical interface for monitoring AFP service throughput (kilobytes, megabytes, or gigabytes per second). These graphs provide a visual reference that you can use to monitor your server’s resource utilization.
Launch Server Admin and select the AFP service for your server in the Computers & Services list.
You can choose to monitor service connections to AFP, FTP, and Windows services.
Click the Graphs tab to display a graph of the Average Connected Users (Figure 5.50).
Use the slider below the graph to manipulate the graph’s sample timeframe.
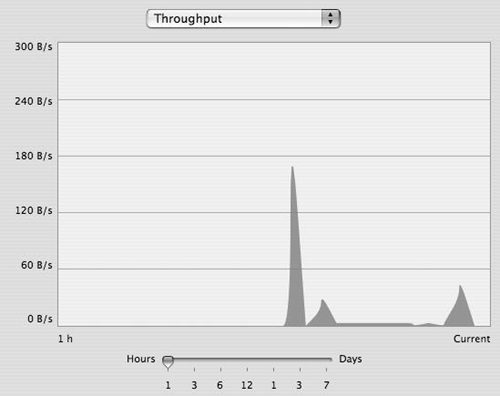
From the pop-up menu, select Throughput.
The resulting graph shows average AFP service network throughput (Figure 5.51).
Click the Refresh button to force Server Admin to refresh the connected user list immediately.
Share points that are configured to automatically mount on your clients at startup are called network mounts. (In previous versions of Mac OS X Server, they were sometimes called automounts.) It’s important to understand that network mounts are always available to any user on the client computer, whereas a share point located in the user’s Login Items is available only to that user and is mounted only when the user logs in.
Essentially, network mounts are instructions stored in a directory database that tell client computers to mount certain share points at startup. Thus, the Workgroup Manager tool can configure network mounts only for servers that are part of a directory service system. In addition, your client computers must be configured as clients of the directory service system. (For more information about Directory Services and Open Directory, see Chapter 3.)
Network mounts are an important option because there are certain share points that client computers must have access to at all times.
Launch the Workgroup Manager tool located in /Applications/Server, authenticate as the administrator if necessary, and click the Sharing icon.
Click the Share Points tab above the sharing browser and select the Users folder (Figure 5.52):
The Users and/or Groups folders are common network mounts.
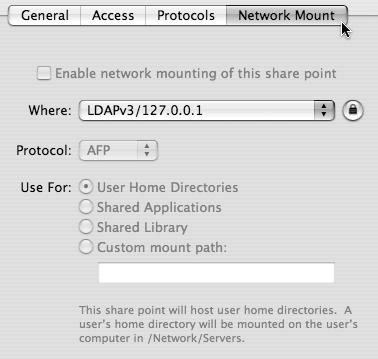
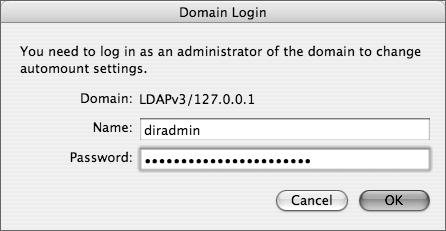
Click the Network Mount tab and click the Lock icon next to the directory that will be hosting the mount to view the authentication dialog (usually LDAPv3/127.0.0.1) (Figure 5.53).
Authenticate as an administrator of the selected directory server (Figure 5.54).
Authenticating as an administrator makes the “Enable network mounting of this share point” option available.
Click the “Enable network mounting of this share point” check box (Figure 5.55).
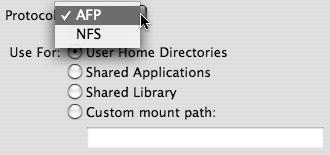
From the Protocol pop-up menu, select either AFP or NFS as the share point’s protocol (Figure 5.56).
AFP is the generally suggested way of handling network mounts.
Select the User Home Directories radio button and click Save.
See the following section for an explanation of the other options.
Restart the Mac OS X computers and verify the network mount.
Home directory network mounts are found on the local clients at /Network/Servers/<servername>/<sharename>.

✓ Tip
To configure individual network users’ home directories, see the instructions in Chapter 4.
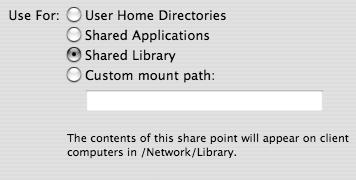
You may find it useful to add other types of share points as network mounts. Examples include the Groups folder, a shared Applications folder, a shared Library folder, or any other share point you want to automatically mount to a specific point on the local client. You can create additional network mounts by repeating the previous task and selecting another share point. To change the mount point on the client, choose from the following network mount options (Figure 5.57).
Shared Applications will automatically mount to the /Network/Applications directory. The client system will search this folder for available applications.
Shared Library will automatically mount to the /Network/Library directory. The client system will search this folder for available resources, including fonts, frameworks, preference panes, or any other application or system support files.
Custom mount path will automatically mount to the path specified in the field below.
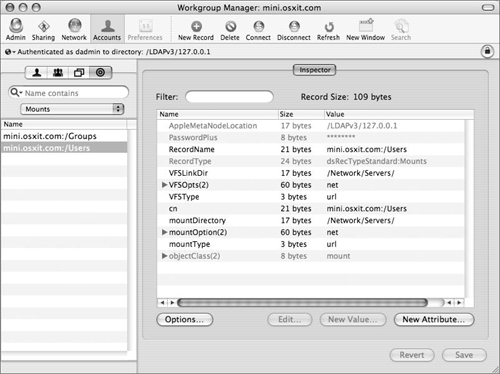
You can view the network mount details using the Workgroup Manager Inspector (Figure 5.58).
Locally Configured Network Mounts
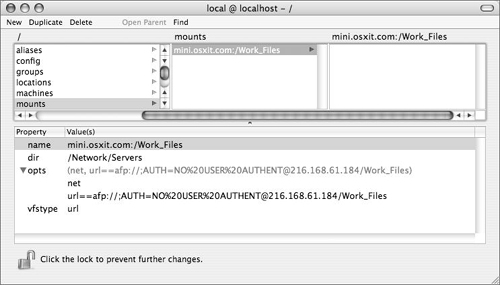
Instructions for automatic network mounts can be stored in any directory database, including the client’s local NetInfo database. From the client in NetInfo Manager, you can add new mount directory entries. You need to add only a few properties and values for each mount entry:
name = <servername>:/<sharepoint>dir = <localmountpoint>vfstype = urlopts = net, url==<serverurl>
A typical network mount entry has the following properties (Figure 5.59):
name = xserver:/Usersdir = /Network/Servers/vfstype = urlopts = net, url==afp://;AUTH=_NO%20USER%[email protected]/Users