A directory service is a centralized store for user accounts, groups, authentication data and security policies. Generally available over a network, this centralized storage facilitates consistent management, since administrative data only has to be managed once, rather than for multiple applications (file servers, mail servers, desktop security, etc.). The term Open Directory refers to Apple’s Directory Services architecture—both its components for centrally storing administrative data (generally called Open Directory Server) and the built-in capacity of Mac OS X to access third-party directory services like Active Directory and eDirectory. Because its functionality is specific to Mac OS X Server, this chapter deals primarily with Open Directory Server, as well as configuring Mac OS X Server to access a directory service.
Directory Services are complex. There’s no getting around that. Like many of the services of Mac OS X Server, a thorough and complete graphical interface would resemble a jet cockpit, and would be inaccessible to much of Apple’s core audience.
Open Directory Server is made up of three underlying services (OpenLDAP, Password Server, and MIT Kerberos). Adding complexity to this is the fact that non-Mac directories typically do not share Apple’s goals of simplicity, and integrating Mac OS X Server with them can be quite onerous.
To simplify matters, Apple has introduced the concept of Open Directory roles. An Open Directory role is simply a sort of macro state that defines the configuration of Open Directory Server’s underlying services. This well-defined set of configurations brings consistency and predictability to Open Directory Server’s complex capabilities.
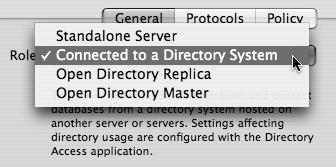
In general, changes in a server’s Open Directory role are activated using the Open Directory module of the Server Admin application. The pop-up menu in the Open Directory’s General Settings tab yields four choices (Figure 3.1):
When running in Standalone mode, a Mac OS X Server accesses only the local directory—there is no shared directory domain, and the user and group accounts are stored in the server’s local NetInfo database. Passwords are stored in the /private/var/db/shadow/hash/ directory. This is what you should choose when setting up a Mac OS X Server for the first time.
In addition to its local domain, an Open Directory master hosts an Open Directory shared domain. User and group accounts (along with other directory data) are stored in an LDAP (Lightweight Directory Access Protocol) directory, and authentication takes place using Apple’s Password Server. Single Sign-On (SSO) services are provided by an MIT Kerberos KDC (Key Distribution Center).
An Open Directory replica brings redundancy to an Open Directory domain by housing an exact copy of the master’s LDAP Directory, Password Server, and MIT Kerberos KDC. In most circumstances, this data is read-only.
When Mac OS X Server is connected to a Directory System, it accesses directory data from Open Directory Server, an Active Directory domain, or some other directory service (including eDirectory and Sun’s NIS).
This Open Directory configuration infrastructure is the cornerstone of the Apple Directory Services platform. Its consistent service configuration and directory data provide a foundation on which robust and fairly scalable infrastructures may be built.
An Open Directory (OD) master houses shared identification, authentication, and authorization data for Mac, Linux, and, in some cases, Windows clients. It is the basis of a shared Open Directory domain.
Open Directory Server provides a fairly scalable and, in most cases, reliable infrastructure for small to medium-sized Mac-centric workgroups. Since it is based on open standards and in many cases open source software, it is also an acceptable (although not always ideal) platform for other directory-based applications, such as LDAP-enabled Web portals and document management systems.
To make use of Open Directory Server, however, you first need to create the Open Directory master to house it.
As with most administrative tasks, you can create an OD master graphically by using the Server Admin application. This time, you’ll work with the Open Directory module.
First, ensure that your server is up to date and that forward and reverse DNS entries are properly configured. If the Mac OS X Server is also a DNS server, refer to Chapter 6, “Network Services Options.”
Launch Server Admin, located in /Applications/Server and select Open Directory from the services list.
See Chapter 2, “Server Tools,” for instructions on launching the various tools used throughout this book.
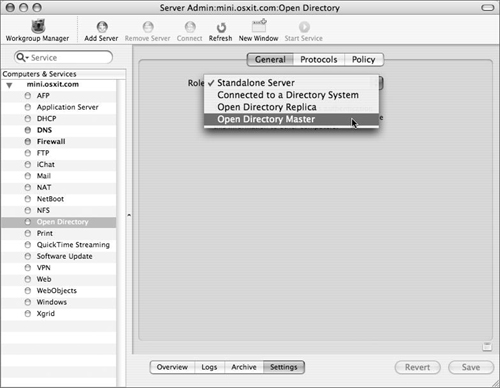
Click the General tab and choose Open Directory Master from the Role pop-up menu (see Figure 3.1).
In the dialog that appears, specify a name, short name, and password for the new administrator of the shared domain you are creating (Figure 3.2).
Defaults (Directory Administrator and dadmin) are suggested for you. You can override these defaults to make the administrator’s name harder to guess.
Either accept or enter different Kerberos and LDAP information for your Open Directory domain.
If your DNS configuration is correct, defaults are supplied for you. Feel free to override them, especially if your DNS environment results in an abnormally long or awkward search base or Kerberos realm.
Click Create to close the dialog.
Click Save in the Server Admin window.

✓ Tip
View the slapconfig.log file located in the /Library/Logs directory if you encounter any errors.
What Else Happens When You Create an Open Directory Master?
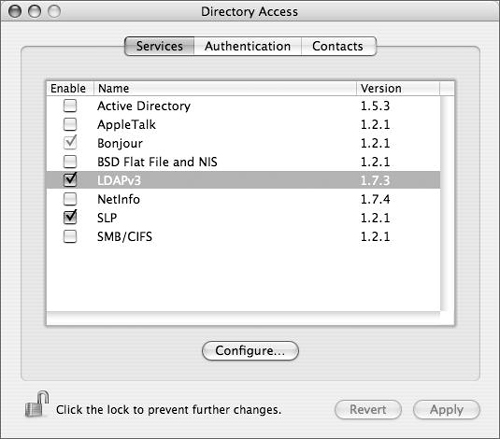
After you create an Open Directory master, you can open your Directory Access application and select the Authentication tab (Figure 3.3).
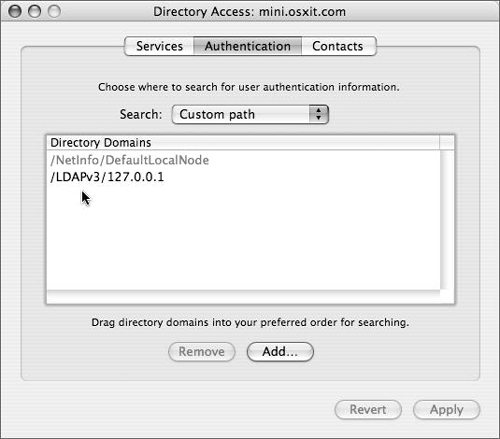
You’ll see an entry for LDAPv3/127.0.0.1, which indicates that the Mac OS X Server is now bound to itself. That is, the process that creates the LDAP directory and the Kerberos Key Distribution Center (KDC), discussed later in this chapter, also creates the entry and places it in the Directory Services structure.
The Directory Administrator you create is also added to the admin group in the Server’s local NetInfo domain, and a root user (with the same password as the Directory Administrator) is created in the shared domain.
The directory structure now looks like this:
<division> <title>NetInfo (Local) Domain</title>Members of the admin group are
Local root w/same password as...
Your local administrator account
Your LDAP administrator account
LDAP root w/same password as...
Your LDAP administrator account
This duplicity in root, both with the user ID 0, is a bit confusing. Access is granted to folder and file access based on UID, but access to databases is based on generated unique ID. So, the user root may have two distinct passwords—one local, and one LDAP.
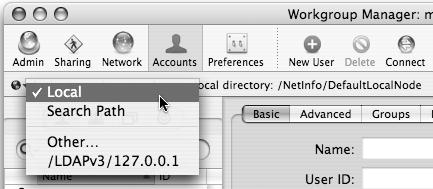
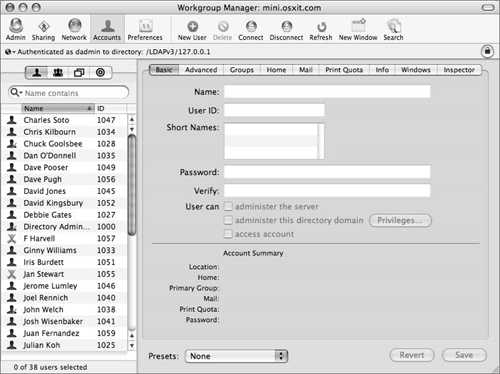
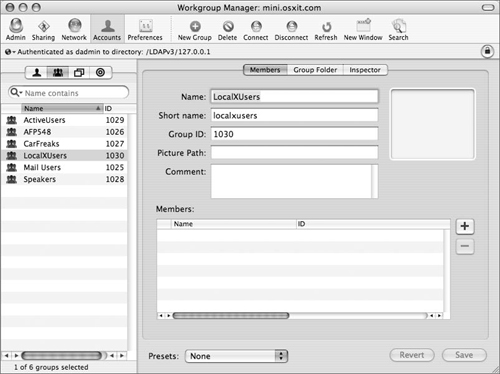
To manage user, group, and computer accounts in your shared Open Directory domain, use the Workgroup Manager application to connect to your Open Directory master.
Depending on which domain you want to administer, you either use the local NetInfo administrator’s name or the LDAP administrator’s name. It’s a good idea to use the local administrator’s name (Figure 3.4), so that he or she can access the local database, and then unlock the LDAP database using the LDAP administrator’s username and password.

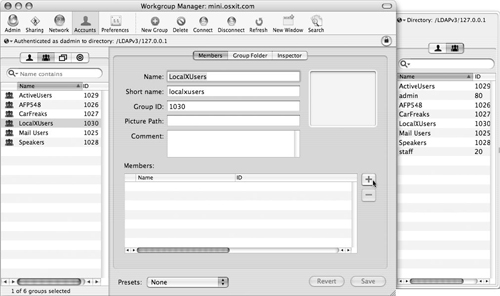
Because the LDAP administrator’s name is added to the local NetInfo admin group, you could add it to the keychain of the user who will be using Workgroup Manager on a consistent basis, if you want. However, for security reasons, you may not want to do this (Figure 3.5).

Once both administrators are added, you can choose different directories to administer by viewing the Directory pop-up menu in the upper-left corner of Workgroup Manager (Figure 3.6). Actual account management is covered in more depth in Chapter 4, “User and Group Management.”
✓ Tips
In Mac OS X Server 10.4, clicking Workgroup Manager in the upper-left corner of Server Admin results in a Workgroup Manager authentication dialog that specifically targets Server Admin’s currently selected server. This is one workaround for Workgroup Manager’s annoying habit of trying to log in to the local workstation you’re working from.
You should display the All records tab and Inspector, covered in Chapter 2, as you go through this chapter.
LDAP was designed as a consistent and standardized way to make directory data available over a network, regardless of how or where it is stored. Mac OS X Servers 10.2–10.4.x, Active Directory, and SunONE/iPlanet directory servers are all structured very differently. They all, however, support LDAP access to their underlying data store, and any LDAP client can query them.
So the idea behind LDAP is rather simple—it is an abstraction layer that allows for access to underlying data. The implementation of this idea, however, turns out to be rather complex. LDAP employs a hierarchical structure and odd naming convention, which tends to confuse first-time administrators. Its schema (or rules with regard to the content and format of directory data) can be extremely complex.
In general, an LDAP directory is made up of a hierarchical grouping of entries. Each entry usually contains one or more attributes; for example, a user record should have a short name, numerical user ID, and home directory path associated with it. The user record is an entry, whereas the short name and numerical user ID are attributes.
Each of these attributes has one or more values that actually contain the user data. The directory’s schema ensures that particular entries have all of their required attributes, and that the format of those attributes is correct. Numerical user IDs, for instance, should always have an integer value.
The good news is that, in most cases, Apple insulates the administrator from this complexity. Particularly, in an environment where most users are on Apple computers and all are on Open Directory, you’ll likely never be exposed to raw LDAP data. Integrating with other directory systems, however, can be more difficult. (Accessing eDirectory, iPlanet, or other LDAP directories will be covered later in this chapter.)
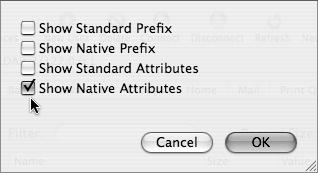
The main idea behind understanding this very complex and scalable architecture is to keep in mind that Apple maintains two attributes (and their associated prefixes) for every value. That is, every user has at least one short name as well as a long name, a user ID, and a globally unique ID. These are known as attributes, and they each have values typically associated with them. In Open Directory and OpenLDAP, these attributes have different names (Table 3.1). In Workgroup Manager, you have an option to view the Standard (Apple Open Directory) and/or native (OpenLDAP) attributes and associative values by choosing Inspector > Options (Figure 3.7).
Table 3.1. Example attribute names and values
WORKGROUP MANAGER CALLS IT.... | OPEN DIRECTORY (STANDARD IN WGM) CALLS IT... | OPENLDAP (NATIVE IN WGM) CALLS IT... | TYPICAL VALUE IS... |
Name | RealName | cn | Michael Stanley |
User ID | UniqueID | uidnumber | 2112 |
Short Names | RecordName | uid (NOT an error here) | msb |
Login Shell | UserShell | loginShell | /bin/bash |
Primary Group ID | PrimaryGroupID | gidnumber | 20 |
You will notice a few things. First, all three methods of naming attributes are different. Second, Open Directory attributes almost always begin with a capital letter, whereas OpenLDAP names do not. Third, what is not shown are the Apple-specific attributes, such as managed client settings. OpenLDAP has no record of these settings, so Apple has added its own schema set to the OpenLDAP architecture. These can be found by opening the /private/etc/openldap/schema/apple.schem a file. Within the scope of this book, it is not possible to handle all the potential permutations resulting from extending or modifying the schema.
The next part of an Open Directory master, Password Server, is the part of Mac OS X Server responsible for managing passwords for the shared (LDAP) domain. It is ultimately a process called PasswordService and is created when an Open Directory master is chosen from the list of potential server configuration types. It writes out to three log files, which you can access by using the Server Admin tool under Open Directory and choosing the Logs tab. They and their ultimate locations are:
/Library/Logs/PasswordService/ApplePasswordServer.Error.log
/Library/Logs/PasswordService/ApplePasswordServer.Replication.log
/Library/Logs/PasswordService/ApplePasswordServer.Server.log
Using the mkpassdb command, you can also back up the database, merge two password server databases, review the mechanisms for handling the passwords, and remove password server slots. Please refer to the man page for more information on mkpassdb.
Password policies (complexity requirements, expiration policies, and password histories) have always been important in governmental sectors. Increasingly, though, a regulatory environment fueled by Sarbanes-Oxley, HIPPA, and FERPA has driven their adoption in the educational and private sectors as well. You can set these policies either globally, using the Server Admin application, or on a per-user basis, using Workgroup Manager. Note that per-user settings override global ones, and that in any case, administrative users in Mac OS X Server 10.4 are not subject to password policy restrictions.
Password policies can be very effective in maintaining compliance with your organization’s guidelines but have varying degrees of restriction, as shown in Table 3.2.
Table 3.2. User authentication policies
GUI DISABLE ACCOUNTS OPTION | USAGE | PWPOLICY COMMAND-LINE EQUIVALENT |
On Date | Disables an account on a set date, such as when a contractor is set to leave a job site |
|
After a set number of days | Disables an account after a set number of days, such as when a student has access for the number of days in a grading period |
|
After a period of inactivity | Disables an account after the user doesn’t log in for a set number of days, such as when a user stops using a particular file server |
|
After a set number of failed login attempts | Disables an account after a user or hacker attempts to enter incorrect information a set number of times |
|
GUI PASSWORD POLICY OPTION | USAGE | PWPOLICY COMMAND-LINE EQUIVALENT |
Length Policy | Dictates that a password must be at least a set number of characters long |
|
Letter Policy | Requires a password to contain at least one letter |
|
Numeric character policy | Requires a password to contain at least one numeric character |
|
Account name policy | Requires the password to be different from the account name |
|
Reused passwords policy | Requires a password to be different from previous passwords |
|
Password change policy | Requires a password to be changed after a set number of days, weeks, or months |
|
Be reset on first user login | Require a new password at next login |
|
Allow the user to change the password (in WGM) | Allows the user to change their password |
|
Requires a password to have both upper and lowercase letters |
| |
Dictates that a password must be no longer than a set number of characters |
| |
Value chosen to reset login after failed attempts |
| |
Compares password against Dictionary |
|
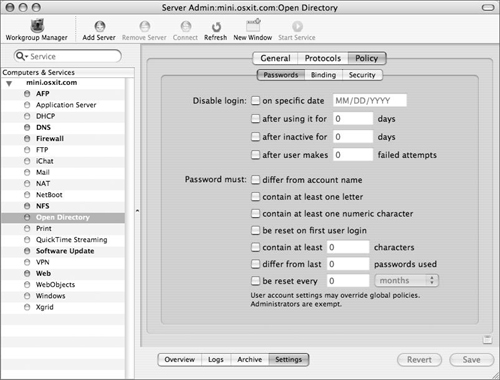
Launch Server Admin, located in /Applications/Server, select Open Directory from the services list and click the Settings tab.
Click the Policy tab and then the Passwords tab (Figure 3.8).
Configure Password options appropriate to your organization’s security policies.
✓ Tip
If you follow this procedure on an Open Directory master or replica (replicas will be discussed later in this chapter), it will affect both the shared (LDAP) domain and the local (NetInfo) domain (the policies will be synchronized). However, if you pursue it on a Mac OS X Server that is not hosting a shared domain (as of 10.4.4), it will affect the global policy for the local (NetInfo) domain. You set per-user policies (as of 10.3.3) in the local (NetInfo) and the shared (LDAP) domain. In addition, four other options are available via
pwpolicythat currently have no GUI counterpart. These options may not be supported by the local (NetInfo) domain.
Launch Workgroup Manager located in /Applications/Server and connect to your server as a local or directory administrator (Figure 3.9).
From the “Authenticated as” pop-up menu in the upper-left corner of the screen, choose either a local or shared domain (Figure 3.10).
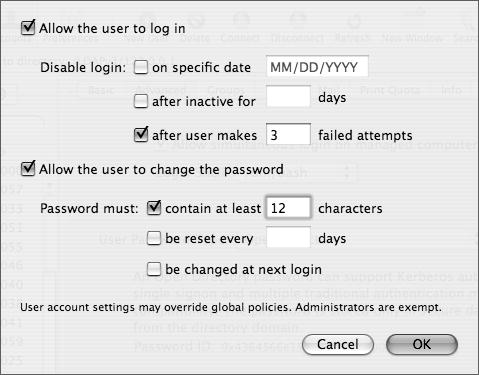
Select one or more user accounts and click the Advanced pane.
Click Options and configure password options appropriate to your organization’s security policies. Then click OK (Figure 3.11).
Compare the per-user policies with the global policies in Server Admin (set in the previous task) to ensure there are no conflicts.
Use the
pwpolicycommand to affect other non-GUI policies.This example shows how you can require mixed case by replacing diradmin with the short name of your shared directory administrator):
pwpolicy -a diradmin -v - setglobalpolicy requiresMixedCase=1
Enter your shared directory administrator’s short name password to authenticate.
The
-voption is verbose and allows feedback to be shown in the Terminal.Type
pwpolicy –getglobalpolicyto review your new policies.
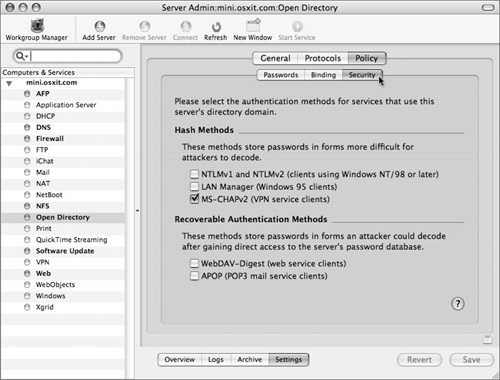
Password Server also has the ability to utilize several methods for storing passwords. The following password storage methods are accessible in the Security tab within the Open Directory service module of Server Admin or by using the NeST command-line tool:
SMB-NTLMv2—. Used for Windows ME, XP, 2000, 2003, and higher
SMB-NT—. Used for Windows 98 and NT
SMB-LAN-MANAGER—. Used for Windows 95 clients
MS-CHAPv2—. Used for VPN access
GSSAPI—. Generic Security Service Application Program Interface
WEBDAV-DIGEST—. Used for WebDAV
APOP—. Used for authenticated Post Office Protocol
Each of the methods of storing passwords has its pros and cons. In general, you should turn off the protocols you do not use, especially those that are somewhat unsecure, such as SMB-NT, SMB-LAN-MANAGER, WEBDAV-DIGEST, and APOP.
Launch Server Admin, located in /Applications/Server, select Open Directory from the services list and click the Settings tab.
You can leave Server Admin open for the next several tasks.
Click the Policy tab and then the Security tab (Figure 3.12).
Select the check boxes as appropriate and click Save.
or
Use the NeST command-line tool:
sudo NeST –setprotocols APOP off
LDAP services in Mac OS X Server are provided by the slapd daemon—part of the OpenLDAP LDAP implementation. Certain aspects of slapd’s behavior are configurable in the Protocols and Policy tabs of the Open Directory module’s Settings section within Server Admin.
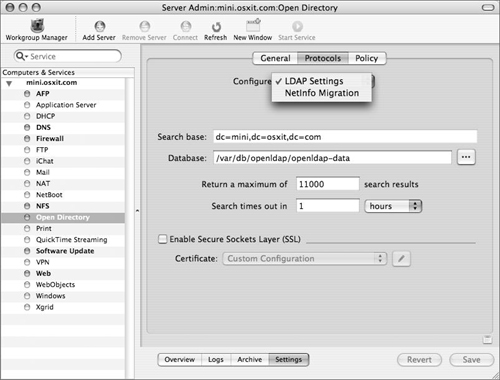
Within the Settings section of the Open Directory module, click the Protocols tab and make sure that LDAP Settings is chosen from the Configure pop-down menu (Figure 3.13).
These are basic settings that control the behavior of
slapd. More advanced configurations are feasible by manually editing the slapd.conf and slapd_macosxserver.conf files in /private/etc/openldap. See the slapd.conf man page for more details.From the following list of options, choose the ones you want to change:
Search Base—. You can’t really change the search base graphically, but it appears here.
Database—. The location of the database used by
slapd, the actual LDAP server process. You can locate the data store on higher-performing or more redundant file servers, such as a RAID array, if you choose. You might also want to segregate it on a non-system volume, in case the system volume is filled by log files or user files.Return a maximum of n search results—. Assign a maximum number of records returned from any search. This is useful in preventing denial-of-service attacks that try to review large directories.
Search times out in n—. Setting to discourage loss of service centered around exhausting available TCP sockets. By timing out searches we can ensure that no extraneous sockets are in use.
Enable Secure Sockets Layer—. Enable ldaps:// connections, and choose among available SSL certificates. This is only marginally useful since out-of-box Open Directory clients do not verify the authenticity of ldaps:// certificates, and since certificates produced by Mac OS X Server’s Certificate interface are, by default, not signed by a certificate authority.
The following LDAP binding and security policies are entirely optional and affect only Open Directory clients. Other LDAP clients are totally unaware of them and may continue to connect anonymously or using clear-text, unsecure credentials regardless of what you do here. In other words, these settings do nothing to secure your Open Directory master.
The first set of LDAP policies are “Enable directory binding” and “Require clients to bind to directory.” These revolve around authenticated binding, wherein the Open Directory client uses a Computer account to perform authenticated LDAP queries on the Open Directory master. This behavior is new in Mac OS X Server 10.4. Although authenticated queries could be performed in previous releases, there was no system or standard to provision machine accounts. Again, note that these are client-side policies obeyed only by Open Directory clients, and that these settings do not affect the LDAP server’s configuration in any way.
The next set of LDAP policies, discussed in the following task, deal with the security characteristics of the LDAP connection performed by Open Directory clients. Selection of all is required to mark a directory domain as trusted, which is required in order to enforce certain client management policies such as MCX login scripts.
What all of these options really boil down to is that in a default state the entire LDAP component of your Open Directory is available anonymously anyway. So encrypting anything but passwords is a little redundant at this point unless you’ve implemented a fairly rigorous set of directory ACLs. Therefore, ensuring that passwords are protected is probably enough for most people.
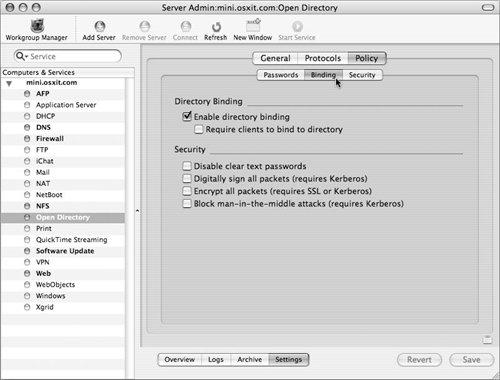
Within the Settings section of the Open Directory module, select the Security tab and then the Security tab (Figure 3.14).
Click the appropriate check boxes:
Enable Directory Binding—. Permits Open Directory clients to perform authenticated LDAP operations, and alerts them that during initial directory discovery they should permit the creation of a machine account.
Require clients to bind to directory—. Requires Open Directory clients to use authenticated binding. Note that non–Open Directory, generic LDAP clients may still make unauthenticated queries.
Disable clear text passwords—. Ensures that Open Directory clients do not send LDAP passwords in clear text. Clients will select the most secure SASL authentication method available to them: Generic Security Service Application Program Interface (GSSAPI and, in this case, Kerberos) or Challenge Response Authentication Method (CRAM-MD5), but will not fall back to clear-text authentication unless the connection is encrypted by SSL.
Digitally sign all packets—. Cryptographically ensures that every packet is legitimate. Requires Kerberos to work.
Encrypt all packets—. Ensures that no LDAP traffic whatsoever is sent over the network in clear text. Requires either Kerberos or SSL.
Block man-in-the-middle attacks—. Very similar to “Digitally sign all packets,” this option informs the client that it should prevent man-in-the-middle attacks by ensuring the cryptographic signature of the Kerberos authentication operations.
Click Save.
Kerberos is an open source initiative from MIT and complements the other two pieces of an Open Directory master quite nicely. To put it simply, there are three players in the Kerberos game: a client computer; a computer running a service, such as mail, file sharing, Web, or otherwise; and a computer running as a Key Distribution Center (KDC). All of these interact with each other to provide extremely secure authentication.
System administrators like Kerberos because it offers a feature called Single Sign-On (SSO). When a user logs into a computer that is bound to a KDC, the very act of logging in gets them a ticket from the KDC, which they can then use to prove their identity to that server or other computers running “Kerberized” services without entering a password.
Mac OS X Server running as an Open Directory master is also a KDC. Every time a user is created in the shared domain, a user principal is created for that user. This is the Kerberos way of saying that user can take part in the authentication process. Most services running on a Mac OS X Server can be Kerberized; that is, they can accept Kerberos authentication for their services.
The following services can leverage Kerberos in their structure:
Secure Shell (ssh)
Apple File Sharing protocol (AFP)
Sending and receiving email (POP, IMAP, SMTP)
Windows sharing (SMB)
File Transfer Protocol (FTP)
Virtual private networking (VPN)
Web (HTTP)
Xgrid (Xgrid)
Kerberos is set up for you when you promote to an Open Directory Master. Once a KDC has been established, you can choose any of the above services from the Server Admin tool (except ssh, which is already tuned for Kerberos) and force Kerberos from the authentication methods of these services. Typically all services are already configured to use Kerberos authentication in addition to standard methods in their default state.
Forcing Kerberos authentication will not allow Mac OS X computers to connect unless they have previously bound to the server via the LDAPv3 plug-in inside Directory Access, or they have manually edited the edu.mit.Kerberos file located in /Library/Preferences on their Mac OS X computers. Problem is, unless they have bound to a server before, this file may not exist, so there is no template for how to edit the contents. That’s why a simple bind to the server is easier; it retrieves the information from the server and creates the file on the Mac OS X computer for you.
If you have already set up an Open Directory master and the Mac OS X computer is properly configured to know the DNS information, you can bind the Mac OS X computer to the server and get your edu.mit.Kerberos file, so that you can use Kerberized services.
Make sure your Mac OS X computer’s Network preference pane has the correct information to see the domain name information for the Mac OS X Server by checking the DNS and domain name fields.
Launch Directory Access and authenticate using the lock in the lower-left corner of the screen to unlock the icon and permit editing (Figure 3.15).
Click the LDAPv3 check box (if it isn’t selected already) and double-click LDAPv3 to open a plug-in configuration dialog (Figure 3.16).
Click the Show Options disclosure triangle.
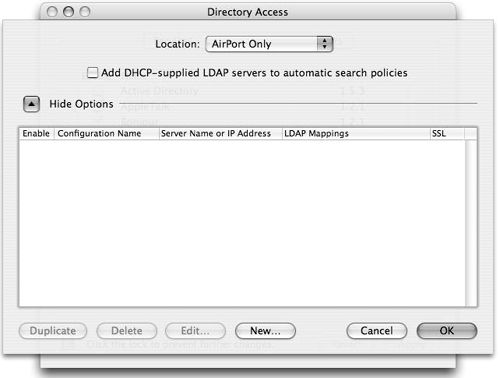
Make sure the “Add DHCP-supplied LDAP servers to automatic search policies” check box is deselected (Figure 3.17).
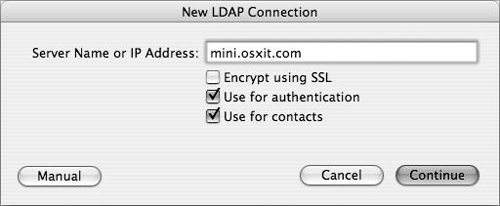
Click New to open the New LDAP Connection dialog.
Enter the fully qualified domain name of the server and click Continue (Figure 3.18).
There is no need to change the computer name.
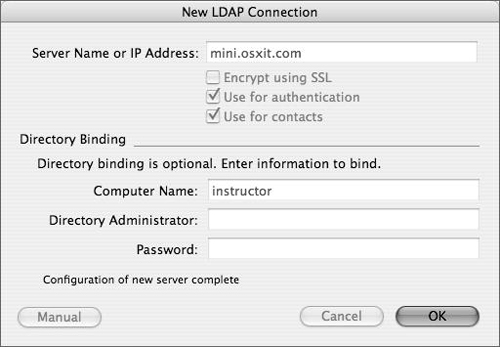
If you choose authenticated binding, enter a username and password from the shared (LDAP) domain and click Continue (Figure 3.19).
When a text message near the bottom of the dialog indicates that configuration (binding) is complete, click OK to close this dialog (Figure 3.20).
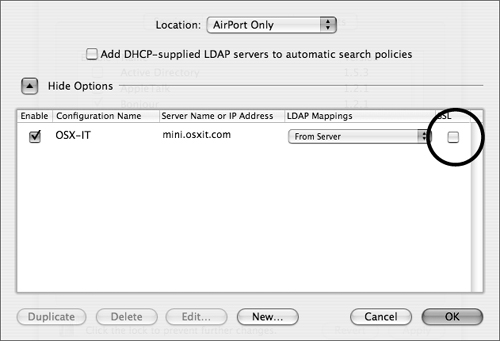
In the plug-in configuration dialog, review your LDAP entry and change the configuration name, if necessary.
Click the SSL check box if the server is using SSL with LDAP (ldaps://) and click OK to close this dialog (Figure 3.21).
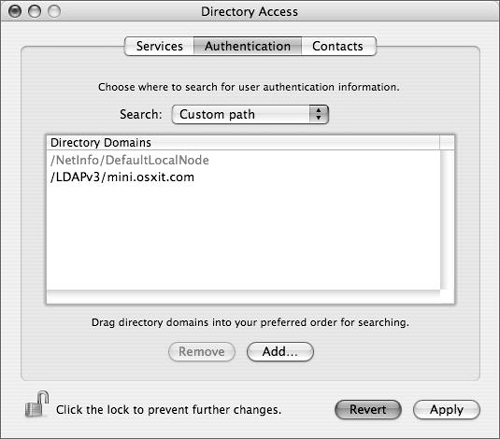
In the Directory Access window, click the Authentication tab to make sure your server is part of the authentication path and then click Apply (Figure 3.22).
Open a Terminal window and type
idpatrickand press the Return key on your keyboard.Use the short name of a user in your shared (LDAP) domain instead of patrick. If successful, you are now bound to your LDAP domain and have an edu.mit.Kerberos file.


Prior to Mac OS X Server 10.3, Open Directory Server was not particularly useful to any but the smallest organizations. This was mainly because of its lack of redundancy—Open Directory had no redundancy, so if the single master disappeared, clients would be left without any directory service. Both the client-side behavior and the server-side redundancy have gradually improved with every Mac OS X Server release, and now Open Directory presents a relatively robust, suitably redundant infrastructure for small to medium organizations.
When choosing a role for the Mac OS X Server, the Open Directory Replica option causes the Mac OS X Server to import the necessary data from the specified Open Directory master, thus turning the replica into a secondary copy of the OD master’s LDAP, PWS, and KDC.
Creating a replica has several benefits. The most obvious is that it eliminates any single point of failure. Second, having more than one server to authenticate users means that requests for authentication can be spread across several servers, possibly in various areas of the country.
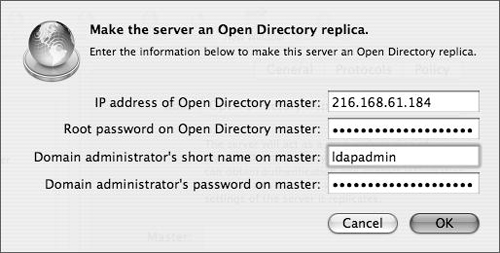
Apple has done a good job making the replica creation process as simple as possible. To create an Open Directory replica using Server Admin, you must first, of course, have an Open Directory master and know the IP address, shared (LDAP) administrator’s name, password, and local root password. Also, make sure that your server is up to date and that forward and reverse DNS entries are properly configured. If the Mac OS X Server is also a DNS server, refer to Chapter 6. Password-authenticated ssh logins should be enabled on the master, at least temporarily during the replica-creation process.
Launch Server Admin, located in /Applications/Server, select Open Directory from the services list, and click the Settings tab.
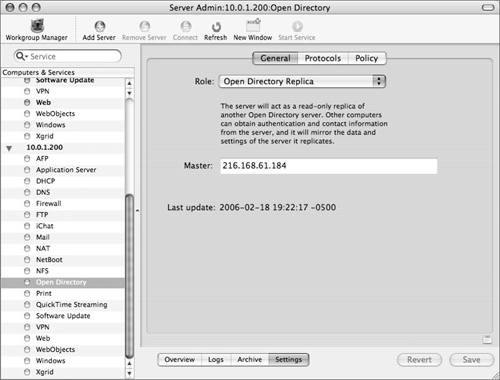
Click the General tab and choose Open Directory Replica from the Role pop-up menu (see Figure 3.1).
In the dialog that appears, specify the IP address of the Open Directory master, the root password on the master, and the username and password of an Open Directory administrator. Then click OK (Figure 3.23).
In the Server Admin window, click Save and wait for the replication to occur.
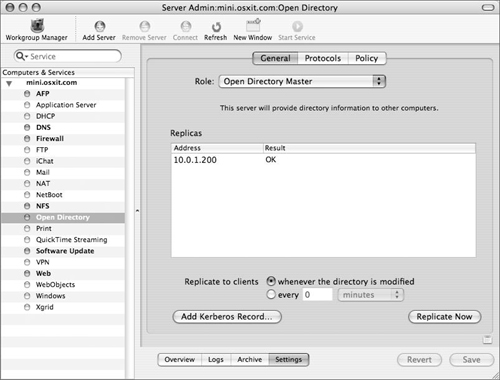
After a few moments, the window will update showing the replication information (Figure 3.24). During the replica-creation process, the LDAP and KDC data is
scp’d (secure copied, a file transfer protocol based on ssh) over to the new replica. Password Server data is replicated using the Password Server protocol.Check your Open Directory master to make sure that the replica was created and choose how often you wish your master to push information down to your replica (Figure 3.25):
Replicate to Clients—. Determines how frequently (defined in the GUI as minutes or days) data is sent to Open Directory replicas. Can be set on a time interval or whenever directory data is changed. If the time interval is less than 60 minutes, data is sent to replicas whenever any changes are made is on the Open Directory master.
Replicate Now—. Forces immediate replication of the Password Server and LDAP data.
✓ Tips
During this process of replica creation, the master’s LDAP server will be temporarily stopped in order to ensure that its exported LDAP data is up to date. This will result in a temporary service outage. So create your first replica as soon as possible. The more user, group, and computer records in your domain, the longer this could take.
KDC (Kerberos) data is actually replicated and maintained by the Password Server. So the only two replication protocols are critical, Password Server and OpenLDAP.
In all but the smallest organizations, most of the Mac OS X Servers will be neither Open Directory masters nor Open Directory replicas. Instead, your file, Web, mail, VPN, iChat (Jabber), and other services will be configured to access one or more directory domains—Open Directory, Active Directory, or otherwise.
This is the whole point of centralizing directory data. You maintain your user, group, and other administrative data centrally. Mac OS X (and hence Mac OS X Server) is extremely flexible in this regard. Realizing that an Open Directory master is not always the directory service of choice among its customers, Apple has engineered Mac OS X to be one of the most flexible cross-platform directory clients in existence today. Directory Access is the primary method for configuring that access.
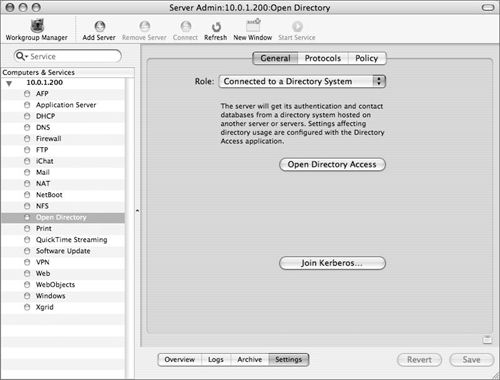
When you choose Connected to a Directory Service in Server Admin, you will be directed to Directory Access to configure your connection to the other directory service (although you can also join an existing Kerberos realm as well) (Figure 3.26).
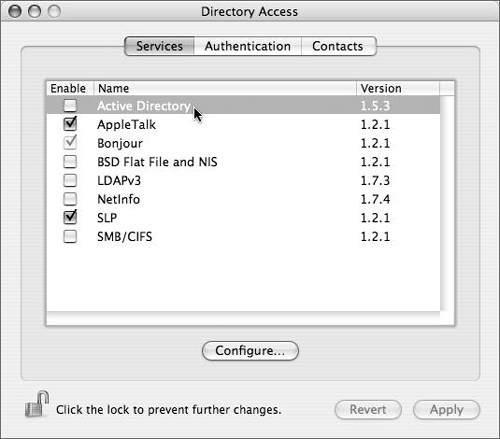
The Directory Access application is used primarily to connect a Mac OS X or Mac OS X Server computer to another directory service or system.
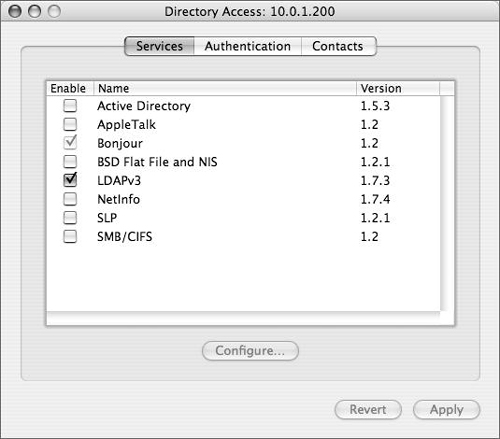
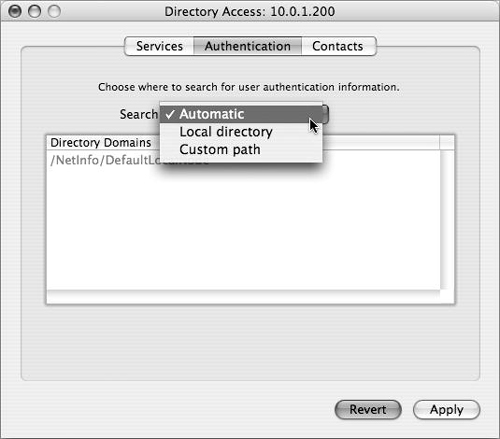
Directory Access has three tabs: Services, Authentication, and Contacts. In practical terms, the Services tab lists all of the different types of directory services Mac OS X and Mac OS X Server can access, and allows each one to be configured (Figure 3.27). The Authentication tab lists the configured directory domains that will be searched for user, group, and other directory data (Figure 3.28). The Contacts tab allows configured directory domains to be used for contact information by the Mail and Address Book applications.
To understand how the Directory Access application works, you must be familiar with the concept behind what it does. Since Directory Access is based on a modular plug-in architecture, the application works differently depending on the plug-in used.
Let’s say you have another Mac OS X Server already in your organization, and you want this Mac OS X Server to see all the users and groups you’ve created on your first server. Or, you have a Microsoft Active Directory server, and you want to see all the users in that directory service (provided you have the proper access). When you click the Services tab, you can choose from four different methods of connecting your Mac OS X and/or Mac OS X Server to another directory service:
Active Directory—. Use this plug-in to bind Mac OS X or Mac OS X Server to an Active Directory domain (as you’ll see later in this chapter).
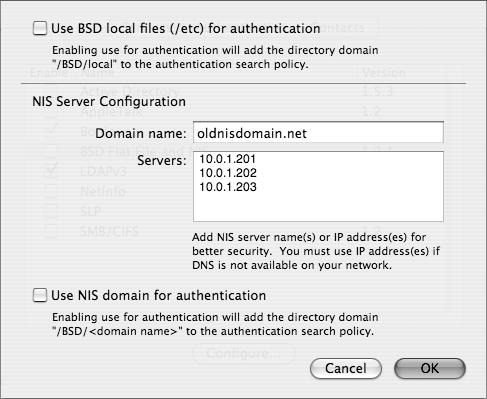
BSD Flat Files and NIS—. Use this plug-in to allow Mac OS X and/or Mac OS X Server to search locally for flat files (/private/etc/master.passwd) containing user and group information and/or allow it to use Sun’s NIS, Network Information System (Figure 3.29).
LDAPv3—. Use this option when you’re connecting Mac OS X and/or Mac OS X Server to another Open Directory Server or any other LDAP-based directory service.
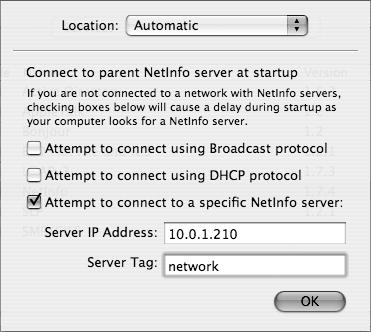
NetInfo—. You can use this plug-in when you’re connecting a Mac OS X computer to an older parent NetInfo directory, such as Mac OS X Server 10.2 (Jaguar Server) (Figure 3.30).
Once you’ve chosen a method and the information is retrieved correctly, you can then have your Mac OS X and/or Mac OS X Server authenticate against that additional directory service.
Whenever a user logs in, Mac OS X and Mac OS X Server always check the local NetInfo directory first. If a user record isn’t found in the local NetInfo directory, Mac OS X checks the authentication path for the username and password information, allowing the authenticated user to log in. That search list is handled on the Authentication tab of the Directory Access application (as shown in Figure 3.28).
This can be a multi-tiered situation. For example, suppose you want your Mac OS X computer users to log in to their machines, and their user names and passwords are stored on another directory server, not your Mac OS X Server. You don’t have to create any entries in the Mac OS X local NetInfo directory. Simply have your Mac OS X Server piggyback on that other server for usernames and passwords, and then add computer management using your Mac OS X Server.
✓ Tip
If you’re working on an Xserve or managing your server remotely, you can connect to your server’s Directory Access application through yours. To do so, launch your Directory Access application located in /Application/Utilities/, and choose Server > Connect. In the resulting dialog, type in the address or name of the server and the local administrator’s name and password, and click Connect. You’ll have to reauthenticate every five minutes while this application is open, so it’s a good idea to get in, make your changes, save them, and get out.
If you want, you can use the Server Admin application to begin the process of configuring your Mac OS X Server to access an existing Open Directory domain. This makes sense, since that’s where other directory configuration (such as creating an Open Directory replica or master) takes place. Before proceeding with the following task, make sure your Mac OS X Server’s Network preference pane has the correct information to see the domain name information for the other Mac OS X Server.
Launch Server Admin and navigate to the Settings section in the Open Directory module.
Click the General tab, then choose “Connected to a Directory System” from the Role pop-up menu (Figure 3.31), and click Save.
Now you can use the Directory Access application for the remainder of your server directory configuration process.
Launch Directory Access by running it locally on the server itself or by connecting to your server remotely via Directory Access’s Server menu and authenticate as required (Figure 3.32).
Follow steps 3–11 in the “To bind Mac OS X to a Mac OS X Server Open Directory master” task earlier in this chapter.
Open a Terminal window, type
idpaulv, and press Return.Use the short name of a user in your shared (LDAP) domain instead of
paulv. Your Mac OS X Server is now bound to the other Mac OS X Server’s shared (LDAP) domain.
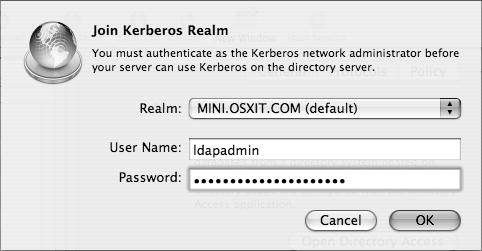
When a Mac OS X Server is connected to another directory system with a Kerberos infrastructure, you can choose to have your Mac OS X Server join a Kerberos realm. First you must have the KDC’s administrator name and password (Figure 3.33). Once this has been done, services on your Mac OS X Server can accept tickets from users whose authentication information is maintained on the KDC.
Microsoft’s Active Directory (AD) is one of the most commonly deployed directory services today. As such, integration with it is very important. Apple has engineered the Active Directory plug-in installed with Mac OS X to work well with AD.
Mac OS X is able to access Active Directory natively, without modifying the Active Directory’s schema and without any extra software installed on the Mac. This enables AD accounts to make use of Mac OS X Server services like Mail, AFP, iChat, and Weblogs. Mac OS X Server can even store SMB home directories for Windows users.
In addition, Kerberos Single Sign-On is supported by an AD domain in much the same way that it is in Open Directory. Like most other directory services, this configuration takes place mostly in the Directory Access utility.
Before proceeding with the following task, make sure that your server is up to date and that forward and reverse DNS entries are properly configured. An Active Directory integrated DNS server should be listed as the first DNS server for the primary network interface in the Network pane of the system preferences application (Figure 3.34). Ideally, your server will also live in the same DNS domain as your Windows systems to facilitate Single Sign-On.

Launch Directory Access by running it locally on the server itself or connecting to your server remotely via Directory Access’s Server menu and authenticate as required (Figure 3.35).
Select the Active Directory plug-in and click the Configure button.
or
Double-click the Active Directory plug-in.
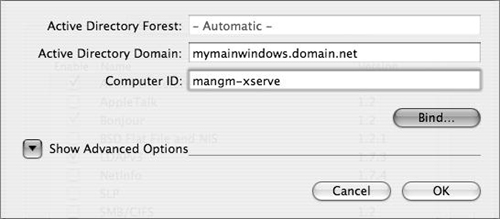
In the dialog that appears, specify the fully qualified domain name of your Active Directory domain (not the DNS name or IP address of your AD domain controller).
Specify a computer ID (Figure 3.36).
For Mac OS X Server, this computer ID should correspond to the host portion of the server’s fully qualified domain name.
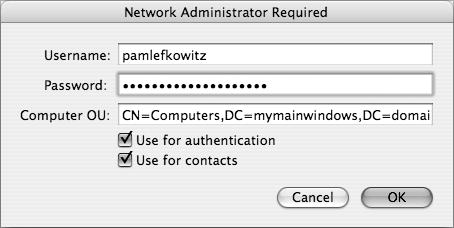
Click Bind. A dialog for supplying the administrative credentials appears (Figure 3.37).
In the Computer OU field, supply the credentials of a user with full control over the OU or CN and click Bind.
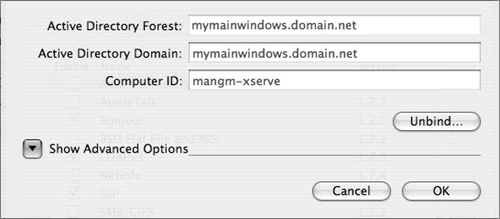
If binding is successful, the Active Directory Domain and Computer ID boxes will become unfocused, and the Bind button will become an Unbind button. The Active Directory bind will then be added to the authentication path (Figure 3.38).
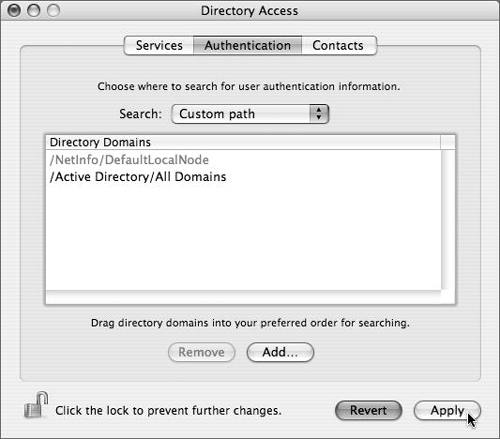
Click the Authentication tab in Directory Access to ensure that Active Directory is now part of the authentication path and click Apply (Figure 3.39).
You may now access AD user accounts in much the same way you would Open Directory accounts: by assigning permissions, accessing Mac OS X Server Services, and provisioning access to Web resources.
✓ Tips
If binding is not successful, enable the
DirectoryService daemondebugging by executingsudo killall -USR1 DirectoryService. View the resulting log in /Library/Logs/DirectoryService/DirectoryService.debug.log during a second bind attempt.Common to both the LDAPv3 and Active Directory plug-ins in Mac OS X and Mac OS X Server 10.4 are the “Use for authentication” and “Use for contacts” check boxes, which prevent the extraneous trips to the Authentication and Contacts tabs required in v10.3 and earlier.
It’s common to need more out of your directory services infrastructure than Active Directory can provide. Although basic Active Directory integration is feasible with no modification to the directory, Mac OS X supports a number of features that are not available on Active Directory. This is the nature of cross-platform integration—a certain level of commonality is feasible, but platform-specific features will generally mean requirements that a single directory cannot provide.
A frequent strategy for alleviating this shortcoming is deployment of peer directories. User, group, and other data lives in Active Directory. Mac-specific management data that Active Directory is generally incapable of providing lives in the Open Directory, and Mac clients are configured to access both. As of 10.4.3, Active Directory groups may be nested inside Open Directory groups using Workgroup Manager or the command-line dseditgroup.
By applying Mac OS X managed client settings to the Open Directory group that contains the AD group, users in the AD group are effectively managed, even though Active Directory cannot house Mac OS X managed client attributes. This is often known as the Golden Triangle, one corner being Active Directory, one corner being Mac OS X Server, and one corner being a Mac OS X computer.
To further this scenario, mobile home directories are often created to allow for home directory synching. The goal here is to:
Create an OD master.
Bind the OD master to an AD domain.
Configure Mac OS X computers to bind to both domains.
Synchronize local home directories for each user with directories on the OD master.
Allow user authentication to rely on the AD server.
Before any binding can occur, a machine that can store MCX attributes in records at the user, group, or computer level must be available on the network. Logically, the Mac OS X Server should be promoted to Open Directory master. Before proceeding with this task, first follow the “To create an Open Directory Master” and the “To bind to an Active Directory domain” tasks earlier in this chapter. Then in the Authentication tab of Directory Access on the Mac OS X Server, Active Directory must be listed before the server’s own LDAPv3/127.0.0.1 connection.
Create the Network mount point by following the “To create a home directory network mount” task in Chapter 5, “File Sharing.”
Launch Server Admin, start the Apple File Service, and use Kerberos as the authentication protocol.
For more on the Apple File Service, refer to Chapter 5.
Launch the Workgroup Manager tool located in /Applications/Server, and authenticate as the administrator if necessary.
Click the directory authentication icon and select the LDAP directory from the “Authenticate as” pop-up menu (Figure 3.40).
Select the Accounts icon in the toolbar and then click the Groups icon.
Choose the New Group icon and enter the group’s long name and short name (Figure 3.41).
Open the users drawer by clicking the plus button next to the members window, and then select the group icon in the drawer.
The Users and Groups list will open on the side of Workgroup Manager (Figure 3.42).
There are two methods for creating groups from the Active Directory Users. One is to place the individual AD users into groups in the shared (LDAP) domain group. The other is to place AD groups into shared (LDAP) domain group. This second method, discussed here, refers to the new nested groups feature in Mac OS X Server 10.4 and avoids additional administration tasks.
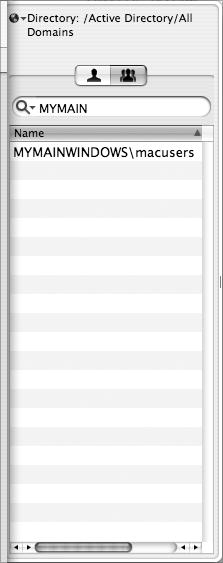
Choose the Active Directory Domain from the “Authenticate as” pop-up menu (and type in the AD group you wish to see if necessary by choosing Other from the list) (Figure 3.43).
The Active Directory group shows up in the authentication list (Figure 3.44).
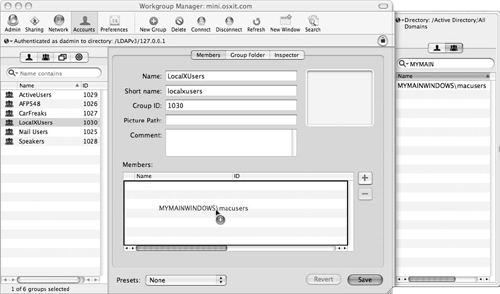
Select the group that contains all the users who will be using Mac OS X and drag that group into the Members area; then click Save (Figure 3.45).
Your shared (LDAP) domain now has an Active Directory group within its own LDAP group.
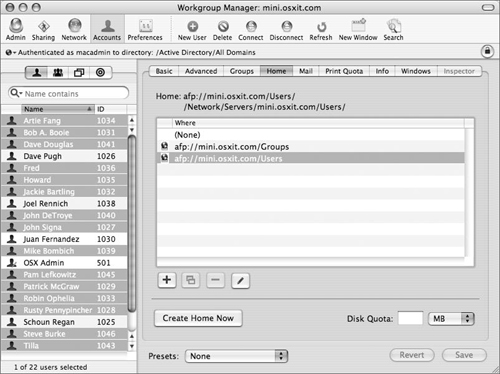
Select the Users tab in the Active Directory Domain, click the Home folder tab, and select a Home folder path for those users (Figure 3.46).
Click Create Home Folder at the bottom of the window before you click Save.
It is critical that home folders be created before the users ever log in.
Click the Groups tab in Workgroup Manager and select the LDAPv3 group housing the AD nested group.
Add mobile home folder options for the group.
Refer to the section “About the Mobile Accounts managed preference” in Chapter 13, “Client Management,” for instructions.
Follow steps 1–3 in the “To bind to an Active Directory domain” task earlier in this chapter to bind the Mac OS X computer(s).
Remember to use unique names for each computer.
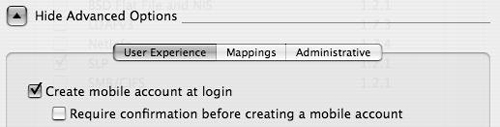
In the Active Directory plug-in window, click the Show Advanced Options disclosure triangle.
Select the “Create mobile account at login” check box and deselect the “Require confirmation before creating a mobile account” check box (Figure 3.47).
Continue with steps 4–7 in the “To bind to an Active Directory domain” task earlier in this chapter.
On the Mac OS X computer(s), complete the “To bind Mac OS X to a Mac OS X Server Open Directory Master” task earlier in this chapter.
Reboot the Mac OS X computer(s).
You should now be able to log in to a Mac OS X computer with a username and password that exists on the Active Directory server, have a local home folder created for you based on that account, and have that local home folder synchronized with an identical home folder on the Mac OS X Server.

LDAP is a tremendously flexible protocol that shows an extremely wide scope of deployment. Because of this, it’s difficult to generalize among different types of LDAP deployments. Even given a single directory service platform (eDirectory, for instance), a wide variety of deployed configurations exist. Because of this, mapping is incredibly important. Mapping attributes is one way to ensure a smoother transition from one directory service to the other.
Although this seems complicated, essentially all you’re doing is connecting the dots:
Determine the basic access configuration—port number, search base, and whether or not SSL is in use. Also important in some cases are authentication semantics: authentication methods and whether or not authentication is required to access the directory. This has to come from the LDAP administrator, not you. You are attempting to make the Mac OS X Server conform to their directory service, not the other way around.
Determine where user records are stored and whether or not sufficient data exists to support the Mac OS X user experience (at a minimum, a short name and numerical user ID should be available). If the attribute doesn’t exist on the other directory service, you must either create that attribute or use an empty attribute and match the new name.
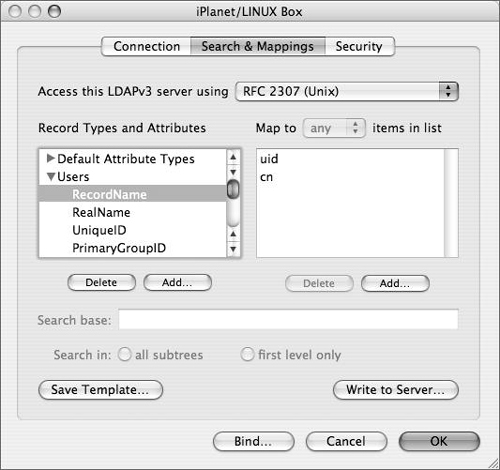
Configure the LDAPv3 plug-in. Start with the RFC2307 mappings, and customize them according to the research you put into your LDAP directory (Figure 3.48).
The final directory service technology this chapter will look at is Network Information Services (NIS). This technology is still used in certain places, and Mac OS X and Mac OS X Servers can authenticate against it using the BSD Flat File and NIS plug-in. It can also be used to authenticate against flat files that exist on the local disk.
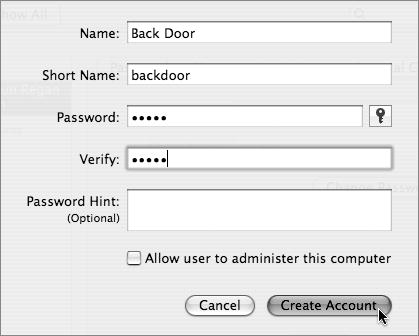
Choose the Accounts tab from within the System Preferences application to create a user with the Long Name Back Door and the Short Name backdoor (Figure 3.49).
This creates the home folder directory for the user backdoor (you can use any name that suits you).
Open the Terminal application, and type
sudo mv /Users/backdoor/ /private/var/Press Return, and enter your administrator password when asked.
This moves the home folder of the user backdoor away from the normal location in the /Users folder and places it in the hidden /private/var directory.
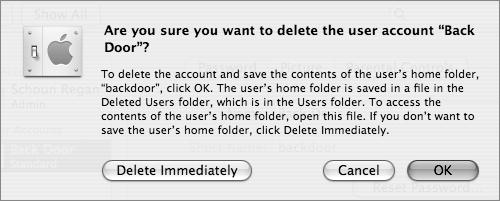
Open System Preferences, and delete the user backdoor by clicking the minus button below the list of users and clicking Delete Immediately (Figure 3.50).
This removes the user from the local NetInfo database; however, the home folder for that user has been saved and moved.
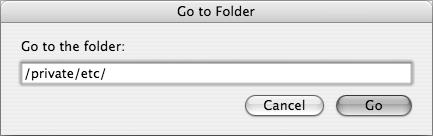
Open a new Finder window, choose Go > Go To Folder, and type
/private/etcin the resulting dialog (Figure 3.51).Open the file, master.passwd, in a text editor, such as
viorpico, by typingsudo vi master.passwd.View the last line of the file, and create a new last line of the file, mimicking everything you see except changing the following:
Short Name
User ID
Group ID
Home Folder path
Shell type
For example, in the line
backdoor:*:501:501::0:0:Back Door:/var/backdoor:/bin/bash, from left to right:backdooris the user’s short name.The asterisk is a placeholder for the password that will be changed later.
501:501is the user ID followed by the primary group ID.Back Dooris the user’s long name./var/backdooris the path to the home folder, which was moved into /var earlier./bin/bashis the user shell type.
Save the file.
Open the Terminal, and change the password for your new user by typing
sudo passwd -i file backdoorand pressing Return.Enter your password first if necessary, because you started the command with
sudo. Then enter and reenter the new backdoor user’s password to change it.While you’re in the Terminal, type
sudo chown -R backdoor:backdoor/var/backdoor, and press Return.This command reassociates the backdoor user with the backdoor home folder.
Open the /private/etc/group file (again using
viorpico) and add this backdoor user to the admin group, allowing them to have administrative privileges.You’ve created a hidden user inside the local flat file with the same UID and group ID as the local administrator. You must now add the local flat files to the authentication search path.
Launch Directory Access and authenticate by clicking the lock in the lower-left corner of the dialog.
Click the Services tab, and click the BSD Flat File and NIS plug-in check box if it isn’t already checked (Figure 3.52).
Click the Configure button to open the BSD authentication dialog.
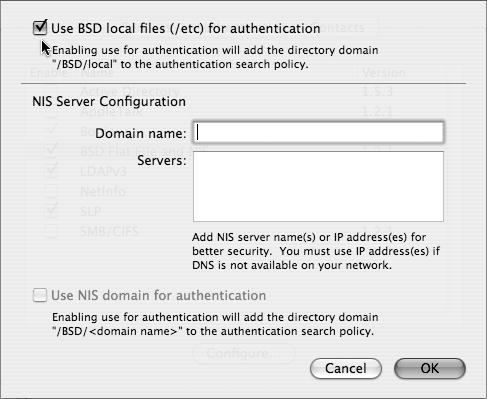
Click the “Use BSD local files (/etc) for authentication” check box and then click OK to close the dialog (Figure 3.53).
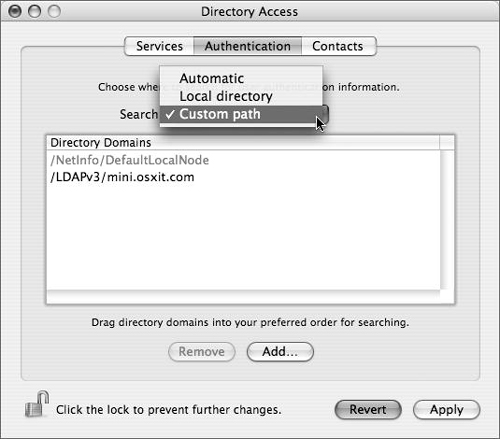
In Directory Services, click the Authentication tab and choose Custom path from the pull-down menu if not already selected (Figure 3.54).
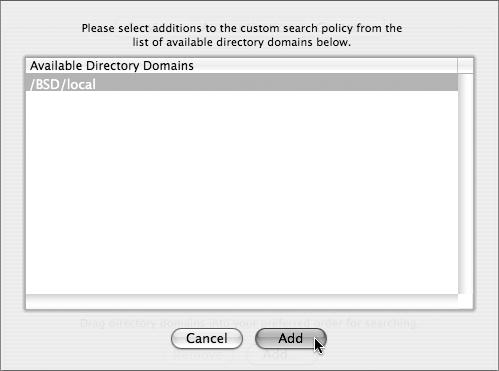
Click Add to open a list of Available Directory Domains.
Select /BSD/local from the list and click Add (Figure 3.55).
Click Apply to commit the changes to your Open Directory architecture.
Your Mac OS X Server is now ready to have a hidden user authenticate from flat-file users.
Log out, and then log in with your new hidden account.