
What network-related services does Mac OS X Server offer, and how do you go about managing these services? Often, you’ll want your Mac OS X Server to do double duty as a router, DHCP server, or DNS server, as well as handling Network Address Translation (NAT). Perhaps you’re replacing an older Windows NT server or upgrading an AppleShareIP server. Each of these services extends the functionality of your server. This chapter looks at setting up some of these services and discusses how they will benefit you.
DNS is an acronym for both Domain Name System and Domain Name Server. DNS is widely used but widely misunderstood.
The Domain Name System is used to make the Internet easy to navigate. Instead of typing numbers like http://17.254.0.91, you type http://www.apple.com; both addresses go to the same place, but the second is certainly much easier to remember. In order for DNS to work, Apple Computer must have a computer that is in charge of the DNS domain apple.com, which in turn lists computers under its domain such as www.apple.com, training.apple.com, train.apple.com, and so forth.
Let’s back up a bit. Suppose you wish to find a Web site, let’s say www.afp548.com. You’d probably start by searching the .com domain, which tells you where afp548.com is, which, in turn, tells you where www.afp548.com is located. That computer is running a Web server and responds to your request by giving you back Web pages. Or you may type in ftp.afp548.com in Connect to Server and the same process would take place, finally connecting you to the FTP port (port 21) of afp548.com. This concept works because almost all devices on the Internet that have an IP address associate that address with a name. This, in a nutshell, is how the Domain Name System works.
Mac OS X Server, when running as an LDAP server and a Kerberos Key Distribution Center (KDC), relies heavily on DNS, so it’s critical to discuss some key points about how to properly implement DNS on your system. If you are not running DNS on your Mac OS X Server, it is still important that you understand how DNS works. You will need to keep your DNS administrator apprised of any changes to your system so they can properly update the DNS records on their DNS servers.
First, Mac OS X Server can be a Domain Name Server. That is, it can translate its IP address(es) into names and back. If your organization already has a Domain Name Server, it’s imperative that you have the DNS administrator add zone records for your server. Zone records are text files kept on a DNS server that convert names to IP addresses and IP addresses to names.
Many zone records can be used, but this chapter discusses forward and reverse records. If nothing else, you must have both forward and reverse records for your Mac OS X Server if you wish to use it as an LDAP server and a KDC. These particular records are known as A records and PTR records, and they will be shown later in this chapter.
✓ Tip
Before creating an Open Directory master, it is imperative that DNS be on one box within your organization and have records for your server (this can, of course, be the server that is the OD master) if you wish to take advantage of everything an Open Directory master has to offer. A good rule of thumb is to get your DNS house in order before turning on any other services or promoting your machine to a master.
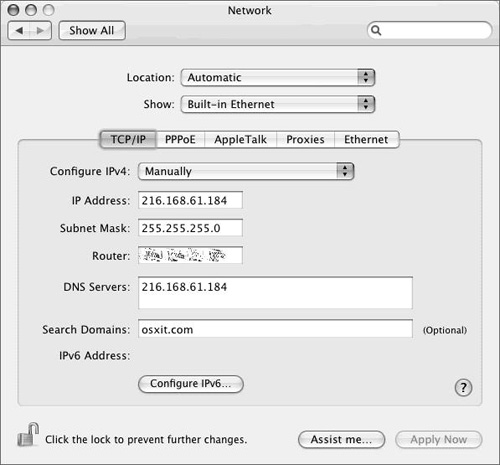
Select System Preferences from the Apple menu and click on the Network icon to open the Network Preference pane. Enter the proper IP address, subnet mask, and router address for your server, if it is not entered already (Figure 6.1).
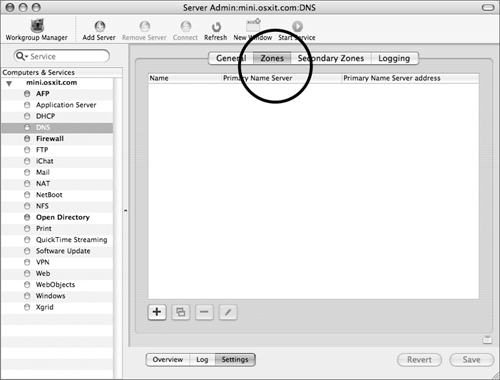
Launch Server Admin and select the DNS service for your server in the Computers & Services list.
You’ll use Server Admin for most of the exercises in this chapter, so leave it open.
Click Settings, select the General tab, and click one of the following check boxes (Figure 6.2):
Zone transfers allows for the DNS zone information on this server to be copied to another server, in case this DNS server stops responding.
Recursion allows for lookups outside of the domain itself and responds with whatever it finds. Recursion is global to the server. If you are running more than one domain and one is internal and one external, you should turn it off for domains that are internal only and turn it on for servers that must face the outside world.
Select the Zones tab to configure a basic zone (Figure 6.3).
Click the plus button to open the Editing zone dialog, where you can enter the following information (Figure 6.4):
The name of the zone you want to add
The name of the machine hosting the zone
The IP address (if the server is configured with more than one) associated with the zone
Additional DNS servers that will host this zone
Administrator email address
The “time to live” for the individual records
Click Save and then click Start to start the DNS server.
You may have to click Start twice the first time you start your DNS server.
In the Network preference pane, enter your own DNS server and search domain so that the server can locate itself (Figure 6.5).
To test your work, open the terminal on your server, type
hostname, and press Return.This should return the fully qualified domain name of your server. If it doesn’t, you may have to stop and start the DNS service and repeat this step again.
Type the word
host, followed by the result of the hostname command, and press Return.This resolves the name to the IP address and should show the proper IP address associated with the name.
Type the word
host, followed by the IP address result from the first host command.This resolves the IP address back to the name, ensuring that both forward and reverse records are functioning properly.
If everything resolved correctly, close the Terminal.


In addition to setting up simple DNS records to become a self-serving Open Directory master (that is, not relying on another server to do DNS for you), having mail services is yet another reason to run DNS. To add a Mail (MX) Exchange record to your DNS service, refer to Chapter 8, “Enabling Mail Services.”
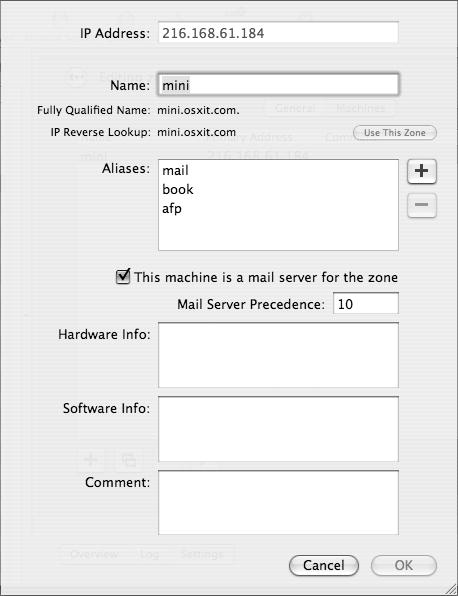
There are other services to offer, such as Web, FTP, and AFP, to name a few. You may wish to set up aliases for these records. Aliases allow more than one name in a domain to point to the same IP address. In this fashion you can have www.osxit.com, www2.osxit.com, afp.osxit.com, and so on, all pointing to mini.osxit.com, which is resolving to 216.168.61.184.
There are plenty of other types of records you can have, such as the following:
Address records
Pointer records
Namespace records
Text records
There are several other entries that can be made inside of your DNS zone file, which are beyond the scope of this book. For more information about DNS, you can point your browser to: www.menandmice.com/online_docs_and_faq/glossary/glossarytoc.htm.
In Server Admin, select the DNS service for your server in the Computers & Services list.
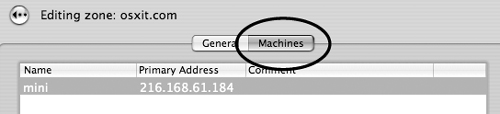
Click Settings and then select the Zones tab and double-click your zone (as seen in Figure 6.3) to open the Editing zone dialog.
Select the Machines tab and double-click the record below to view any aliases (Figure 6.6).
A new window appears, showing any aliases associated with that record and giving you options to add more (Figure 6.7).
Click the plus button and add the name that you want others to type (preceding your domain name) to access your server, and then click OK (Figure 6.8).
When you’ve finished making changes, click Save.

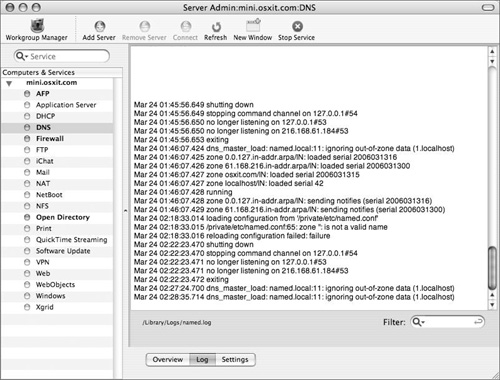
It is important to have DNS logging turned on and active, so that you can troubleshoot DNS issues that may plague your server.
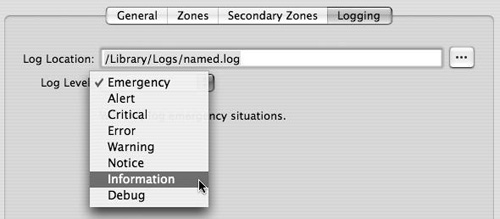
Select the DNS service for your server in the Computers & Services list, click the Settings button, and then select the Logging tab.
Enter a location in the Log Location field and choose Errors from the Log Level pop-up menu (Figure 6.9).
When you’ve finished making changes, click Save.
Check the Log tab for errors relating to your DNS service, such as a zone file not loading (Figure 6.10).
Computers, printers, routers, and servers all communicate via IP addresses. But where do these addresses come from? There are routable addresses and nonroutable addresses, or public and private addresses. Chapter 3 discusses these address ranges.
You now need to decide how you can best manage computers connected to your network. Perhaps they will obtain an address from your server; if that’s the case, then understanding how to set up DHCP services is an essential piece of Mac OS X Server. Prior to turning on your DHCP service, you need to ask anyone else on your network if their computer is acting as the DHCP server. Having two DHCP servers on the same network can wreak havoc on the network and should be avoided at all costs.
You can also quickly change the setting of any client computer to DHCP and see if it obtains anything but a 169.254.x.x address, or self-assigned address, indicating that there is no DHCP server on the local network.
At the bottom of the Server Admin pane, there are four buttons that deal with DHCP:
Overview shows whether the service is running and displays the current number of leases.
Log displays the current log file for the DHCP service.
Clients shows all the client machines that are using an address given to them by the DHCP service.
Settings shows how many network ranges (called subnets) you’re serving addresses to and what network interface you’re using for each range. This tab also lets you set your desired level of logging.
Assuming you’ve done your homework and determined that your Mac OS X Server is going to be a DHCP server for your network, decide which addresses you want to pass out to the client computers. You should also decide whether passing out extra information with the address is necessary for your network. For example, Mac OS X DHCP server can pass out the following information to a client: IP address, subnet mask, router address, DNS addresses, search domains, LDAP information, and Windows WINS information. All this information is transferred from the server to the client when the client asks for an address.
Let’s examine what takes place when a DHCP server is on the network:
The client machine starts up and searches for a DHCP server.
The DHCP server responds to the client and offers the client an IP address and other information.
The client formally requests the information from the server, and the server sends it down to the client.
The client asks any other computers or printers on the network if the address offered is already taken.
If no one responds that they have the IP address in question, the client then proceeds to commit the information to memory. The client is leasing the address from the server.
This process takes place every so often during the day. If you tell your server to give out addresses for eight hours, then your client will ask the server if it can renew the address it has at four hours, or half the lease time.
Having leases that run for six months can be useful when you have only a handful of computers; but if you have laptops that come and go, and people hopping on and off their computers all day, it’s better to set the lease time for 8 hours so that you’re assured the client computers will ask for a renewal during a standard eight-hour day, thus potentially freeing up addresses for others to use the following day.
Again, before you start the DHCP service on your Mac OS X Server, be sure no one else is providing DHCP services on your network.
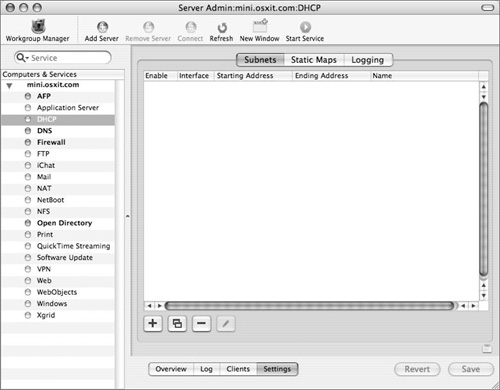
In Server Admin, select the DHCP service for your server in the Computers & Services list.
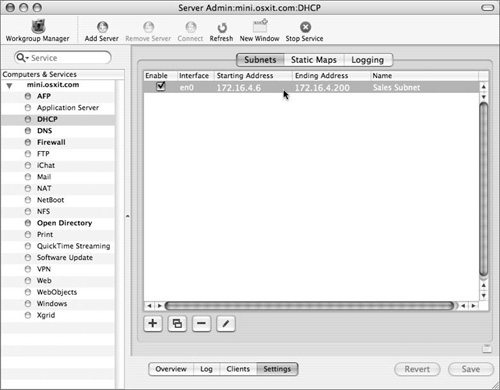
Click Settings and then select the Subnets tab (Figure 6.11).
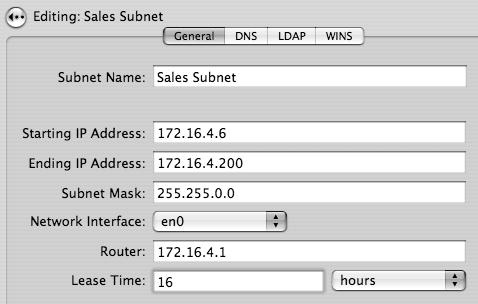
Click the plus button to open an Editing pane, where you can enter the following information (Figure 6.12):
Subnet Name
Starting IP Address
Ending IP Address
Subnet Mask
Network Interface
Router
Lease Time
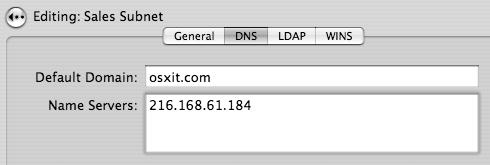
Select the DNS tab, and enter the appropriate DNS information you want the client computers to receive (Figure 6.13).
You may enter more than one DNS and search domain.
Click the back arrow in the top-left corner of the pane to return to the Subnets pane.
Click the Enable check box, if it’s not already checked (Figure 6.14).
Click Save and then click Start Service to start the DHCP service.

✓ Tip
You can set up two DHCP subnets on the same interface. You might do this if you already have a printer or a server within the range of addresses you wish to use. For example, if you have a server or a printer with an IP address of 192.168.1.50, you can have two DHCP ranges—the first going from 192.168.1.2 to 192.168.1.49 and the second range going from 192.168.1.51 to 192.168.1.200, thereby skipping the address users already know.
You’ve just learned how to push down IP address information that allows users to connect to your network. But what if your needs are bigger? What if you have home directories on your server and you want the client machines to automatically find them? As discussed in Chapter 3, you can make a Mac OS X Server an LDAP server; one function of that is allowing home folders to exist on the server.
If you have more than 200 client machines, going to each machine to point it to the server is tedious and time consuming. A better way is to allow the DHCP server to push down the information to each client along with the IP address information.
Select the DHCP service for your server in the Computers & Services list, click Settings, and then select the Subnets tab (Figure 6.15).
Double-click the subnet to open an Editing pane.
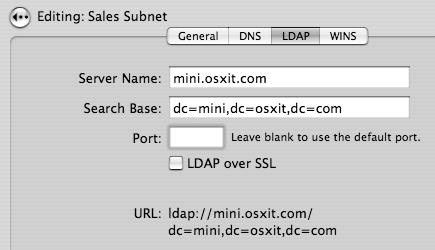
Select the LDAP tab and enter the appropriate information (Figure 6.16):
Server Name is the fully qualified domain name of your server, such as xserver.example.com. This entry is different from those of DNS and should not have a trailing dot at the end of the name.
Search Base is the LDAP search base of your server. In most cases, this looks something like
dc=servername, dc=example,dc=com, which parses your domain name into standard LDAP structure. For more information on what to enter here, refer back to the “To create a master directory” task in Chapter 3.Port lets you enter a port for the information to go over, or leave this field blank to use the default port.
Click the LDAP over SSL check box to secure your connection over Secure Socket Layer (discussed in Chapter 10, “Security”).
Click the back arrow in the top-left corner of the pane to return to the Subnets pane.
When you’ve finished making changes, click Save.
If the DHCP service is already running, you’ll be prompted to restart the service. Doing so implements your changes.
✓ Tip
Recall that the LDAP information is needed so the client machine can see the server. In this manner, the client can authenticate against the server and obtain a home folder or other shared folders. If the client machines are already configured to accept a DHCP address, all you have to do is ensure that the LDAP information is passed down along with the IP information.
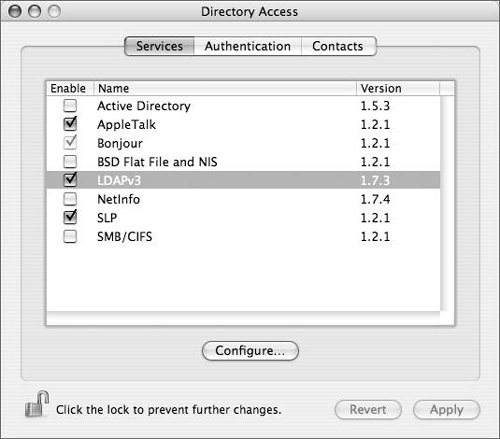
On Mac OS X computer(s), launch Directory Access, click the lock in the lower-left corner, and select the Services tab (Figure 6.17).
Select the LDAP plug-in and double-click it to open a new pane.
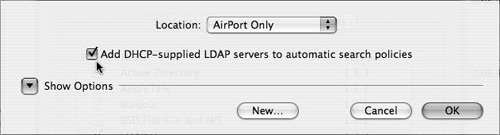
Click the “Add DHCP-supplied LDAP servers” check box, if it’s not already selected, and click OK (Figure 6.18).
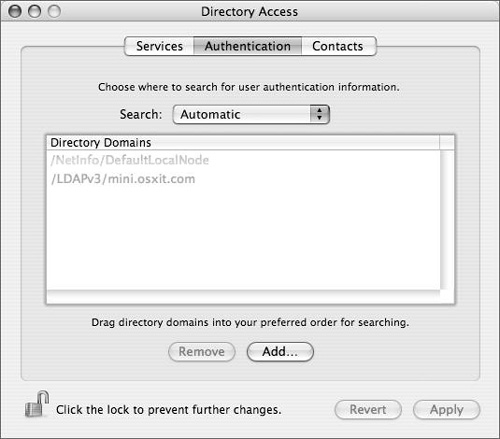
Select the Authentication tab and from the Search pop-up menu, choose Automatic as the path where Open Directory searches for authentication information (Figure 6.19).
Your client machine is now ready to look for LDAP information. If your client machine is getting the DHCP LDAP information, you should see your server’s information in the authentication list. If you don’t, be sure your DHCP server is sending down the appropriate information.
✓ Tips
One other set of data can be pushed down to a client machine: WINS data. Windows Internet Naming Service (WINS) is used by Windows computers to locate one another on a network across subnets. If you have Windows clients obtaining an address from a Mac OS X Server, you configure the DHCP server to push down the WINS information.
Using Mac OS X Server as a DHCP server is an excellent way to reduce dependency on an existing Windows server that can now be retired.
There may be a time when you wish to specify which computers receive a certain IP address. For example, you may have computers and printers that always need the same address, yet you do not want your users to set their computers and printers with static addresses. Use the Static Maps tab of the DHCP service to restrict which computers receive a given IP address from a Mac OS X Server DHCP service.
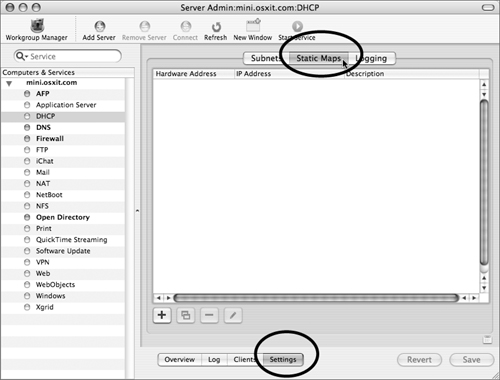
Launch Server Admin and select the DHCP service for your server in the Computers & Services list.
Click Settings and select the Static Maps tab (Figure 6.20).
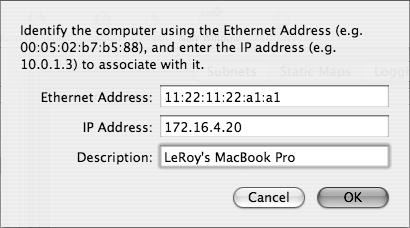
Click the plus button to open a pane where you can add the hardware address of the built-in Ethernet interface that is associated with the machines that you want to allow or deny an address from the DHCP service (Figure 6.21).
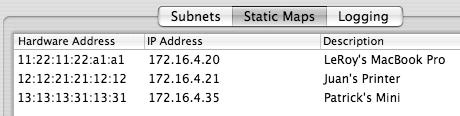
Click OK to return to the Static Maps pane and review your changes to the IP addresses (Figure 6.22).
When you’ve finished making changes, click Save.
Your DHCP service will now map given IP addresses to the devices listed in the Static Map window.
To restart the DHCP service and have the devices request a new address, restart the devices or unplug the Ethernet cable and plug it back in.
Mac OS X Server can perform NAT, taking requests from machines connected to one network interface and submitting them as if the server had made the request. Enabling NAT doesn’t require two network interfaces, but it’s suggested.
Any Macintosh that supports Mac OS X Server can perform NAT. This function is also found in inexpensive wireless routers, such as Apple’s AirPort Base Station.
There are a few reasons to use NAT:
Shortage of IP addresses
Security
Control
Perhaps your organization doesn’t need to have every computer use a public IP address. Using public IP addresses for each computer can, of course, lead to security issues, because every computer can be seen by the outside world. You still need all your computers to access the Internet and send and receive email, but you don’t want to take the security risk of having those public IPs. Or, maybe you want to watch all requests to Web sites so you can monitor them for unauthorized use. Perhaps you purchased an Xserve and have no need to purchase many public IP addresses, which can be very expensive. In all these cases, NAT is for you.
Before you begin the next task, be sure your primary network interface is set up correctly and that you can connect to the network properly (Figure 6.23). Then set up your secondary network interface with the appropriate IP information for your internal network (Figure 6.24). You must have both network interfaces active to make NAT function.

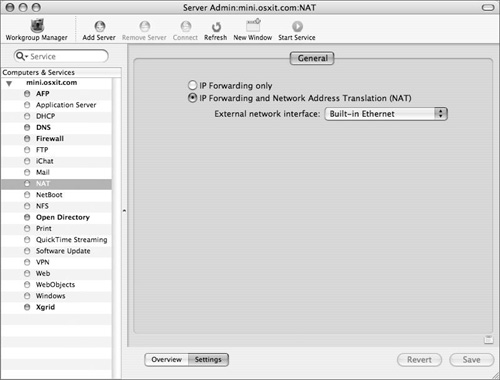
Launch Server Admin, select the NAT service for your server in the Computers & Services list, and then click Settings (Figure 6.25).
Choose the primary interface to share, click the IP Forwarding and Network Address Translation (NAT) option, and click and when you’ve finished making changes, click Save.
The interface you select is the interface that connects to the public network. In most cases, this is the network interface that connects to the Internet. The “IP Forwarding only” option is discussed in the next section.
Start the NAT service by clicking Start Service.
Choose the Firewall service from the Computers & Services list.
Click Start Service again to start the Firewall service.
The firewall must be running, but it doesn’t need to be fully configured for NAT to function.
If necessary, start a DHCP server on the network to provide IP addresses to the client machines.
Client machines can now connect to the Internet, but no device on the Internet can contact your client machines, because they don’t really exist on the Internet. As far as other devices on the Internet are concerned, all requests for information are coming from your Mac OS X Server.
Another useful feature of Mac OS X Server is that it can do IP forwarding, an option in the NAT service settings that allows requests from one network to be sent to another network. It’s necessary when you have a Mac OS X Server with two network interfaces and you want to have information passed from one network to the other. IP forwarding differs slightly from NAT in that your internal network is likely to have public IP addresses, whereas NAT makes all requests as if those requests were coming from the server (the clients have private IP addresses).
When you’re deciding how and where a Mac OS X Server should go, one consideration is whether the server will be a link between two different networks. For example, you could have your Mac OS X Server’s built-in Ethernet interface go from the server to a switch, and then have the switch connect 40 or so computers that have public IP addresses (they exist on the Internet as separate devices). These computers would use the Mac OS X Server’s built-in Ethernet IP address as their router address. All information sent out of those 40 Macs would flow through the Mac OS X Server’s built-in Ethernet interface.
Now, perhaps this is an Xserve with a second built-in Ethernet card, or maybe another Macintosh with a second Ethernet card added. Regardless, the second Ethernet interface is probably connected to another network; possibly this interface is connected to the Internet. It has different IP information than the first built-in Ethernet interface. If this scenario is something you want your Mac OS X Server to do, then you’ll be enabling IP forwarding.
You’ve probably already set up your network information to connect you to the Internet. When you want to enable IP forwarding, your secondary network should be below your primary network in the network interface list in your Network Preference pane.
✓ Tip
If you can, it’s a common best practice to have one Mac OS X Server do NAT, DHCP, and possibly DNS for the secondary network. Another Mac OS X Server may handle IP forwarding, or this function is handled by a router. Other Mac OS X Servers are then placed in the network to handle home directories, Web and mail, and file sharing.