
Your MacBook desktop is the area that is displayed on its screen. Although the size of the screen is fixed, you can maximize the size of your desktop on that screen. Like a physical desktop, you place things (in this case, windows) "on top" to focus your attention on them and use their content. As you work, your desktop naturally becomes cluttered with windows for applications, documents, and system tools. Keeping control of all these windows can help you make the most of your MacBook's desktop space. The good news is that it's a lot easier to keep your MacBook desktop neat and tidy than it is a real desktop, and you don't even need a dust rag.
Maximizing Desktop Space
Setting Desktop Preferences
Working with the Dock
Working with the Sidebar and Toolbar
Working with Exposé
Working with Spaces
Working with the Dashboard
MacBooks have a 13-inch display. This is a good size for portability, but more display space is always better for maximum efficiency while you work. Fortunately, you can maximize the amount of information you see on your MacBook's screen by configuring its display. For even more working room, you can attach and use an external display. For the ultimate in desktop space, you can connect your MacBook to a projector. When you are using an external display or projector, you can have the same image displayed on the MacBook display and the external device, or you can expand your desktop over both displays.
While the physical size of the MacBook screen is fixed, the amount of information that can be displayed on it (its resolution) is not. Setting the appropriate resolution, which determines the amount of information that is displayed on the screen, is a matter of choosing the largest resolution that you can view comfortably with no eyestrain. Here's how to find your individual maximum resolution:
Open the System Preferences application.
Click the Displays icon. The Displays pane appears (see figure 1.1).
Click the Display tab if it's not selected already. In the Resolutions pane, you see all the resolutions that are supported by your MacBook's display. Resolutions are shown as the number of horizontal pixels by the number of vertical pixels, as in 1024 × 768. Larger values have a higher resolution. Some resolutions are stretched so that they fill the screen (the MacBook has a widescreen format display).
Click a resolution. The screen updates to use the resolution you selected.
Drag the Brightness slider to the right to make the screen brighter, or to the left to make it dimmer.
Add the Displays menu to the menu bar by selecting the Show displays in menu bar check box.
Hide the System Preferences application by pressing

Open several windows on the desktop.
If you can see the information on the screen comfortably, move back into the System Preferences application and select a higher resolution.
Look at the open windows again.
If you can still see the information comfortably, repeat Steps 9 and 10 until the information gets too small to read comfortably or you reach the maximum resolution.
If the information in the windows is too small to read comfortably, move back to a lower resolution.

Note
You can quickly change resolution by opening the Displays menu and selecting the resolution you want to use. On this menu, you see a number of recent resolution settings you've used. You can change the number of recent resolutions displayed on the menu by selecting Number of Recent Items and then choosing a number between 0 and 10. You can also open the Displays Preferences pane by selecting Displays Preferences.
One truth of working with computers is that you can never have too much screen space to work with. In addition to making your document and windows larger so you can see more of their contents, more screen space helps you work more efficiently because you can have more windows open at the same time.
As you learned in the previous section, one way to gain more display space is to make the resolution as large as you can comfortably view it to maximize the number of pixels on the screen and, thus, the amount of information displayed there. At some point you'll reach a maximum amount of information on the screen due to the maximum resolution of the MacBook (currently 1280 × 800) or because the information at a higher resolution becomes too small for you to view comfortably.
To add more screen space to your MacBook (which can support many displays and resolutions), you can connect an external display. You can use this display in two ways: It can become an extension of your desktop so that you can open additional windows on it just as if it was part of your MacBook's built-in display; or you can use video mirroring, which means the same information appears on both displays.
When choosing an external display, the two most important considerations are size and cost. Larger displays are better because they give you more working space. Larger displays also tend to be more expensive, although that depends on the specific brand you choose. In most cases, if you choose the largest display you can afford from a reputable manufacturer, such as Apple, ViewSonic, or Samsung, you'll be in good shape.
To add an external display, you connect it to the MacBook's Mini-DVI port. To do this, you need a Mini-DVI to DVI adapter that converts the Mini-DVI connection to a standard DVI connector used on most modern displays.
Attaching an external display to a MacBook is easy:
Connect one end of the display's video cable to the Mini-DVI port to DVI adapter and the other end to the DVI port on the display.
Plug the Mini-DVI to DVI adapter into the Mini-DVI port.
Connect the display to a power source.
Power up the display.
Once an external display is connected to your MacBook, you can configure it with the following steps:
Open the System Preferences application.
Click the Displays icon. A Displays pane opens on the MacBook's display and on the external display. The name of the pane on the MacBook's internal display is Color LCD, while the name of the pane on the external display is the name of the display. Also notice that the Displays pane on the primary display (by default, the MacBook's display) contains the Arrangement tab.
Note
If the second display doesn't become active, click Detect Displays in the Displays pane. This should activate it.
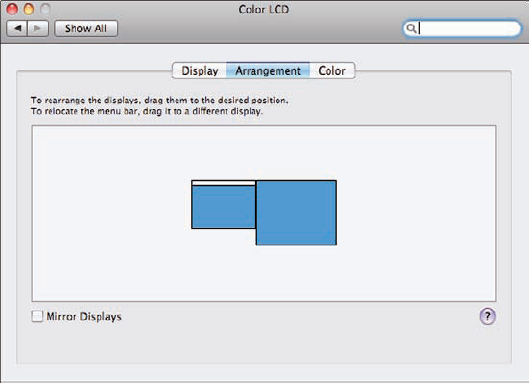
Click the Arrangement tab on the Displays pane on the MacBook screen (see figure 1.2). You see an icon representation of each display. The display marked with the menu bar at the top is the primary display, which by definition is the one on which the menu bar appears. The Dock also appears on the primary display.
Drag the external display's icon so it is on the left or right side of the MacBook display's icon, to match the physical location of the display compared to the MacBook.
If you want the external display to be the primary display, drag the menu bar from the MacBook display's icon onto the external display's icon. When you release the trackpad button, the menu bar jumps to the external display. Windows that were open on the MacBook's display move onto the external display and vice versa.
Select the Displays pane for the external display.
Choose the resolution for the external display by selecting it on the list of available resolutions.
If the Refresh rate menu appears, choose the highest rate available.
Quit the System Preferences application.
You can now use the space on the external display like you use the internal display. To place a window on the external display, drag it from the MacBook's display onto the external display. You can move windows, the pointer, and other items from one display to the other just as you can move them around the MacBook's internal display. You can configure windows on each display so that you can see many windows at the same time. For example, you might want your primary documents open on the external display and your email application open on the MacBook's display.
The menu bar remains on the primary display, so if you do most of your work on the external display, you might want to make it the primary display to make menu access easier.
Note
If you click the Gather Windows button on the Displays pane, each pane is moved onto the primary display.
If the resolutions are significantly different between the two displays, you see a big change in appearance when you move a window between them. You might have to resize a window on one display that was the right size on the other.
To stop using the external display, disconnect it from the MacBook. If it was the primary display, the MacBook's display becomes the primary. Any open windows on the external display move onto the MacBook's display.
The next time you connect the external display, you don't need to reconfigure it; your last configuration is remembered so you can just connect the display again and get to work with the extra elbowroom.
If you make presentations, conduct training, or just want a really big display, a projector is the way to go. With it, you can broadcast your MacBook's display to very large sizes for easy viewing by an audience. Using a projector is similar to using an external display so if you can work with one of them, you can work with the other.
Obtaining a projector is a bit more complicated than a display and is usually more expensive. Among the many things to consider when obtaining a projector are the following:
Size. A smaller projector is easier to carry with you, and as you move through airports and such, this is very important. Smaller projectors of the same quality are more expensive than larger projectors, so you need to find a balance between portability and price.
Resolution. There is more variability in the resolution of projectors than for displays. At the lower end of the price range, you'll find projectors that are capable of only 800 × 600 resolution. Many Mac applications can't even run at a resolution this low. The least resolution you should consider for a projector is 1024 × 768 (also called XGA). Higher resolutions are better but also more expensive.
Brightness. The brightness of projectors is specified in lumens. Projectors with higher lumen ratings are generally able to throw larger and brighter images farther. How many lumens you need depends on a lot of factors, most of which are probably beyond your control (such as the brightness levels where you'll be using the projector if you travel with it).
Throw range. This measures the closest and farthest distances at which the projector can be used.
Video interface. Like displays, the options for projectors include DVI or VGA. However, most projectors provide a number of other input options such as component, composite, and S-Video. These are important if you will also be using the projector with other sources, such as a DVD player.
Bulb life. Like all other bulbs, the bulb in a projector will eventually fail and need to be replaced. Unlike bulbs for lights, you can expect to pay hundreds of dollars for a replacement bulb for a projector, so you should try to get one with a long bulb life.
Cost. You should expect to pay $800 or more for a good-quality projector that has at least 1024 × 768 resolution.
Note
If you are using an unfamiliar projector, set the MacBook resolution to a relatively low value, such as 1024 × 768. If the projector doesn't display, reduce the resolution to see whether it starts displaying. Once it displays, increase the resolution until the projector is no longer capable of displaying the image.
Using a projector is very similar to using an external display. You connect a projector to the MacBook using a Mini-DVI to DVI or Mini-DVI to VGA adapter and then use the Displays pane to set the projector's resolution.
Warning
Some projectors automatically select the appropriate input source while some don't. If the projector isn't projecting an image, use its source menu to select the source to which your MacBook is connected. You can also use the Detect Displays command on the Displays menu or on the Displays pane of the System Preferences application to see if that restores an image on the projector.
However, in most cases, you want to use video mirroring so that the image being projected is the same as you see on the MacBook's desktop; this is the usual arrangement for presentations and such, because you can stand in front of and face the audience, and view the MacBook display while the audience sees the same image through the projector.
You can activate video mirroring in a couple of ways:
Open the Displays pane of the System Preferences application, click the Arrangement tab, and select the Mirror Displays check box.
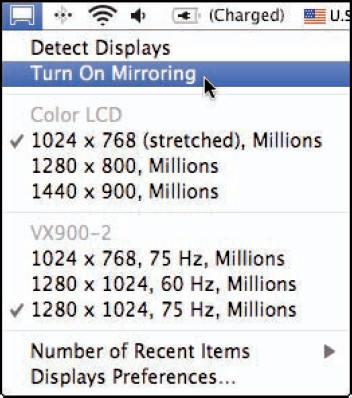
Open the Displays menu and select Turn On Mirroring (see figure 1.3).
When you turn video mirroring on, the projector takes on the same resolution as the MacBook's internal display.
You can configure your desktop so it appears the way you want it to. You can control some of the icons that appear on it by default, and you can configure the image that fills your desktop.
By default, icons for your MacBook's hard drive, external hard drives, DVDs and CDs, and servers appear on the desktop. This is okay if that is your preference, but they take up space on the desktop that isn't necessary because you can get to these elements more easily by opening a Finder window and using the sidebar.
Note
It's easy to forget sometimes that the folders and files you see on the desktop are determined by the contents of the Desktop folder within your Home folder. If you want to keep a folder or file but don't want it to take up space on your desktop, simply move it into a different folder within your Home folder. In addition to having a neater appearance, this also helps you work more efficiently because you'll have an easier time finding folders and files than when they are scattered on your desktop.
To hide these icons, perform the following steps:
Choose Finder

Click the General tab if it isn't selected already.
Deselect the check boxes for the icons that you don't want to see on your desktop. For example, to hide the icon for the MacBook's hard drive, deselect the Hard disks check box (see figure 1.4). As you deselect the check boxes, the related icons disappear from your desktop.

I confess that this section has nothing to do with efficiency. However, there's more to life than being efficient. Because you stare at your desktop so much, you might as well have something interesting to look at, which is where desktop pictures come in.
You can set any image to be your desktop picture. The images you can use as your desktop include the default images that are included with Mac OS X, image files you create or download from the Internet, and, best of all, photos from your iPhoto library. You can also configure your MacBook so that the desktop picture changes over time to keep it even more interesting.
To configure your desktop pictures, perform the following steps:
Open the System Preferences application.
Click the Desktop & Screen Saver icon. The Desktop & Screen Saver pane appears.
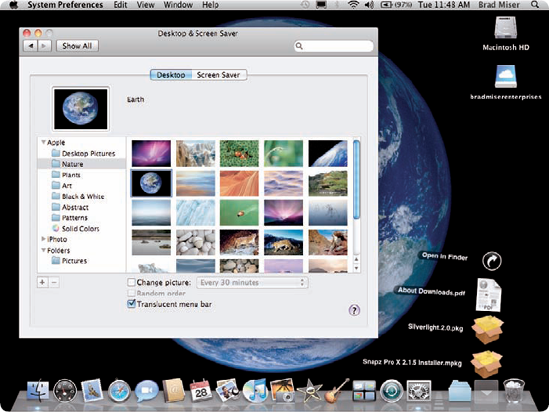
Click the Desktop tab. The Desktop picture tools appear. On the center-left side of the pane are the sources of images from which you can select pictures for your desktop. These are organized by source, including Apple (default images), iPhoto (images from your iPhoto library), and Folders (your Pictures folder plus any others you add).
Note
When your MacBook is connected to an external display, the Secondary Desktop pane appears on that display. You can use that pane to set the desktop pictures on the external display as you can for the internal display. You can have the same desktop picture settings or completely different images and display options there.
Expand the source of images you want to work with by clicking its Expansion triangle. The contents of that source appear. For example, if you expand the Apple source, you see its folders. If you expand the iPhoto source, you see Events, Photos, photo albums, and so on.
Select a source of images in the left pane of the window. Thumbnails of the images in that source appear in the right pane of the window. For example, if you select the Nature folder under the Apple source, you see thumbnails of the nature images included by default.
Click the image that you want to apply to the desktop. The image fills the desktop and you see it in the image well at the top of the Desktop pane (see figure 1.5).
If the image you selected isn't the same proportion as your current screen resolution, use the pop-up menu that appears just above the thumbnail pane to choose how you want the image to be scaled to the screen. For example, choose Fit to Screen to have photos scaled so that they fit the screen, Fill Screen to have photos scaled to fill the screen, Tile to have images that are smaller than the desktop to fill the desktop space as tiles, and so on.
If the image doesn't fill the screen, click the Color button that appears to the right of the menu when it can be used. The Color Picker opens.
Use the Color Picker to choose the background color that appears behind photos when they don't fill the desktop.
To change the desktop picture automatically, select the Change picture check box. This causes the images in the source selected on the Source list, such as Nature, to be applied to the desktop according to your settings.
On the pop-up menu, choose how often you want the picture to change. The options include at different time intervals or when different events occur.
If you want images to be selected randomly instead of by the order in which they appear in the source, select the Random order check box. A new image from the selected source is applied to the desktop according to the timing you selected.
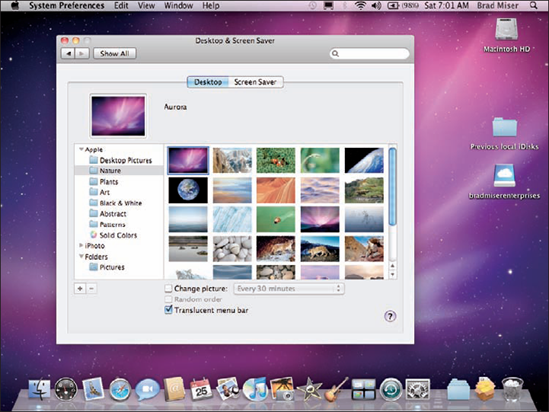
To have the menu bar be translucent so you can see the desktop picture behind it, select the Translucent menu bar check box. When this option is not selected, the menu bar becomes a solid color.
Quit the System Preferences application. Enjoy your desktop!
Note
You can use any folder as a source of desktop pictures by clicking the Add (+) button located at the bottom of the source list. Use the resulting dialog box to move to and select the folder containing the images you want to use. After you click the Choose button, that folder appears as a source on the list and you can work with it just like the default sources.
The Dock is an important part of your desktop space. By default, it appears at the bottom of the desktop, but you can control many aspects of its appearance, where it is located, and, to a great degree, how it works. The Dock is organized into two general sections. The area to the left of the application/document separation line (the white, dashed line that looks like a highway dividing line that is a few icons to the left of the Trash icon) contains application icons. On the right side of this line, you see icons for documents, folders, minimized Finder or application windows, and the Trash/Eject icon.
When folders appear on the Dock, by default they become stacks. When you click a stack, it pops up into a fan or appears as a grid (depending on how many items are in the folder) so that you can work with items it contains (see figure 1.6). You can disable this feature for any folder so that it behaves more like a normal folder (more on that shortly).
The Dock performs the following functions:
Shows running applications. Whenever an application is running, you see its icon on the Dock. A small glowing light is located at the bottom of every running application's icon. Application icons also provide information about what is happening with those applications. For example, when you receive email, the Mail application's icon changes to indicate the number of messages you have received since you last read messages.
Enables you to open applications, folders, minimized windows, and documents quickly by clicking the related icon.
Enables you to quickly switch among open applications and windows by clicking the icon for the item you want to bring to the front.
Gets your attention. When an application needs your attention, its icon bounces on the Dock until you move into that application and handle whatever the issue is.
Enables you to control an application and switch to any windows open in an application. When you perform a secondary click (one way to do this is to Ctrl+click) on the icon of an application, a pop-up menu appears. When the application is running, this menu lists commands as well as all the open windows related to that application. When the application isn't running, you see a different set of commands, such as the Open command you can use to open the application.
Enables you to customize its appearance and function. You can store the icon for any item (applications, folders, and documents) on the Dock. You can control how the Dock looks, including its size, whether it is always visible, where it is located, and which applications, folders, and documents appear on it.
Two icons on the Dock are unique and are always on the Dock: the Finder and the Trash. When you click the Finder icon (anchored on the left end of a horizontal Dock or at the top of a vertical one), a Finder window opens if none is currently open. If at least one Finder window is open, clicking the Finder icon brings the Finder window you used most recently to the front.
The Trash icon is where all folders and files go when their time is done. When the Trash contains files or folders, its icon includes crumpled paper so that you know the Trash is full. When you select an ejectable item, such as a DVD, the Trash icon changes to the Eject symbol. You can drag a disc or other ejectable item onto that icon to eject the disc, disk, or volume.
Unless an application is permanently installed on the Dock (in which case the icon remains in the same position), the icon for each application you open appears on the right (or bottom) edge of the application area of the Dock.
Unlike open applications, open documents don't automatically appear on the Dock. Document icons appear on the Dock only when you add them to the Dock manually or when you have minimized a document's window. Remember that when you open an application's menu in the Dock (secondary click), you see a list of all the windows open in that application.
When you minimize a window, by default, the window moves into the Dock using the Genie Effect, during which it is pulled down into the Dock. You can change this so that the Scale Effect is used instead. This looks like the window is being quickly scaled down while it is placed on the Dock. Minimized windows are marked with the related application's icon in the lower-right corner of the Dock icon so you can easily tell from which application the windows come.
Note
When you hide an application, its open windows do not appear on the Dock. The hidden application's icon continues to be marked so you know that the application is running. You can open a hidden application's Dock menu to jump into one of its open windows.
When you quit an open application, its icon disappears from the Dock (unless you have added that application to the Dock so that it always appears there). Minimized windows disappear from the Dock when you maximize them or when you close the application from which a document window comes.
Note
To move between applications quickly, press
The Dock gets even more useful when you organize it to suit your preferences. You can move icons around the Dock, add more applications to it, remove applications that are currently on it, and add your own folders and documents to it so that they are easily accessible.
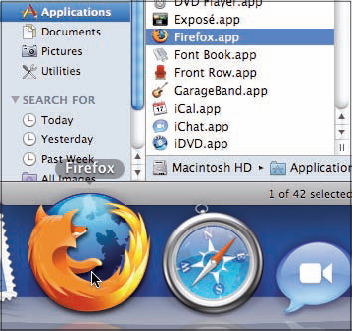
To add an application's icon to the Dock, simply drag it from a Finder window and drop it onto the location on the Dock where you want it to be stored (see figure 1.7). (Application icons must be placed on the left side of the dividing line.) When you add an application icon to the Dock, an alias to the application is created; like the default application icons, you can click the icon to open the application and perform a secondary click on its icon to open its Dock menu.
Note
You can add multiple items to the Dock at the same time by holding down the
You can rearrange the application icons that are installed on the Dock by dragging them to the location where you want them to reside. Like installing a new icon, when you move an existing icon between two others, they separate so you can place the icon where you want it.
Note
The Dock has two icons that you can't move at all: Finder and Trash/Eject. Other than these two endpoints, you can change all the other icons on the Dock as much as you like. You can't change the location of the dividing line; it moves to the left or to the right, based on the number of icons on each side of it.
You can remove an application icon from the Dock by dragging it up onto the desktop and releasing the trackpad button. When you do this, the icon disappears in a puff of digital smoke and no longer appears on the Dock. Because the icons on the Dock are aliases, removing them doesn't affect the applications that those aliases represent.
When you place a folder's icon on the Dock, it becomes a stack. A stack has some special characteristics, which is why it isn't just called a folder (however, you can configure a stack to behave like a folder). Two stacks are installed on your Dock by default: the Downloads and Documents stacks. You can add any other folders to the Dock just as you add applications to the Dock; simply drag their icons onto the Dock and drop them where you want them to be placed (folders and documents have to be placed on the right side of the dividing line). You can also reorganize stack icons by dragging them around on the Dock. And, as you can probably guess, you can remove stacks from the Dock by dragging their icons up onto the desktop.
Stack icons sometimes take on the icon of the most recent file that has been placed into them. For example, if you last downloaded a disk image file, the Downloads stack icon is the icon for a disk image. When you place an image into your Pictures folder and have that folder installed on your Dock, its icon is a thumbnail of the last image you placed in it.
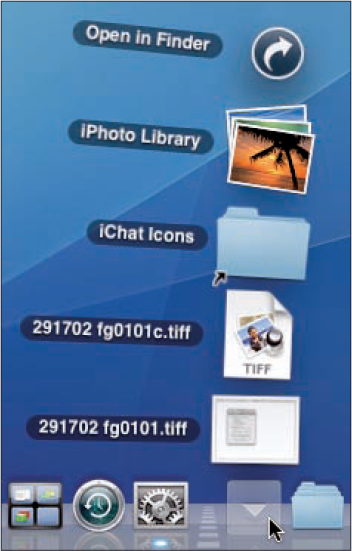
When you click a stack's icon, its contents fan onto the desktop if there are a few of them, or open into a grid if there are many. You can access an item on the fan or grid by clicking it. You can open the folder's contents in a Finder window by clicking Open in Finder.
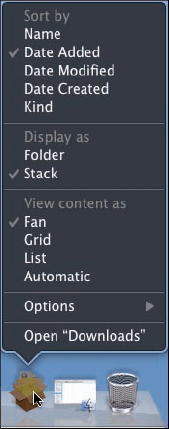
As mentioned earlier, you can also configure how an individual stack's icon behaves by using its contextual menu. Perform a secondary click on the stack's icon and its menu appears (see figure 1.8).
The options you have include:
Sort by. Choose the attribute by which you want the items in the stack to be sorted. For example, choose Date Added to have the most recently added content appear at the bottom of the fan (if the stack is set to fan, of course).
Display as. Select Stack to have the icon look like a stack or Folder to replace the stack icon with the folder's icon. The only difference is that when you select Folder, you always see the folder's icon on the Dock, as opposed to the icon of the most recently added item, which is what you see when Stack is selected.
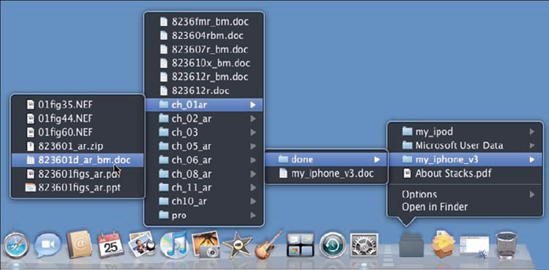
View content as. Select Fan to see the default fan layout for the stack (until it contains too many items, at which point it uses the grid instead). Select Grid to have the folder's contents appear in a grid. Select List to display the contents in a list that looks similar to a mini-Finder window (see figure 1.9); this is very useful for folders that contain subfolders because you can select a folder to move into it on another hierarchical menu. Select Automatic to have the Mac OS select the view that is most appropriate, based on the folder's contents.
Options. Choose Remove from Dock to remove the icon from the Dock. Choose Show in Finder to open a Finder window showing the folder's contents.
Open. Choose this command to open the folder on the desktop.
Note
The third type of Dock icon is for windows you have minimized (by double-clicking a window's title bar for example). You can move a minimized window icon within the folder side of the Dock, but its location is only temporary (it remains there only until you maximize or close the window). If you drag a minimized window from the Dock, it snaps back to the Dock. You remove minimized windows from the Dock by maximizing or closing them.
The Dock offers several behaviors you can change to suit your preferences. You can also change various aspects of its appearance, as follows:
Choose Apple menu
Click the Dock icon. The Dock pane appears.
Note
All Dock settings are specific to each user account (see Chapter 2). One user's Dock settings do not affect any other user's Dock configuration.
Drag the Size slider to the right to make the default Dock larger, or to the left to make it smaller. This impacts only the size of the Dock when no applications that aren't installed on it are open and no windows are currently minimized. The Dock changes size automatically as you open applications and minimize windows, but this setting does change its starting size.
Select the Magnification check box if you want to magnify an area of the Dock when you point to it. This can make identifying items easier, especially when many items are on the Dock or when it is small.
If you use magnification, drag the Magnification slider to the right to increase the level of magnification, or to the left to decrease it.
Select the position of the Dock on the desktop by clicking Left, Bottom (default), or Right.
Note
When your MacBook is connected to an external display, the Dock always appears on the primary display.
On the Minimize using pop-up menu, select Genie Effect to have windows pulled down to the Dock when you minimize them, or Scale Effect to have them shrink down into the Dock.
By default, application icons bounce as the application opens; if you don't want this to happen, deselect the Animate opening applications check box.
If you want the Dock to be hidden automatically when you aren't pointing to it, select the Automatically hide and show the Dock check box. If you set the Dock so that it is hidden except when you point to it, you can use more of your display. When this behavior is enabled and you point to the Dock's location, it pops onto the desktop and you can use it. When you move off the Dock, it is hidden again.
Note
You can turn Hiding on or off by pressing Option+
Much of the time that you are working on your desktop will involve Finder windows. Two areas of Finder windows that you will use frequently are the sidebar and the toolbar. You can use these features as they are, but you can also customize them to make your desktop space more efficient.
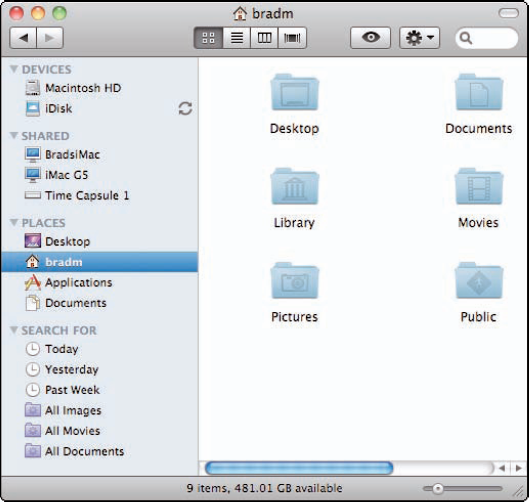
The Finder's sidebar makes it easy to get to specific locations; in many ways, the sidebar is similar to the Dock. It comes with a number of default locations, but you can add items to or remove them from the sidebar so that it contains the items you use most frequently.
The sidebar is organized into sections (see figure 1.10). DEVICES includes disks and other devices (including iPods and your iDisk) that are mounted on your MacBook. SHARED items include those you are accessing on a network. PLACES contains folders and files. SEARCH FOR displays saved searches.
Using the items on the sidebar is simple (which is why the sidebar is so useful). Simply click the icon with which you want to work. What happens when you click depends on the kind of icon you clicked. The potential outcomes are:
Devices. When you select a device, the contents of that device are displayed in the Finder window. For example, when you click a hard drive's icon, you see its contents.
Shared folder or drive. When you select a shared network resource, you see the tools you can use to log in to that resource or you see the contents of the resource if your MacBook is configured to log in to it automatically.
Folder. If the icon is a folder located in the PLACES section, you see the folder's contents in the Finder window.
Document. If the icon is a document located in the PLACES section, the associated application launches and you see and work with the document's contents.
Application. If the icon is an application located in the PLACES section, the application launches.
Search. If you click an icon located in the SEARCH FOR section, the search runs and you see the results of the search in the Finder window.
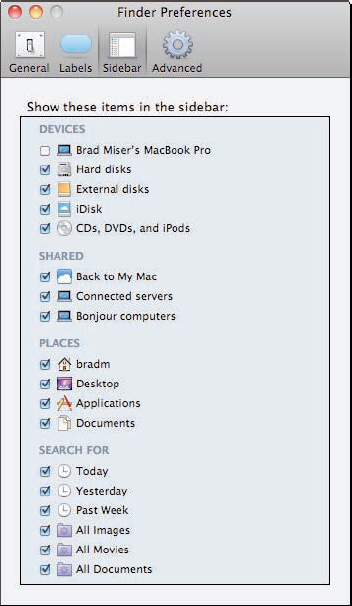
You can customize the sidebar so that it has the content you want. Here's how:
Choose Finder
Click the Sidebar tab (seefigure 1.11).
Select the check box for each item that you want to appear on the sidebar.
Deselect the check box for any items that you don't want to appear on the sidebar.
Close the Finder Preferences window.
Open a Finder window.
To remove an item from the sidebar, drag it from the sidebar and release the trackpad button when you've moved it off the sidebar. It disappears in a puff of smoke. Like the Dock, when you remove something from the sidebar, it's not removed from the computer. The item remains in its current location on your MacBook, but it is no longer accessible from the sidebar.
To add something to the sidebar, drag it from a Finder window or desktop onto the sidebar. As you move the item onto the sidebar, a blue line appears on the sidebar at the location to which you've moved the item.
When you're over the location in which you want to place the item, release the trackpad button. The item's icon is added to the sidebar, and you can use it just like the default items.
To change the order of items in the sidebar, drag them up or down the list. As you move an item between others, they slide apart to show you where the item you are moving will be. (You can only move items around within their sections.)
The toolbar appears at the top of the Finder window and contains buttons and pop-up menus that you can use to access commands quickly and easily. It includes a number of default buttons and pop-up menus, but you can configure the toolbar so that it contains the tools you use most frequently.
When you open a Finder window, the toolbar appears at the top of the window. The default tools on the toolbar (as grouped from left to right) are:
Back/Forward buttons. These buttons move you along the hierarchy of Finder windows that you've moved through, just like Back and Forward buttons in a Web browser.
View buttons. You can change the view of the current window by clicking one of the View buttons. For example, to see the window in List view, click the second button in the View group (its icon has horizontal lines).
Quick Look/Slideshow button. When something in the window is selected and you click this button, you see a quick view of the item (such as a thumbnail of an image file) or a slide show if you have selected multiple items.
Action pop-up menu. This menu contains a number of useful contextual commands (meaning the specific commands on the menu depend on the item or items you have selected). These commands are the same as those that appear when you perform a secondary click on an item.
Search bar. You can search for items on the desktop by typing text or numbers into the Search bar. As you type, items that match your search term appear in the Finder window.
Note
You can hide the sidebar and toolbar by clicking the Hide Toolbar/Sidebar button located in the upper-right corner of Finder windows. To restore these elements, click the button again. The Status bar at the bottom of the window is also controlled by this button; it appears or disappears when the toolbar and sidebar do.
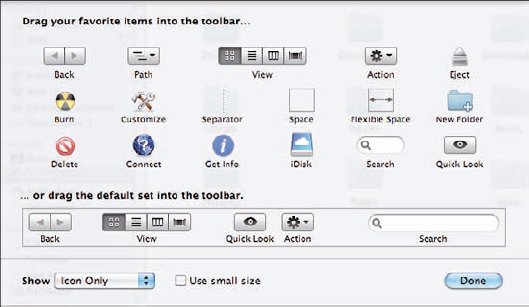
You can place the tools you prefer on your toolbar by performing the following steps:
Open a Finder window.
Choose View
To remove a button from the toolbar, drag its icon from the toolbar onto the desktop. When you release the trackpad button, the selected button disappears in a puff of smoke. The button continues to be available on the sheet if you want to add it again later.
To add a button to the toolbar, drag it from the sheet and drop it on the toolbar at the location in which you want to place it. When you release the trackpad button, the selected button is added to the toolbar.
When you finish customizing the toolbar, click Done. The Toolbar Customization sheet closes and you see your customized toolbar.
Note
To return the toolbar to its default state, open the Toolbar Customization sheet and drag the default set of buttons onto the toolbar.
As you work on documents, move to Web sites, check your email, choose tunes to listen to, and all the other things you do while using your MacBook, you can accumulate a lot of open windows on your desktop. This is a good thing because it makes it easy to multitask so that you don't have to stop one activity to start another. The downside is that it's easy to lose track of where a specific window you want is located, or you might have a hard time getting back to the desktop.
Exposé is the Mac OS X feature that helps you manage screen clutter from open windows. It has three modes:
Hide all open windows
Reduce all open windows to thumbnails
Reduce an application's windows to thumbnails
Each of these options has specific uses, and you access them in slightly different ways.
This mode is useful when your desktop is so cluttered that you are having a hard time finding anything. When you activate it, all the open windows are hidden so that you can work on the suddenly uncluttered desktop. To clear away all your windows in one sweep, press F3 or press the keyboard shortcut (in most cases, the default is Fn+F11; you learn how to set this later in this section). All the windows are moved off the screen, leaving an uncluttered desktop for you to work on. If you look carefully at the now shaded edges of the desktop in figure 1.13, you see the edges of the windows that have been moved off to the side.
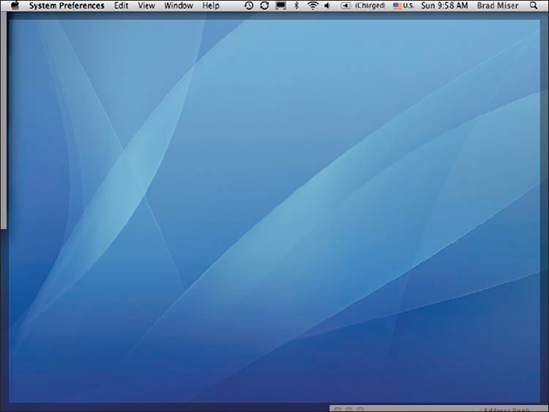
Figure 1.13. Where, oh where, have all my windows gone? (If you look carefully at the shaded edges of the screen, you'll see them.)
You can return your desktop to its cluttered condition by pressing the keyboard shortcut (Fn+F11 in most cases) or clicking anywhere in the shaded borders of the desktop. The windows slide back onto the visible part of the desktop where you can use them again.
This technique is useful when you have a lot of open windows and you want to move into a specific one. You can reduce all your windows to thumbnails and then move into the window you want to use by clicking it. Press the keyboard shortcut (Fn+F9 by default) to shrink all open windows down so that they all fit on the desktop. Each thumbnail is labeled so you can more precisely tell what it is when several windows look the same (such as document windows).
When you point to a window, the window is highlighted in blue (see figure 1.14). To move into a window, click its thumbnail. The window becomes active and moves to the front so you can use it. The rest of the windows resume their former places and are moved into the background.
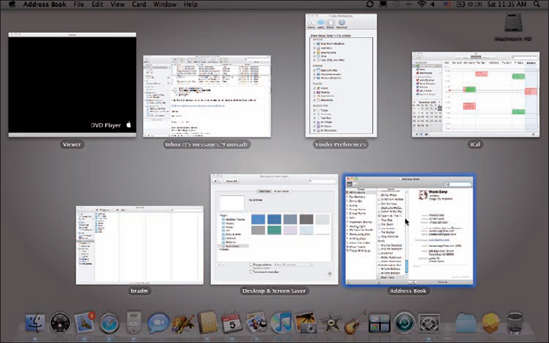
Figure 1.14. Reducing all open windows to thumbnails is a great way to find and jump into a specific window (here, I'm pointing to the Address Book window).
Note
When you have windows showing with Exposé, press the Tab key to quickly move through sets of windows that are associated with each open application. Press
This mode is similar to the previous one, except that instead of showing all open windows as thumbnails, it shows only the windows in the current application as thumbnails. Use this mode when you are working with multiple windows within the same application and want to jump to a specific one.
Press the keyboard shortcut (Fn+F10 by default) to shrink down all open windows for the current application so that they all fit on the desktop; each window is labeled with its title. When you point to a window, the window is highlighted in blue. To move into a window, click it. The window becomes active and moves to the front so that you can use it. The rest of the open application windows move into the background.
You can customize how you activate Exposé by performing the following steps:
Open the System Preferences application.
Click the Exposé & Spaces icon. The Exposé & Spaces pane appears.
Click the Exposé tab.
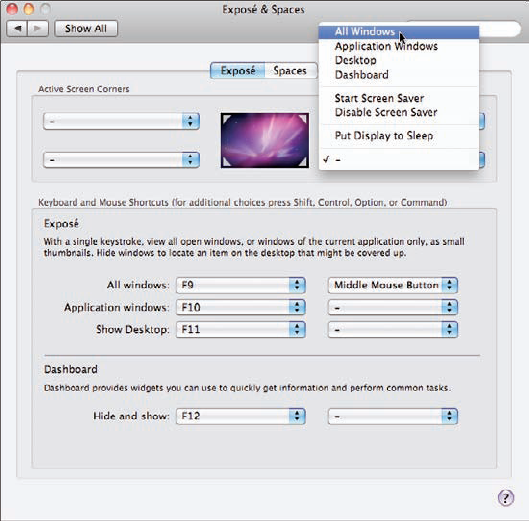
To cause an Exposé action when you point to a corner of the desktop (to create a hot corner), use the pop-up menus located next to each corner of the desktop thumbnail at the top of the pane to select the action you want to happen when you point to that corner (seefigure 1.15).
Use the All windows, Application windows, and Show Desktop pop-up menus to configure the keyboard shortcuts for those actions.
Use the pop-up menu to the right of each of those menus to select if you want a secondary or middle mouse click (three- or more button mouse) to activate the related Exposé action.
Quit the System Preferences application. The new keyboard shortcuts for Exposé take effect.
Note
To add keyboard modifiers to the shortcut keys or hot corners, press a key, such as the
As you use your MacBook, it's likely that you'll develop sets of tasks that you work on at the same time. For example, you might use Word to create text and a graphics application to write a book. These kinds of activities invariably involve a lot of windows. While you can use Exposé to manage these windows, it's not so efficient, because you can only focus on one window at a time and it can still take some work to get to the windows you want to use.
With Spaces, you can create collections of applications and their windows so that you can jump between sets easily and quickly. For example, if you have several Internet applications that you use, you can create an Internet space for those applications, such as an email application and Web browser. To use your Internet applications, just open that space and the windows are all in the positions you last left them. You might have another space that contains Address Book, iCal, and your email application. You can use these applications just by switching to their space. Spaces make moving to and using different sets of windows fast and easy, and improve the efficiency with which you work.
You can have as many spaces as you need, so there's really no limit to how you can configure your desktop.
To get started with Spaces, first create each space, using the following steps:
Open the System Preferences application.
Click the Exposé & Spaces icon. The Exposé & Spaces pane appears.
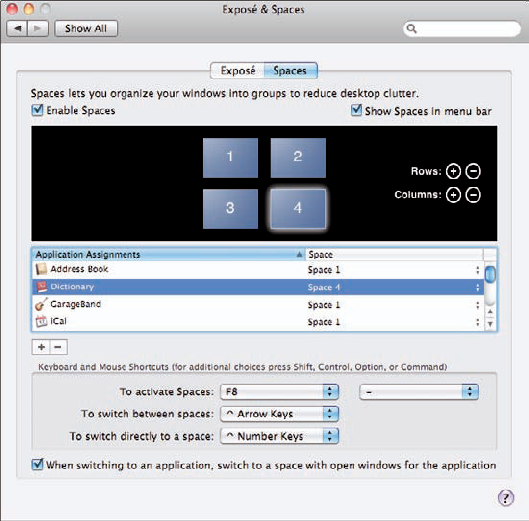
Select the Enable Spaces check box. Spaces become active. At the top of the pane are thumbnails of the spaces you'll be configuring. By default, four spaces are available; you can add more if you need them. Each space is assigned a number that you use to identify that space.
Select the Show Spaces in menu bar check box. This puts the Spaces menu on the Finder menu bar, which makes it easier to work with your Spaces without going into the System Preferences application.
Click the Add (+) button just above the pop-up menus at the bottom of the application list in the center pane of the window. The Applications pop-up menu appears.
Add the application you want to add to the space by doing one of the following:
If the application you want to add appears on the menu, select it.
If an application you want to add doesn't appear on the menu, select Other. The Applications sheet appears. By default, the Applications folder, where most applications are stored, is shown. Move to and select the application you want to add to the space, and click Add.
Note
You can select multiple applications at the same time by holding the
On the Spaces pane, you see the applications on the application list in the Application Assignments column. The space to which the applications are assigned is shown in the Space column. By default, all applications are assigned to Space 1.
Open the Spaces menu for the first application on the list.
Choose the number of the space in which you want to include that application (see figure 1.16),or choose Every Space to include it in all spaces. After you make a selection, the space number is shown on the menu for that application, and the selected space's icon at the top of the window is highlighted.
Note
To sort the list of applications by space number, click the Space column heading. This is a more effective view because you see the applications organized by the spaces within which they are contained.
To add two more spaces in a row, click the Add (+) button next to the word Rows in the thumbnail section of the window; to add two more spaces in a column, click the Add (+) button next to the word Columns in the thumbnail section of the window. Two new spaces appear in the thumbnail section, and the corresponding spaces are available for application assignment. The numbers of the previous spaces are adjusted according to whether you added new spaces in rows or in columns. Any space assignments are also adjusted so that the applications remain in their current spaces, even if the space number changes.
Note
I wouldn't go crazy with the number of spaces at first. Start with the default four and work with them until you determine you need more spaces. If you create too many spaces, you'll reduce the benefits you get because then you'll have to manage lots of spaces, too.
On the To activate Spaces menu, choose the keyboard shortcut you want to use to activate Spaces; if you want to assign this command to a secondary or middle mouse-click, use the pop-up menu near the right side of the pane. The default keyboard shortcut is F8, but you can choose any function key or function key and modifier key, such as
On the To switch directly between spaces pop-up menu, choose the modifier keys with the arrow keys to move among your spaces. The default is Ctrl+arrow.
To set the modifier key that you use to jump directly to a space by its number, open the To switch directly to a space pop-up menu and choose the modifier key you want to use. The default is Ctrl+number (of the space you want to jump to).
If you don't want to move into a space with which an application is associated when you use that application, deselect the When switching to an application, switch to a space with open windows for the application check box. When this is selected and you use an application, you automatically jump into a space that has open windows for that application. With the check box deselected, the space is ignored.
Note
To delete spaces, click the Remove (–) button next to the Rows or Columns text. The spaces are removed and the applications that were assigned to them remain on the list, but they become assigned to the space adjacent to the ones you deleted.
After you configure your spaces, you can start using them. If you expect that moving to a space causes all of the applications it contains to open, I hate to disappoint you, but spaces only impact running applications. However, this does make some sense because you'd use a lot of your MacBook's resources if all the applications in each space opened when you moved into that space. To use Spaces, do the following:
Open the applications associated with your spaces. As each application opens, the Spaces Manager briefly appears on the screen and the box associated with the space is highlighted in white.
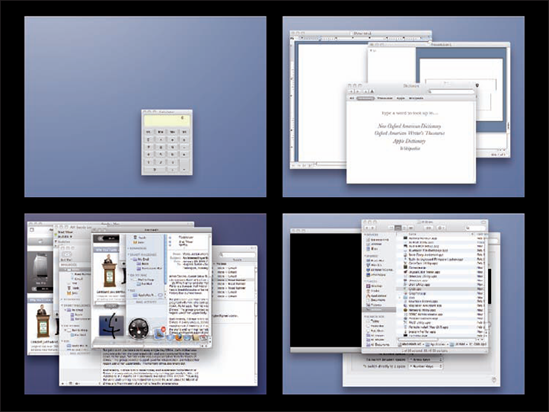
To move to a different space, press the Spaces activation key (the default is Fn+F8). The desktop is hidden and the Spaces Manager appears (see figure 1.17). Here you see thumbnails of each of the spaces you have configured. Within each space, you see the windows that are open in that space.
To move into a space, click it. The open applications associated with that space appear, and you can work with them.
To jump directly to a space, press the keyboard shortcut for switching directly to a space, which by default is Ctrl+number, where number is the number of the space you want to move into. The open applications associated with that space appear, and you can work with them.
To move between spaces without using a space's number or clicking a space's thumbnail, press the keyboard shortcut for switching between spaces, which by default is Ctrl+arrow, where arrow is one of the arrow keys on the keyboard. The Spaces Manager palette appears, and each box on the palette represents one of your spaces.
While holding the Ctrl key down, press an arrow key to move to the space you want to enter. As you press an arrow key, an arrow appears in the palette to show you in which direction you're moving.
When the appropriate space is highlighted with the white box, release the trackpad button. The open applications associated with that space appear.
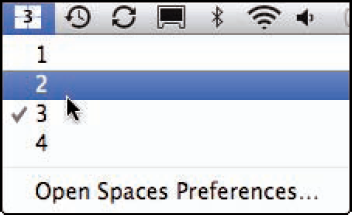
Following are some other Spaces tips:
You can use the Spaces menu on the Finder menu bar to manage your spaces (see figure 1.18). At the top of the menu, you see the number of the space in which you are currently working. When you open the menu, you can select a space number to jump into it or select Open Spaces Preferences to move to the Spaces pane in the System Preferences application.
You can't add the Finder to a space, but it is associated with the space under which a Finder window is currently open. When you click the Finder's Dock icon, you jump into that space and can use that Finder window or open others as needed.
Keep in mind that you can enable and disable Spaces whenever you want without impacting your Spaces configuration. Sometimes, it's more efficient to disable it for a period of time, such as when you want to use a couple of applications that are in different spaces at the same time.
When you open an application that is not included in a space, you remain in the current space. Any applications not associated with a space can be used within any space, just like applications that are assigned to Every Space.
The Dashboard is actually an application that is a collection of mini-applications called widgets. By default, the Dashboard application is always running so that its widgets are always available to you. Unless you remove it from the Dock, the Dashboard's icon is located to the immediate right of the Finder icon on the Dock (or below the Finder icon if you use a vertical Dock).
By default, you can activate the Dashboard in the following ways:
Press F4 (default).
Click the Dashboard icon on the Dock.
Open the Dashboard Dock icon menu and choose Show Dashboard.
Double-click the Dashboard's icon in the Applications folder.
Double-click a widget's icon.
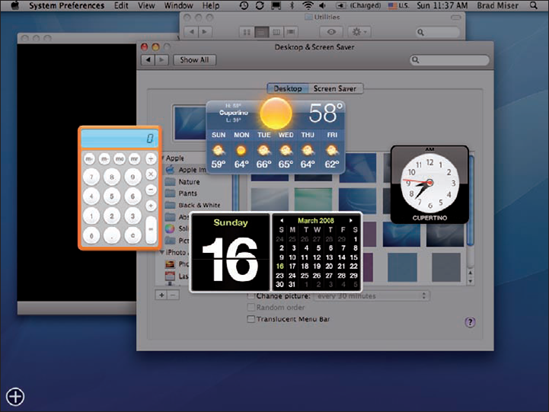
When you activate the Dashboard, the widgets that are configured to open when it is activated appear (see figure 1.19). You can then use those widgets or see their information.
When you finish using widgets, deactivate the Dashboard again by pressing F4 or by clicking on the desktop outside of any open widget. All the widgets disappear, the Dashboard closes, and you return to your desktop.
Like Exposé, you can set the hot corners used to open or close the Dashboard by performing the following steps:
Open the System Preferences application.
Click the Exposé & Spaces icon. The Exposé & Spaces pane appears.
Click the Exposé tab.
To open the Dashboard by pointing to a corner of the desktop (set a hot corner), use the pop-up menu located next to each corner of the desktop thumbnail at the top of the pane to select Dashboard for the corner you want to make the hot corner.
To change the Dashboard keyboard shortcut, open the Hide and show pop-up menu and choose the function or modifier keys you want to use; or use the menu to the right of that one to set the shortcut to be a secondary or middle mouse click.
One of the nice things about the Dashboard is that you can configure the exact set of widgets that you want to use and how those widgets appear on the screen. Here's how to customize your Dashboard:
Press F4 to activate the Dashboard. The widgets that are currently configured to open appear.
Click the Add (+) button in the lower-left corner of the screen. The widget bar opens and you see all of the widgets that are currently installed on your MacBook. At the bottom of each widget's icon on the widget bar you see the widget's name. Widgets are shown in alphabetical order from left to right; browse the widgets by clicking the left- or right-facing arrows at each end of the bar. Each widget open on the screen contains the Close (x) button that indicates you are in Dashboard management mode (see figure 1.20).
To add a widget to your Dashboard, drag its icon from the widget bar onto the screen at the location where you want it to appear. The widget appears on the screen with a cool rippling effect.
Move the open widgets around the screen so they are in the position you want them to be when you activate the Dashboard.
Close any widgets that you don't want to open when you activate the Dashboard by clicking their Close button (the "x" located in the upper-left corner of each widget's window). The widget disappears from the Dashboard but remains on the widget bar.
Note
You can add multiple instances of the same widget to the Dashboard. Each time you add a widget, a new version of that widget is added to the Dashboard. This is useful for widgets that you configure with specific information, such as a location (the Weather widget is a good example).
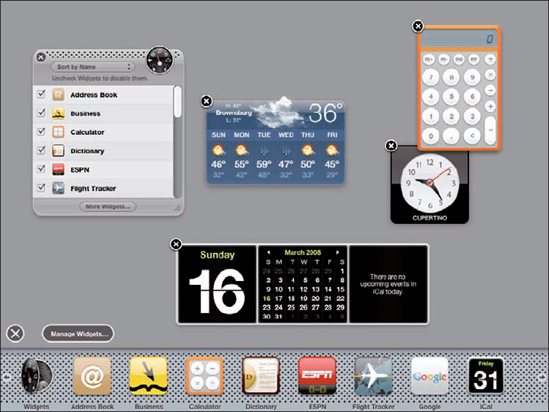
Figure 1.20. The widget bar at the bottom of the Dashboard shows all the widgets that are installed on your MacBook.
You can use the Widgets Manager to configure your widgets. It is not shown by default, but you can open it using the following steps:
Open the Dashboard if it isn't open already.
Click the Add (+) button located in the lower-left corner of the window. The widget bar appears.
Click the Manage Widgets button. The Widgets Managure which is actually a widget in itself, appears(see figure 1.21).
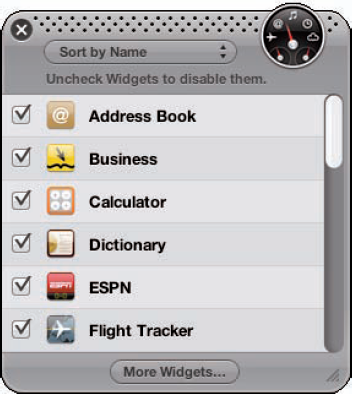
Following are some ways you can use the Widgets Manager:
The list shows all of the widgets that are installed under the current user account.
You can disable a widget by deselecting its check box. This causes the widget to be removed from the Dashboard (if it's been added there) and to be removed from the widget bar. This doesn't actually remove the widget from your computer, however. You can restore a widget by selecting its check box again.
Widgets marked with a red circle with a hyphen in its center are available only under the current user account.
Note
Many widgets, such as the Weather and World Clock widgets, require an Internet connection to work. Others, such as the Calculator, don't.
To see if a widget has configuration options, move the pointer over the widget in which you are interested. If it has options, the Info button appears; this button is usually a lowercase "i", sometimes inside a circle, sometimes not. The location of the button varies, and sometimes it is hard to see, so just watch closely when you hover over a widget.
When you click the Info button, the widget's configuration tools appear (see figure 1.22). You can use those tools to make the widget work or look the way you want it to. When you finish, click Done and the widget is updated accordingly.
You should always check out the Info options for any widgets that you use because they will probably make those widgets even more useful to you.
The Dashboard includes quite a few widgets, but there are thousands of widgets available on the Apple widget Web site that you can download and install. Here's how to do it:
Open the Dashboard.
Open the widget bar.
If the Widgets Manager isn't installed on your Dashboard, click the Manage Widgets button. The Widgets Manager appears.
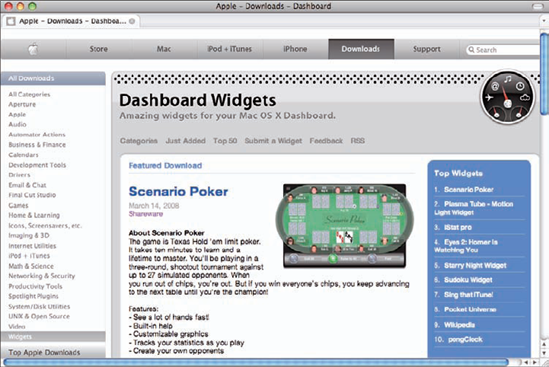
In the Widgets Manager, click More Widgets. Your default Web browser opens and takes you to the Apple widgets Web page (see figure 1.23).
Browse or search until you find a widget you want to try.
Download the widget. In most cases, the widget is downloaded directly and you're prompted to install the widget after it's been downloaded. If this is the case for a widget you download, skip to Step 8.
If the file is downloaded to your Downloads folder, move to and open it. Widget files have the file extension .wdgt. If you don't see this extension, you might have to double-click the file you downloaded to expand it.
Click Install at the prompt. You move to the Dashboard and see the new widget that you installed.
Click Keep to keep the widget or Delete to get rid of it. If you click Keep, it is installed on your Dashboard. If you click Delete, it is not installed on your Dashboard.
Configure and use the new widget.
Note
When you install a widget from the Apple Web site, it is installed only in the current user's Widgets folder. To make it available to everyone who uses your MacBook, move it from the Widgets folder in your Home folder to the Widgets folder in the System folder. Then everyone who uses your MacBook is also able to use the widget.
While you have to do some basic programming to create a widget like those you see on the Apple widget Web site, you can create your own widgets by capturing parts of Web sites that then appear as widgets on your Dashboard. Follow these steps:
Open Safari.
Move to a Web page containing information or tools that you want to capture in a widget.
Do one of the following:
Click the Add this page to the Dashboard button on the Safari toolbar (it looks like a pair of scissors cutting paper).
Choose File
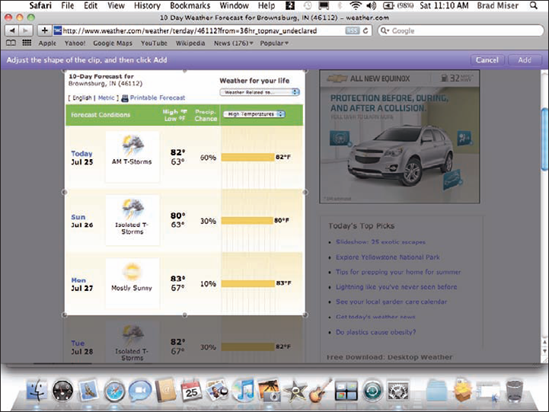
A selection box and capture toolbar appear (see figure 1.24).
Make the selection box enclose the part of the page that you want to be a widget by dragging the box to the general area you want to capture, clicking the trackpad button to lock the selection box, and then dragging its resize handles to enclose the part of the page you want as a widget.
Note
Depending on how the Web page is constructed, you may see certain parts of the page selected as you move over them. If they are the widget you want to create, it's a good idea to allow this automatic selection to achieve the best results.
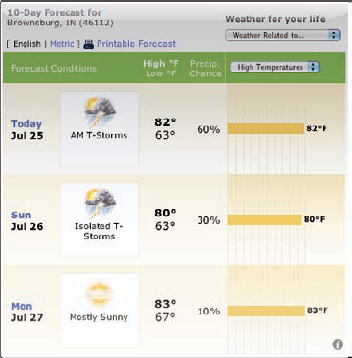
Click the Add (+) button on the toolbar. The Dashboard opens and the part of the page you selected becomes a widget (see figure 1.25).
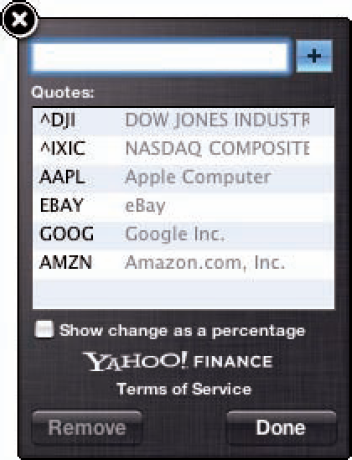
Click the new widget's Info button.
Use the resulting tools to select a theme. The theme determines the border of the widget.
If the clip has audio and you want it to play only while the Dashboard is open, select the Only play audio in Dashboard check box.
Click Done.
Place the widget on your Dashboard.
The Web capture selection tool captures a static portion of the Web page, based on what you select. If the information changes on the source Web page, it might shift what's shown in the widget you create. You'll need to re-create the widget to fix any problems that result.
To get rid of a Web capture widget, open the Dashboard and then open the widget bar. Then click the Close button for the widget. Unlike other widgets, when you close a widget you've captured, it's gone forever.
Note
If the widget isn't exactly what you want it to be, you need to recapture it. You can't edit the widget on the Dashboard.