
10
Machine Learning Pipelines with Kubeflow on Amazon EKS
In Chapter 9, Security, Governance, and Compliance Strategies, we discussed a lot of concepts and solutions that focus on the other challenges and issues we need to worry about when dealing with machine learning (ML) requirements. You have probably realized by now that ML practitioners have a lot of responsibilities and work to do outside model training and deployment! Once a model gets deployed into production, we would have to monitor the model and ensure that we are able to detect and manage a variety of issues. In addition to this, ML engineers might need to build ML pipelines to automate the different steps in the ML life cycle. To ensure that we reliably deploy ML models in production, as well as streamline the ML life cycle, it is best that we learn and apply the different principles of machine learning operations (MLOps). With MLOps, we will make use of the tried-and-tested tools and practices from software engineering, DevOps, and data engineering to productionalize ML models. These include utilizing a variety of automation techniques to convert manually executed Jupyter notebooks into automated ML workflows and pipelines.
In this chapter, we will build and run an automated MLOps pipeline using Kubeflow on top of Kubernetes and Amazon Elastic Kubernetes Service (EKS). If you are wondering what these are, do not worry, as we will discuss these tools, platforms, and services in detail later! Once we have a better understanding of how they work, we will dive deeper into the recommended strategies and best practices when building more complex pipelines, along with securing and scaling our setup.
That said, in this chapter, we will cover the following topics:
- Diving deeper into Kubeflow, Kubernetes, and EKS
- Preparing the essential prerequisites
- Setting up Kubeflow on Amazon EKS
- Running our first Kubeflow pipeline
- Using the Kubeflow Pipelines SDK to build ML workflows
- Cleaning up
- Recommended strategies and best practices
Once we reach the end of this chapter, we should have more confidence in building complex ML pipelines using the tools, platforms, and services we have learned about in this chapter.
Technical requirements
Before we start, it is important that we have the following ready:
- A web browser (preferably Chrome or Firefox)
- Access to the Cloud9 environment that was prepared in the Creating your Cloud9 environment and Increasing the Cloud9 storage sections of Chapter 1, Introduction to ML Engineering on AWS
The Jupyter notebooks, source code, and other files used for each chapter are available at this repository: https://github.com/PacktPublishing/Machine-Learning-Engineering-on-AWS.
Important Note
It is recommended that you use an IAM user with limited permissions instead of the root account when running the examples in this book. If you are just starting out with using AWS, you can proceed with using the root account in the meantime.
Diving deeper into Kubeflow, Kubernetes, and EKS
In Chapter 3, Deep Learning Containers, we learned that containers help guarantee the consistency of environments where applications can run. In the hands-on solutions of the said chapter, we worked with two containers—one container for training our deep learning model and another one for deploying the model. In larger applications, we will most likely encounter the usage of multiple containers running a variety of applications, databases, and automated scripts. Managing these containers is not easy and creating custom scripts to manage the uptime and scaling of the running containers is an overhead we wish to avoid. That said, it is recommended that you use a tool that helps you focus on what you need to accomplish. One of the available tools that can help us deploy, scale, and manage containerized applications is Kubernetes. This is an open source container orchestration system that provides a framework for running resilient distributed systems. It automatically takes care of the scaling and failover work behind the scenes—this means that if your container stops working for some reason, Kubernetes will automatically replace it. Cool, right? Of course, this is only one of the cool features available. In addition to this, Kubernetes provides the following:
- Automated deployments and rollbacks
- Secret (credentials) management
- Managing and distributing network traffic to the containers
- Storage orchestration
- Making the most of servers (nodes) by fitting containers accordingly depending on the CPU and RAM requirements
Note that this list is not exhaustive, and there are more features available when using Kubernetes. When using Kubernetes, it is essential that we have a good understanding of the terminology, concepts, and tools used. In Figure 10.1, we can see an example of a Kubernetes cluster:

Figure 10.1 – An example Kubernetes cluster
Let’s quickly define and describe some of the concepts presented in Figure 10.1:
- Node: This maps to a virtual or physical machine (or an EC2 instance) that contains running containerized applications.
- Cluster: This is a group of nodes (or servers).
- Pod: This is a group of one or more application containers that represent a single unit of service (running inside a node).
- Control Plane: This manages the worker nodes (servers) along with the Pods in a Kubernetes cluster.
- kubectl: This is the command-line tool for running commands to manage Kubernetes resources.
Note that this is a simplified list as we won’t dive deep into the other concepts and terminology in this chapter. Knowing them should be sufficient to help us go through the hands-on solutions of this chapter.
When running Kubernetes on AWS, it is recommended that you use a managed service such as Amazon EKS, which helps manage a lot of things for us behind the scenes—including the availability and scalability of control plane nodes (which are the nodes focused on storing cluster data, ensuring application availability, and other important processes and tasks in the cluster). When using Amazon EKS, we no longer need to worry about the management of the control plane instances since AWS automatically scales these instances and replaces any unhealthy instances for us, too. In addition to these, Amazon EKS helps engineers work with other AWS services and resources (for example, AWS IAM, AWS Application Load Balancer, and Amazon CloudWatch) seamlessly when using Kubernetes.
Note
It is possible to set up the autoscaling of nodes with Kubernetes and Amazon EKS. This is configured using solutions such as Kubernetes Cluster Autoscaler. For more information, feel free to check out https://aws.github.io/aws-eks-best-practices/cluster-autoscaling/.
The primary tool when managing EKS clusters is the eksctl command-line tool. With this tool, EKS clusters can easily be created, updated, and deleted with a single command. Once the clusters become available, we can proceed with using other tools such as the kubectl command-line tool to create and manage Kubernetes resources inside the clusters.
Due to the power and potential of Kubernetes, a lot of other tools have been built on top of it. These include Kubeflow—a popular open source ML platform focused on helping data scientists and ML engineers orchestrate and manage complex ML workflows on Kubernetes. Kubeflow brings together a collection of data science and ML tools that are already familiar to data scientists and ML engineers. These include the following:
- JupyterHub – This is a hub that helps spawn and manage multiple Jupyter notebooks (where data scientists can run code for ML experiments).
- Argo Workflows – This is a workflow engine on which automated pipelines run.
- Knative Serving – This enables rapid deployment of serverless containers (where ML models can run).
- Istio – This is a service mesh that provides a way to easily manage network configuration and communication between the deployed microservices in the cluster.
- MinIO – This is a multi-cloud object storage solution that is native to Kubernetes.
With Kubeflow, ML practitioners can perform ML experiments and deployments without worrying about the infrastructure. At the same time, automated ML workflows and pipelines can easily be deployed and managed using a variety of tools available in Kubeflow (such as Kubeflow Pipelines and the Kubeflow Pipelines SDK). When properly built, these pipelines can help data scientists and ML engineers save a significant amount of time through the automation of different steps of the ML process. At the same time, these pipelines can enable automated model retraining that will help ensure deployed models are updated using the latest training data available.
Now that we have a better idea of the tools we are going to use, we will proceed with preparing the essential prerequisites for running ML pipelines using Kubeflow on Amazon EKS!
Preparing the essential prerequisites
In this section, we will work on the following:
- Preparing the IAM role for the EC2 instance of the Cloud9 environment
- Attaching the IAM role to the EC2 instance of the Cloud9 environment
- Updating the Cloud9 environment with the essential prerequisites
Let’s work on and prepare the essential prerequisites one by one.
Preparing the IAM role for the EC2 instance of the Cloud9 environment
In order for us to securely create and manage Amazon EKS and AWS CloudFormation resources from inside the EC2 instance of the Cloud9 environment, we would need to attach an IAM role to the EC2 instance. In this section, we will prepare this IAM role and configure it with the permissions required to create and manage the other resources in this chapter.
Note
We will discuss Amazon EKS and AWS CloudFormation in more detail in the Setting up Kubeflow on Amazon EKS section of this chapter.
In the next set of steps, we will navigate to the IAM console and create an IAM role that will be attached to the EC2 instance (of the Cloud9 environment) later in this chapter:
- Navigate to the IAM console by typing iam into the search bar and then clicking on IAM from the list of results, as highlighted in Figure 10.2:

Figure 10.2 – Navigating to the IAM console
In Figure 10.2, we have one of the ways to navigate to the IAM console. Another option would be to click on the Services drop-down menu (not shown in the preceding screenshot) and locate the IAM service under the Security, Identity, and Compliance group of services.
- In the left-hand sidebar, locate and click on Roles (under Access management).
- In the upper-right corner of the page, locate and click on the Create role button.
- In the Select trusted entity page (which is step 1 of 3), select AWS service under Trusted entity type, as highlighted in Figure 10.3:

Figure 10.3 – The Select trusted entity page
Here, we also make sure that the EC2 option is selected under Use case > Common use cases. Once we have reviewed the selected options, we can click on the Next button afterward.
- In the Add permissions page (which is step 2 of 3), type administrator into the filter search box (as highlighted in Figure 10.4), and then press the Enter key to filter the list of results. Toggle on the checkbox corresponding to the AdministratorAccess policy, scroll down to the bottom of the page, and then click on the Next button:

Figure 10.4 – The Add permissions page
Make sure that you do not accidentally select the incorrect permission from the list of filtered results since there are permissions with similar names available. The AdministratorAccess policy should have the Description value of Provides full access to AWS services and resources.
Important Note
In this chapter, the usage of the AdministratorAccess policy will help us avoid different permission-related issues while we are setting things up. When setting this up in your work environment, you should use a custom policy that only adds the permission the EC2 instance needs to run the application (and nothing more).
- In the Name, review, and create page (which is step 3 of 3), specify kubeflow-on-eks in the Role name input box. Scroll down to the bottom of the page and then click on the Create role button.
Wasn’t that easy! At this point, we should have an IAM role we can attach to AWS resources such as EC2 instances.
Attaching the IAM role to the EC2 instance of the Cloud9 environment
Now that we have the IAM role ready, we can now proceed with attaching this IAM role to the EC2 instance.
Important Note
In this chapter, we will create and manage our resources in the Oregon (us-west-2) region. Make sure that you have set the correct region before proceeding with the next steps.
In the next set of steps, we will use the AWS Management Console to attach the IAM role to the EC2 instance where our Cloud9 environment is running:
- Navigate to the Cloud9 console by typing cloud9 in the search bar and then selecting Cloud9 from the list of results:

Figure 10.5 – Navigating to the Cloud9 console
In Figure 10.5, we have one of the ways to navigate to the Cloud9 service page. Another option would be to click on the Services drop-down menu (not shown in the preceding screenshot) and locate the Cloud9 service in the Developer Tools group of services.
- Locate and select the Cloud9 environment that we prepared in Chapter 1, Introduction to ML Engineering on AWS:

Figure 10.6 – Locating the View details button
Once you have selected the Cloud9 environment, click on the View details button located in the upper-right portion of the page (as highlighted in Figure 10.6).
Note
You might also decide to create a new Cloud9 environment from scratch and increase the size of the volume attached to the EC2 instance where the environment is running. If that’s the case, make sure to follow the step-by-step instructions specified in the Creating your Cloud9 environment and Increasing the Cloud9 storage sections of Chapter 1, Introduction to ML Engineering on AWS.
- Under Environment details, locate and click on the Go To Instance link, as highlighted in Figure 10.7:

Figure 10.7 – Locating and clicking on the Go To Instance button
This should redirect you to the EC2 console where you should see the specific EC2 instance where the Cloud9 environment is running.
- Toggle on the checkbox corresponding to the EC2 instance (starting with aws-cloud9), and then open the Actions drop-down menu, as highlighted in Figure 10.8:

Figure 10.8 – Modifying the IAM role of the EC2 instance
- Next, we locate and click on the Modify IAM role option under the list of options under Security. This should redirect you to a page where you can select the specific IAM role to attach to the selected EC2 instance.
- In the IAM role drop-down menu (as highlighted in Figure 10.9), locate and select the IAM role we created earlier in this chapter (that is, the kubeflow-on-eks IAM role):

Figure 10.9 – Specifying kubeflow-on-eks as the IAM role
Once we have updated the IAM role drop-down value to kubeflow-on-eks, you can now click on the Update IAM role button (as highlighted in Figure 10.9).
- Navigate back to the Cloud9 console by typing cloud9 in the search bar and then selecting Cloud9 from the list of results.
- Locate and click on the Open IDE button associated with our Cloud9 environment. This should open a Cloud9 environment that is similar to what is shown in Figure 10.10:

Figure 10.10 – The Cloud9 environment
Here, we should see a familiar screen (as we have used this already in Chapter 1, Introduction to ML Engineering on AWS, and Chapter 3, Deep Learning Containers).
In the Terminal of the Cloud9 environment (after the $ sign in the lower part of the screen), run the following command to disable the managed temporary credentials inside the environment:
ENV_ID=$C9_PID
aws cloud9 update-environment --managed-credentials-action DISABLE --environment-id $ENV_ID
- Also, let’s remove the credentials file inside the .aws directory to ensure that temporary credentials are not in place, too:
rm -vf /home/ubuntu/.aws/credentials
- Finally, let’s verify that the Cloud9 environment is using the IAM role we prepared in this chapter (that is, the kubeflow-on-eks IAM role):
aws sts get-caller-identity --query Arn
This should yield a result similar to the following:
arn:aws:sts::1234567890:assumed-role/kubeflow-on-eks/i-abcdefgh12345
Once we have verified that we are using the correct IAM role inside the Cloud9 environment, we can proceed with the next section.
Note
What happened here? IAM roles (attached to the AWS resources) generate and provide credentials inside environments that expire every few hours. For us to be able to work with IAM roles, we need to remove any existing set of credentials (inside the Cloud9 environment) so that the environment will use the IAM role credentials instead. For more information on this topic, feel free to check out https://docs.aws.amazon.com/cloud9/latest/user-guide/security-iam.html.
Updating the Cloud9 environment with the essential prerequisites
Before we can create our EKS cluster and set up Kubeflow on top of it, we would need to download and install a few prerequisites including several command-line tools, such as kubectl, eksctl, and kustomize.
Note
We will discuss how these work in the Setting up Kubeflow on Amazon EKS section of this chapter.
In the next set of steps, we will run a couple of scripts that will install the prerequisites needed to get Kubernetes and Kubeflow running in our environment:
- Let’s begin by using the wget command (in the Terminal of the Cloud9 environment) to download the prerequisites.zip file containing a variety of installation scripts. After that, we will use the unzip command to extract the contents of the ZIP file we just downloaded:
wget -O prerequisites.zip https://bit.ly/3ByyDGV
unzip prerequisites.zip
This should extract the following files from the ZIP file:
- 00_install_kubectl_aws_jq_and_more.sh – This is a script that runs all the other scripts (with the prefixes of 01 to 07) to install the prerequisites.
- 01_install_kubectl.sh – This is a script that installs the kubectl command-line tool.
- 02_install_aws_cli_v2.sh – This is a script that installs v2 of the AWS CLI.
- 03_install_jq_and_more.sh – This is a script that installs and sets up a few prerequisites, such as jq and yq.
- 04_check_prerequisites.sh – This is a script that checks whether the first few prerequisites have been installed successfully.
- 05_additional_setup_instructions.sh – This is a script that sets up the Bash completion.
- 06_download_eksctl.sh – This is a script that installs the eksctl command-line tool.
- 07_install_kustomize.sh – This is a script that installs version 3.2.3 of kustomize.
- Navigate to the ch10_prerequisites folder and run the chmod command to make the scripts inside the folder executable:
cd ch10_prerequisites
chmod +x *.sh
- Now, run the following command to start the installation and setup processes:
sudo ./00_install_kubectl_aws_jq_and_more.sh
This should run the other scripts inside the ch10_prerequisites folder starting from 01_install_kubectl.sh to 07_install_kustomize.sh.
Note
Once the 00_install_kubectl_aws_jq_and_more.sh script has finished running, several prerequisites, such as AWS CLI v2, eksctl, and kustomize, should already be available for us to use to prepare Kubernetes clusters (if there are no errors during installation). Make sure that you review the logs generated by the script before proceeding.
This should yield a result similar to the following:
aws-cli/2.7.20 Python/3.9.11 Linux/5.4.0-1081-aws exe/x86_64.ubuntu.18 prompt/off
- Next, let’s verify the version of kustomize that we will be using:
kustomize version
This should yield a result similar to the following:
Version: {Version:kustomize/v3.2.3 GitCommit:f8412aa3d39f32151525aff97a351288f5a7470b BuildDate:2019-10-08T23:30:25Z GoOs:linux GoArch:amd64}- Let’s verify the version of eksctl, too:
eksctl version
This should yield a result similar to the following:
0.109.0
- Run the following so that the other changes (such as the environment variable values) from the installation scripts reflect in our current shell:
. ~/.bash_completion
. ~/.bash_profile
. ~/.bashrc
Note the presence of a dot (.) and a space before the tilde symbol (~) at the start of each line.
- Run the following block of commands to set a few environment variables and configure the default region when using the AWS CLI:
export AWS_REGION="us-west-2" echo "export AWS_REGION=${AWS_REGION}" | tee -a ~/.bash_profile aws configure set default.region ${AWS_REGION} - Finally, verify that the default region has been set successfully:
aws configure get default.region
This should yield a value of us-west-2 (if we are running our Cloud9 environment in Oregon).
Now that all prerequisites have been installed, set up, and verified, we can proceed with creating an EKS cluster and setting up Kubeflow on top of it!
Setting up Kubeflow on Amazon EKS
With all of the prerequisites ready, we can now proceed with creating our EKS cluster and then installing Kubeflow on top of it. During the installation and setup process, we will use the following tools:
- eksctl – The CLI tool for creating and managing Amazon EKS clusters
- kubectl – The CLI tool for creating, configuring, and deleting Kubernetes resources
- AWS CLI – The CLI tool for creating, configuring, and deleting AWS resources
- kustomize – The CLI tool for managing the configuration of Kubernetes objects
The hands-on portion of this section involves following a high-level set of steps:
- Preparing the eks.yaml file containing the EKS configuration (such as the number of nodes, desired capacity, and instance type)
- Running the eks create cluster command using the eks.yaml file to create the Amazon EKS cluster
- Using kustomize and kubectl to install Kubeflow inside our cluster
With these in mind, we can now proceed with setting up our EKS cluster and Kubeflow:
- Continuing where we left off in the previous section, let’s run the following commands in the Terminal of the Cloud9 environment:
cd ~/environment
mkdir ch10
cd ch10
Here, we create the ch10 directory using the mkdir command. After that, we will navigate to the directory using the cd command.
- Next, let’s use the touch command to create an empty eks.yaml file:
touch eks.yaml
- In the File Tree, locate the environment directory with the name of your Cloud9 environment. Right-click on this directory to open a context menu similar to what is shown in Figure 10.11:

Figure 10.11 – Refreshing the displayed directories and files
Select Refresh from the list of options to ensure that the latest changes have been reflected in the file tree.
- Next, double-click on the eks.yaml file (inside the ch10 directory) in the file tree to open the file in the Editor pane. Inside this blank file, specify the following YAML configuration:
---
apiVersion: eksctl.io/v1alpha5
kind: ClusterConfig
metadata:
  name: kubeflow-eks-000
  region: us-west-2
  version: "1.21"
availabilityZones: ["us-west-2a", "us-west-2b", "us-west-2c", "us-west-2d"]
managedNodeGroups:
- name: nodegroup
  desiredCapacity: 5
  instanceType: m5.xlarge
  ssh:
    enableSsm: true
Make sure to save your changes by pressing the Ctrl + S keys (or, alternatively, Cmd + S when using a Mac device). Additionally, you can use the Save option in the File menu to save your changes.
Important Note
Before proceeding, it is crucial that we are aware of the resources that will be created when we run the eksctl create cluster command using this configuration file. Here, we specify that we want our cluster (named kubeflow-eks-000) to have five (5) m5.xlarge instances. Once you run the eksctl create cluster command in the next step, make sure that you delete the cluster within an hour or two after cluster creation to manage costs. Feel free to jump to the Cleaning up section at the end of this chapter once you need to delete the cluster.
- Before creating real resources for our cluster, let’s use the eksctl create cluster command with the --dry-run option:
eksctl create cluster -f eks.yaml --dry-run
This should help us inspect the configuration before we create the actual set of resources.
- Now, let’s create our cluster using the eksctl create command:
eksctl create cluster -f eks.yaml
Here, we use the eks.yaml file we prepared in the previous step as the configuration file when running the command.
Important Note
If you encounter an error with a message similar to Error: invalid version, 1.2X is no longer supported, supported values: 1.2X, 1.2X, 1.2X, 1.2X, feel free to update the version string value in the eks.yaml file with the lowest supported version specified in the error message. Once you have updated the eks.yaml file, you can run the eksctl create cluster command again and check whether the issue has been resolved. For more information on this topic, feel free to check out https://docs.aws.amazon.com/eks/latest/userguide/kubernetes-versions.html.
Running the eksctl create cluster command should take about 15–30 minutes to complete. It will use CloudFormation stacks for launching the AWS resources. If you are wondering what CloudFormation is, it is a service that lets you define each of your infrastructure’s components and their settings in a template. This template is then read by CloudFormation to provision the resources required by your infrastructure:

Figure 10.12 – How EKS resources are created using eksctl
In Figure 10.12, we can see that the eksctl command makes use of the eks.yaml file to prepare the templates that will be used by the CloudFormation service to provision resources.
Note
Note that eksctl creates other resources outside of CloudFormation, too. This means that the CloudFormation templates used to prepare the EKS resources will not contain all resources created using the eksctl command. That said, it is best to use the eksctl delete cluster command when deleting the resources created in this section. Once you need to delete the resources, make sure that you follow the instructions specified in the Cleaning up section of this chapter.
This should give us five nodes with the STATUS value of Ready.
Important Note
If you encounter issues when deploying EKS clusters, make sure that you check out https://docs.aws.amazon.com/eks/latest/userguide/troubleshooting.html.
- Before proceeding, let’s make sure that CLUSTER_NAME and CLUSTER_REGION have been set with the appropriate values:
CLUSTER_NAME=kubeflow-eks-000
CLUSTER_REGION=us-west-2
Here, we specify a CLUSTER_NAME value equivalent to the name specified in the eks.yaml file. Note that if you need to experiment with another set of configuration parameters, you can specify a different cluster name (by updating both CLUSTER_NAME and the eks.yaml file) and replace kubeflow-eks-000 with kubeflow-eks-001 (and so on) when creating new clusters. Just make sure that you properly delete any existing clusters before creating a new one.
- Additionally, let’s associate an IAM OIDC provider with the cluster:
eksctl utils associate-iam-oidc-provider --cluster $CLUSTER_NAME --approve -v4
So, what’s an IAM OIDC provider? Well, it’s an IAM entity used to establish trust between your AWS account and an external OpenID Connect-compatible identity provider. This means that instead of creating IAM users, we can use IAM OIDC providers instead and give these identities permissions to work with the resources in our AWS account.
Note
For more information about this topic, feel free to check out https://docs.aws.amazon.com/IAM/latest/UserGuide/id_roles_providers_create_oidc.html.
- Let’s use the aws eks update-kubeconfig command to configure kubectl so that we can connect to the Amazon EKS cluster:
aws eks update-kubeconfig --name $CLUSTER_NAME --region ${AWS_REGION} - Next, we will clone two repositories that include the manifests (files containing the specifications of the Kubernetes objects) for installing what we need:
export KUBEFLOW_VERSION=v1.5.1 export AWS_VERSION=v1.5.1-aws-b1.0.0 git clone https://github.com/awslabs/kubeflow-manifests.git && cd kubeflow-manifests git checkout ${AWS_VERSION} git clone --branch ${KUBEFLOW_VERSION} https://github.com/kubeflow/manifests.git upstream - Navigate to the deployments/vanilla directory:
cd deployments/vanilla
We should find a kustomization.yaml file inside this directory. For more information on this topic, feel free to check out https://kubernetes.io/docs/tasks/manage-kubernetes-objects/kustomization/.
- With everything ready, let’s run this single-line command to install the Kubeflow components and services:
while ! kustomize build . | kubectl apply -f -; do echo "Retrying"; sleep 30; done
Note
This step should take about 4–10 minutes to complete. If the output logs seem to be looping indefinitely for more than 20–30 minutes already, you might need to experiment with different values in the version string value in the eks.yaml file. What values can we use? Let’s say that the currently supported versions are 1.20, 1.21, 1.22, and 1.23 (as indicated in https://docs.aws.amazon.com/eks/latest/userguide/kubernetes-versions.html). Should we try using version 1.23? If we were to use the latest supported Kubernetes version 1.23 in the eks.yaml file, there’s a chance that we might encounter issues installing Kubeflow. We might need to wait for a few months for the Kubeflow support to catch up (as indicated in https://awslabs.github.io/kubeflow-manifests/docs/about/eks-compatibility/). That said, we can try specifying 1.20, 1.21, or 1.22 in the eks.yaml file when using the eksctl create cluster command (starting from the lowest supported version of 1.20 first). With these in mind, the next step is to delete the cluster using the eksctl delete cluster command (please see the Cleaning up section), update the eks.yaml file with the desired Kubernetes version, and then repeat the steps starting from the eksctl create cluster command in this section.
- Let’s quickly inspect the created resources using the following commands:
ns_array=(kubeflow kubeflow-user-example-com kserve cert-manager istio-system auth knative-eventing knative-serving)
for i in ${ns_array[@]}; do
  echo "[+] kubectl get pods -n $i"
  kubectl get pods -n $i;
  echo "---"
done
Here, we use the kubectl get pods command to inspect the resources created inside the nodes of the cluster.
- Now, we run the following command so that we can access the Kubeflow dashboard via port 8080 of the Cloud9 environment:
kubectl port-forward svc/istio-ingressgateway -n istio-system 8080:80 --address=localhost
- Click on Preview (which is located at the top of the page) to open a list of drop-down menu options similar to what is shown in Figure 10.13:
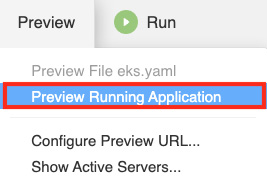
Figure 10.13 – Preview Running Application
From the list of drop-down menu options, select Preview Running Application to open a small window just beside the Terminal pane at the bottom of the screen.
Note
We were able to preview the application directly from our Cloud9 environment since the application is currently running using HTTP over port 8080. For more information about this topic, feel free to check out https://docs.aws.amazon.com/cloud9/latest/user-guide/app-preview.html.
- Click on the button, as highlighted in Figure 10.14, to open the preview window in a separate browser tab:

Figure 10.14 – Previewing in a new window
Make sure that you do not close the browser tab where the Cloud9 environment is running while working with the application preview in the second browser tab.
- Specify the following credentials on the Log in to Your Account page:
- Email Address: [email protected]
- Password: 12341234
Important Note
Do not share the URL of the application preview tab with others. To change the default password, feel free to check the following link at https://awslabs.github.io/kubeflow-manifests/docs/deployment/connect-kubeflow-dashboard/
This should redirect you to the Kubeflow Central Dashboard similar to what is shown in Figure 10.15:

Figure 10.15 – The Kubeflow central dashboard
In Figure 10.15, we can see the Kubeflow Central Dashboard—a dashboard interface that provides immediate access to the components and resources we have created and worked with. Feel free to navigate to the different parts of this dashboard using the sidebar.
Finally, all the setup work has been completed! In the next section, we will run our first custom Kubeflow pipeline. Feel free to grab a cup of coffee or tea before proceeding.
Running our first Kubeflow pipeline
In this section, we will run a custom pipeline that will download a sample tabular dataset and use it as training data to build our linear regression model. The steps and instructions to be executed by the pipeline have been defined inside a YAML file. Once this YAML file has been uploaded, we would then be able to run a Kubeflow pipeline that will run the following steps:
- Download dataset: Here, we will be downloading and working with a dataset that only has 20 records (along with the row containing the header). In addition to this, we will start with a clean version without any missing or invalid values:

Figure 10.16 – A sample tabular dataset
In Figure 10.16, we can see that our dataset has three columns:
- last_name – This is the last name of the manager.
- management_experience_months – This is the total number of months a manager has been managing team members.
- monthly_salary – This is the current salary, per month, of the manager (in USD).
To simplify things a bit, we will be working with a dataset that only has a few records—just enough to produce a simple ML model. In addition to this, we will start with a clean version without any missing or invalid values.
- Process data: After downloading the dataset, our pipeline will proceed with processing the data and transforming it into a pandas DataFrame where the first column is the target column (monthly_salary) and the second column is the predictor column (management_experiment_months). At the same time, we will perform the train-test split so that we can use 70% of the dataset for training the model and the remaining 30% for evaluating it.
- Train model: The DataFrame containing the training set would then be used to train the linear regression model. Here, we will make use of scikit-learn’s LinearRegression algorithm to fit a linear model on the training data.
- Evaluate model: Once the training step has been completed, we will evaluate it using the test set.
- Perform sample prediction: Finally, we will perform a sample prediction where the model would yield a predicted output value (monthly_salary) given an input value (management_experiment_months).
Note
Note that we have full control of how our pipeline would behave. We can think of a pipeline as just a sequence of steps where each step might generate an output that would then be used by another step as input.
Now that we have a better idea of what our pipeline looks like, let’s proceed with running our first pipeline:
- Let’s begin by opening the following link in another browser tab: https://raw.githubusercontent.com/PacktPublishing/Machine-Learning-Engineering-on-AWS/main/chapter10/basic_pipeline.yaml.
- Right-click on any part of the page to open a context menu that is similar to what is shown in Figure 10.17:

Figure 10.17 – Downloading the YAML file
Save the file as basic_pipeline.yaml and download it to the Downloads folder (or similar) of your local machine.
- Back in the browser tab showing the Kubeflow Central Dashboard, locate and click on Pipelines in the sidebar.
- Next, click on the Upload pipeline button (beside the Refresh button)
- In the Upload Pipeline or Pipeline Version page, specify My first pipeline under Pipeline Name. After that, select the Upload a file checkbox, as shown in Figure 10.18. Locate and upload the basic_pipeline.yaml file (from your local machine) using the file input field provided. Finally, click on the Create button (as highlighted in Figure 10.18):

Figure 10.18 – Uploading a pipeline (file)
Clicking on the Create button should create the pipeline and redirect you to a pipeline page similar to what is shown in Figure 10.19:

Figure 10.19 – A graph of the first pipeline
At this point, our pipeline should be ready! The next step would be to create an experiment and run it.
Note
What just happened? Upon uploading the YAML file, Kubeflow Pipelines converted the YAML file into a pipeline that can be executed through a pipeline run.
- Next, locate and click on the Create experiment button (located in the upper-right corner of the page). Feel free to zoom in/out (and close any popups and overlays that might appear) if you cannot locate the Create experiment button.
- Specify My first experiment under Experiment name. Then click on the Next button.
- On the Start a run page, scroll down to the bottom of the page and then click on the Start button.
- Locate and click on Run of My first pipeline, as highlighted in Figure 10.20:

Figure 10.20 – Navigating to the pipeline run
Here, we can see that our pipeline has already started running. After navigating to the specific pipeline run page, you should see a relatively new or partially completed pipeline similar to what is shown in Figure 10.21:

Figure 10.21 – Waiting for the pipeline to finish running
This should take around 1–2 minutes to complete. You should see a check mark on each of the steps that have been completed successfully.
- While the pipeline is running, you might click on any of the steps to inspect the corresponding set of input and output artifacts, logs, and other details:

Figure 10.22 – Inspecting the artifacts
In Figure 10.22, we can see that we are able to view and debug the input and output artifacts after clicking on the box corresponding to the Process data step. Also, we should find other details about the current step by navigating to the other tabs (Visualizations, Details, Volumes, and Logs).
Congratulations on running your first pipeline! If you are wondering how we prepared this pipeline, we simply used the Kubeflow Pipelines SDK to define the steps of the pipeline and generate the YAML file containing all the instructions and configurations. In the next section, we will dive a bit deeper into using the Kubeflow Pipelines SDK when building custom ML pipelines.
Using the Kubeflow Pipelines SDK to build ML workflows
In this section, we will build ML workflows using the Kubeflow Pipelines SDK. The Kubeflow Pipelines SDK contains what we need to build the pipeline components containing the custom code we want to run. Using the Kubeflow Pipelines SDK, we can define the Python functions that would map to the pipeline components of a pipeline.
Here are some guidelines that we need to follow when building Python function-based components using the Kubeflow Pipelines SDK:
- The defined Python functions should be standalone and should not use any code and variables declared outside of the function definition. This means that import statements (for example, import pandas) should be implemented inside the function, too. Here’s a quick example of how imports should be implemented:
def process_data(...):
    import pandas as pd
    df_all_data = pd.read_csv(df_all_data_path)
    # and so on...
- Data must be passed as files when passing large amounts of data (or data with complex data types) between components. Here’s a quick example of this in action:
def evaluate_model(
    model_path: InputPath(str),
    df_test_data_path: InputPath(str)):

    import pandas as pd
    from joblib import load

    df_test_data = pd.read_csv(df_test_data_path)
    model = load(model_path)
    # and so on...
- Use the create_component_from_func() function (from kfp.components) to convert the defined function into a pipeline component. A list of packages can be specified in the packages_to_install parameter when calling the create_component_from_func() function similar to what we have in the following block of code:
process_data_op = create_component_from_func(
    process_data,
    packages_to_install=['pandas', 'sklearn']
)
The packages specified would then be installed before the function is executed.
- Optionally, we might prepare a custom container image that will be used for the environment where the Python function will run. The custom container image can be specified in the base_image parameter when calling the create_component_from_func() function.
That said, let’s begin defining and configuring our ML pipeline using the Kubeflow Pipelines SDK:
- Locate and click on Notebooks in the sidebar of the Kubeflow Central Dashboard.
- Next, click on the New Notebook button.
- Specify first-notebook for the Name input field value.
- Scroll down to the bottom of the page, and then click on the LAUNCH button.
Note
Wait for the notebook to become available. It should take about 1–2 minutes for the notebook to be ready.
- Click on the CONNECT button once the notebook becomes available.
- In the Jupyter Lab Launcher, select the Python 3 option (under Notebook), as highlighted in Figure 10.23:
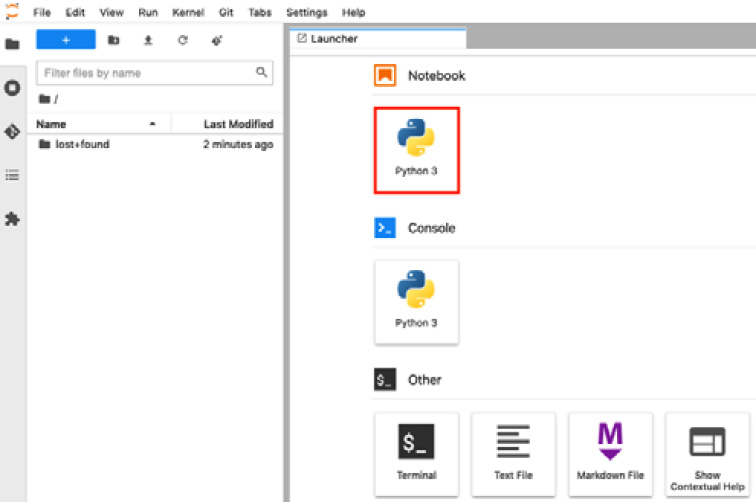
Figure 10.23 – Jupyter Lab Launcher
This should create a new Jupyter Notebook (inside a container within a Kubernetes Pod) where we can run our Python code.
Note
We will run the blocks of code in the succeeding set of steps inside the Jupyter notebook we launched.
- Let’s perform a few imports from the Kubeflow Pipelines SDK:
import kfp
from kfp import dsl
from kfp.components import InputPath, OutputPath
from kfp.components import create_component_from_func
- For the first step in our pipeline, we define the download_dataset() function, which downloads a dummy dataset and converts it into a CSV file. This CSV file gets passed to the next step through the df_all_data_path OutputPath object:
def download_dataset(
    df_all_data_path: OutputPath(str)):

    import pandas as pd

    url="https://bit.ly/3POP8CI"

    df_all_data = pd.read_csv(url)
    print(df_all_data)
    df_all_data.to_csv(
        df_all_data_path,
        header=True,
        index=False)
- For the second step in our pipeline, we define the process_data() function where we read the CSV data from the previous step and apply the train-test split, which will yield a training set and a test set. These can then be saved as CSV files and passed to the next step through the df_training_data_path and df_test_data_path OutputPath objects, respectively:
def process_data( df_all_data_path: InputPath(str), df_training_data_path: OutputPath(str), df_test_data_path: OutputPath(str)): import pandas as pd from sklearn.model_selection import train_test_split df_all_data = pd.read_csv(df_all_data_path) print(df_all_data) mem = 'management_experience_months' ms = 'monthly_salary' X = df_all_data[mem].values y = df_all_data[ms].values X_train, X_test, y_train, y_test = train_test_split( X, y, test_size=0.3, random_state=0 ) df_training_data = pd.DataFrame({ 'monthly_salary': y_train, 'management_experience_months': X_train }) df_training_data.to_csv( df_training_data_path, header=True, index=False ) df_test_data = pd.DataFrame({ 'monthly_salary': y_test, 'management_experience_months': X_test }) df_test_data.to_csv( df_test_data_path, header=True, index=False ) - For the third step in our pipeline, we define the train_model() function where we use the training data from the previous step to train a sample model. Then, the trained model gets saved and passed to the next step via the model_path OutputPath object:
def train_model(
    df_training_data_path: InputPath(str),
    model_path: OutputPath(str)):

    import pandas as pd
    from sklearn.linear_model import LinearRegression
    from joblib import dump

    df_training_data = pd.read_csv(
        df_training_data_path
    )
    print(df_training_data)

    mem = 'management_experience_months'
    X_train = df_training_data[mem].values
    ms = 'monthly_salary'
    y_train = df_training_data[ms].values

    model = LinearRegression().fit(
        X_train.reshape(-1, 1), y_train
    )
    print(model)
    dump(model, model_path)
- In the fourth step, we define the evaluate_model() function where we use the test data from the second step to evaluate the trained model that we obtained from the previous step:
def evaluate_model(
    model_path: InputPath(str),
    df_test_data_path: InputPath(str)):

    import pandas as pd
    from joblib import load

    df_test_data = pd.read_csv(df_test_data_path)
    mem = 'management_experience_months'
    ms = 'monthly_salary'
    X_test = df_test_data[mem].values
    y_test = df_test_data[ms].values

    model = load(model_path)
    print(model.score(X_test.reshape(-1, 1), y_test))
- For the final step of our pipeline, we define the perform_sample_prediction() function where we use the trained model from the third step to perform a sample prediction (using a sample input value):
def perform_sample_prediction(
    model_path: InputPath(str)):
    from joblib import load

    model = load(model_path)
    print(model.predict([[42]])[0])
- Then, we use the create_component_from_func() function for each of the functions we have prepared to create components. Here, we specify the packages to install before running these functions:
download_dataset_op = create_component_from_func(
    download_dataset,
    packages_to_install=['pandas']
)
process_data_op = create_component_from_func(
    process_data,
    packages_to_install=['pandas', 'sklearn']
)
train_model_op = create_component_from_func(
    train_model,
    packages_to_install=[
        'pandas', 'sklearn', 'joblib'
    ]
)
evaluate_model_op = create_component_from_func(
    evaluate_model,
    packages_to_install=[
        'pandas', 'joblib', 'sklearn'
    ]
)
perform_sample_prediction_op =
    create_component_from_func(
        perform_sample_prediction,
        packages_to_install=['joblib', 'sklearn']
    )
- Now, let’s bring everything together and define the pipeline with the basic_pipeline() function:
@dsl.pipeline(
    name='Basic pipeline',
    description='Basic pipeline'
)
def basic_pipeline():
    DOWNLOAD_DATASET = download_dataset_op()
    PROCESS_DATA = process_data_op(
        DOWNLOAD_DATASET.output
    )
    TRAIN_MODEL = train_model_op(
        PROCESS_DATA.outputs['df_training_data']
    )
    EVALUATE_MODEL = evaluate_model_op(
        TRAIN_MODEL.outputs['model'],
        PROCESS_DATA.outputs['df_test_data']
    )
    PERFORM_SAMPLE_PREDICTION =
        perform_sample_prediction_op(
            TRAIN_MODEL.outputs['model']
        )
    PERFORM_SAMPLE_PREDICTION.after(EVALUATE_MODEL)
- Finally, let’s generate the pipeline’s YAML file using the following block of code:
kfp.compiler.Compiler().compile(
    basic_pipeline,
    'basic_pipeline.yaml'
)
At this point, we should see a YAML file in the file browser. If not, feel free to use the refresh button to update the list of files displayed.
- In the file browser, right-click on the generated basic_pipeline.yaml file to open a context menu similar to what is shown in Figure 10.24:
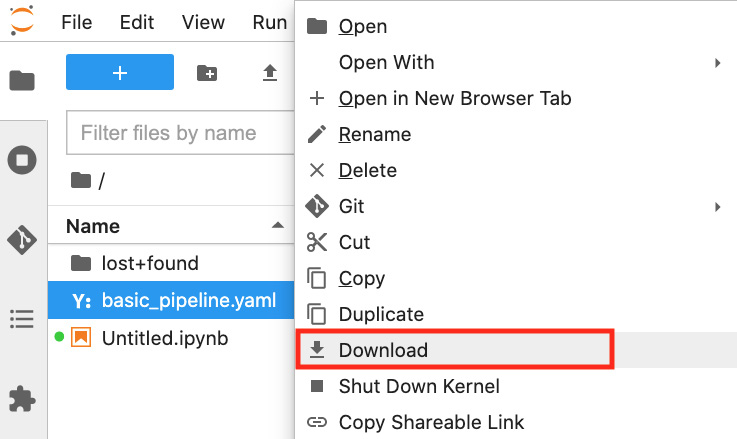
Figure 10.24 – Downloading the basic_pipeline.yaml file
Select Download from the list of options in the context menu (as highlighted in Figure 10.24). This should download the YAML file to the downloads folder (or similar) of your local machine.
- After downloading the basic_pipeline.yaml file, navigate to the browser tab where we have Kubeflow Central Dashboard open. After that, navigate to the Pipelines page by clicking on Pipelines in the sidebar (in Kubeflow Central Dashboard).
- Next, click on the Upload pipeline button (beside the Refresh button), and then use the basic_pipeline.yaml file we generated in this section to run another pipeline.
Important Note
Feel free to check and follow the steps specified in the Running our first Kubeflow pipeline section of this chapter when running a new pipeline. We will leave this to you as an exercise! (The resulting pipeline should be the same.)
That was easier than expected, right? We should congratulate ourselves after completing the hands-on solutions in this chapter! Being able to properly set up Kubeflow on EKS along with getting custom ML pipelines to work using Kubeflow is an achievement. This should give us the confidence to build more complex ML pipelines using the technology stack that we are using right now.
In the next section, we will do a quick cleanup and delete the resources we created in this chapter.
Cleaning up
Now that we have completed working on the hands-on solutions of this chapter, it is time we clean up and turn off the resources we will no longer use. At this point in time, we have an EKS cluster running with 5 x m5.xlarge instances running. We need to terminate these resources to manage the cost.
Note
If we do not turn these off (for a month), how much would it cost? At a minimum (per month), it would cost around USD 700.80 for the running EC2 instances (5 instances x 0.192 USD x 730 hours in a month) plus USD 73 for the EKS cluster (1 Cluster x 0.10 USD per hour x 730 hours per month) assuming that we are running the EKS cluster in the Oregon region (us-west-2). Note that there will be other additional costs associated with the EBS volumes attached to these instances along with the other resources used in this chapter.
In the next set of steps, we will uninstall and delete the resources in the Cloud9 environment’s Terminal:
- Let’s navigate back to the Cloud9 environment Terminal tab, where we last ran the following command (NOTE: do not run the following command as we just need to navigate back to the tab where this command is running):
kubectl port-forward svc/istio-ingressgateway -n istio-system 8080:80 --address=localhost
We should find a few Handling connection for 8080 logs in this Terminal.
- Stop this command by pressing Ctrl + C (or, alternatively, Cmd + C when using a Mac device) inside the Terminal.
- After that, let’s run the following command, which utilizes kubectl delete to delete the resources:
cd ~/environment/ch10/kubeflow-manifests/
cd deployments/vanilla/
kustomize build . | kubectl delete -f -
- Let’s delete the EKS cluster by running the following command:
eksctl delete cluster --region $CLUSTER_REGION --name $CLUSTER_NAME
Ensure that the CLUSTER_REGION and CLUSTER_NAME variables are set with the appropriate values before running the command. For example, if you are running the Kubernetes cluster in the Oregon region, CLUSTER_REGION should be set to us-west-2, while CLUSTER_NAME should be set to kubeflow-eks-000 (this is similar to what’s specified in the eks.yaml file)
Important Note
Make sure that you verify that the CloudFormation Stack created by the eksctl command is completely deleted. You can do this by navigating to the CloudFormation console and checking whether there are stacks with a DELETE_FAILED status. If that’s the case, simply reattempt the deletion of these stacks until all resources have been successfully deleted.
- Finally, detach the IAM role attached to the EC2 instance where the Cloud9 environment is running. We will leave this to you as an exercise!
Make sure to review whether all delete operations have succeeded before proceeding to the next section.
Recommended strategies and best practices
Before we end this chapter, we will quickly discuss some of the recommended strategies and best practices when working with Kubeflow on EKS.
Let’s start by identifying the ways we can improve how we designed and implemented our ML pipeline. What improvements can we make to the initial version of our pipeline? Here are some of the possible upgrades we can implement:
- Making the pipeline more reusable by allowing the first step of our pipeline to accept the dataset input path as an input parameter (instead of it being hardcoded in a similar way to what we have right now)
- Building and using a custom container image instead of using the packages_to_install parameter when working with pipeline components
- Saving the model artifacts into a storage service such as Amazon S3 (which will help us make sure that we are able to keep the artifacts even if the Kubernetes cluster has been deleted)
- Adding resource limits (such as CPU and memory limits) to specific steps in the pipeline using a ContainerOp object’s set_memory_limit() and set_cpu_limit()
- Utilizing SageMaker Components for Kubeflow Pipelines to move some of the data processing and training workloads to SageMaker
Note
If you are interested in learning and applying the best practices when preparing Kubeflow Pipelines’ components, feel free to check out https://www.kubeflow.org/docs/components/pipelines/sdk/best-practices/.
Next, let’s talk about some strategies and solutions that we can implement to upgrade our EKS cluster and Kubeflow setup:
- Setting up CloudWatch Container Insights on the Amazon EKS cluster to monitor the cluster performance
- Setting up and deploying Kubernetes Dashboard and/or Rancher to manage and control the Amazon EKS cluster resources
- Setting up Prometheus and Grafana for monitoring the Kubernetes cluster
- Changing the default user password when accessing the Kubeflow Central Dashboard
- Using AWS Cognito as an identity provider when deploying Kubeflow (for Kubeflow user authentication)
- Deploying Kubeflow with Amazon Relational Database Service (RDS) and Amazon Simple Storage Service (S3) for storing metadata and pipeline artifacts
- Exposing and accessing Kubeflow through an Application Load Balancer
- Using Amazon Elastic File System (EFS) with Kubeflow for persistent storage
- Reducing the permissions (to a minimal set of privileges) of the IAM role attached to the EC2 instance where the Cloud9 environment is running
- Auditing and upgrading the security configuration of each of the resources used
- Setting up autoscaling of the EKS cluster (for example, using Cluster Autoscaler)
- To manage the long-term costs of running EKS clusters, we can utilize the Cost Savings Plans, which involves reducing the overall cost of running resources after making a long-term commitment (for example, a 1-year or 3-year commitment)
There’s more we can add to this list, but these should do for now! Make sure to review and check the recommended solutions and strategies shared in Chapter 9, Security, Governance, and Compliance Strategies, too.
Summary
In this chapter, we set up and configured our containerized ML environment using Kubeflow, Kubernetes, and Amazon EKS. After setting up the environment, we then prepared and ran a custom ML pipeline using the Kubeflow Pipelines SDK. After completing all the hands-on work needed, we proceeded with cleaning up the resources we created. Before ending the chapter, we discussed relevant best practices and strategies to secure, scale, and manage ML pipelines using the technology stack we used in the hands-on portion of this chapter.
In the next chapter, we will build and set up an ML pipeline using SageMaker Pipelines—Amazon SageMaker’s purpose-built solution for automating ML workflows using relevant MLOps practices.
Further reading
For more information on the topics covered in this chapter, feel free to check out the following resources:
- Kubernetes concepts (https://kubernetes.io/docs/concepts/)
- Getting started with Amazon EKS (https://docs.aws.amazon.com/eks/latest/userguide/getting-started.html)
- eksctl – The official CLI for Amazon EKS (https://eksctl.io/)
- Amazon EKS troubleshooting (https://docs.aws.amazon.com/eks/latest/userguide/troubleshooting.html)
- Kubeflow on AWS – Deployment (https://awslabs.github.io/kubeflow-manifests/docs/deployment/)
- Kubeflow on AWS Security (https://awslabs.github.io/kubeflow-manifests/docs/about/security/)