
3
Deep Learning Containers
In Chapter 2, Deep Learning AMIs, we used AWS Deep Learning AMIs (DLAMIs) to set up an environment inside an EC2 instance where we could train and evaluate a deep learning model. In this chapter, we will take a closer look at AWS Deep Learning Containers (DLCs), which can run consistently across multiple environments and services. In addition to this, we will discuss the similarities and differences between DLAMIs and DLCs.
The hands-on solutions in this chapter focus on the different ways we can use DLCs to solve several pain points when working on machine learning (ML) requirements in the cloud. For example, container technologies such as Docker allow us to make the most of our running EC2 instances since we’ll be able to run different types of applications inside containers, without having to worry about whether their dependencies would conflict or not. In addition to this, we would have more options and solutions available when trying to manage and reduce costs. For one thing, if we were to use the container image support of AWS Lambda (a serverless compute service that lets us run our custom backend code) to deploy our deep learning model inside a serverless function, we would be able to significantly reduce the infrastructure costs associated with having an inference endpoint running 24/7. At the same time, with a serverless function, all we need to worry about is the custom code inside the function since AWS will take care of the infrastructure where this function would run.
In the scenario discussed in the Understanding how AWS pricing works for EC2 instances section of the previous chapter, we were able to reduce the cost of running a 24/7 inference endpoint to about $69.12 per month using an m6i.large instance. It is important to note that this value would more or less remain constant, even if this inference endpoint is not receiving any traffic. In other words, we might be paying $69.12 per month for a resource that could be either underutilized or unused. If we were to set up a staging environment that is configured the same as the production environment, this cost would double and it’s pretty much guaranteed that the staging environment resources would be severely underutilized. At this point, you might be wondering, Is it possible for us to reduce this cost further? The good news is that this is possible, so long as we can design a more optimal architecture using the right set of tools, services, and frameworks.
We will start the hands-on section of this chapter by training a PyTorch model inside a DLC. This model will be uploaded to a custom container image that will then be used to create an AWS Lambda function. After that, we will create an API Gateway HTTP API that accepts an HTTP request and triggers the AWS Lambda function with an event containing the input request data. The AWS Lambda function will then load the model we trained to perform ML predictions.
In this chapter, we will cover the following topics:
- Getting started with AWS Deep Learning Containers
- Essential prerequisites
- Using AWS Deep Learning Containers to train an ML model
- Serverless ML deployment with Lambda’s container image support
While working on the hands-on solutions of this chapter, we will cover several serverless services such as AWS Lambda and Amazon API Gateway, which allow us to run applications without having to manage the infrastructure ourselves. At the same time, the cost of using these resources scales automatically, depending on the usage of these resources. In a typical setup, we may have an EC2 instance running 24/7 where we will be paying for the running resource, regardless of whether it is being used. With AWS Lambda, we only need to pay when the function code runs. If it only runs for a few seconds per month, then we may pay close to zero for that month!
With these points in mind, let’s begin this chapter with a quick introduction to how AWS DLCs work.
Technical requirements
Before we start, we must have the following ready:
- A web browser (preferably Chrome or Firefox)
- Access to the AWS account that was used in the first two chapters of this book
- Access to the Cloud9 environment that you prepared in the Creating your Cloud9 environment and Increasing the Cloud9 storage sections of Chapter 1, Introduction to ML Engineering on AWS
The Jupyter notebooks, source code, and other files used for each chapter are available in this book’s GitHub repository at https://github.com/PacktPublishing/Machine-Learning-Engineering-on-AWS.
Important Note
It is recommended that you use an IAM user with limited permissions instead of the root account when running the examples in this book. We will discuss this, along with other security best practices, in detail in Chapter 9, Security, Governance, and Compliance Strategies. If you are just starting using AWS, you may proceed with using the root account in the meantime.
Getting started with AWS Deep Learning Containers
Containers allow developers, engineers, and system administrators to run processes, scripts, and applications inside consistent isolated environments. This consistency is guaranteed since these containers are launched from container images, similar to how EC2 instances are launched from Amazon Machine Images (AMIs).
It is important to note that we can run different isolated containers at the same time inside an instance. This allows engineering teams to make the most of the computing power available to the existing instances and run different types of processes and workloads, similar to what we have in the following diagram:

Figure 3.1 – Running multiple containers inside a single EC2 instance
One of the most popular container management solutions available is Docker. It is an open source containerization platform that allows developers and engineers to easily build, run, and manage containers. It involves the usage of a Dockerfile, which is a text document containing instructions on how to build container images. These container images are then managed and stored inside container registries so that they can be used at a later time.
Note
Docker images are used to create containers. Docker images are like ZIP files that package everything needed to run an application. When a Docker container is run from a container image (using the docker run command), the container acts like a virtual machine, with its environment isolated and separate from the server where the container is running.
Now that we have a better idea of how containers and container images work, let’s proceed by discussing what DLCs are and how these are used to speed up the training and deployment of ML models. One of the key benefits when using AWS DLCs is that most of the relevant ML packages, frameworks, and libraries are installed in the container images already. This means that ML engineers and data scientists no longer need to worry about installing and configuring the ML frameworks, libraries, and packages. This allows them to proceed with preparing the custom scripts used for training and deploying their deep learning models.
Since DLC images are simply prebuilt container images, these can be used in any AWS service where containers and container images can be used. These AWS services include Amazon EC2, Amazon Elastic Container Service (ECS), Amazon Elastic Kubernetes Service (EKS), Amazon SageMaker, AWS CodeBuild, AWS Lambda, and more.
With these in mind, let’s proceed with training and deploying a deep learning model using AWS Deep Learning Containers!
Essential prerequisites
In this section, we will ensure that the following prerequisites are ready before proceeding with the training steps:
- We will prepare a Cloud9 environment and ensure it has been set up so that we can train the model and build the custom container image.
- We will prepare a training dataset that will be used when training the deep learning model.
Preparing the Cloud9 environment
In the first part of this chapter, we will run our Deep Learning Container inside an EC2 instance, similar to what’s shown in the following diagram:

Figure 3.2 – Running a Deep Learning Container inside an EC2 instance
This container will serve as the environment where the ML model is trained using a script that utilizes the PyTorch framework. Even if PyTorch is not installed in the EC2 instance, the training script will still run successfully since it will be executed inside the container environment where PyTorch is preinstalled.
Note
If you are wondering what PyTorch is, it is one of the most popular open source ML frameworks available. You may check out https://pytorch.org/ for more information.
In the next set of steps, we will make sure that our Cloud9 environment is ready:
- Type cloud9 in the search bar. Select Cloud9 from the list of results:

Figure 3.3 – Navigating to the Cloud9 console
Here, we can see that the region is currently set to Oregon (us-west-2). Make sure that you change this to where you created the Cloud9 instance in Chapter 1, Introduction to ML Engineering on AWS.
- Open the Cloud9 environment you created in the Creating your Cloud9 environment section of Chapter 1, Introduction to ML Engineering on AWS, by clicking the Open IDE button. If there are no existing environments in the list of created environments, make sure that you are in the same region (that is, us-west-2) where the Cloud9 environment was created in Chapter 1, Introduction to ML Engineering on AWS.
Note
If you skipped the first chapter, make sure that you complete the Creating your Cloud9 environment and Increasing the Cloud9 storage sections of that chapter before proceeding.
- In the Terminal of the Cloud9 environment, run the following bash commands to create the ch03 directory:
mkdir -p ch03
cd ch03
We will use this directory as our current working directory for this chapter.
Now that we have our Cloud9 environment ready, let’s proceed with downloading the training dataset so that we can train our deep learning model.
Downloading the sample dataset
The training dataset we will use in this chapter is the same dataset we used in Chapter 2, Deep Learning AMIs. It has two columns that correspond to the continuous x and y variables. Later in this chapter, we will also generate a regression model using this dataset. The regression model is expected to accept an input x value and return a predicted y value.
In the next set of steps, we will download the training dataset into our Cloud9 environment:
- Run the following command to create the data directory:
mkdir -p data
- Next, let’s download the training data CSV file by using the wget command:
wget https://bit.ly/3h1KBx2 -O data/training_data.csv
- Use the head command to inspect what our training data looks like:
head data/training_data.csv
This should give us rows of (x,y) pairs, similar to what is shown in the following screenshot:

Figure 3.4 – The first few rows of the training_data.csv file
Since we started this section inside the ch03 directory, it is important to note that the training_data.csv file should be inside the ch03/data directory.
Now that we have the prerequisites ready, we can proceed with the training step.
Using AWS Deep Learning Containers to train an ML model
At this point, you might be wondering what makes a deep learning model different from other ML models. Deep learning models are networks of interconnected nodes that communicate with each other, similar to how networks of neurons communicate in a human brain. These models make use of multiple layers in the network, similar to what we have in the following diagram. Having more layers and more neurons per layer gives deep learning models the ability to process and learn complex non-linear patterns and relationships:
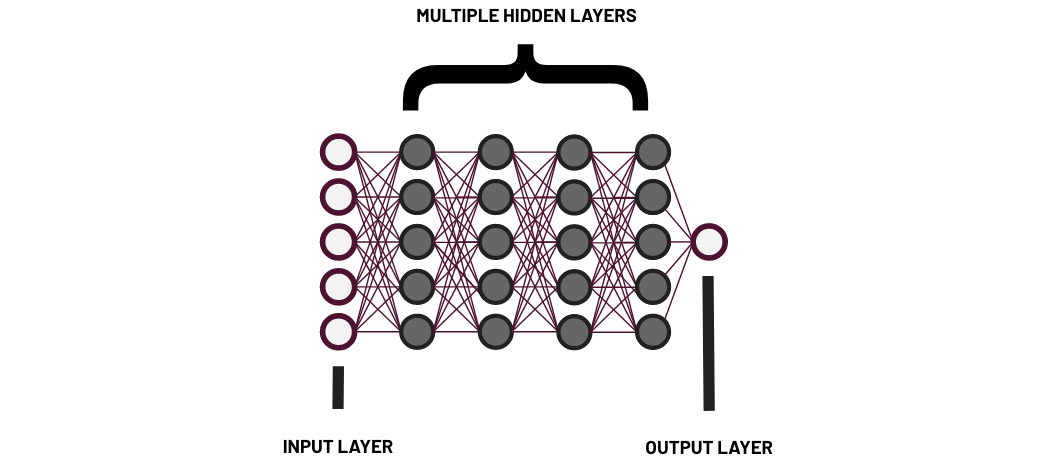
Figure 3.5 – Deep learning model
Deep learning has several practical applications in natural language processing (NLP), computer vision, and fraud detection. In addition to these, here are some of its other applications and examples as well:
- Generative Adversarial Networks (GANs): These can be used to generate realistic examples from the original dataset, similar to what we had in the Generating a synthetic dataset using a deep learning model section of Chapter 1, Introduction to ML Engineering on AWS.
- Deep Reinforcement Learning: This utilizes deep neural networks and reinforcement learning techniques to solve complex problems in industries such as robotics and gaming.
These past couple of years, the training and deployment of deep learning models have been greatly simplified with deep learning frameworks such as PyTorch, TensorFlow, and MXNet. AWS DLCs speed things up further by providing container images that already come preinstalled with everything you need to run these ML frameworks.
Note
You can view the list of available DLC images here: https://github.com/aws/deep-learning-containers/blob/master/available_images.md. Note that these container images are categorized by (1) the installed ML framework (PyTorch, TensorFlow, or MXNet), (2) the job type (training or inference), and (3) the installed Python version.
In the next set of steps, we will use the DLC image that’s been optimized to train PyTorch models:
- Let’s download the train.py file by running the following command:
wget https://bit.ly/3KcsG3v -O train.py
Before we proceed, let’s check the contents of the train.py file by opening it from the File tree:

Figure 3.6 – Opening the train.py file from the File tree
We should see a script that makes use of the training data stored in the data directory to train a deep learning model. This model gets saved in the model directory after the training step has been completed:
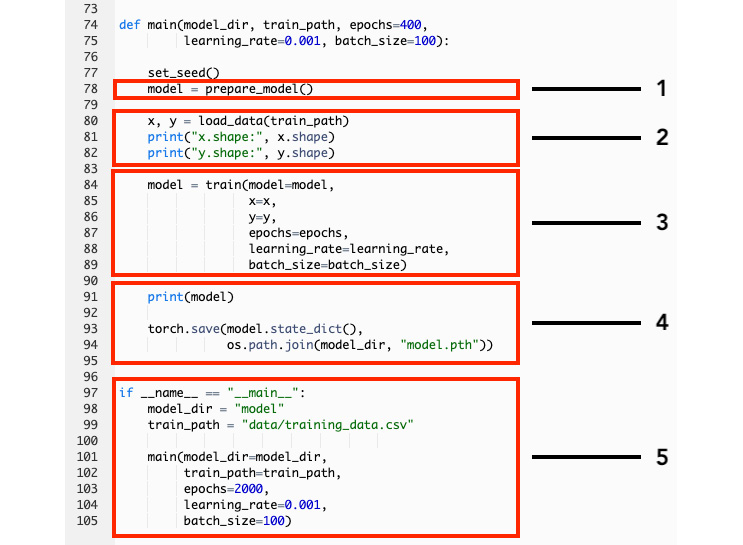
Figure 3.7 – The main() function of the train.py script file
Here, we can see that the main() function of our train.py script performs the following operations:
- (1) defines the model using the prepare_model() function
- (2) loads the training data using the load_data() function
- (3) performs the training step using the fit() method
- (4) saves the model artifacts using the torch.save() method
The last block of code in the preceding screenshot simply runs the main() function if train.py is being executed directly as a script.
Note
You can find the complete train.py script here: https://github.com/PacktPublishing/Machine-Learning-Engineering-on-AWS/blob/main/chapter03/train.py.
- Next, create the model directory using the mkdir command:
mkdir -p model
Later, we will see that the model output gets saved inside this directory.
- Install the tree utility by running the following command:
sudo apt install tree
- Let’s use the tree utility we just installed:
tree
This should yield a tree-like structure, similar to what we have in the following screenshot:

Figure 3.8 – Results after using the tree command
It is important to note that the train.py script is in the ch03 directory, which is where the data and model directories are located as well.
- Download the train.sh file using the wget command:
wget https://bit.ly/3Iz7zaV -O train.sh
If we check the contents of the train.sh file, we should see the following lines:
aws ecr get-login-password --region us-west-2 | docker login --username AWS --password-stdin 763104351884.dkr.ecr.us-west-2.amazonaws.com
TRAINING_IMAGE=763104351884.dkr.ecr.us-west-2.amazonaws.com/pytorch-training:1.8.1-cpu-py36-ubuntu18.04
docker run -it -v `pwd`:/env -w /env $TRAINING_IMAGE python train.py
The train.sh script first authenticates with Amazon Elastic Container Registry (a fully managed Docker container registry where we can store our container images) so that we can successfully download the training container image. This container image has PyTorch 1.8.1 and Python 3.6 preinstalled already.
Important Note
The code in the train.sh script assumes that we will run the training experiment inside an EC2 instance (where the Cloud9 environment is running) in the Oregon (us-west-2) region. Make sure that you replace us-west-2 with the appropriate region code. For more information on this topic, feel free to check out https://docs.aws.amazon.com/AWSEC2/latest/UserGuide/using-regions-availability-zones.html.
The docker run command first downloads the specified container image and creates a running container process using that image. After that, the contents of the current working directory are “copied” to the container after the current working directory (ch03) is mounted to the container using the -v flag when running the docker run command. We then set the working directory to where our files were mounted (/env) inside the container using the -w flag. Once all the steps are complete, the train.py script is executed inside the environment of the running container.
Note
Check out https://docs.docker.com/engine/reference/run/ for more information on how to use the docker run command.
- Now that we have a better idea of what will happen when we execute the train.sh file, let’s run it using the following commands:
chmod +x train.sh
./train.sh
This should yield a set of logs, similar to the following:

Figure 3.9 – Logs generated while running the train.sh script
Here, the train.sh script ran a container that invoked the train.py (Python) script to train the deep learning model. In the preceding screenshot, we can see the logs that were generated by the train.py script as it iteratively updates the weights of the neural network to improve the quality of the output model (that is, reducing the loss per iteration so that we can minimize the error). It is important to note that this train.py script makes use of PyTorch to prepare and train a sample deep learning model using the data provided.
This is the reason why we’re using a deep learning container image that has PyTorch 1.8.1 and Python 3.6 preinstalled already.
Note
This step may take 5 to 10 minutes to complete. Feel free to get a cup of coffee or tea while waiting!
- After the training script has finished running, let’s check whether the model directory contains a model.pth file using the tree command:
tree
This should yield a tree-like structure, similar to the following:

Figure 3.10 – Verifying whether the model was saved successfully
This model.pth file contains the serialized model we have trained using the train.py script. This file was created using the torch.save() method after the model training step was completed. Feel free to check out https://pytorch.org/tutorials/beginner/saving_loading_models.html for more information.
Note
The generated model.pth file allows us to use the parameters of the model to make predictions (after the model has been loaded from the file). For example, if our model makes use of an equation such as ax^2 + bxy + cy^2 = 0, the a, b, and c values are the model parameters. With this, if we have x (which is the independent variable), we can easily compute the value of y. That said, we can say that determining a, b, and c is the task of the training phase, and that determining y given x (and given a, b, and c) is the task of the inference phase. By loading the model.pth file, we can proceed with the inference phase and compute for the predicted value of y given an input x value.
Wasn’t that easy? With the training step complete, we will proceed with the deployment step in the next section.
Serverless ML deployment with Lambda’s container image support
Now that we have the model.pth file, what do we do with it? The answer is simple: we will deploy this model in a serverless API using an AWS Lambda function and an Amazon API Gateway HTTP API, as shown in the following diagram:

Figure 3.11 – Serverless ML deployment with an API Gateway and AWS Lambda
As we can see, the HTTP API should be able to accept GET requests from “clients” such as mobile apps and other web servers that interface with end users. These requests then get passed to the AWS Lambda function as input event data. The Lambda function then loads the model from the model.pth file and uses it to compute the predicted y value using the x value from the input event data.
Building the custom container image
Our AWS Lambda function code needs to utilize PyTorch functions and utilities to load the model. To get this setup working properly, we will build a custom container image from an existing DLC image optimized for PyTorch inference requirements. This custom container image will be used for the environment where our AWS Lambda function code will run through AWS Lambda’s container image support.
Note
For more information on AWS Lambda’s container image support, check out https://aws.amazon.com/blogs/aws/new-for-aws-lambda-container-image-support/.
It is important to note that a variety of DLC images are available for us to choose from. These images are categorized based on their job type (training versus inference), installed framework (PyTorch versus TensorFlow versus MXNet versus other options), and installed Python version (3.8 versus 3.7 versus 3.6 versus other options). Since we are planning to use a container where a PyTorch model can be loaded and used to perform predictions, we will be choosing a PyTorch DLC optimized for inference as the base image when building the custom Docker image.
The following steps focus on building a custom container image from an existing DLC image:
- Make sure you are inside the ch03 directory by running the pwd command in the Terminal.
- Next, run the following commands to download dlclambda.zip and extract its contents inside the ch03 directory:
wget https://bit.ly/3pt5mGN -O dlclambda.zip
unzip dlclambda.zip
This ZIP file contains the files and scripts needed to build the custom container image.
- Use the tree command to see what the ch03 directory looks like:
tree
This should yield a tree-like structure, similar to the following:

Figure 3.12 – Results after running the tree command
Here, several new files have been extracted from the dlclambda.zip file:
- Dockerfile
- app/app.py
- build.sh
- download-rie.sh
- invoke.sh
- run.sh
We will discuss each of these files in detail as we go through the steps in this chapter.
- In the File tree, locate and open the app.py file located inside the ch03/app directory:

Figure 3.13 – app.py Lambda handler implementation
This file contains the AWS Lambda handler implementation code, which (1) loads the model, (2) extracts the input x value from the event data, (3) computes for the predicted y value using the model, and (4) returns the output y value as a string.
In the Completing and testing the serverless API setup section near the end of this chapter, we will set up an HTTP API that accepts a value for x via the URL query string (for example, https://<URL>/predict?x=42). Once the request comes in, Lambda will call a handler function that contains the code to handle the incoming request. It will load the deep learning model and use it to predict the value of y using the value of x.
Note
You can find the complete app/app.py file here: https://github.com/PacktPublishing/Machine-Learning-Engineering-on-AWS/blob/main/chapter03/app/app.py.
- Copy the model.pth file from the model directory into the app/model directory using the cp command:
cp model/model.pth app/model/model.pth
Important Note
Make sure that you only load ML models from trusted sources. Inside app/app.py, we are loading the model using torch.load(), which can be exploited by attackers with a model containing a malicious payload. Attackers can easily prepare a model (with a malicious payload) that, when loaded, would give the attacker access to your server or resource running the ML scripts (for example, through a reverse shell). For more information on this topic, you may check the author’s talk on how to hack and secure ML environments and systems: https://speakerdeck.com/arvslat/pycon-apac-2022-hacking-and-securing-machine-learning-environments-and-systems?slide=8.
- Next, let’s make the build.sh, download-rie.sh, invoke.sh, and run.sh script files executable using the chmod command:
chmod +x *.sh
- Before running the build.sh command, let’s check the script’s contents using the cat command:
cat build.sh
This should yield a single line of code, similar to what we have in the following code block:
docker build -t dlclambda .
The docker build command builds a Docker container image using the instructions specified in the Dockerfile in the current directory. What does this mean? This means that we are building a container image using the relevant files in the directory and we’re using the instructions in the Dockerfile to install the necessary packages as well. This process is similar to preparing the DNA of a container, which can be used to create new containers with an environment configured with the desired set of tools and packages.
Since we passed dlclambda as the argument to the -t flag, our custom container image will have the dlclambda:latest name and tag after the build process completes. Note that we can replace the latest tag with a specific version number (for example, dlclambda:3), but we will stick with using the latest tag for now.
Note
For more information on the docker build command, feel free to check out https://docs.docker.com/engine/reference/commandline/build/.
- We must check the contents of the Dockerfile as well. What happens when we build the container image using this Dockerfile?
- The following DLC image is used as the base image for the two stages of the build: https://763104351884.dkr.ecr.us-west-2.amazonaws.com/pytorch-inference:1.8.1-cpu-py36-ubuntu18.04. It is important to note that this Dockerfile makes use of multi-stage builds to ensure that the final container does not contain the unused artifacts and files from the previous build stages.
- Next, the Lambda Runtime Interface Client is installed. This allows any custom container image to be compatible for use with AWS Lambda.
- The /function directory is created. The contents of the app/ directory (inside the ch03 directory of the Cloud9 environment) are then copied to the /function directory inside the container.
- ENTRYPOINT is set to /opt/conda/bin/python -m awslambdaric. CMD is then set to app.handler. The ENTRYPOINT and CMD instructions define which command is executed when the container starts to run.
Note
A multi-stage build is a process that helps significantly reduce the size of the Docker container image by having multiple FROM instructions within a single Dockerfile. Each of these FROM instructions corresponds to a new build stage where artifacts and files from previous stages can be copied. With a multi-stage build, the last build stage produces the final image (which ideally does not include the unused files from the previous build stages).
The expected final output would be a container image that can be used to launch a container, similar to the following:

Figure 3.14 – Lambda Runtime Interface Client
If this container is launched without any additional parameters, the following command will execute:
/opt/conda/bin/python -m awslambdaric app.handler
This will run the Runtime Interface Client and use the handler() function of our app.py file to process AWS Lambda events. This handler() function will then use the deep learning model we trained in the Using AWS Deep Learning Containers to train an ML model section to make predictions.
Note
You can find the Dockerfile here: https://github.com/PacktPublishing/Machine-Learning-Engineering-on-AWS/blob/main/chapter03/Dockerfile.
Before running the build.sh script, make sure that you replace all instances of us-west-2 in the Dockerfile with the appropriate region code.
- Now, let’s run the build.sh script:
./build.sh
- Finally, we need to check whether the size of the custom container image exceeds 10 GB using the docker images command:
docker images | grep dlclambda
We should see that the container image size of dlclambda is 4.61GB. It is important to note that there is a 10 GB limit when using container images for Lambda functions. The image size of our custom container image needs to be below 10 GB if we want these to be used in AWS Lambda.
At this point, our custom container image is ready. The next step is to test the container image locally before using it to create an AWS Lambda function.
Testing the container image
We can test the container image locally using the Lambda Runtime Interface Emulator. This will help us check whether our container image will run properly when it is deployed to AWS Lambda later.
In the next couple of steps, we will download and use the Lambda Runtime Interface Emulator to check our container image:
- Use the cat command to check the contents of download-rie.sh:
cat download-rie.sh
This should print the following block of code as output in the Terminal:
mkdir -p ~/.aws-lambda-rie && curl -Lo ~/.aws-lambda-rie/aws-lambda-rie
https://github.com/aws/aws-lambda-runtime-interface-emulator/releases/latest/download/aws-lambda-rie
&& chmod +x ~/.aws-lambda-rie/aws-lambda-rie
The download-rie.sh script simply downloads the Lambda Runtime Interface Emulator binary and makes it executable using the chmod command.
- Next, run the download-rie.sh script:
sudo ./download-rie.sh
- Use the cat command to check the contents of run.sh:
cat run.sh
We should see a docker run command with several parameter values, similar to what we have in the following code block:
docker run -v ~/.aws-lambda-rie:/aws-lambda -p 9000:8080 --entrypoint /aws-lambda/aws-lambda-rie dlclambda:latest /opt/conda/bin/python -m awslambdaric app.handler
Let’s quickly check the parameter values that were passed to each of the flags:
- -v: ~/.aws-lambda-rie is a directory outside of the running Docker container to be mounted to /aws-lambda (which is inside the container).
- -p: This binds port 8080 of the container to port 9000 of the instance.
- --entrypoint: This will override the default ENTRYPOINT command that gets executed when the container starts.
- [IMAGE]: dlclambda:latest.
- [COMMAND] [ARG…]: /opt/conda/bin/python -m awslambdaric app.handler.
This docker run command overrides the default ENTRYPOINT command and uses the Lambda Interface Emulator binary, aws-lambda-rie, instead of using the --entrypoint flag. This will then start a local endpoint at http://localhost:9000/2015-03-31/functions/function/invocations.
Note
For more information on the docker run command, feel free to check out https://docs.docker.com/engine/reference/commandline/run/.
- Now, let’s invoke the run.sh script:
./run.sh
- Create a new Terminal tab by clicking the plus (+) button, as shown in the following screenshot:

Figure 3.15 – Creating a new Terminal tab
Note that the run.sh script should be kept running while we are opening a New Terminal tab.
- In the New Terminal tab, run the following commands before executing the invoke.sh script:
cd ch03
cat invoke.sh
This should show us what is inside the invoke.sh script file. It should contain a one-liner script, similar to what we have in the following block of code:
curl -XPOST "http://localhost:9000/2015-03-31/functions/function/invocations" -d '{"queryStringParameters":{"x":42}}'This script simply makes use of the curl command to send a sample POST request containing the x input value to the local endpoint that was started by the run.sh script earlier.
- Now, let’s run the invoke.sh script:
./invoke.sh
This should yield a value close to "42.4586". Feel free to change the input x value in the invoke.sh script to see how the output value changes as well.
Given that we were able to successfully invoke the app.py Lambda function handler inside the custom container image using the Lambda Runtime Interface Emulator, we can now proceed with pushing our container image to Amazon ECR and using it to create an AWS Lambda function.
Pushing the container image to Amazon ECR
Amazon Elastic Container Registry (ECR) is a container registry service that allows us to store and manage Docker container images. In this section, we will create an ECR repository and then push our custom container image to this ECR repository.
Let’s start by creating an ECR repository:
- In the top right-hand corner of the Cloud9 environment, locate and click the circle beside the Share button, as shown in the following screenshot. Select Go To Dashboard from the list of options:

Figure 3.16 – Navigating to the Cloud9 console
This should open the Cloud9 console, where we can find all the created Cloud9 environments.
- Type registry in the search bar. Select Elastic Container Registry from the list of results.
- Locate and click the Create repository button in the top right-hand corner of the ECR console page.
- On the Create repository form, specify the Repository name field value (for example, dlclambda):

Figure 3.17 – Creating an ECR repository
Optionally, you can enable Tag immutability, similar to what is shown in the preceding screenshot. This will help ensure that we do not accidentally overwrite existing container image tags.
- Scroll down to the bottom of the page and then click Create Repository.
- We should see a success notification, along with the View push commands button, similar to what we have in the following screenshot:

Figure 3.18 – View push commands
Click the View push commands button to open the Push commands for <ECR repository name> popup window.
- Locate the bash command inside the gray box under Step 1. Copy the command to the clipboard by clicking the box button highlighted in the following screenshot:

Figure 3.19 – Push commands
This command will be used to authenticate the Docker client in our Cloud9 environment to Amazon ECR. This will give us permission to push and pull container images to Amazon ECR.
- Navigate back to the Browser tab with the Cloud9 environment. In the Terminal, paste and run the copied bash command:

Figure 3.20 – Running the client authentication command
We should get a Login Succeeded message. Without this step, we wouldn’t be able to push and pull container images from Amazon ECR.
- Navigate back to the browser tab with the ECR push commands and copy the command under Step 3, as highlighted in the following screenshot:

Figure 3.21 – Copying the docker tag command
This time, we will be copying the docker tag command from the Push commands window to the clipboard. The docker tag command is used to create and map named references to Docker images.
Note
The docker tag command is used to specify and add metadata (such as the name and the version) to a container image. A container image repository stores different versions of a specific image, and the docker tag command helps the repository identify which version of the image will be updated (or uploaded) when the docker push command is used. For more information, feel free to check out https://docs.docker.com/engine/reference/commandline/tag/.
- Back in the browser tab that contains the Cloud9 environment, paste the copied docker tag command in the Terminal window. Locate the latest tag value at the end of the command and replace it with 1 instead:
docker tag dlclambda:latest <ACCOUNT ID>.dkr.ecr.us-west-2.amazonaws.com/dlclambda:latest
The command should be similar to what we have in the following code block after the latest tag has been replaced with 1:
docker tag dlclambda:latest <ACCOUNT ID>.dkr.ecr.us-west-2.amazonaws.com/dlclambda:1
Make sure that the <ACCOUNT ID> value is correctly set to the account ID of the AWS account you are using. The docker tag command that you copied from the Push commands window should already have the <ACCOUNT ID> value set correctly.
- Use the docker images command to quickly check the container images in our Cloud9 environment:
docker images
This should return all the container images, including the dlclambda container images, as shown in the following screenshot:

Figure 3.22 – Running the docker images command
It is important to note that both container image tags shown in the preceding screenshot have the same image ID. This means that they point to the same image, even if they have different names and tags.
- Push the container image to the Amazon ECR repository using the docker push command:
docker push <ACCOUNT ID>.dkr.ecr.us-west-2.amazonaws.com/dlclambda:1
Make sure that you replace the value of <ACCOUNT ID> with the account ID of the AWS account you are using. You can get the value for <ACCOUNT ID> by checking the numerical value before .dkr.ecr.us-west-2.amazonaws.com/dlclambda after running the docker images command in the previous step.
Note
Note that the image tag value is a 1 (one) instead of the letter l after the container image name and the colon.
- Navigate back to the browser tab that contains the ECR push commands and click the Close button.
- Locate and click the name of the ECR repository we created (that is, dlclambda) under the list of Private repositories:

Figure 3.23 – Private repositories
This should redirect us to the details page, where we can see the different image tags, as shown in the following screenshot:

Figure 3.24 – Repository details page
Once our container image with the specified image tag has been reflected in the corresponding Amazon ECR repository details page, we can use it to create AWS Lambda functions using Lambda’s container image support.
Now that our custom container image has been pushed to Amazon ECR, we can prepare and configure the serverless API setup!
Running ML predictions on AWS Lambda
AWS Lambda is a serverless compute service that allows developers and engineers to run event-driven code without having to provision or manage infrastructure. Lambda functions can be invoked by resources from other AWS services such as API Gateway (a fully managed service for configuring and managing APIs), Amazon S3 (an object storage service where we can upload and download files), Amazon SQS (a fully managed message queuing service), and more. These functions are executed inside isolated runtime environments that have a defined max execution time and max memory limits, similar to what we have in the following diagram:

Figure 3.25 – AWS Lambda isolated runtime environment
There are two ways to deploy Lambda function code and its dependencies:
- Using a container image as the deployment package.
- Using a .zip file as the deployment package
When using a container image as the deployment package, the custom Lambda function code can use what is installed and configured inside the container image. That said, if we were to use the custom container image that was built from AWS DLC, we would be able to use the installed ML framework (that is, PyTorch) in our function code and run ML predictions inside an AWS Lambda execution environment.
Now that we have a better understanding of how AWS Lambda’s container image support works, let’s proceed with creating our AWS Lambda function:
- Type lambda in the search bar. Select Lambda from the list of results to navigate to the AWS Lambda console.
- Locate and click the Create function button found at the top-right of the page.
- On the Create function page, choose Container image from the list of options available, as shown in the following screenshot. Under Basic information, specify a Function name value (for example, dlclambda):

Figure 3.26 – Using the container image support of AWS Lambda
Selecting the Container image option means that we will use a custom container image as the deployment package. This deployment package is expected to contain the Lambda code, along with its dependencies.
- Under Container image URI, click the Browse Images button. This will open a popup window, similar to the following:

Figure 3.27 – Selecting the container image
Under Amazon ECR image repository, select the container image we have pushed to Amazon ECR (dlclambda:1).
- Click the Select image button so that the dlclambda container image will be used for the deployment package of our Lambda function.
- After that, click Create function.
Note
This step may take 3 to 5 minutes to complete. Feel free to get a cup of coffee or tea while waiting!
- Navigate to the Configuration > General configuration tab and click Edit:

Figure 3.28 – Editing the general configuration
Here, we can see that the AWS Lambda function is configured with a default max memory limit of 128 MB and a timeout of 3 seconds. An error is raised if the Lambda function exceeds one or more of the configured limits during execution.
- Next, update the Memory field value to 10240 MB since we’re expecting our AWS Lambda function to use a significant amount of memory while performing the inference task. Update the Timeout value to 1 min and 0 seconds as well since the inference step may take longer than the default value of 3 seconds:

Figure 3.29 – Modifying the memory and timeout settings
Note that increasing the memory and timeout limits here will influence the compute power and total running time available for the Lambda function, as well as the overall cost of running predictions using the service. For now, let’s focus on getting the AWS Lambda function to work using these current configuration values for Memory and Timeout. Once we can get the initial setup running, we can play with different combinations of configuration values to manage the performance and cost of our setup.
Note
We can use the AWS Compute Optimizer to help us optimize the overall performance and cost of AWS Lambda functions. For more information on this topic, check out https://aws.amazon.com/blogs/compute/optimizing-aws-lambda-cost-and-performance-using-aws-compute-optimizer/.
- Click the Save button afterward. We should see a notification similar to Updating the function <function name> while the changes are being applied.
- Navigate to the Test tab.
- Under Test event, specify the Name field value (for example, test):

Figure 3.30 – Configuring the test event
Make sure that you specify the following test event value inside the code editor, similar to what is shown in the preceding screenshot:
{
  "queryStringParameters": {
    "x": 42
  }
}
This test event value gets passed to the event (first) parameter of the AWS Lambda handler() function when a test execution is performed.
- Click Save.
- Now, let’s test our setup by clicking the Test button:

Figure 3.31 – Successful execution result
After a few seconds, we should see that the execution results succeeded, similar to what we have in the preceding screenshot.
- In the Test event editor, change the value of x to 41 and then click the Test button again. This time, you will notice that it’s significantly faster and returns a value (that is, 41.481697) almost right away.
Important Note
During an AWS Lambda function’s first invocation, it may take a few seconds for its function code to be downloaded and for its execution environment to be prepared. This phenomenon is commonly referred to as a cold start. When it is invoked a second time (within the same minute, for example), the Lambda function runs immediately without the delay associated with the cold start. For example, a Lambda function may take around 30 to 40 seconds for its first invocation to complete. After that, all succeeding requests would take a second or less. The Lambda function completes its execution significantly faster since the execution environment that was prepared during the first invocation is frozen and reused for succeeding invocations. If the AWS Lambda function is not invoked after some time (for example, around 10 to 30 minutes of inactivity), the execution environment is deleted and a new one needs to be prepared again the next time the function gets invoked. There are different ways to manage this and ensure that the AWS Lambda function performs consistently without experiencing the effects of a cold start. One of the strategies is to utilize Provisioned Concurrency, which helps ensure predictable function start times. Check out https://aws.amazon.com/blogs/compute/operating-lambda-performance-optimization-part-1/ for more information on this topic.
With our AWS Lambda function ready to perform ML predictions, we can proceed with creating the serverless HTTP API that will trigger our Lambda function.
Completing and testing the serverless API setup
The AWS Lambda function we created needs to be triggered by an event source. One of the possible event sources is an API Gateway HTTP API configured to receive an HTTP request. After receiving the request, the HTTP API will pass the request data to the AWS Lambda function as an event. Once the Lambda function receives the event, it will use the deep learning model to perform inference, and then return the predicted output value to the HTTP API. After that, the HTTP API will return the HTTP response to the requesting resource.
There are different ways to create an API Gateway HTTP API. In the next couple of steps, we will create this HTTP API directly from the AWS Lambda console:
- Locate the Function overview pane and click Add trigger:

Figure 3.32 – Add trigger
The Add trigger button should be on the left-hand side of the Function overview pane, as shown in the preceding screenshot.

Figure 3.33 – Trigger configuration
Here’s the trigger configuration that we have:
- Select a trigger: API Gateway
- Create a new API or use an existing one: Create an API
- API type: HTTP API
- Security: Open
This will create and configure an HTTP API that accepts a request and sends the request data as an event to the AWS Lambda function.
Important Note
Note that this configuration needs to be secured once we have configured our setup for production use. For more information on this topic, check out https://docs.aws.amazon.com/apigateway/latest/developerguide/security.html.
- Once you have finished configuring the new trigger, click the Add button.
- Locate the API Gateway trigger we just created under the Triggers pane. Click the API Gateway link (for example, dlclambda-API) which should open a new tab. Under Develop (in the sidebar), click Integrations. Under Routes for dlclambda-API, click ANY. Click Manage Integration and then click Edit (located in the Integration Details pane). In the Edit Integration page, update the value of Payload format version (under Advanced Settings) to 2.0 similar to what we have in Figure 3.34. Click Save afterwards.

Figure 3.34 – Updating the Payload format version
After updating the Payload format version, navigate back to our AWS Lambda browser tab and then click the API endpoint link (which should open a new tab). Since we did not specify an x value in the URL, the Lambda function will use 0 as the default x value when performing a test inference.
Note
You may want to trigger an exception instead if there is no x value specified when a request is sent to the API Gateway endpoint. Feel free to change this behavior by modifying line 44 of app.py: https://github.com/PacktPublishing/Machine-Learning-Engineering-on-AWS/blob/main/chapter03/app/app.py.
- Append ?x=42 to the end of the browser URL, similar to what we have in the following URL string:
https://<API ID>.execute-api.us-west-2.amazonaws.com/default/dlclambda?x=42
Make sure that you press the Enter key to invoke a Lambda function execution with 42 as the input x value:

Figure 3.35 – Testing the API endpoint
This should return a value close to 42.4586, as shown in the preceding screenshot. Feel free to test different values for x to see how the predicted y value changes.
Important Note
Make sure that you delete the AWS Lambda and API Gateway resources once you are done configuring and testing the API setup.
At this point, we should be proud of ourselves as we were able to successfully deploy our deep learning model in a serverless API using AWS Lambda and Amazon API Gateway! Before the release of AWS Lambda’s container image support, it was tricky to set up and maintain serverless ML inference APIs using the same tech stack we used in this chapter. Now that we have this initial setup working, it should be easier to prepare and configure similar serverless ML-powered APIs. Note that we also have the option to create a Lambda function URL to generate a unique URL endpoint for the Lambda function.

Figure 3.36 – Cost of running the serverless API versus an API running inside an EC2 instance
Before we end this chapter, let’s quickly check what the costs would look like if we were to use AWS Lambda and API Gateway for the ML inference endpoint. As shown in the preceding diagram, the expected cost of running this serverless API depends on the traffic passing through it. This means that the cost would be minimal if no traffic is passing through the API. Once more traffic passes through this HTTP API endpoint, the cost would gradually increase as well. Comparing this to the chart on the right, the expected cost will be the same, regardless of whether there’s traffic passing through the HTTP API that was deployed inside an EC2 instance.
Choosing the architecture and setup to use for your API depends on a variety of factors. We will not discuss this topic in detail, so feel free to check out the resources available here: https://aws.amazon.com/lambda/resources/.
Summary
In this chapter, we were able to take a closer look at AWS Deep Learning Containers (DLCs). Similar to AWS Deep Learning AMIs (DLAMIs), AWS DLCs already have the relevant ML frameworks, libraries, and packages installed. This significantly speeds up the process of building and deploying deep learning models. At the same time, container environments are guaranteed to be consistent since these are run from pre-built container images.
One of the key differences between DLAMIs and DLCs is that multiple AWS DLCs can run inside a single EC2 instance. These containers can also be used in other AWS services that support containers. These services include AWS Lambda, Amazon ECS, Amazon EKS, and Amazon EC2, to name a few.
In this chapter, we were able to train a deep learning model using a DLC. We then deployed this model to an AWS Lambda function through Lambda’s container image support. After that, we tested the Lambda function to see whether it’s able to successfully load the deep learning model to perform predictions. To trigger this Lambda function from an HTTP endpoint, we created an API Gateway HTTP API.
In the next chapter, we will focus on serverless data management and use a variety of services to set up and configure a data warehouse and a data lake. We will be working with the following AWS services, capabilities, and features: Redshift Serverless, AWS Lake Formation, AWS Glue, and Amazon Athena.
Further reading
For more information on the topics covered in this chapter, feel free to check out the following resources:
- What are Deep Learning Containers? (https://docs.aws.amazon.com/deep-learning-containers/latest/devguide/what-is-dlc.html)
- Security in Amazon API Gateway (https://docs.aws.amazon.com/apigateway/latest/developerguide/security.html)
- New for AWS Lambda – Container Image Support (https://aws.amazon.com/blogs/aws/new-for-aws-lambda-container-image-support/)
- Issues to Avoid When Implementing Serverless Architecture with AWS Lambda (https://aws.amazon.com/blogs/architecture/mistakes-to-avoid-when-implementing-serverless-architecture-with-lambda/)