
14
Using BentoML
In this chapter, we will talk about BentoML, another popular tool for deploying ML models. BentoML helps to continuously deploy ML models, and monitors and provides prediction APIs. Throughout this chapter, we will learn about the basic key concepts of BentoML and then see an end-to-end example of deploying a model using BentoML.
At a high level, we are going to cover the following main topics in this chapter:
- Introducing BentoML
- Using BentoML to serve a model
Technical requirements
In this chapter, we will mostly use the same libraries that we have used in previous chapters. You should have Postman or another REST API client installed to be able to send API calls and see the response. All the code for this chapter is provided at this link: https://github.com/PacktPublishing/Machine-Learning-Model-Serving-Patterns-and-Best-Practices/tree/main/Chapter%2014.
If ModuleNotFoundError appears while trying to import any library, then you should install the missing module using the pip3 install <module_name> command. You will need the bentoml library for this chapter. Please install bentoml using the pip3 install bentoml command.
Introducing BentoML
BentoML is a popular tool for serving ML models. It provides support for deploying models created using almost all the popular libraries. Throughout this section, we will discuss how to get started with BentoML and how to use it for serving, along with some key concepts.
We will discuss the following concepts that are needed to use BentoML:
- Preparing models
- Services and APIs
- Bento
Let’s discuss each concept in detail.
Preparing models
A trained ML model cannot be directly served using BentoML because BentoML needs to convert all the models into a common format so that it can extend support to any models from any ML library. The model needs to be saved using the BentoML API. BentoML provides the save_model API for almost all the popular ML libraries. For example, if you develop an ML model using the scikit-learn library, then you need to use the bentoml.sklearn.save_model(...) API to save the model for serving using BentoML. Let’s look at the following example.
- First, we create a basic model and save it using the BentoML API:
import bentoml
from sklearn.ensemble import RandomForestRegressor
from sklearn.datasets import make_regression
X, y = make_regression(n_features=4, n_informative=2,
random_state=0, shuffle=False)
regr = RandomForestRegressor(max_depth=2, random_state=0)
regr.fit(X, y)
saved_model = bentoml.sklearn.save_model(
name = "DummyRegressionModel",
model = regr
)
print(saved_model)
After running the code, we see the following output in the console:
converting 'DummyRegressionModel' to lowercase: 'dummyregressionmodel'
Model(tag="dummyregressionmodel:dudusucwz6ej6ktz")
Let’s have a look at the log, which says that the model’s name has been converted to lowercase. The output from the print statement also printed the model object reference in the model store. Note that the tag of the model starts with the model name that we passed.
- Now, let’s run the bentoml models list command in the terminal or console, and we will see the following output:
(venv) (base) % bentoml models list
Tag Module Size Creation Time
dummyregressionmodel:dudusucwz6ej6ktz bentoml.sklearn 74.99 KiB 2022-10-28 09:45:06
So, we got a list of the models that are currently present in the list of the model store.
- Let’s run the program again, and the same model will be saved with a different tag. If we run the bentoml models list command in the terminal again, we will see the following output as shown in Figure 14.1:

Figure 14.1 – The latest model is placed earlier in the list
Let’s take a look at the output shown inside the red square. This time, we have another model, and the latest model is shown at the top.
- Let’s run the program again by changing regr = RandomForestRegressor(max_depth=2, random_state=0) to the regr = RandomForestRegressor(max_depth=3, random_state=0) line. We have changed max_depth from 2 to 3 so that we can notice clearly which model we are loading during serving.
- Now, from the program, let’s try to load the model from the model store using the following code snippet:
import bentoml
from sklearn.ensemble import RandomForestRegressor
regr: RandomForestRegressor = bentoml.sklearn.load_model("dummyregressionmodel")print(regr)
We get the following output in our console from the print statement:
RandomForestRegressor(max_depth=3, random_state=0)
That means load_model, by default, loaded the latest model, as the max_depth value of the model is 3, which was changed during the last run. From there, we can understand how BentoML can help us load the latest version of the model deployed to the model store.
- Now, if you want to load a specific version of the model, you have to provide the full tag name. For example, let’s try to load the model with the dummyregressionmodel:dudusucwz6ej6ktz tag using the following code snippet:
import bentoml
from sklearn.ensemble import RandomForestRegressor
regr: RandomForestRegressor = bentoml.sklearn.load_model("dummyregressionmodel:dudusucwz6ej6ktz")print(regr)
The output we get this time is the following:
RandomForestRegressor(max_depth=2, random_state=0)
Therefore, we have loaded the earlier model where max_depth was 2. In this way, we can roll back to an old model if needed during serving by specifying the older version as in this code snippet: bentoml.sklearn.load_model("dummyregressionmodel:dudusucwz6ej6ktz"). BentoML will automatically make the rollback without any additional developer effort. Rollback is very important in a production environment. If something goes wrong, we might need to roll back to a previous stable version of the model.
Services and APIs
BentoML is based on the idea of service-oriented architecture, and the core building block of BentoML in which a user defines the model serving logic is called a service. All clients, such as business analysts, data scientists, and so on, who want to get inference from the served model will call a service through the APIs exposed by it. A service is created by calling bentoml.Service(). Let’s run an example:
- Let’s create a service to serve the dummy regression model we created before, using the following code snippet:
import bentoml
import numpy as np
from bentoml.io import NumpyNdarray
regr_runner = bentoml.sklearn.get("dummyregressionmodel").to_runner()print(regr_runner)
service = bentoml.Service("DummyRegressionService", runners=[regr_runner])@service.api(input=NumpyNdarray(), output=NumpyNdarray())
def predict(input: np.ndarray) -> np.ndarray:
print("input is ", input)response = regr_runner.run(input)
print("Response is ", response)return response
We have created a service and given it a name, DummyRegressionService.
We have also loaded the model as a runner using the regr_runner = bentoml.sklearn.get("dummyregressionmodel").to_runner() line and used this runner during the creation of the service. Then, we created a prediction API and specified the input and output type using the @service.api(input=NumpyNdarray(), output=NumpyNdarray()) decorator.
- Now, we can run the service using the following command in the terminal: (venv) (base) johirulislam@Johiruls-MBP BentoMLExamples % bentoml serve service1.py.
Let’s look at the log to see what is happening. It is very helpful to study the log to understand what the server is doing. The log that we get in the terminal is the following:
Runner(runnable_class=<class 'bentoml._internal.frameworks.sklearn.get_runnable.<locals>.SklearnRunnable'>, runnable_init_params={}, name='dummyregressionmodel', models=[Model(tag="dummyregressionmodel:6ish6osw2c7uuktz",path="/Users/johirulislam/bentoml/models/dummyregressionmodel/6ish6osw2c7uuktz")], resource_config=None, runner_methods=[RunnerMethod(runner=..., name='predict', config=RunnableMethodConfig(batchable=False, batch_dim=(0, 0), input_spec=None, output_spec=None), max_batch_size=100, max_latency_ms=10000)]
2022-10-28T11:04:18-0500 [WARNING] [cli] converting DummyRegressionService to lowercase: dummyregressionservice
*** Truncated ***
Let’s look at the highlighted lines. On the first highlighted line, note that the latest version of the model was loaded. We can verify this by running the bentoml command, bentoml models list, in the terminal to get the models list, as follows:
Tag                                    Module           Size        Creation Time
dummyregressionmodel:6ish6osw2c7uuktz  bentoml.sklearn  124.86 KiB  2022-10-28 09:58:13
dummyregressionmodel:3fqunzswz6b4qktz  bentoml.sklearn  74.99 KiB   2022-10-28 09:50:22
dummyregressionmodel:dudusucwz6ej6ktz  bentoml.sklearn  74.99 KiB   2022-10-28 09:45:06
Note that our latest model has the dummyregressionmodel:6ish6osw2c7uuktz tag. Let’s also have a look at the log to see how the model is stored in the model store. The model is stored in the ~/bentoml/models/dummyregressionmodel/6ish6osw2c7uuktz path. We can see that the tag after the model name is created as a folder, under the folder created with the model’s name. Let’s open the ~/bentoml/models/dummyregressionmodel path, and we will see a folder structure like the one shown in Figure 14.2.
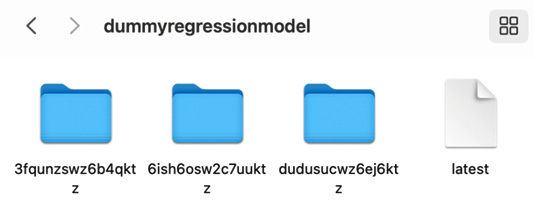
Figure 14.2 – The directory structure of the model store for the dummyregressionmodel model
- Note that for each of the tags, there is a folder from which the model is accessed by the service. We can see a special file called latest. Let’s open the file, and we will see that it contains the tag of the latest model, as shown in Figure 14.3.
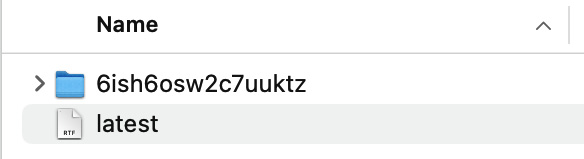
Figure 14.3 – The latest file contains the tag of the latest model
This is the file that BentoML uses internally to keep track of the latest model. If we look at the serving log, we will see that the model with the tag shown in Figure 14.2 was loaded earlier and created a runner for serving.
We have seen that a service takes runners that serve requests, so a service can take multiple models as runners to make predictions. This will help us to combine multiple models. A runner is a unit of serving logic.
We have seen, by default, that the name of the function with the @service.api(..) decorator becomes the API route. The name of the function in the service shown previously in the code snippet in step 1 is predict. Therefore, predict is the endpoint for the API. We will use the Postman REST API client to send the request and get the response. If you do not have Postman installed, please read the Technical requirements section for instructions on how to install it. Now, let’s go to Postman and try to send a request to the service API using the /predict route. The request and response from Postman are shown in Figure 14.4.
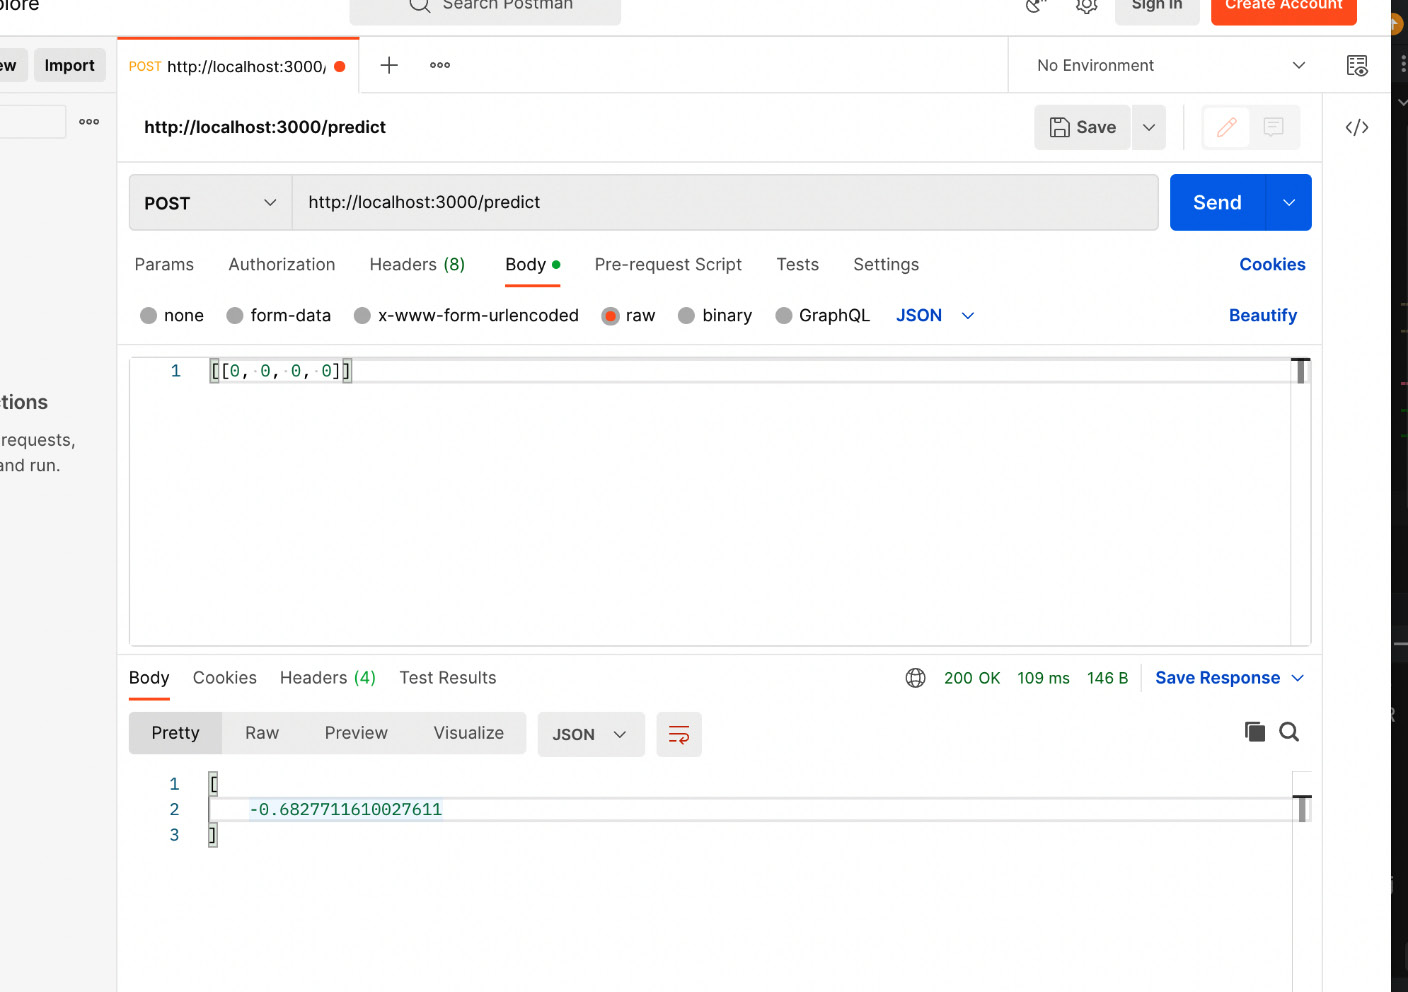
Figure 14.4 – Sending a request to dummyregressionservice using Postman and getting a response
However, if we want, we can also change the route according to our choice. For example, let’s specify the route using the following code snippet:
@service.api(
    input=NumpyNdarray(),
    output=NumpyNdarray(),
    route="/infer"
)
def predict(input: np.ndarray) -> np.ndarray:
    print("input is ", input)
    response = regr_runner.run(input)
    print("Response is ", response)
    return response
We have specified the endpoint for the predict method as /infer. Now, if we go to Postman, we can send a request to the new endpoint, as shown in Figure 14.5.

Figure 14.5 – We can specify custom routes and use them when making API calls from Postman
We can also add basic validators when we create the route. For example, let’s specify the input shape during the creation of the API using the following code snippet:
@service.api(
    input=NumpyNdarray(
        shape=(1, 4),
        enforce_shape=True
    ),
    output=NumpyNdarray(),
    route="/infer"
)
def predict(input: np.ndarray) -> np.ndarray:
    print("input is ", input)
    response = regr_runner.run(input)
    print("Response is ", response)
    return response
We have specified the input shape to be (1, 4) and set enforce_shape=True. This means if the shape constraint is violated, we will get an exception. Now, let’s try to send a request to the API using a numpy array of a (2, 4) shape from Postman. We get a response, as shown in Figure 14.6.
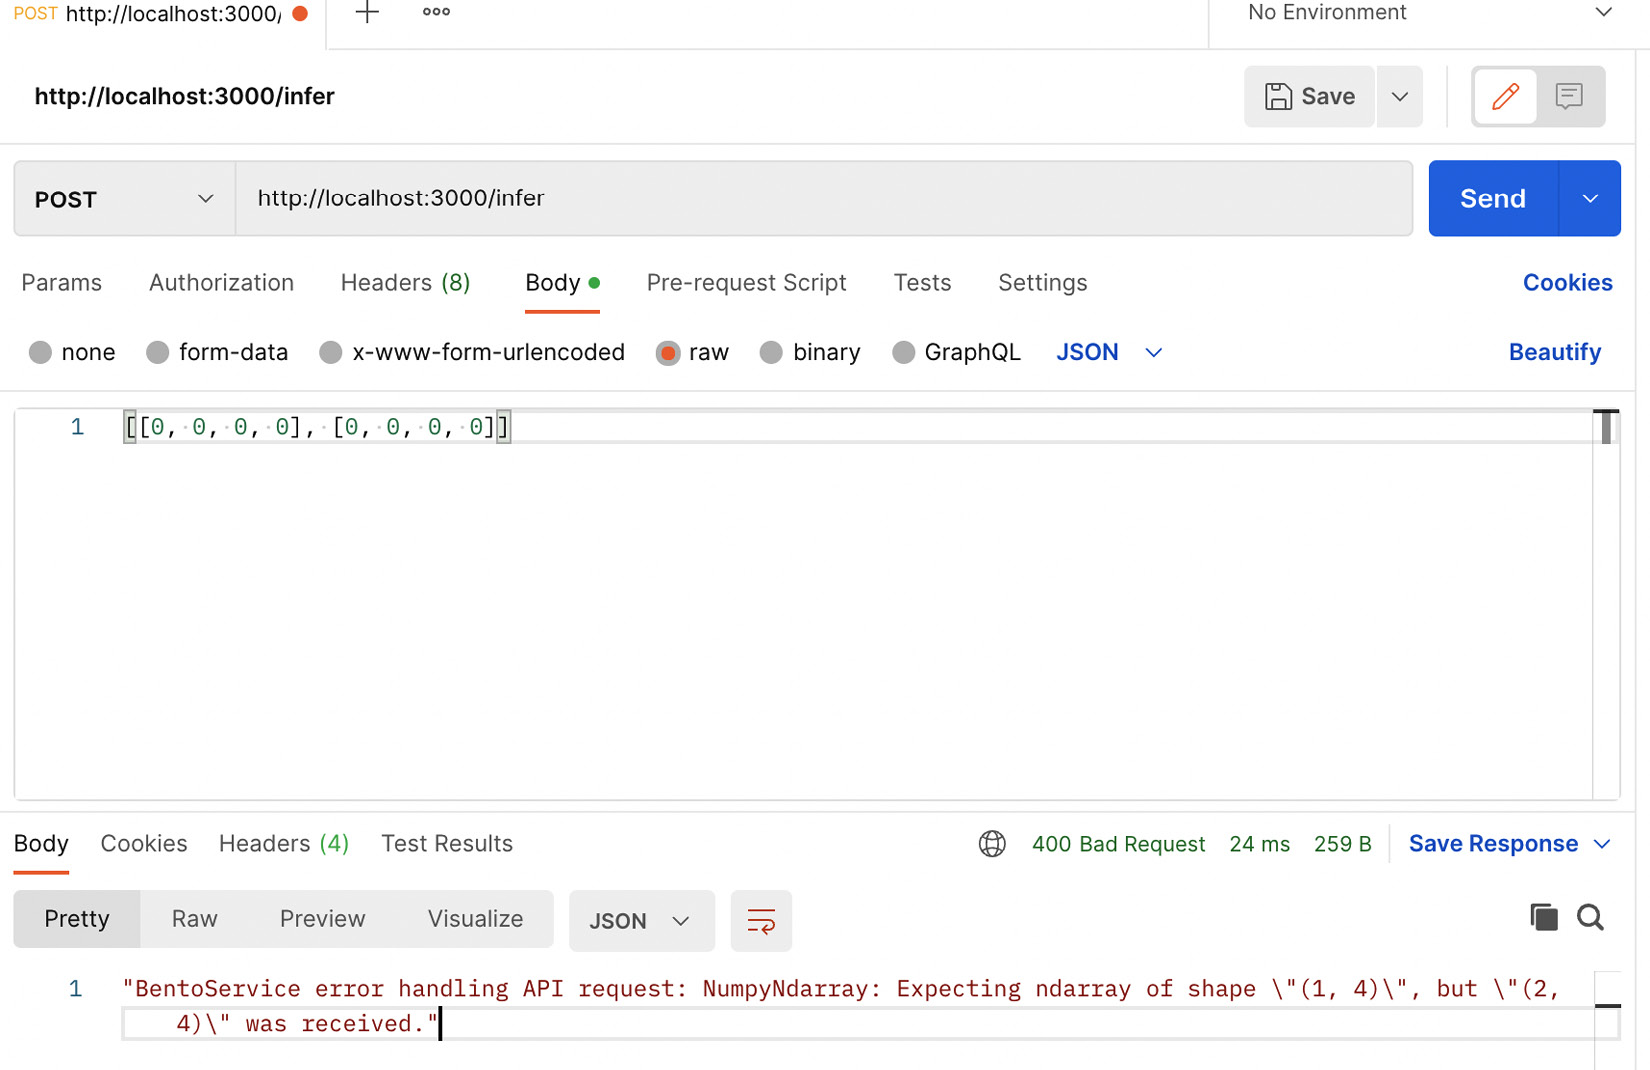
Figure 14.6 – A demonstration of the violation of validation constraints in BentoML in Postman
The error message clearly specifies that the API expects an array of a (1, 4) shape, but it got an array of a (2, 4) shape. Please note that the input of the (2, 4) shape is valid for the RandomForestRegression model we have; in fact, it can take any array of a (, 4) shape. The first number in the tuple can be any number. We just enforced this constraint for the demonstration of this validation from BentoML. This way, BentoML can provide you with some support for a business logic pattern. To learn more about different kinds of business logic in business logic patterns, please refer to Chapter 11, Business Logic Pattern.
Bento
Now, we will talk about the most important concept of BentoML, called a Bento. A Bento is an archive of files that contains the source code, models, data files, and all the dependencies needed for running a service. It standardizes how to reproduce the environment required to serve bentoml.Service.
- To create a Bento, first, you need a special file called bentofile.yaml. It has some similarities to the build files that software engineers use. Let’s create bentofile.yaml using the following contents:
service: "bento_service_dummy:bento_service" # Same as the argument passed to `bentoml serve`
labels:
owner: johir
stage: dev
include:
- "*.py" # A pattern for matching which files to include in the bento
exclude:
- "*.py" # A pattern for matching which files to exclude in the bento
python:
packages: # Additional pip packages required by the service
- scikit-learn
- numpy
Here, the "bento_service_dummy:bento_service" service contains the name of the Python file containing the service and the name of the service. We have created the file and the service named bento_service_dummy.py and bento_service respectively, as shown in Figure 14.7.
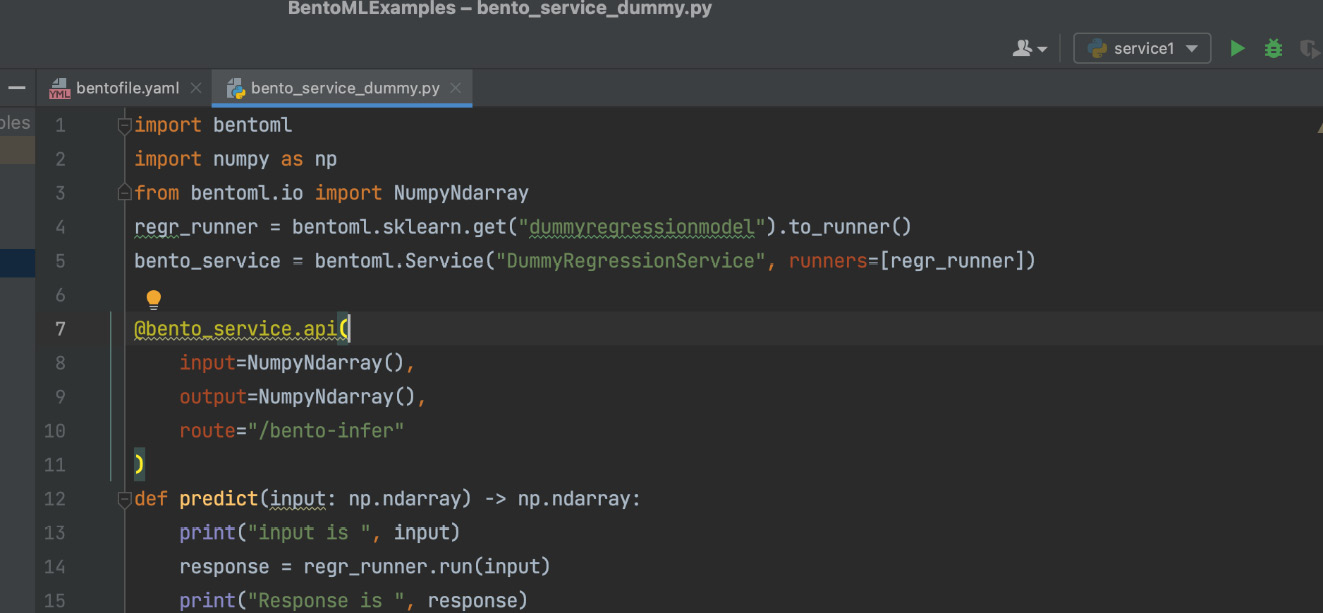
Figure 14.7 – The Python file and the service that is used in the bentofile.yaml file
Here, the include field includes the files that need to be included in the Bento and the exclude field indicates the files that need to be excluded from the Bento.
- Now, we can build the Bento using the bentoml build command in the terminal. We will see the following log in the terminal:
converting DummyRegressionService to lowercase: dummyregressionservice
Building BentoML service "dummyregressionservice:byi5uecw46p4cktz" from build context "<root path to your programs>/BentoMLExamples"
Packing model "dummyregressionmodel:6ish6osw2c7uuktz"
Locking PyPI package versions..
*** Truncated ***
Successfully built Bento(tag="dummyregressionservice:byi5uecw46p4cktz")
Let’s look at the log, and we can see that a Bento has successfully been built with the dummyregressionservice:byi5uecw46p4cktz tag. Now, if we go to the /Users/<Replace with your compute name>/bentoml/ directory, we will see it has a special folder now, bentos, as shown in Figure 14.8. The username used here is the username on my computer; it will be different on your computer.
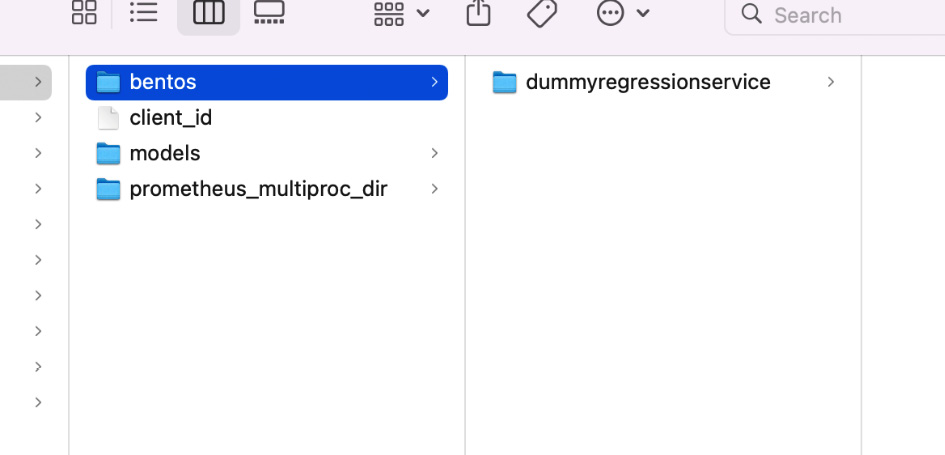
Figure 14.8 – Bentos are stored in a separate store under the bentoml directory
Let’s go inside the Bento folder, dummyregressionservice, where we will find a folder with the byi5uecw46p4cktz tag name, which is shown in the log, and a file called latest, which contains the latest tag and indicates the latest version of the model.
Note
Model tags such as byi5uecw46p4cktz will be totally different in your case, as these are generated by the BentoML library randomly.
Now, let’s go inside the byi5uecw46p4cktz directory. We will see that all the source code, required models for the service, environment information, and APIs are present inside the folder, as shown in Figure 14.9.

Figure 14.9 – Inside the byi5uecw46p4cktz Bento directory
Now, let’s serve the Bento using the bento serve command in the terminal. Let’s look at the log, where we will see the following:
(venv) (base) johirulislam@Johiruls-MBP BentoMLExamples % bentoml serve
2022-10-28T12:58:16-0500 [WARNING] [cli] converting DummyRegressionService to lowercase: dummyregressionservice
2022-10-28T12:58:16-0500 [INFO] [cli] Prometheus metrics for HTTP BentoServer from "." can be accessed at http://localhost:3000/metrics.
2022-10-28T12:58:16-0500 [INFO] [cli] Starting development HTTP BentoServer from "." running on http://0.0.0.0:3000 (Press CTRL+C to quit)
2022-10-28T12:58:17-0500 [WARNING] [dev_api_server] converting DummyRegressionService to lowercase: dummyregressionservice
Note that the server is started and is ready to take requests. From Postman, we can now send a request to the service, using Bento in the same way as we did for a standalone service. For example, our endpoint for bento_service is "/bento-infer", and the request from Postman will look like Figure 14.10.
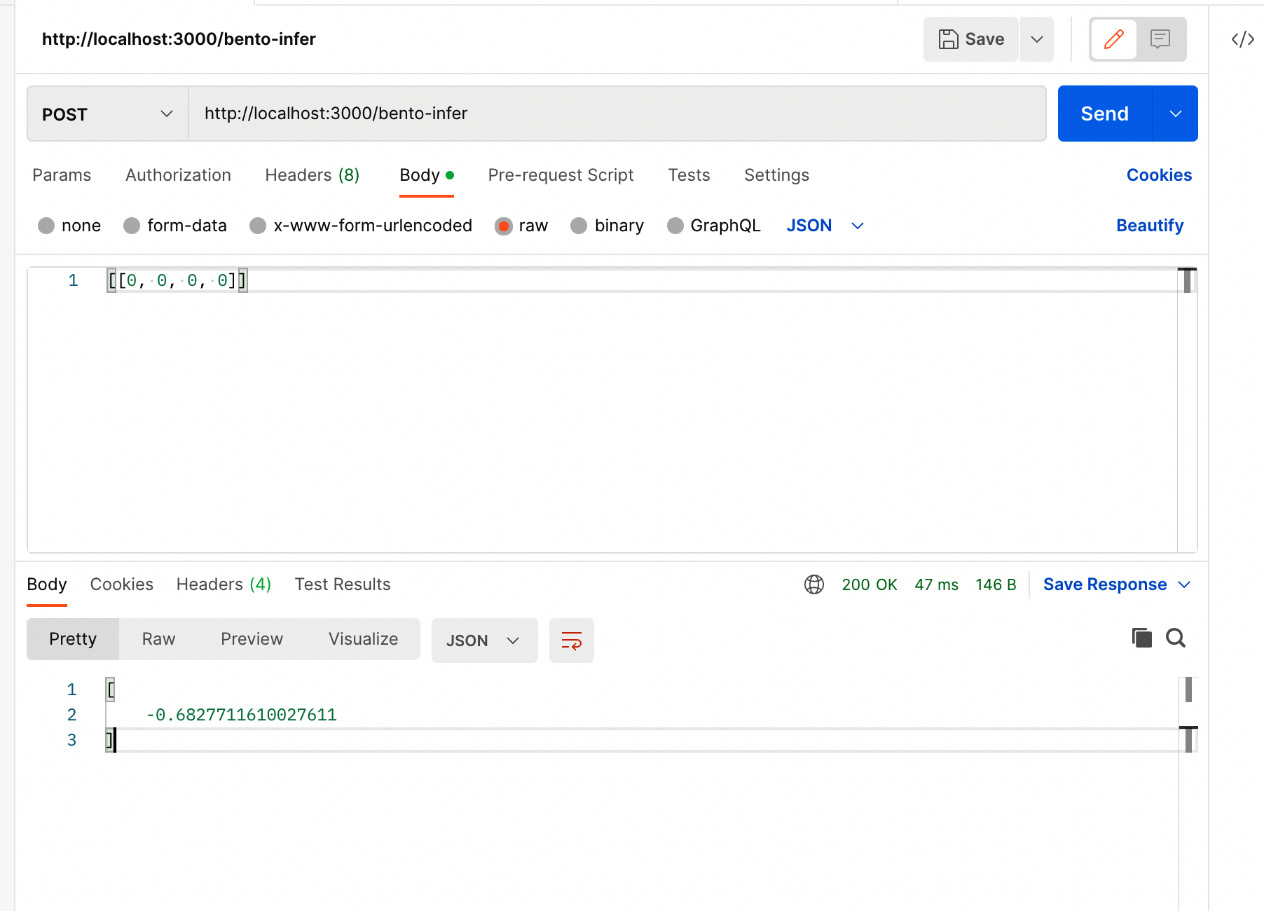
Figure 14.10 – Sending a request to Bento using Postman
The advantage of Bento over a standalone service is that Bento can be ported without the challenges of worrying about whether necessary libraries are present on the server, whether the necessary environment is set up on the server, and so on.
In this section, we have introduced you to some of the basic concepts of BentoML and have also shown some examples. In the next section, we will serve two models following the ensemble pattern of serving using BentoML.
Using BentoML to serve a model
In this section, we will serve two regression models and pass them to a service as runners. We might need to use more than one regression model to get more accurate predictions using an ensemble of multiple models. Then, we will get predictions from these two models and send the combined response to the user:
- First of all, let’s create the two models and save them using the BentoML API. First, let’s create a RandomForestRegression model using the following code snippet and save it using the BentoML API:
X, y = make_regression(n_features=4, n_informative=2,
random_state=0, shuffle=False)
rf = RandomForestRegressor(max_depth=3, random_state=0)
rf.fit(X, y)
rf_model = bentoml.sklearn.save_model(
name = "rf",
model = rf
)
Then, we create an AdaBoostRegressor model and save it with the BentoML API using the following code snippet:
boost = AdaBoostRegressor(random_state=0)
boost.fit(X, y)
boost_model = bentoml.sklearn.save_model(
    name = "boost",
    model = boost
)
Then, we run the program and follow the logs to ensure the models are created and converted using the BentoML API successfully. We see the following log in the terminal:
Model(tag="rf:fmb5uxcw76xuuktz")
Model(tag="boost:fnzdy2cw76xuuktz")
With that, the models are saved and assigned some tags to be loaded by the BentoML service.
- We create a service using two runners that can be used to ensemble the response from the two models. In the following code snippet, we create two runners for the two models we created before in step 1:
rf_runner = bentoml.sklearn.get("rf").to_runner()boost_runner = bentoml.sklearn.get("boost").to_runner()reg_service = bentoml.Service("regression_service", runners=[rf_runner, boost_runner])@reg_service.api(
input=NumpyNdarray(),
output=NumpyNdarray(),
route="/infer"
)
def predict(input: np.ndarray) -> np.ndarray:
print("input is ", input)rf_response = rf_runner.run(input)
print("RF response ", rf_response)boost_response = boost_runner.run(input)
print("Boost response ", boost_response)avg = (rf_response + boost_response) / 2
print("Average is ", avg)return avg
We have saved the code along with the relevant imports in a file named regression_service.py.
- We can now start the service using the bentoml serve regression_service.py command. We can now look at the log where we can see that the server has started and is ready to receive API calls:
2022-10-28T15:36:35-0500 [INFO] [cli] Prometheus metrics for HTTP BentoServer from "regression_service.py" can be accessed at http://localhost:3000/metrics.
2022-10-28T15:36:35-0500 [INFO] [cli] Starting development HTTP BentoServer from "regression_service.py" running on http://0.0.0.0:3000 (Press CTRL+C to quit)
Note that the server is listening on port 3000 in localhost.
- Now, let’s go to Postman and send an inference request from there, and we will see an output like that in Figure 14.11.

Figure 14.11 – Sending a request from Postman to the service serving two regression models, following an ensemble pattern
Now, let’s look at the log again. We should be able to see the response from the print statements in the log now, as shown here:
input is  [[0 0 0 0]]
RF response  [-0.68277116]
Boost response  [6.85135808]
Average is  [3.08429346]
2022-10-28T15:37:10-0500 [INFO] [dev_api_server:regression_service] 127.0.0.1:62121 (scheme=http,method=POST,path=/infer,type=application/json,length=14) (status=200,type=application/json,length=20) 53.526ms (trace=e0db708558d83c3bba0627f6e50b9165,span=75abbc1f48585e7d,sampled=0)
From the log, we can see that the service got the correct input that we sent. The response from the RandomForestRegression model is [-0.68277116], and the response from the AdaBoostRegression model is [6.85135808]. It took the average of these two models’ responses and returned [3.08429346] to the caller, which is what we saw from Postman.
In this section, we have used BentoML to serve two models using an ensemble pattern. We have tried to show an end-to-end process of serving the model using a standalone service. However, during deployment to an actual production server, you should use Bento instead of a standalone service.
Summary
In this chapter, we introduced you to BentoML, a popular framework for serving machine learning models. We have shown how can you convert models into a Bento-supported format using the BentoML API. We have also shown you how can you create a service that can be served by exposing API endpoints to customers. You have also learned about Bento and have seen how it can help you to create an environment-independent service by packaging all the dependencies and data files inside a Bento.
In the next chapter, we will look at a cloud-based service that can help to serve a model.
Further reading
You can read the following articles to learn more about BentoML:
- Installation of BentoML: https://docs.bentoml.org/en/latest/installation.html
- Main concepts of BentoML: https://docs.bentoml.org/en/latest/concepts/index.html
- To learn more about the supported libraries and frameworks in BentoML, please follow this link: https://docs.bentoml.org/en/latest/frameworks/index.html