
15
Serving ML Models using a Fully Managed AWS Sagemaker Cloud Solution
We have, so far, looked at some tools such as TensorFlow Serving, Ray Serve, and BentoML. In this chapter, we will see how we can serve an ML model using a fully managed cloud solution. There are a few popular cloud solutions provided by Amazon, Google, Microsoft, IBM, and more. In this chapter, we will discuss how we can serve an ML model using Amazon SageMaker. Explaining all aspects of Amazon SageMaker (https://aws.amazon.com/sagemaker/) is beyond the scope of this book. We will only introduce some basic concepts, deploy a model, and test whether we can invoke the model.
At a high level, we are going to cover the following main topics in this chapter:
- Introducing Amazon SageMaker
- Using Amazon SageMaker to serve a model
Technical requirements
In this chapter, we will mostly use Amazon SageMaker, so you will need an AWS account for that. If you do not already have an AWS account, feel free to create one by following this link: https://aws.amazon.com/free/. This link will guide you on how you can create a free account for learning and trial purposes.
Introducing Amazon SageMaker
In this section, we will introduce Amazon SageMaker to demonstrate how a fully managed cloud solution can help you to serve ML models.
Amazon SageMaker is a full stack solution to ML. It helps at every step of the ML pipeline, such as feature engineering, training, tuning, deploying, and monitoring. It supports almost all the leading ML frameworks, including the following:
- TensorFlow
- PyTorch
- scikit-learn
We can create models using our chosen library and train and serve them using Amazon SageMaker. At a high level, Amazon SageMaker provides the following utilities for ML practitioners:
- Easier access to the development of ML for more people by providing IDEs and built-in no-code interfaces for business analysts
- Support to store, preprocess, and extract features from a large volume of structured and unstructured data
- An optimized framework supports faster training by reducing the training time of complex models from hours to minutes
- Automate the end-to-end MLOps process to build, train, deploy, and manage ML models at scale
Amazon SageMaker has many built-in features for supporting full stack ML solutions and utilities. We will discuss some of those features in the following subsection.
Amazon SageMaker features
In this subsection, we will talk about some of the main features of Amazon SageMaker. A detailed discussion of all these features is beyond the scope of this book. We will just give a high-level overview. Amazon SageMaker has the following built-in features as per the documentation, which can be found at https://docs.aws.amazon.com/sagemaker/latest/dg/whatis.html:
- SageMaker Studio: This is an ML IDE where you can perform the operations needed at different stages in the ML life cycle, starting from building the model and going all the way through to deploying it. You can read about SageMaker Studio in more detail by following this link: https://docs.aws.amazon.com/sagemaker/latest/dg/studio-ui.html.
- SageMaker Canvas: This provides support to build a model and get predictions without any coding. You need to import your data to the canvas, the canvas will internally make the models ready for you, and then you can make the predictions. To learn more about the tool, please follow this link: https://docs.aws.amazon.com/sagemaker/latest/dg/canvas.html.
- SageMaker Ground Truth Plus: This tool provides support to build a training dataset by labeling the data. You need to upload the data and labeling requirements and the tool will provide the labeled training data for you. This labeling task is often done manually or using some algorithms developed by data scientists. This tool makes ML easier by removing a lot of the effort. To learn more about the tool, please follow this link: https://docs.aws.amazon.com/sagemaker/latest/dg/gtp.html.
- Amazon SageMaker Studio Lab: This is a free service that provides access to Amazon computing resources from an environment based on the open source JupyterLab. This is a light version of Amazon SageMaker Studio with reduced functionalities. To learn more about this free service, please follow this link: https://docs.aws.amazon.com/sagemaker/latest/dg/studio-lab.html.
- Amazon SageMaker Training Compiler: This is used to train a deep learning model very fast on GPU instances that are managed by Amazon SageMaker. To learn more about the tool, please follow this link: https://docs.aws.amazon.com/sagemaker/latest/dg/training-compiler.html.
- SageMaker serverless endpoints: This provides serverless endpoints for hosting models and also scales automatically to serve increased traffic. To learn more about this feature, please follow this link: https://docs.aws.amazon.com/sagemaker/latest/dg/serverless-endpoints.html.
- SageMaker Inference Recommender: This tool recommends the inference instance and configuration that can be served to a live inference endpoint. This recommender helps you to find the best instance of the inference out of multiple instances present. To get a detailed understanding of this feature, please follow this link: https://docs.aws.amazon.com/sagemaker/latest/dg/inference-recommender.html.
- SageMaker model registry: This helps you to create a catalog of production models, manage the versioning of models, manage the approval stage of a model, deploy a model to production, and so on. This model registry can help you keep track of the history and evolution of a model over time, providing better audit and monitoring support. To learn more about this feature, please follow this link: https://docs.aws.amazon.com/sagemaker/latest/dg/model-registry.html.
- SageMaker projects: This helps you to automate MLOps, which means automating the end-to-end process of the ML model life cycle using CI/CD. To learn more about this feature, please follow this link: https://docs.aws.amazon.com/sagemaker/latest/dg/sagemaker-projects.html.
- SageMaker Model Building Pipelines: This helps you to create ML pipelines. To learn more about this tool, please follow this link: https://docs.aws.amazon.com/sagemaker/latest/dg/pipelines.html.
- SageMaker ML Lineage Tracking: This feature helps you to create and store information about each step in the ML workflow, starting from data preparation to deployment. With this information, we can reproduce an ML workflow, track a model, track the lineage of a dataset, and so on. To learn more about this feature, please follow this link: https://docs.aws.amazon.com/sagemaker/latest/dg/lineage-tracking.html.
- SageMaker Data Wrangler: This feature provides an end-to-end data engineering solution, such as importing, cleaning, and transforming data, extracting features, analyzing, and so on. To learn more about this feature, please follow this link: https://docs.aws.amazon.com/sagemaker/latest/dg/data-wrangler.html.
- SageMaker Feature Store: You can store features created from the raw data using this functionality provided by SageMaker so that the features can be accessed whenever needed. This helps with the reuse of features instead of creating them from scratch all the time. To learn more about this feature, please follow this link: https://docs.aws.amazon.com/sagemaker/latest/dg/feature-store.html.
- SageMaker Clarify: This is a great feature for explainable AI within SageMaker. This will help you to remove potential bias and explain the predictions from models. Please go to https://docs.aws.amazon.com/sagemaker/latest/dg/clarify-fairness-and-explainability.html to learn more about this feature.
- SageMaker Edge Manager: This feature will help you to customize the models for edge devices. The details of this feature can be found here: https://docs.aws.amazon.com/sagemaker/latest/dg/edge.html.
- SageMaker Studio notebooks: This feature provides support for high-performing notebooks that have integration with Amazon IAM for access management, fast startup times, and so on. To learn more about this feature, please follow this link: https://docs.aws.amazon.com/sagemaker/latest/dg/whatis.html.
- SageMaker Autopilot: This feature provides support for AutoML in SageMaker. It explores the data, analyzes the problem type, and then builds the optimal model without any client coding required. To learn more about this feature, please follow this link: https://docs.aws.amazon.com/sagemaker/latest/dg/autopilot-automate-model-development.html.
- SageMaker Model Monitor: This feature helps you to analyze and monitor the model in production and identify whether there is any data drift or deviation in model performance. To learn more about this feature, please follow this link: https://docs.aws.amazon.com/sagemaker/latest/dg/model-monitor.html.
- SageMaker Neo: This feature helps you to train your model once with the necessary optimizations and then run it everywhere, both in the cloud and on edge devices. Please go to https://docs.aws.amazon.com/sagemaker/latest/dg/neo.html to learn more about this feature.
We have mentioned some of the key features of Amazon SageMaker here. There are many other features supported in Amazon SageMaker and the list keeps evolving as time goes on. From the preceding list of features, we can see that Amazon SageMaker provides a large number of tools for the whole ML life cycle. This can be an optimal full stack solution for you to run your data science/ML projects from end to end.
In the next section, we will create and serve an ML model using Amazon SageMaker.
Using Amazon SageMaker to serve a model
In this section, we will use Amazon SageMaker to serve a model from end to end. You will need an AWS account if you want to follow the examples. Please refer to the Technical requirements section to see how to create an AWS account. We will use an XGBoost model created using the same dataset shown here, . We will not discuss the steps to create and train the model here. We will reuse the trained model created in the tutorial at the link.
We will split the exercise into the following subsections for better understanding:
- Creating a notebook in Amazon SageMaker
- Serving the model using Amazon SageMaker
Creating a notebook in Amazon SageMaker
In this subsection, we will create a notebook that can be used to write our code:
- First of all, let’s log in to our AWS account, and we will see the AWS console home page, as in Figure 15.1.
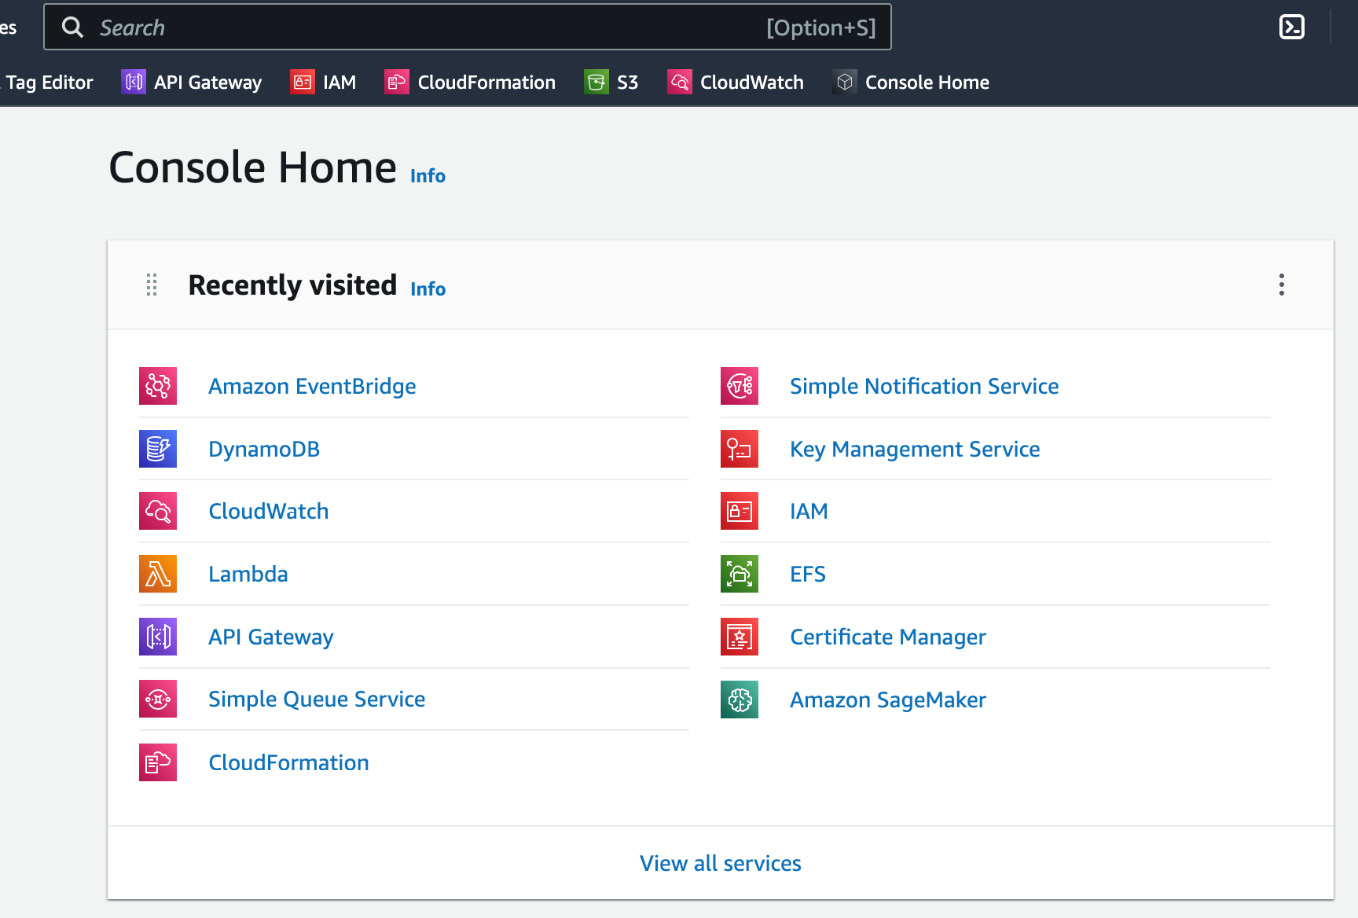
Figure 15.1 – AWS console home page
- Amazon SageMaker is in the Recently visited tools list, as shown in Figure 15.1. If you do not see it in the search bar, search for Amazon SageMaker and click on the link for Amazon SageMaker. This will take you to the Amazon SageMaker home page, as shown in Figure 15.2.

Figure 15.2 – Amazon SageMaker home page in the AWS console
- Locate the Notebook item in the left-hand sidebar shown in Figure 15.2. Click Notebook | Notebook instances and it will take you to the page listing all the notebook instances, as shown in Figure 15.3.
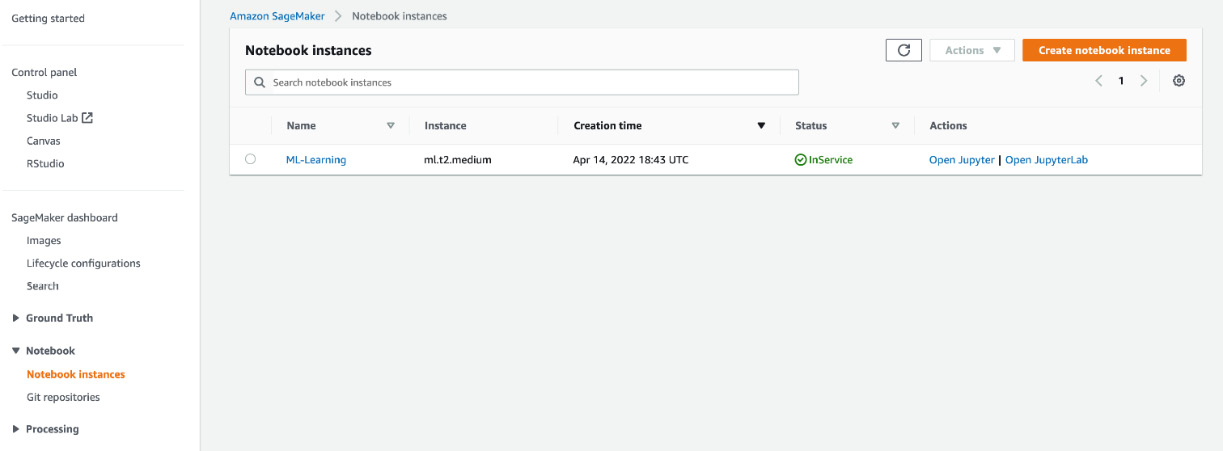
Figure 15.3 – List of all notebook instances accessed by clicking Notebook | Notebook instances
- You might see the list shown in Figure 15.3 is empty. If so, you need to create a notebook. Click on the Create notebook instance button, shown in the top-right corner in Figure 15.3. After clicking on the button, you should see a window has appeared, as in Figure 15.4.
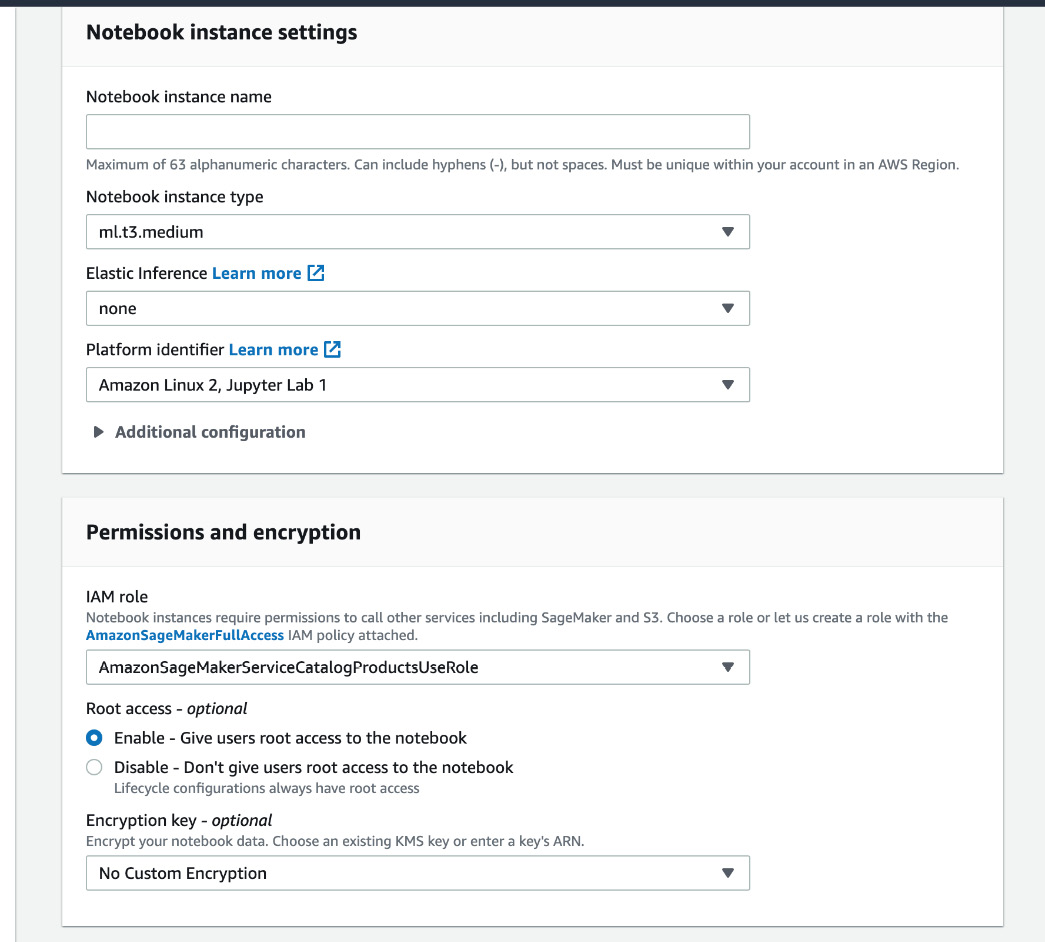
Figure 15.4 – Window for the creation of a notebook instance
- Give a name to the notebook in the Notebook instance name field. Then, for Notebook instance type, select ml.t2.medium from the drop-down list.
- For the IAM role, from the drop-down list, select Create a new role, as shown in Figure 15.5.

Figure 15.5 – Options in the drop-down list for the IAM role field
After clicking on the link, you should see the window in Figure 15.6.

Figure 15.6 – Pop-up window to create an IAM role
- Then, click on the Create role button in the pop-up window.
- After completing step 6, you will be redirected to the page for the creation of a notebook instance. You should see the window in Figure 15.7.
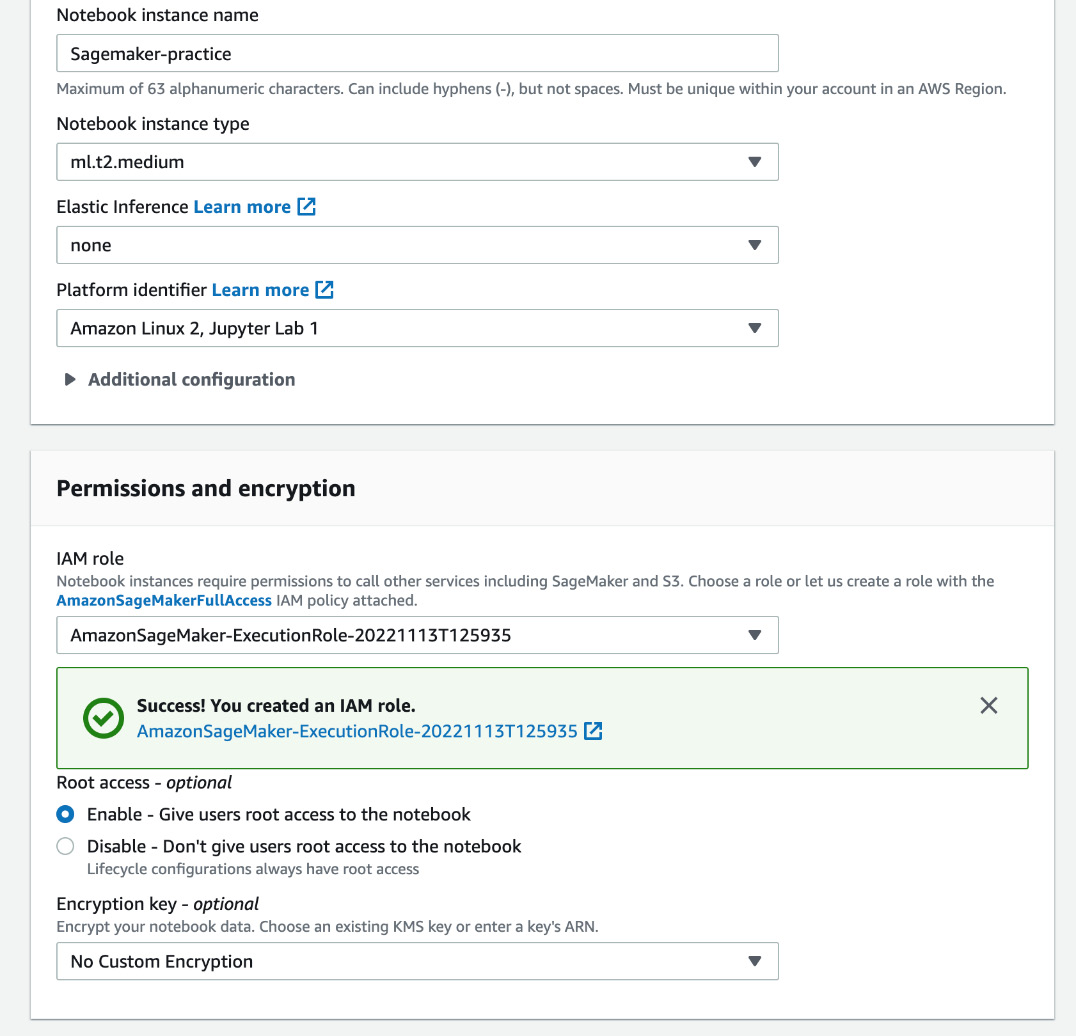
Figure 15.7 – Values of different fields for the creation of a notebook instance
- Keep all the other fields as their defaults and click on the Create notebook instance button at the bottom of the window. Now, it will redirect you to the page where all the notebook instances are listed and you should see the notebook instance that you just created there, as shown in Figure 15.8.

Figure 15.8 – Newly created notebook instance is shown in the notebook instances list
Wait for some time (around 2 minutes) until the status of the newly created notebook changes from Pending to InService, as shown in Figure 15.9:
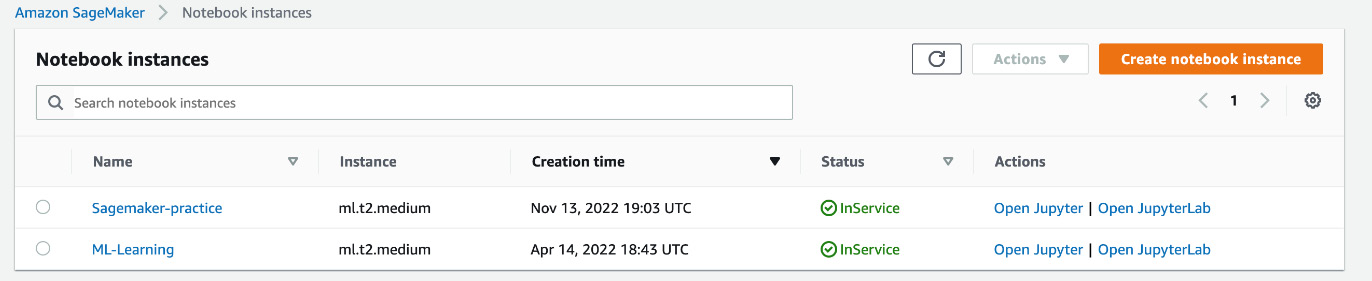
Figure 15.9 – Notebook is ready for access and use with the InService status
- Now, click on the Open Jupyter button, as shown in Figure 15.9, and you will be redirected to a new window with the Jupyter Notebook home page opened there, as shown in Figure 15.10.

Figure 15.10 – Jupyter Notebook directory where all the notebooks are stored
- We will click on the New drop-down button, as shown in Figure 15.10, and we will see a drop-down list, as in Figure 15.11.
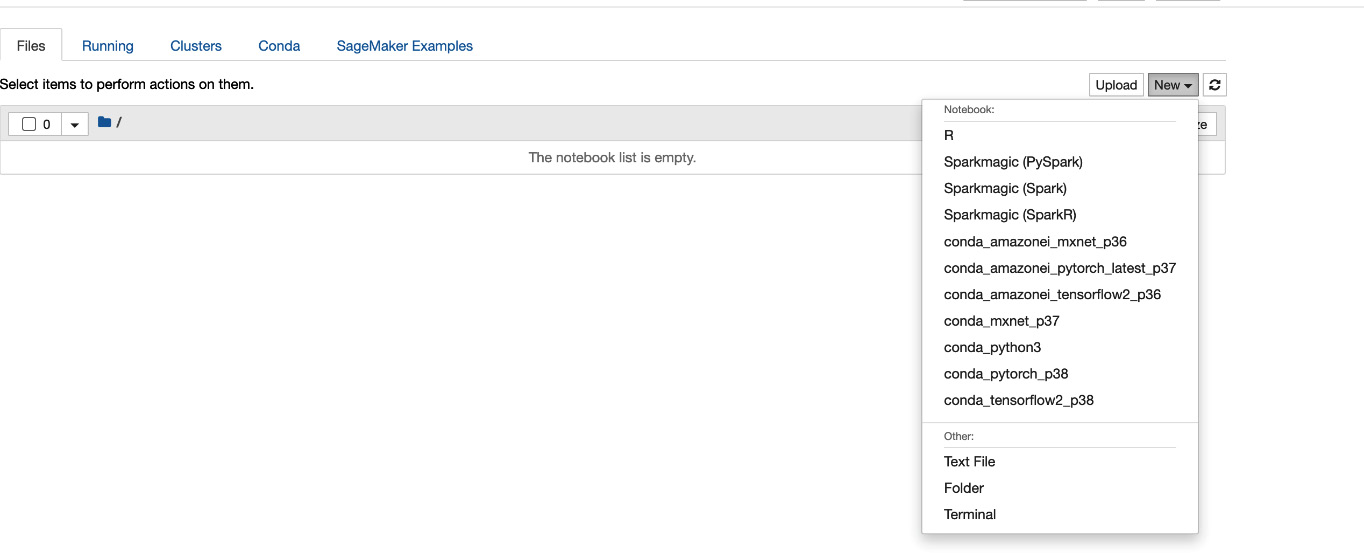
Figure 15.11 – Drop-down menu items for creating a notebook
- We click on the conda_python3 option from the dropdown shown in Figure 15.11. This will take us to a new window by creating a new notebook where we can write our code. We can name the notebook and it will give us the options to enter cells and run code, as shown in Figure 15.12.

Figure 15.12 – Our notebook is ready for writing code
Now, your notebook is ready to create your model.
In the next subsection, we will serve an XGBoost model.
Serving the model using Amazon SageMaker
Amazon SageMaker provides a Docker registry path and other parameters for each of the models it supports. The full list for different regions can be found here: https://docs.aws.amazon.com/sagemaker/latest/dg/sagemaker-algo-docker-registry-paths.html.
We will use the XGBoost algorithm from here: https://docs.aws.amazon.com/sagemaker/latest/dg/ecr-us-east-1.html#xgboost-us-east-1.title. The link gives instructions on how to retrieve the registry path for the model. We follow the steps as shown at https://aws.amazon.com/getting-started/hands-on/build-train-deploy-machine-learning-model-sagemaker/ to train the model, as shown in step 2 and step 3 of the page at this link, and then we can serve the model following these steps:
- To serve the model, we have to run the following command in the notebook to serve the model:
xgb_predictor = xgb.deploy(initial_instance_count=1,instance_type='ml.m4.xlarge')
- Now, let’s go to the Amazon SageMaker home page again. Then, click on Inferences | Endpoint configurations, as shown in Figure 15.13. We can see that an endpoint configuration is already created for the model after we run the command mentioned in step 1.
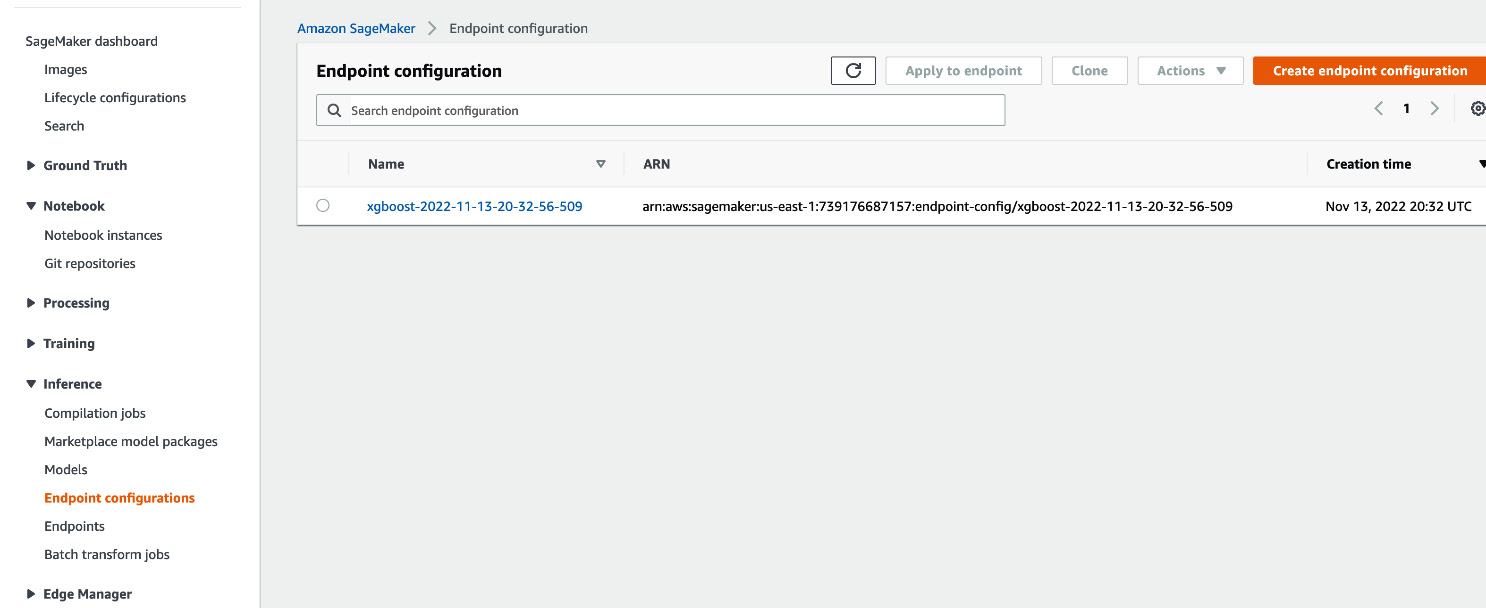
Figure 15.13 – Endpoint configuration list
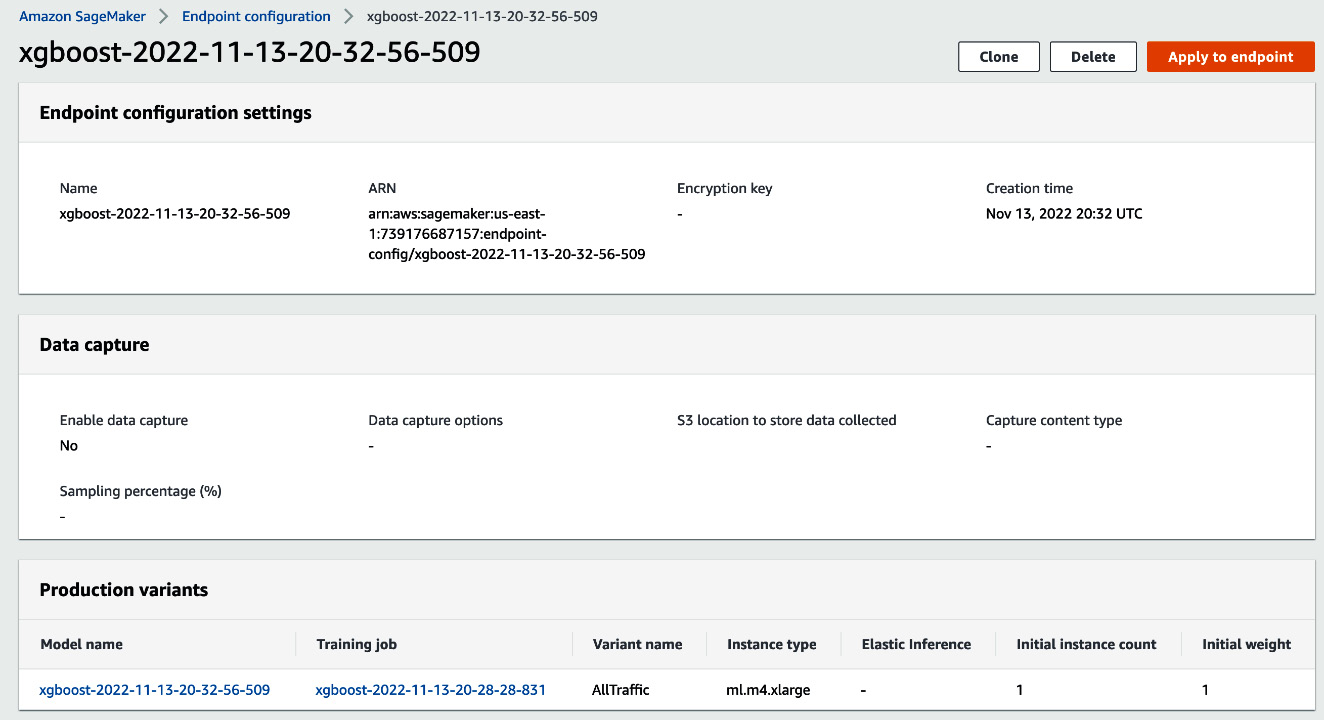
Figure 15.14 – Detailed view of the endpoint configuration
- Locate the Apply to endpoint button and click on that. After clicking it, an endpoint will be created that can be called by clients with appropriate credentials. The endpoint information will be seen in a window as in Figure 15.5.
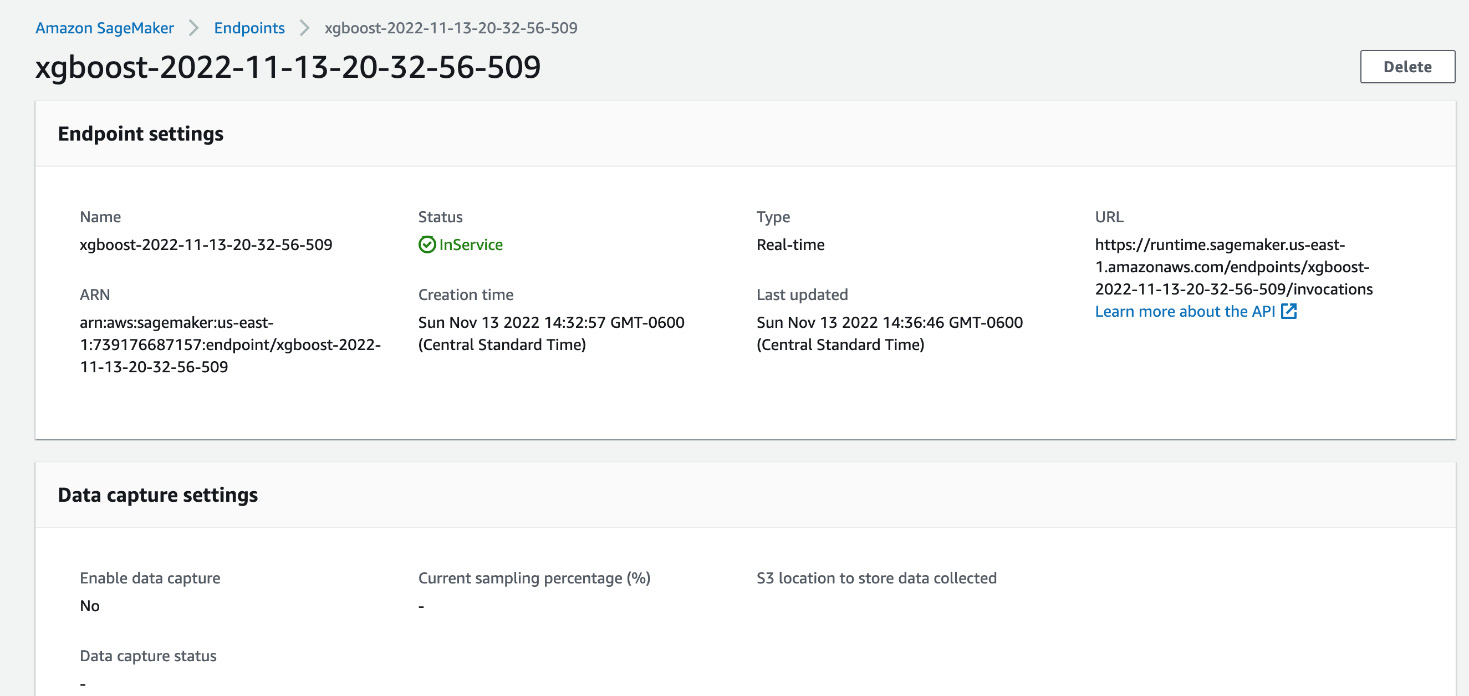
Figure 15.15 – An endpoint is created for inference from the model along with a URL
This URL can be used to send POST HTTP requests to this endpoint for inference. To send the request, you will need the appropriate credentials.
- To be able to send requests from Postman, you need to configure the credentials in the Authorization tab in Postman. Select the AWS Signature option from the drop-down list, as shown in Figure 15.16. Then, provide the access key, secret access key, and session token. To create these tokens, you need to follow the instructions mentioned at this link: https://aws.amazon.com/premiumsupport/knowledge-center/create-access-key.

Figure 15.16 – List of available authorization credentials to select from
Configuring the payload in Postman is also challenging, so it is better to test the endpoint using the AWS-provided Python SDK called boto3. We discuss how we can send requests to the endpoint in step 6.
- We can create an API client using boto3 and then pass the payload as follows:
from sagemaker.serializers import CSVSerializer
client = boto3.client('sagemaker-runtime')response = client.invoke_endpoint(
EndpointName="xgboost-2022-11-13-20-32-56-509",
Body= b'29,2,999,0,1,0,0,1,0,0,0,0,0,0,0,0,0,0,0,1,0,0,0,0,1,0,0,0,0,0,1,0,0,1,0,0,1,0,0,0,1,0,0,0,0,1,0,0,0,0,0,0,0,0,1,0,0,1,0',
ContentType = 'text/csv')
print(response)
print("Prediction is", response['Body'].read().decode('utf-8'))
After running the code, you will see the following output:
{'ResponseMetadata': {'RequestId': '936b2e78-97e8-48b7-9dfe-ca2f7789deb3', 'HTTPStatusCode': 200, 'HTTPHeaders': {'x-amzn-requestid': '936b2e78-97e8-48b7-9dfe-ca2f7789deb3', 'x-amzn-invoked-production-variant': 'AllTraffic', 'date': 'Sun, 13 Nov 2022 22:42:55 GMT', 'content-type': 'text/csv; charset=utf-8', 'content-length': '19'}, 'RetryAttempts': 0}, 'ContentType': 'text/csv; charset=utf-8', 'InvokedProductionVariant': 'AllTraffic', 'Body': <botocore.response.StreamingBody object at 0x7fa8e0cd6fa0>}
Prediction is 0.33817121386528015
We notice that we got the prediction as highlighted in the code block. In the preceding code snippet, EndpointName is the actual endpoint name that we saw in Figure 15.15. As we are running the program in the same account, we do not have to provide any credentials, but if your client program is in a different place, you will also have to provide credentials to send the request. Please refer to this link, https://docs.aws.amazon.com/IAM/latest/UserGuide/id_credentials_temp_use-resources.html, if you need to create credentials for API access.
In this section, we have shown how we can serve a model using Amazon SageMaker and create an endpoint for taking inference requests. We have also learned that the AWS security system is built in and cannot be bypassed. In the next section, we will summarize the chapter and conclude.
Summary
In this chapter, we have explored a fully managed cloud solution for serving ML models. You have seen how serving works in Amazon SageMaker, which is a strong representation of a fully managed cloud solution, and you have explored Amazon SageMaker and seen, step by step, how to create a notebook in Amazon SageMaker and how to deploy a model. We have also seen how you can create an endpoint for the model and how you can invoke the endpoint from a client program using boto3. This is our last chapter on the tools that we intended to discuss. There are a lot of tools out on the market and a lot more are coming out. I hope, now that you have an idea about serving patterns, you can choose the right tool for you. Amazon SageMaker is a integral ecosystem for ML engineers and data scientists. This chapter only gives an introduction to serving by building a model from scratch using the models from the model registry. There are many other ways to create models, such as using SageMaker Autopilot, SageMaker Studio, and so on. Feel free to explore the world of fully managed cloud solutions to serve ML models.
With this chapter, we conclude our book. We have covered some state-of-the-art patterns for serving ML models and also have explored some relevant tools. I hope this will help you in maintaining the best practice of serving and help fight the stereotype that most ML models do not see the light of day and make it to production. We also encourage you to keep exploring and developing your skills even further beyond what we have discussed in this book.