
Chapter 18
Amazon Rekognition
WHAT'S IN THIS CHAPTER
- Introduction to the Amazon Rekognition service
- Use the Amazon Rekognition management console
- Use the AWS CLI to interact with Amazon Rekognition
- Call Amazon Rekognition APIs from AWS Lambda
Amazon Rekognition is a fully managed web service that provides access to a deep-learning models for image and video analysis. Using Amazon Rekognition you can create projects that can analyze the content of images and videos to implement features such as object detection, object location, scene analysis, activity detection, and content filtering. In this lesson you will learn to use the Amazon Rekognition APIs from the management console, the AWS CLI, and an AWS Lambda function.
- NOTE To follow along with this chapter ensure you have created the S3 buckets listed in Appendix B.
You can download the code files for this chapter from
www.wiley.com/go/machinelearningawscloudor from GitHub using the following URL:
Key Concepts
In this section you will learn some of the key concepts you will encounter while working with Amazon Rekognition.
Object Detection
Object detection is a discipline within computer vision that focuses on creating algorithms that allow computers to analyze the content of digital images and prepare a list of objects found in the image. Traditionally these algorithms have relied on having a database of template objects and using matching techniques to match templates in the database against the content of the image. Recent advances in deep learning have led to the creation of more reliable and robust algorithms. Object detection with Amazon Rekognition results in a set of string labels that describe the content of the image, and is referred to as label detection in Amazon Rekognition.
Object Location
Object location is a discipline within computer vision that builds upon object detection algorithms and provides information on the location of objects found within the image. The location is usually specified as a bounding box with respect to one of the corners of the image.
Scene Detection
Scene detection (also known as scene description) is a discipline in artificial intelligence that attempts to build upon the results of object detection and location algorithms to arrive at a textual description of a digital image. For instance, an object detection algorithm may detect a person and a bicycle in an image. An object location algorithm will then be able to define the bounding boxes of these objects in the image. A scene detection algorithm could use these results to describe the scene as “Man riding a bicycle on a sunny day.” Scene detection using convolutional neural networks (CNNs) is an area of active research.
Activity Detection
Activity detection is a discipline in artificial intelligence that attempts to create algorithms that analyze the contents of a video frame by frame and arrive at a description of an activity that occurs in the video. The key difference between activity detection and scene detection is that scene detection works on a single isolated image, whereas activity detection examines a sequence of images.
Facial Recognition
Facial recognition algorithms attempt to examine a digital image (or a video feed) to detect and locate known human faces. The recognition aspects of these algorithms require that the algorithm has access to a database of faces and only attempts to locate the faces that exist in the database. Faces are usually added to the database as part of a training operation. In the past, the main algorithm in facial recognition involved using Haar wavelet descriptors; however, today the main approach to facial recognition involves using convolutional neural networks, which have produced accuracies that approach that of a human being tasked to recognize the same faces.
Face Collection
A face collection is an indexed container of information that describes human faces. Face collections are used with Amazon Rekognition APIs such as DetectFaces that implement facial recognition.
API Sets
Amazon Rekognition provides two sets of APIs: the Amazon Rekognition Image APIs and the Amazon Rekognition Video APIs. As their names suggest, these APIs are to be used with single images or videos, respectively. Inputs and outputs to both API sets are JSON objects; however, Amazon Rekognition Image APIs are synchronous whereas Amazon Rekognition Video APIs are asynchronous. Asynchronous API operations allow you to start an operation by calling an initiation API (such as StartFaceDetection) and then publish the completion status of the operation to an Amazon SNS topic. On receiving a notification from Amazon SNS you can then use a get API for the type of operation you initiated (such as GetFaceDetection).
Non-Storage and Storage-Based Operations
Non-storage API operations are those operation where Amazon Rekognition does not persist any information during the analysis process, or the result of the analysis. You provide input images or videos, and the API operation reads the inputs and provides the results with nothing being persisted by Amazon Rekognition. Storage-based operations, on the other hand, store the results of the operation within Amazon Rekognition and are typically used when building a face collection for subsequent facial recognition operations. The APIs that build the face collection are storage based; however, the actual facial recognition APIs are not.
Model Versioning
Amazon Rekognition makes use of deep-learning CNN models to implement its APIs. Amazon continually improves these models and frequently releases new versions. If you are using the Amazon Rekognition Image APIs, you do not need to keep track of the model versions used by Amazon Rekognition as the latest version will automatically be used. However, if you are using Amazon Rekognition Video APIs that use a previously built face collection or if you are adding faces to an existing collection, you will only be able to use the version of the model that was used when the collection was created. Face collections created using one model version cannot be translated to (and used with) a different model version.
Pricing and Availability
Amazon Rekognition is available on a pay-per-use model. Use of the image APIs is charged based on the number of images processed; use of the video APIs is charged based on the minutes of videos processed. If you store faces in a collection, you will also be charged for the number of faces stored. This service is included in the AWS free-tier account. You can get more details on the pricing model at https://aws.amazon.com/rekognition/pricing/.
Amazon Rekognition is not available in all regions. You can get information on the regions in which it is available from the following URL: https://aws.amazon.com/about-aws/global-infrastructure/regional-product-services/.
Analyzing Images Using the Amazon Rekognition Management Console
In this section you will use the Amazon Rekognition management console to perform object detection on images. Due to the nature of the operations they perform, Amazon Rekognition APIs are typically accessed using one of the AWS SDKs directly from your projects, or via an AWS Lambda function that is triggered in response to an event.
The Amazon Rekognition management console provides an easy-to-use interface that lets you try out the Rekognition APIs on individual images and video sequences.
Log in to the AWS management console using the dedicated sign-in link for your development IAM user account. Use the region selector to select a region where the Amazon Rekognition service is available. The screenshots in this section assume that the console is connected to the EU (Ireland) region. Click the Services menu and access the Amazon Rekognition service home page (Figure 18.1).
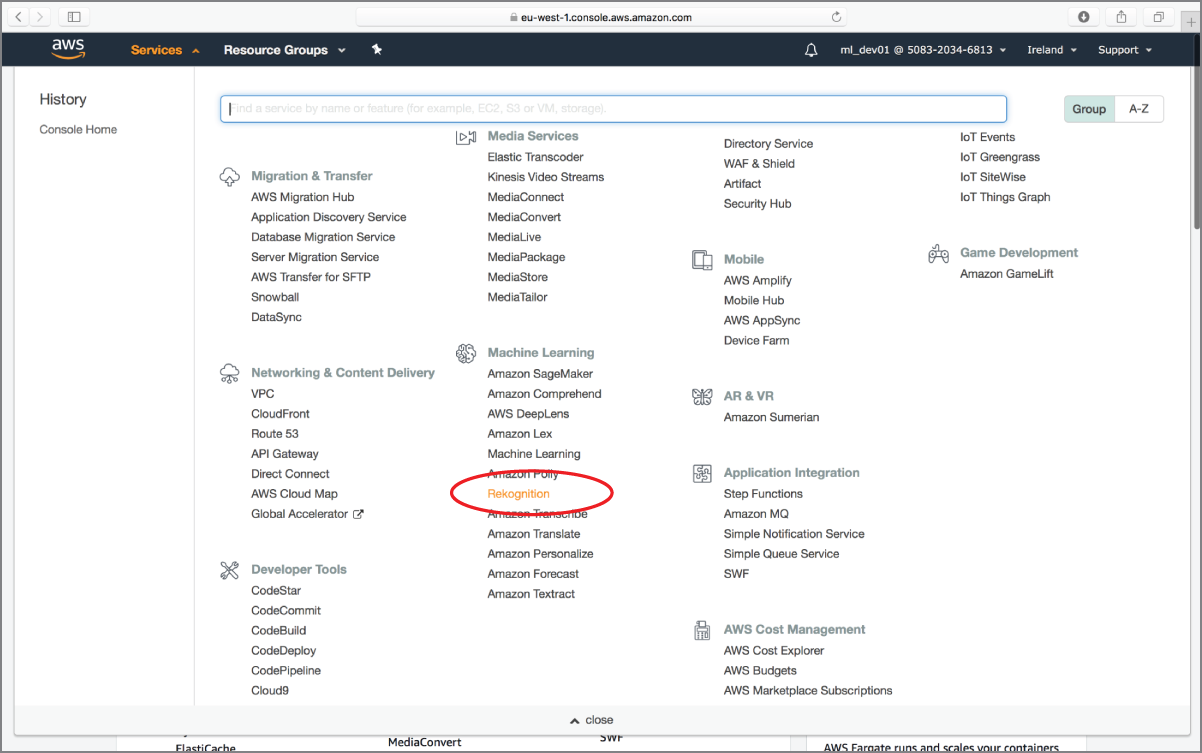
FIGURE 18.1 Accessing the Amazon Rekognition service home page
Expand the menu on the left side of the page if it is not visible and click the Object And Scene Detection link under the Demos category (Figure 18.2).
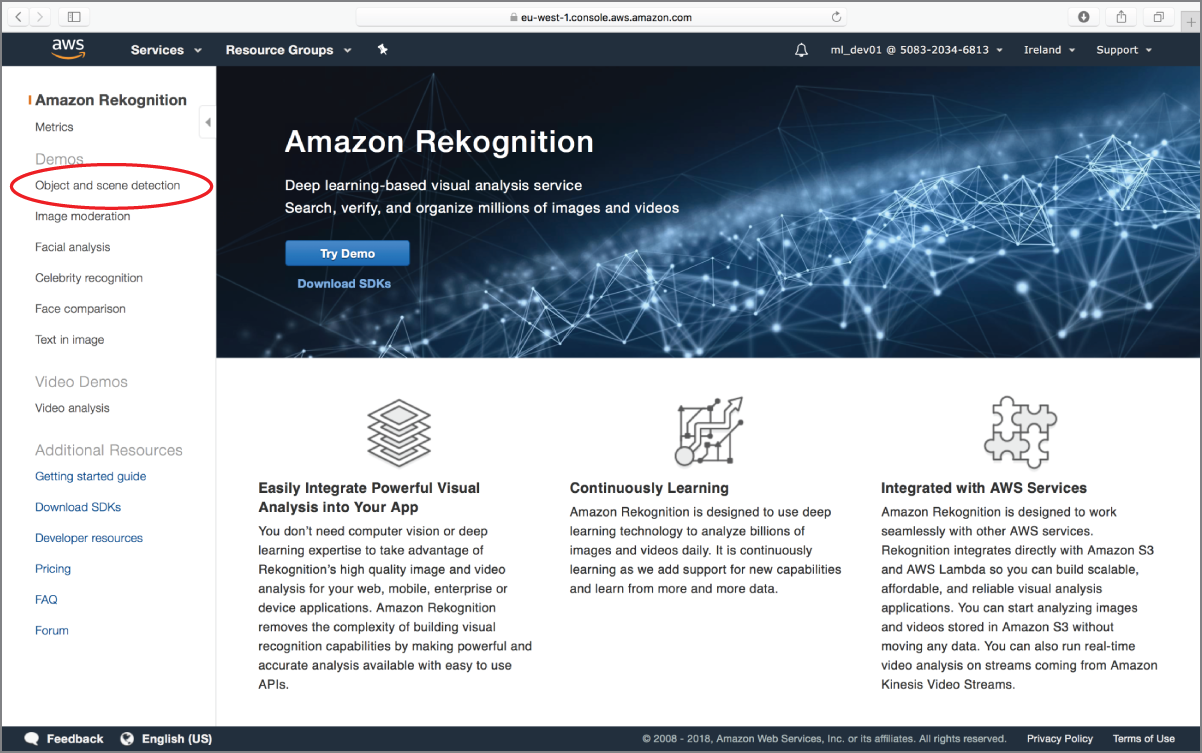
FIGURE 18.2 Accessing the Object and Scene Detection demo
You can use one of the sample images provided by Amazon or use your own. The images used in this chapter are included with the files that accompany this chapter. Upload the bicycle_01 image from the sample images and observe the list of object labels detected by Amazon Rekognition (Figure 18.3).

FIGURE 18.3 Object labels detected in a sample scene
Each label is listed along with a confidence score between 0 and 100, with labels with higher confidence at the top of the list. When you use the management console to access the Rekognition APIs, the console creates a JSON request on your behalf and sends the request to the relevant Rekognition image (or video) API. The response from the API is also a JSON object, which the management console parses before displaying the labels on the web page.
You can access the raw JSON request and response by expanding the Request and Response sections of the web page. The request object in this example contains a single attribute called Image that contains the Base64-encoded contents of the image file that you have uploaded:
{"Image": {"Bytes": "…"}}
The response object is considerably larger, and contains information on the object labels and their confidence scores:
{"LabelModelVersion": "2.0","Labels": [ {"Confidence": 99.98981475830078,"Instances": [],"Name": "Vehicle","Parents": [{"Name": "Transportation"}]},{"Confidence": 99.98981475830078,"Instances": [],"Name": "Transportation","Parents": []},{"Confidence": 99.98981475830078,"Instances": [{"BoundingBox":{"Height": 0.6593928337097168,"Left": 0.04068286344408989,"Top": 0.2880190312862396,"Width": 0.7587363719940186},"Confidence": 99.98981475830078}],"Name": "Bicycle","Parents": [{"Name": "Vehicle" },{"Name": "Transportation"}]},{"Confidence": 99.98981475830078,"Instances": [],"Name": "Bike","Parents": [{"Name": "Vehicle" },{"Name": "Transportation" }]},{"Confidence": 99.92826080322266,"Instances": [],"Name": "Machine","Parents": []},{"Confidence": 99.92826080322266,"Instances": [{"BoundingBox": {"Height": 0.44183894991874695,"Left": 0.5008670091629028,"Top": 0.4816884696483612,"Width": 0.2692929804325104},"Confidence": 99.92826080322266 }],"Name": "Wheel","Parents": [{ "Name": "Machine" } ]},{"Confidence": 55.68204879760742,"Instances": [],"Name": "Mountain Bike","Parents": [{"Name": "Vehicle"},{"Name": "Bicycle"},{"Name": "Transportation"}]}]}
Each label is represented as an item in an array, and consists of a name, confidence score, information on bounding box coordinates if applicable, and the name of the parent label if Amazon Rekognition detects a hierarchical relationship between labels. For instance, the Wheel label has a parent label called Machine:
{"Confidence": 99.92826080322266,"Instances": [ {"BoundingBox": {"Height": 0.44183894991874695,"Left": 0.5008670091629028,"Top": 0.4816884696483612,"Width": 0.2692929804325104},"Confidence": 99.92826080322266}],"Name": "Wheel","Parents": [ { "Name": "Machine" } ]}
You can use the Metrics link to view aggregate graphs on six metrics over a period of time (see Figure 18.4).
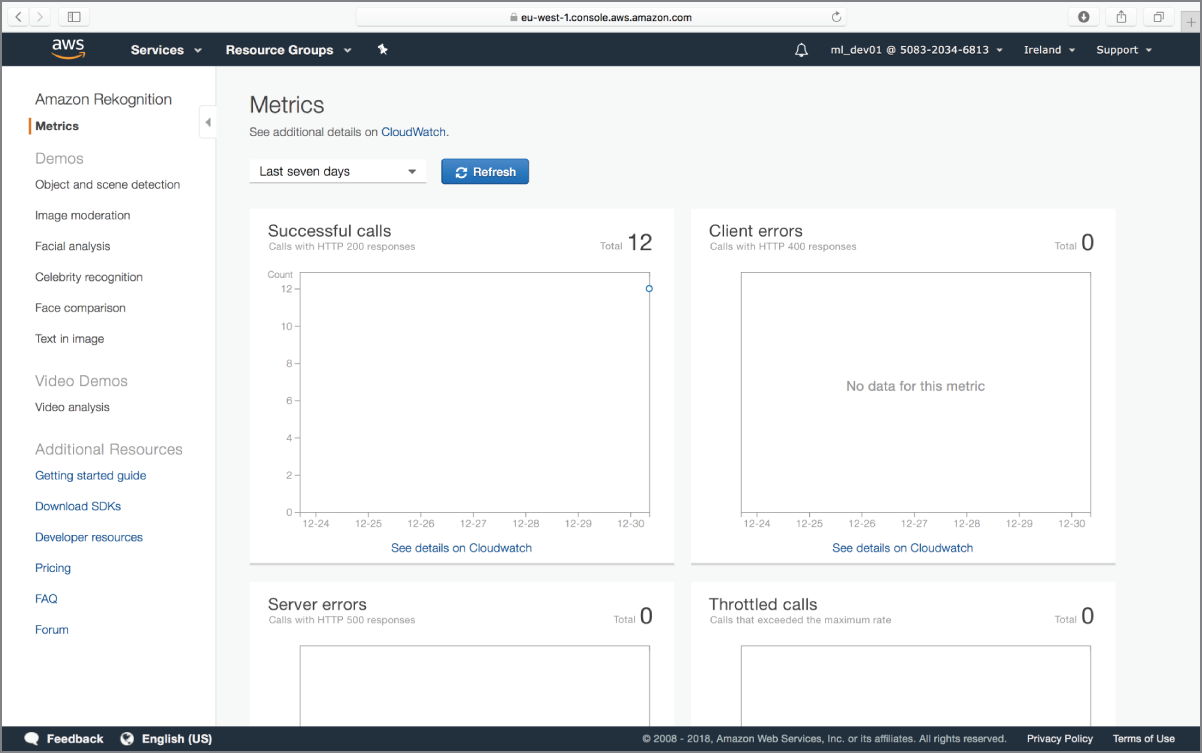
FIGURE 18.4 Amazon Rekognition aggregate metric graphs
The six metrics and associated graphs are listed in Table 18.1.
TABLE 18.1: Aggregate Metric Graphs
| NAME OF GRAPH | METRIC NAME |
| Successful calls | SuccessfulRequestCount |
| Client errors | UserErrorCount |
| Server errors | ServerErrorCount |
| Throttled | ThrottledCount |
| Detected labels | DetectedLabelCount |
| Detected faces | DetectedFaceCount |
To view the Amazon Rekognition metric graphs, the IAM user that you are using must have appropriate Amazon CloudWatch and Amazon Rekognition permissions; at the very least the user should have the AmazonRekognitionReadOnlyAccess and CloudWatchReadOnlyAccess permissions.
The aggregate graphs that you see in the Rekognition metrics pane are powered by Amazon CloudWatch metric reports. You can learn more about monitoring Amazon Rekognition at the following URL: https://docs.aws.amazon.com/rekognition/latest/dg/rekognition_monitoring.html.
Interactive Image Analysis with the AWS CLI
You can use the AWS CLI to access the underlying Amazon Rekognition APIs and perform image and video analysis over the command line. The Amazon Rekognition APIs accept JSON inputs and provide JSON responses. Since the Amazon Rekognition APIs work on images or videos—which are fundamentally large-sized objects—the most common approach to submit images or videos to the Amazon Rekognition APIs is to upload them to an Amazon S3 bucket and submit the Amazon S3 object ARN (Amazon Resource Name) as a parameter in the JSON request payload.
Another option is to encode the bytes of the image or video object as a BASE64 string and include the BASE64 string in the JSON request payload. This technique is not recommended, and it is better to separate image/video upload from the actual Amazon Rekognition API call.
The examples in this section will upload the images to an Amazon S3 bucket before calling the Amazon Rekognition APIs. The bucket that will be used in this section is called awsml-rekognition-awscli-source. Since bucket names are unique, you will need to substitute references to this bucket with your own bucket name. This section also assumes you have installed and configured the AWS CLI to use your development IAM credentials.
To upload an image to an Amazon S3 bucket with the AWS CLI, launch a Terminal window on your Mac or a Command Prompt window on Windows, and type a statement similar to the following:
$ aws s3 cp <source-file-name> s3://<bucket-name>Replace <source-file-name> with the full path to the image file on your computer, and <bucket-name> with the name of your Amazon S3 bucket. For example, the following command will upload a file called tower-bridge-01.jpg to a bucket called awsml-rekognition-awscli-source:
aws s3 cp/Users/abhishekmishra/Desktop /tower_bridge_01.jpgs3://awsml-rekognition-awscli-source
The image will take a few seconds to upload. You can verify that the image has uploaded by listing the contents of the bucket using the following command:
$ aws s3 ls s3://awsml-rekognition-awscli-sourceOnce you have confirmed that the image has been uploaded to your Amazon S3 bucket, type the following command to perform object analysis on the image using the Amazon Rekognition image APIs. Replace the name of the Amazon S3 bucket and object as necessary:
aws rekognition detect-labels --image'{"S3Object":{"Bucket":"awsml-rekognition-awscli-source","Name":"tower_bridge_01.jpg"}}'
The command-line statement invokes the DetectLabels API with a single input parameter called image, which is a JSON object:
{"S3Object":{"Bucket":"awsml-rekognition-awscli-source","Name":"tower_bridge_01.jpg"}}
Press the Enter key on your keyboard to execute the command. The result of executing this command is a list of labels along with their confidence scores as a JSON object:
{"Labels": [{"Name": "Building","Confidence": 99.22096252441406,"Instances": [],"Parents": []},{"Name": "Bridge","Confidence": 97.9942855834961,"Instances": [{"BoundingBox": {"Width": 0.8991885185241699,"Height": 0.580137312412262,"Left": 0.09563709050416946,"Top": 0.2453334629535675},"Confidence": 96.43193817138672}],"Parents": [{"Name": "Building"}]},{"Name": "Architecture","Confidence": 91.6387939453125,"Instances": [],"Parents": [{"Name": "Building"}]},{"Name": "Outdoors","Confidence": 83.56424713134766,"Instances": [],"Parents": []},{"Name": "Suspension Bridge","Confidence": 80.96751403808594,"Instances": [],"Parents": [{"Name": "Bridge"},{"Name": "Building"}]},{"Name": "Arch","Confidence": 76.18531799316406,"Instances": [],"Parents": [{"Name": "Building"},{"Name": "Architecture"}]},{"Name": "Arched","Confidence": 76.18531799316406,"Instances": [],"Parents": [{"Name": "Building"},{"Name": "Architecture"}]},{"Name": "Nature","Confidence": 73.91722869873047,"Instances": [],"Parents": []},{"Name": "Arch Bridge","Confidence": 70.39462280273438,"Instances": [],"Parents": [{"Name": "Architecture"},{"Name": "Arch"},{"Name": "Bridge"},{"Name": "Building"}]},{"Name": "Urban","Confidence": 58.88948440551758,"Instances": [],"Parents": []},{"Name": "Metropolis","Confidence": 58.88948440551758,"Instances": [],"Parents": [{"Name": "Urban"},{"Name": "Building"},{"Name": "City"}]},{"Name": "City","Confidence": 58.88948440551758,"Instances": [],"Parents": [{"Name": "Urban"},{"Name": "Building"}]},{"Name": "Town","Confidence": 58.88948440551758,"Instances": [],"Parents": [{"Name": "Urban"},{"Name": "Building"}]}],"LabelModelVersion": "2.0"}
If you were to include the --max-labels and --min-confidence arguments in addition to the ––image argument in the command-line statement, you could restrict the response to contain fewer labels, and those that are above a minimum confidence score. The following command-line statement demonstrates how these additional attributes can be used:
$aws rekognition detect-labels--image '{"S3Object":{"Bucket":"awsml-rekognition-awscli-source","Name":"tower_bridge_01.jpg"}}'--max-labels 4--min-confidence 98.75
Press the Enter key on your keyboard to execute the command. After a few seconds, the output on your computer should resemble the following:
{"Labels": [{"Name": "Building","Confidence": 99.22096252441406,"Instances": [],"Parents": []}],"LabelModelVersion": "2.0"}
If no labels are found, the DetectLabels operation will return a JSON object with an empty Labels array.
Using Amazon Rekognition with AWS Lambda
In the previous sections of this chapter you have learned to use Amazon Rekognition using the management console and the AWS CLI. While using these APIs interactively certainly provides results, you cannot integrate AWS Rekognition with your own projects in this way.
To integrate Amazon Rekognition in a real-world project, you will most likely pick one of two approaches:
- Use one of the language-specific AWS SDKs and call the Amazon Rekognition APIs directly from your code.
- Create an AWS Lambda function that will call the Amazon Rekognition APIs when triggered.
In this section you will create an Amazon DynamoDB table and an AWS Lambda function that will be triggered when an image is uploaded to an Amazon S3 bucket. Once triggered, the AWS Lambda function will read the uploaded image from the Amazon S3 bucket and use Amazon Rekognition image APIs to extract a list of objects detected in the image. The names of the objects will then be written to the Amazon DynamoDB table along with the image filename. The Amazon DynamoDB table will serve as a content-based index and could be used by an application to search for images that contain a particular object.
In real-world scenarios, there may be several other events that you could use to trigger the AWS Lambda function, such as an HTTP request being received by an API Gateway. Triggering an AWS Lambda function in the scenarios just described is not covered in this book.
- NOTE To follow along with this section ensure you have created the S3 buckets listed in Appendix B.
You can download the code files for this chapter from
www.wiley.com/go/machinelearningawscloudor from GitHub using the following URL:https://github.com/asmtechnology/awsmlbook-chapter18.git
Creating the Amazon DynamoDB Table
To get started, log in to the AWS management console using the dedicated sign-in link for your development IAM user account and use the region selector to select a region where the Amazon Rekognition service is available. The screenshots in this section assume that the console is connected to the EU (Ireland) region. Click the Services menu and access the Amazon DynamoDB service home page (Figure 18.5).
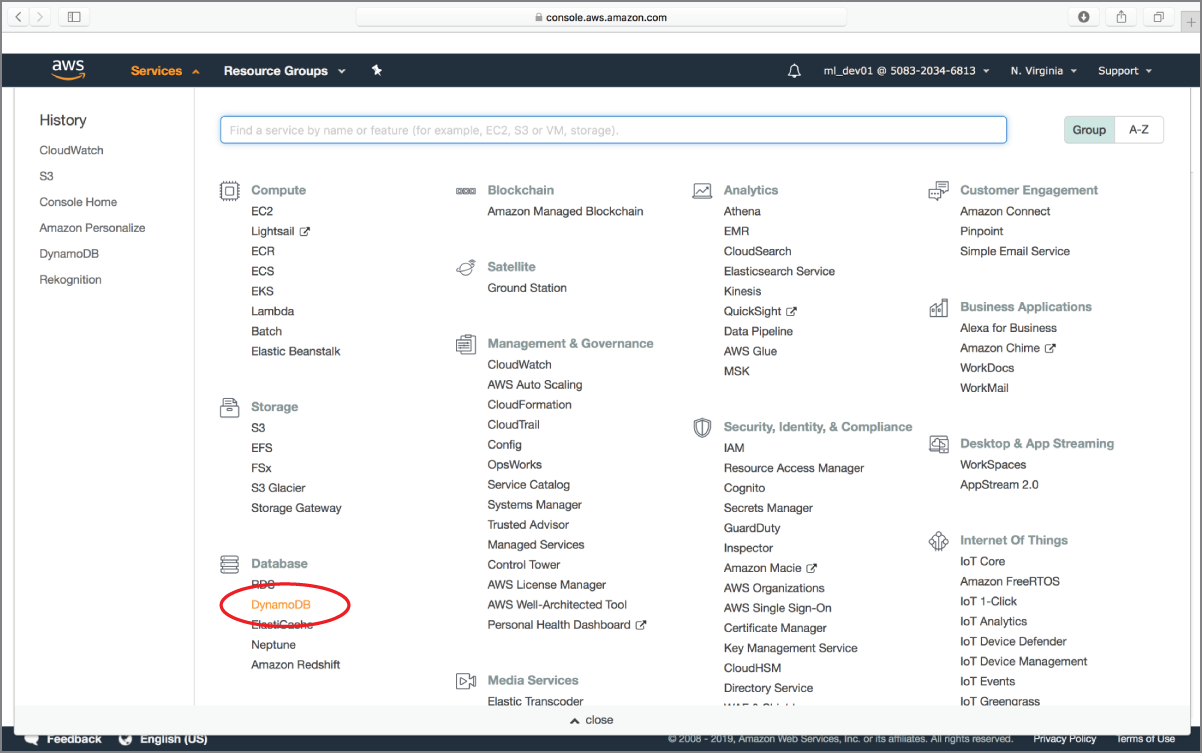
FIGURE 18.5 Accessing the Amazon DynamoDB management console
Ensure the Amazon DynamoDB console is set to work with the same region that contains your Amazon S3 bucket. Create a new table called imageindex with a partition key attribute called label and a sort key attribute called filename (see Figure 18.6). If you have never used Amazon DynamoDB, or need a refresher on the concepts, refer to Chapter 11 before continuing with this section.
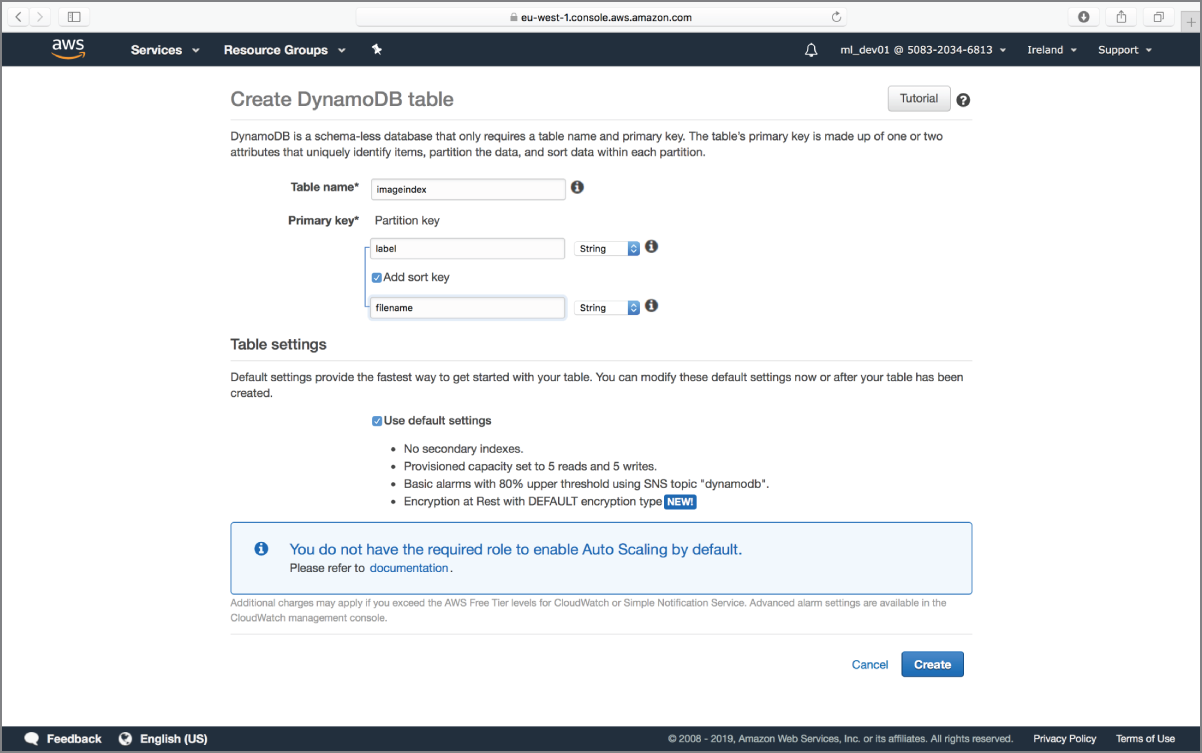
FIGURE 18.6 Amazon DynamoDB table name and primary key attributes
Uncheck the Use Default Settings option on the page and scroll down to locate the Read/Write Capacity Mode section (Figure 18.7). Ensure the table is set to use provisioned capacity units, and uncheck the auto scaling options for read and write capacity units.
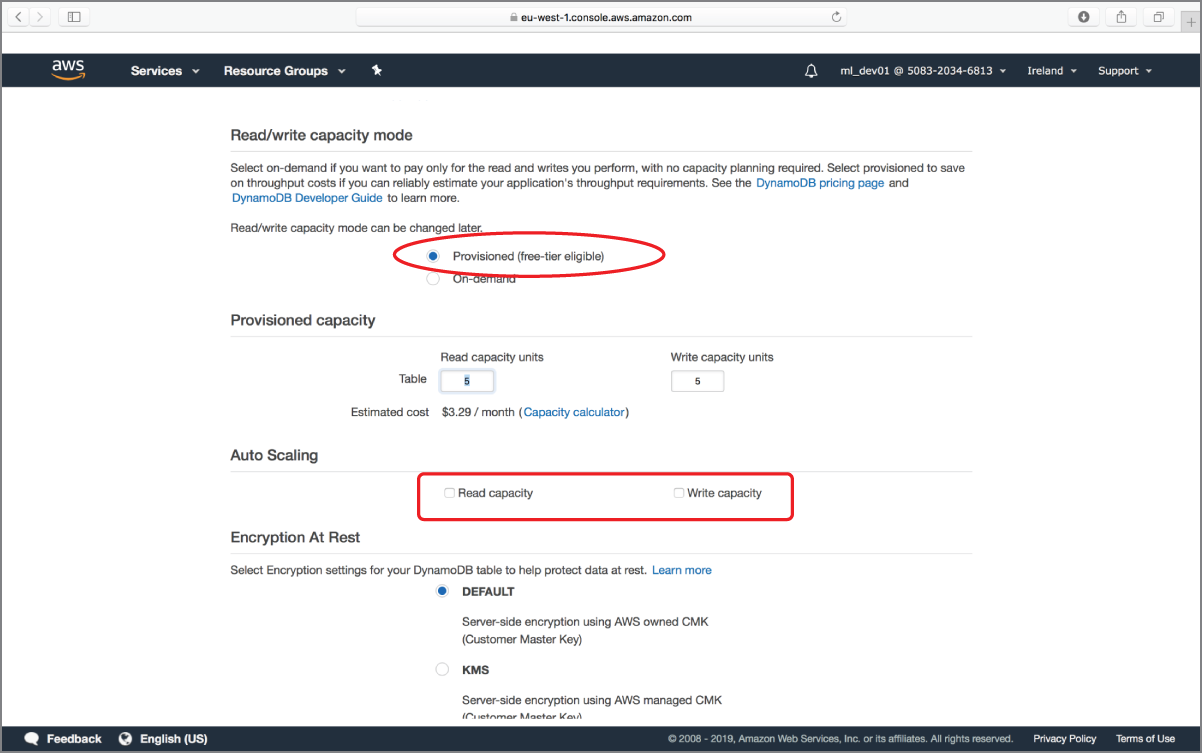
FIGURE 18.7 Amazon DynamoDB Table Read/Write Capacity Mode section
Click the Create Table button at the bottom of the page to finish creating the table. You should see the new table listed alongside any existing tables in the Amazon DynamoDB management console (Figure 18.8).
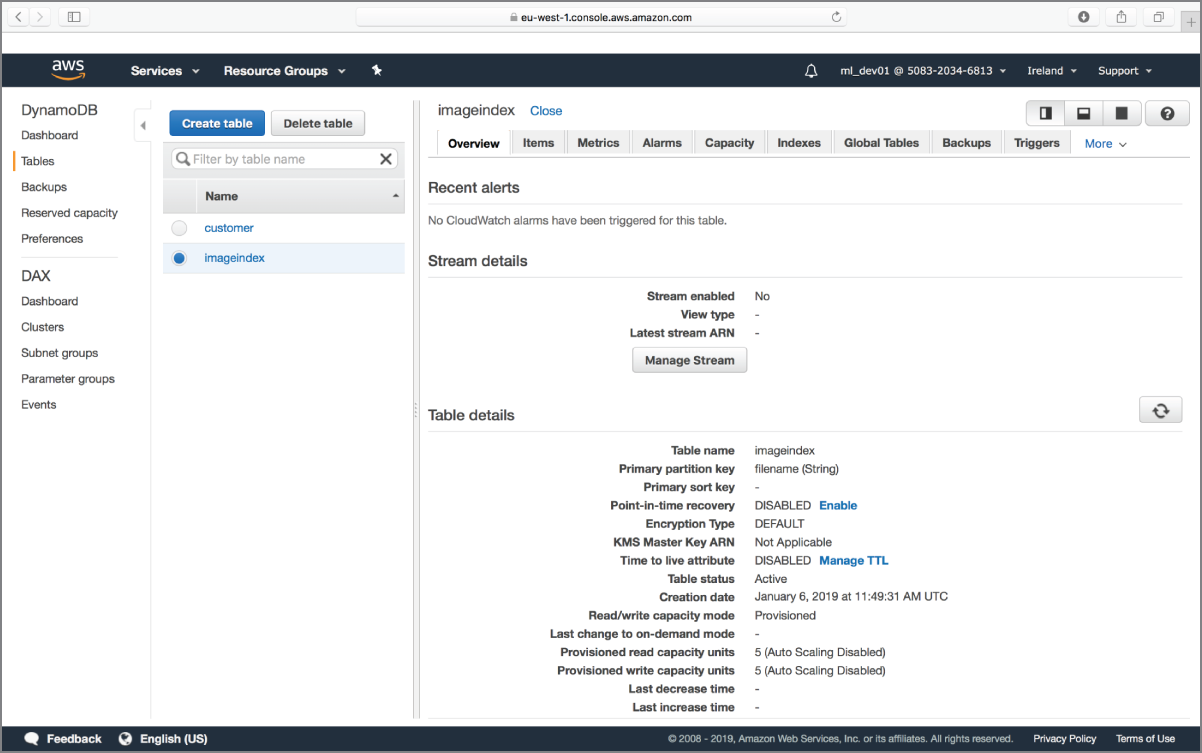
FIGURE 18.8 Amazon DynamoDB management console displaying a list of tables
Creating the AWS Lambda Function
Click the Services menu and access the AWS Lambda service home page. Ensure the management console is configured to use the same region in which your Amazon S3 buckets and Amazon DynamoDB tables have been created. Click the Create function button to start the process of creating a new AWS Lambda function. If you are new to AWS Lambda, or would like to refresh your skills, refer to Chapter 12 before continuing with the rest of this section.
After clicking the Create Function button, you will be asked to select a template for the function (Figure 18.9). Select the Author From Scratch option.
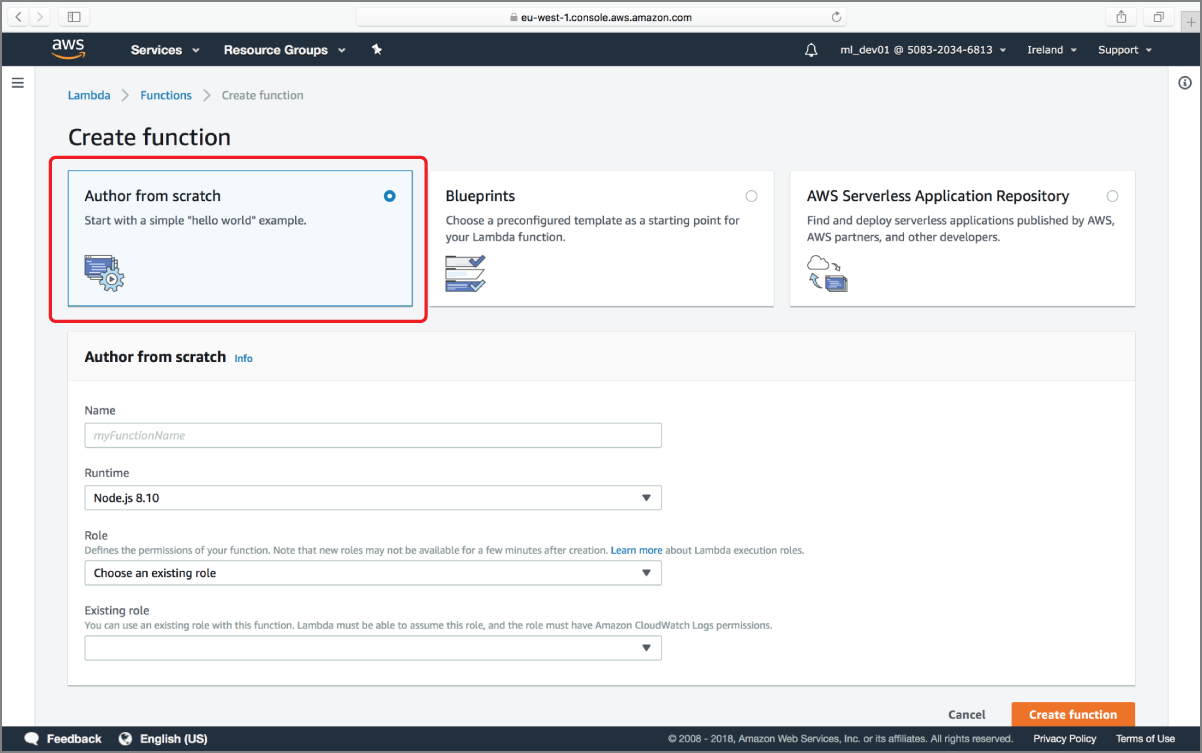
FIGURE 18.9 Creating an AWS Lambda function from scratch
Name the function DetectLabels, use the Runtime drop-down to select the Python 3.6 runtime, and select the Create A New Role With Basic Lambda Permissions from Execution Role drop-down (Figure 18.10).
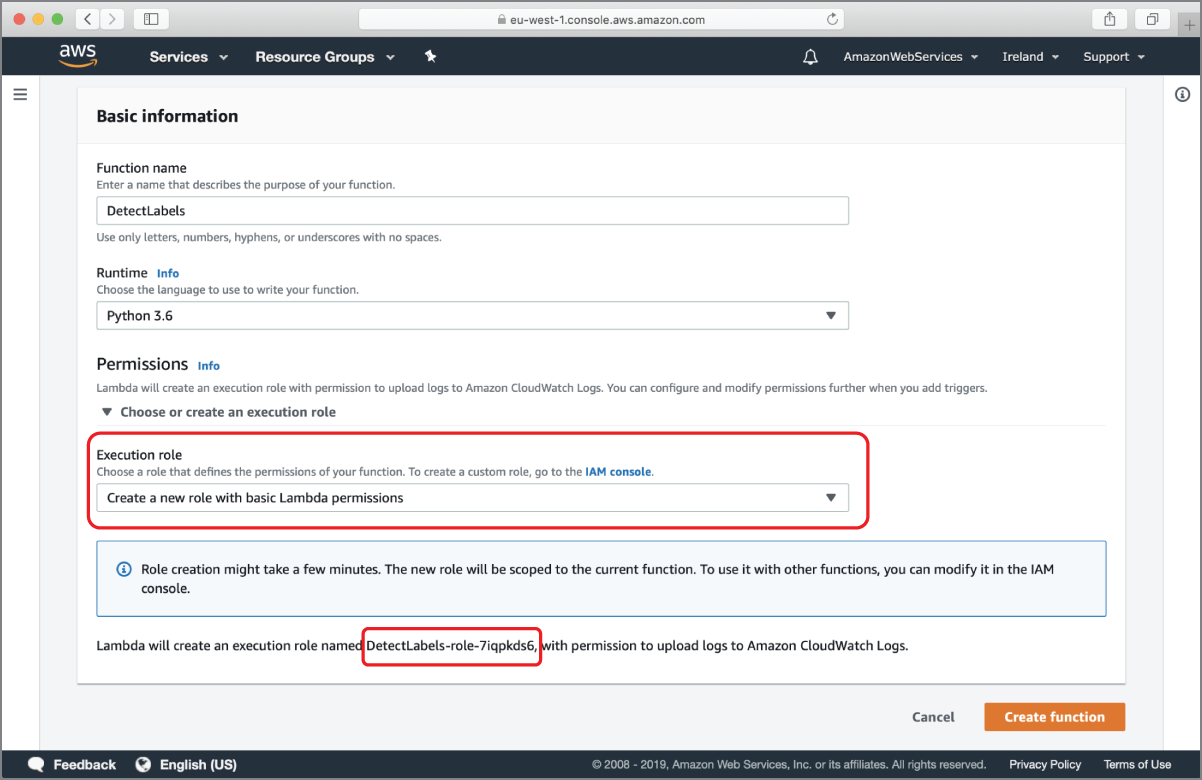
FIGURE 18.10 Lambda Function Name and Runtime settings
AWS will create a new IAM role for your function with a minimal set of permissions that will allow your function to write logs to AWS CloudWatch. The name of this IAM role is displayed below the Execution Role drop-down in Figure 18.10 and will be similar to DetectLabels-role-xxxxx. Make a note of this name as you will need to modify the role to allow access to Amazon S3, Amazon DynamoDB, and Amazon Rekognition. Click on the Create Function button at the bottom of the page to create the AWS Lambda function and the IAM role.
After the AWS Lambda function is created, use the services menu to switch to the IAM management console and navigate to the new IAM role that was just created for you when you created the Lambda function. Locate the permissions policy document associated with the role and click on the Edit Policy button (Figure 18.11).
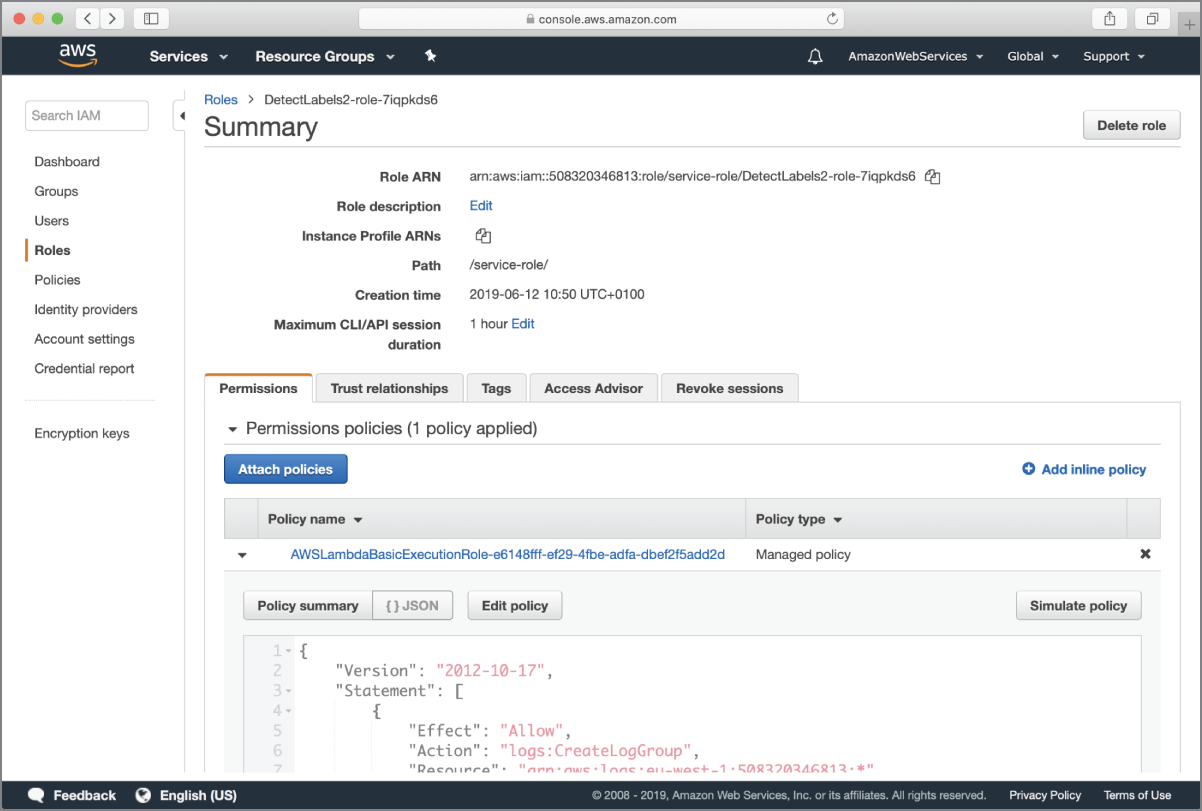
FIGURE 18.11 Viewing the default policy document associated with the IAM role created by AWS Lambda
You will be taken to the policy editor screen. Click on the JSON tab to view the policy document as a JSON file (Figure 18.12).
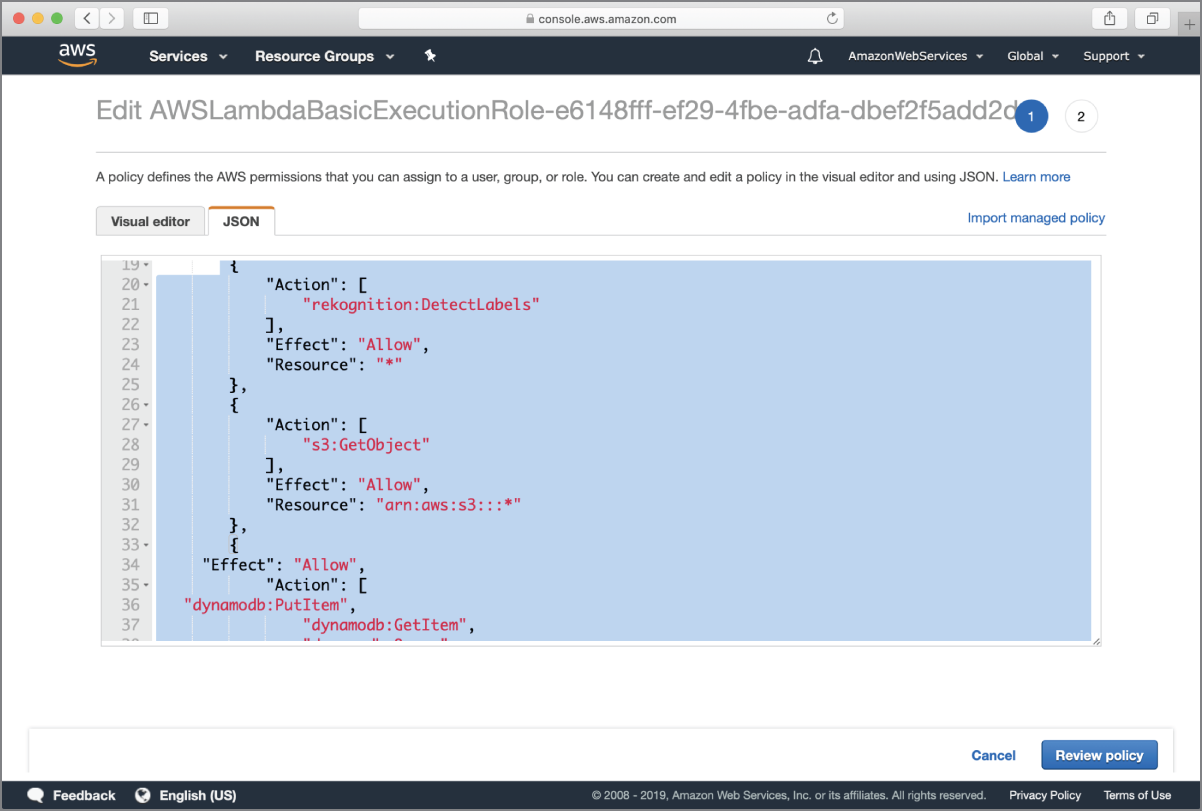
FIGURE 18.12 Updating the default policy document associated with the IAM role created by AWS Lambda
Add the following objects to the Statement array:
{"Action": ["rekognition:DetectLabels"],"Effect": "Allow","Resource": "*"},{"Action": ["s3:GetObject"],"Effect": "Allow","Resource": "arn:aws:s3:::*"},{"Effect": "Allow","Action": ["dynamodb:PutItem","dynamodb:GetItem","dynamodb:Query","dynamodb:UpdateItem"],"Resource": "*"}
Your final policy document should resemble this:
{"Version": "2012-10-17","Statement": [{"Effect": "Allow","Action": "logs:CreateLogGroup","Resource": "arn:aws:logs:eu-west-1:5083XXXX13:*"},{"Effect": "Allow","Action": ["logs:CreateLogStream","logs:PutLogEvents"],"Resource": ["arn:aws:logs:eu-west-1:5083XXXX813:log-group:/aws/lambda/DetectLabels2:*"]},{"Action": ["rekognition:DetectLabels"],"Effect": "Allow","Resource": "*"},{"Action": ["s3:GetObject"],"Effect": "Allow","Resource": "arn:aws:s3:::*"},{"Effect": "Allow","Action": ["dynamodb:PutItem","dynamodb:GetItem","dynamodb:Query","dynamodb:UpdateItem"],"Resource": "*"}]}
This policy document allows AWS Lambda to write logs to CloudWatch, call the Amazon Rekognition DetectLabels API, read objects from any Amazon S3 bucket, read and write items to any Amazon DynamoDB table, and execute queries on any Amazon DynamoDB table in your account.
You can allow access to additional Amazon Rekognition APIs by adding the relevant actions after "rekognition:DetectLabels". You can get a list of available Amazon Rekognition actions that can be used in policy documents at https://docs.aws.amazon.com/rekognition/latest/dg/api-permissions-reference.html.
Click on the Review Policy button at the bottom of the page to go to the Review Policy screen (Figure 18.13).
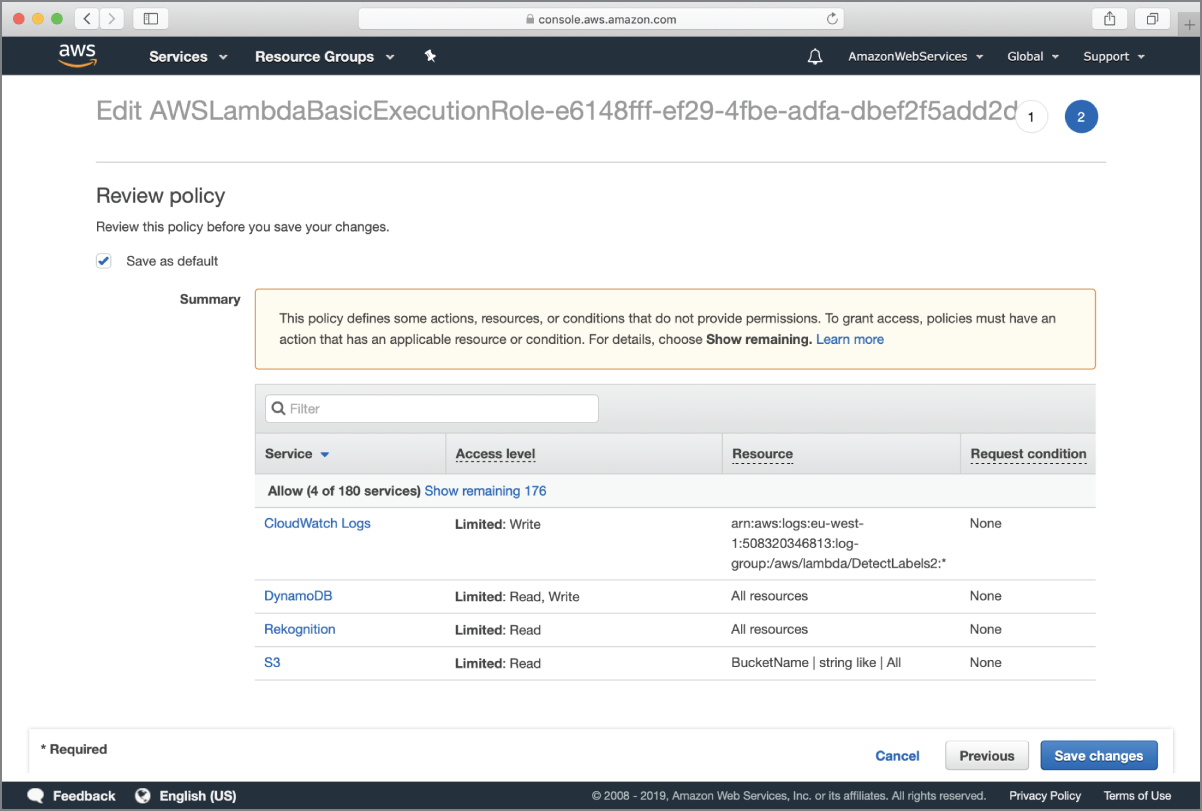
FIGURE 18.13 Review Policy screen
Click on the Save Changes button to finish updating the IAM policy. After the policy changes have been saved, use the Services menu to switch back to the AWS Lambda management console and navigate to the DetectLabels Lambda function.
Locate the function designer section of the page and add the Amazon S3 trigger to the function. The function designer should resemble Figure 18.14 and should list Amazon CloudWatch Logs, Amazon S3, Amazon DynamoDB, and Amazon Rekognition as the resources that can be accessed by the function.
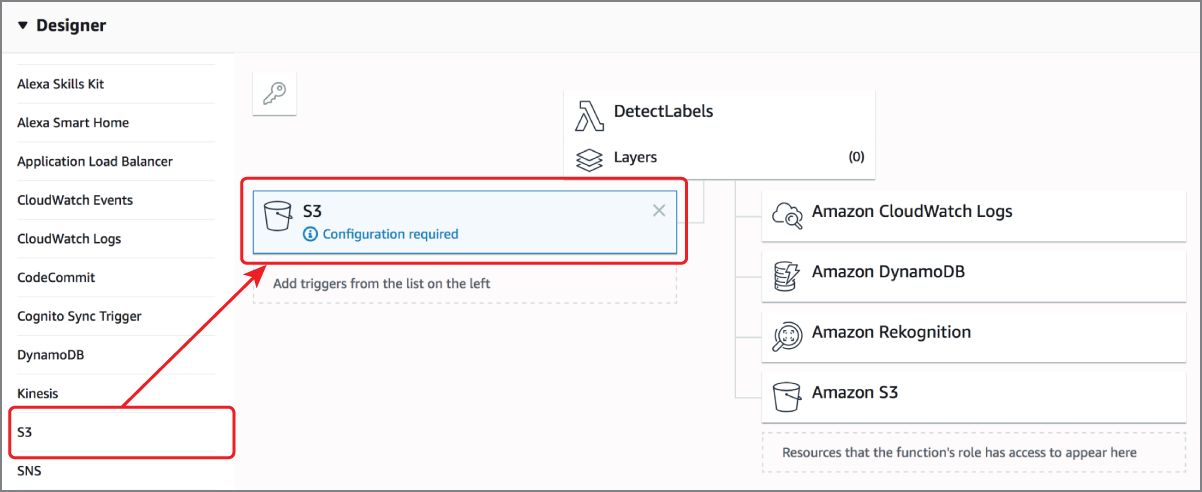
FIGURE 18.14 AWS Lambda function designer
Scroll down to the Configure Triggers section and choose an Amazon S3 bucket that will serve as the event source. In this example, the source bucket is called awsml-rekognition-awslambda-source. Ensure the Event Type is set to Object Created (All) and click the Add button to finish configuring the S3 event trigger (Figure 18.15).
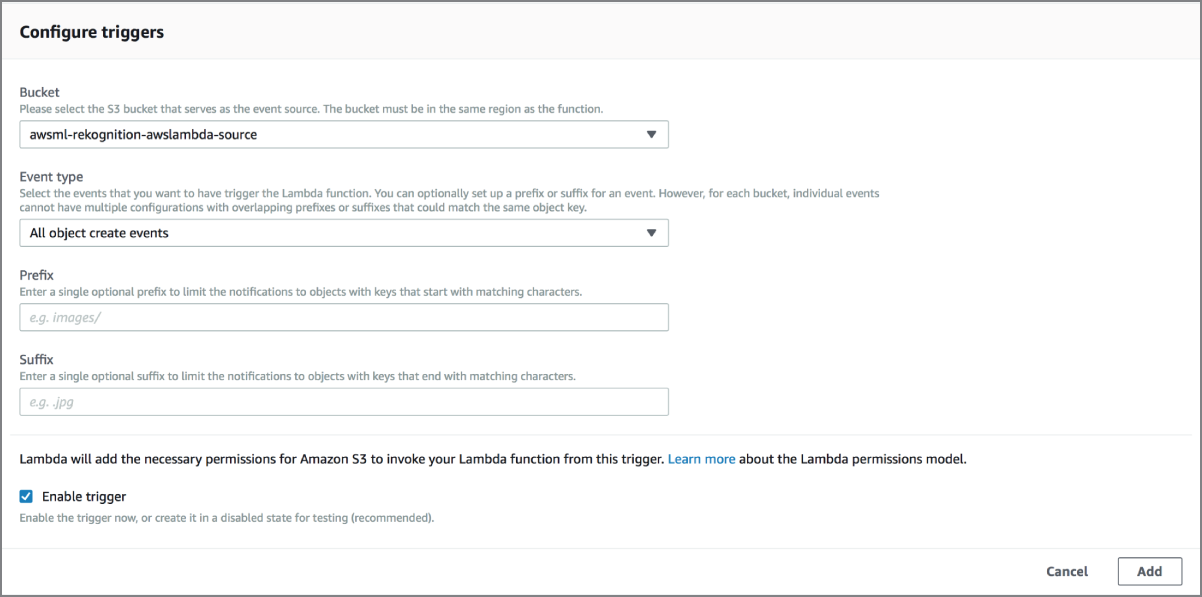
FIGURE 18.15 Configuring the S3 event trigger
Click the Save button at the top of the page to save your changes. By creating the trigger, you have set up the Lambda function to be executed every time a new file is uploaded to the source S3 bucket.
To update the Lambda function code, scroll down to the function designer and click the function name to reveal the code editor (Figure 18.16).
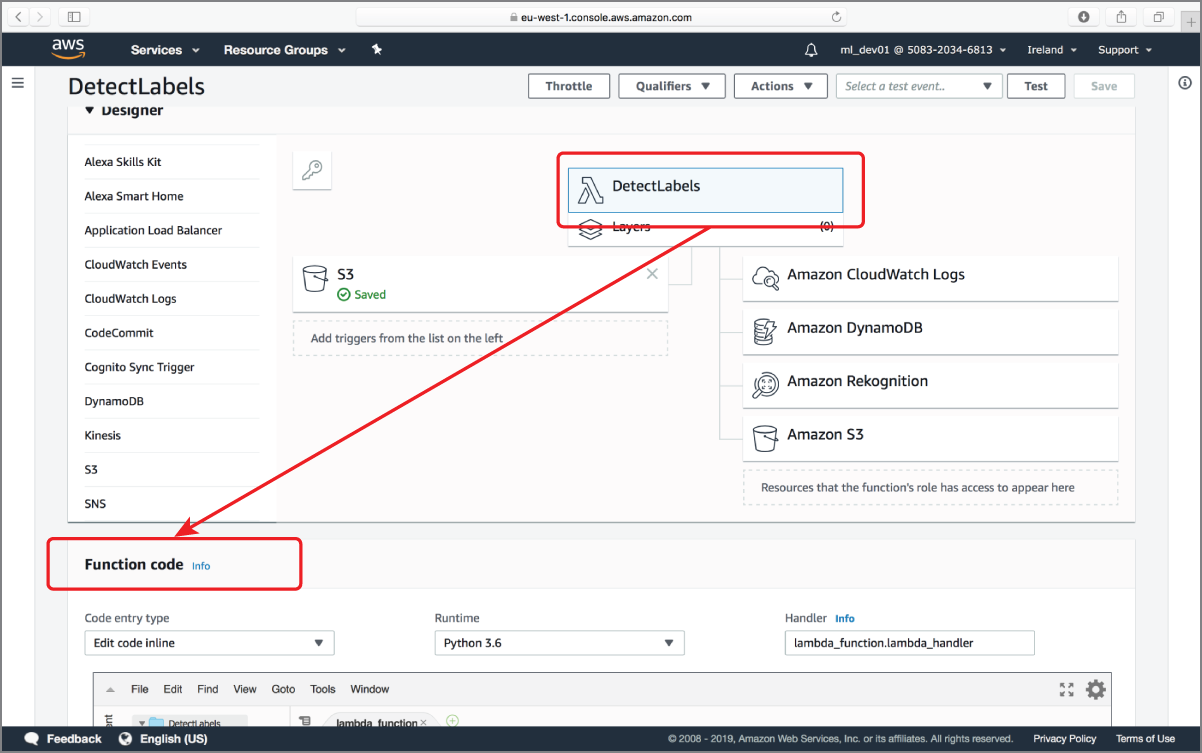
FIGURE 18.16 Configuring the AWS Lambda function code
Replace the boilerplate code in the code editor with the contents of Listing 18.1.
Click the Save button below the function editor to finish creating your Lambda function. To test this function, use the Services drop-down menu to switch to Amazon S3 and navigate to the bucket that you have associated with the AWS Lambda function trigger. Upload an image file into the bucket. After uploading the image to Amazon S3, switch over to the Amazon DynamoDB management console and inspect the contents of the imageindex table. You should see one new item in the table for each label detected by Amazon Rekognition (Figure 18.17).
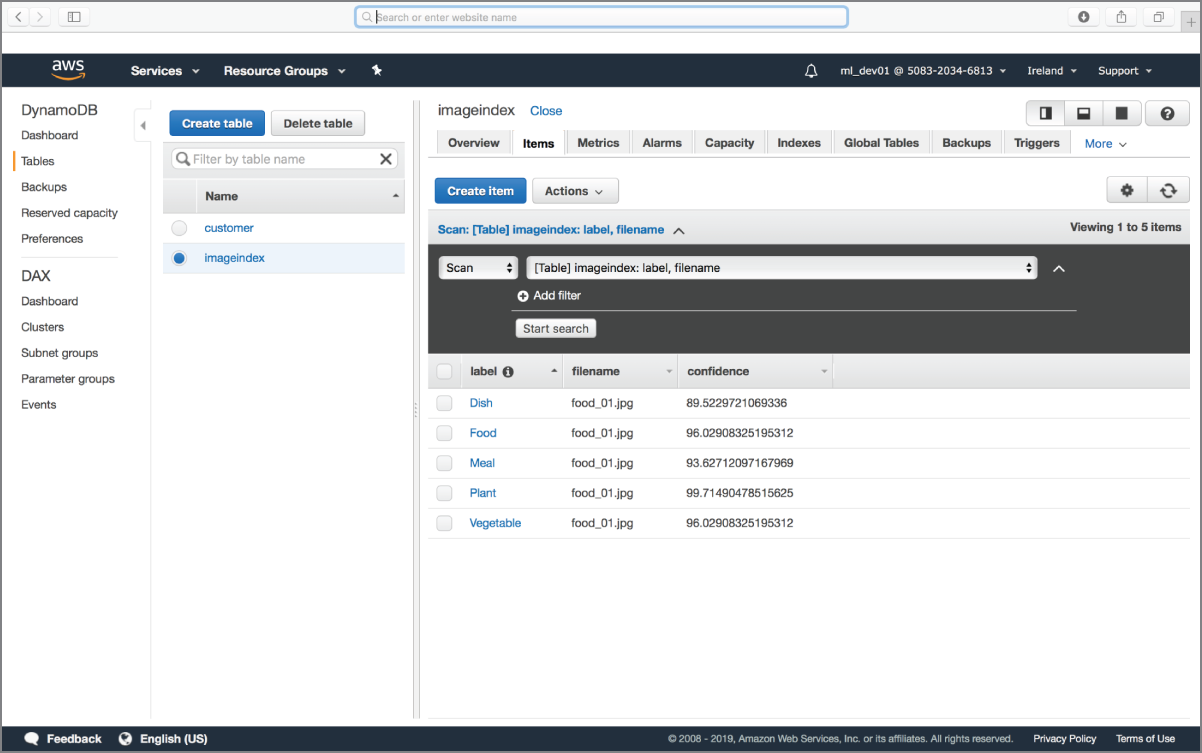
FIGURE 18.17 Examining the results of the AWS Lambda function
If you upload a few images to the S3 bucket, you will soon have a number of rows in the Amazon DynamoDB table. You can then execute a query on the table to retrieve all images that contain a specific object (see Figure 18.18).

FIGURE 18.18 Querying the Amazon DynamoDB table will allow you to search for images based on their content.
The output bucket is hardcoded in Listing 18.1. You should change it to the appropriate value if you are using a different bucket name. The bucket names and files used in this example are:
- Source bucket:
awsml-rekognition-awslambda-source - DynamoDB Table:
imageindex - Input file:
food_01.jpg
- NOTE You can download the code files for this chapter from
www.wiley.com/go/machinelearningawscloudor from GitHub using the following URL:https://github.com/asmtechnology/awsmlbook-chapter18.git
Summary
- Amazon Rekognition is a fully managed web service that provides access to a deep-learning–based models for computer vision tasks such as object location, scene analysis, and video analysis.
- Amazon Rekognition APIs consist of two subsets: the Amazon Rekognition Image APIs and the Amazon Rekognition Video APIs.
- Amazon Rekognition Image APIs operate synchronously, whereas Amazon Rekognition Video APIs operate asynchronously.
- The asynchronous model of Amazon Rekognition Video APIs relies on using Amazon SNS topics to notify listeners of the completion status of an operation.
- Non–storage-based APIs do not store any data on Amazon Rekognition. Storage-based APIs, on the other hand, store information in Amazon Rekognition.
- Amazon Rekognition Video APIs that provide the capability to build face collections are storage-based APIs.
- When creating a face collection, you are tied into the version of the model used by Amazon Rekognition at the point the collection is created. You cannot update the model version used by a face collection.