
Chapter 1
Before You Start
Before beginning any project, you’ll want to gather all of the necessary tools and materials. In this chapter, we introduce some of the more common supplies that you need when you’re sewing circuits. We also describe some of the basic stitches that are used in embroidery and sewing.
Needlework Tools and Materials
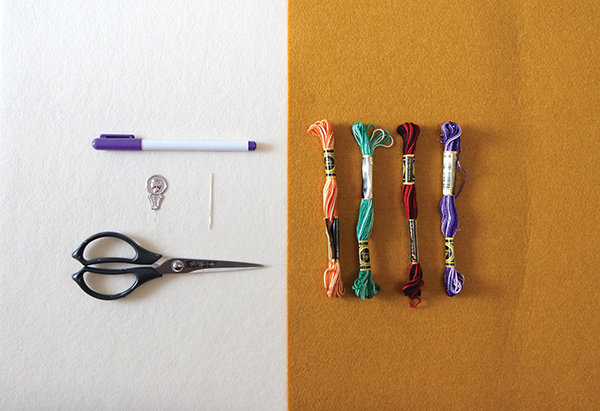
Figure 1-1 shows the most frequently used tools and materials for sewing and embroidery. You can purchase these items at any hobby or craft store or online.
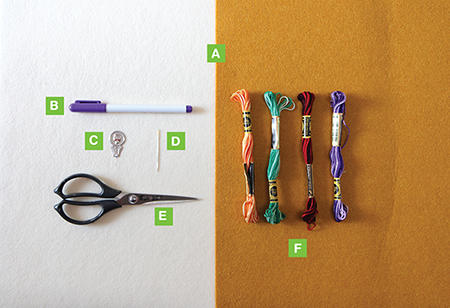
Figure 1-1: Needlework tools and materials
Basic Needlework: Knots and Stitches
The following are a few stitches and knots you should know in order to use embroidery or sew circuits. Feel free to refer back to these instructions as you work on the projects in this book. Many great video tutorials online also demonstrate these stitches.
Tying Thread at the Beginning
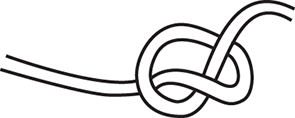
When you start sewing, tie a simple overhand knot at the end of your thread to keep it from passing through the fabric.
Tying Thread at the End
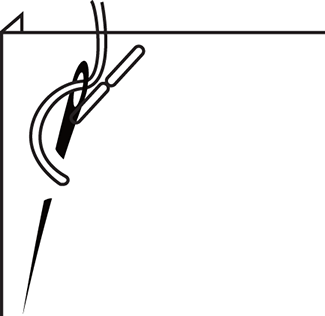
When you are done with a line of stitches, poke the needle about halfway through a bit of the fabric. Wrap the thread around the sharp end of the needle two or three times (see Figure 1-2). Hold the thread and fabric still as you pull the needle through the loops. Make sure your knot is nice and tight before you cut off the loose end of the thread (see Figure 1-3). If you are sewing with conductive thread, it is a good idea to put a dab of clear nail polish or fabric glue on your knot to keep it from unraveling.
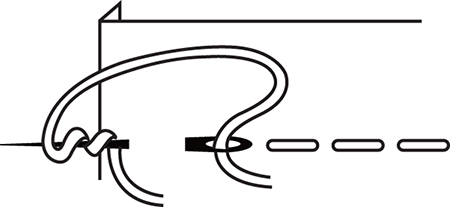
Figure 1-2: Tying the thread at the end
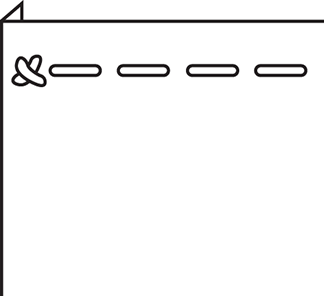
Figure 1-3: Finished knot at the end of your thread
The Running Stitch
This is the most basic of stitches. Poke the needle over and then under the fabric at regular intervals. You can make your stitches large or small depending on how you want the stitch to look.
The Back Stitch
This is the most commonly used stitch in embroidery. It can look beautiful with colored thread. When you poke your needle up to begin a stitch, move the needle back to poke it down through the hole where your thread went down on your last stitch. After that, stitch out farther forward from the last time you poked your needle up, and continue that process of going back to the end of your last stitch before moving forward.
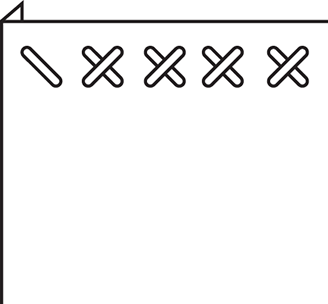
The Cross Stitch
This is a great stitch for adding color and texture to embroidery projects. Form X shapes on one side of the fabric by starting with a series of parallel angled stitches; then turn the fabric around and stitch back the other way to finish the Xs.
Sewing Circuits: Tools and Materials
Figure 1-4 shows the tools and materials that are more specific to sewing circuits. You probably won’t find most of them in craft stores, so you’ll have to order them online. You can find a list of recommended suppliers at the website for this book: www.techdiy.org.
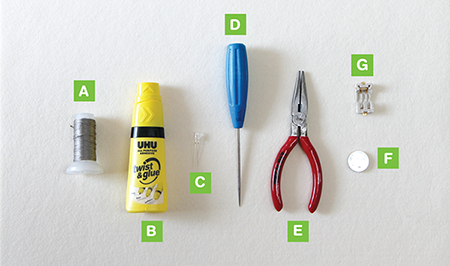
Figure 1-4: Tools and materials for sewing circuits
How to Use This Book
All of the chapters in this book are split into three sections: Learn, Make, and Explore.
Step 1: Learn
You’ll start each project by learning about how the specific circuit focused on in that chapter works. Each chapter introduces a new electronic component or concept. Try to understand how electricity is going to flow through your circuit and the attached electronic components before you start sewing. As you continue to work through these projects and progress through the book, you will learn about some more advanced concepts of electricity and how to work with many different electronic components.
Step 2: Make
Next you will start by creating your own ideas on how to use the circuits in each chapter. Don’t try to copy all the projects in this book exactly. We recommend that you change the ideas a bit to make them more fun and relevant to your interests. As you come up with new and increasingly complicated ideas, don’t try anything that seems too difficult before you are ready. Attempt to find a balance between pushing the boundaries of your skills and continuing to build on the knowledge that you learn from the projects in this book.
Always start designing your projects and circuits using paper and pencil and check carefully for any possible problems before you begin sewing. Sewing circuits can be difficult. It’s a lot easier to fix problems if you catch them before you sew them down.
Make your projects using the guides in each chapter. Follow the steps in the project guides for sewing your circuits. Be especially careful that you don’t accidentally tangle, cross, or cut your conductive thread between components.
Step 3: Explore
The final section of each chapter presents some more project ideas that use the concepts you learned in that chapter.
After you finish each project, it is a great idea to reflect and write a little bit about your experience. What did you learn by making this project? What would you do differently if you made another version? If you take a photograph and post it onto a website with your reflections, for instance, other people might learn from your project! This is a wonderful opportunity to start and share a portfolio of your own craft and technology projects.
We recommend doing the projects in this book in order, starting with the simple circuit in the Happy House Project in the following chapter and culminating in the final project in Chapter 10, which involves computer programming. Each project is meant to introduce a new concept or electronic component, and each chapter builds on the skills you learned in previous chapters. Although the subtitle of the book is Easy Electronics Projects for Parents and Kids, some of the later activities, especially the projects in Chapters 7, 8, and 9, are fairly challenging. But as long as you work your way through the first few projects, you will learn the skills you need to accomplish those more complex projects.
Have fun exploring the wonderful world of electricity and creating your own projects that light up, move around, and make sounds!