
Chapter 2
My Happy House
Make a Circuit
In this introductory project, you learn about electricity, circuits, and some basic electronic components. You will start your first project by drawing a simple picture on paper. Then you will embroider that drawing onto a sheet of felt. Finally, you’ll connect an LED (light-emitting diode) to a battery with conductive thread to create a simple light-up circuit on your embroidered picture.
 Learn
Learn
In this section, you will learn about some common electronic components and make your first circuit. But first you need to learn a little bit about what electricity is and how it flows through a circuit.
How Does Electricity Flow?
When you flip the switch to turn on the lights in your home, you close a circuit between a power source and your lights that allows electricity to flow. Usually circuits are made from copper or other metals because these materials are good at conducting electricity. When you connect a circuit to a power source such as a battery, electrons leave the negative side of the battery and push free electrons in the copper toward the positive side of the battery, like balls being pushed through a tube. Each individual electron actually moves really slowly—about 1 meter per second. But because the electrons are all pushing each other through the circuit, the lights turn on right away.
Light-Emitting Diodes (LEDs)
An LED is a small, energy-efficient light bulb that has many applications. You’ll find LEDs in everything from toys to real spaceships.
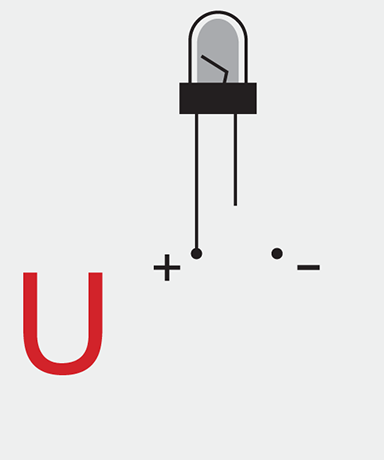
LEDs have two wire “legs.” The longer leg connects to the positive side of a battery whereas the shorter leg connects to the negative side. You will curl the legs of your LEDs to make it easier to sew with them, so it will be difficult to see the differences in length when you are working. Here are two other ways to determine which leg is positive and which is negative.
Examine the bottom of the LED where the wires come out. One side of the plastic is flat. This is the negative side.

Another way to identify the positive and negative sides is to look closely at the inside of the LED. There is a diagonal gap between the two sides. That diagonal points up toward the positive leg and down toward the negative leg.


Battery
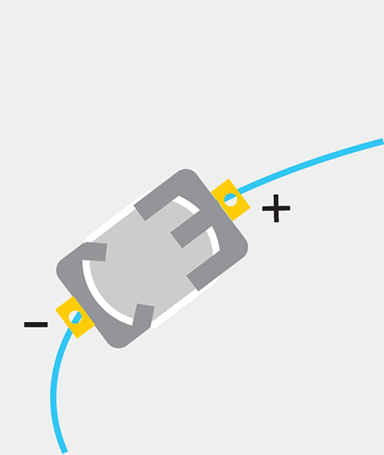
In order to turn on an LED, you need at least 3 volts of electricity. Since LEDs are energy efficient, they can last a long time—more than 10 years! The projects in this book use a 3V (three-volt) lithium cell battery called a CR2032 coin cell battery. These batteries have a + symbol on the positive side. The other side is the negative side. They are fairly common and easy to find in stores that sell batteries.
Battery Holders
In order to easily connect and remove batteries from your circuits, you need to use a battery holder that is simple to sew. I recommend this battery holder because it has holes that you can pass a needle through. You can find such a battery holder at Sparkfun (www.sparkfun.com) or Adafruit (www.adafruit.com).

Let There Be Light!
To test your battery and LED, put the battery between the two legs of the LED. Make sure the long leg touches the positive side of the battery and the short leg is connected to the negative side.

Symbols of Electric Circuit Diagrams
Take a look at Figure 2-1. Electronic circuit diagrams use these symbols for electronic parts. If you can remember these symbols, you’ll be able to both read and draw diagrams like the one in Figure 2-2.

Figure 2-1: Symbols to use for electric circuit diagrams
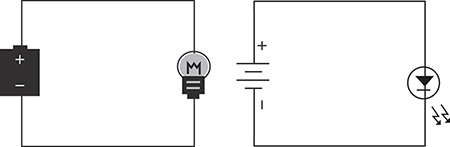
Figure 2-2: A basic electronic circuit diagram with a battery and a light
 Make
Make
Use Your Imagination
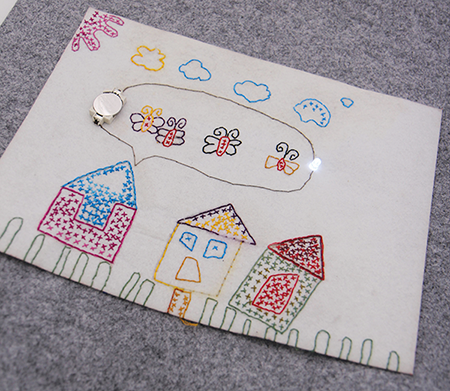
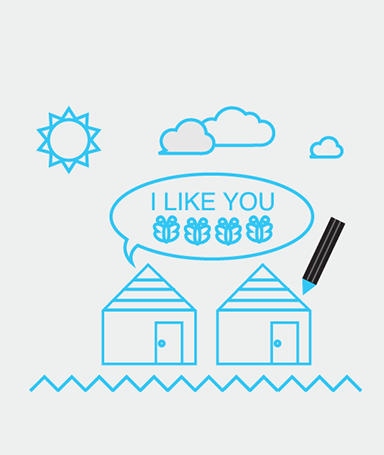
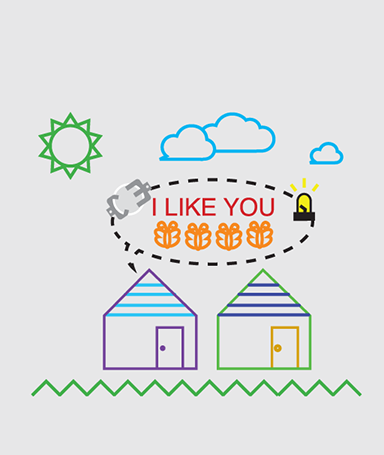
Start by drawing a sketch on paper. Choose a piece of paper that is the same size as your felt or fabric sheet. Make sure to leave enough space in your drawing for your LED and battery holder. Try to come up with a sketch that cleverly uses the circuit and needlework together as in Figure 2-3.

Figure 2-3: Sketch your design on paper.
Plan It Out
Now that you’ve come up with an idea of what you want your project to look like, draw in your circuit with the LED and battery holder and connect it to the rest of your drawing with dashed lines (see Figure 2-4). Make sure to label the positive and negative side of your LED and battery holder with the appropriate symbols. Remember, the long leg of the LED needs to be connected to the positive side of the battery and the short leg must connect to the negative side.
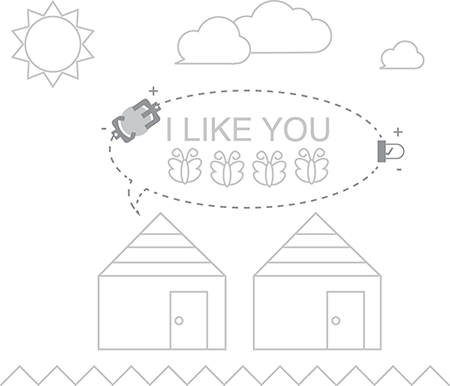
Figure 2-4: Drawing with LED and battery holder included
Preparation
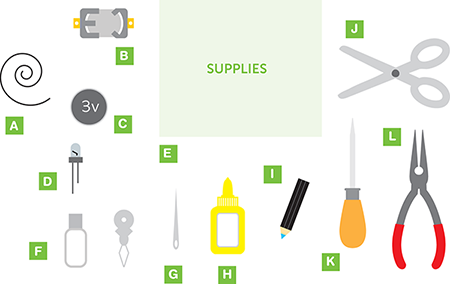
Now that you have an idea and a sketch for your project, you can start to sew the image and circuit onto fabric. Before you begin, make sure that you have all the supplies that you need. When you are sewing, take your time and make sure that each stitch is neat and complete before you begin the next stitch. It is okay if you make a mistake or get tangled. Just take out that thread and start the section over again. You will get better over time! Feel free to refer to the “Basic Needlework: Knots and Stitches” section in Chapter 1 for tips and help.
Make It
Follow these steps to make your first soft circuit project:
- Based on your paper sketch, use a chalk pen to copy your drawing onto a sheet of felt or fabric.
- Use colorful embroidery thread to make running stitches, back stitches, and cross stitches to sew the drawing onto your fabric. If sewing and embroidery are new to you, it might be easier to use an embroidery hoop to hold the felt or fabric while you are working.

- Check the location of the battery holder’s positive and negative sides. Make sure to place it in the correct orientation and then paste it to the fabric using fabric glue. Let the glue dry. Gluing the battery holder to the fabric is optional, but doing so will make it easier for you to sew your circuit.
- Poke holes for the two legs of the LED using an awl. Note which hole is for the positive leg and which hole is for the negative leg.

- Check the length of the LED legs. Make sure to put the long leg in the hole that is pointed toward the positive side of the battery holder; put the shorter leg in the hole that points toward the negative side. Using pliers, curl the legs of the LED on the underside of the fabric into a spiral to which you can attach the conductive thread.
- Using conductive thread, sew the LED’s positive leg to the positive side of the battery holder. Do the same with the negative leg and the negative side of the battery holder.

- Insert your battery into the holder. Make sure to place it correctly—the positive side of the battery should face up. If you’ve succeeded, your LED should light up!
- Conductive thread tends to fray and can become unknotted where you connect it to the LED and battery holder. To prevent this from happening, you can use a small dab of fabric glue or clear nail polish on those four spots.

- Now that you’re finished, you can place your soft circuit in a frame so you can hang it up. Just take out the battery when you want to turn it off.

In Chapter 3, you will learn how to add a switch so that you can turn your circuits on and off.
 Explore
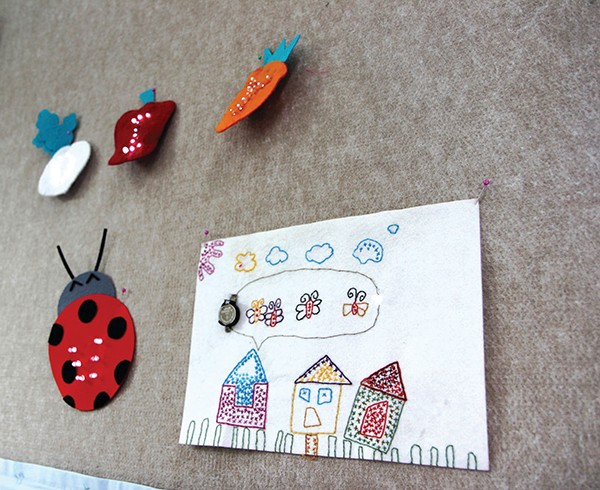
My daughter inspired this project. During a visit to a children’s museum in New York City, she made this painting, called “The place where I live,” using watercolors.


Here are some other ideas for practice sewing and basic electronic circuits using cute pictures that include LED lights!
Hello Snail
As we explained earlier, when you are adding circuits to your sewing projects, you cannot allow the positive and negative sides of the conductive thread to cross. This may seem like a limitation; however, sometimes constraints become sources for ideas. This is how I had the idea for the snail circuit in Figure 2-5. Doesn’t the battery holder work well as part of the snail’s house?
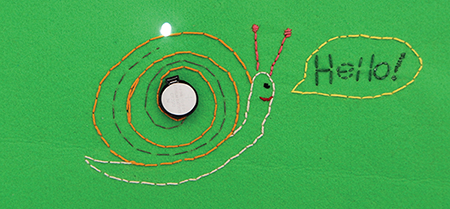
Figure 2-5: Using constraints as part of your design
Other Basic Electronic Circuit Projects
In addition to creating your own circuit projects, you can add circuits to existing needlework. For instance, take a look at this embroidered tablecloth with LEDs sewn into the center of a flower.

A Headband with Ornaments and Glowing Lights
You might want to try making a headband like this one my daughter and I made; you can add many interesting ornaments, like pins and buttons. If you add LEDs, like we did, they just seem to blend into the other ornaments! I found that this headband’s twinkling lights made it easy to spot my daughter on the playground in the evening!

What’s Next?
Great job on sewing your first circuit! To turn the circuit off, you have remove the battery. Wouldn’t it be nice if you could turn it on and off with a switch? In the next chapter you are going to learn about what types of material conduct electricity and what types do not. You will also learn how you can use this information to control the flow of electricity in a circuit using a homemade switch.