
Chapter 10
Dice Board Game
Programming with Scratch and Makey Makey

For the final project in this book, you are going to move beyond simple circuits and into computer programming. With computers, we can make our circuits even smarter. In fact, sensors in the real world can affect what is happening on a computer screen!
In this project, you are going to make a board game that includes soft switches that you will build yourself. You will also write a computer program that responds to switches being pressed on your board game. Then you will write a computer program that rolls random digital dice and triggers some “mystery” spaces in your game.
 Learn
Learn
To make the project shown in Figure 10-1, you are going to be using the Scratch programming language and the Makey Makey microcontroller, which are both really powerful and fun tools. You are also going to make some homemade fabric switches for this project. Let’s learn a bit about all of these new tools and ideas before you begin.

Figure 10-1: Lucky Dice board game with computer-controlled dice
Scratch
If you have never programmed a computer before, Scratch is a great language to begin with. Scratch was developed at the Massachusetts Institute of Technology (MIT) Media Lab by the Lifelong Kindergarten Group. Scratch is designed to make it easy and fun for children to learn computer programming and create awesome projects that they can easily share online. Scratch makes it simple to learn how to program because the code uses blocks that you snap together instead of requiring you to write text. To make a Scratch program, you snap these blocks together much like you do when you’re constructing with LEGOs. Not only is it really easy to get started, as you get better at Scratch, it is possible to make some advanced programs. You can make video games, solve difficult math problems, make animations or music videos, design and play music instruments, and much, much more. On the Scratch website, you can create your own projects for free, share those projects with the world, and even remix projects made by other Scratchers! You can get started right now and learn more at http://scratch.mit.edu.
Makey Makey
This project also uses the Makey Makey microcontroller—a small, inexpensive computer—to connect the board game to your computer and the Scratch program. The Makey Makey is a really fun device that allows you to trigger keyboard key presses by connecting alligator clips (or other conductive objects). This makes it so you can, for instance, simulate pressing the space bar by touching a piece of conductive thread and a piece of tinfoil together. Then you can write a Scratch program that reacts to these simulated key presses. To learn more about the Makey Makey and what you can do with it, check out the Makey Makey website at www.makeymakey.com/.
Fabric Switches
Your game board is going to use several homemade soft switches to trigger key presses, like the space bar and the direction keys (up, down, left, and right), through your Makey Makey. If you press the middle of these fabric switches, electricity is able to flow from one piece of conductive material to the conductive material on the other side of the switch. After gathering the following materials, you can follow the steps listed here to make a simple fabric switch for your own projects.
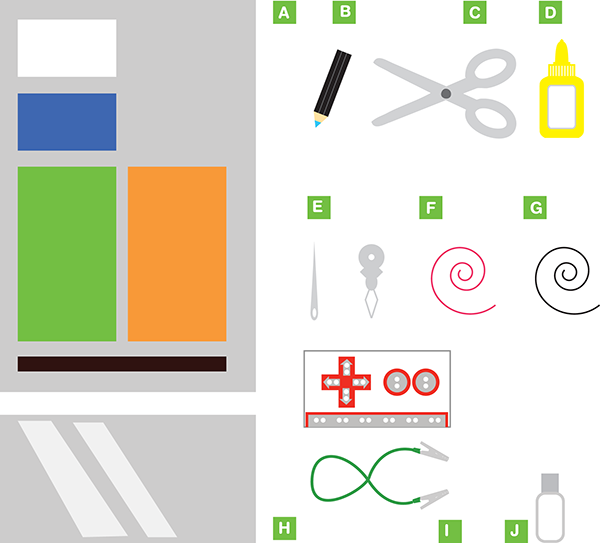
Materials You Will Need:
- Conductive fabric or tinfoil
- Felt
- Thick fabric, felt, or a thin sponge
1. Glue two strips of conductive fabric or tinfoil to two squares of felt so they appear as they do on the left side of Figure 10-2. Make sure to leave some of the conductive material hanging off to the side so that you have two places to connect your circuit to the switch.
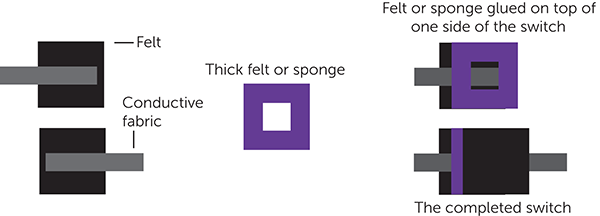
Figure 10-2: How to make a fabric switch
2. Cut a hole in the middle of a square of thick felt (see the middle image in Figure 10-2). You can also use two layers of regular felt or a thick sponge. The thickness of this material has to be enough to keep the two conductive fabric pieces from touching each other in the next step.
3. Glue the piece from Step 2 in between the two pieces from Step 1 (see the top-right image in Figure 10-2). Start by gluing the thick felt or sponge piece on top of one of pieces of the conductive material (see Figures 10-3 and 10-4). Then glue the second piece from Step 1 on top of the thick felt or sponge piece from Step 2. The finished switch is shown in the bottom-right image in Figure 10-2. The two strips of conductive fabric should face each other but not touch each other unless you press down on the switch.

Figure 10-3: Apply glue to the thick felt or sponge that goes in between the two pieces of conductive material.

Figure 10-4: This is the switch before gluing on the top layer.
For this chapter’s project, you are going to build similar switches into your board game.
 Make
Make
Use Your Imagination
What kind of board game do you want to make? I was inspired by the classic game Chutes and Ladders. In my game, players “roll” the digital dice in a computer program by pressing a fabric switch on the bottom-right corner of the board game. If a player lands on a space that contains a question mark, they can press a fabric switch on that space and get a mystery mission or quiz question.
Now that you understand how my game works, think of your own version of a board game that can use fabric switches and a computer program.
Before you start sketching your board game, consider the size of the board. If it’s too small, it will be hard to fit playing pieces on the spaces. If you can’t find a piece of felt that is large enough for your game, you can use a piece of cardboard instead. The game that I made is about two feet tall and one foot wide. For my sketch, I taped three pieces of paper together to make a long rectangle (see Figure 10-5), but yours does not have to be that big.
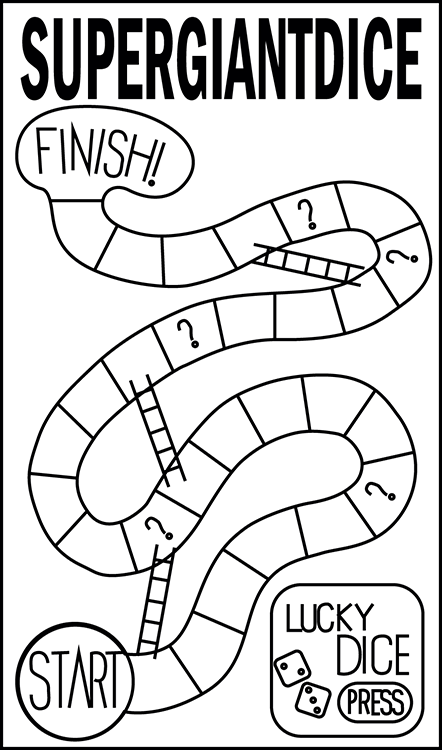
Figure 10-5: A sketch of the SuperGiantDice board game
Plan It Out
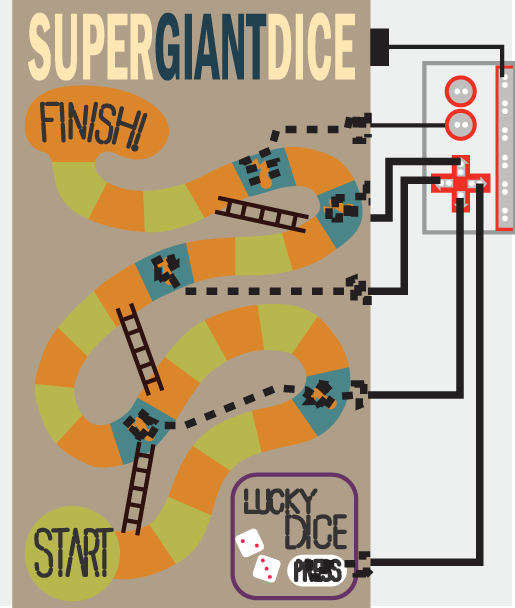
On your sketch, to help plan your circuit, mark off the positions where the fabric switches will go. I used one switch to trigger the digital dice to roll in my Scratch computer program. I also positioned four “mystery” switches on some of the spaces in the game. The top sides of these switches use conductive thread to connect to key triggers on the Makey Makey. I used the up, down, left, and right arrows and the space bar for these trigger keys. In my setup, a tinfoil sheet underneath the game board acts as the bottom side of each switch. That sheet is connected to the “earth” strip on the Makey Makey. When any of the switches are depressed, the conductive thread touches the tinfoil underneath the board and closes the switch between the key trigger and the “earth” on the Makey Makey (see Figure 10-6).

Figure 10-6: The board game circuit sketch with the switches connected to the Makey Makey
Preparation
Once you have your sketch and plan for the game all ready, you can gather your supplies, make your game board, connect the circuit, and write your computer program.
Make It
Follow these steps to make a board game that connects to a computer:
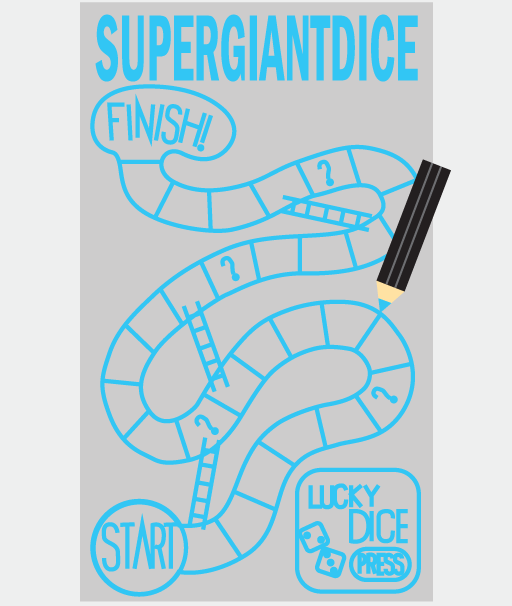
- Based on your paper drawing, use a chalk pen on a large sheet of felt (or cardboard) to sketch your project.
- Cut out any felt pieces for your game and use fabric glue to connect them to your board. You can also use embroidery stitches for words or decorations. Leave the places where your switches are going to go blank for now.

- Carefully cut holes on your game board under the places where you want to put your switches.
- Using conductive thread, sew back and forth to create a conductive surface that will act as the top part of your switch.
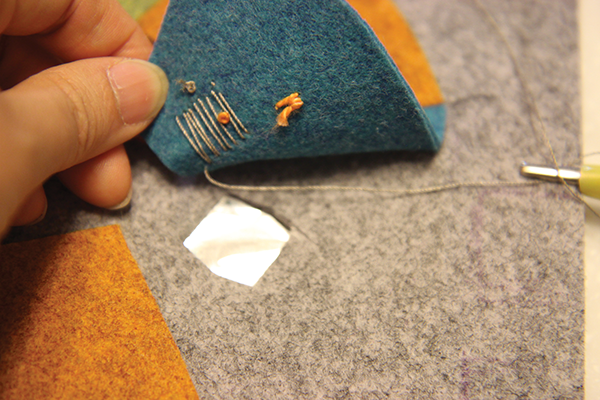
- Then lead that thread to the edge of your game board so that you can connect an alligator clip to the end. Be careful that the thread does not go through the game board to the other side unless you press the switch down.

- Using alligator clips, connect the conductive thread that serves as the top part of your switch to one of the key triggers on the Makey Makey.
- Repeat steps 4–6 for each of your switches.
- Place a sheet of aluminum foil or conductive fabric underneath your game board.
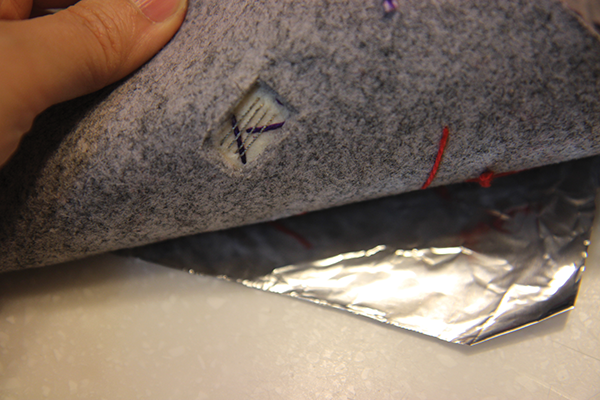
- Using an alligator clip, connect the aluminum foil or conductive material underneath your game board to the “earth” metal strip on the bottom of your Makey Makey. Take a look at the completed game.
- Now it’s time to test your switches by connecting your Makey Makey to a computer with the included USB cable. If any windows pop up when you plug in the Makey Makey, you can just close them.
- Open any text or writing program. You should be able to trigger the space key and direction arrows by pressing your switches.
- Once you know that you switches are working, it is time to write your Scratch program. Go to http://scratch.mit.edu, create an account if you don’t have one, and start a new project.
- You can delete the Scratch Cat sprite by choosing the scissors tool at the top of the screen and then clicking on the cat.
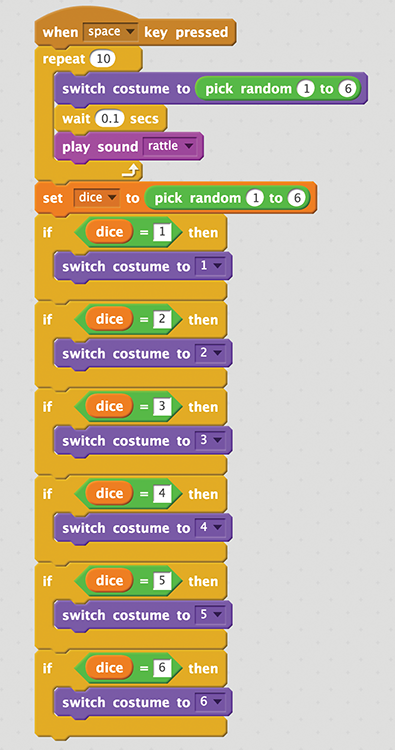
- Begin programming by creating a new sprite for your dice. Make six costumes for this sprite, one for each possible dice roll.

- In the Data scripts, create a new variable named dice.

- Now you will create a script for your dice sprite that says, “When the space key is pressed, switch the costume randomly and play a rattle sound 10 times. After that, choose a random number between 1 and 6, and then display that costume for the dice.”
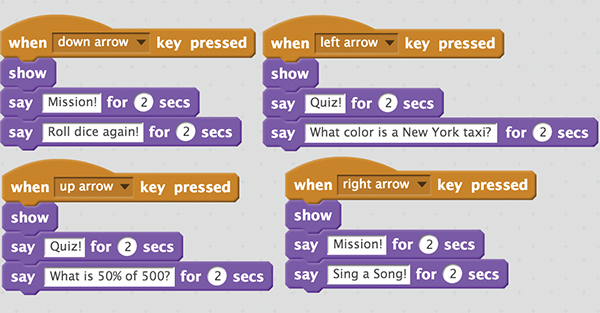
- Create some Scripts for your “mystery” switches. These switches are connected to the up, down, left, and right key triggers on the Makey Makey, so you should create scripts that are triggered by those keys. Be creative! Here are some examples.
- Make sure that your Makey Makey is connected and then test that your switches trigger the scripts by pressing each one.
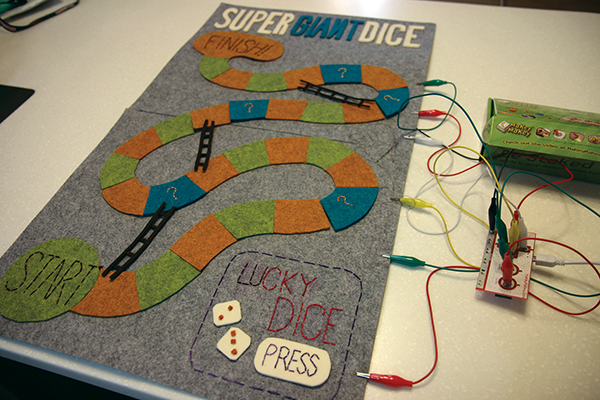
Figures 10-7 and 10-8 show different views of the completed game.
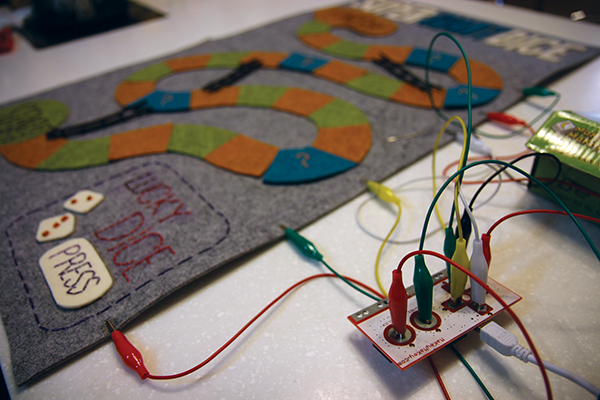
Figure 10-7: The board game with switches connected to the Makey Makey

Figure 10-8: The finished board game
 Explore
Invite some friends over to play-test your new game! Make sure to share your Scratch program on the Scratch website. The Scratch community is a fantastic place in which to share projects with other enthusiastic game designers. You can find the Scratch program associated with the project in this chapter at https://scratch.mit.edu/projects/101845048.
You can make your game even more fun by adding sounds or animations to your Scratch program. To learn more about other things that you can do with Scratch, check out some of the resources on the Scratch Help page at https://scratch.mit.edu/help/.
Designing games this way is endless fun. Figure 10-9 shows my daughter working on a game.
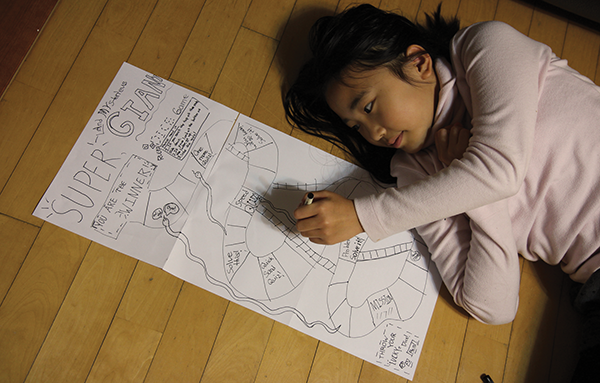
Figure 10-9: My daughter designing her own board game
Josh Burker, a middle school technology teacher, had yet another game idea. He made this version of the classic game Operation! (see Figure 10-10) using Scratch and the Makey Makey. You can find a guide for how to make this game on the Makey Makey website at http://makeymakey.com/guides/pdfs/MaKeyMaKeyScratchOperationGame.pdf.
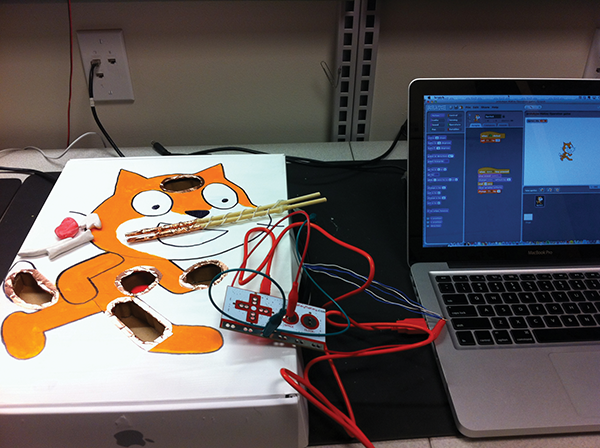
Figure 10-10: Josh Burker’s Operation! remake
What’s Next?
Congratulations! You’ve now finished all the projects in this book! Just think back on what you’ve accomplished—you started with a simple LED circuit and worked all the way up to writing your own computer program! By now, you know that the only way to get better at sewing and working with electronics is to continue practicing. I challenge you to keep making circuits as you imagine new ways to use the knowledge and skills that you gained by working through the projects in this book.
Would you like one more challenge before you go off on your own? Take a look at the appendix to see how you can make the moonlit flowers we discussed in Chapter 3. Good luck with all your switch-making endeavors!