
Chapter 9
Solar Sun
Working with Solar Power

All of the projects that you have made so far have used coin cell batteries for their power source. But once those batteries run out, you’ll have to dispose of them somehow. Usually that means recycling them or throwing them away, which is not a sustainable way to power your projects because the batteries contain dangerous metals that can get released into the environment.
A better solution is to use a solar panel for power. Because solar panels use renewable energy from the sun, they don’t run out of electrical charge like batteries, so you don’t have to recycle them or throw them away. In this project, you are going to learn how to use a solar panel and a super capacitor to power light-emitting diodes (LEDs).
 Learn
Learn
Let’s talk about how solar panels work and how you can use super capacitors to store energy from the sun and power your projects with renewable energy.
Solar Cells
Did you know that even though the sun is 93 million miles away from the earth, it still emits enough energy every second to supply the power needs of our planet for almost 500,000 years? If only we could harness all of this energy!
A solar panel, or solar cell, can convert the light energy from the sun into electricity (see Figure 9-1). A solar panel contains two types of a material called silicon. The top sheet is called n-type silicon and it contains extra electrons. The bottom sheet is called p-type silicon. This material contains “holes” where electrons would like to go. When the sun shines on the top of the solar panel, the light knocks into the extra electrons in the n-type silicon and causes the electrons to flow across to the p-type silicon. This flow of electrons creates an electrical current that you can use to power your projects!

Figure 9-1: How a solar cell works
The Circuit
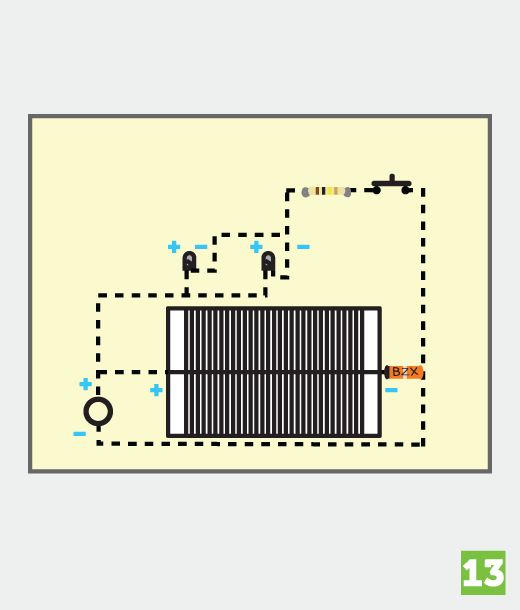
Although the solar panel provides the power for this circuit, this power needs to be stored somewhere. For this project, you will store the electricity in a super capacitor. This is just like the capacitor that you used in the UFO project in the previous chapter, except it can store even more electrical charge. You’ll also have to include a diode in the circuit as well. Electricity can only flow one way through a diode, so this will prevent electricity from moving backward through your circuit and leaking out of the solar panel (see Figure 9-2).

Figure 9-2: The solar panel circuit
In full sunlight, the solar panel in this circuit provides 6 volts (V) at 160 milliamps (mA), but the super capacitor and the diode will use up some of that voltage, so the voltage available for your LEDs is actually closer to 4.5 volts. When choosing a solar panel, it is usually a good idea to pick one with a higher voltage than what you think you need. For recommendations and suppliers, please visit the website for this book at www.techdiy.org. Also keep in mind that a solar cell that emits a higher current will be able to charge your super capacitor even faster than one that emits a lower current.
 Make
Make
Use Your Imagination
Before you start your drawing, consider the size of your solar panel and where it will fit on your project. Don’t forget that your solar panel only generates electricity when it is exposed to light, so make sure that you don’t cover it up! Make a life-sized sketch of your project similar to the one in Figure 9-3.

Figure 9-3: A sketch of the Solar Sun project
Plan It Out
In your drawing, include the actual sizes of your solar panel and the other components. And just as you have done with your previous designs, make sure that you don’t put your components too close together. You want to give yourself room to sew your connections without getting your conductive thread tangled or crossing it between components. Figure 9-4 shows an example of what such a drawing should look like.
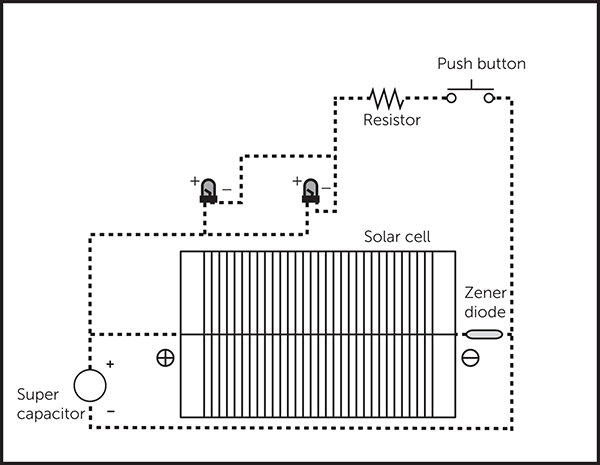
Figure 9-4: The back of the Solar Sun project with the circuit diagram
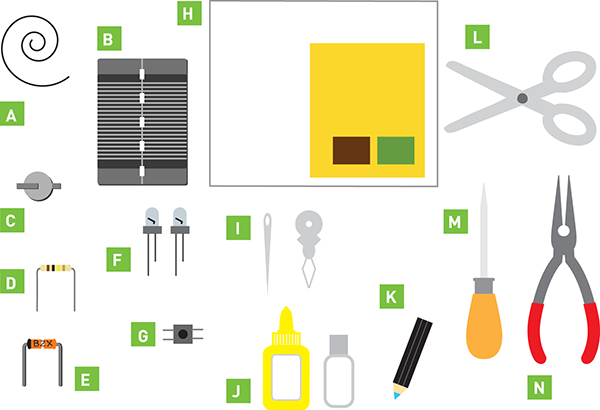
Preparation
Once you are done sketching and planning out your project, you can collect your materials and begin putting everything together. Just as with the previous projects, go slowly. Focus on making each stitch neat and complete before moving on to the next stitch. Also, double-check that your components are facing the right direction before you sew them down.
Make It
Now it’s time to follow these steps to make your solar project:
- Draw your design on a felt sheet using the chalk pen.
- Cut out and glue together your felt pieces.
- Mark the positions of your LEDs.

- Using an awl, or other sharp tool, poke two holes for the legs of each LED.

- Mark the positive and negative holes on the back of the project with the chalk pen.
- Place the legs of the LEDs through the felt. Make sure the LEDs are facing the front and the legs are on the back.
- Use needle-nose pliers to curl the legs on the LEDs so that you can sew to them.
- On the back side of your project, sketch the circuit diagram with the chalk pen. Make sure to mark the positive and negative sides of the solar panel, the super capacitor, and the Zener diode.

Now you are ready to start sewing your circuit.
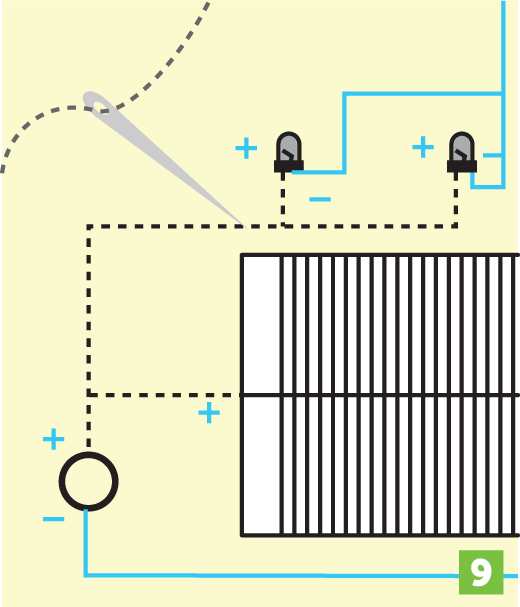
- With conductive thread, connect the positive side of the solar panel to the positive legs of your LEDs and the positive leg of the super capacitor. Since the legs of the super capacitor are so short, you’ll have to be careful as you use needle-nose pliers to bend them into hooks so that you can sew to them.
- Use needle-nose pliers to curl the four short legs of the push button into hooks so that you can sew to them. You will end up sewing to two of the four legs; when you do, make sure to use two of the legs that are diagonal from each other on the button.
- Using conductive thread, connect one side of the push button to the negative legs of the LEDs through a 100-ohm resistor.

- Next, connect the negative pole of the super capacitor to the positive leg of the Zener diode.

- Continue by connecting the Zener diode’s positive leg with the free side of the push button. Then connect the Zener diode’s negative leg with the negative pole of the solar cell.
- Finish up by flipping your project over and attaching any decorations with fabric glue.

- It takes a little bit of time to fully charge the super capacitor. Leave your project out in the sunlight for a few minutes and then press the push button to test your circuit. Your LEDs should light up until the super capacitor runs out of charge.

You’ll have to put your project out in the sun to recharge the super capacitor each time that you want to impress your friends!
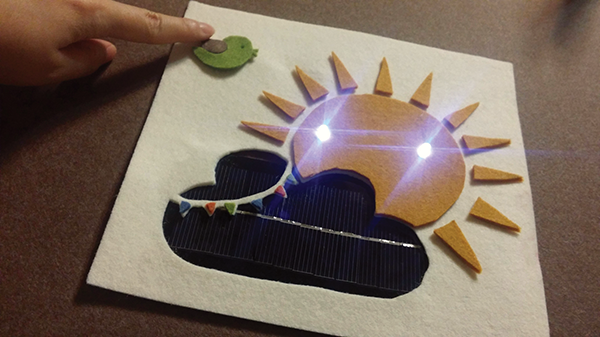
Figures 9-5 and 9-6 show the front and back of the completed project.
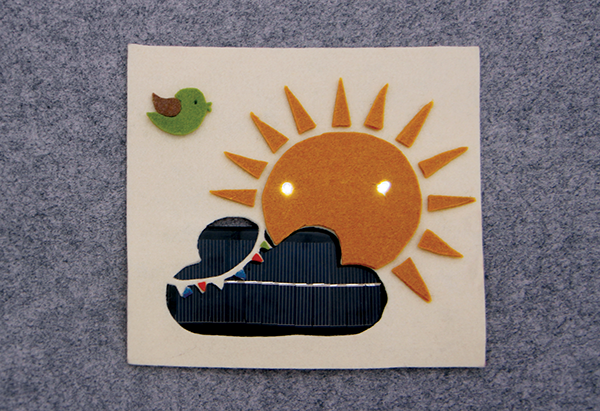
Figure 9-5: The finished Solar Sun project

Figure 9-6: The back of the Solar Sun project with the circuit
 Explore
Projects that use solar panels can lead to interesting discussions about sustainable energy. When you share this project, make sure to tell people how solar energy is better for the environment than batteries that you throw away.
The remainder of the figures in this chapter show other projects that use solar panels. Figures 9-7 and 9-8 show the front and back of a solar-powered house.

Figure 9-7: Solar-powered house

Figure 9-8: The solar-powered house’s circuit
Solar cells are a great way to power projects without using batteries. However, projects that use solar cells have to be exposed to sunlight to work. When I was thinking about projects that would work well outdoors, I thought about making a handbag that lights up. The result is the Solar Bag project (see Figures 9-9–9-11). Round holes in the side of the bag expose solar cells that can gather electricity during the day. When it gets dark, a strip of LEDs turns on to light up the night. I am still developing this project as a design experiment.

Figure 9-9: The lights for the Solar Bag project
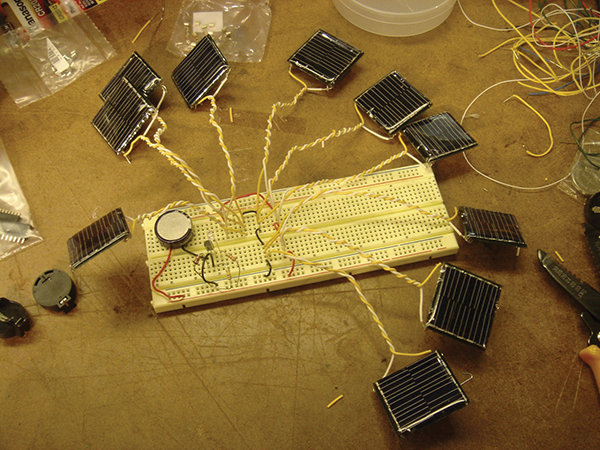
Figure 9-10: Prototyping the circuit for the Solar Bag project
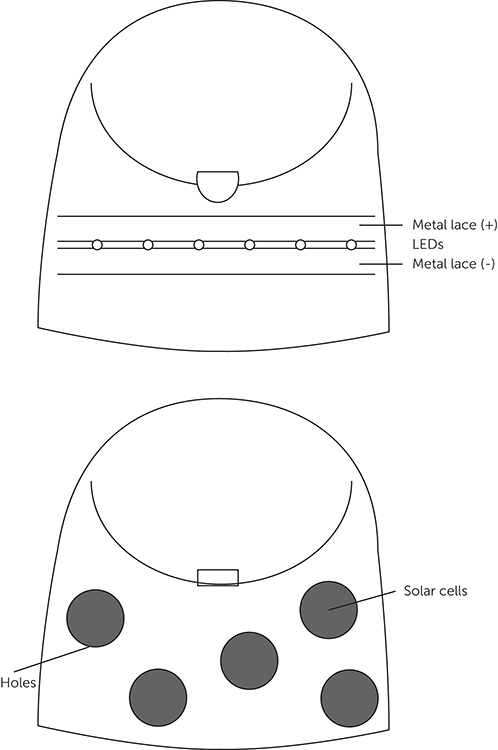
Figure 9-11: A sketch and plan for the Solar Bag project
What’s Next?
Congratulations! Now you know how to use solar panels to make your projects more sustainable and earth friendly. For the final project, you are going to make your own board game with built-in homemade switches, connect it to a computer, and write your own computer program!