
The Family Photo Archive

Use simple, powerful tools to rescue your photos from stored obscurity and turn them into a DVD slide show.
Illustrations by Nik Schulz
I have a wife and two children, and between the four of us, we own three digital cameras that generate literally thousands of pictures every year. These images are now piling up on my hard drive in exactly the same way that those old 4×6 photo prints of holidays, sporting events, travels, and disasters piled up in my closet. What’s the point in this accumulation, if no one ever looks at any of it? Is there an easy way to transform it into a digital archive that will have enduring value? Can user-friendly software make the job tolerable? I decided to find out.

1. PREPARE SOFTWARE AND MUSIC FILES
1a. Choose a format.
I decided to turn my mess of digital photos into numerous high-definition (1080p) music-video slide shows. These would be short and fun to watch, and I could place all of them on a single DVD with a menu system allowing any to be selected and viewed by different people at different times.
1b. Get the necessary software.
I needed some really easy-to-use software, and didn’t want to pay too much. As it happened, I didn’t have to pay anything at all. Having recently upgraded to Windows Vista, I found that it comes bundled with some significantly improved tools to deal with digital media, most notably Windows Photo Gallery, Windows Movie Maker, and Windows DVD Maker. (Earlier versions of these programs also exist for Windows XP — and on the Mac, of course, you have tools beginning with i, such as iMovie and iPhoto.)
1c. Select background music.
I’m sure that most people have been ripping and burning audio CDs for years, but not me; all my music is in a Sony 300 CD changer. So I grabbed a dozen CDs and ripped them in Windows Media Player. This was really easy. From the Menu bar I selected Rip ⇒ Rip CD Automatically When Inserted and Eject CD After Ripping. Then I just had to insert the CD, wait for it to eject, and insert another. This was so simple I ended up ripping 287 CDs while I was doing other things on the computer.
1d. Devise a work flow.
I used Photo Gallery, Movie Maker, and DVD Maker sequentially. Photo Gallery enabled me to select and organize photos into affinity groups. Movie Maker promised to produce high-def animated musical slide shows from each Photo Gallery group. DVD Maker, as its name suggests, would burn them onto a disc with the menu system that I wanted.

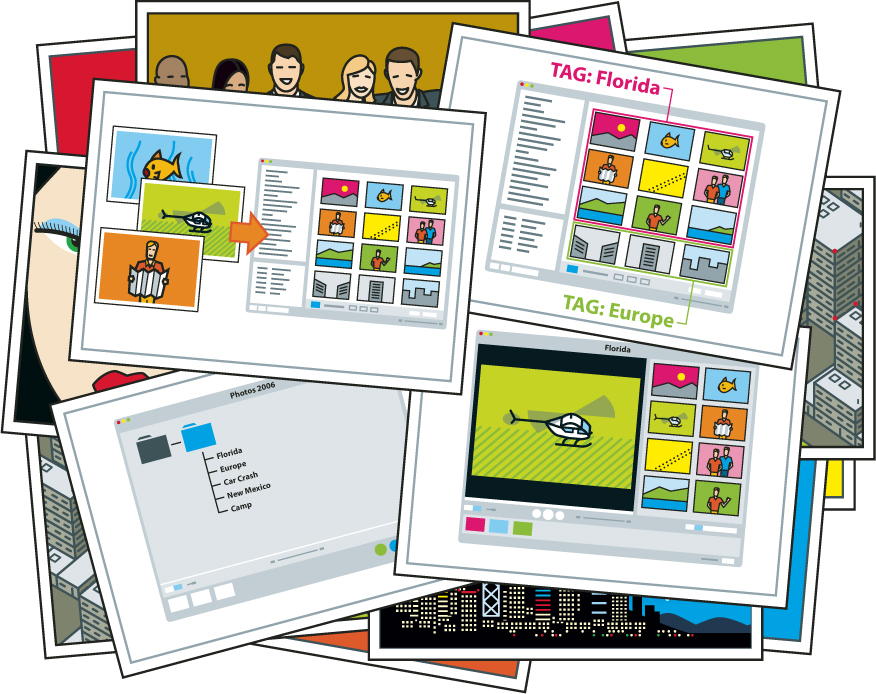
2. ORGANIZE THE PICTURES
I started with my thousands of digital photos. Photo Gallery divides the screen into 4 sections: a central photo thumbnail viewing pane called List View, a Navigation Tree on the left, a photo Info Pane on the right, and a Media Player-type Navigation Bar control panel at the bottom (Figure A). This allows you to organize and sort photos using properties called Tags. Tags are like group names and are easily created by selecting the Add Tags button in the photo info pane. I created the 2006 DVD tag and 14 subcategory tags representing the major events of the year:
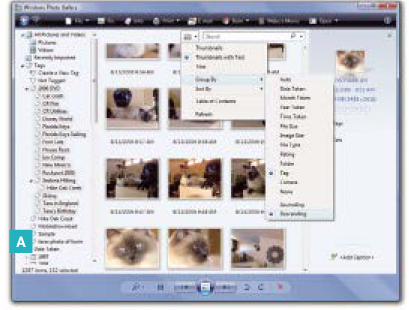
PHOTO GALLERY. Fig. A: Photo Gallery main window showing general layout with Menu/Button bar, Navigation pane, Content pane, Info pane, and control panel. Selected menu Thumbnail ⇒ Group By ⇒ Tag, Descending.
2006 DVD
Canyon Ridge Fire
Canyon Ridge Utilities
Fool Cats
House Rock
Car Crash
Tara Europe
Rockport 2006
New Mexico
Tara’s 16th Birthday
Ian Camp
Flagstaff Skiing
Sedona Hiking
Disney World
Florida Keys Sailing
I nested all 14 subcategory tags into 2006 DVD by simply dragging them to that tag, as if I were dragging files into a folder.
To display all the photos on my hard drive in the List View pane, I clicked the button All Pictures and Videos in the Navigation Tree. I then sorted photos using the option Thumbnail ⇒ Group By … in the menu that drops down beside the Search window.
Holding down the Ctrl or Shift key, and scrolling with the mouse wheel, I selected every picture I wanted for the DVD, and tagged them to 2006 DVD by selecting Add Tags ⇒ 2006 DVD in the Info Pane on the right (Figure B).

Fig. B: Photo Gallery main window with additional tags being added to selected photos from the group of photos with the tag “2006 DVD” (highlighted with all its subtags in the Navigation pane).
Next, I clicked the 2006 DVD tag in the Navigation Tree on the left side and displayed those 1,287 images. I also applied the other 14 tags to the corresponding pictures by Ctrl-clicking pictures and selecting Add Tags followed by the appropriate tag in the pulldown menu.
This sounds complex, but it was easy to do since most pictures were already in large chronological groups. When the tagging was finished, I changed the grouping by selecting Thumbnail ⇒ Group By ⇒ Tag, Descending. This put all the various tagged groups together (they had been in different chunks because 3 of the groups were taken around the same time with different cameras), and in chronological order within each group. Now I was ready to import these groups of photos into Windows Movie Maker to design individual slide shows.
3. DESIGN A SLIDE SHOW
Most people think that good design stands out. I disagree; good design is like a transparent window revealing the subject, which in a slide show consists of the people or places in your photographs.
Good slide shows are also about emotion and imagination. They involve art more than technology. Keep it simple: good pictures and music. As the architect Ludwig Mies van der Rohe famously said, “Less is more.” Simplicity is elegant. This was important to bear in mind when I used Windows Movie Maker since it has so many tempting features, which should be used with restraint.
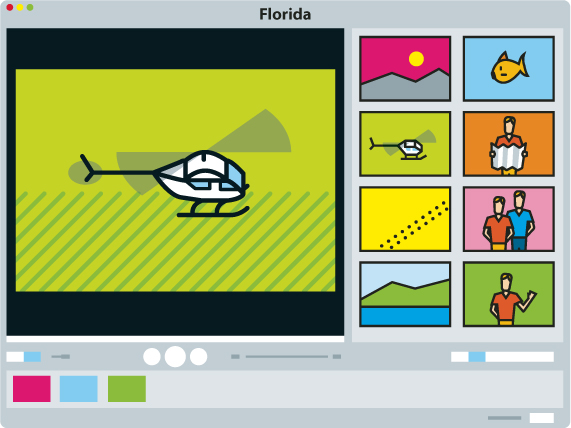
Movie Maker divides its screen into 4 sections (Figure C). At the top center is the content pane, where audio/video/photo media Collections can be imported with the Import Media button. This content pane is also used to display Effects and Transitions. At top right is the Preview pane, like a miniature Windows Media Player (or QuickTime Player).

MOVIE MAKER. Fig. C: Main window showing general layout with Zoom Effects displayed in the content pane, various Transitions implemented in Storyboard (icons between photos), and Preview pane displaying slide show photo number 7.
At the top left is the Tasks pane, where you determine how you want to import, edit, and publish. At the bottom of the main window is the editing pane. This consists of the Timeline or Storyboard (they alternate, and are just different representations of the graphic media queue), the audio track, and the title overlay.
Typically, during production items (media, transitions, and effects) are dragged from the content pane to the editing pane, and the production progress is monitored in the Preview pane.
Movie Maker is designed for video but works very well with still photos for creating animated slide shows. Making each slide show involves 4 steps: selecting music, photos, transitions, and effects.
3a. Select the music.
The foundation for each slide show is a piece of music appropriate for the subject of the pictures. Popular tunes work well because they bring up remembered feelings. Music with lyrics creates a more passive experience, requiring less imagination, as lyrics solidly set the theme of the show.
Slide shows without lyrics can be more interesting with repeated viewing because the viewer is free to reinterpret each show. I used Windows Media Player running concurrently with Photo Gallery so that I could sample musical selections while I was looking at the group of photos for that particular slide show, until I found something appropriate.
Image duration is the length of time the image is seen, including transitions. It’s important that the tempo of the music matches the tempo of the image duration. The default image duration is 7 seconds. It can be reset in a dialog box (Figure D) invoked by selecting from the Menu bar Tools ⇒ Options ⇒ Advanced. I decided on a default duration based on my music selection, and divided the total time of the music (in seconds) by this duration time to calculate the total number of photos I needed in the show.

Fig. D: Advanced tab of the Options dialog box showing default durations and other properties.
Thus, picture subject determines music, music determines duration, and duration determines number of pictures.
3b. Select the photos.
One of my slide shows is of my family’s sailing lessons in the Florida Keys, and the music I selected for this is “Kokomo” by the Beach Boys. I might have used something more sophisticated but this show is mostly for my kids.
I created a New Project in the File menu and used the Import Media button to import “Kokomo” into the content pane. I dragged the “Kokomo” icon down to the Audio/Music line of the Timeline. The Timeline now reveals that “Kokomo” is 220 seconds long. I needed to set the default duration time before placing photos, so I selected Tools ⇒ Options ⇒ Advanced tab. “Kokomo” is fast enough that I left the duration at 7 seconds, producing a total photo number of 220/7 or 32.
I went back to Photo Gallery and clicked on the Florida Keys Sailing tag in the Navigation Tree, bringing up all of those photos. Holding down the Ctrl key, I individually selected 32 photos while Photo Gallery kept count. I then clicked the Make a Movie button in the Menu/Button bar, and Windows automatically added these photos to Movie Maker, inserting them into the Timeline.
3c. Choose transitions.
Movie Maker contains 2 powerful editing features: Effects and Transitions. Double-clicking on any Effect or Transition in the content pane will demo that feature in the Preview pane.
Back in the days of Kodak Carousel projectors, professional slide shows were made with multiple projectors and dissolve units. Dissolve units controlled the power to the projector bulbs, fading them on and off slowly to blend pictures from one to another. In a similar way, Movie Maker uses Transitions to blend one picture to another. The Fade Transition mimics a dissolve and is the smoothest and least disruptive way to transition from one picture to the next. I prefer it over all others.
Most of the other Transitions are major distractions. Many are very slick and impressive, and they work smoothly, but they tend to distract the viewer from the photos. This is a good thing only if your pictures are bad.
The easiest way to add a transition is to drag it from the Transitions content pane to the transition icon between 2 images on the Storyboard. To add the same Transition to many images, 1) click on the Transition and copy (Ctrl-C), 2) click the transition icon in the Storyboard, and 3) paste (Ctrl-V). Then repeat 2 and 3 as needed.
3d. Choose effects.
The real power of Movie Maker to create a slide show comes from its Effects option, particularly a group of 15 dynamic zoom and pan effects. Used in conjunction with high-resolution images (greater than 3 megapixels) these effects add flow and movement to the show. You can use them to pan across vast landscapes, zoom in on a child’s face, or zoom out to reveal the whole story of a particular picture.
The easiest way to add an effect is to drag it from the Effects content pane to the image in the Storyboard or Timeline of the edit pane. To add the same effect to many images, 1) select it and copy, 2) click the star on another image, and 3) paste.
The 15 dynamic Effects should be applied so they best match the composition of each photo. Zoom in on important detail. Zoom out from detail to reveal wide-angle views. Pan to detail, not away from it. Effects should be carefully selected for each photo.
Any picture can contain multiple static or dynamic effects for a wide range of different image qualities. If a picture contains multiple effects, right-clicking the Effects star on that picture brings up the Add or Remove Effects window. Here you can change the applied Effects and their order, significantly altering the final picture. You can also copy entire collections of Effects from one picture to the next with the right-click menu items Copy and Paste.
3e. The wrap.
When my movie was complete, I clicked the Publish Movie button, which opens a dialog box that is mostly self-explanatory (Figure E). In this box you can specify different formats of your movie, for different devices. The Publish button creates the movie by saving it on your hard drive.

Fig. E: Publish Movie Settings window showing More Settings menu, with HD 1080p selected, and movie settings and file size for that selection.

4. BURN THE DVD
I still needed to use DVD Maker to consolidate multiple slide show movies onto a DVD that would be compatible with any DVD player or computer. While the movies were saved in HD, I had no HD DVD burner to make an HD DVD. I resolved to make a regular-definition DVD and burn an HD version when I upgrade my equipment sometime in the future.
Windows DVD Maker is a simple, straightforward, and rather linear program. Click the Add Items button to choose photos and videos in the Add Pictures and Video to the DVD window (Figure F). Remove items by selecting them and pressing the Delete key. Rearrange files by dragging them up or down.
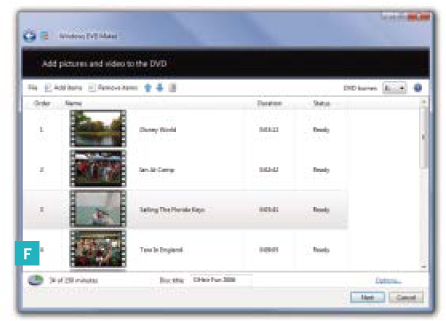
DVD MAKER. Fig. F: The Add Pictures and Video to DVD window, showing general layout, slide show queue in Content pane, Menu/Button bar, and disc title window.
A pie chart indicates time used on the DVD, and a disc title window is located at the bottom, with the date as a default title; type your title here. Click the Options button to open the DVD Options window, where playback settings, aspect ratio, video format, and DVD burner speed can be set.
Click the Next button to open the Ready to Burn Disc dialog box (Figure G). At this point you can select a menu style for your DVD. A static image of each selected menu style is shown in the main window, but since most menus are dynamic, it’s necessary to use the Preview feature to fully understand each style. Menu styles, and the entire DVD, can be previewed using the Preview button on the Menu/Button bar. Depending on your computer, previews can be somewhat rough, but this is no reflection of the finished DVD operation.

Fig. G: Ready to Burn Disc window, showing Preview pane, Menu Styles pane, and Menu/Button bar.
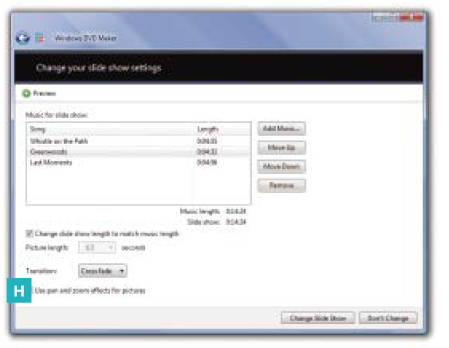
Fig. H: Change Your Slide Show Settings window, showing music content pane and buttons, length data, picture length (duration) with auto picture length selected, and transition and effects selected.
My finished DVD contains 14 separate musical slide shows, each lasting between 2 and 7 minutes. The DVD will play all slide shows sequentially, or individually from the menu. The slide shows are fun and simple, and popular with my family and friends. Best of all, they were quite easy to make, and now that I’ve climbed the learning curve, I can repeat the process easily whenever I accumulate a new batch of digital photographs. Instead of a disorganized stash of half-forgotten photos, I now have an item of genuine archival interest and value.
As for my closet full of old 4×6 color prints — they’re still there. Dealing with my digital collection turned out to be much more fun.
Brian O’Heir is an architectural designer and home decor store owner living in Sedona, Ariz.

A can of compressed air and an airbrush are faster and easier than a brush or roller. Plus, no brush marks, drips, or runs. Oh yeah — it’s great for stencils, too (duh).
—Tony Fraser