Photography by Daryl Hrdlicka
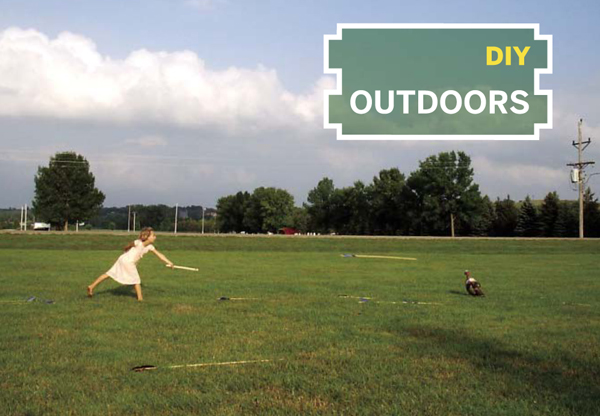
THE ATLATL
 Make the ancient tool that hurls 6-foot spears at up to 100mph.
Before the bow and arrow there was the atlatl*, or spear-thrower, an ancient weapon that could throw a spear or dart with enough force to penetrate a mammoth’s hide. It was used in North America for about 10,000 years, and used by native Australians and Aleuts as recently as 50 years ago.
It’s easy to make your own atlatl, and throwing with it is fun and very satisfying. Here’s how to make one in the style of the Kuikuru (kwee-KOO-roo) of the Amazon Basin, who still use the spear-thrower today. I’ll also explain how to make darts for it, and how to throw. But never forget that the atlatl is a weapon. It is dangerous. A dart will go through a side of beef. So I’ll go through some precautions as well.
Atlatl Basics
Atlatls range in form from the simple to the very ornate, but they all have the same 3 components: the hook, the grip, and the shaft. The grip is where you hold the atlatl, the hook engages the back of your projectile and propels it, and the shaft connects the two and acts as a lever to multiply the speed of your arm.
A typical length for an atlatl is 18"–24", although some have been found as short as 6" (in California) and as long as 48" (in Australia). Length is mostly a matter of personal preference, but it needs to fit the length of your arm and of the dart you’re throwing.
The simplest atlatl is the first kind ever used — the basic branch atlatl. To make one of these, just find a tree branch that measures about ¾" in diameter and has a smaller branch angling out of it. Cut it just below the smaller branch, clip off the other end about 18" farther up, and then clip off the smaller branch. Now you have a functioning atlatl. To make it a little easier to handle and control, you can add a finger loop. Just attach a 10"×¾" strip of soft leather about 7" from the narrow end, looping it around on the side opposite the branch stub.
Making a Kuikuru Spear-Thrower
1. Size and trace the template above (Figure A) onto your piece of wood, and cut it out (Figure B). Use the wood boring bit for the finger hole. I normally make a 1" hole, because I have fairly large fingers and I share my atlatls a lot. People with smaller hands can use an atlatl with a 1" hole, but ideally it should fit close around their index finger; my wife’s atlatl has a ¾" hole. I’d say start with 1", and possibly adjust this for your next one.
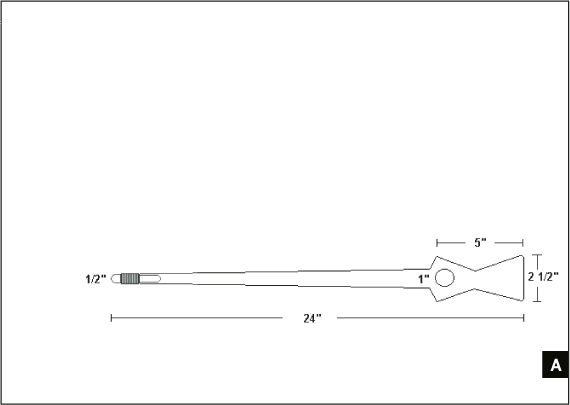
Fig. A: Template for traditional Kuikuru spear-thrower.
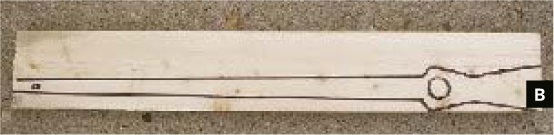
Fig. B: Outline traced onto pine board, and ready to cut.
2. Use the utility knife to round off the edges, then sand it all smooth (Figure C).

Fig. C: Atlatl shaft cut and sanded smooth.
3. Drill a hole in the end for the peg; this will act as the hook. Go in at about a 45° angle (Figure D).

Fig. D: Drilling the hole for the peg or hook.
4. Put some wood glue in the hole and insert the peg (Figure E). You’re done!

Fig. E: Peg installed. If you’re using pine (as here), it’s a good idea to reinforce the peg by lashing it with some cordage.
5. If you’re using a softwood, reinforce the peg joint by wrapping it with sinew or cordage. I normally use pine because it’s cheap and easy to shape, but it tends to break near the peg, so wrapping it helps.
You don’t need reinforcement with a hardwood such as oak or maple, but those also require more skill and the proper tools to work effectively — two things I don’t have. For your first one, I recommend pine.
Making a Dart
1. Sharpen one end of the dowel (Figure F). I just use a utility knife. You can also add stone, bone, or steel points to darts, but you should probably gain more experience before making your darts lethal.
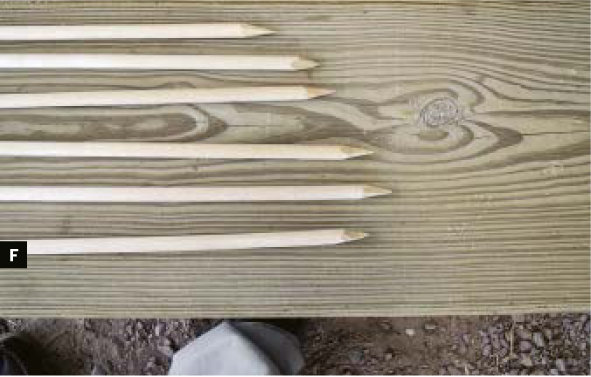
Fig. F: Dart points sharpened with a hobby knife.
2. Drill a dimple in the other end. This is the “nock” that the peg fits into. I usually drill with a ¼" bit and just touch the end, going in about ⅛" or so.
3. Hot-glue the feathers on, one on each side, with the quills forward (Figure G). Then wrap tape over the glue to help keep it on, or wrap it with artificial sinew if you want it to look better (Figure H).
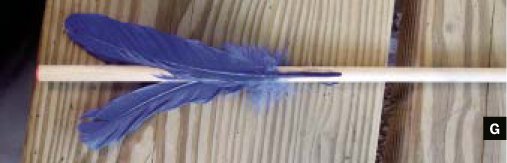
Fig. G: Feathers hot-glued to the tail end of the dart. These slow the tail end down, keeping it in back during flight.

Fig. H: First dart finished; now make some more!
4. With large feathers, glue and tape down the trailing ends so that they don’t fray as fast (Figure I).

Fig. I: Larger feathers glued and taped in back so they won’t fray as fast.
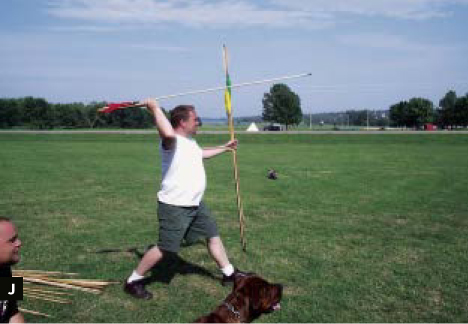
Fig. J: At the Hedoka Knap-In Primitive Skills event, an atlatl thrower steps into his throw.
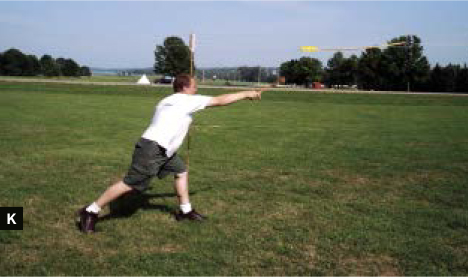
Fig. K: The dart is sent on its way. Note the downward flex in the shaft.
Your dart is done! While you’re at it, you might as well make another 5 or so. Otherwise, you’ll get very tired chasing it after each throw, and you’ll get less practice. Since you’re using dowels, your darts will be closely matched, which will help you practice.
Two factors that govern your dart’s flight are its flex (also called its spine), and the feathers (its fletching). Flex is the amount of pressure it takes to make the shaft bend. An atlatl generates 6–10lbs of pressure (depending on your throw), so your darts need a spine of 6–10lbs. Less than that and you won’t be able to throw it; more, and it won’t fly right.
To measure the spine of a piece of wood or bamboo, press it lengthwise onto a bathroom scale. When the shaft begins to bend, look at the number. That’s it. Common ⅜"×48" dowels typically flex in our desired range, as do ½"×72" dowels, which are better for target practice. It’s satisfying to make a dart out of a natural piece of wood and hone it to the proper flex, but it’s also quite a bit of work. So to start with, I’d say use dowels.
Unlike with an arrow, the feathers on a dart don’t act as vanes. They add wind resistance, which slows the rear end so the sharp end stays in front. You can use other materials besides feathers, such as birch bark, cornhusks, cloth, and duct tape, but you can’t beat feathers for the look.
For our 48" dowel, a pair of 8" feathers should work fine. With less fletching, the dart will travel farther but won’t be as accurate. More fletching means the dart will be more accurate, but won’t go as far.
Using the Atlatl
Now let’s get out there and throw! The 3 basic steps are the grip, the stance, and the throw itself.
The Grip Slide your index finger through the hole from the side opposite the peg, and grip the handle with your other fingers. Put the point of the dart on the ground, then fit the atlatl peg into the nock and hold the dart with your thumb and index finger. Squeeze them, almost like you’re holding a pencil, but keep them on the sides of the dart, not over the back. The dart will come out of your hand at the proper moment, if you just let it.
The Stance Point your left foot at the target (if you’re right-handed) and angle your right foot away from it, about a shoulder’s-width back. You should feel comfortable and balanced. Turn your body sideways, in line with your left foot, and turn your head to look at the target. Point at the target with your left arm to help with accuracy and balance.
The Throw First, aim the dart by bringing your grip hand up by your ear and sighting along the shaft to your target. Next, bring your arm straight back as far as you comfortably can, but don’t twist your wrist on the way back, which will point the dart off to the side. Unless you’re a powerful thrower, tip your hand back so that the point rises up a few inches. This will give your throw an arc, making it travel farther. Pause to collect yourself and focus.
And now, the throwing motion itself: using an atlatl is like throwing a fastball — you need to put your whole body into it. Lean back, balancing on your back foot. Then step forward and shift your weight onto your other foot. Slide your arm forward, keeping the dart pointed at the target, and when it’s almost fully extended, snap your wrist forward hard. It should all be one fluid movement, and the atlatl should end up pointing at the target. For an example, watch the video clips of atlatl throwing on Bob Perkins’ website, atlatl.com.
Practice without a dart until you get used to it. And don’t worry about releasing the dart; it should come free on its own at the proper moment. Don’t try to throw it hard — this will just mess you up. Just concentrate on throwing smoothly, and your speed and power will develop. Everything will click at some point, and it will be a thing of beauty.
Target Practice
Throwing the atlatl purely for distance is fun, but after a while you get tired of chasing down all your darts. Besides, you’ll want to see what it would be like to hunt with one. You can use paper archery targets on hay bales, and 15yds is usually a good starting distance. If you switch to a heavier dart, you’ll want to double up the bales.
Standard bull′s-eye targets are fine for accuracy competitions, but I personally don’t like them. The atlatl is for hunting, so I prefer animal silhouettes; 3D targets, your basic foam animals, are my personal favorite. You really feel like the “mighty hunter,” and the first time your dart flies straight and true into the target, well, it’s indescribable. You need to experience it.
In a pinch, almost anything will make a decent target. A friend and I once used some styrofoam coolers. We ended up hunting those “sheep” for about 3 hours, until it got so dark we couldn’t even see them anymore! We were tied at the time (it’s always about competition, you know), so we had to keep going, listening to see whether we’d hit them or not. If I remember right, he won. Barely.
![]() ATLATL SAFETY — WHERE TO THROW
ATLATL SAFETY — WHERE TO THROW
» When you throw an atlatl, make sure you have an open area that’s at least 30yds long, with nothing breakable behind it.
» There should never be anyone in front of you when you throw.
» In spite of your aim, the dart can and will go out of control once in a while. It may go off to one side or go farther than you intended. Make allowances for this.
Daryl Hrdlicka (thudscave.com/npaa) lives in southwestern Minnesota with his wife and four kids. They homeschool, so making cool stuff is always on the menu. Daryl teaches the atlatl at the Jeffers Petroglyphs Historic Site.

Photography by Michael A. Covington
Five-second exposure of Orion rising, with 50mm lens at f/1.8, ISO 400, Canon Digital Rebel.
SHOOT THE STARS
Astrophotography with your digital SLR camera.
Today’s digital SLR cameras can easily photograph more stars in the night sky than you can see — as well as picking up star clusters, nebulae, and galaxies.
Here’s how to shoot the stars with just a camera and tripod.
1. Choose your weapons.
A digital SLR (DSLR) camera is best because of its low-noise sensor (Figure A). A point-and-shoot digital camera may work if it has a fast lens (low f-number).

Fig. A: Look to the skies, DSLRs! This is all you need to do astrophotography.
Film cameras work too, if you can get someone to make good prints from the resulting negatives, or if you use slide film so you can see directly what you got.
2. Set up a manual exposure.
Use a 50mm f/1.8 lens if you have one, or set your zoom lens to medium-wide. Put the camera in manual (M) mode, with the aperture at the lowest f-number and the speed at ISO 400. Choose manual focus, too.
If your camera has long-exposure noise reduction (Figure B), turn it on. (On Canons this is deep in the custom settings menu.) This will compensate for “hot pixels” by automatically taking a second exposure just like the first, but with the shutter closed, and then subtracting.
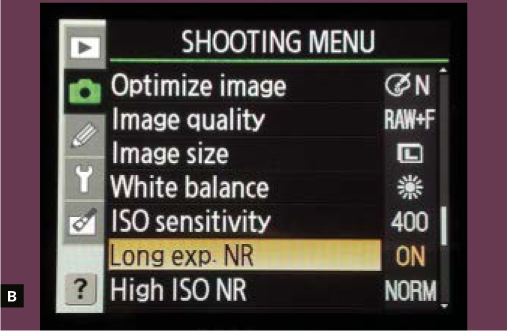
Fig. B: Long-exposure noise reduction automatically subtracts hot pixels. Not all cameras have it.
3. Aim at a clear, starry sky.
Put the camera on a tripod and set an exposure time of 5 seconds. Choose delayed shutter release (Figure C) so your finger won’t shake the camera. Take aim at the sky, and shoot.
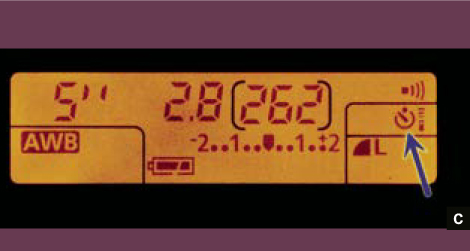
Fig. C: Delayed shutter release (indicated by arrow) eliminates vibration from your finger pushing the button.
4. Refine the focus.
Your camera can’t autofocus on the stars, and the infinity mark probably isn’t accurate. So focus manually the best you can, and then take multiple pictures, making small changes in the focus. View each one at maximum magnification on the camera’s LCD screen until you’ve found the best setting.
5. Sharpen and adjust.
Use Photoshop or any picture editing software to sharpen the image (bringing out lots more stars) and adjust the brightness and contrast. The sky background should not be black; more stars are visible if it’s only medium-dark.
6. Identify what you’ve bagged.
Use a star atlas, planetarium software, or online sky atlas (heavens-above.com) to find out what you caught (Figure D). Don’t be surprised if your picture shows 10 times as many stars as you could see with the unaided eye.

Fig. D: Not a bad catch — hundreds of stars, a famous nebula, and a star cluster.
Michael A. Covington is the author of Astrophotography for the Amateur and the new Digital SLR Astrophotography (dslrbook.com). By day he does artificial intelligence research at the University of Georgia.
Instant Merit Badge:

Animated Knots by Grog (animatedknots.com) shows how to tie a hundred useful knots, with clear animated photo sequences. From necktie Windsors to the Prusik triple sliding hitch (a dangling MacGyver would use one to climb straight up a rope), it’s a handy resource for household use, boating, camping, or rigging just about anything with rope or cordage.
—Keith Hammond
Spicy Hardware Tip:
A simple spice rack at the workbench can organize smaller bottles of glues, solvents, lubricants, etc. With less than a dollar’s worth of hardware they’ll mount to the garage wall or pegboard. Variations can be found at hardware stores, home improvement centers, storage retail stores, and some kitchen stores. A simple Google product search for “white wire spice rack” returns various sizes, from a single shelf for less than $3, to a four-shelf version for about $30.
— Nathan Luoto
Find more tools-n-tips at makezine.com/tnt.

Photography by Thomas Arey
This well-used kids’ BMX bike needed only new tubes and some chain oil to return it to use.
BIKE SCROUNGING
How to fix a castoff bike and give it away.
I’m going to venture a guess that many makers’ earliest experiences working with tools and trying to figure out machines involved a bicycle. Even today it’s the rare kid who hasn’t tried to fix or even modify their bike. It’s one of the reasons I still have great hope for humanity.
Cycling is good basic transportation, a boon to the cardiovascular system, and most of all, fun! But have you ever considered that cycling can also be free?
In the course of the trash picking and dumpster diving I do to bring these occasional articles to MAKE, I often run across bicycles left at the curb with other signs of our society’s tendency to toss away what might be repaired or repurposed.
I’ve taken many of these rejected rides, turned them back into working bicycles, and donated them, either locally or through service organizations, to folks whose lives can literally be changed by owning a bicycle.
My general experience shows that the parts from 2 or 3 disposed bikes can make for 1 good bike. Any leftover parts from each scrounging venture go into storage to support future bike recovery operations.
Bicycle recovery is the perfect “learn by doing” process. Beyond stripping some threads (also repairable) you can’t really hurt anything. Mixing and matching parts from different bikes will make you more adept at repair. This can even turn into a marketable skill with enough practice. Good bicycle mechanics are hard to find.
Your public library and the internet will turn up dozens of books and websites to help you get beyond the basics quickly. A good book that covers just about everything you need to know and more is The Bicycling Guide to Complete Bicycle Maintenance and Repair: For Road and Mountain Bikes by Todd Downs.
Sheldon Brown (sheldonbrown.com) is a well-known cycle mechanic who shares tons of information free on the web. A good source for odd and hard-to-find parts is Loose Screws (loosescrews.com).
Older bikes and most consumer-grade cycles can be worked on with common hand tools. The only specialty tool you may need from the start is a chain tool, required to remove and replace the chain on most multigear bikes. This tool can be found for as little as $10, but if you plan to do this a lot you should invest in high-quality tools.
When you come upon a bike leaning against a trash can, don’t assume it’s being trashed. I always knock on the door and check. More often than not I hear, “I got a couple more around back, you want them, too?”
When you get your bike(s) home, go through these steps:
1. Check your find over. Why was this bike tossed? I am always surprised to find that a few small problems led to the trip to the curb: a flat tire, snapped brake cable, or rusted chain being the most common.
2. Once you fix up the obvious problems, go over every nut, bolt, and bearing to tighten things up and check for more subtle problems that may require further disassembly.
3. In most cases, if it moves, lubricate it! Extremely neglected bikes may require greasing the bearings, but a little chain oil will get most bikes back on the road.
4. Replace bad or worn parts with other items from your trash-picking efforts. Get friendly with your local bike shop. They have trash bins, too!
5. Even if the tires inflate, check both tires and tubes for signs of dry rot. Well-cared-for tires can last a long time but this may be the one place you need to spend money.
6. Broken spokes and bent wheels are intermediate-level repairs. Until you master the skills for this task just keep an eye out for other good wheels on your scrounging route.

Fig. A: An old ten-speed with a rusty chain and a few missing parts. A perfect project bike for personal use or for donation.

Fig. B: A reincarnated Raleigh road bike ready to ride for many miles.
7. Double-check all matters of safety, especially the braking system.
8. Enjoy the ride. It may be a little rough and rusty, but it rolls and the price is right!
After you’ve built a bike or two for your personal needs, why not think of getting your rebuilds into the hands of folks who can use them? Check your local social-service and faith-based organizations.
If you want your bikes to go beyond your local neighborhood to help the world, one clearinghouse website for bike donation is the International Bike Fund’s page at ibike.org/encouragement/freebike.htm. This site lists organizations throughout the United States and other countries, and includes details about how your efforts to repair and reincarnate castaway cycles can truly work to change the world.
T.J. "Skip" Arey N2EI has been a freelance writer to the radio/electronics hobby world for over 25 years and is the author of Radio Monitoring: The How-To Guide.