Photography by Norene Leddy and Ed Bringas
SHOE SHINE
 Make Cinderella jealous.
Platforms, the latest series of work in the ongoing Aphrodite Project (theaphroditeproject.tv), is a social sculpture: an interactive, wearable device that is a conceptual homage to the cult of the Greek goddess, as well as a practical object and a vehicle for public dialogue.
An integrated system of shoes and online services, Platforms draws on the innovations of the courtesans of antiquity to improve the conditions of 21st-century women who, despite advances in culture and technology, are still vulnerable to surveillance and violence. Platforms empowers all women with tools they can make to stay safe.
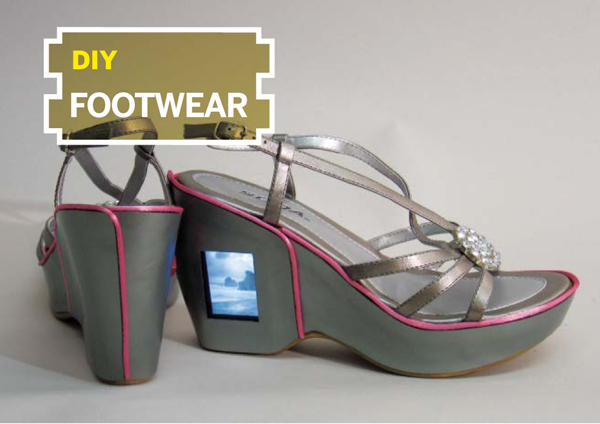
While we designed the shoes with women’s safety in mind, they’re also intended as a vehicle for self-expression. The video shoe is essentially a portable media player (PMP) placed in a platform shoe, and can be configured to show whatever movies, images, or messages you put on it. The other shoe has a 120dB siren, for when you feel like sounding the alarm.
1. Make balsa templates for the electronics.
1a. Make a balsa wood block the size of your PMP plus ⅛" on the face and 1/16" on all other sides. 1b. Unscrew the alarm casing and remove the piezo speaker and circuit. Make a balsa block the size of the circuit and speaker with the 9V battery and snap connector, plus 1/16" of wiggle room on all sides.
2. Prepare the shoes.
2a. Trace the outlines of the balsa wood blocks on the outside of the heels, centering so at least ¼" of the heel is intact on all sides (Figure A). Using an Olfa knife, hollow out the heels around your outline plus an additional ⅛" all around, or more if possible, to make room for the ShapeLock plastic housing. The more you can cut out for the ShapeLock, the sturdier your shoes will be when you wear them.

Fig. A: Balsa template for alarm components, wrapped in foil and traced onto heel. Glue this foil so it won’t slip.
2b. Line the hollow spaces of the heels with aluminum foil as a release for the ShapeLock. Wrap the balsa blocks in foil (Figure B). Glue the foil so it won’t come off the blocks.
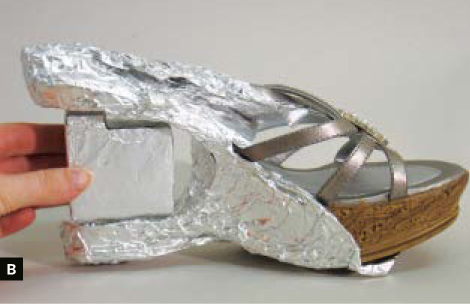
Fig. B: Template and hollowed heel wrapped in foil. Cover exposed parts of the shoe; ShapeLock is tough to remove.
3. Prepare the ShapeLock.
Heat water to 160°F in a saucepan. Drop about a quarter of the ShapeLock into the water. When the ShapeLock changes from opaque to translucent, remove with tongs, and let dry.
Give yourself 30 seconds or more before handling so you don’t burn yourself, then knead out any excess water. ShapeLock has a working temperature of 150°F, which should give you 2–5 minutes of working time. Try a few tests to get a feel for the material.
4. Apply the ShapeLock and place the wooden templates.
The hardest part of making these shoes is aligning the PMP with the outer edge of the foot bed and heel. Most platform shoes taper inward from the foot bed, so your PMP will need to rest at an angle.
4a. Line the hollowed-out heel with ShapeLock, allowing enough space to insert the PMP template block. While the ShapeLock is still soft, place the wood block flush with the foot bed and heel (Figure C). It may take a few tries to get the right angle. If it doesn’t work, remelt the ShapeLock and try again.

Fig. C: Template aligned with foot bed and heel. Once this angle is set, fill the rest with ShapeLock.
4b. Allow the ShapeLock to harden completely, and then remove it and the aluminum foil from the shoe. Hardened ShapeLock will not bond with any fresh ShapeLock or with the shoe, so melt the outer layer with a hair dryer and then place it back in the heel to bond with the shoe. Tiny gaps can be filled in later. With the hair dryer, melt the outer layer of ShapeLock and fill in the rest of the heel, heating and cooling as needed.
4c. Repeat with the alarm shoe. The placement of the alarm template is not as critical as the placement of the PMP, since leather will cover the entire speaker. Just make sure that you leave enough room for the ShapeLock to have a minimum of ⅛" thickness, and that it’s not sticking out from the heel or foot bed.
4d. Double-check your heel measurements, making sure that both are even, and that the heel dimensions have not changed. Melt more ShapeLock as needed to fill in any gaps, and heat the hardened ShapeLock before applying new ShapeLock. For a final shaping, place a metal spoon in the saucepan to heat up. Use the hair dryer to heat the ShapeLock, then use the heated spoon to smooth it (Figure D). With a screwdriver or knife, remove the balsa blocks from the heels.
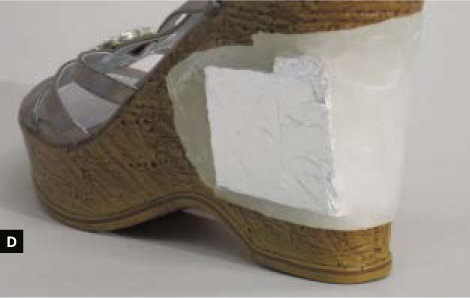
Fig. D: Check the angle again, making sure shoes match. Smooth and fill gaps with ShapeLock and a spoon.
5. Install the PMP.
Cut a piece of ⅛" plexiglass to cover the face of your PMP (Figure E). Make sure the player fits in the ShapeLock heel with the ⅛" plexi. This may require some sanding. If needed, use a Dremel at low speeds to remove excess ShapeLock. If it gets too soft during sanding, put the shoe in the freezer to harden it between sandings.

Fig. E: PMP with plexiglass face. Make sure the PMP fits in the cavity easily with the plexiglass.
6. Install the audible alarm system.
6a. Dip the alarm circuit in rubber cement or rubberized glue to protect the circuit. Once dry, arrange the speaker, circuit, and battery in the heel (Figure F), and mark an area to drill a hole for the switch on the opposite side. Make sure the drilled hole won’t interfere with the circuit board or speaker.
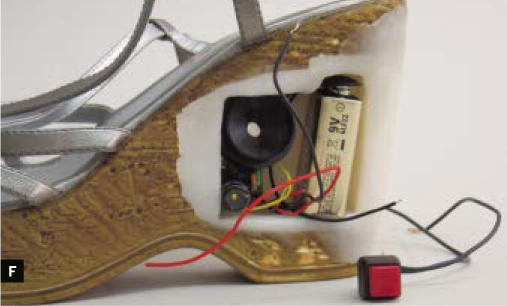
Fig. F: Test the alarm components before securing them with ShapeLock.
6b. Drill a hole through the ShapeLock large enough for the diameter of the switch. Using a Dremel tool, mill out enough room for the top of the switch to sit almost flush with the heel. Connect the switch to the circuit and battery to test (Figure G).
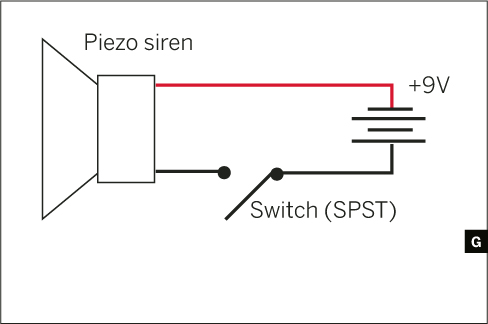
Fig. G: Audible alarm schematic.
6c. Connect the wires, and slip heat-shrink tubing over the exposed connections. Using a small lighter, place the flame near the heat-shrink tubing to tighten the tubing to the wires.
6d. Use a small amount of ShapeLock to secure the button, circuit, and speaker in place (Figures H and I). Remember to heat the ShapeLock inside the shoe so it will bond. Then drill 2 holes the size of your magnets behind where the battery will sit. Super-glue the magnets in place; these will hold the battery.
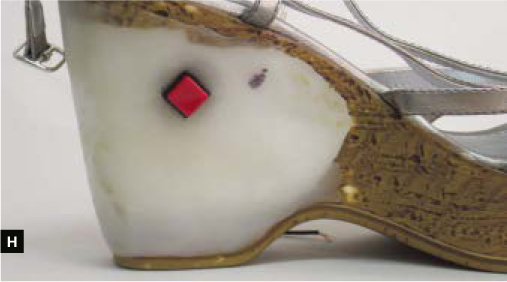
Fig. H: The switch should be seated so it sits almost flush with the heel, with the button sticking out slightly.

Fig. I: Secure the speaker and circuit board with ShapeLock, but leave the battery and snap connector loose.
7. Finish the exterior.
7a. For each shoe, trace a mylar pattern for the leather to wrap about ¾ of the sole, starting at the center of the heel, along the inside of the shoe, around the toe, and ending with a seam ½" to the front of the PMP or alarm cavity (Figure J).
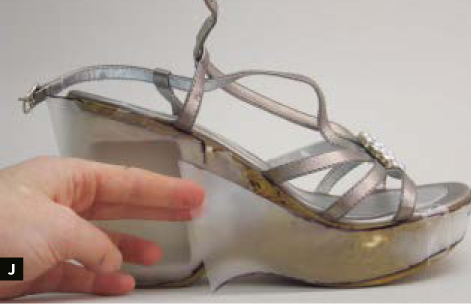
Fig. J: Wrap the mylar around the heel and trace the outline with a Sharpie to create the pattern for your leather.
7b. Use this pattern to cut the leather (for an example, see our pattern at makezine.com/12/diy_footwear); for the alarm shoe, also cut a small hole for the switch. Tack the piping to the top edge of the leather with rubber cement, if the piping bunches around the curves, notch its backside. Attach the leather with shoe glue, from the front side of the electronics cavity all the way around to the center of the heel.
7c. Now make a second pattern for each shoe, going from the center of the heel and covering the electronics, overlapping the first pattern ½" to the front (Figure K). This is the flap that will allow you to remove the PMP and the alarm battery.

Fig. K: Mylar pattern for PMP flap includes a cutout for the PMP screen.
Cut out the PMP flap, then cut out a window for the PMP screen, leaving space to attach the plexiglass to the leather. Attach piping to the top and seam the edges, then glue the flap along the center of the heel, allowing the leather to hinge. Glue the plexiglass cover to the leather, making sure it sits flush when closed.
Cut out the alarm flap, attach piping, and use a knife or punch to make small holes over the speaker to let sound out. Glue along the center of the heel. 7d. To close the flaps, glue a thin steel strip to the front edge inside each flap. Drill 2 small holes the size of the magnets into the ShapeLock, aligned with the steel strip. Super-glue the magnets in place. These will hold the flaps closed, and allow you to remove the PMP or battery (Figure L).
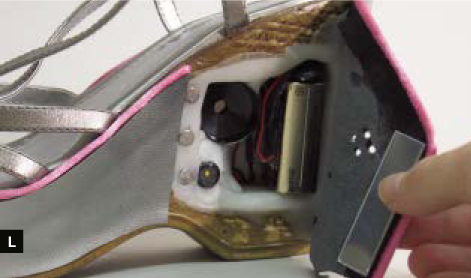
Fig. L: Completed alarm system with holes punched in leather flap and sheet steel glued to the edge for magnetic closure.
The Aphrodite Project is a series of multimedia artworks — Sanctuary, Platforms, and Kestos Imas — started by Norene Leddy in 2000. theaphroditeproject.tv