Photography by Neal Skacel
MIDI CAMERA CONTROL
 ESPN-style coverage with a video crew of one or two.
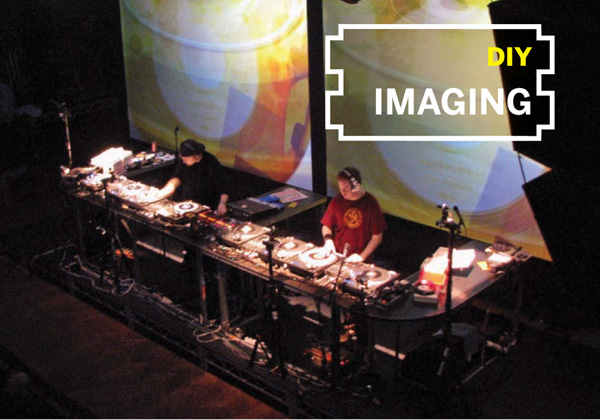
I had the chance to run visuals for a unique DJ act called The Hard Sell, a collaboration of turntablists DJ Shadow and Cut Chemist. The art of spinning and cutting records is usually not visible to dance club audiences. Cut and Shadow wanted to let everyone see, up close and personal, all the action on their 8 simultaneously spinning turntables playing old 45s.
But they needed a way to do it unobtrusively. Given the often cramped spaces of the venues they perform in, they couldn’t have a crew of sweaty dudes in black clothes wielding cameras in their faces. Also, Cut and Shadow wanted to mix in additional visuals from DVDs, to change and match the moods of the different tracks.
I got involved when Ben Stokes, the show’s lead visualist, said to me: “I like robots. I like cameras. I love robot-cameras! You build all kinds of crazy stuff; what can you come up with for this?”
I suggested I could probably make some small robotic mounts for the cameras, each with their own pan-and-tilt mechanism driven by hobby servos. They’d be small, light, cheap and effective — my favorite combo!
Here’s the multi-camera live setup I devised for the show, and a lower-budget version that you can put together without all the professional equipment.
Cameras and Servos
For cameras, we used standard CCD security cameras with composite video output (camcorders would have been too large and heavy). For the mounts, I found a nice little prefab pan-and-tilt bracket from servocity.com that worked with hobby servomotors. A handful of these brackets and a pair of servos for each one, and we had a bunch of quick and easy rigs, ready to be powered up.
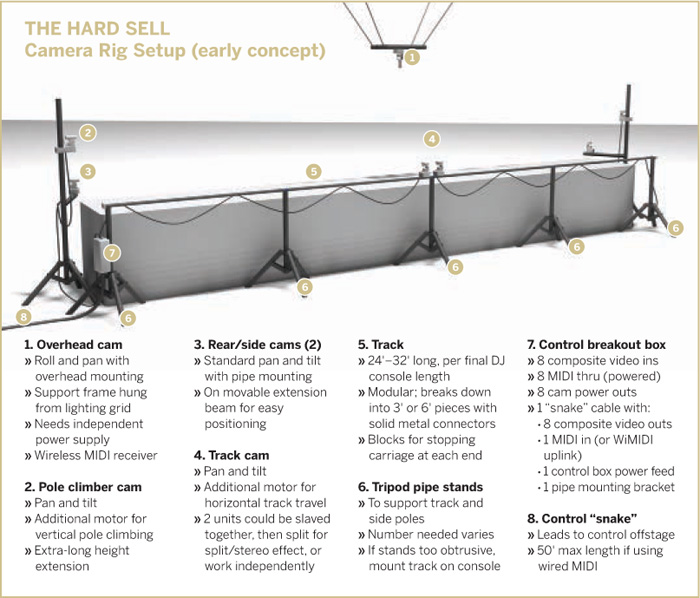
Illustration by Josh Cardenas
MIDI Control
We mused about having the cameras move autonomously in random patterns, but decided we wanted control over each, so we could frame the shots and follow the artists as they moved from deck to deck.
Hobby servos are built for R/C, of course, but the prospect of relying on a multichannel radio transmitter wherever we performed made me nervous. In a performance-critical environment, I didn’t want interference from any wireless mics, radios, and other devices that happened to be operating nearby.
Instead, we kept things musical by using MIDI, which is the standard protocol for electronic music hardware and software. Since MIDI is multichannel, we could control many cameras from the same interface. And in addition to enabling live control, MIDI let us record, edit, and play back camera movements just like you can record, edit, and play back music.
To bridge the gap between our MIDI control signal and our pan-and-tilt hobby servos, we used the ServoCenter control board from Yost Engineering. This little circuit board has MIDI sockets and connectors for up to 16 standard hobby servos.
The ServoCenter translates MIDI’s Continuous Controller (or CC) messages, which are usually associated with knobs or sliders, to corresponding servo control signals. By configuring which CC channels run which servomotors, you tie the controls on any MIDI device to the cameras.
For the Hard Sell tour, our MIDI controller was a Korg MicroKontrol, a 3-octave keyboard with a row of 8 knob-slider pairs over the keys. We assigned each knob-slider pair to a different camera, with the knob set to pan and the slider set to tilt.
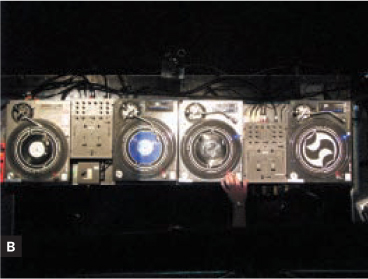
Our camera setups (above) changed as the tour progressed, with the most ambitious being at the Hollywood Bowl: several cams on poles captured the DJs’ setup, a couple cams on the floor took extreme angles of the DJs (Figure A) and the crowd, an overhead camera looked down (Figure B), and a cam mounted on a robotic dolly I built ran back and forth on a track in front of the two DJs, allowing us to get some very dynamic, moving shots. The speed and direction of the dolly were controlled by MIDI as well, with the ServoCenter driving a beefier servo that turned the dolly’s rubber wheels.

Mixing the Video
The next question was how to switch or mix the multiple video feeds for projection onto the big screen. With our 9-cam Hollywood Bowl setup we used a security camera DVR, which let us switch feeds and also record all the cameras — the entire show (albeit at low quality) — direct to a hard drive.
At other shows we used an Edirol V-4 video mixer, a favorite VJ workhorse that can switch, mix, and apply effects to 4 simultaneous video streams. The mixer let us intercut the cam feeds, morph them into more abstract patterns, and add in any DVD visuals we queued up.
As we did more shows, we devised new ways to bend the technology to our will. We tried recording the MIDI control messages with music software on a laptop, then playing them back as pre-orchestrated camera moves. Also, I had been experimenting with VVVV, a free software toolkit for prototyping multimedia applications. I wrote VVVV routines for my laptop that generated MIDI commands to move the cameras in patterns, such as sine waves.
After some more tinkering, I was able to bring camera video streams into my laptop, then manipulate or mix them with other graphics, all in VVVV. (You can do the same thing with other software as well, such as Pure Data, Max/MSP, and Quartz Composer.)
Try This at Home
Working on the Hard Sell tour made us realize the possibilities of MIDI cams. With setups like this, just 1 or 2 people could provide dynamic, multi-camera video coverage for all kinds of live events: sports, performances, contests, demos, even pranks. Now I also wonder how many tiny robotic cameras I could manage at once.
Running VVVV on a laptop, you can eliminate the need for the high-end hardware we used on the Hard Sell tour. I concocted a work-alike system that uses just a PC, the servos and ServoCenter, and a webcam for video capture. Computing power is a factor, but a fast computer can handle simple mixing with 2 video feeds. Just make sure the webcams are different brands, so that Windows won’t see them as having identical IDs (I have heard that FireWire webcams don’t have this problem).
MATERIALS AND TOOLS
USB webcam Most computers will be overwhelmed by video coming from more than 2–3 cameras.
Servomotors, standard hobby size (2 per camera) I used Hi-Tec model #HS-645MG.
Pan-and-tilt brackets to fit the servos. ServoCity part #SPT100 (makezine.com/go/brackets)
ServoCenter full package, MIDI $90, item #SCPMIDI from tech.yostengineering.com. This includes the controller board, AC adapter, MIDI cable, software, and documentation.
USB-MIDI interface I recommend the M-Audio Uno.
Windows XP-based PC VVVV doesn’t run on Vista.
Project box, 4"×8"×2" Plastic is easiest to work with.
Standoffs with matching nuts: 1¼" (4) and 2" (4)
Electrical tape
Double-sided tape or velcro tape, or even zip ties
Phillips screwdriver, slip-joint pliers
Drill with 1/8"–5/8" step drill bit
Pan-Tilt MIDI Cam Unit
To make a nice, self-contained single camera unit I enclosed the ServoCenter board in a project box and attached the pan-tilt assembly on top. The webcam connects to the laptop, the pan-tilt servos connect to the ServoCenter, and the laptop connects to the ServoCenter through a USB-MIDI interface.
On the laptop, VVVV runs 2 separate workflows at once: one generates MIDI to control the servos, and one processes the video input from the webcams.
I drilled the top of the box and used 1¼" standoffs to attach the pan motor, which acts as the base of the pan-tilt assembly (Figure C). Inside, I mounted the ServoCenter board using 3/8" standoffs. The servo wires are threaded through another hole in top (Figure D), and holes in the side allow access to the ServoCenter’s MIDI and power.

Fig. C: Measuring holes for mounting the servo assembly to the project box.

Fig. D: Servo motor wires are threaded down to the ServoCenter board underneath.

Fig. E: Motor connection to the ServoCenter; the board can handle up to 16 motors.
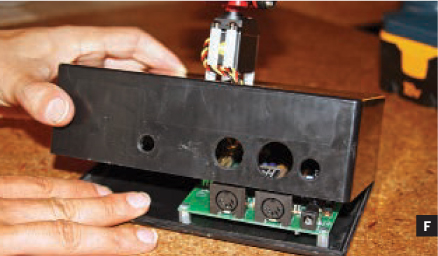
Fig. F: Finished assembly of the MIDI cam unit.

Fig. G: The MIDI cam system laptop runs VVVV to control camera movements and process live video feed.
If your webcam has a stiff cord, a small servo might have trouble pushing it around; if so, cut away the insulation on the outside of the cord. Then mount the webcam on top of the pan-tilt assembly. I used a short ¼" bolt that threaded right into the cam’s original mounting hole, but you could use any method that securely attaches the camera.
To start running your MIDI cam, download and install VVVV (vvvv.org), Midi Yoke, and MIDI-OX (both at midiox.com). Then download my script at makezine.com/19/diycircuits_midicams.
Run the core VVVV app, then open the script and see the embedded instructions, which explain how to set it up to move your cams, as well as use some other simple VJ functions to mix in images or videos.
VVVV is a graphical programming language that lets you build applications by drawing “building blocks,” and linking them together. It’s not your standard Windows program, so figuring it out takes a bit of reading the Help and poking around. But once you get the hang of it, it all makes sense; it has a logical, schematic-like workflow, so if you’ve ever read or drawn a circuit diagram, you should pick it up quickly.
If you have MIDI hardware, you can connect that to your laptop and use it to control your cameras through VVVV. Moving a physical knob or slider is better than poking around with a screen and keyboard, especially if you’re performing live.
![]() For project software and to see the MIDI cams in action: makezine.com/19/diycircuits_midicams
For project software and to see the MIDI cams in action: makezine.com/19/diycircuits_midicams
By day, Josh Cardenas is a digital artist at ImageMovers Digital, but his background in computer graphics has led him into the VJ world. Witness his pixel-fu at visceralx.com.
EYE CONTACT DEVICE
 Look more trustworthy while videoconferencing.
Services like Skype let you videoconference for free, but it never feels like a natural conversation. You see the other person staring down at the screen rather than looking at you. We humans are wired to look each other in the eye, and when someone doesn’t, we naturally wonder if they’re hiding something. Here’s a setup that I use to make videoconferencing feel more like real face-to-face communication.
The Teleprompter Principle
My device is simply a box, open at each end, with a piece of glass splitting it diagonally and a hole in the top for a camera. It follows the same principle that teleprompters use to display text.
Size the box to just fit around your computer screen, and make it as deep as the screen is high. I used 5/8" particleboard shelving material, dowel pegs, and glue. Center a hole in the top that’s large enough to give your webcam an unobstructed view of the mirror, and coat the interior with flat black paint to eliminate reflections.
The reflective pane should match the width of your screen, and be √2 (about 1.4) times as tall. To hold it, I cut diagonal slots with a table saw about ¼" deep into the sides of the box, on the inside. I also drilled holes and ran a dowel along the bottom, to keep the mirror from sliding out. To cushion it, I tucked a strip of pipe insulation underneath.
For the camera, USB webcams are best for family conferencing, since their wide-angle lenses will include everyone. For conferences between individuals, a camcorder lets you zoom in; WebCamDV software will route the camera’s FireWire output to your videoconferencing application.
You can point the camera straight down, but I now use an SLR camera spy lens (right angle adapter) to fold the optical path like a periscope. This has the additional advantage of righting the image.
With your computer screen in back of the box and your camera on top, you’re ready to go. Your friends will see you looking directly into their eyes. Yes, it’s clunky, but no more so than those CRTs that we used not so long ago.

Photography by Don McLane
MATERIALS
Computer the one you videoconference from
USB webcam, or FireWire camcorder and WebCamDV software This $20 utility from OrangeWare (orangeware.com) turns a DV camcorder into a webcam.
Headset or echo-cancelling speaker/microphone Audio will be a problem without one of these.
Box-making materials to make a box that’s sized to fit your computer screen (see tutorial at left)
Dowel This runs across the bottom of the box to hold the mirror in, and you may need additional length to cut into pegs for joining the box.
Videoconferencing software such as Skype, NetMeeting, Gmail, or Ekiga. I use AccessGrid, which is open source ware for group conferences.
Semi-reflective pane sized to fit in your box diagonally For best results, use half-silvered glass or plexiglass (see telepromptermirrors.com), but a regular clear pane will also work, for one-tenth the price.
Flat black paint
Lazy Susan (optional) nice for changing position
Spy lens for SLRs (optional) if using a camcorder
TOOLS
Table saw
Drill and drill bits
Hole saw big enough for your camera to see through the hole without obscuring its view
Don McLane develops lab experiences at the University of Washington Tacoma that are (hopefully) educational and (hopefully) not life-threatening. He has a bachelor’s degree in physics and a master’s in electrical engineering.