
 SKILL BUILDER
KINECT HACKING
Go from handwaving to coding with the Microsoft Kinect SDK.
Kinect for Xbox 360 is an amazing little device stuffed with magical sensors. Its revolutionary power and affordability ($150 without the Xbox console) has sparked a wave of innovation in human-computer interfaces that engage the whole body. Now all kinds of games and gadgets can recognize your movements and gestures as commands to do all kinds of things, without you having to wear anything.
This article will explain what Kinect is, how it works, and how you can develop your own Kinect hacks. As a starter application, I’ll explain the Kinect Weather Map, a live video application that changes your background to a different animated weather map whenever you walk across the frame and turn — just like a TV meteorologist, but without a green screen.
Joshua Blake (@joshblake) is an integrator (developer-UX designer hybrid) with extensive experience developing Natural User Interfaces (NUI) for Kinect, Microsoft Surface, and Windows 7 touch. He founded the OpenKinect community and is technical director of the InfoStrat Advanced Technology Group in Washington, D.C. nui.joshland.org
Portions of this article were adapted from the author’s upcoming book, Natural User Interfaces in .NET.

Gregory Hayes
![]() A POWERFUL SYSTEM Engineering intern Eric Chu shows off the author’s Kinect Weather Map app in the MAKE Labs.
A POWERFUL SYSTEM Engineering intern Eric Chu shows off the author’s Kinect Weather Map app in the MAKE Labs.
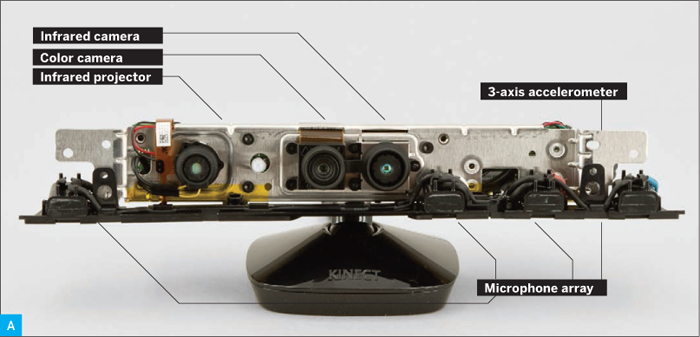
IN TERMS OF COMPONENTS (Figure A), Kinect integrates several sensors: a color (RGB) camera and an infrared (IR) camera, each capable of 640×480 pixel resolution at 30 frames per second (fps), a microphone array that isolates speech from background noise, and a 3-axis accelerometer, which is used to detect whether Kinect is level.
futurepicture.com (B) ; Joshua Blake (C, D)
Along with the sensors are a motor that tilts Kinect up and down, and a laser IR projector that uses a diffraction grating to project a speckle pattern onto the world in front of it (Figure B). For power, Kinect requires 12V at 1.08A, which means you either plug it in with a wall wart or you can splice it to battery power, like an 8×AA battery pack.

THE Z-PLANE AND THE SKELETON
The IR projector and IR camera are where the magic begins. Here’s a simplified explanation.
Every small grouping of dots in the projected IR laser speckle pattern is unique and recognizable to the IR image processor, even when deformed or displaced against the rest of the pattern. The IR projector is physically offset from the IR camera, about 5” left of it from the camera’s POV, which lets Kinect triangulate a depth value by determining the shift of each dot group (Figure C).

Any point in the speckle pattern will shift rightward, as seen by the camera, as it reflects off of a closer surface — like the way your car’s headlights’ reflections diverge as you approach a reflective surface.
MATERIALS
Kinect for Xbox 360 retail box $150, includes the Kinect Sensor Power Supply that you’ll need for plugging Kinect into your computer.
The “Xbox Console with Kinect” bundles do not include this power supply, but if you’ve already got a bundle, you can buy the power supply separately for $35.
TOOLS
Computer running Windows 7 with dual-core, 2.66GHz or faster processor, Windows 7-compatible graphics card that supports DirectX 9.0c, and 2GB RAM (4GB recommended).
If you don’t have Windows 7, you can still do everything described here with other Kinect drivers, but you’ll need to translate the sample code into your own language and SDK of choice.
Compiler and IDE software Microsoft Visual Studio 2010 Express (free) or other 2010 edition
Kinect development software Kinect for Windows SDK from Microsoft (free), or libfreenect or OpenNI code libraries (free and open source).
If you want to do additional development with the SDK or try out the audio features of Kinect, see the Kinect SDK Readme for additional software to install.
Figure C shows an example of a horizontal slice representing dot brightness with numbers 1–6. In one part of its view field, the camera would see 6-1-2-3-4 reflected from 1 meter away, and 2-3-4-5-6 reflected from 2m. Also note the darkened triangle, which shows the area that the IR camera sees that is in the shadow of the object as illuminated by the projector. Kinect can’t determine depth data for these parts of the scene without interpolating, giving possibly inaccurate values.
Kinect generates a depth image from each dot pattern offset, and transmits it via USB cable to the Xbox 360 or PC. Each pixel in the depth image represents a distance away from the camera plane in millimeters.
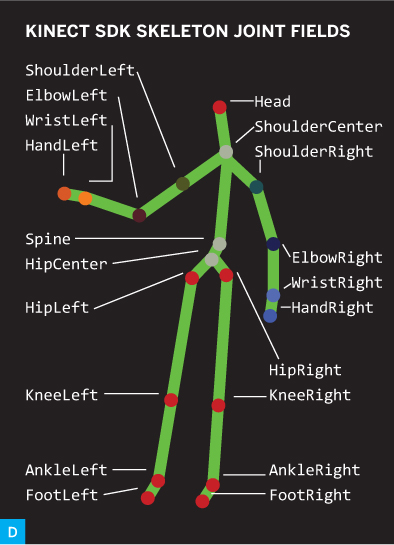
In addition, on the XBox 360 and PC, advanced software performs the sophisticated task of recognizing humans from the depth image and identifying (x,y, z) positions for up to 20 skeleton joints (Figure D). The depth image and joints are available to developers, along with the RGB image from the color camera. These images are mirrored, so when you face a Kinect and a display, your left hand shows up on the left side of the image.
KINECT HACKING SETUP
Commercial Kinect games are written using the Xbox Development Kit, which is only available to game studios with Xbox publishing agreements. For the rest of us, the current best way to tap into Kinect is to write client applications for a Windows PC connected to Kinect via a USB cable.
To enable your PC to communicate with Kinect, you need to install a set of drivers and an SDK (software development kit) defining the structures you can call from your program to get the data. There are 3 options here: libfreenect and OpenNI, which were developed independently, and the Kinect for Windows SDK, which Microsoft officially released more recently. Their pros and cons are summarized in the table above.
![]() DRIVERS + SDK
DRIVERS + SDK
libfreenect
Open source drivers developed by the OpenKinect community. First drivers published for Kinect.
Pros: Many language wrappers and support for Windows, Linux, and Mac.
Cons: Does not have skeleton tracking built in.
OpenNI, NITE, & SensorKinect
Natural interaction framework and drivers published by PrimeSense, manufacturer of the chips inside Kinect.
Pros: Support for Windows, Linux, and Mac. Open source except for skeleton tracking and gestures, which are provided by NITE, a closed source component.
Cons: Multiple components to install from different sources. No microphone array or tilt motor support.
Kinect for Windows SDK
Official Microsoft drivers for Kinect.
Pros: Robust skeleton tracking.
Cons: Requires Windows 7.
For this article, I’m using Kinect for Windows SDK, which requires a PC running Windows 7. (You can do everything described below with other Kinect drivers, but you’ll need to translate the sample code into your own language and SDK of choice.) The Kinect SDK has a non-commercial use license during the beta, and a commercially licensed version is currently under development for release in early 2012.
If you already have libfreenect or OpenNI installed and you want to install the Kinect SDK, you must first plug in Kinect and un-install the previous drivers. To do this, open Windows Device Manager, right-click the Kinect Camera, Audio, and Motor devices, and then check the “Delete the driver software” checkbox, and confirm by clicking OK. Then launch Add or Remove Programs, and un-install any other driver installation packages listed that have Kinect in the name.
We’ll write an application in 2 languages: XAML and C#. The visuals and controls are designed in XAML, a markup language for Windows interfaces that’s based on the XML document language. To define how the interface elements behave, and to make them object-oriented, you associate them with a “code-behind” class written in C# (pronounced see-sharp), a language with a similar syntax to C++ that’s used for writing Microsoft .NET programs.
To create this application, we’ll use Microsoft Visual Studio 2010 Express, which is the free version of Microsoft Visual Studio 2010, a development environment that supports C#, XAML, Visual Basic .NET, and other languages. (If you have the full Visual Studio, you can also develop in that, of course.)
To get set up, download and install Microsoft Visual Studio 2010 Express from microsoft.com/express/downloads and the Kinect SDK Beta 2 from kinectforwindows.org. Download the 32-bit or 64-bit version of the SDK depending on your edition of Windows 7; if you’re unsure, open the Start menu and right-click on Computer, click Properties, and check whether the System Type line says “64-bit.” If you want to do voice-recognition applications, then there are a few additional components you also need to install, but for now this is all we need.
 MAKE A KINECT WEATHER MAP
Use depth data (including the player index) to replace the video background behind a subject without using a green screen.
Here’s an application that replaces the video background behind a subject with a weather map, the way TV meteorologists use green screens — except with Kinect, you don’t need a green screen. You can easily adapt this technique to other backgrounds and uses.
1. Get image and depth data from Kinect.
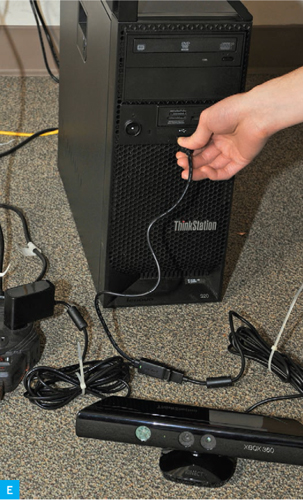
First we need to start getting data out of Kinect. Plug Kinect’s USB plug into your computer and its power plug to an outlet (Figure E). If the SDK is installed properly, Kinect’s LED indicator should blink, and a Windows pop-up may also indicate that the Kinect device is ready.
Gregory Hayes
To verify communication to the PC, go to the Start menu under Microsoft Kinect 1.0 Beta2 SDK, and run the SkeletalViewer or ShapeGame samples. A zip file with source code for these samples can be found in the same location in the Start menu.
To create the project, launch your IDE (either Visual Studio 2010 Express or Visual Studio 2010) and select File → New → Project, then choose the WPF Application project template under Visual C# → Windows. (WPF, or Windows Presentation Foundation, is an interface framework that can encompass XAML elements with C# code-behind, as with our project.) Enter “KinectWeatherMap” for the project name, select a directory if you don’t like the default one, then press OK. This creates a blank WPF application.
To tell your app to access the Kinect SDK, find the Solution Explorer (or select it from the View menu), right-click on References, and click Add Reference. Click the .NET tab in the popup, then find and select Microsoft. Research.Kinect and press OK. (To help find Microsoft.Research.Kinect, click the Component Name header to sort by name.) Now we’re ready to write some code.
Double-click on MainWindow.xaml. This is auto-generated XAML code for the default first window that opens when you run the application. The file defines what visuals and controls are displayed in that window, and defines names for use in the code-behind class. The file already includes a Window tag and a Grid tag, and we’ll add 2 Image tags to define the frames that will hold the Kinect camera image and the background weather image (Figure F, following page). To do this, replace the contents of MainWindow.xaml with:

<Window x:Class="KinectWeatherMap.![]()
![]() MainWindow"
MainWindow"
xmlns="http://schemas.microsoft.com/![]()
![]() winfx/2006/xaml/presentation"
winfx/2006/xaml/presentation"
xmlns:x="http://schemas.microsoft.com/![]()
![]() winfx/2006/xaml"
winfx/2006/xaml"
xmlns:local="clr-![]()
![]() namespace:KinectWeatherMap"
namespace:KinectWeatherMap"
Title="Kinect Weather Map"
WindowState="Maximized">
<Grid>
<local:GifImage x:Name="weatherImage"/>
<Image Name="kinectImage"
Stretch="Uniform" />
</Grid>
</Window>
The GifImage tag references our own control that supports animated GIFs like the ones we’ll be pulling from the National Weather Service. You can find code for the GifImage class, along with all other code for this project, and updates for future releases of Kinect SDK, at makeprojects.com/v/29. This article steps through different versions of the code routines as we add functionality, so be sure to paste in the correct version for the step you’re at.
Add the new GifImage class by right-clicking KinectWeatherMap in the Solution Explorer, then Add → Class. Name it GifImage.cs and then overwrite the file contents by pasting in the GifImage.cs code from the URL above.
To work with the C# class, the code-behind for the XAML, open the Solution Explorer panel in the IDE, then click the little triangle next to MainWindow.xaml and double-click on MainWindow.xaml.cs. Now we see the code-behind file and can write some code to talk to Kinect (Figure G). To tell the compiler where to find the class definitions used in the code, we declare:

using Microsoft.Research.Kinect.Nui;
Below the using statements, inside the MainWindow class definition but before its constructor routine, add the following fields to store the most recent depth image and a color offset map that translates between pixel positions in the IR camera’s depth image and color camera pixel positions:
ImageFrame lastDepthFrame;
int[] colorOffsetMap;
Inside the constructor, add the lines below, which call the InitKinect method (which we’ll add next) to initialize the first Kinect plugged in. With no Kinect connected, the program will just silently do nothing.
this.Loaded += (s, e) =>
{
InitKinect(Runtime.Kinects.![]()
![]() FirstOrDefault());
FirstOrDefault());
};
After the constructor in MainWindow.xaml.cs add the methods InitKinect, runtime_Depth FrameReady, runtime_VideoFrameReady, and runtime_SkeletonFrameReady, pasting the code in from makeprojects.com/v/29. InitKinect configures Kinect to send us data and set up a colorOffsetMap array for us to use later, and the other 3 are event handlers that are called whenever Kinect sees new depth, RGB, or skeleton data.
Now try running the application by pressing the F5 key or selecting Debug → Start Debugging. You should see a window with the RGB video image streaming from Kinect. Hello, World! We’re also saving the depth image in the lastDepthFrame field, for processing later.
2. Remove the background.
The depth image provides 2 values for each pixel: its distance from Kinect’s camera plane (in meters), and the player index, indicating which player the pixel belongs to, if any. The player index ranges from 0 to 6, with 0 for no player (background or furniture), and 1–6 based on who enters the scene. In this application, each of the 76,800 pixels (320×240) in the depth image consists of 2 bytes that contain both the depth data and the player index (Figure H).

Joshua Blake
To remove the background, we’re going to do some image processing using the player index. We’ll create a new image to represent the foreground, initially set it to transparent, and then iterate over each depth image pixel. If the player index is not zero, we’ll copy the corresponding RBG image pixel to our foreground image. Since we’re using images from both the IR and color cameras, we also need to convert between the 2 slightly different sets of coordinates using the colorOffsetMap array that we set up in the constructor. All of this happens in the runtime_VideoFrameReady method that we created earlier. Copy the “Remove the Background” version of the code from makeprojects.com/v/29, and paste it into the project code.
We’re only using the player index, but if you also wanted to retrieve the depth data from the image, you could add the following line inside the method’s inner for loop, after defining the depthIndex variable:
short depth = (short)
((depthBytes[depthIndex] >> 3) |
(depthBytes[depthIndex + 1] << 5));
Now compile and run the application. You should see a blank white background on your computer, until you or someone else moves into Kinect’s field of view, at least from the waist up. When you do, the player index will become non-zero for pixels where Kinect is tracking your body, the code will copy over those color pixels, and you’ll see an image with only people and no background (Figure I) — like a green screen without a green screen!

You may notice that the “cutout” doesn’t always match the RGB image, especially if you’re moving quickly. This glitch is partly noise, partly because the RGB and depth frames may not be delivered at exactly the same rate, and partly because our code is simplified for learning, rather than optimized for speed. There are several techniques an intermediate developer could use to speed up the code and to sync the RGB and depth frames better, based on timestamp.
3. Track the skeleton and add the maps.
Finally, we want to add the weather maps in the background and be able to switch them using a simple gesture. To recognize the gesture, we’ll use Kinect’s skeleton tracking data.
What kind of gesture? Broadcast meteorologists often change the weather map as they walk across the screen and pivot to face the opposite direction. To detect this gesture, we need to check 2 conditions: which side of the image the ShoulderCenter joint is on, and whether the left shoulder or right shoulder is closer to the camera. If both of these conditions change from their previous state, we know the user has performed the walk-and-turn gesture and we can cycle the background image. We check for turning so that the background doesn’t cycle when the user is just reaching for the far side of the map.
To add this feature, we first need to add a few fields at the top of the MainWindow class:
int currentBackground = -1;
List<string> bgImages = new List<string>();
bool isPoseLeft = false;
bool isPoseRight = false;
To retrieve the map images, add the following inside the MainWindow constructor after the call to InitializeComponent(). You can substitute the URLs for other animated GIF maps provided by the National Weather Service:
bgImages.Add("http://radar.weather.gov/![]()
![]() ridge/Conus/Loop/NatLoop_Small.gif");
ridge/Conus/Loop/NatLoop_Small.gif");
bgImages.Add("http://radar.weather.gov/![]()
![]() ridge/Conus/Loop/southeast_loop.gif");
ridge/Conus/Loop/southeast_loop.gif");
bgImages.Add("http://radar.weather.gov/![]()
![]() ridge/Conus/Loop/northeast_loop.gif");
ridge/Conus/Loop/northeast_loop.gif");
bgImages.Add("http://radar.weather.gov/![]()
![]() ridge/Conus/Loop/pacnorthwest_loop.gif");
ridge/Conus/Loop/pacnorthwest_loop.gif");
bgImages.Add("http://radar.weather.gov/![]()
![]() ridge/Conus/Loop/pacsouthwest_loop.gif");
ridge/Conus/Loop/pacsouthwest_loop.gif");
CycleBackground();
Now update the runtime_SkeletonFrameReady method to the code version under “Track the Skeleton” at makeprojects.com/v/29, and also add the new CycleBackground() method, which cycles through the background images with each body-turn gesture. The code will find the skeleton closest to the Kinect and use shoulder positions to determine if the skeleton is facing right or left, and if the pose changes it will call CycleBackground to put up a new animated background image, which is downloaded automatically (Figure J).

Joshua Blake
Now stand up, and with your best voice, describe and gesticulate over the weather map background. To change images, walk to the other side of the image while turning your shoulders toward the center.
Congratulations, you’ve just made a Kinect hack! Now go show it off to your friends and see what else you can come up with.
![]() For project code, video of the Kinect Weather Map hack in action, and other resources, visit makeprojects.com/v/29.
For project code, video of the Kinect Weather Map hack in action, and other resources, visit makeprojects.com/v/29.
MORE FUN KINECT HACKS
Here are some other great Kinect hacks; find the links at makeprojects.com/v/29.
SWORDFIGHTING The Kinect JediBot is a robotic arm that holds a toy light-saber and engages in swordfights against human opponents.
OBJECT SCANNING Kinect can scan objects for conversion into 3D images used in design, animation, and 3D printing. The Kinect Turntable 3D Scanner scans small objects on a small rotating stage, while the Kinect 3D Object and People Scan builds up 3D images of larger objects with Kinect hardware in a handheld wand.
HELICOPTERS A YouTube sensation, UC Berkeley’s Quadrotor project puts Kinect on an Ascending Technologies Pelican R/C helicopter, enabling it to autonomously navigate indoors, follow coded signs, and avoid being swatted. Jonathan Oxer uses an offboard Kinect to control an ARDrone Parrot copter with simple, dog-trainer hand gestures.
ASSISTIVE TECH (top) The NAVI project (Navigational Aids for the Visually Impaired) pairs a Kinect mounted atop a helmet with headphones and a vibrotactile waistband to enable blind people to find their way around and avoid obstacles, cued by audio messages (“Door ahead in 3,” “2,” “1,” “Pull the door”) and vibration at different points around the waistband.


HCI Group University of Konstanz (top), Lumen Digital Ltd. (bottom)
“MINORITY REPORT” INTERFACES (bottom) Minority Report Software for Kinect enables the interface style seen in the movie Minority Report, in which people navigate wall-sized representations of large data sets with hand and arm movements. The Kiwibank Interactive Wall enables users in front of a projection wall to fly through a simulated space by steering their arms like wings.
TABLETOP SIMULATIONS The Kinect Augmented Urban Model allows users to build up an urban landscape on a full-screen tabletop and simulate the buildings’ shadow patterns at different times throughout the day.
MOTORIZED LOUNGE CHAIRS Jellybean, the Kinect Drivable Lounge Chair, lets the user drive around with simple hand gestures while seated comfortably. ![]()