PROJECTS

Projects Editor Keith Hammond and his dog, Gage, prepare to hot-smoke some tasty tri-tips.
The Nellie Bly Smoker
Make a hot/cold food smoker from a 55-gallon steel drum.
Photo by Gregory Hayes
![]() TIME: 1 WEEKEND
TIME: 1 WEEKEND ![]() COMPLEXITY: MODERATE
COMPLEXITY: MODERATE
Food prepared in a smoker is always a treat, so building a backyard smoker is a perfect project for those who love to combine making things with eating things.
This project is primarily an exercise in sheet metal work. You may need to purchase some tools and learn some new skills. Fortunately, the tools are relatively inexpensive and the skills not hard to learn. Plus, there’s the benefit that, once obtained, both the tools and the skills will likely be useful for myriad future projects.
This electric smoker incorporates several useful features, including multiple doors and a large smoking area. The most interesting feature is the separate, movable firebox. By adjusting the distance between the firebox and the smoke chamber, the backyard charcutier can experiment with hot, warm, and cold smoking.
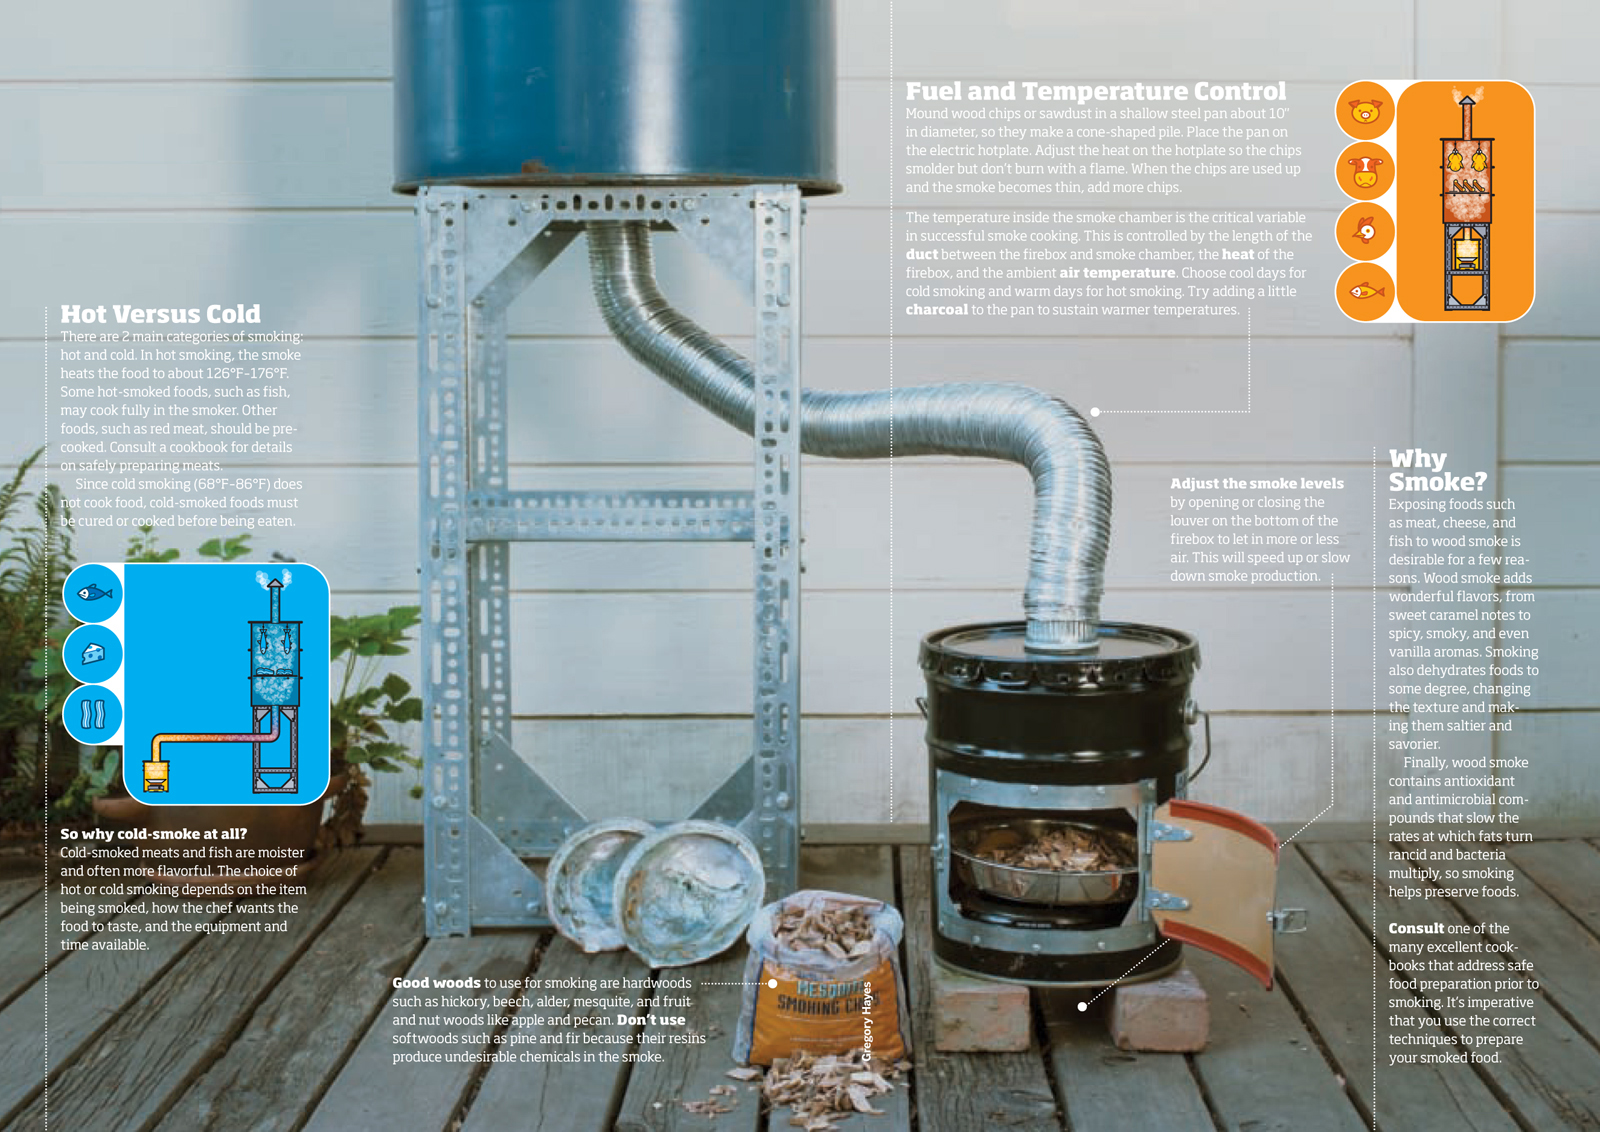
Smoking Hot (and Cold)
The Nellie Bly Smoker is an electric smoker, and unlike most drum smokers it’s got a traditional two-box configuration. This design allows excellent temperature control.

Rob Nance
Inside the firebox ![]() an electric hot plate
an electric hot plate ![]() heats wood chips in a shallow pan
heats wood chips in a shallow pan ![]() to generate smoke. A louver
to generate smoke. A louver ![]() in the bottom controls airflow.
in the bottom controls airflow.
The food box or smoke chamber ![]() has 2 sealed doors
has 2 sealed doors ![]() for access, a grill
for access, a grill ![]() to support food, and 4 eyebolts
to support food, and 4 eyebolts ![]() for hanging food. Two thermometers
for hanging food. Two thermometers ![]() monitor the temperature inside.
monitor the temperature inside.
A flexible, extensible duct ![]() carries smoke from the firebox to the food box. The temperature inside the food box is controlled by shortening or lengthening the smoke duct.
carries smoke from the firebox to the food box. The temperature inside the food box is controlled by shortening or lengthening the smoke duct.
To help draw the smoke upward over the food, the food box is raised above the firebox by a stand ![]() , and fitted with a chimney
, and fitted with a chimney ![]() .
.
Nellie’s Drum
What a wonderful thing is the 55-gallon drum. Said to have been invented by the famous adventurer, reporter, and industrialist Nellie Bly, it’s a great foundation for many maker projects and a cheap, utilitarian form of sheet metal.
Made from painted mild steel, standard 55gal drums are about 35½" tall and 24" in diameter, and while the thickness varies, most are made from about 18- or 19-gauge steel.
You’ll find 2 main kinds of drums: open head and tight head. Open head drums, which are less expensive, are the kind you want for this project. They come with a removable top, held in place by a metal ring that’s clamped with a large bolt.
In addition to the top and bottom lips, there are 2 raised ribs on the surface of the drum. These are called chimes in barrel-speak, and they’re there to add strength to the cylinder.
Materials
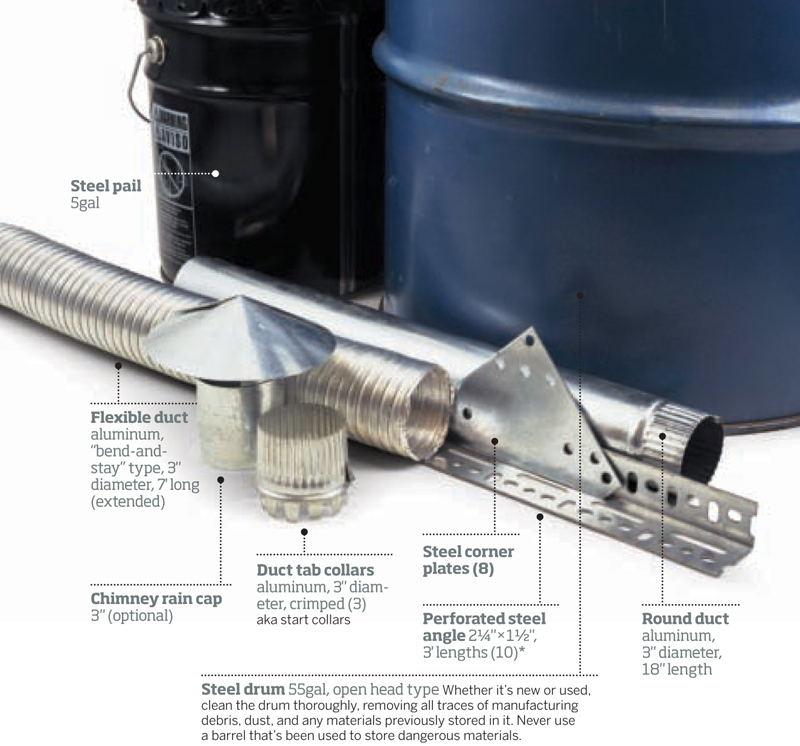
Gregory Hayes
* Wood or welded angle iron may be used for the stand in lieu of perforated angle iron. But if you use wood, be aware that the elevated smoke chamber temperatures could cause a fire.
» Hinges, 2" (6)
» Draw-pull latches, 3" (3)
» Silicone weatherstripping gasket, D-shaped, 12’
» Expanded metal, 1/8" thick, 2’×2’
» Steel rods, threaded, ¼-20, 18" long (2) with nuts (4) and washers (4)
» Eye bolts, ¼"×2" (4) with nuts (2) and washers (4)
» Sheet metal, 26 gauge, 12"×24"
» Sheet metal, 22 to 26 gauge, about 4"×8"
» Electric hot plate, 1,000W or more, adjustable, approx 9" diameter We used Maxam #KTELSB.
» Bolts, 3/8"×¾" (50) with nuts and lock washers
» Aluminized tape, 2" wide
» Meat thermometers (2)
» Steel pan, 10"diameter, shallow
» Machine screws or sheet metal screws (optional)
TOOLS
» Jigsaw with metal cutting blades You can also use a reciprocating saw, aka saber saw, but it’s less accurate.
» Drill and drill bits
» Center punch
» Socket wrench set
» Blind rivet tool with 1/8" or 3/16" rivets
» Crayon or grease pen, light colored
» File, angle grinder, or rotary tool with grinding bit e.g. Dremel
» Bench vise
» Nibbler, electric or pneumatic (optional)
» Screwdriver (optional)
Build your smoker.
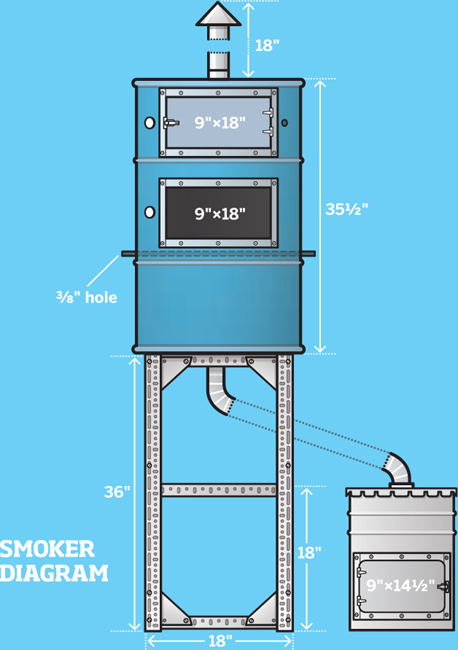
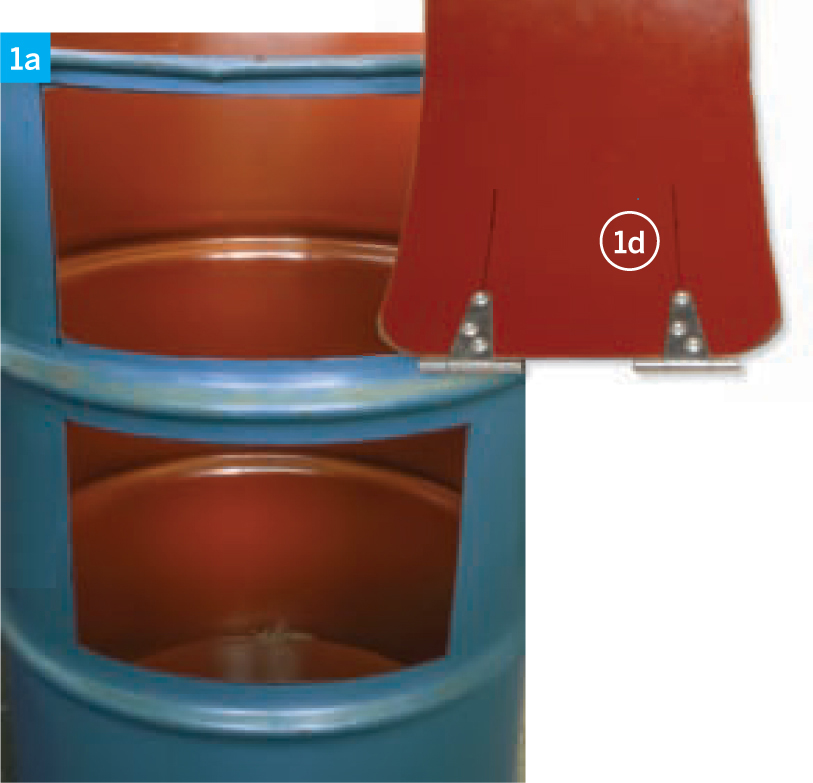
1. MAKE THE DOORS
This diagram shows the modifications required to turn your 55gal drum into a working smoke chamber. In a nutshell, you need to make several openings in the barrel: the doors through which the food is inserted and removed, a smoke inlet hole, a smoke outlet hole, and several smaller holes for grill supports and thermometers near the doors.
1a. Using a light-colored grease pen or crayon, mark the doors as shown above, centered between the barrel chimes. Punch your hole marks before drilling, to center your drill bit and prevent it walking across the metal. In the corners of the door, drill holes large enough for the jigsaw blade.
Support the barrel so it stays in place, insert the jigsaw, and cut out the doors carefully — you’ll use the cutouts as the doors. Grind all edges smooth with a file, rotary tool, or angle grinder.
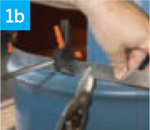
1b. Use a nibbler or jigsaw to cut 1"-wide metal door facings from 26-gauge sheet metal, 1" longer and 1" wider than your doors. The doors close against these strips, keeping the smoke inside the chamber.

Damien Scogin (diagram); Gunther Kirsch
1c. Place the facings on the barrel so they overlap the door opening by ½", and clamp them in place.

Drill 1/8" holes through the facings and barrel at 3" to 4" intervals, and then use 1/8" pop rivets to fasten the facings to the the barrel. You can also use 3/16" rivets. If you’ve not used blind rivets before, it’s easy and fun.
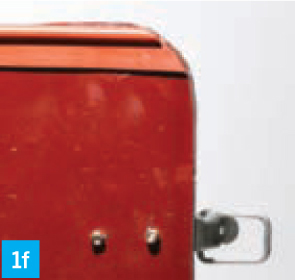
1d. Attach each door to the barrel with 2 hinges, using rivets, sheet metal screws, or short #8 machine screws. If you rivet the hinges to the doors, insert the rivets from the inside so they won’t block the doors from closing.
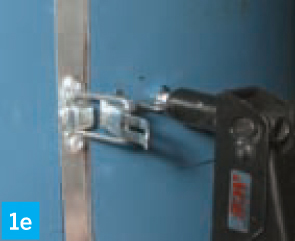
1e. Attach the draw-pull latches to the barrel and door so that when the door is closed, the latch pulls the door securely into place.
1f. Once the doors are attached to your satisfaction, apply weatherstripping to the edges of the doors so smoke can’t escape.

2. VENT THE SMOKER
2a. Cut two 3"-diameter holes, centered in the top and bottom flat surfaces of the barrel. Again, use a punch and drill to make a starter hole for the jigsaw.
Because jigsaws have a hard time with tight-radius cuts like this, you may want to use an air nibbler instead, to make quick work of the job.
2b. Remove the top from the barrel. Insert the tabbed collars into the top and bottom smoke holes and bend the tabs back so the collar stays securely in place. Seal with aluminized tape. Replace the top on the barrel.
William Gurstelle (pop riveting sidebar)
Pop Riveting
A Useful Skill for Sheet Metal Work
A blind rivet or pop rivet gun has one fixed and one movable handle and an opening in the top that accommodates heads for different-sized rivets. Pop rivets are deformable tubes with a long pin (called the mandrel) through the middle. To permanently fasten 2 pieces of sheet metal:
1. Clamp the pieces to be fastened, and drill a snug hole through both (use a ⅛" bit for ⅛" rivets, etc.).
2. Insert the rivet in the hole, tube side first.
3. Insert the mandrel pin into the rivet gun and squeeze hard on the handles. The gun pulls the pin, which causes the tube on the rivet to deform, mushrooming outward and locking the 2 pieces of sheet metal. You’ll hear a “pop” that means the pin has broken off and the 2 pieces are joined permanently.
3. ADD THE GRILL, HANGERS, AND THERMOMETERS
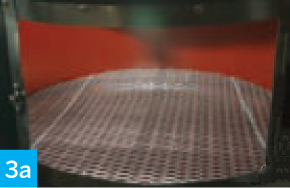
3a. Drill 3/8" holes in the sides of the barrel as shown in the Smoker Diagram (page 98). Insert 18" threaded steel rods and secure with nuts. Cut a circular grill from expanded metal, sized to fit your barrel, and place it atop the rods.
3b. Drill four 5/16" holes in the lid. Insert the eye bolts inside and fasten each with a nut and 2 washers.

TIP These eye bolts are useful for hanging large fish and fowl in the smoke chamber.
3c. Drill holes near the doors and insert the thermometers such that they fit snugly.
4. MAKE THE CHIMNEY
Rivet the (optional) rain cap to one end of the 18" duct. Rivet the other end to the tab collar in the barrel lid, and seal with aluminized tape.
5. MAKE THE FIREBOX
5a. Test-fit your hot plate and pan in the bottom of the steel pail, then cut and mount a 9"×14½" door in the pail’s side, as in Step 1.
5b. Lay out 2 triangular vent holes in the bottom of the pail, and a 3" smoke outlet hole centered in the lid. Use the punch, drill, and jigsaw to cut out the holes.
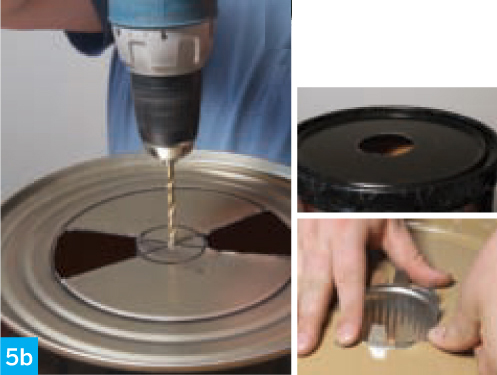
Insert the remaining tabbed collar into the 3" round hole in the top of the firebox, bend the tabs to secure it, and seal with aluminized tape.
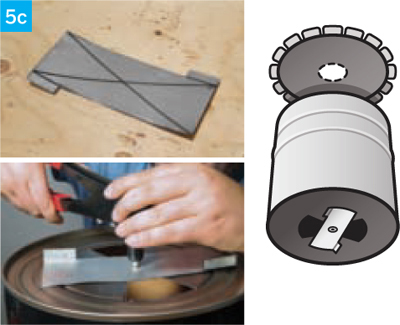
5c. Cut a louver from thin sheet metal large enough to cover both vent holes. Attach to the bottom of the firebox with a rivet in the center.
Damien Scogin (diagram)
6. BUILD THE STAND
The smoke chamber must be positioned higher than the firebox. I built a sturdy stand from perforated steel angle and bolts, but you could weld angle iron instead, or improvise your own frame.
The Smoker Diagram shows how to lay out and assemble the perforated steel angle. Use angle plates at the corners to add strength and rigidity to the structure.
Note the position of the crossmembers about midway between top and bottom. These support the firebox during hot smoking.

7. CONNECT THE SMOKE DUCT
7a. Hot smoking setup. Place the firebox on the stand directly below the smoke chamber’s inlet hole. Connect the firebox outlet collar to the smoke chamber inlet collar using a short piece of 3" duct. Seal with aluminized tape.
William Gurstelle (7b)
7b. Cold smoking setup. Position the firebox about 6’ away from the smoke chamber and extend the 3"-diameter bend-and-stay duct to its full length. Attach the duct to the smoke chamber inlet collar and the firebox outlet collar. Seal with aluminized tape.

![]() Want to get started? Check out our recipe on how to smoke fish at makeprojects.com/v/32.
Want to get started? Check out our recipe on how to smoke fish at makeprojects.com/v/32.
![]() TEST BUILDER: Daniel Spangler, MAKE Labs
TEST BUILDER: Daniel Spangler, MAKE Labs
William Gurstelle is a contributing editor of MAKE. Visit williamgurstelle.com for more information on this and other maker-friendly projects.
Smoke ’Em If You Got ’Em