PROJECT CATAPULT GLIDER LAUNCHER
Catapult Glider Launcher
Fling your Rocket Glider or other toy aircraft 150 feet into the sky!
For many years, the U.S. military has enjoyed playing with “toys.” Today that includes unmanned drone aircraft, but in the past, it was toy balsa wood airplanes. Thousands of folding-wing balsa gliders were shot out of the sky in the early 1940s for World War II artillery practice. High in the air, these toy airplanes had the scale effect of a full-sized plane. Developed and patented in 1939 by Jim Walker, founder of the American Junior Aircraft Company, the folding-wing Army Interceptor glider bore the brunt of the action.
My folding-wing Rocket Glider, based on the Interceptor, was featured as a how-to project in MAKE Volume 31 and is available as a kit from Maker Shed. While the Interceptor originally used a handheld rubber-band catapult, the military designed a launcher to hurl the gliders nearly 300 feet high. In 2004, Frank Macy designed the first reproduction of this launcher, on which this project is based.
With nearly 20 pounds of pulling force, this simple catapult remarkably flings the tiny glider (weighing less than an ounce) 150 feet into the air. Stand clear, pull the rope trigger, and watch a piece of history rocket into the sky!
1. Build the tripod catapult stand.
1a. Cut the lumber to the following lengths:
» 2×2: 8’ (3), 38" (1), and 47" (1)
» 1×2: 36" (2), 12" (1), 16" (1), 17" (1), and 3" (1)
» 1×4: 30" (1)
Materials
» Lumber: 2×2×8’ (4), 1×2×8’ (2), 1×4×30" (1) Cheap pine is fine; I used clear fir for a nicer look.
» Bolts, ¼": 4" (5), 3½" (4), 5½" (1)
» Nuts, ¼" (8)
» Wing nuts, ¼" (2)
» Washers, ¼" (20)
» Wood screws: ¾" (5), 2" (4)
» Screw eyes, 15/8" (4)
» Chain, light duty, 33"
» Wood glue
» Hinge, T style, 4"
» Aluminum C-channel, ½"×½"×1/16" thick, 26" length
» Surgical tubing, ½" OD, 6’ length
» Steel rod, 1/8" diameter, 9½" length
» Wire or cable, 14 gauge, stranded, coated
» Rubber band, 3½", heavy duty or you can double a 7" band
» Rope, light duty, 6’ needs to slip smoothly through screw eyes
» Wire clothes hanger
» Folding-wing glider for launching. Make your own at makeprojects.com/project/f/1934, or get our Rocket Glider kit, item #MKRS2 at Maker Shed (makershed.com).
TOOLS
» Miter saw power or hand
» Drill and drill bits: 3/32", 1/8", ¼", ½"
» Hacksaw
» Screwdriver and wrench or socket set
» Wire cutters/strippers
» Scissors or utility knife
Build the glider in
MAKE VOLUME 31
Or get the kit from MAKER SHED #MKRS2
![]() TIME: A WEEKEND
TIME: A WEEKEND ![]() COMPLEXITY: EASY
COMPLEXITY: EASY
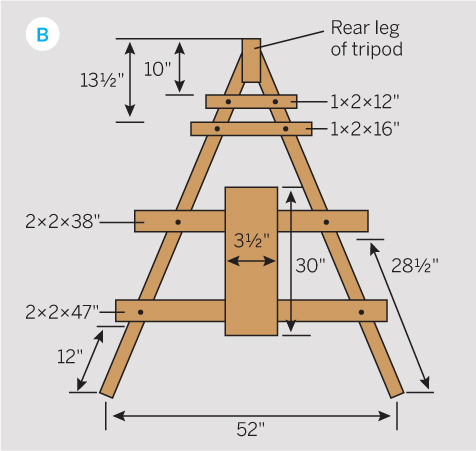
1b. Assemble the tripod stand, following the assembly drawings (Figures A and B). Cut the top inside corners of the 2 front legs at 15° so they’ll meet the rear leg flush when they’re splayed out (Figures C and D).


Gregory Hayes
Drill ¼" holes where indicated, then attach the pieces with ¼" bolts, washers, and nuts, except the 30" launch platform (see Step 2).
Use wing nuts at the top of the tripod (with a 4" bolt) and where the catapult arms attach to the rear leg (5½" bolt). This way, the catapult arms can be loosened and swung back so the launcher is more portable.
1c. Attach one screw eye 3’ up on the rear leg, and another on the upper rail that supports the launch platform. Measure 33" of chain and attach it to both screw eyes (Figure E).
Drill ½" holes horizontally through the free ends of the catapult arms.
2. Build the launch platform.
2a. Cut the aluminum C-channel to 26" using a hacksaw. Following Figure F, place the channel, open side up, in the center of the 1×4 board, 2" from the top. Drill pilot holes through the channel and attach it with ¾" wood screws.
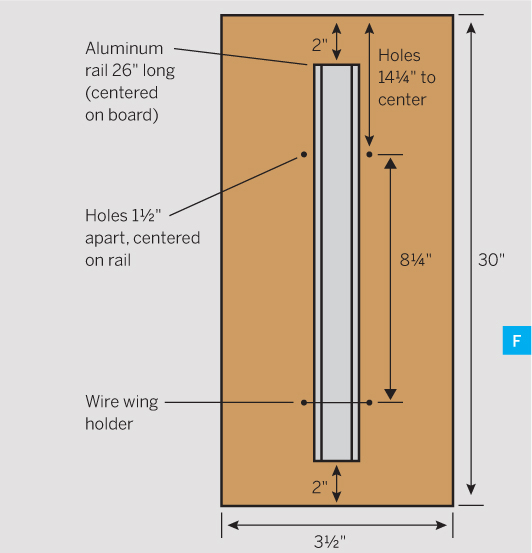
2b. Measure down 14¼" from the top of the 1×4, then drill two ¼" holes 1½" apart (on center), one on each side of the channel.
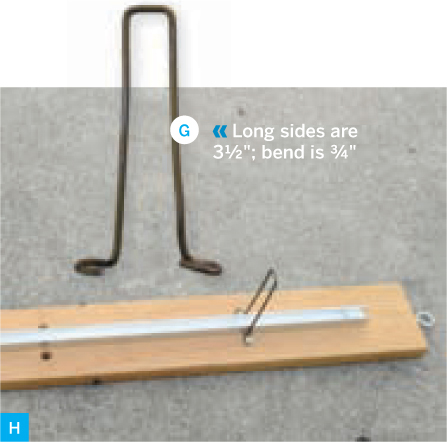
2c. To install the wing holder, cut a 10" piece of wire from a clothes hanger and bend it into the shape shown in Figure G. Then screw it into the launch platform 8¼" below the ¼" holes you made. Placement is important; it must hold the Rocket Glider’s wings back, but not impede it from leaving the launcher.
If you’ll be launching some other craft, don’t install the wing holder yet; wait until you build the trigger mechanism in the next step so you can get your measurements right.
2d. Attach a screw eye centered in the bottom edge of the launch platform (Figure H); this will guide the trigger cord.
2e. Finally, mount the launch platform centered on the lower horizontal rails on the tripod stand, using wood screws.
3. Make the trigger.
3a. Glue and screw the 3" piece of 1×2 horizontally to the top of the 17" piece of 1×2 (Figure I). Drill two 3/32" or 1/8" holes in the horizontal piece, 1½" apart, so the 1/8" rod will fit snugly.

3b. Bend the 1/8" rod into a U shape with 4" legs, 1½" wide at the base. Carefully hammer the U-shaped rod all the way into the 2 holes so they stick out the other side about 3" (Figure J). These are the trigger rods.
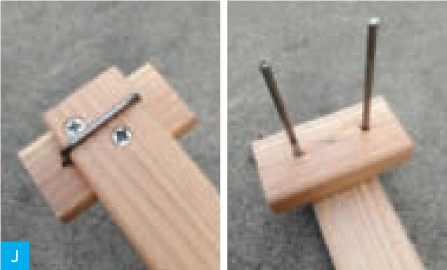
IMPORTANT
Make sure the trigger rods are the same length, so they’ll release the glider at the same time.
3c. Drill a ½" hole through the bottom of the trigger board and tie the launch cord through it.
4. Put it all together.
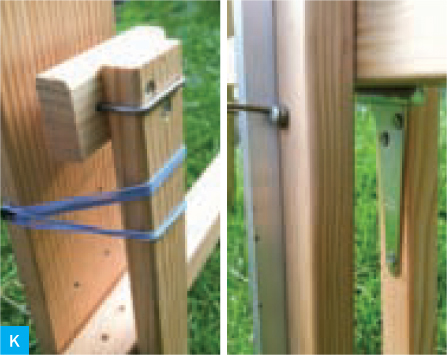
4a. Feed the trigger rods through the ¼" holes in the launch platform. Attach 2 wood screws into the sides of the launch platform and stretch a rubber band between them to hold the trigger board in place. The 2 pins should move easily in and out of the holes in the launch platform. Bend them if you need to.
When you’re satisfied with the trigger action, attach the T-hinge to the trigger board and the bottom rail (Figure K).
4b. Feed the trigger cord through the screw eye in the bottom of the launch platform.
4c. Cut the surgical tubing into two 3’ lengths and tie a big knot in one end of each. Feed these through the ½" holes in the ends of the catapult arms.
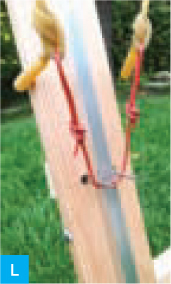
4d. Cut a 24" length of the heavy coated wire and tie a knot in each end. Tie the wire into the free ends of each length of surgical tubing (Figure L). You’re done. ![]()
Launching Tips
Set up your launcher on a good-sized field with little or no wind. With the catapult arms in launch position, tighten the wing nuts.
Pull the surgical tubing downward and hook the catapult wire onto the trigger rods (Figure L). The tubing should be pointing straight up vertically.
Now practice triggering the catapult without the glider. With your head well clear, place one foot on the catapult cross-rail, and slowly pull the rope back, triggering the catapult. Don’t jerk it, or the trigger can bounce back and damage your glider.
This is an extremely powerful catapult to launch a glider that weighs barely 1oz. There is room for disaster. I suggest practice-launching something else before you move on to the glider.
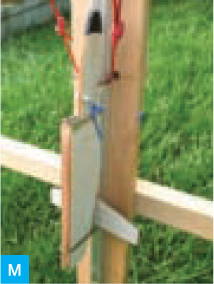
Now for the true test. With the wings folded back, place the glider in the C-channel, and hook the launch notch in the bottom of the glider onto the catapult wire. The folded wings should slip freely into the wire wing holder (Figure M).
Just like the U.S. Army did 70 years ago with a similar launcher, pull the rope slowly ... and watch your glider zip skyward.
Mods
This catapult launcher is a rough replica of the one used by the U.S. military, so while it folds, it’s still not very portable. I challenge MAKE readers to come up with more compact and clever designs and share them at make projects.com/project/g/2563. The possibilities are endless!
CAUTION Once the launcher is active, keep your head away from the catapult!
Rick Schertle ([email protected]) teaches middle school in San Jose, Calif., and designed the Compressed Air Rockets for MAKE Volume 15 and the Rocket Glider for MAKE Volume 31. With his wife and kids, he loves all things that fly.