
PROJECTS MAKING PIGMENTS
Making Pigments
![]() TIME: 1 HOUR OVER 2 DAYS
TIME: 1 HOUR OVER 2 DAYS ![]() COST: $10–$20
COST: $10–$20
Illustrated by Nate Van Dyke; Photograph by Gregory Hayes
Use household materials and simple electrolysis to make metal oxide powders for tinting paints.
![]() After reading about ferrofluids (liquids with magnetic properties) in MAKE, I started trying to make my own. I learned how to electrolyze water with iron electrodes to create magnetite — a jet-black iron-oxide — and realized the same process could be used to make simple metal oxide pigments. Instead of just buying supplies at the art store, I wanted to make a painting truly "from scratch.”
After reading about ferrofluids (liquids with magnetic properties) in MAKE, I started trying to make my own. I learned how to electrolyze water with iron electrodes to create magnetite — a jet-black iron-oxide — and realized the same process could be used to make simple metal oxide pigments. Instead of just buying supplies at the art store, I wanted to make a painting truly "from scratch.”
Electrolysis is the process of using direct current to cause a chemical reaction that would not otherwise occur. It requires an electrolyte, 2 electrodes, and a current source. It has many applications, but the most common is probably electroplating, which is used, for example, to coat a large piece of cheaper metal with a small amount of a more expensive one that is more attractive or a better conductor.
My pigment-making process is dirt simple. The current source is an old cellphone charger with the plug cut off. The electrodes are pieces of common metal hardware, and because they’re identical I don’t have to pay attention to the current’s polarity. The electrolyte is just salt water.
The reaction takes 3 hours and produces a brownish-black mixture of iron oxyhydroxides. It can be repeated with copper electrodes to give it a vibrant orange.
1. Mix the Electrolyte.
Water on its own is a poor conductor, so we add an ionic chemical — in this case sodium chloride — to increase its conductivity. Pour a small amount of salt into the glass dish. Fill about halfway with water and stir to dissolve.

Gunther Kirsch
2. Wire the Electrodes.
Cut off the charger plug and strip the wires (Figure 2a, following page).

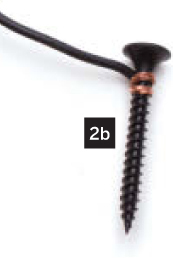
Twist the wires around the screws near the heads (Figure 2b).
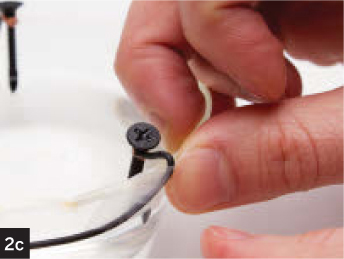
Position the screws at opposite edges of the dish, keeping the wire above the waterline. Secure the wires to the sides of the dish with tape (Figure 2c).
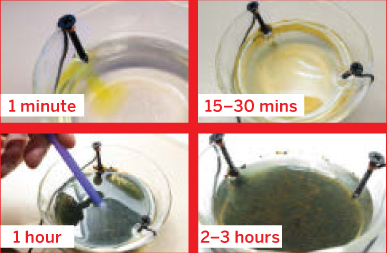
The water should begin to turn yellow within minutes. After an hour, you should see black iron hydroxide settling on the bottom of the dish. The bubbles will probably have lifted some to the surface, where it will turn red or orange. After 2-3 hours, the water should be almost completely opaque. The cathode should be covered with scale.
3. Run the Reaction.
Plug in the charger. You should see bubbles coming off the screws. Stir occasionally with a small paintbrush, breaking up any chunks and brushing off the electrodes. Unplug the charger after 3 hours.
(See the sidebar, Time the Reaction)
4. Separate the Products.
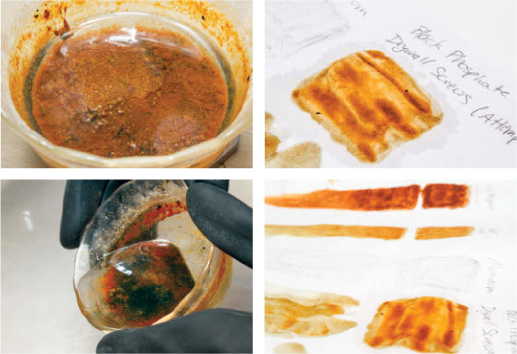
Remove the electrodes and clean them off. The cathode should be noticeably eroded as shown in Figure 4a.

Put on your gloves, take the dish outside, and fill it to the brim with acetone (Figure 4b).

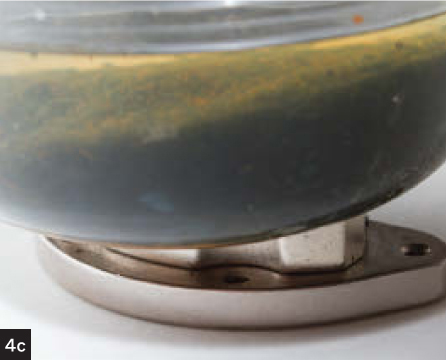
Touch the magnet to the bottom of the dish. The black form of iron oxide is slightly magnetic, and this should help separate it at the bottom of the dish (Figure 4c).
Leave the dish overnight.
Using Your Pigments
The next day, there should be a completely clear layer of water and acetone on top of a thick sludge of red iron hydroxide and black iron oxide. Carefully pour off the excess acetone and water.
At this point, you have a thin ink you can use as is. Dip your brush, apply it to paper, and the acetone will evaporate quickly without warping the page like water does. The longer you wait, the more acetone will evaporate and the thicker the ink will be.
GOING FURTHER
If left uncovered, the acetone will evaporate and leave a dry cake of iron oxide, but you can add more acetone (or some other carrier) to reconstitute it.
If you repeat this process, substituting small copper pipe fittings for the steel screws, you will produce a brilliant orange powder. ![]()

Sean T. McBeth is a hobbyist, software engineer, photographer, and stalwart member of Philadelphia hackerspace Hive76. He can be reached at [email protected].