Buyer’s Guide | Fused Filament Printers | Ultimaker 2
ULTIMAKER 2
Best in Shootout for overall print quality
WRITTEN BY ELI RICHTER
Available at ![]() bit.ly/ultimaker-2-printer
bit.ly/ultimaker-2-printer

Brian Kaldorf
Ultimaker | ultimaker.com
![]() Price as Tested $2,499
Price as Tested $2,499
![]() Build Volume 230×225×205mm
Build Volume 230×225×205mm
![]() Bed Style Heated glass
Bed Style Heated glass
![]() Temperature Control Yes
Temperature Control Yes
![]() Materials PLA, ABS (others encouraged)
Materials PLA, ABS (others encouraged)
![]() Print Untethered? SD card, OctoPrint compatible
Print Untethered? SD card, OctoPrint compatible
![]() Onboard Controls? Yes
Onboard Controls? Yes
![]() Host Software Cura
Host Software Cura
![]() Slicer CuraEngine
Slicer CuraEngine
![]() OS Mac, Linux, Windows
OS Mac, Linux, Windows
![]() Open Software? Cura/CuraEngine: AGPLv3
Open Software? Cura/CuraEngine: AGPLv3
![]() Open Hardware? Auxiliary design files: CC BY-NC-SA 3.0
Open Hardware? Auxiliary design files: CC BY-NC-SA 3.0
ALTHOUGH ULTIMAKER’S SECOND OFFERING RECENTLY CELEBRATED ITS FIRST BIRTHDAY, its performance in our Shootout was head and shoulders above the rest of the FFF machines. This is a great machine for those who want to load a model and print without spending hours setting up and tweaking parameters, but it still gives the advanced user enough control to get even more out of the Ultimaker 2. Ultimaker also maintains its own integrated 3D-printing ecosystem, with an online model library at YouMagine.com and web-based modeling tool UltiShaper 3D.
GREAT OUT OF THE BOX
The Ultimaker 2 ships almost entirely preassembled and ready to go. Simply remove the (awesome) glass build plate from its protective bubble wrap, and secure it with the premounted aluminum clips. Snap on the filament holder, power it on, run the leveling procedure, load the filament, and this bot’s ready to go. Bed leveling is performed manually using the familiar “paper thickness” ritual, and onboard menus on the OLED screen quickly guide the user through the process. While auto-bed leveling would be a welcome feature, the 3-point system (versus a 4-point system where two knobs must be adjusted in tandem) works very well and the adjustment knobs turn smoothly, making fine-tuning a breeze.
Models are prepared for printing with Cura, Ultimaker’s open-source software, and files are written directly to an SD card. Software configuration is simple: Just select your printer from a list of preconfigured options. For those who want to just load a model and print, Cura’s default streamlined “Quickpoint” mode displays three basic print quality options: fast, normal, and high quality. More adventurous users can switch the software into “Expert Mode,” which opens up a multitude of tweakable settings. Normal mode works great for most prints, but it can be a bit fast for smaller models. Prints are run directly from a computer SD card using the onboard controls.
Using the stock settings, this printer was at the head of the pack for most of our test prints, notably those that tested the physical stability of the machine. Tests with lower scores, such as the Overhang and Bridging prints, were hurt by the aggressive speeds and could be vastly improved with some minor tweaking.
FEATURE PACKED, OCTOPRINT COMPATIBLE
The Ultimaker 2 has all of the features one should expect of a class-leading printer: a heated glass build platform, illuminated build area, onboard controls, two PLA cooling fans, with a frame that is sturdy and attractive. It’s also OctoPrint compatible, so wireless printing (and slicing via Cura) is possible with the user addition and setup of a Raspberry Pi and a wi-fi dongle. Absent from this feature list is an autoleveler and second extruder, which though in development, was not yet available as of press time. If a dual extruder is on your immediate must-have list, then you may want to wait. However, Ultimaker has always included a spot in their extruder carriage for the possible addition of a second one, so upgrades of this machine are feasible.
NOT QUITE PERFECT, BUT DARNED CLOSE
One has to dig deep to find things not to like about the Ultimaker 2. During the Shootout, we had two thirds of the build area LEDs fail (I told you, we’re digging deep). Feeding material into the extruder can be tricky and the fans on the hot end assembly are a little loud — unfortunate for this otherwise quiet printer. Ultimaker was responsive when we anonymously contacted their support about the faulty LED strips, offering advice to troubleshoot and replacement units.
CONCLUSION
Makers on a tight budget may want to look elsewhere, but few machines can beat the Ultimaker 2’s combination of high-quality, hassle-free printing with easy-to-use software and an attractive, compact package. ![]()
PRINT SCORES
|
1 |
2 |
3 |
4 |
5 |
|
1 |
2 |
3 |
4 |
5 |
|
1 |
2 |
3 |
4 |
5 |
|
1 |
2 |
3 |
4 |
5 |
|
1 |
2 |
3 |
4 |
5 |
|
1 |
2 |
3 |
4 |
5 |
|
1 |
2 |
3 |
4 |
5 |
|
1 |
2 |
3 |
4 |
5 |
|
FAIL |
PASS |
|||
|
FAIL |
PASS |
|||
PRO TIPS
![]() Reduce printing speed for small parts or tweak settings in Cura to set minimum layer time.
Reduce printing speed for small parts or tweak settings in Cura to set minimum layer time.
![]() Use a glue stick to keep large overnight prints adhered to the platform — brims and rafts can be difficult to remove.
Use a glue stick to keep large overnight prints adhered to the platform — brims and rafts can be difficult to remove.
![]() Back filament from hot end manually (heat nozzle, move material, remove tube and trim before executing “change filament procedure”) to avoid melted chunks jamming filament feed.
Back filament from hot end manually (heat nozzle, move material, remove tube and trim before executing “change filament procedure”) to avoid melted chunks jamming filament feed.
WHY TO BUY
Best in Shootout print quality. Killer heated glass bed is perfect for PLA prints, also works well with ABS, Bridge Nylon, PETT and T-glase. Beginner-friendly software, but also offers complete setting control. Onboard controls allow for fine-tuning of temp and speed settings midprint.

ELI RICHTER is an engineer by day and maker by night. He is a core member of HackPittsburgh where he manages and maintains their 3D-printer program. Other projects include running HackPittsburgh’s PPPRS racing team, Hack to the Future. elijahrichter.wordpress.com
Buyer’s Guide | Fused Filament Printers | TAZ 4
TAZ 4
Thoughtful construction, great prints, libre hardware
WRITTEN BY MATT STULTZ

Brian Kaldorf
TAZ 4 | lulzbot.com
![]() Price as Tested $2,195
Price as Tested $2,195
![]() Build Volume 298×275×250mm
Build Volume 298×275×250mm
![]() Bed Style Heated glass
Bed Style Heated glass
![]() Temperature Control? Yes
Temperature Control? Yes
![]() Materials ABS, PLA, HIPS, PVA, and wood filaments
Materials ABS, PLA, HIPS, PVA, and wood filaments
![]() Print Untethered? SD card, OctoPrint compatible
Print Untethered? SD card, OctoPrint compatible
![]() Onboard Controls? Yes
Onboard Controls? Yes
![]() Host Software Printrun
Host Software Printrun
![]() Slicer Slic3r
Slicer Slic3r
![]() OS Mac, Linux, Windows
OS Mac, Linux, Windows
![]() Open Software? Third-party software
Open Software? Third-party software
![]() Open Hardware? GPLv3 and CC-BY-SA 4.0
Open Hardware? GPLv3 and CC-BY-SA 4.0
THE LULZBOT TAZ 4 WAS HIGH ON MY LIST OF PRINTERS TO TEST THIS YEAR. I have always been impressed with the engineering and attention to detail that LulzBot has put into its machines. Having spent some time on the original TAZ during last year’s testing, I wanted to see what improvements had been made. I expected a printer that the hackers would love — capable of producing large prints that are perfect for demos and parts. I didn’t expect a machine that would print high-quality prints on par with any other machine on the market. I was pleasantly surprised!
MINOR ASSEMBLY, FOOLPROOF CONNECTORS
Unpacking the TAZ 4, you will find the printer mostly assembled but with a few of the parts packed separately for easy shipment. You will also find a quick-setup guide, a larger manual, a spool of filament, and an excellent toolkit. Assembly is a snap — the TAZ 4 uses high-quality connectors that make the wiring foolproof. Most of the parts can be assembled by hand, but the few that can’t are easily completed with the included toolkit. With the help of the quick-start guide, you will be up and running with your first prints in about an hour.
BY ENGINEERS, FOR ENGINEERS
In a field of printers that are starting to spend a serious amount of effort on their design aesthetics, the LulzBot TAZ 4 isn’t going to be winning any beauty pageants — it’s been designed by engineers for engineers. The creators took time to not only figure out how to do the things they wanted but how to do them the best way. The spool holder is hinged to hide away during transportation or storage, but swivels down and locks in place for use. The filament guide snaps onto its holder and can adjust with the movements of the machine. In most printers we find that screw holes are either tapped directly into the plastic or have nuts on the backside to hold the bolts in place. The TAZ uses press-fit brass threaded inserts that ensure all connections stay rock solid. Instead of using the standard steel roller bearings for linear motion, the TAZ uses igus polymer bushings. These bushings run quieter and without lubrication, resulting in zero maintenance and a longer lifespan.
KEEPING IT OPEN SOURCE
As more printers hit the market as closed-source projects, LulzBot has continued its commitment to manufacturing a fully open-source printer. All of the files — their source files, schematics, and code — are available for you to fix, build, and redesign any portion of the machine. They also support a large number of the slicing and control software options that are available for the OS printers. LulzBot’s site includes config files for the popular open-source Slic3r engine tuned for numerous materials, making it simple to start printing in ABS, PLA, NinjaFlex, and others.
Even the printed manual that comes with the TAZ is open source. If you get nothing else out of this review, download (bit.ly/taz-manual) and take a look. Many sections are nonprinter specific and are perfect for anyone interested in 3D printing. If you use Slic3r this is a must-read!
CONCLUSION
So who is the TAZ 4 a perfect printer for? While I’m hesitant to say this is a printer for a first-time printer owner, the quick-start guide and manual make it easy for anyone to get this machine up and running. Makers, hackers, engineers, and artists will feel right at home with this machine. The large, heated glass build platform, ability to print untethered, and ease of modification will give them everything they are looking for. Sometimes it’s best to spend your time on engineering rather than good looks. ![]()
PRINT SCORES
|
1 |
2 |
3 |
4 |
5 |
|
1 |
2 |
3 |
4 |
5 |
|
1 |
2 |
3 |
4 |
5 |
|
1 |
2 |
3 |
4 |
5 |
|
1 |
2 |
3 |
4 |
5 |
|
1 |
2 |
3 |
4 |
5 |
|
1 |
2 |
3 |
|
|
|
1 |
2 |
3 |
4 |
5 |
|
FAIL |
PASS |
|||
|
FAIL |
PASS |
|||
PRO TIPS
![]() The quick-fit extruder makes upgrades a snap. LulzBot already makes a flexible filament extruder and promises a dual extruder upgrade soon.
The quick-fit extruder makes upgrades a snap. LulzBot already makes a flexible filament extruder and promises a dual extruder upgrade soon.
![]() Even if the TAZ isn’t for you, download the manual at bit.ly/taz-manual, it’s packed with info on Slic3r and 3DP tips.
Even if the TAZ isn’t for you, download the manual at bit.ly/taz-manual, it’s packed with info on Slic3r and 3DP tips.
![]() Download the Slic3r config files from LulzBot’s site to get printing in a wide variety of materials quickly.
Download the Slic3r config files from LulzBot’s site to get printing in a wide variety of materials quickly.
WHY TO BUY
Large print area with a heated glass bed makes print removal easy and supports most materials. It’s totally open source, extremely well engineered, has a quick-exchange extruder system, an amazing manual, and a top-quality toolkit. It produces excellent prints in a wide variety of materials and has an extruder upgrade made for flexible filaments.


MATT STULTZ is a community organizer and founder of both 3D Printing Providence and HackPittsburgh. He’s a professional software developer, which helps fuel his passion for being a maker! 3DPPVD.org
Buyer’s Guide | Fused Filament Printers | Printrbot Simple Metal
PRINTRBOT SIMPLE METAL
Last year’s portable “best value” returns with some serious upgrades
WRITTEN BY LUIS RODRIGUEZ
Available at ![]() bit.ly/printrbot-metal
bit.ly/printrbot-metal
Brian Kaldorf
Printrbot Simple Metal | printrbot.com
![]() Price as Tested $599 (plus $39 for metal handle)
Price as Tested $599 (plus $39 for metal handle)
![]() Build Volume 150×150×150mm
Build Volume 150×150×150mm
![]() Bed Style Unheated steel (heated upgrade available)
Bed Style Unheated steel (heated upgrade available)
![]() Temperature Control Yes
Temperature Control Yes
![]() Materials PLA (ABS if heated bed)
Materials PLA (ABS if heated bed)
![]() Print Untethered? MicroSD, OctoPrint compatible
Print Untethered? MicroSD, OctoPrint compatible
![]() Onboard Controls? No, but LCD add-on available
Onboard Controls? No, but LCD add-on available
![]() Host Software Repetier-Host
Host Software Repetier-Host
![]() Slicer Slic3r
Slicer Slic3r
![]() OS Mac, Windows, Linux
OS Mac, Windows, Linux
![]() Open Software? Third-party software
Open Software? Third-party software
![]() Open Hardware? Auxiliary design files: CC BY-NC-SA 3.0
Open Hardware? Auxiliary design files: CC BY-NC-SA 3.0
THE ALL-METAL CONSTRUCTION OF THE PRINTRBOT SIMPLE METAL feels more like a professional power tool than an entry-level 3D printer. The weight of this small, portable printer gives it a real sense of quality, and the inclusion of a now-standard auto-leveling bed makes it a real step up from its wooden predecessors. This printer is packed with features and rivals machines costing much more.
SAME GREAT VALUE, NOW ALL METAL
Upgrades from the original Simple (still sold as an upgraded “Maker’s Kit”) include a larger build platform that measures a healthy 150×150×150mm, a powder-coated steel frame, thicker polished guide rods, large linear bearings that are seated in machined aluminum carriage, and an all-aluminum, direct-drive extruder that includes a UBIS hot end with interchangeable tips. Our assembled review unit also came with an aluminum handle ($39 upgrade) with an integrated printed spool holder (free).
MANY OPTIONAL UPGRADES AVAILABLE
With the healthy-sized bed you can print many substantially sized items in PLA and nylon on the unheated surface. ABS is supported if you add the optional heated bed upgrade. In fact, the heated bed upgrade ($99) and the interchangeable tips (ranging from 0.25 to 0.75mm for $8 each) allow you to experiment with just about any material. You can print tethered via Repetier-Host, untethered via onboard microSD card, or add onboard controls with the Printrbot LCD control kit accessory ($65). Don’t forget to print the fan shroud upgrade, it enabled our test unit to attain perfect scores on the Bridging and Overhang tests.
IMPROVED DOCUMENTATION, GREAT SUPPORT
The Simple’s setup documentation is professional and thorough. Due to the amount of information presented, it can feel a bit overwhelming, but it’s a fantastic reference when needed. Printrbot also has a robust help site (help.printrbot.com) and community forum (printrbottalk.com), and it’s common to the see the Printrbot’s founder, Brook Drumm, answering questions directly. That’s a nice customer service touch. There’s also a great education section for teachers and students (learn.printrbot.com).
A FEW MINOR ISSUES
The Simple Metal is pretty great, but it’s not perfect. The initial adjustment of the auto-level probe is a tad cumbersome. It takes a bit of double-hand holding to adjust the probe while fighting the tension on the wiring in the close quarters around the adjustment nuts. The inclusion of a laser-cut wrench helps, and is a nice, sentimental reminder of Printrbot’s beginnings. In addition, it can be hard to tell if the printer is turned on until you notice the glow from underneath the machine. This was not immediately apparent in a well-lit room. We also had a serious nozzle clog issue during an 8-hour overnight print that resulted in the filament forcing its way out of the extruder in a bizarrely perfect, spring-like coil.
Although it’s a common open-source toolchain issue not directly related to Printrbot, it can be a frustrating experience for a first-time user to walk through Slic3r’s multiple setup screens and dialog boxes. I’d like to see Cura formally recommended as another open-source option, as the Printrbot community already recommends it. I also was not impressed with the “write to SD” function of Repetier-Host; I took the microSD card out and loaded it into the computer to transfer the file manually, although it’s a bit hard to access.
CONCLUSION
This printer is a joy and doesn’t feel like an entry-level machine at all. I recommend this printer daily to visitors to Science City, explaining it has many features of higher-priced printers (plus some they don’t offer). This resonates with educators and budget-conscious parents. It’s also perfect for my friends at the local hackerspace, many of whom have spent quite a bit more on machines that don’t have the print quality or the fit and finish of the Simple Metal. ![]()
PRINT SCORES
|
1 |
2 |
3 |
4 |
5 |
|
1 |
2 |
3 |
4 |
5 |
|
1 |
2 |
3 |
4 |
5 |
|
1 |
2 |
3 |
4 |
5 |
|
1 |
2 |
3 |
4 |
5 |
|
1 |
2 |
3 |
4 |
5 |
|
1 |
2 |
3 |
4 |
5 |
|
1 |
2 |
3 |
4 |
5 |
|
FAIL |
PASS |
|||
|
FAIL |
PASS |
|||
PRO TIPS
![]() During Slic3r setup, measure your filament diameter. Add 0.1mm to avoid a known bug and perfectly adjust your extrusion.
During Slic3r setup, measure your filament diameter. Add 0.1mm to avoid a known bug and perfectly adjust your extrusion.
![]() Print the fan shroud from printrbot.com/project/simple-metal, it will greatly improve every print thereafter.
Print the fan shroud from printrbot.com/project/simple-metal, it will greatly improve every print thereafter.
![]() Avoid Repetier-Host’s “write to SD” — manually transfer files to SD from your computer’s SD reader.
Avoid Repetier-Host’s “write to SD” — manually transfer files to SD from your computer’s SD reader.
WHY TO BUY
It’s feature-packed, portable, and solidly built. With its high print scores and many available upgrades, the Simple Metal is a great value for beginners and experts alike.


LUIS RODRIGUEZ is the lead organizer for Maker Faire Kansas City and has been 3D printing since 2009, when he got his first MakerBot Cupcake. Luis works at Science City, where he manages the Maker Studio and Spark!Lab. unionstation.org/sciencecity
Buyer’s Guide | Fused Filament Printers | Ditto Pro
DITTO PRO
Easy for beginners. Plus, attractive, affordable, and tinkerer-friendly.
WRITTEN BY JOHN ABELLA

Brian Kaldorf
DITTO PRO | tinkerine.com
![]() Price as Tested $1,899
Price as Tested $1,899
![]() Build Volume 220×165×220mm
Build Volume 220×165×220mm
![]() Bed Style Unheated glass
Bed Style Unheated glass
![]() Temperature Control Yes
Temperature Control Yes
![]() Materials PLA
Materials PLA
![]() Print Untethered? SD card, OctoPrint compatible
Print Untethered? SD card, OctoPrint compatible
![]() Onboard Controls? Yes
Onboard Controls? Yes
![]() Host Software Tinkerine Suite
Host Software Tinkerine Suite
![]() Slicer Integrated CuraEngine
Slicer Integrated CuraEngine
![]() OS Mac, Windows
OS Mac, Windows
![]() Open Software? No
Open Software? No
![]() Open Hardware? No
Open Hardware? No
BACK FOR A SECOND YEAR, VANCOUVER’S TINKERINE STUDIOS HAS ADDED a shiny new printer to their lineup, the Ditto Pro. We put the bright white machine through its paces and found that there’s a lot to like.
UNIQUE OPEN C FRAME
Keeping with the open design of their previous Ditto and Litto models, the new Pro has a very accessible “open C frame” build area. It’s great for demonstrations, as onlookers can easily see how it works. Fashioned from white Dibond panels, it features bright LED lighting and a built-in graphical LCD screen with an SD card slot. The extruder hot end is well designed, and the filament loading and changing was easy following the on-screen prompts.
The Ditto Pro is one of the few systems where the filament spool is kept within the confines of the printer. It’s a small detail, but a game changer when you’re pressed for space.
FOURTH HIGHEST IN OVERALL PRINT QUALITY
This machine scored the fourth highest overall print quality in our tests, with especially impressive performance in the Overhang and Surface Finish tests. The Ditto Pro’s build area of 215×160×205mm falls just below average size, and it comes equipped with a removable, unheated, glass build plate, making this machine PLA only. Leveling the build plate was easy using the on-screen direction and the three-point adjustment knobs, but our testers had problems with print adhesion until we began using glue sticks.
INTUITIVE BESPOKE SOFTWARE
Tinkerine supplies their own bespoke software for their printers, known as Tinkerine Suite. It provides a user-friendly interface while tucking away the more technical details, and uses Ultimaker’s open-source Cura engine under the hood. Many of our testers found the software to be intuitive and easy to use. There’s no provision for manually controlling the printer from the software, but it’s an available option in the LCD menus.
LACKING DETAILED DOCUMENTATION
One of the biggest improvements across the field of tested printers this year has been in the area of documentation; unfortunately this has not been the case for the Ditto Pro. The primary machine documentation for this model was a nicely designed, but extremely brief, quick-start guide and an 18-page Tinkerine Suite software manual. With other companies providing bound 50-100 page guides, supplying so little in the way of documentation is a significant shortcoming.
The FAQ section on the Tinkerine website covers some topics such as print adhesion, but it doesn’t offer concrete direction, instead suggesting only that something may be needed. Similarly, the FAQ suggests that in certain circumstances the stepper driver voltage may need to be tuned, but offers no direction about what the process entails or how to go about it.
CONTROL ISSUES
Throughout the course of our testing, the Ditto Pro performed extremely well, and did not experience any jams or clogs. However, testers consistently reported that the LCD control panel knob was way too sensitive, often making it hard to select the correct item from the menu. This ranged from a nuisance to borderline unusable throughout the weekend and was a source of frustration for many testers.
CONCLUSION
The Ditto Pro is a great-looking machine with print performance to match. It scored as well as some of the best printers we tested, while far less expensive than most of them. If the documentation were improved significantly, we believe that the combination of good design and easy to use software would make it ideal for new users. As it stands, the Ditto Pro is probably best for the user willing to get a little more involved in the care and feeding of the system — a tinkerer, and maybe that’s the point. ![]()
PRINT SCORES
|
1 |
2 |
3 |
4 |
5 |
|
1 |
2 |
3 |
4 |
5 |
|
1 |
2 |
3 |
4 |
5 |
|
1 |
2 |
3 |
4 |
5 |
|
1 |
2 |
3 |
4 |
5 |
|
1 |
2 |
3 |
4 |
5 |
|
1 |
2 |
3 |
4 |
5 |
|
1 |
2 |
3 |
4 |
5 |
|
FAIL |
PASS |
|||
|
FAIL |
PASS |
|||
PRO TIPS
To get your prints to stick to the platform, cover it with blue tape or use a glue stick.
WHY TO BUY
Simplified software (but configurable settings) that produces great prints with nice Surface Finish and solid Overhangs. The Ditto Pro takes G-code, so you can use whatever slicer you like.

JOHN ABELLA is a maker of things, obsessive hobbyist, 3D printing and CNC enthusiast. Maker Faire New York 3D Printer Village wrangler and lead instructor at BotBuider.net. John has written for all three Make: 3D printer guides.
Buyer’s Guide | Fused Filament Printers | BeeTheFirst
BEETHEFIRST
Smartly designed consumer-grade hardware, with a little something extra
WRITTEN BY CHRIS YOHE & ANNA KAZIUNAS FRANCE

Brian Kaldorf
BeeTheFirst | beeverycreative.com
![]() Price as Tested $2,172
Price as Tested $2,172
![]() Build Volume 190x135x125mm
Build Volume 190x135x125mm
![]() Bed Style Unheated acrylic
Bed Style Unheated acrylic
![]() Temperature Control No
Temperature Control No
![]() Materials BeeTheFirst PLA only
Materials BeeTheFirst PLA only
![]() Print Untethered? Unplug USB, wi-fi via BeeConnect
Print Untethered? Unplug USB, wi-fi via BeeConnect
![]() Onboard controls? No
Onboard controls? No
![]() Host Software BeeSoft
Host Software BeeSoft
![]() Slicer Integrated CuraEngine
Slicer Integrated CuraEngine
![]() OS Mac, Windows, Linux
OS Mac, Windows, Linux
![]() Open Software? BeeSoft GPL v2.0, BeeTheFirst firmware GPL v3.0
Open Software? BeeSoft GPL v2.0, BeeTheFirst firmware GPL v3.0
![]() Open Hardware? No
Open Hardware? No
LOOKING FOR A TRULY CONSUMER-GRADE PRINTER THAT INTEGRATES LOOKS AND PORTABILITY WITH SMART DESIGN? You’ll find it in BeeTheFirst. Portugal’s BeeVery-Creative provides a fantastic out-of-the-box experience that allows anyone to painlessly enter the world of desktop 3D printing. Neophytes will be up and running quickly and this portable, polished machine is sure to look great on any desktop or coffee table, but even seasoned veterans will find some interesting software Easter eggs if they peek below the shiny surface.
BEAUTY AND BRAINS
Upon unboxing, it’s immediately clear that this is something new. But it’s not just the hip, modern, minimalist design, the clever built-in handle, or magnetically removable build plate that piqued our interest — we were impressed by the forward-thinking industrial and user-experience design.
OCCAM’S RAZOR
It’s refreshing to see a machine that’s been designed from the ground up with equal focus on aesthetics, ergonomics, user experience, and functionality. BeeTheFirst also defies the current trend of adding fancy extruder sensors and auto-levelers to solve common printer problems, instead applying the tenet of Occam’s razor: Good design solves problems in the simplest way possible, instead of cramming in more tech.
The cleverly integrated, magnetic/kinematically coupled bed with large accessible knobs is hands down the easiest we have ever leveled. The thick acrylic build platform sits upon a sturdy metal arm, which unlike the flimsy plastic parts present on many desktop machines, will never warp or twist. We popped it off and on dozens of times throughout our testing without the need to re-level.
CLEAR BEGINNER DOCUMENTATION
The user guide is well written, brief, and surprisingly informative. It gives a concise breakdown of the machine and clearly sets new-user expectations. There are also numerous troubleshooting videos on BeeVeryCreative’s site, including how to take apart the case (it’s easier than it looks) to clear a jammed extruder.
MATERIALS MATTER
Another interesting design feature is the tiny, magnetically attached internal spool that holds proprietary (but unchipped) filament. Like Afinia, BeeVeryCreative seeks to eliminate nozzle jamming by operating at higher temperatures of about 220°C. We fed ours non-OEM orange Ultimachine which produced part of a very stringy print before jamming completely. BeeVeryCreative materials have been limited to eight colors of PLA, but recent software update options reveal that more are on the way soon.
STRAIGHTFORWARD SOFTWARE, NO ADVANCED SETTINGS
When it comes to printing, they couldn’t have made it simpler. The custom BeeSoft host software has all of the standard placement, scaling, and rotation options, but the print dialog deliberately restricts layer height and infill to a few simple choices in order to streamline the experience. BeeSoft is in active development and provides both regular and beta releases frequently. Since the Shootout, the low (0.3mm) and high (0.1mm) slicing options have been expanded to include a 0.05mm setting and additional infill density options, plus the ability to print untethered after kicking off a print via USB.
Shootout prints run at 0.1mm ranked within the top third of printers tested. This machine also had very little Backlash, but had some trouble with Fine Features and scored poorly on the Tolerance test.
EASTER EGGS!
Hardcore enthusiasts don’t despair! While not advertised, there are plenty of software hacking opportunities under the hood. Here’s where it gets interesting: BeeSoft’s interface is derived from ReplicatorG and slices with CuraEngine. Both BeeSoft and the BeeTheFirst firmware are completely open-source and GPL-licensed: point your browser to github.com/beeverycreative and clone away!
They’ve also forked OctoPrint and created their own BeeTF variant of OctoPi that works with the BeeTF’s speedy R2C2 printer controller (ARM 32bits running at 100MHz) over USB native. They plan to offer their own BeeConnect Raspberry Pi kit, followed by assembled versions and mobile apps.
CONCLUSION
With hand-holding for beginners and a GitHub repo full of open-source software for advanced users, BeeTheFirst has something for everyone. ![]()
PRINT SCORES
|
1 |
2 |
3 |
4 |
5 |
|
1 |
2 |
3 |
4 |
5 |
|
1 |
2 |
3 |
4 |
5 |
|
1 |
2 |
3 |
4 |
5 |
|
1 |
2 |
3 |
4 |
5 |
|
1 |
2 |
3 |
4 |
5 |
|
1 |
2 |
3 |
4 |
5 |
|
1 |
2 |
3 |
4 |
5 |
|
FAIL |
PASS |
|||
|
FAIL |
PASS |
|||
PRO TIPS
![]() The BeeConnect software is continually updated and released in two parallel versions, one production, one beta. Check out the beta for the newest features.
The BeeConnect software is continually updated and released in two parallel versions, one production, one beta. Check out the beta for the newest features.
![]() BeeTheFirst can print with Afinia’s new PLA (green worked well for us)
BeeTheFirst can print with Afinia’s new PLA (green worked well for us)
![]() Want to print wirelessly? Grab a Raspberry Pi and check out “BeeConnect”: github.com/beeverycreative
Want to print wirelessly? Grab a Raspberry Pi and check out “BeeConnect”: github.com/beeverycreative
WHY TO BUY
An easy-to-use, attractive, portable machine with stripped-down, custom open-source software. Uses smart hardware design (instead of sensors) to make bed leveling easy.


CHRIS YOHE Software developer by day, hardware hacker by night, Chris is a man of many gadgets. A member of HackPittsburgh, he is an avid 3D printing enthusiast and like many others is amassing a slowly growing army of manufacturing minions. From rugby, to tailgating, to 3D printing he’s always looking for an excuse to make the world a better, or at least more interesting, place.
Buyer’s Guide | Fused Filament Printers | Type A 2014 Series 1
TYPE A 2014 SERIES 1
Integrated OctoPrint, but needs fine-tuning
WRITTEN BY MATT GRIFFIN

Brian Kaldorf
2014 SERIES 1 | typeamachines.com
![]() Price as Tested $2,749
Price as Tested $2,749
![]() Build Volume 305×305×305mm
Build Volume 305×305×305mm
![]() Bed Style Unheated glass
Bed Style Unheated glass
![]() Temperature Control? Yes
Temperature Control? Yes
![]() Materials PLA
Materials PLA
![]() Print Untethered? Preconfigured OctoPrint
Print Untethered? Preconfigured OctoPrint
![]() Onboard Controls? Limited
Onboard Controls? Limited
![]() Host Software Cura for Type A Machines
Host Software Cura for Type A Machines
![]() Slicer Integrated CuraEngine
Slicer Integrated CuraEngine
![]() OS Mac, Windows, Linux
OS Mac, Windows, Linux
![]() Open Software? Type A Cura: source released, license unknown
Open Software? Type A Cura: source released, license unknown
![]() Open Hardware? Auxiliary design files, license unknown
Open Hardware? Auxiliary design files, license unknown
TYPE A MACHINES’ 2014 SERIES 1 EDITION IS ITS FIRST SLEEK, TOOLED, powder-coated aluminum and acrylic paneled printer with the largest build volume (one cubic foot!) of any printer we reviewed.
EASY SETUP, MINIMALISTIC CONTROLS
Type A Machines invested considerable attention in crafting the documentation and unboxing experience. As a result — from setup to first prints — prepping the 2014 Series 1 was a piece of cake, one of the easiest setups I experienced in the Shootout. Physical interface elements are minimal, consisting of a handy glowing “machine halt” button and two knobs for manual platform adjustments (one raises/lowers the platform, the other fine tunes “Z-height” — a nice touch!).
INTEGRATED WIRELESS PRINTING
The Type A-branded out-of-the-box OctoPrint integration proved to be my favorite new feature. I was able to prep, monitor, and even pause the machine on my laptop from across the room while spending time servicing other printers. I had no issues setting up OctoPrint for wireless browser access, but a few testers had a harder time and walked away from this experience frustrated. There are a few “gotchas” along the way if you skim the Quick Start Guide too quickly.
“LOOKS FAST, BUT HOW’S THE RIDE?”
As one of the testers said wistfully, “a machine looking like this should print better.” The 2014 Series 1 delivered on ease of setup and operation, but in our Shootout weekend did not deliver the print quality to match comparably priced machines or meet the expectations established by the design-forward new printer body.
Sometimes the extruder would begin to underextrude, laying down wispy, brittle material — a sign of stripped filament, an overheated feeder, or a clogged nozzle. Also, the extruder fan, necessary for printing PLA, seemed to be poorly placed and directed. Studying the prints afterward, we could tell which side of the objects faced the extruder fan and which didn’t, which seemed odd.
CONCLUSION
Type A has integrated a number of clever and well-implemented machine design and software toolchain improvements into the Type A 2014 Series 1. Overall, printing was easy and consistent, but we weren’t as impressed as we had hoped to be given the ambitious resets and “tested and tuned in our factory” promise. ![]()
PRINT SCORES
|
1 |
2 |
3 |
4 |
5 |
|
1 |
2 |
3 |
4 |
5 |
|
1 |
2 |
3 |
4 |
5 |
|
1 |
2 |
3 |
4 |
5 |
|
1 |
2 |
3 |
4 |
5 |
|
1 |
2 |
3 |
4 |
5 |
|
1 |
2 |
3 |
4 |
5 |
|
1 |
2 |
3 |
4 |
5 |
|
FAIL |
PASS |
|||
|
FAIL |
PASS |
|||
PRO TIPS
![]() To print a broad range of materials, you’ll need to add a fan shroud for active cooling or a flexible filament guide.
To print a broad range of materials, you’ll need to add a fan shroud for active cooling or a flexible filament guide.
![]() Windows users, pay close attention to setup instructions, don’t skip the browser plugin for Chrome, or you will have difficulty connecting.
Windows users, pay close attention to setup instructions, don’t skip the browser plugin for Chrome, or you will have difficulty connecting.
WHY TO BUY
Fully implemented and skinned OctoPrint hardware/software for immediate networked printing. In addition to Cura, you can now print to the Type A directly from Meshmixer, Autodesk’s model repair and support creation software.


MATT GRIFFIN is director of community & support at Adafruit Industries, a former MakerBot community manager, and author of the forthcoming book, Design and Modeling for 3D Printing (Maker Media). He can be seen weekly on Adafruit’s “3D Hangouts” live video series, and glimpses of his adventures in the early days of desktop 3D printing are tucked into the corners of the Netflix original documentary, Print the Legend.
Buyer’s Guide | Fused Filament Printers | Afinia H480
AFINIA H480
Excellent out-of-the-box experience, great for educators
WRITTEN BY JOSH AJIMA

Brian Kaldorf
AFINIA H480 | Afinia.com
![]() Price as Tested $1,299
Price as Tested $1,299
![]() Build Volume 140×140×135mm
Build Volume 140×140×135mm
![]() Bed Style Heated perf board
Bed Style Heated perf board
![]() Temperature Control? No
Temperature Control? No
![]() Materials Afinia PLA, ABS
Materials Afinia PLA, ABS
![]() Print Untethered? Unplug USB
Print Untethered? Unplug USB
![]() Onboard controls? No
Onboard controls? No
![]() Software Afinia 3D
Software Afinia 3D
![]() Slicer Afinia 3D
Slicer Afinia 3D
![]() OS Mac, Windows
OS Mac, Windows
![]() Open Software? No
Open Software? No
![]() Open Hardware? No
Open Hardware? No
Available at ![]() bit.ly/Alfina-H480
bit.ly/Alfina-H480
AFINIA CONTINUES TO LIVE UP TO ITS “EASY TO USE” REPUTATION WITH THEIR UPDATED H-SERIES PRINTER. The H480 printer may appear identical to the previous model, but it now includes automatic platform leveling and nozzle height detection.
AUTOMATIC CALIBRATION
Leveling a print bed and setting the extruder height are two of the biggest challenges for beginners. The Afinia H480 uses a magnetically attached sensor to perform automatic platform level calibration. A sensor attached to the extruder probes the bed at 9 different points and a separate sensor determines the correct nozzle height. Even experienced users may be surprised at how reliable prints are when these important calibration steps are automated.
SIMPLE SETUP, GREAT PRINT SURFACES
The Afinia software is easy to use, providing all the essentials for slicing and printer control in an uncluttered interface. The software defaults create rafts and supports which, combined with the heated bed, gives great print results, although the built-in slicer didn’t fare well with very small positive Fine Features or Bridging. It excels at producing high-quality Surface Finish and did well with the articulated robot Tolerances. Other printers may have flashier interfaces or larger build volumes, but the Afinia’s Surface Finish and ease of use keeps it in the top 10.
NOW WITH (PROPRIETARY) PLA
The Afinia (and its Up brethren) lack user-controlled temperature settings and print ABS at a much higher temp (260°) than other printers. This requires Afinia-produced high-temperature filament to perform properly. Afinia has also begun to produce its own brand of specially formulated PLA, but color selection is (at press time) limited. It’s not recommended to use non-Afinia/Up filaments with this machine.
NOT FOR TINKERERS
The same features that make the H-Series a top “Just Hit Print” choice will steer hardware hackers away. The closed design means that there are limited options to tweak or tinker with the machine. The Afinia software only allows limited choices for layer height, temperature and percent infill.
CONCLUSION
Overall, the updated Afinia H480 offers a reliable print experience that should appeal to the growing ranks of new 3D printer users. ![]()
PRINT SCORES
|
1 |
2 |
3 |
4 |
5 |
|
1 |
2 |
3 |
4 |
5 |
|
1 |
2 |
3 |
4 |
5 |
|
1 |
2 |
3 |
4 |
5 |
|
1 |
2 |
3 |
4 |
5 |
|
1 |
2 |
3 |
4 |
5 |
|
1 |
2 |
3 |
4 |
5 |
|
1 |
2 |
3 |
4 |
5 |
|
FAIL |
PASS |
|||
|
FAIL |
PASS |
|||
PRO TIPS
![]() Load models and configure settings while preheating to save time.
Load models and configure settings while preheating to save time.
![]() Use BuildTak to eliminate perforated print bottoms.
Use BuildTak to eliminate perforated print bottoms.
![]() You can’t turn off support completely, but you can minimize the support angle to 10° to eliminate most support structures. Use “Print Setup” menu (3D Print menu > setup)
You can’t turn off support completely, but you can minimize the support angle to 10° to eliminate most support structures. Use “Print Setup” menu (3D Print menu > setup)
WHY TO BUY
Great surface finish with “fine” print settings. Automatic platform leveling and nozzle height detection remove beginner frustration. Good for educators, as reliable design and easy-to-use software mean successful prints with less training and support issues. Includes a 1-year manufacturer’s warranty, with an optional 1-year extension. Includes accessories kit.


JOSH AJIMA is a high school technology resource teacher and a K12 makerspace and 3D printing advocate. He created the Makerspace Starter Kit, runs a STEM camp makerspace, and sponsors a 3D printing club. designmaketeach.com
Buyer’s Guide | Fused Filament Printers | Felix 3.0 and DeeGreen
FELIX 3.0
Nice surface finish, but tinkering required
WRITTEN BY MATT STULTZ & YVES SINNER

Available at ![]() bit.ly/Felix-3
bit.ly/Felix-3
LAST YEAR THE FELIX 2.0 WAS OUR “SURPRISE HIT.” THIS YEAR’S MODEL, the fully assembled Felix 3.0 (also available as a kit) has been upgraded with injection-molded parts and a dual-extrusion option, but it retains its portability, minimalist feel, and excellent print surfaces.
This machine doesn’t ship with a printed manual, but their site provides a well-illustrated setup guide and configuration files for KISSlicer and SFACT. The tiny bed-leveling nuts are hard to access, but we liked the Felix’s two-part leveling and filament management systems.
There were some major issues: Our prints were offsetting/shifting to the side. Felix support said to tighten the belts, but the support forums diagnosis was improperly adjusted, overheating stepper drivers. Without the proper tools on hand we opted for an active cooling solution. Opening the electronics case and positioning a fan across the stepper drivers enabled us to complete our test prints. ![]()
PRINT SCORES
|
1 |
2 |
3 |
4 |
5 |
|
1 |
2 |
3 |
4 |
5 |
|
1 |
2 |
3 |
4 |
5 |
|
1 |
2 |
3 |
4 |
5 |
|
1 |
2 |
3 |
4 |
5 |
|
1 |
2 |
3 |
4 |
5 |
|
1 |
2 |
3 |
4 |
5 |
|
1 |
2 |
3 |
4 |
5 |
|
FAIL |
PASS |
|||
|
FAIL |
PASS |
|||
PRO TIPS
Fix offset prints by adjusting the stepper drivers with a nonconductive screwdriver and multimeter, or use active cooling.
WHY TO BUY
Portability, large print bed, dual-extrusion capability, and continued upgradeability: A Felix 1.0 can be upgraded to a Felix 3.0.
felix 3.0 | felixusaprinters.com
![]() Price as Tested $2,012 (assembled dual extrusion)
Price as Tested $2,012 (assembled dual extrusion)
![]() Build Volume 255×205×235mm
Build Volume 255×205×235mm
![]() Bed Style Heated
Bed Style Heated
![]() Temperature Control? Yes
Temperature Control? Yes
![]() Materials PLA, ABS, Arnitel
Materials PLA, ABS, Arnitel
![]() Print Untethered? Yes
Print Untethered? Yes
![]() Onboard controls? SD card
Onboard controls? SD card
![]() Host Software Repetier-Host
Host Software Repetier-Host
![]() Slicer SFACT/KISSlicer
Slicer SFACT/KISSlicer
![]() OS Mac, Windows, Linux
OS Mac, Windows, Linux
![]() Open Software? Third-party software
Open Software? Third-party software
![]() Open Hardware? No
Open Hardware? No
DEEGREEN
Quiet, with very reliable automatic bed leveling
WRITTEN BY ERIC CHU

Brian Kaldorf
WITH AN ALL-METAL FRAME WRAPPED UP IN CLEAN ALUMINUM-POLYMER sheets, be3D’s fully enclosed DeeGreen is a consumer-centric printer with a touchscreen and fully automatic bed leveling (its best feature).
Each print starts with the servo-actuated, limit-switch sensor swinging down. The pointed tip on the sensor touches numerous spots on the glass build plate, then swings back up and the print begins with an extruder-priming bed wipe.
The auto-leveling was extremely reliable throughout the testing, but the unheated, removable, magnetic glass platform needs preprint glue stick application. Postprint, that glue can also make removal tough.
Although the printer uses premium materials, our review unit’s touchscreen was falling into the machine, and one of the acrylic windows fell off. Print quality was at the low end of printers tested, but it was one of just five printers to pass both mechanical tests. ![]()
PRINT SCORES
|
1 |
2 |
3 |
4 |
5 |
|
1 |
2 |
3 |
4 |
5 |
|
1 |
2 |
3 |
4 |
5 |
|
1 |
2 |
3 |
4 |
5 |
|
1 |
2 |
3 |
4 |
5 |
|
1 |
2 |
3 |
4 |
5 |
|
1 |
2 |
3 |
4 |
5 |
|
1 |
2 |
3 |
4 |
5 |
|
FAIL |
PASS |
|||
|
FAIL |
PASS |
|||
PRO TIPS
For every print, clean the build plate and reapply glue stick, remove with scraper
WHY TO BUY
Automatic bed leveling, quiet enclosed build area, autostop safety features
DeeGreen | be3d.cz
![]() Price as Tested $2,025
Price as Tested $2,025
![]() Build Volume 150×150×150mm
Build Volume 150×150×150mm
![]() Bed Style Unheated glass
Bed Style Unheated glass
![]() Temperature Control? No
Temperature Control? No
![]() Materials PLA, PVA
Materials PLA, PVA
![]() Print Untethered? SD Card, unplug USB
Print Untethered? SD Card, unplug USB
![]() Onboard controls? Yes
Onboard controls? Yes
![]() Host Software DeeControl
Host Software DeeControl
![]() Slicer DeeControl integrated CuraEngine
Slicer DeeControl integrated CuraEngine
![]() OS Mac, Windows
OS Mac, Windows
![]() Open Software? No
Open Software? No
![]() Open Hardware? No
Open Hardware? No
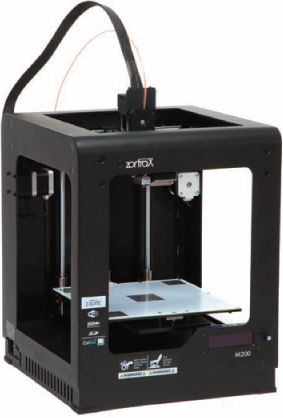
Buyer’s Guide | Fused Filament Printers | Zortrax M200
ZORTRAX M200
Unique case and lots of extras
WRITTEN BY NICK PARKS
Gunther Kirsch
ZORTRAX M200 | zortrax.com
![]() Price as Tested $1,990
Price as Tested $1,990
![]() Build Volume 200×200×185mm
Build Volume 200×200×185mm
![]() Bed Style Heated perf board
Bed Style Heated perf board
![]() Temperature Control? No
Temperature Control? No
![]() Materials ABS
Materials ABS
![]() Print Untethered? SD card
Print Untethered? SD card
![]() Onboard Controls? Yes
Onboard Controls? Yes
![]() Host Software Z-Suite
Host Software Z-Suite
![]() Slicer Z-Suite
Slicer Z-Suite
![]() OS Mac, Windows
OS Mac, Windows
![]() Open Software? No
Open Software? No
![]() Open Hardware? No
Open Hardware? No
THE ZORTRAX M200 COMBINES SUPERB PRINT QUALITY WITH A LARGE BUILD volume, a built-in screen and SD card reader for untethered printing, and requires almost no maintenance. This machine comes with a large variety of useful extras including a complete hot end, two extra nozzles, and a toolkit that includes everything required for maintaining the machine.
ALL-ALUMINUM EXTERIOR, UNIQUE 8-ROD GANTRY
The build quality of this machine is absolutely amazing. The M200 is made entirely of aluminum, which allows the machine to be both light and rigid. It also has a unique gantry setup that uses four X-axis and four Y-axis rods, which also increases the machine’s rigidity.
The Zortrax doesn’t have auto leveling, instead the bed is equipped with five conductive squares that the M200 uses to level the bed and calibrate the nozzle height, prompting the user to either tighten or loosen the bed-leveling adjustment knobs. These features, coupled with the perforated board, allow the prints to maintain strong adhesion to the bed while printing.
NO TEMP CONTROL, ABS ONLY
The Zortrax software does not allow for user temperature control and is built for printing in ABS only. I’ve always found ABS to be smelly, warp-prone, and generally difficult to work with, but the M200 does a great job of preventing warping by using a perforated bed and raft system that holds the prints down tight.
Zortrax makes two lines of filament, Z-ABS and Z-ULTRAT, both of which are formulated to work well on the M200. The Z-ABS is just standard ABS filament that works well and costs only $20. The Z-ULTRAT has a high hardness and low elasticity level of deformation, but costs $50. We ran the test prints in Ultimachine ABS, which yielded beautiful prints, but I found that support material wasn’t as easy to remove as it was when using the filaments designed for the machine.
CONCLUSION
I recommend the Zortrax M200 to anyone looking for a machine that can print large, precise, and durable prints without requiring a lot of time to fiddle with settings or breaking the bank. ![]()
PRINT SCORES
|
1 |
2 |
3 |
4 |
5 |
|
1 |
2 |
3 |
4 |
5 |
|
1 |
2 |
3 |
4 |
5 |
|
1 |
2 |
3 |
4 |
5 |
|
1 |
2 |
3 |
4 |
5 |
|
1 |
2 |
3 |
4 |
5 |
|
1 |
2 |
3 |
4 |
5 |
|
1 |
2 |
3 |
4 |
5 |
|
FAIL |
PASS |
|||
|
FAIL |
PASS |
|||
PRO TIPS
![]() Zortrax owners get reduced prices on filament, lowering each 1Kg spool of standard filament to $19.99.
Zortrax owners get reduced prices on filament, lowering each 1Kg spool of standard filament to $19.99.
WHY TO BUY
Auto calibration, easy-to-use software. Great for workplaces where quality, reliably, and ease of use are highly important. An excellent choice for people who need the durability of ABS without all of the warping and frustration.


NICK PARKS is an engineering intern at Make: Labs and is studying mechanical engineering at Santa Rosa Junior College. He likes to build and take apart things to make products better or create something new. He enjoys working at Make: magazine and likes to help other people build projects of their own.
Buyer’s Guide | Fused Filament Printers | da Vinci
DA VINCI
Even China couldn’t build a 3D printer this cheap
WRITTEN BY MICHAEL CURRY

Brian Kaldorf
DA VINCI | xyzprinting.com
![]() Price as Tested $499
Price as Tested $499
![]() Build Volume 200×200×200mm
Build Volume 200×200×200mm
![]() Bed Style Heated glass
Bed Style Heated glass
![]() Temperature Control? No
Temperature Control? No
![]() Materials XYZprinting ABS filament cartridges
Materials XYZprinting ABS filament cartridges
![]() Print Untethered? No
Print Untethered? No
![]() Onboard Controls? Limited
Onboard Controls? Limited
![]() Host Software XYZWare
Host Software XYZWare
![]() Slicer XYZWare
Slicer XYZWare
![]() OS Mac, Windows
OS Mac, Windows
![]() Open Software? No
Open Software? No
![]() Open Hardware? No
Open Hardware? No
AT $499, THE DA VINCI 1.0 BY XYZ PRINTING IS CURRENTLY THE BEST-SELLING PRINTER ON AMAZON. It’s made in Thailand, an important distinction, because I’m certain even China couldn’t build a 3D printer this inexpensive. The da Vinci’s spec sheet boasts features previously seen only on other company’s flagship models: an enclosed build volume, heated glass build plate, LCD Screen, assisted leveling, integrated nozzle cleaner, and front panel controls (although they are for changing filament and bed leveling only, not untethered printing). It’s packaged like a consumer product (no exposed wires) and the build volume is neatly enclosed behind translucent plastic. We tested the single extrusion version, but a dual has recently become available.
MICROCHIPPED, PROPRIETARY PLASTIC
Our package clearly had some serious international miles on it, but everything was well packed and in good order. Inside the box was a quick-start guide, basic toolkit, and one proprietary microchip-embedded cartridge of ABS filament (a 600g cartridge is $28, limited colors). Setup was easy, and the instructions for loading the filament are printed on the inside of the machine’s top cover.
PRINT LIKE IT’S 2010
XYZ’s software is geared toward novice users with intuitive controls, but the software has some quirks. Workflow is exclusively one-way. Once a model is sliced it cannot be adjusted — change anything and you’ll have to reload and start over. The software’s most glaring shortcoming is its slicer, which feels like an early prototype, indifferently laying down plastic with little regard to geometric conditions or input settings. Basic settings like layer height and infill didn’t seem to have any effect on the printed result.
The da Vinci’s print quality is roughly on par with what you would have seen from a kit-built machine in 2010. Its scores were consistently low in every category we tested. The immature slicing engine and low-quality gantry system make it difficult for the da Vinci to produce prints with fine detail or dimensional accuracy.
CONCLUSION
The da Vinci looks and prints exactly like the inexpensive consumer product it is. This is the disposable inkjet of 3D printing. It’s a cheap, (mostly) easy-to-use option for hobbyists and younger students. ![]()
PRINT SCORES
|
1 |
2 |
3 |
4 |
5 |
|
1 |
2 |
3 |
4 |
5 |
|
1 |
2 |
3 |
4 |
5 |
|
1 |
2 |
3 |
4 |
5 |
|
1 |
2 |
3 |
4 |
5 |
|
1 |
2 |
3 |
4 |
5 |
|
1 |
2 |
3 |
4 |
5 |
|
1 |
2 |
3 |
4 |
5 |
|
FAIL |
PASS |
|||
|
FAIL |
PASS |
|||
PRO TIPS
![]() Avoid playing with the leveling system, it’s easier to turn off the machine and level the platform by hand.
Avoid playing with the leveling system, it’s easier to turn off the machine and level the platform by hand.
![]() The printer’s low price has inspired a community of hardware hackers who are modifying the machines, search for their tips and see makezine.com/da-vinci
The printer’s low price has inspired a community of hardware hackers who are modifying the machines, search for their tips and see makezine.com/da-vinci
WHY TO BUY
It’s cheap, fully enclosed, and a good value (price versus build volume). There’s an SD card and filament hack possible for those who want to tinker.


MICHAEL CURRY is an independent designer and researcher from Kansas City. skimbal.com
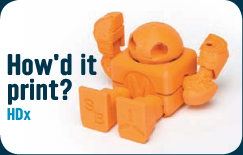
Buyer’s Guide | Fused Filament Printers | Airwolf HD, HDx and HD2x
AIRWOLF HD, HDX AND HD2X
Big volume, bigger price tag
WRITTEN BY MICHEL SINNER

Brian Kaldorf
AIRWOLF | airwolf3d.com
![]() Price as Tested HD2x:$3,995; HDx:$3,495; HD: $2,995
Price as Tested HD2x:$3,995; HDx:$3,495; HD: $2,995
![]() Build Volume HD/HDx: 300×200×300mm, HD2x: 280×200×300mm
Build Volume HD/HDx: 300×200×300mm, HD2x: 280×200×300mm
![]() Bed Style Heated glass
Bed Style Heated glass
![]() Temperature Control? Yes
Temperature Control? Yes
![]() Materials PLA, ABS, nylon, polycarbonate, PVA, and more
Materials PLA, ABS, nylon, polycarbonate, PVA, and more
![]() Print Untethered? MicroSD Card
Print Untethered? MicroSD Card
![]() Onboard Controls? Yes
Onboard Controls? Yes
![]() Host Software MatterControl/Cura/Repetier-Host
Host Software MatterControl/Cura/Repetier-Host
![]() Slicer CuraEngine / Slic3r
Slicer CuraEngine / Slic3r
![]() OS Mac, Windows, Linux
OS Mac, Windows, Linux
![]() Open Software? Third-party software
Open Software? Third-party software
![]() Open Hardware? No
Open Hardware? No
THE AW3D HD, HDX, AND HD2X ARE THE LATEST ADDITIONS TO AIRWOLF 3D’s ever-growing printer portfolio, clearly targeted at buyers with (very) deep pockets looking to print big in a wide variety of materials.
HIGH TEMP HOT END
Thanks to Airwolf 3D’s new proprietary JRx hot end with a 0.5mm nozzle, the HDx and HD2x are not only capable of printing at temperatures up to 320°C but also with a vast array of materials including PLA, ABS, nylon, HIPS, and polycarbonate (for the HD, maximum temperature is only 260°C, so Airwolf 3D recommends to refrain from using nylon/PC). They also have a massive build volume of 18,000 cm3 (only the Type A and TAZ are larger). However, these features come with a hefty price tag, making the Airwolf machines the most expensive FFF machines we tested.
With an external footprint of 610×445×460mm, the first thing you’ll need for these behemoths is lots of dedicated space and a sturdy desk or workbench. Airwolf now uses clear, 6mm-thick acrylic enclosures, which contributes to the printers’ sturdiness, but brings the weight up to a whopping 40 pounds, rendering portability close to zero. Setting up these machines is easy due to clear and well-illustrated documentation. The initial calibration guide makes bed leveling a breeze, but loading/unloading the filament can prove tricky.
SOLIDLY BUILT, BUT SOME MAJOR FLAWS
The HDx’s overall print quality was in the lower middle of the pack (its siblings were near the bottom) and didn’t fare well on Overhangs, Bridging, or Surface Finish. However, all models scored well on the mechanical tests (XY, Z Resonance) and Backlash tests, a testament to its sturdy, well-constructed frame. Additionally, users with big fingers will undoubtedly have problems using the VIKI front panel wheel and its microSD slot; both can be extremely fiddly. The HDx also integrates many 3D-printed parts: the joints between the acrylic panels, the spool holders, the top of the hot end, the extruder, etc.
CONCLUSION
The AW3D HD line — with their remarkable heated glass print bed (PET coated), their large print volume, high-temp nozzles, and beefy frames — have a lot going for them. However, the below-average print quality and the absence of premium features like auto bed leveling, a magnetically fixed glass bed (instead of binder clips), onboard cameras, and wi-fi connectivity doesn’t justify their exorbitant price tags. ![]()
PRINT SCORES
HD |
|||||
|
1 |
2 |
3 |
4 |
5 |
|
1 |
2 |
3 |
4 |
5 |
|
1 |
2 |
3 |
4 |
5 |
|
1 |
2 |
3 |
4 |
5 |
|
1 |
2 |
3 |
4 |
5 |
|
1 |
2 |
3 |
4 |
5 |
|
1 |
2 |
3 |
4 |
5 |
|
1 |
2 |
3 |
4 |
5 |
|
FAIL |
PASS |
|||
|
FAIL |
PASS |
|||
|
|||||
HDx |
|||||
|
1 |
2 |
3 |
4 |
5 |
|
1 |
2 |
3 |
4 |
5 |
|
1 |
2 |
3 |
4 |
5 |
|
1 |
2 |
3 |
4 |
5 |
|
1 |
2 |
3 |
4 |
5 |
|
1 |
2 |
3 |
4 |
5 |
|
1 |
2 |
3 |
4 |
5 |
|
1 |
2 |
3 |
4 |
5 |
|
FAIL |
PASS |
|||
|
FAIL |
PASS |
|||
|
|||||
HD2x |
|||||
|
1 |
2 |
3 |
4 |
5 |
|
1 |
2 |
3 |
4 |
5 |
|
1 |
2 |
3 |
4 |
5 |
|
1 |
2 |
3 |
4 |
5 |
|
1 |
2 |
3 |
4 |
5 |
|
1 |
2 |
3 |
4 |
5 |
|
1 |
2 |
3 |
4 |
5 |
|
1 |
2 |
3 |
4 |
5 |
|
FAIL |
PASS |
|||
|
FAIL |
PASS |
|||
PRO TIPS
Slicing with CuraEngine produced much faster prints than MatterControl with equal print quality.
WHY TO BUY
Sturdy frame, huge build volume, high-temp nozzles.
Buyer’s Guide | Fused Filament Printers | Replicator 5th Generation
REPLICATOR 5TH GENERATION
“Feature-packed” is putting it mildly
WRITTEN BY JOHN ABELLA

Brian Kaldorf
REPLICATOR | makerbot.com
![]() Price as Tested $2,899
Price as Tested $2,899
![]() Build Volume 252×199×150mm
Build Volume 252×199×150mm
![]() Bed Style Unheated plastic
Bed Style Unheated plastic
![]() Temperature Control? Yes
Temperature Control? Yes
![]() Materials MakerBot PLA
Materials MakerBot PLA
![]() Print Untethered? USB Stick, wi-fi / networked app
Print Untethered? USB Stick, wi-fi / networked app
![]() Onboard Controls? Yes
Onboard Controls? Yes
![]() Host Software MakerBot Desktop
Host Software MakerBot Desktop
![]() Slicer MakerBot Slicer
Slicer MakerBot Slicer
![]() OS Mac, Windows, Linux
OS Mac, Windows, Linux
![]() Open Software? No
Open Software? No
![]() Open Hardware? No
Open Hardware? No
Available at ![]() bit.ly/Replicator-5th
bit.ly/Replicator-5th
IT’S IMMEDIATELY OBVIOUS UPON UNPACKING THE MAKERBOT REPLICATOR that substantial engineering resources went into this fifth-generation machine’s consumer-focused hardware and software. It sports a large, bright, color LCD interface, mobile or PC app-controlled LAN / wi-fi printing, an internal print-watching camera and a magnetically attached, sensor-packed Smart Extruder. The onboard LCD interface was by far the most complex of all systems we tested. While printing, you can scroll through system status to see print progress, slicer settings used, a rendering of the finished piece, and even snap photos.
INTEGRATED 3DP ECOSYSTEM
The MakerBot Desktop software is easy to use and certainly the most comprehensive of all packages tested. In addition to allowing the user to prepare and print files, it has extensive integration with Thingiverse and MakerBot Digital Store. After login, designs the user has “liked” on Thingiverse or models purchased from the Digital Store are automatically populated in the software, allowing (almost) one-click printability.
SURFACE FINISH NEEDS WORK
The new Replicator’s print quality was at the higher end, especially on the Overhangs, Tolerance, and Backlash. However, it was near the bottom of the pack in our Fine Features testing. Testers also commented that the Surface Finish was a step down from the Replicator 2.
NOISY
Within the first few minutes of using the new Replicator we noticed that it’s not a quiet machine. As testers came over to watch it in action, the first thing mentioned was always the noise; the Z-axis movements sounded particularly pained.
RAZORS VERSUS BLADES
Use of non-OEM filament on the 5th generation Replicator is aggressively discouraged through the inclusion of an internally mounted, unusually sized filament spool and will void the 6-month machine warranty. We voided ours with Ultimachine, and it printed without issue. While we didn’t experience problems with the Smart Extruder, it’s worth noting that it’s not user-serviceable. When jams occur after the 90-day extruder warranty period expires, a $175 replacement must be purchased.
CONCLUSION
Out of all the machines tested, the fifth-generation Replicator is the closest to a networked appliance. We just wish there was more for the maker in this ‘bot. ![]()
PRINT SCORES
|
1 |
2 |
3 |
4 |
5 |
|
1 |
2 |
3 |
4 |
5 |
|
1 |
2 |
3 |
4 |
5 |
|
1 |
2 |
3 |
4 |
5 |
|
1 |
2 |
3 |
4 |
5 |
|
1 |
2 |
3 |
4 |
5 |
|
1 |
2 |
3 |
4 |
5 |
|
1 |
2 |
3 |
4 |
5 |
|
FAIL |
PASS |
|||
|
FAIL |
PASS |
|||
PRO TIPS
![]() Have piles of non-MakerBot PLA on standard spools? Use a lazy Susan for filament management.
Have piles of non-MakerBot PLA on standard spools? Use a lazy Susan for filament management.
![]() The software does not warn or prevent trying to print something larger than the build area of the system.
The software does not warn or prevent trying to print something larger than the build area of the system.
WHY TO BUY
Ideal for someone who doesn’t want to get under the hood but wants a networked, app-integrated machine with all the bells and whistles and is willing to pay (and keep paying) a premium for it.


JOHN ABELLA is a maker of things, obsessive hobbyist, 3D printing and CNC enthusiast. Maker Faire New York 3D Printer Village wrangler and lead instructor at BotBuider.net. John has written for all three Make: 3D printer guides.
Buyer’s Guide | Ultimaker Original+ | Print-Rite CoLiDo & PowerSpec 3D Pro
PRINT-RITE COLIDO
This “clone” runs G-code
WRITTEN BY ERIC CHU

PRINT-RITE’S COLIDO 3D PRINTER IS A MAKERBOT REPLICATOR CLONE WITH A TWIST — it runs G-code instead of .x3g files — allowing for slicer interchangeability.
Print-Rite provided Slic3r profiles whose prints scored well on the Overhangs and Tolerance tests. The LCD interface allows adjusting settings on the fly — great for experimenting and fine-tuning.
It’s a good machine for hackers to tinker with. It has a solid gantry with very little backlash and although it’s single extrusion, it has a dual-extruder motor mount. The heated aluminum print bed is leveled with four wing nuts and comes with glass sheets that are held on with two binder clips. The extruder uses metal parts and has a spring-loaded bearing to tension the filament against the drive gear. Prints are great when printing with its included filament but I had jamming issues when printing with Ultimachine’s PLA, and there is no active cooling fan. ![]()
PRINT SCORES
|
1 |
2 |
3 |
4 |
5 |
|
1 |
2 |
3 |
4 |
5 |
|
1 |
2 |
3 |
4 |
5 |
|
1 |
2 |
3 |
4 |
5 |
|
1 |
2 |
3 |
4 |
5 |
|
1 |
2 |
3 |
4 |
5 |
|
1 |
2 |
3 |
4 |
5 |
|
1 |
2 |
3 |
4 |
5 |
|
FAIL |
PASS |
|||
|
FAIL |
PASS |
|||
PRO TIPS
The leveling script doesn’t work properly, level the bed by hand.
WHY TO BUY
Low-cost, tinkerer-friendly Replicator clone that runs G-code, has a glass build plate
PRINT-RITE COLIDO | www.union-tec.com
![]() Price as Tested $799
Price as Tested $799
![]() Build Volume 225×145×150mm
Build Volume 225×145×150mm
![]() Bed Style Heated aluminum, glass sheet
Bed Style Heated aluminum, glass sheet
![]() Temperature Control? Yes
Temperature Control? Yes
![]() Materials PLA, ABS
Materials PLA, ABS
![]() Print Untethered? SD card, OctoPrint compatible
Print Untethered? SD card, OctoPrint compatible
![]() Onboard Controls? Yes
Onboard Controls? Yes
![]() Host Software Repetier-Host
Host Software Repetier-Host
![]() Slicer Slic3r
Slicer Slic3r
![]() OS Mac, Windows, Linux
OS Mac, Windows, Linux
![]() Open Software? Third-party software
Open Software? Third-party software
![]() Open Hardware? No
Open Hardware? No
POWERSPEC 3D PRO
Dual extrusion for under $1,000
WRITTEN BY ERIC CHU
Brian Kaldorf
MICRO CENTER’S POWERSPEC 3D PRO IS ESSENTIALLY THE MAKERBOT ORIGINAL REPLICATOR (launched in early 2012, now retired), but it has a few design and materials improvements at half the price.
The black metal chassis of the printer is styled to mimic the Replicator 2X, but with hard composite boards with handle slots that cover the sides, with Replicator 2 style extruders. The directional buttons for onboard controls have been updated, providing tactile feedback when pressed. These details may seem minor, but they make the printer more enjoyable to use and easier to transport.
The included instructions step the user through setup of the outdated ReplicatorG, used with MakerBots until the release of MakerWare (with the painfully slow Skeinforge slicer). The 2X-style front lid doesn’t fully close, leaving a bottom gap and instead of a single-piece vacuum-formed top cover, it is replaced by a user-assembled acrylic-sheet hood that feels a bit fragile. ![]()
PRINT SCORES
|
1 |
2 |
3 |
4 |
5 |
|
1 |
2 |
3 |
4 |
5 |
|
1 |
2 |
3 |
4 |
5 |
|
1 |
2 |
3 |
4 |
5 |
|
1 |
2 |
3 |
4 |
5 |
|
1 |
2 |
3 |
4 |
5 |
|
1 |
2 |
3 |
4 |
5 |
|
1 |
2 |
3 |
4 |
5 |
|
FAIL |
PASS |
|||
|
FAIL |
PASS |
|||
PRO TIPS
Heat bed to 65°C for PLA. Print slowly. Use MakerBot Desktop instead of ReplicatorG. Check out Sailfish firmware.
WHY TO BUY
A dual extrusion machine based on a well-loved design that prints best in ABS.
PowerSpec 3D Pro | microcenter.com
![]() Price as Tested $999.99
Price as Tested $999.99
![]() Build Volume 226×144×149mm
Build Volume 226×144×149mm
![]() Bed Style Heated
Bed Style Heated
![]() Temperature Control? Yes
Temperature Control? Yes
![]() Materials PLA, ABS, PVA
Materials PLA, ABS, PVA
![]() Print Untethered? SD Card
Print Untethered? SD Card
![]() Onboard Controls? Yes
Onboard Controls? Yes
![]() Host Software ReplicatorG (MakerBot Desktop possible)
Host Software ReplicatorG (MakerBot Desktop possible)
![]() Slicer Skeinforge (MakerBot Slicer possible)
Slicer Skeinforge (MakerBot Slicer possible)
![]() OS Mac, Windows, Linux
OS Mac, Windows, Linux
![]() Open Software? Third-party software
Open Software? Third-party software
![]() Open Hardware? No
Open Hardware? No
Buyer’s Guide | Attack of the Clones | Idea Builder
IDEA BUILDER
Dremel combines simplicity and low cost
WRITTEN BY TOM BURTONWOOD

Clint Blowers
IDEA BUILDER | dremel3d.com
![]() Price as Tested $999
Price as Tested $999
![]() Build Volume 230×150×140mm
Build Volume 230×150×140mm
![]() Bed Style Unheated acrylic, BuildTak surface provided
Bed Style Unheated acrylic, BuildTak surface provided
![]() Temperature Control No
Temperature Control No
![]() Materials Dremel PLA
Materials Dremel PLA
![]() Print Untethered? SD card
Print Untethered? SD card
![]() Onboard Controls? Yes
Onboard Controls? Yes
![]() Host Software Dremel 3D
Host Software Dremel 3D
![]() Slicer Dremel 3D
Slicer Dremel 3D
![]() OS Mac, Windows, Linux
OS Mac, Windows, Linux
![]() Open Software? No
Open Software? No
![]() Open Hardware? No
Open Hardware? No
FROM THE EXTERIOR PACKAGING AND $999 PRICE POINT, IT’S OBVIOUS that the Dremel Idea Builder is a product aimed squarely at the mass market. Their design team has clearly thought through the unboxing experience. Inside is a full-color, easy to follow, quick-start guide, two sheets of Dremel-branded BuildTak, and a printed instruction manual. As you would expect from a company like Dremel, their instruction manual is quite comprehensive and it’s especially gratifying to see a glossary of terms to explain 3D printing to a new audience of makers.
Dremel has a long history of working with partners around the world to manufacture their tools and products, so it’s no surprise to learn that the Idea Builder was conceived in partnership with China-based FlashForge, makers of the popular “Creator” Replicator clones. This model is based on the FlashForge Dreamer, whose electronics utilize the ARM Contex-M4 CPU processor, instead of the ATmega chips used in the FlashForge Mightyboards.
ATTENTION TO DETAIL
With their entrance into 3DP, Dremel paid attention to the details. The Idea Builder has a color touch-screen interface that makes leveling the bed, loading filament, and selecting files a joy. This single-extruder machine feels solid, but lightweight. The sleek plastic exterior sports chrome-like plastic trim, a detachable blue lid, two removable ventilation panels on each side, and a hinged, clear plexi front cover with a magnetic closure. The non-standard interior spool holder reduces the footprint and the large 3-point bed leveling knobs are easy to adjust.
NICE SOFTWARE, LIMITED SETTINGS
The Dremel 3D software interface is similar to MakerBot Desktop or Cura. It displays a 3D rendering of the build volume with options to move, rotate and scale parts, highlights model areas that need support, and shows a print preview. The speedy slicer has built-in high (0.1mm), medium (0.2mm) and low (0.3mm) resolution presets, but noticeably absent were options to change print temperatures, infill percentages, add rafts (without support), or use custom G-code profiles. There’s also no heated platform, so this machine is PLA only.
CONCLUSION
The Idea Builder’s attractive price point and features make it worth considering for a variety of user types. Although the software settings and materials choices are limited, Dremel has created a streamlined, consumer-ready user experience that will include free customer support delivered by “Dremel Experts” via phone, Skype, and email. ![]()
PRINT SCORES
|
1 |
2 |
3 |
4 |
5 |
|
1 |
2 |
3 |
4 |
5 |
|
1 |
2 |
3 |
4 |
5 |
|
1 |
2 |
3 |
4 |
5 |
|
1 |
2 |
3 |
4 |
5 |
|
1 |
2 |
3 |
4 |
5 |
|
1 |
2 |
3 |
4 |
5 |
|
1 |
2 |
3 |
4 |
5 |
|
FAIL |
PASS |
|||
|
FAIL |
PASS |
|||
PRO TIPS
Dremel recommends you use their PLA, but they aren’t embedding microchips that require you to do so. The spool holder is a nonstandard size, so pick up a lazy Susan and feed the filament through the side vent to use your own.
WHY TO BUY
Attractive price point. For those who prioritize simplicity and ease of use over settings customization and materials choices.


TOM BURTONWOOD is an artist, educator, and entrepreneur based in Chicago, IL. He co-founded Mimesis, LLC, focusing on 3D scanning and digital fabrication. He teaches at The School of the Art Institute of Chicago and Columbia College. tomburtonwood.com
Buyer’s Guide | Fused Filament Delta Printers | DeltaMaker
DELTAMAKER
Simplify your workflow with this minimalistic deltabot
WRITTEN BY ANNA KAZIUNAS FRANCE

Brian Kaldorf
DeltaMaker | DeltaMaker.com
![]() Price as Tested $2,399
Price as Tested $2,399
![]() Build Volume 260mm Z, 240mm wide hexagonal platform
Build Volume 260mm Z, 240mm wide hexagonal platform
![]() Bed Style Unheated acrylic
Bed Style Unheated acrylic
![]() Temperature Control? Yes
Temperature Control? Yes
![]() Materials PLA
Materials PLA
![]() Print Untethered? Preconfigured OctoPrint
Print Untethered? Preconfigured OctoPrint
![]() Onboard Controls? No
Onboard Controls? No
![]() Host Software OctoPrint
Host Software OctoPrint
![]() Slicer CuraEngine
Slicer CuraEngine
![]() OS Mac, Windows, Linux
OS Mac, Windows, Linux
![]() Open Software? Third-party software
Open Software? Third-party software
![]() Open Hardware? No
Open Hardware? No
EVERYTHING ABOUT THE DELTAMAKER EXPERIENCE IS MINIMALISTIC AND SEAMLESS. With a Raspberry Pi tucked out of sight inside the base of its sleek silver frame, this wirelessly OctoPrint-controlled ‘bot arrives completely assembled with onboard CuraEngine slicing. While not a new OctoPrint feature, this is the first commercial machine I’ve seen with it enabled (Type A ships without onboard slicing). I’m flabbergasted that other vendors haven’t adopted it.
STREAMLINED SETUP
Setup consists of removing the machine from the securely packed box, placing the removable, magnetically attached acrylic build plate on the frame, and plugging it in. Skim the setup guide for the OctoPrint login info, autolevel, load filament, and start printing from the browser of any device.
PROPERLY PRECONFIGURED ONBOARD SLICING
The built-in slicing configuration is conservatively configured to ensure success. It’s super easy and works quite well, as long as the model has been properly oriented before uploading. It’s refreshing that, unlike many other vendors utilizing free software toolchains, DeltaMaker took the time to properly preconfigure their slicing settings. The result is that their spartan approach makes the machine layer almost invisible, allowing OctoPrint to take center stage. Like any advanced digital fabrication tool – the hardware just works – and user energy is spent in software tweaking parameters, not mechanical fussing.
DOCUMENTATION DEFICIENCY, XY VIBRATION
One area where DeltaMaker’s minimalist approach breaks down is the complete lack of readily available, online documentation. This austerity stands out in sharp contrast to the other machines tested. A second detraction is that the hollow-ball connector rod ends that join the arms to the extruder-mounted effector platform seem to rattle a bit. It’s not particularly loud, especially when compared to Cartesian printers, but it appears to have produced resonance in the XY plane, failing our XY Resonance test.
CONCLUSION
While the DeltaMaker had miserable ratings for Retraction and Overhang, it earned top scores for Accuracy, Bridging, Backlash, Tolerance, and Z mechanical. It also produced a nicely surfaced, completely articulated robot, tying with the Zortrax for the fourth highest overall print-quality score. ![]()
PRINT SCORES
|
1 |
2 |
3 |
4 |
5 |
|
1 |
2 |
3 |
4 |
5 |
|
1 |
2 |
3 |
4 |
5 |
|
1 |
2 |
3 |
4 |
5 |
|
1 |
2 |
3 |
4 |
5 |
|
1 |
2 |
3 |
4 |
5 |
|
1 |
2 |
3 |
4 |
5 |
|
1 |
2 |
3 |
4 |
5 |
|
FAIL |
PASS |
|||
|
FAIL |
PASS |
|||
PRO TIPS
![]() Although currently without a heated-bed option, the Azteeg X3 controller used makes future upgrades possible.
Although currently without a heated-bed option, the Azteeg X3 controller used makes future upgrades possible.
![]() The Marlin firmware is slicer agnostic and both KISSslicer and Slic3r are viable options, but just use Cura. For more complex slicing needs, switch to the desktop version and upload your G-code via the browser.
The Marlin firmware is slicer agnostic and both KISSslicer and Slic3r are viable options, but just use Cura. For more complex slicing needs, switch to the desktop version and upload your G-code via the browser.
WHY TO BUY
This delta robot-style machine looks and operates very differently than the boxy, Cartesian printers. It has a tall Z build area and ships with preconfigured OctoPrint with wi-fi enabled CuraEngine slicing out of the box.


ANNA KAZIUNAS FRANCE is Make: magazine’s Digital Fabrication Editor. She’s also Dean of the global Fab Academy program, co-author of Getting Started with MakerBot, compiled Make: 3D Printing and has organized and directed the 3D Printer Shootout for the past two years. kaziunas.com
Buyer’s Guide | Fused Filament Delta Printers | SeeMeCNC Orion
SEEMECNC ORION
Affordable delta arrives (mostly) preassembled, but requires some fine-tuning
WRITTEN BY MATT GRIFFIN

Brian Kaldorf
SeeMeCNC Orion | seemecnc.com
![]() Price as Tested $1,200
Price as Tested $1,200
![]() Build Volume 230mm Z, round 150mm diameter platform
Build Volume 230mm Z, round 150mm diameter platform
![]() Bed Style Heated glass
Bed Style Heated glass
![]() Temperature Control? Yes
Temperature Control? Yes
![]() Materials PLA, ABS
Materials PLA, ABS
![]() Print Untethered? SD card, OctoPrint compatible
Print Untethered? SD card, OctoPrint compatible
![]() Onboard Controls? Yes
Onboard Controls? Yes
![]() Host Software Repetier-Host
Host Software Repetier-Host
![]() Slicer Slic3r
Slicer Slic3r
![]() OS Mac, Windows, Linux
OS Mac, Windows, Linux
![]() Open Software? Third-party software
Open Software? Third-party software
![]() Open Hardware? Auxiliary design files, license unknown
Open Hardware? Auxiliary design files, license unknown
Available at ![]() bit.ly/Orion-Delta
bit.ly/Orion-Delta
SEEMECNC’S SECOND DELTA PRINTER, THE ORION, SHIPS WITH AN ASSEMBLED frame and a low price that could go a long way to increase delta adoption in the maker community.
SETTING UP THE ORION
The Orion arrives (mostly) preassembled with the Cheapskate carriages, delta arms, and EZStruder bowden extruder already connected to the towers, a tremendous relief for those who have studied the early delta printer kits. The online manual clearly guides you through plugging in electronics, LCD interface, and power supply.
Unlike a few recent deltabots, there’s no autoleveler — you must calibrate the Z-height manually. The correct height for printing the first layers is determined by measuring down from the Z-axis endstop at the top of the machine, so time spent tuning this carefully will be rewarded later.
WOBBLES AND ECCENTRICITIES
One of the Orion’s handiest features is the Cheapskate carriage. The “eccentric cams” on each carriage can be rotated to tighten or loosen their grip on the aluminum extrusion tracks. After a few unusually low-quality prints, we discovered that one of these carriages was loose. After tightening, we reran all of the parts again.
Shootout prints were run using the vendor’s recommended host and slicing software, but the Slic3r-prepared test probes proved problematic. It scored poorly on almost all tests, even after the prints were rerun. Exceptions include high marks on the difficult Overhangs probe and a “pass” on both the mechanical XY and Z Resonance tests.
SLOW DOWN AND USE CURA
After tallying our test data, we noticed that the Orion’s provided profiles were WAY too fast — over twice the speed of any other machine tested. Experienced Orion users report that their results have been superior using Cura with their own settings rather than the provided Slic3r profiles. Fellow tester Matt Stultz reports that the Orion is his go-to production machine and advises new users to use Cura from the start.
CONCLUSION
Although this printer did not perform well during our testing, makers who slow down their print speed, use Cura, and spend the time upfront to carefully fine-tune the Cheapskate carriages’ Z-height should be pleasantly surprised with the performance of this affordable delta. ![]()
PRINT SCORES
|
1 |
2 |
3 |
4 |
5 |
|
1 |
2 |
3 |
4 |
5 |
|
1 |
2 |
3 |
4 |
5 |
|
1 |
2 |
3 |
4 |
5 |
|
1 |
2 |
3 |
4 |
5 |
|
1 |
2 |
3 |
4 |
5 |
|
1 |
2 |
3 |
4 |
5 |
|
1 |
2 |
3 |
4 |
5 |
|
FAIL |
PASS |
|||
|
FAIL |
PASS |
|||
PRO TIPS
![]() The cancelation option on the LCD interface isn’t quickly accessible. To halt in a hurry, hit the button under the main control knob.
The cancelation option on the LCD interface isn’t quickly accessible. To halt in a hurry, hit the button under the main control knob.
![]() Take the time to fine-tune the Z-height by turning the screw head protruding from the top of each carriage. When homing preprint, the screws make contact with the endstops; fine-tuning each of these (to 0.1mm or less!) takes serious time — and the resulting changes in the path of the nozzle across the build area can be difficult to evaluate.
Take the time to fine-tune the Z-height by turning the screw head protruding from the top of each carriage. When homing preprint, the screws make contact with the endstops; fine-tuning each of these (to 0.1mm or less!) takes serious time — and the resulting changes in the path of the nozzle across the build area can be difficult to evaluate.
WHY TO BUY
Low cost deltabot, handy onboard LCD interface, unusual design is fun to watch.


MATT GRIFFIN is Director of Community & Support at Adafruit Industries, a former MakerBot community manager, and author of the forthcoming book Design and Modeling for 3D Printing (Maker Media). He can be seen weekly on Adafruit’s “3D Hangouts” live video series, and glimpses of his adventures in the early days of desktop 3D printing are tucked into the corners of the Netflix original documentary Print the Legend.
Buyer’s Guide | Tinkerer Filament Printers | Ultimaker Original+
ULTIMAKER ORIGINAL+
Same great kit, now with a heated glass bed
WRITTEN BY YVES SINNER & NICK PARKS

Brian Kaldorf
Ultimaker Original+ | ultimaker.com
![]() Price as Tested $1,600 (kit)
Price as Tested $1,600 (kit)
![]() Build Volume 210×210×205mm
Build Volume 210×210×205mm
![]() Bed Style Heated glass
Bed Style Heated glass
![]() Temperature Control? Yes
Temperature Control? Yes
![]() Materials PLA, ABS (others encouraged)
Materials PLA, ABS (others encouraged)
![]() Print Untethered? SD card, OctoPrint compatible
Print Untethered? SD card, OctoPrint compatible
![]() Onboard Controls? Yes
Onboard Controls? Yes
![]() Host Software Cura
Host Software Cura
![]() Slicer CuraEngine
Slicer CuraEngine
![]() OS Mac, Windows, Linux
OS Mac, Windows, Linux
![]() Open Software? Cura/CuraEngine: AGPLv3
Open Software? Cura/CuraEngine: AGPLv3
![]() Open Hardware? Auxiliary files: CC BY-NC 3.0
Open Hardware? Auxiliary files: CC BY-NC 3.0
RELEASED JUST OVER THREE YEARS AGO, THE ULTIMAKER ORIGINAL KIT JUST KEEPS GETTING BETTER. The Original+ has a slew of enhancements that include a heated glass bed (upgrade kit available), an improved Z-axis, new electronics, and Ulticontroller onboard controls with SD card are now included.
BUT THAT’S NOT ALL …
Another welcomed improvement is the move to a 3-point bed leveling system, which is much easier and quicker than the previous 4-point bed adjustment system. Additionally, there have also been changes to the extruder. The polypropylene fan duct has been replaced with a sturdy metal one and new plastic spacers and clips are used in the assembly of the hot end. Our test machine was fully assembled (and a prototype, which may have hurt XY, Z scores) but judging from our personal kit build experiences, this redesigned extruder will be significantly easier to build.
PERIODIC MAINTENANCE
The overnight prints on this machine performed extremely well and reliable. One thing we did notice was that one of the nuts was a little loose when we came in the next morning. Experience using other Ultimaker Originals for the last two years has shown that it’s important to tighten all of the nuts every three to six months.
LET THERE BE LEDS?
The only thing that this machine might be missing is a lighted build platform. That is one of the many things that the Ultimaker 2 did extremely well, and it seemed to be a big hit. I imagine that Ultimaker will eventually release a lighting kit or, perhaps, Make: Projects will come up with a clever tutorial on how to light up this machine.
CONCLUSION
This printer packs a huge value. It puts a huge build volume, refined quality, reliability, and incredible speeds into a continually upgradable, well-supported machine. It may not be as sleek as the Ultimaker 2, but at nearly half the price ($1,600) it’s a great bargain. With its low maintenance and high performance, this hackable machine is great for any maker. ![]()
PRINT SCORES
|
1 |
2 |
3 |
4 |
5 |
|
1 |
2 |
3 |
4 |
5 |
|
1 |
2 |
3 |
4 |
5 |
|
1 |
2 |
3 |
4 |
5 |
|
1 |
2 |
3 |
4 |
5 |
|
1 |
2 |
3 |
4 |
5 |
|
1 |
2 |
3 |
4 |
5 |
|
1 |
2 |
3 |
4 |
5 |
|
FAIL |
PASS |
|||
|
FAIL |
PASS |
|||
PRO TIPS
Regularly retighten nuts on the sliding blocks and the extruder, they tend to loosen.
WHY TO BUY
Continually upgradable, extremely fast and reliable printing, excellent hackability, great surface finish, large build area, heated glass, low maintenance.


YVES SINNER is a Luxembourg/Europe-based blogger, 3D-printing enthusiast, innovation expert, and start-up advisor. You can follow him and his brother Michel on 3Dprintingforbeginners.com.

NICK PARKS is an engineering intern at Make: Labs and is studying mechanical engineering at Santa Rosa Junior College.
Buyer’s Guide | Tinkerer Filament Printers | Bukobot 8 v2 Duo and Bukito v2
BUKOBOT 8 V2 DUO
Tweakable design, multi-material capabilities, and great technical support
WRITTEN BY TOM BURTONWOOD

Brian Kaldorf
THE BUKOBOT 8 V2 DUO KIT (SENT TO US ASSEMBLED) SEEMS LARGELY UNCHANGED FROM THE SINGLE EXTRUSION MACHINE WE REVIEWED LAST YEAR, apart from the addition of a second Spitfire extruder. With its hackable, RepRap-style design (STL/DXF files available), it doesn’t look like a beginner’s machine and that’s probably a good thing.
Performance-wise, the Bukobot 8 v2 Duo did not work as well as might be expected during the Shootout testing weekend. Initially I tried to use Cura as instructed in the documentation, but the configuration files from the Deezmaker website repeatedly crashed the program. Manually configuring Cura did not fare much better for me, so instead I opted to use legacy Slic3r profiles downloaded from the Bukobot site. These profiles printed well, scoring respectable marks on the Accuracy, Backlash, and Bridging probes.
This machine landed roughly in the middle of the pack after two days of intensive testing, but its pedigree and construction suggests it could do much better. ![]()
PRINT SCORES
|
1 |
2 |
3 |
4 |
5 |
|
1 |
2 |
3 |
4 |
5 |
|
1 |
2 |
3 |
4 |
5 |
|
1 |
2 |
3 |
4 |
5 |
|
1 |
2 |
3 |
4 |
5 |
|
1 |
2 |
3 |
4 |
5 |
|
1 |
2 |
3 |
4 |
5 |
|
1 |
2 |
3 |
4 |
5 |
|
FAIL |
PASS |
|||
|
FAIL |
PASS |
|||
PRO TIPS
Slic3r + Repetier-Host preformed better than Cura. To dial in the machine, use online forums and technical support.
WHY TO BUY
Tweakable design, multi-material capabilities, and great technical support.
Bukobot 8 v2 Duo | bukobot.com
![]() Price as Tested $1,499 (kit)
Price as Tested $1,499 (kit)
![]() Build Volume 200×200×200mm
Build Volume 200×200×200mm
![]() Bed Style Heated
Bed Style Heated
![]() Temperature Control? Yes
Temperature Control? Yes
![]() Materials ABS, PLA, Nylon, Polycarbonate, PVA, HIPS, TPE
Materials ABS, PLA, Nylon, Polycarbonate, PVA, HIPS, TPE
![]() Print Untethered? SD card, OctoPrint compatible
Print Untethered? SD card, OctoPrint compatible
![]() Onboard Controls? No
Onboard Controls? No
![]() Host Software Cura
Host Software Cura
![]() Slicer CuraEngine
Slicer CuraEngine
![]() OS Mac, Linux, Windows
OS Mac, Linux, Windows
![]() Open Software? Third-party software
Open Software? Third-party software
![]() Open Hardware? Auxiliary design files: CC BY-NC-SA 3.0
Open Hardware? Auxiliary design files: CC BY-NC-SA 3.0
BUKITO V2
Hackable, tweakable, and tinkerer-friendly
WRITTEN BY KACIE HULTGREN

Brian Kaldorf
THE BUKITO IS A FUN AND COMPACT PRINTER THAT’S SO RIGID AND LIGHT, IT CAN PRINT IN PLA OR NYLON — upside down! It’s a perfect travel-size printer for demos and workshops. We like the large platform-leveling knobs, unique syncro-mesh timing belts, and rigid V-Slot extrusions. The all-metal hot end supports high-temperature printing, and it ships with a nylon-friendly Garolite platform.
In our tests, print performance in PLA was average. The great ratings for Accuracy and Backlash indicate a machine that’s well built and tuned, but these scores were outweighed by poor Overhang and Bridging scores. The optional cooling fan (absent on ours) could greatly increase the Bukito’s overall ranking.
For an uninitiated consumer, the software setup and lack of a slicing guide will be a little daunting, but experienced users won’t have any issues with the online documentation. The company’s lead engineer addressed many of our anonymous support questions personally. ![]()
PRINT SCORES
|
1 |
2 |
3 |
4 |
5 |
|
1 |
2 |
3 |
4 |
5 |
|
1 |
2 |
3 |
4 |
5 |
|
1 |
2 |
3 |
4 |
5 |
|
1 |
2 |
3 |
4 |
5 |
|
1 |
2 |
3 |
4 |
5 |
|
1 |
2 |
3 |
4 |
5 |
|
1 |
2 |
3 |
4 |
5 |
|
FAIL |
PASS |
|||
|
FAIL |
PASS |
|||
PRO TIPS
Wish it had a display? Use Marlin’s auto-start function for prints that begin from SD on startup.
WHY TO BUY
Portable, nylon-capable out of the box, tinkerer focused.
Bukito v2 | deezmaker.com
![]() Price as Tested $899 (kit)
Price as Tested $899 (kit)
![]() Build Volume 140×150×125mm
Build Volume 140×150×125mm
![]() Bed Style Unheated Garolite
Bed Style Unheated Garolite
![]() Temperature Control? Yes
Temperature Control? Yes
![]() Materials PLA and Nylon 618
Materials PLA and Nylon 618
![]() Print Untethered? MicroSD card, OctoPrint compatible
Print Untethered? MicroSD card, OctoPrint compatible
![]() Onboard Controls? Yes
Onboard Controls? Yes
![]() Host Software Repetier-Host
Host Software Repetier-Host
![]() Slicer Slic3r
Slicer Slic3r
![]() OS Mac, Linux, Windows
OS Mac, Linux, Windows
![]() Open Software? Third-party software
Open Software? Third-party software
![]() Open Hardware? CC BY-NC-SA design files “forthcoming”
Open Hardware? CC BY-NC-SA design files “forthcoming”
Buyer’s Guide | Stereolithography Printers | Form 1+
FORM 1+
Create highly detailed sculptural prints — fast
WRITTEN BY LUIS RODRIGUEZ

Brian Kaldorf
Form 1+ | formlabs.com
![]() Price as Tested $3,299
Price as Tested $3,299
![]() Build Volume 125×125×165mm
Build Volume 125×125×165mm
![]() Z Resolution 25/50/100 microns (0.025/0.05/0.10mm)
Z Resolution 25/50/100 microns (0.025/0.05/0.10mm)
![]() XY Resolution 300 microns (0.30 mm)
XY Resolution 300 microns (0.30 mm)
![]() Materials Clear, White, Gray, and Black detail UV curable resin
Materials Clear, White, Gray, and Black detail UV curable resin
![]() Print Untethered? Kickoff via USB
Print Untethered? Kickoff via USB
![]() Software PreForm
Software PreForm
![]() OS Mac,Windows
OS Mac,Windows
![]() Open Software? No
Open Software? No
![]() Open Hardware? No
Open Hardware? No
THE UPGRADED FORM 1+ IS SLEEK AND THE DESIGN IS FLAWLESS. No part of the construction feels weak or cheaply made. Operation is silent and underwhelming. The resulting prints are not. The Form1+ is a stereolithography system (SLA), drawing each slice of the model into liquid resin with a laser to harden it. As the build platform moves up, a solid model appears out of the liquid.
FASTER AND MORE ACCURATE
The Form 1+ features a new, 4x more powerful laser that cuts print time in half, a re-engineered galvanometer control system to increase speed and accuracy, and an improved peel mechanism. Capable of 0.1, 0.05 and 0.025mm layer heights and with a minimum feature size of 0.3mm, it can’t match the B9 or ProJet’s claimed resolutions, but they can’t match its build area.
MULTICOLOR MATERIAL STORAGE AND SWAPPING
The included injection-molded resin tanks have been upgraded to a light-blocking orange acrylic, enabling safe storage of unused resin with the included lids. This allows the user to switch resin colors between prints.
EXTENSIVE DOCUMENTATION
The included quick-start guide gets you unboxed and up and printing in less than 30 minutes, and it includes information on how to setup your included finishing station. Plus, Formlabs has an extensive support site (formlabs.com/en/support).
PREFORM SOFTWARE
The Form 1+ excels at sculptural prints and targets designers. SLA machines must create support structures to enable overhangs (which are removed postfabrication). Form-labs’ continually updated Preform software has numerous auto-generating and custom support-material editing functions (which work extremely well), and placement and removal features (added after our testing) that enable advanced control of placement and density, giving designers complete control over where they adhere to print surfaces.
SOME PRINT FAILURES, NO CASTABLE RESIN
We did experience a few failed prints that couldn’t be explained. Occasionally we had a layer that did not peel, which means every subsequent layer was blocked from curing, and we had to fish resin chunks out of the vat. One downside for some users is that the Form 1+ does not have castable resin options. (See B9 Creator and ProJet).
CONCLUSION
The Form 1+’s upgrades make an already-solid user experience (we called its predecessor a “modern marvel”) even better. While the cost of the machine is higher than most desktop printers, its output and build volume is unparalleled. For those who want incredible print detail and numerous resin color choices but don’t need castable resin, it’s an easy choice. ![]()
PRO TIPS
![]() The Formlabs support site is an awesome resource — use the active community forum.
The Formlabs support site is an awesome resource — use the active community forum.
![]() When prints fail, stop the build early, clean the bottom of the resin tank, and restart. Careful sifting of cured resin will ensure subsequent prints are successful.
When prints fail, stop the build early, clean the bottom of the resin tank, and restart. Careful sifting of cured resin will ensure subsequent prints are successful.
WHY TO BUY
The level of detail is ideal for someone making lab apparatus for microfluidics, detailed character animation, sculpture, or jewelry. It’s so easy to use that anyone from an artist to a student or teacher can explore this new medium. I work in a science center, and we plan to use it for many different teaching aids and models. From DNA molecules to magnifying tiny insects, you can output a level of detail that is impossible with other 3D-printing technologies.
Formlabs makes its products upgradable and is currently offering a $1,200 upgrade package for the previous model owners.


LUIS RODRIGUEZ is the lead organizer for Maker Faire Kansas City and has been 3D printing since 2009, when he got his first MakerBot Cupcake. Luis works at Science City, where he manages the Maker Studio and Spark!Lab. unionstation.org/sciencecity
Buyer’s Guide | Stereolithography Printers | ProJet 1200
PROJET 1200
This tiny, resin-cartridge-fed printer is designed for jewelers and dentists
WRITTEN BY ANDERSON TA

Brian Kaldorf
ProJet 1200 | cubify.com/en/ProJet
![]() Price as Tested $4,900
Price as Tested $4,900
![]() Build Volume 43×27×150mm
Build Volume 43×27×150mm
![]() Z Resolution 30 microns (0.03 mm)
Z Resolution 30 microns (0.03 mm)
![]() XY Resolution 56 microns (0.056 mm)
XY Resolution 56 microns (0.056 mm)
![]() Projector Resolution LED DLP, effective 585 dpi
Projector Resolution LED DLP, effective 585 dpi
![]() Materials VisiJet FTX Green UV curable, castable resin
Materials VisiJet FTX Green UV curable, castable resin
![]() Print Untethered? Kickoff via USB, wi-fi
Print Untethered? Kickoff via USB, wi-fi
![]() Software Geomagic Print
Software Geomagic Print
![]() OS Windows only
OS Windows only
![]() Open Software? No
Open Software? No
![]() Open Hardware? No
Open Hardware? No
AT LONG LAST, 3D-PRINTING INDUSTRY GIANT 3D SYSTEMS HAS ENTERED THE DESKTOP SLA MARKET WITH THE PROJET 1200. With a sleek form factor, it is about the size of a mini breadmaker, and it packs a fair bit of technology inside.
SIMPLE, SELF-CONTAINED, NETWORKED DLP
This DLP-based system has a small resin-curing pico projector in its base, and a built-in, post-curing station, which curiously is not large enough to hold a print the height of the build area. Onboard controls are limited to a simple, two-line LCD display and a single green, glowing button. It’s possible to send files over USB, but we found it was happiest when networked and receiving files over wi-fi.
TINY MACHINE FOR MAKER PROS
At 43x27x100mm the build area is tiny, but it needs to be due to its design. Unlike the B9 and Form 1+, it does not have a layer-separating mechanism to assist in print release between layers, limiting successful prints to very small objects or ones that have a small, cross-sectional surface area. That said, it’s explicitly targeted at a maker-pro audience of jewelers and dentists who typically work small and use investment-casting processes that require clean burnout. The convenient, but costly ($490 for a pack of 10) prepackaged VisiJet FTX Green no-ash burnout resin cartridges and $4,900 price tag reflect this focus.
FIRMWARE MISHAPS AND GEOMAGIC PRINT
After installing Geomagic Print and powering up the machine, we were prompted for a firmware update, which bricked the unit. After multiple frustrating instances of unplugging, powering down and USB reconnecting, it became operational again. We also had some issues with failed prints with large flat bottom surfaces until we got the hang of the workflow.
The Windows-only software has all the simple and most of the advanced features you’d expect, but support customizability felt limited compared to the extensive support-manipulation options available in the B9 Creator and Preform software.
CONCLUSION
Advanced features aside, it’s very easy to use, and there’s no resin to pour. Pop in and lock down a resin cartridge, load the build platform, and prep and print. ![]()
PRO TIPS
![]() If model has large, flat bottom surfaces, angle slightly with “Interactive Transform.” Click “Auto Support.” Turn view to bottom, select “Manual Support,” and drag slider to “Large.” Add extra supports and click print.
If model has large, flat bottom surfaces, angle slightly with “Interactive Transform.” Click “Auto Support.” Turn view to bottom, select “Manual Support,” and drag slider to “Large.” Add extra supports and click print.
![]() Don’t try to pick failed prints out of the cartridge, you many puncture it and make a mess.
Don’t try to pick failed prints out of the cartridge, you many puncture it and make a mess.
![]() Geomagic print expects a raft and offsets the Z 0.09 by default, modifiable in preferences.
Geomagic print expects a raft and offsets the Z 0.09 by default, modifiable in preferences.
![]() For better print adhesion, try roughing up the build platform.
For better print adhesion, try roughing up the build platform.
WHY TO BUY
Compact, easy-to-use, networked, maker-pro-ready SLA targeted at jewelers and dentists. Resin that burns out cleanly, designed for metal casting. No fishing around in a vat for failed print floaties, just pop in another cartridge.


ANDERSON TA is a digital fabrication expert. By day he manages Miller Lab at Rice University where they are researching various applications for 3D printing in the field of tissue engineering and regenerative medicine. By night, he works to promote and make open hardware an option for all. He lives to make things that enable others to bring their ideas to life.
Buyer’s Guide | Stereolithography Printers | B9 Creator and SLA Synopsis
B9 CREATOR V1.2
Tinkerer’s machine capable of the finest resolution of printers tested
WRITTEN BY NICK PARKS AND ERIC CHU
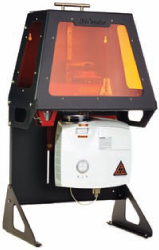
Brian Kaldorf
THE B9 V1.2 IS AN UPGRADED VERSION OF THE B9 V1.1 WE REVIEWED LAST YEAR. New additions include a 1080p projector, a deeper vat, and XY- and Z-axis mechanical improvements. The B9, like the ProJet 1200, is a DLP machine and uses a projector to cure the resin, as opposed to a laser. The new aluminum resin vat is robust and allows resin to be rinsed out with alcohol without having to worry about damaging the acrylic.
Geared towards jewelers who use lost-wax (in this case, resin) casting methods, the B9 is unusual in that it can be configured for different resolutions and corresponding build area sizes. The new, higher resolution DLP projector enables more detail in the XY plane, producing finer attributes. At the minimum recommended Cherry-resin layer height of 25-50 microns (0.025 – 0.05mm) and 30 microns (0.03mm) in the XY axes the B9 is capable of the finest resolution of all the printers tested.
However, we had some issues, and it took many tries with lots of tinkering and fine-tuning to get successful prints; we often ended up with a bunch of partially cured resin floaties in the resin tank. When it printed, it printed very well. Unfortunately our testing was constrained to 70 microns XY with the Red resin due to a firmware issue that blocked us from changing settings. ![]()
WHY TO BUY
Castable resin, extremely fine detail capabilities. Target market is jewelers and other artisans who use lost-wax casting methods. But lots of tinkering and fine-tuning required
PRO TIPS
![]() Use small batches of resin to avoid having to throw out large quantities when prints fail.
Use small batches of resin to avoid having to throw out large quantities when prints fail.
![]() Buy yourself some masks or a respirator because this machine requires a lot of user interaction.
Buy yourself some masks or a respirator because this machine requires a lot of user interaction.
B9 Creator v1.2 | b9creator.com
![]() Price as Tested $5,495
Price as Tested $5,495
![]() Z Resolution: 25-100 microns (0.025-0.1mm), depending on resin used
Z Resolution: 25-100 microns (0.025-0.1mm), depending on resin used
![]() XY Resolution: 30/50/70 microns (multiple configurations)
XY Resolution: 30/50/70 microns (multiple configurations)
![]() Projector Resolution: 1920 x 1080 (1080p)
Projector Resolution: 1920 x 1080 (1080p)
![]() Build Volume: 57.6 x 32.4mm at 30µm x-y 96 x 54mm at 50µm x-y TESTED: 104 x 76.6mm at 70µm x-y
Build Volume: 57.6 x 32.4mm at 30µm x-y 96 x 54mm at 50µm x-y TESTED: 104 x 76.6mm at 70µm x-y
![]() Materials: Red or Cherry UV curable, castable resin.
Materials: Red or Cherry UV curable, castable resin.
![]() Print Untethered? No
Print Untethered? No
![]() Software: B9 Creator
Software: B9 Creator
![]() OS Mac, Windows, Linux
OS Mac, Windows, Linux
![]() Open Software? Host software: GPLv3; firmware: CC BY-SA 3.0
Open Software? Host software: GPLv3; firmware: CC BY-SA 3.0
![]() Open Hardware? Auxiliary design files BOM, electronics: B9Creator 3D Printer Noncommercial Hardware License
Open Hardware? Auxiliary design files BOM, electronics: B9Creator 3D Printer Noncommercial Hardware License
SLA SYNOPSIS
WRITTEN BY ANNA KAZIUNAS FRANCE

Jeffrey Braverman
AS DISCUSSED IN “WHAT IS PRINT QUALITY?” ON PAGE 34, our Dimensional Accuracy probe measures a printer’s ability to fabricate dimensionally correct geometries in the XY plane. Resolution is the absolute limit of what the technology is possible of producing.
Dimensional Accuracy
ACTUAL DIAMETER 20MM

Machine |
Accuracy |
Precision |
Form 1 |
-0.14 |
+/- 0.08mm |
ProJet 1200 |
0 |
+/- 0.21mm |
B9 Creator |
-0.25 |
+/- 0.06mm |
Resin shrinkage may play a role, but we were unable to test during Shootout. |
||
RESOLUTION
The circular text at the top of the Make: Rook test print is 0.87mm (870 microns) — 0.9mm (900 microns) tall in the XY plane (depending on the letter), and measures 0.17mm (170 microns) in Z plane. Rook dimensions: X: 14.33 Y: 14.34, Z: 24mm.
PROJECTOR-BASED (DLP):
ProJet 1200, B9 Creator
In projection-based systems like the B9 Creator and ProJet 1200, the desired Z resolution or “layer height” and projector resolution determines the XY print size. Increased resolution reduces the possible print area.

LEFT: ProJet 1200: Printed at 30 microns (only setting), projector 585 dpi
RIGHT: B9 Creator: Printed at coarsest 70 micron (0.07mm) option (unfortunately, firmware issues kept us from configuring and testing at higher resolutions), projector 1080p
LASER BASED:
Form 1+
In laser-based systems the minimum feature size (finest points / walls possible) is determined by laser spot size. ![]()
Form 1+: Printed at default 50 micron (0.05mm) layer height, machine has 300 micron minimum feature size.