One of the most exciting aspects of making music with both Mixcraft and GarageBand is that both programs have the capability to create “ready-togo” content that can be shared and distributed to a large audience instead of simply containing it within the educational space. Both teachers and students can quite easily take works that they have created with either program and upload them to a wide variety of accessible outlets, including stand-alone websites, blogs, wikis, pod-casts, YouTube, or even commercial outlets, such as the iTunes Music Store. This last chapter of the book will examine the various ways you can accomplish this type of digital distribution and will touch on several related topics, such as copyright, licensing, paying royalties, and the remix/mashup culture. This chapter is intended to provide the next steps for the many different ways in which music educators can utilize both Mixcraft and GarageBand in the music classroom.
In each of the lessons contained in this book, you end up with some type of finished product—in most cases, a piece of music. When starting any of these lessons, teachers should ask always ask themselves, “What is my ultimate goal?” The easiest thing to do is to play the student work in the classroom for an opportunity for critique and reflection. But when this is finished, what happens to the music? The simplest thing to do is to have the students save their work to a removable storage device or burn their work to a CD. Burning files to an audio CD is quite simple with both Mixcraft and Garage-Band. (You can read the tutorial files on how to do this in both programs at the end of Chapters 2 and 3 and view the accompanying tutorial videos on the companion DVD.)
However, students in our classrooms today are more likely to consume their media in more non-physical formats, such as MP3 files. Many have been downloading, uploading, listening to, and sharing MP3 files for the past decade, using either somewhat nefarious peer-to-peer sharing networks (such as LimeWire or BitTorrent) or through legal outlets (such as iTunes, Pandora Radio, or Amazon). Rather than sticking with the first two, and perhaps more traditional, models of distribution (listening and burning), teachers might consider more current methods of digital distribution that the recording industry is slowly coming to accept as the future.
The easiest way to share student work (or teacher work, for that matter) with a large audience is by posting the work to a website and making the files available for listening, downloading, or both. In the past, creating a website that could accommodate such functionality required either some in-depth HTML programming skills or a relative or friend who knew how to program websites. Today, there are many templates and site-creation software programs and websites that allow you to do WYSIWYG (what you see is what you get) editing for the web. Apple users can utilize the iWeb application that comes with every Mac, and Windows users can utilize a wide variety of inexpensive web-authoring programs to do the same on a PC. These programs allow you to create some aesthetically pleasing sites with templated pages for uploading audio files as podcasts. The only potential downside to this method of website creation is that you will need some space on a web server, and you’ll need some basic type of FTP software to transfer the website files you create to that server. Your school IT director should be able to help you with this.
A viable alternative to the software-based model of website creation is using site-authoring websites that are geared specifically toward education. The advantage of using these sites is that they are almost always free and easy to use. Although there are many choices out there, you should consider using Wikispaces (www.wikispaces.com), WordPress (www.wordpress.com), and EduBlogs (www.edublogs.com). These sites may not be specifically set up to share audio files, but they all have the functionality to do so. Teachers can create custom sites for their classes using any one of these suggestions, and they can post student work that can be shared with a global audience. It is truly up to the teacher to decide the purpose of the site. Some possibilities include:
A blog where student work is posted so that others can comment on it, or a class-specific website that acts as the homepage for a student-run record label that includes recordings students have created as well as recordings of school ensembles.
A website that acts as an electronic “refrigerator” for friends and family to see and/ or hear student projects.
A site where teachers share lesson plans and examples of student work with other educators.
Web 2.0 resources (sites that allow for true two-way interaction between author and user) are wonderful ways to share work with others. However, in some school districts they do not allow teachers to use third-party sites such as these to post student work. Instead, some prefer teachers to use the proprietary templated sites that are available with the server platform that the school adopts. It is recommended that teachers check with their IT departments to see what the district policy is for this option.
For the purposes of this text, the following tutorial helps to illustrate the process of uploading an audio file to Wikispaces. This process is extremely similar on almost every other site-creation website.
When your students have finished working on their projects (which could be almost any of the projects included in this text), the first step in sharing the projects with a global audience is getting them off of the student computer and onto yours. Easy ways to accomplish include the following:
Have students email you their work as an attachment.
Use a removable flash drive (also known as a jump drive or thumb drive) to save the students’ work from their computers onto the drive, and then load the projects onto your computer.
Have students save their work to a network-based folder to which you have access. (Many schools have teacher drop boxes where students can submit their work.)
Have students burn their work to a CD-R or CD-RW so that you can load it onto your machine for downloading. Although this is certainly the most time-consuming of the methods discussed, it may sometimes be necessary to do this if the student work is very large in size (for example, video or film projects).
When the students’ work is on your computer, the next step is to create a website using one of the many education-focused web-hosting sites available (if the district policy allows you to do so). In this example, we will select Wikispaces (www.wikispaces.com) to illustrate the process.
Wikispaces is a website that provides teachers with free space to create educational environments for their students. The term wiki means that the site has functionality that can allow students to edit any of the content on the site. For the purposes of this exercise, we are simply using the free space that Wikispaces provides as a place to post student work. Teachers can opt out of the wiki functionality and use the site as a way to post student work only (though there is a Discussion Board feature that can facilitate critique and reflection on student work).
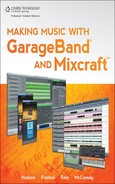
The first step in getting student work on the Wikispaces site is to create an account. As an educator, you are entitled to create a free account for use with your students. Once you have clicked the appropriate options on the Wikispaces homepage, you will be prompted to create an account. Complete the form (see Figure 17.1) and click Join.
After you have registered for an account, you’ll need to select a name for your site, choose the level of permissions (Protected or Private is recommended for use with students), and select the type of wiki you are creating (K-12 Education). When you have completed these steps, you are ready to start creating your site.
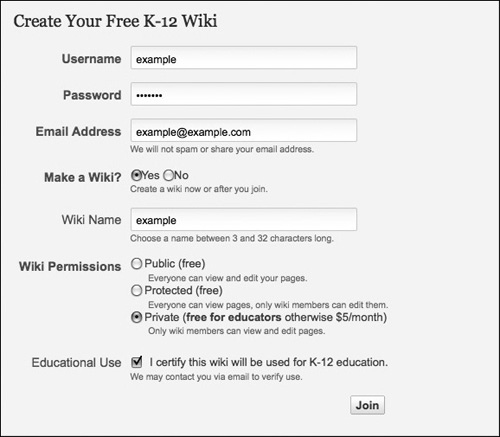
When you first enter your new site, it should look something like what you see in Figure 17.2.
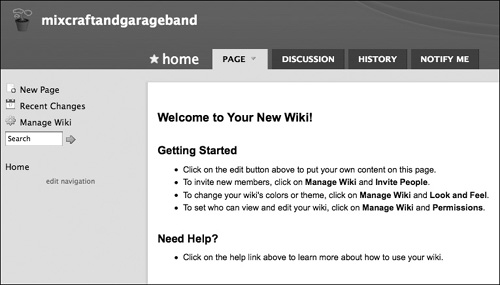
To start creating the page, you’ll need to click the Edit button. This will allow you to edit the page much as you would a Microsoft Word document. You will notice a tool-bar pop up when you are in Edit mode (see Figure 17.3). Along with the familiar word processing controls, you’ll see a File option in the center of the toolbar. This is the option you’ll need to select for inserting/uploading audio files to your site. Click on the File button, and you will be prompted to select the type of file you want to upload (see Figure 17.4). Select Audio File to upload an audio file or Video File to upload a video.
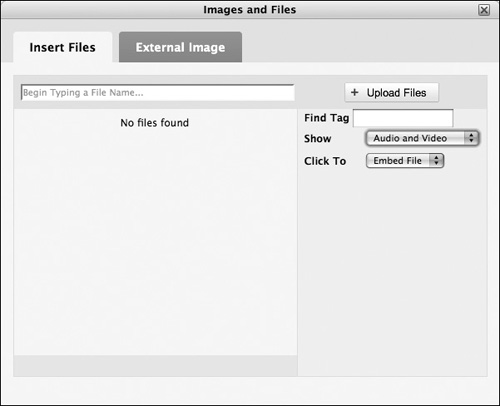
You’ll need to select the student work that you would like to upload from your computer to the site, wait for the file to upload, and then double-click on the file name from the Images and Files menu (refer to Figure 17.4). Most similar websites have the same file-uploading process.
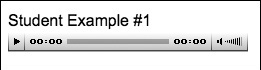
When your audio file is uploaded, it will be placed into the edited page as an Audio Player file with whatever audio format the work is in (.mp3, .mov, .aiff, .wav, .wmv) displayed. You can type text above it to identify the file. When you click Save, you’ll see what the page will look like when viewed by others. You should see an audio player appear (see Figure 17.5) on your page. Users then simply click the Play button to hear the student work.
From a pedagogical standpoint, you can utilize Wikispaces (or any other similar type of website) to upload all of your student work for others to listen to and comment on. You can easily send out the URL of the site to students, parents, administrators, and colleagues to share what your students have accomplished in your class with Mixcraft and GarageBand. In addition to audio files, you can post videos, podcasts, images, and text on these types of websites. One benefit to utilizing these sites is that they are free and easy to use. Another is that you don’t need to pay to store these files on their servers. Lastly, by utilizing these types of sites, you’re giving your students a real-life experience in the digital distribution model of the music business. You can spur many conversations by posting their files online, including copyright (discussed later in this chapter), music piracy, and digital citizenship.
Once again, be sure to consult with your school district’s policy on posting student work online, specifically with regard to maintaining student anonymity. It may very well be against your district’s policy to identify the student by name on any public website.
Another method for the digital distribution of audio and video files is creating a dedicated podcast channel. There are quite a few podcasting websites out there that provide educators with free space for student work. Two of those websites are PodOmatic (www.podomatic.com) and MyPodcast (www.mypodcast.com). The advantage to using sites such as these is that they both can automatically generate a podcast feed URL, which is necessary to include your podcast channel on the biggest podcast site of them all, iTunes.
The following tutorial will take you through the process of setting up a podcast channel using PodOmatic.
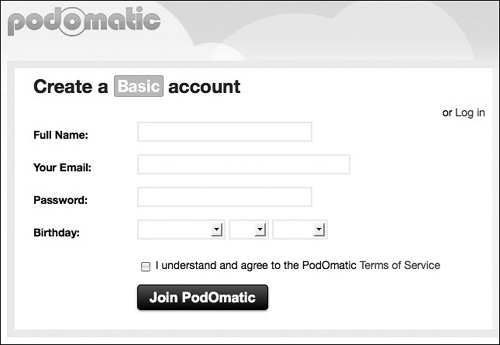
The first step in creating your own podcast channel is registering for an account at any of the many podcast-hosting sites available. PodOmatic has a self-explanatory registration process that requires you to input some basic personal information, including an email address (see Figure 17.6). You will want to choose the Basic option to avoid paying any fees. After you enter your basic information, you will be required to enter the desired URL for your podcast site. You might want to use your school’s name in the URL or a music-oriented name to help your students (and their parents) find your site.
After you go through the initial registration process, a confirmation email will be sent to your email address. When you get this email, you’ll be ready to start editing your podcast channel.
The single most important part of your podcast site is the Podcast RSS Feed URL (which will be listed in the center of the My Podcast administration page of your account). The URL will look something like this: http://mixcraftandgarageband.podomatic.com/rss2.xml. The reason why this URL is so important is that in order to get your podcasts on the iTunes Music Store, you need to submit this address. Any other podcast-hosting site that you choose should have this important address available.
Posting podcasts on PodOmatic is a very similar process to creating a webpage on Wikispaces. You will need to locate the Post an Episode feature on the My Podcast administration page, upload student work, and enter pertinent information about the content. You can use your PodOmatic site either as the main way for your students to access their work or as a space to host the files that are then accessed through iTunes. The advantage to putting the podcasts on iTunes is that it is a wildly popular way of distributing and downloading podcasts, and it once again gives your students a real-world experience. Creating an iTunes Music Store podcast site is free and easy.
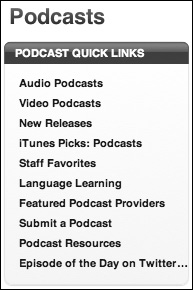
The first step in creating your iTunes Music Store podcast channel is creating an iTunes account. (If you purchase music through iTunes, you already have one of these.) After you have created your account, you will need to locate the Podcast section of the iTunes Music Store. Once there, you will need to click Submit a Podcast in the Podcast Quick Links menu (see Figure 17.7).
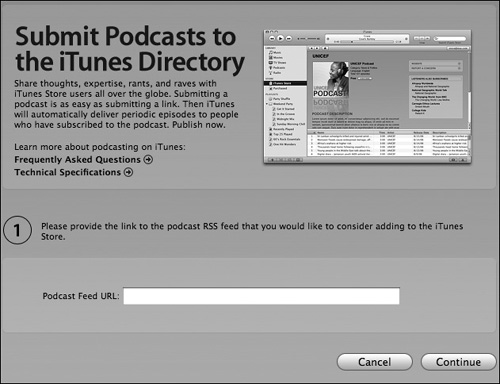
After you click on the Submit a Podcast link, you will come to a page that asks you for your podcast feed URL (see Figure 17.8). All you need to do is copy the RSS feed URL from your PodOmatic My Podcast administration page, paste it into the window, and click Continue. After you do so, you’ll have to complete a few forms that ask questions about the purpose and content of your podcast channel, and you will need to name your podcast channel. After 24 to 48 hours, your podcast channel should appear on the iTunes Music Store. When it is up, you can send your students, parents, administrators, and colleagues there to download the students’ work.
It should be noted that any audio and video file can be a podcast, so if you’re looking to get your students’ work to a wide audience, this might be a good option for you. Teachers should be cautious about what they post to the iTunes Music Store (as it is a premier site for music and video distribution), so we recommend that anything posted be carefully screened first by the teacher. From a copyright perspective, students should avoid using copyright-protected materials in their podcasts—and if they do, they should keep the use within Fair Use guidelines (which will be discussed a bit later in this chapter).
From a pedagogical standpoint, having student work posted on the iTunes Music Store is a wonderful opportunity to provide students with a real-world experience. Creating work in Mixcraft and GarageBand provides them with many opportunities to create professional-sounding (and professional-looking) results, and sharing their work with a global audience is exciting for anyone.
If your students’ work in Mixcraft and GarageBand includes film and video scoring, you might consider posting their finished works on YouTube—the most popular video sharing and viewing site on the Internet. Although there are alternatives to YouTube, such as TeacherTube and SchoolTube, none is quite the same as the original. Creating an account on YouTube is very easy, and it allows you to also create your own You-Tube channel, which can serve as the central hub for sharing student video files.
The first step in creating your own YouTube channel for use with your students is creating a YouTube account. Simply click on Create Account in the upper-right corner of the YouTube homepage to do so. The form you’ll need to complete includes your email address and username. Use your school email address and make your username something to do with your school (examplevillehsmusic, for example). When you have completed the form and accepted the YouTube Terms and Conditions, you’ll need to confirm your email address. Next, log into your YouTube account and start uploading!
To upload a video to YouTube, you will need to click on the Upload button at the top of the YouTube toolbar (see Figure 17.9). You can customize the look and feel of your channel if you wish (you might consider adding your school mascot as the channel icon) and set permissions for commenting, viewing, embedding, and sharing.
YouTube allows you to post videos up to 15 minutes in length and 2 GB in size, and there is no limit to the number of videos you can upload to your channel. Things to consider when deciding whether to utilize YouTube include:
When uploading a video, you will be asked to title, describe, categorize, and tag the movie and to set the privacy settings. For maximum privacy, you can set any video to Unlisted or Private and send an email or the URL to your students so that they can view it. Otherwise, it will automatically be set to Public, where anyone can view the work.
The pedagogical rationale for having your students utilize a 21st-century tool to upload the work they have created in Mixcraft and GarageBand may not always be enough for your district to allow you to post student work to YouTube. However, the benefits include giving your students a real-world experience in content sharing and distribution, as well as giving them an opportunity to share their work with a large audience.
The final, and perhaps most exciting, way to distribute student work (or any recordings that you make of your performing ensembles with Mixcraft and GarageBand) is to make them commercially available through sites such as the iTunes Music Store, Amazon, and Rhapsody. Before considering this option, you will need to check with your administration about creating a bank account specifically for your music department, which may be required to sell content through this type of channel.
There are quite a few ways to get your students’ work (and your own) available for commercial release. The easiest way is to use a website that specializes in digital content distribution. Two such sites are TuneCore (www.tunecore.com) and Catapult (www.catapultdistribution.com). Both sites allow you to upload content to outlets such as the iTunes Music Store, Amazon, and Rhapsody for a nominal annual fee ($20 to $25). In addition to these fees, you are required to pay any associated mechanical licensing fees for recordings of copyright-protected works through sites such as Harry Fox (www.harryfox.com). By far the best option is to distribute only original work to get the most money in return. (Mechanical licensing fees can be up to 20 cents per song after paying additional processing fees.)
This model of distribution can offer some very exciting opportunities for your music program.
You can record and edit your concerts with Mixcraft and GarageBand and sell them through outlets such as the iTunes Music Store, Amazon, and Rhapsody. After paying the associated royalties, you can use the remaining income as a fundraiser for your music department.
Your students can create and run their own record label (there are many examples of this already in place in high schools across the U.S.), giving them valuable real-world experience in the music industry.
As a musician yourself, you might want to consider selling your original music through this outlet.
The pedagogical rationale for exploring the commercial digital distribution model includes giving your students not only real-world experience in the music industry, but also business experience. A student-run record label has many cross-curricular dimensions and could easily be a part of the business department of your school as well. Additionally, making recordings of your performing ensembles available through this medium is a terrific opportunity for fundraising.
When creating and sharing anything in the digital environment, you will no doubt run across copyright issues pretty quickly. There are several excellent texts and websites available on this subject, but the following should give you some idea of what you can and cannot do in relation to working with Mixcraft and GarageBand and your students. One tremendous advantage that both programs have is that they include very large selections of copyright- and royalty-free loops for students to use without any fear of violating copyright law. In fact, you can hear many of the loops included in both programs in commercially released music, TV shows, and commercials. Because both programs also allow you to record and import copyright-protected material, teachers and students should be aware of some basic rules.
If you make recordings of copyright-protected works, you need to pay the mandatory mechanical licensing fees if you want to make more than one copy, regardless of whether you charge people for them.
If you include copyright-protected recordings in your work, you should not use more than 10 percent or 30 seconds of the original work. As long as your use is educational, it will be considered a fair use of the work. However, if you plan on making the work commercially available, you will need to either get permission or pay the required royalties (sometimes both) to do so.
If your students create their own original works, they should seriously consider getting their work registered for copyright protection. They can do this by visiting www.copyright.gov and paying the $35 per work fee. (A work can be an entire album.)
Many students today enjoy making what are known as remixes and mashups. A remix can be defined as a rethinking of a work by editing the recording and adding new material to it. A mashup can be defined as mixing two different songs together to form a new work. There are numerous examples of both genres available on the Internet.
Both Mixcraft and GarageBand are perfectly suited to allow students to make remixes and mashups, and it may be something that you decide to explore with them. In terms of copyright, as long as your use of others’ work is noncommercial and purely educational (along with the 10 percent, 30-second rule), you can make remixes and mashups with your students. If you decide to post their work in any of the methods described earlier in this chapter, you may be told to remove the work (in what is known as a takedown notice) from your site. If you do receive one of these requests, you must remove the content in question immediately to avoid potential prosecution. A good rule of thumb is to always try to post original work only and avoid posting anything that contains copyright-protected materials.
Fair use allows educators to utilize copyright-protected materials in ways that non-educators cannot. There are four factors in determining whether your use of a work is fair. They include:
Purpose. Is your purpose for using the work educational?
Nature. What was the nature of the original work? Was it commercially available?
Amount. How much of the work are you using?
Effect. What effect will this have on the commercial viability of the work?
Fair use can be somewhat confusing. Educators should refer to fairuse.stanford.edu for a clear understanding of what may and may not be considered a fair use of copyright-protected material.
Another possibility in terms of teaching your students about copyright and licensing is to explore the Creative Commons (CC) licenses. These alternative licenses allow for much broader use of materials. Teachers should strongly consider showing their students the Creative Commons site (www.creativecommons.org) and discussing the issues surrounding copyright protection and the alternative licensing ideas that Creative Commons offers.
Mixcraft and GarageBand provide educators and students with tremendously powerful tools for student creativity. As we head further into the 21st century, music educators must find ways of including the entire school population in the music program. Connecting with the other 80 percent of the students who are not currently involved with the performance aspect of school music programs affords exciting opportunities for both students and teachers to explore the creative energy that is inside each of us. Mix-craft and GarageBand allow nontraditional music students (as well as traditional music students) to explore music creation without having to know how to read or notate music. There are countless examples of well-known musicians (including some of the best songwriters ever to walk the planet) making beautiful music without knowing all of the mechanics of music.
Incorporating composition, podcasting, film scoring, and all of the other exciting learning opportunities that Mixcraft and GarageBand afford students into a school music program is one of the few ways to truly incorporate 21st-century learning skills into a school environment. Both programs are inexpensive and easy to use and help foster creativity. Can you think of any good reason not to start using these programs in your school today?
It is the sincere hope of the authors of this text that we have provided you, the educator, with a clear set of strategies, basic knowledge of the software programs, and lesson ideas for incorporating Mixcraft and GarageBand into your music curriculum.