
This chapter contains two lessons to help you understand multitrack recording, mixing and mastering in GarageBand. Please see the companion DVD for a written tutorial on multitrack recording, mixing, and mastering in GarageBand.
2. Performing on instruments, alone and with others, a varied repertoire of music
3. Improvising melodies, variations, and accompaniments
4. Composing and arranging music within specified guidelines
6. Listening to, analyzing, and describing music
7. Evaluating music and music performances
Mix the drum recording by adjusting volume and panning of each track.
Mix the drum recording by applying EQ and reverb effect plug-ins to each track.
Use a compressor effect plug-in on the Master Track.
“Recording and Mixing Drums” by Bob Dennis, available online at www.record-ingeq.com/EQ/req0301/feature.html
Drum Mixing Template.band GarageBand file located on companion DVD
Listen to a variety of rock-and-roll recordings and focus on the drums in each song. I suggest listening to songs from the following albums: Bon Jovi’s Slippery When Wet and Maroon 5’s Songs About Jane. Students can also bring in their favorite albums and listen to them with a focus on the drums.
Read “Recording and Mixing Drums” by Bob Dennis. This article describes microphone placement as well as mixing/processing.
Note
Mixing is a subjective art. The procedures in this lesson are a guide to help you mix this file. It is a good idea to use the suggested settings and then experiment to see whether you prefer slightly (or drastically) different settings. It is through this experimentation that you will really start to learn how to mix.
Locate the file Drum Mixing Template.band on the companion DVD and copy it to your computer’s hard drive.
Open Drum Mixing Template.band in GarageBand and listen to the file.
Solo the Kick track.
Open the Track Info pane and be sure that you have the Kick track selected.
Click the Edit tab in the Track Info pane.
Click on an empty box in this window and add the Track Reverb effect plug-in.
Click on the effect plug-in icon to open the detailed effect plug-in settings window, as shown in Figure 15.1.
Adjust the settings of the Track Reverb effect plug-in as follows (see Figure 15.2):
Reverb Time: 8%
Reverb Color: –7%
Reverb Volume: 15%
Original Volume: 85%
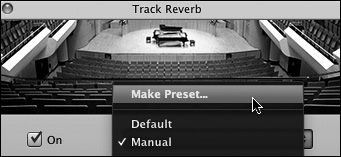
Click the preset pop-up window that currently says Manual.
Click on Make Preset, as shown in Figure 15.3.
Name the preset Drums – Short Reverb and click Save. You can now access this preset for other Drum tracks in this file.
Close the Track Reverb settings window.
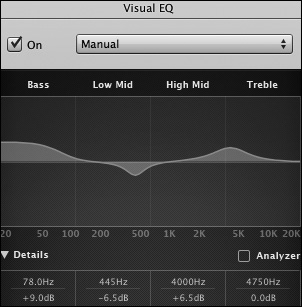
Enable the Visual EQ effect plug-in near the bottom of the Track Info window by clicking the gray square. (It will turn blue when enabled.) See Figure 15.4.
Click on the Visual EQ icon to open the detailed effect plug-in settings window.
Click on Details at the bottom of the effect plug-in settings window.
Click your cursor in the Bass section of this window. Drag left and right until the frequency is set to 78.0 Hz and drag up and down until the volume is set to +9.0 dB.
Click your cursor in the Low Mid section of this window. Drag left and right until the frequency is set to 445 Hz and drag up and down until the volume is set to −6.5 dB.
Click your cursor in the High Mid section of this window. Drag left and right until the frequency is set to 4,000 Hz and drag up and down until the volume is set to +6.5 dB.
Tip
You can also enter EQ settings by double-clicking any value in the Details section of the Visual EQ effect settings window (see Figure 15.5).
Close the Visual EQ settings window.
Un-solo the Kick track.
Select the Snare track, solo the track, and listen to the file.
Add a Track Reverb effect plug-in and open the detailed settings window.
Adjust the settings of the Track Reverb effect plug-in as follows (see Figure 15.6):
Reverb Time: 18%
Reverb Color: -7%
Reverb Volume: 15%
Original Volume: 85%
Click the preset pop-up window and select Make Preset.
Name the preset Drums – Long Reverb and click Save.
Close the Track Reverb settings window.
Enable the Visual EQ effect plug-in and open the detailed settings window.
Click your cursor in the High Mid section of this window. Drag left and right until the frequency is set to 4600 Hz and drag up and down until the volume is set to +5.5 dB. See Figure 15.7.
Solo the Kick and Snare tracks.
Adjust the volume of the Snare track all the way down.
Play the file and slowly turn up the volume of the Snare track to create a good blend between the Kick and Snare tracks. Note that both tracks should be panned center.
Select the Hi-Hat track, solo the track, and listen to the file.
Add a Track Reverb effect plug-in and open the detailed settings window.
Click the preset pop-up window and select Drums – Short Reverb. This is the preset that you created in Step 11.
Enable the Visual EQ effect plug-in and open the detailed settings window.
Click your cursor in the Bass section of this window. Drag left and right until the frequency is set to 215 Hz and drag up and down until the volume is set to −6.5 dB.
Click your cursor in the Treble section of this window. Drag left and right until the frequency is set to 10,800 Hz and drag up and down until the volume is set at +5.5 dB. See Figure 15.8.
Solo the Kick, Snare, and Hi-Hat tracks.
Adjust the volume of the Hi-Hat track all the way down.
Pan the Hi-Hat track all the way to the left (which is also known as hard left). Note: I prefer to mix the drums from the drummer’s perspective, so I place the Hi-Hat track on the right side of the mix as if I were sitting on the drummer’s stool.
Play the file and slowly turn up the volume of the Hi-Hat track to create a good blend between the three tracks. Keep an eye on the master level meter located in the bottom toolbar. You want to turn up the Hi-Hat track until the left channel jumps up just a bit more than the right channel. Note that the left channel is the top level meter and the right channel is the bottom level meter. See Figure 15.9.
Un-solo the Kick, Snare, and Hi-Hat tracks.
Select the Rack Tom track, solo the track, and listen to the file.
Add a Track Reverb effect plug-in and open the detailed settings window.
Click the preset popup window and select Drums – Long Reverb. This is the preset that you created in Step 25.
Enable the Visual EQ effect plug-in and open the detailed settings window.
Click your cursor in the Bass section of this window. Drag left and right until the frequency is set to 81.0 Hz and drag up and down until the volume is set to +9.0 dB.
Click your cursor in the Low Mid section of this window. Drag left and right until the frequency is set to 400 Hz and drag up and down until the volume is set to −6.0 dB.
Click your cursor in the High Mid section of this window. Drag left and right until the frequency is set to 7000 Hz and drag up and down until the volume is set to +4.0 dB. See Figure 15.10.
Select the Floor Tom track, solo the track, and listen to the file.
Add a Track Reverb effect plug-in and open the detailed settings window.
Click the preset pop-up window and select Drums – Long Reverb. This is the preset that you created in Step 25.
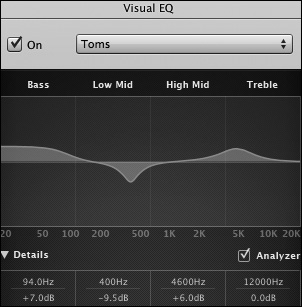
Enable the Visual EQ effect plug-in and open the detailed settings window.
Click your cursor in the Bass section of this window. Drag left and right until the frequency is set to 94.0 Hz and drag up and down until the volume is set to +7.0 dB.
Click your cursor in the Low Mid section of this window. Drag left and right until the frequency is set to 400 Hz and drag up and down until the volume is set to −9.5 dB.
Click your cursor in the High Mid section of this window. Drag left and right until the frequency is set to 4600 Hz and drag up and down until the volume is set to +6.0 dB. See Figure 15.11.
Un-solo all tracks and mute the Overhead Right and Overhead Left tracks.
Pan the Rack Tom track left center and the Floor Tom track right center.
Cycle a section of the song that includes rack and floor tom hits.
Play the file and adjust the volume of both Tom tracks to create a good balance between the tracks. See Figure 15.12.
Select the Overhead Right track, solo the track, and listen to the file.
Add a Track Reverb effect plug-in and open the detailed settings window.
Click the preset pop-up window and select Drums – Short Reverb. This is the preset that you created in Step 25.
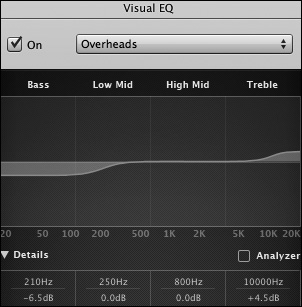
Enable the Visual EQ effect plug-in and open the detailed settings window.
Click your cursor in the Bass section of this window. Drag left and right until the frequency is set to 210.0 Hz and drag up and down until the volume is set to −6.5 dB.
Click your cursor in the Treble section of this window. Drag left and right until the frequency is set to 10,000 Hz and drag up and down until the volume is set to +4.5 dB. See Figure 15.13.
Select the Overhead Left track, solo the track, and listen to the file.
Pan the Overhead Left track hard left.
Repeat Steps 64 to 68 using the Overhead Left track.
Unsolo the Overhead tracks.
Play the file and adjust the volume of the Overhead tracks. As you adjust the volume, listen closely for the crash cymbal in the Overhead Left track and the ride cymbal in the Overhead Right track. Bring up the volume until you hear just enough cymbals.
Select Master Track located near the top of the Track Info pane, as shown in Figure 15.14.
Click on the Edit tab in the Track Info pane.
Click in the empty effects box and select AUDynamicsProcessor.
Play the file and begin to adjust the threshold by clicking and dragging the yellow node up and down the curved line. As the file plays, an arrow will indicate the input volume of the file. As the arrow exceeds your threshold setting, it will turn red; this means that the sound is being reduced or compressed. You want the threshold set so only the loudest sounds are reduced. I suggest setting the threshold to about -33.1 dB for this file. See Figure 15.15.
Adjust the attack time. If the attack time is set too low, you may hear an unnatural pulsing sort of sound in the Drum track. If the attack time is set too high, it will take too long to compress the loudest sound waves. I suggest setting the attack to about 0.015 seconds.
Adjust the release time. If the release is set too low, you may again hear an unnatural pulsing sort of sound. If the release is set too high, it will continue to compress the sound long after the loud sound wave has passed. I suggest setting the release to about 0.2 seconds.
Adjust the master gain setting. As you increase the master gain, keep an eye on the Output Level meter located in the AUDynamicsProcessor effect window. If you set the master gain too high, you can cause clipping and distorted sound. Slowly increase the master gain until the Output Level meter hits just below 0 dB. I suggest setting the master gain to 5.0 dB for this file.
Export the finished mix by selecting Share > Send Song to iTunes or Share > Export Song to Disk.
If you plan to burn this finished file to an audio CD, uncheck Compress in the Export window. This will export the final mix as a full CD-quality file. If you plan to post the file to a website or add it to your iPod, check Compress. A compressed file is great for the Internet or an iPod because it is significantly smaller (about 1/10th the size of a CD-quality file); however, you lose a small bit of quality. The most common compressed audio files are MP3 and AAC files.


Create Software Instrument tracks and compose/record new melodic and harmonic material to accompany the drums using the MIDI keyboard.
Create new Basic tracks and compose/record new melodic and harmonic material to accompany the drums using acoustic instruments or your voice.
Special thanks to Emanuel DelPizzo for generously donating his time to perform on drums for this recording. Visit Mr. DelPizzo’s website at www.wetpaintaudio.com.
6. Listening to, analyzing, and describing music
7. Evaluating music and music performances
8. Understanding relationships between music, the other arts, and disciplines outside the arts.
Mix a large multitrack recording using effect plug-ins and volume/panning adjustments.
Explore Guitar tracks in GarageBand.
Train Song – M Fein Mix.mp3 audio file located on the companion DVD
Train Song Template.band GarageBand file located on the companion DVD
Listen to a variety of rock-and-roll recordings. Focus on the mix. I suggest listening to AC/DC’s Back in Black.
Listen closely for each individual instrument and consider the panning.
Listen for the amount of reverb on the recording.
Listen for any interesting effect plug-ins that may have been used on various instruments. This would include distortion/overdrive on Guitar tracks.
Listen to Train Song – M Fein Mix.mp3, located on the companion DVD. This is my final mixed version of “Train Song” after completing all of the procedures below.
Locate Train Song Template.band, located on the companion DVD and copy it to your computer’s hard drive.
Listen to the file. As the file plays, solo each track to get a feel for the audio on each track. You may notice that during the drum intro in the beginning of the song, you can hear background noise on the other tracks.
Press Command+A to select all of the regions.
Press and hold Shift and click the audio region in the Kick Snare track to deselect it.
Use the Trim tool to remove the silence from all regions except the Kick Snare region. Trim to about Bar 2 Beat 4 when the sound waves begin (see Figure 15.16).
Solo the three Vocal tracks.
Drag the play head to Bar 11 and listen to the Vocal tracks.
Select the Lead Vocals track and open the Track Info pane.
Click the Edit tab in the Track Info pane.
Enable the Compressor effect plug-in by clicking the gray square next to the plug-in icon.
Click on the word Manual and select Vocal Compression Basic from the preset list (see Figure 15.17). The compressor will reduce the amplitude of the loudest sound waves and enable you to make the track feel louder in the mix.
Select an empty effect plug-in box and add Track Reverb.
Click the word Default and select Vocal Room from the preset list, as shown in Figure 15.18.
Select the Backing Vocals 1 track.
Enable the Compressor effect plug-in and select Vocal Compression Basic from the preset list.
Add Track Reverb and select Vocal Hall from the preset list, as shown in Figure 15.19. Note that some engineers would prefer that all Vocal tracks have identical reverb; however, I like the sound of using slightly different, more distant reverb for the backing vocals in this particular file.
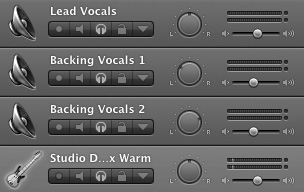
Pan the Backing Vocals 1 track slightly left (−29) and the Backing Vocals 2 track slightly right (+37). This will provide some stereo separation for the Vocal tracks. Keep the Lead Vocals panned center.
Reduce the volume of the Backing Vocal tracks so they are slightly softer than the Lead Vocals. In my mix, I set the Backing Vocals to 8.8 dB and the Lead Vocals to −4.8 dB. See Figure 15.20.
Un-solo the Vocal tracks and close all effect plug-in setting windows.
Next, focus on the Bass track. Select and solo the Bass track.
Listen to the Bass track.
In the Track Info pane, select the Bass category.
Play the file. While the file plays, try out various bass settings from the Track Info pane. I suggest using Studio Direct Box Warm for a nice deep bass tone with less attack (see Figure 15.21).
Solo the Vocal tracks along with the Bass track.
Listen to the file and adjust the volume of the Bass track so it blends well with the Vocal tracks. In my mix, I set the Bass to −4.8 dB. See Figure 15.22.
Un-solo all tracks and close all effect plug-in setting windows.
Next, focus on the Drum tracks. Solo the Kick Snare and Crash tracks.
Listen to the two tracks together.
Select the Kick Snare track.
In the Track Info pane, select the Drums category and then select Thickened Drums from the list on the right, as shown in Figure 15.23.
Click on the Edit tab and click on the Compressor icon.
Select Drum Kit Punchy from the preset pop-up menu, as shown in Figure 15.24.
Drag the Gain slider to the right to 13.5 dB, as shown in Figure 15.25. This will increase the volume of the Kick Snare track. You will rarely increase gain by this huge amount, but in this case the Drum track was recorded with very low levels. Note that when you adjust the Gain slider, the preset will change to Manual.
Select the Crash track.
In the Track Info pane, click the Edit tab.
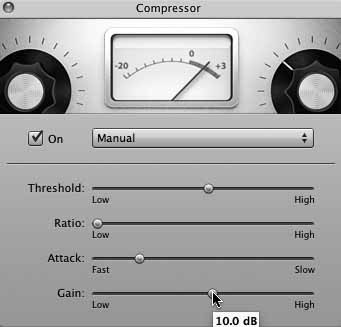
Enable the Compressor effect plug-in and click on the plug-in icon to open the settings window.
Drag the Gain slider to the right to about 10 dB, as shown in Figure 15.26.
Pan the Crash track slightly to the right (+24), as shown in Figure 15.27.
Solo the Vocal, Bass, and Drum tracks.
Listen to the file and adjust the volume of the Drum tracks appropriately. I ended up leaving the Drum volumes at 0.0 dB.
Un-solo all tracks and close all effect plug-in setting windows.
Next, focus on the Guitar Rhythm tracks. Select and solo the Guitar Rhythm 1 track.
Listen to the track.
In the Track Info pane, select the Edit tab.
Enable the Visual EQ effect plug-in.
Click the word Manual and select Guitar Brighten from the pop-up menu, as shown in Figure 15.28. This will increase the frequencies around 5600 Hz by 6.5 dB.
Repeat Steps 42 through 46 on the Guitar Rhythm 2 track.
Solo both Guitar Rhythm tracks.
Pan Guitar Rhythm 1 hard left (−64) and Guitar Rhythm 2 hard right (+64), as shown in Figure 15.29.
Solo the Vocal, Bass, Drum, and Guitar Rhythm tracks.
Listen to the file and adjust the volume of the Guitar Rhythm tracks appropriately. I suggest letting the Guitar Rhythm tracks sit fairly prominent in the mix because these tracks really provide a lot of drive to the tune. I set the volume of both Guitar Rhythm tracks to about −3.8 dB.
Next, focus on the Guitar Fills tracks. These tracks contain electric guitar recorded direct (meaning no amplifier was used during the recording; a cable ran from the guitar’s output directly to the recording interface). GarageBand now includes a host of amp modeling effects that will liven up the sound of the stale-sounding electric guitar fills.
Select Track > New Track and choose Electric Guitar from the pop-up window, as shown in Figure 15.30.
Drag this track up so it is directly below the Guitar Fills 1 track.
Drag the audio region from Guitar Fills 1 to the new Electric Guitar track that you created in Step 53 (see Figure 15.31).
Solo the new track and play the file.
As the file plays, audition various amplifier models by pressing the arrow icons next to the amplifier image in the Track Info pane. I selected the Backface Combo, as shown in Figure 15.32. Note: The effect setting is called Clean Combo, and the name of the amplifier pictured is Backface Combo.
Press Command+D to duplicate this Electric Guitar track.
Drag the audio region from Guitar Fills 2 to the duplicate Electric Guitar track.
Delete the old Guitar Fills tracks (press Command+Delete).
Rename the new Electric Guitar tracks as Guitar Fills 1 AMP and Guitar Fills 2 AMP.
Solo the Guitar Fills AMP tracks.
Pan Guitar Fills 1 AMP hard left (-64) and Guitar Fills 2 AMP hard right (+63), as shown in Figure 15.33.
Solo the Vocal, Bass, Drum, Guitar Rhythm, and Guitar Fills AMP tracks.
Listen to the file and adjust the volume of the Guitar Fills AMP tracks appropriately. I set the volume of both Guitar Fills AMP tracks to −4.8 dB.
Un-solo all tracks.
Next, focus on the Guitar Distortion track. Create a new Electric Guitar track (Track > New Track and select Electric Guitar).
Drag this track directly under the Guitar Distortion track.
Drag the region from Guitar Distortion to the new Electric Guitar track, as shown in Figure 15.34.
Delete the old Guitar Distortion track.
Click the pop-up window above the amplifier image.
Play the file and audition various amplifier and stomp-box preset combinations. Solo and un-solo the track as it plays to see how this track fits with the other tracks. I suggest using Liverpool Bright, as shown in Figure 15.35.
Click the amplifier image to open and view the amplifier settings. Reduce the Presence knob (see Figure 15.36).
Click the Edit button above the amplifier image.
Click the Sustain stomp-box. This will reveal the 10 stomp-box effects available in GarageBand. GarageBand ’11 users note: You have 15 stomp-box effects available.
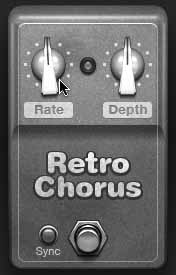
Drag the Retro Chorus stomp-box to an empty yellow box above, as shown in Figure 15.37.
Tip
Double-click the Chorus stomp-box to open the settings window below. These effects work identically to a real guitar stomp-box. Press the foot pedal at the bottom of the effect to enable or disable it (a red light goes on when the effect is enabled) and adjust the knobs to modify the sound (see Figure 15.38).
Mute the Slide Guitar and Harmonica tracks. Note that it makes more sense to mute the two tracks we haven’t worked with yet than to solo the huge number of tracks that we have already mixed.
Listen to the file and adjust the volume of the Guitar Distortion track appropriately. I suggest burying this track in the mix so it only provides a bit of texture to the mix. I set the volume of this track to −16.9 dB.
Un-mute all tracks.
Next, focus on the Slide Guitar track. Select and solo the Slide Guitar track.
Click the Edit tab in the Track Info pane.
Enable the Compressor effect plug-in and click on the icon to open the settings window.
Increase the Gain slider to about 5.5 dB, as shown in Figure 15.39.
Pan the Slide Guitar track slightly right (+25).
Mute the Harmonica track and un-solo the Slide Guitar track.
Play the file and adjust the volume of the Slide Guitar appropriately. I suggest letting the Slide Guitar sit prominently in the mix because it adds so much character to the song. I set the volume to about −1.6 dB (see Figure 15.40).
Next, focus on the Harmonica track. Select and solo the Harmonica track.
Click the Edit tab in the Track Info pane.
Enable the Visual EQ effect plug-in and click the icon to open the settings window.
Reduce the upper High Mid frequencies by 3 dB to help it fit better in the mix (see Figure 15.41).
Pan the Harmonic track slightly left (-27).
Un-solo the Harmonica track and listen to the file.
Set the volume of the Harmonica track appropriately. I set the volume to −5.6dB.
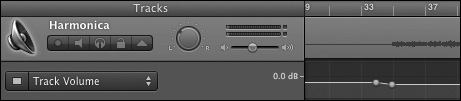
Open the volume automation lane for the Harmonica track.
Reduce the volume of the Harmonica at Bar 34 to about −7.9 dB, as shown in Figure 15.42. This will keep the Harmonica out of the way of the vocals throughout the rest of the song.
Finally, we will focus on the Master Track. Select Track > Show Master Track.
Select the Master Track at the bottom of the screen.
In the Track Info pane, select the Rock category and then select Rock Refreshing Sparkle, as shown in Figure 15.43.
Click the Edit tab.
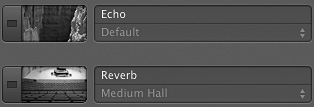
Disable the Echo and Reverb effect plug-ins, as shown in Figure 15.44.
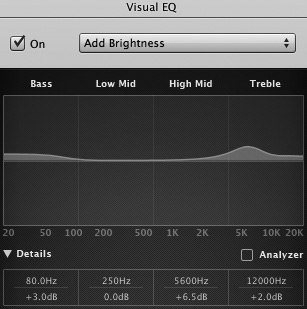
Click the Visual EQ icon to open the settings window.
Bring the Treble frequencies up about 2.0 dB at about 12,000 Hz and bring the Bass frequencies up about 3.0 dB at about 80 Hz by clicking and dragging on the graph (see Figure 15.45).
Close the effect settings window.
Under the Compressor effect plug-in, click the words Rock Basic and select Rock Punch from the pop-up window, as shown in Figure 15.46.
Create a fade-out in the Master Track using automation on the Master Volume line. Begin the fade at Bar 117 and end the fade at Bar 121, as shown in Figure 15.47.
Open a new Finder window by clicking on the Finder icon in the Dock.
Open Train Song – M Fein Mix.mp3 and compare this mixed version of the tune to your GarageBand mix.
Make any final adjustments to panning, volume, or effect plug-ins in your GarageBand file.
Drag the song-ending marker to Bar 121, as shown in Figure 15.48. If you don’t do this, you will have lots of extra silence at the end of your file when you export the final mix.
Export the final mix by selecting Share > Export Song to Disk or Share > Send Song to iTunes.
If you plan to burn this finished file to an audio CD, uncheck Compress in the Export window. This will export the final mix as a full CD-quality file. If you plan to post the file to a website or add it to your iPod, check Compress. A compressed file is great for the Internet or an iPod because it is significantly smaller (about 1/10th the size of a CD-quality file); however, you lose a small bit of quality. The most common compressed audio files are MP3 and AAC files.


Download song stems from the Internet and remix hit songs. Many artists have started to post multitrack versions of their hit songs. The individual audio files are called stems. Nine Inch Nails currently has a website with multitrack versions of many of their songs and a forum to post your remix version (remix.nin.com). Radiohead has also posted multitrack versions of their songs “Nude” and “Reckoner.” These files used to be available for purchase at Amazon.com and the iTunes Store; however, they are not currently available for purchase at the time of this publication. Try doing a Google search for “[name of artist] [name of song] stems” and see what you find!