This chapter contains two lessons to help you get started with MIDI in GarageBand. Please see the companion DVD for a written tutorial for getting started with MIDI in GarageBand. The companion DVD also includes a video tutorial to help you with this chapter.
2. Performing on instruments, alone and with others, a varied repertoire of music
3. Improvising melodies, variations, and accompaniments
4. Composing and arranging music within specified guidelines
5. Reading and notating music
6. Listening to, analyzing, and describing music
7. Evaluating music and music performances
Compose a chord progression using a bank of prerecorded chords.
Compose a melody by moving the notes of the given melody to fit the chord progression using only chord tones.
Compose a bass line using the root and 5th of each chord.
Improvise a percussion accompaniment.
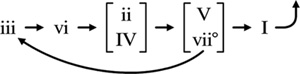
Direct students to www.musictheory.net. This site has an outstanding series of lessons that cover beginning to advanced music theory concepts. Students should watch the lesson entitled Common Chord Progressions.
Play the following musical game with the class to help the students begin to identify the sound of various progressions. Select one student to write a chord on the board. (The teacher will play the chord.) That student will pass the chalkboard or white-board marker to another student, and that student will write a different chord that typically follows the first chord. Continue this activity until all of the students have written a chord on the board. Perform the entire progression on a piano/keyboard. See Figure 7.1.
Drag the GarageBand file Chord Bank Composition Template, located on the companion DVD, onto your computer’s hard drive.
Open Chord Bank Composition Template in GarageBand.
Solo the Chord Bank track by clicking the Headphone icon under the track name (see Figure 7.2). When a track is soloed, the headphones will light up yellow.
Play the file. You will hear the diatonic chords based on the C Major scale.
Using the chord progression chart, compose a chord progression on paper. I strongly suggest using paper and pencil before you try to create the chord progression in GarageBand!
You may use one or two chords per bar. Try to use a mix of one or two chords per bar to keep the harmonic rhythm interesting. The harmonic rhythm is simply the rhythm of the chords. If you had only one chord per bar for every bar, that would be a very boring harmonic rhythm. Similarly, if you had two chords per bar for every bar, that would also be a boring harmonic rhythm.
You should start and end the progression on I (C Major).
This chord progression must last eight measures.
Drag the various chords from the Chord Bank track to the Chord Progression track to compose your chord progression in GarageBand. If you used chords more than once, you can copy them by holding the Option key and clicking and dragging the region. If you are using two chords in a single bar, shorten each region so it only lasts two beats by using the Trim tool. (Note: Place your cursor in the lower-right corner of a region to reveal the Trim tool.) See Figure 7.3.
Listen to the chord progression. Are there any chords that sound out of place? Is the harmonic rhythm interesting? Make any modifications to your chord progression at this time, because the melody and bass parts are based on the chord progression.
Unsolo the Chord Progression track and solo the Melody track.
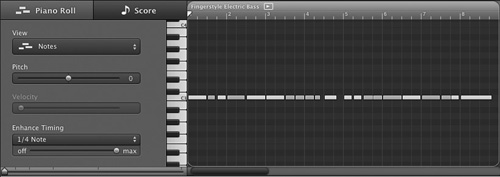
Play the file. You will hear a melody that plays an interesting rhythm but stays only on the pitch C.
Click on the region located in the Melody track.
Open the Track Editor. The default view shows you a piano roll version of the notes with a piano keyboard stretched along the left side of the window. You can also view the traditional music notation by clicking on the Score button. See Figure 7.4.
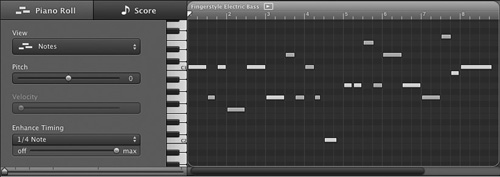
Drag each note up or down to a chord tone in each bar. Do not use any non-chord tones. See Figure 7.5.
Solo the chord progression so both the Chord Progression and the Melody track are soloed.
Listen to the melody along with the chord progression. Do any melody notes sound dissonant? If so, you may have accidentally used a non-chord tone.
Unsolo both the Chord Progression and the Melody track and solo the Bass track.
Play the file. Similar to the original melody region, you will hear a bass part that plays an interesting rhythm but stays only on the pitch C.
Click on the region located in the Bass track and open the Track Editor. See Figure 7.6.
Drag each note up or down to either the root or the 5th of the chord for each bar. For example, if the sounding chord is C Major (I), the bass notes available are C (the root) and G (the 5th). Typically, you will play the root on the first note of the sounding chord. See Figure 7.7.
Unsolo the Bass track and listen to the melody, bass, and chord progression all together. Do any bass notes sound dissonant? If so, you may have used a bass note that was not the root or 5th of the sounding chord.
Currently, all of the instruments sounds are Grand Piano. Although there is nothing wrong with a piano trio, you can add a lot of interest to your composition by using a variety of instrument sounds.
Open the Track Info pane by clicking on the “i” icon in the toolbar, as shown in Figure 7.8.
Click on the Chord Progression track and play the file.
As the file plays, click on a new instrument category and then a new instrument in the Track Info pane. You should hear the sound of your chord progression change.
Tip
You can add many more instrument sounds to GarageBand by purchasing GarageBand JamPacks. Most JamPacks cost about $99 and include both loops and software instruments. You can also try searching the Internet for additional GarageBand software instruments. I recommend downloading the GarageBand instrument packs created by Ben Boldt. (Search “GarageBand Boldt.”) The Boldt instrument packs are shareware, which means they are free to download, install, and use, and you can choose to pay a small fee to the creator.
Repeat Steps 21 and 22 with the Melody and Bass tracks to create an interesting instrumental ensemble. See Figure 7.9.
You are now going to create a percussion accompaniment track. Create a new track by selecting Track > New Track or using the shortcut Option+Command +N (see Figure 7.10).
Select Software Instrument in the next window, as shown in Figure 7.11.
In the Track Info pane, select Drum Kits and then select a drum kit.
Test the sound by pressing on your MIDI keyboard or by using the Musical Typing keyboard (Window > Musical Typing).
Pick one note on your keyboard, such as snare drum. The snare drum sound is located on the fourth lowest D or E on the Musical Typing keyboard and on the lowest D or E on most MIDI keyboards. You may need to try various octaves or pitches to find a drum/percussion sound you think will work well with your other instruments.
Click the red Record button on the toolbar, shown in Figure 7.12, and improvise a drum accompaniment.
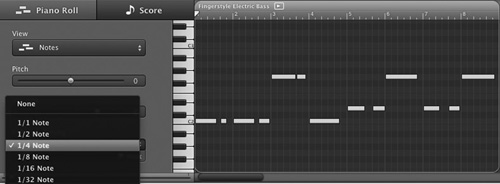
To improve the rhythmic accuracy of your percussion part, you can quantize your notes so they fit exactly on a given rhythmic value. Click on Enhance Timing in the Track Editor. Notice the variety of rhythmic values available. Select the smallest rhythmic value that you just performed. For most recordings you will likely use 1/16 or 1/8; however, you may also use the triplet values if you played any triplet rhythms during your improvisation. See Figure 7.13.
Listen to the entire file and focus on the volume of each track. Adjust the gain (a.k.a. volume) slider in each track so the sound of each track blends with the others. A single instrument should not stand out.
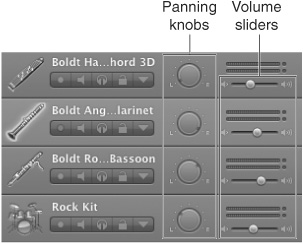
Listen again and focus on the panning of each track. Panning refers to the placement of the sound in the left/right stereo field. If you go to see a concert, some musicians are on the right side of the stage, some are on the left, and some are in the center. The panning of your composition should reflect this reality. For example, try panning the chords to the left, the melody to the right, the bass slightly to the right, and the drum improvisation slightly to the left. Try to balance the right and left sides. It would sound odd if a majority of the sound came from just the left side or just the right side. See Figure 7.14.
Evaluate your composition. Did you:
Compose a chord progression that fits the common chord progression chart?
Correctly use chord tones only throughout the melody?
Correctly use root/5th in the bass part?
Assign new instruments to each track?
Improvise a drum/percussion accompaniment and quantize the recording?
Adjust the volume/panning of each track so all the instruments blend together nicely?
Export the finished project by selecting Share > Send Song to iTunes or Share > Export Song to Disk.


Add additional drum/percussion improvisation tracks. Be sure to quantize after each recording by using the Enhance Timing pop-up window in the Track Editor.
Compose a B section by creating a new chord progression using the chord bank. Because the B section should be a contrast to the A section, you do not need to start and end on I (C Major). It would actually be very normal to begin the B section on F Major (IV) or A minor (vi).
Compose a new melody for your B section. Record a rhythm using only pitch C and be sure to quantize the recording. Then, based on your B section chord progression, drag the melody notes to chord tones in the Track Editor.
Compose a new bass line for your B section. Record a rhythm using only pitch C and be sure to quantize the recording. Then, based on your B section chord progression, drag the bass notes to root/5th in the Track Editor.
2. Performing on instruments, alone and with others, a varied repertoire of music
3. Improvising melodies, variations, and accompaniments
4. Composing and arranging music within specified guidelines
5. Reading and notating music
6. Listening to, analyzing, and describing music
7. Evaluating music and music performances
Create a new GarageBand project, set the time signature appropriately, and import a MIDI file.
Arrange MIDI regions to compose a new version of the Mozart Minuet.
Improvise a bass line for the minuet using a MIDI keyboard.
Improvise a rhythmic accompaniment using a MIDI keyboard.
Print and perform the final composition.
Use a music dictionary to define the word “minuet.” You may also use an online music dictionary, such as the one located at www.music.vt.edu/musicdictionary or www.naxos.com/education/glossary.asp.
Listen to a variety of Mozart minuets. Using the iTunes Music Store, search for “Mozart Minuet” and listen to the preview clips of available songs.
Drag the file Mozart Minuet.mid from the companion DVD to your desktop to copy the file onto your computer’s hard drive.
Launch GarageBand.
Create a new GarageBand project by selecting File > New or using the shortcut Command+N (see Figure 7.15).
Select New Project in the left pane of the QuickStart window and then select Piano from the list of icons (see Figure 7.16).
Name the file Mozart Minuet Composition. Be sure to set the time signature to 3/4 because a minuet is in 3/4 meter (see Figure 7.17). Save the file to your desktop. 6. Delete the first track named Grand Piano by pressing Command+Delete.
Delete the first track named Grand Piano by pressing Command+Delete.
Click on the Finder icon in your Dock and navigate to the desktop.
Drag Mozart Minuet.mid from the Finder window into the gray area in your new GarageBand project. This will import the MIDI file (see Figure 7.18).
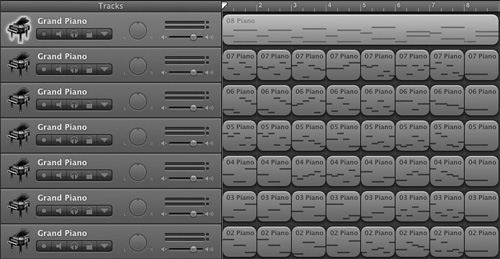
Solo one track at a time and listen to each track individually. The top track of this MIDI file is the harmony track. The six tracks below will be used to create an original melody for your minuet. The six melodic tracks can be used interchangeably. This means that Bar 1 from any track will work with Bar 2 of any track and so forth.
Select the six bottom melodic tracks.
Place the play head at Bar 2 and press Command+T to split all of the regions at Bar 2.
Continue splitting the melodic tracks at Bars 3, 4, 5, 6, 7, and 8 (see Figure 7.19).
Click in the gray area of the Arrange window to deselect the regions.
Create a new Software Instrument track. (Choose Track > New or use the shortcut Option+Command+N and select Software Instrument.) You will use this track to compose your melody.
Mute all six of the melodic tracks by clicking the Speaker icon in each track. The Speaker icon will light up blue when a track is muted.
Drag one of the regions for Bar 1 from any of the melodic tracks into the top track.
Play the file and evaluate the sound of the melodic region that you chose and how it works with the harmony track. Try out another region by moving a different region for Bar 1 into the top track.
Continue using regions from each bar to compose a complete eight-bar minuet melody (see Figure 7.20).
Select all of the regions in your top melody track and join them together by choosing Edit > Join or using the shortcut Command+J (see Figures 7.21 and 7.22).
Select the melody track and select a new instrument sound from the Track Info pane. You certainly can keep the Grand Piano sound, but it may be more interesting to use a different sound.
Create a new Software Instrument. (Choose Track > New or use the shortcut Option+Command+N and select Software Instrument.)
This new track will serve as the bass part for the minuet, so I recommend selecting a bass instrument sound from the Track Info pane. If you decide to select a different instrument category, be sure to play the instrument relatively low on the MIDI keyboard so it serves the sonic purpose of a bass.
The chord progression for this song is C | C | G7 | C | D | G | D | G.
Select Control > Count In, as shown in Figure 7.23. This will provide you with a one-bar count-in before you begin recording.
Record an improvised bass line using only the roots of the chords listed a moment ago.
Quantize your bass recording to the lowest rhythmic value that you performed in the previous step (see Figure 7.24). Most likely, you will quantize to the 1/4 note or 1/8 note.
Create another new Software Instrument track.
Select a sound from the Drum Kits category in the Track Info pane.
Record an improvised drum/percussion accompaniment track using a single drum sound.
Add in additional drum/percussion tracks as you see fit (see Figure 7.25).
Adjust the panning and volume of the various tracks to create an interesting mix. Adjust the volumes of each track so they all blend together well. Adjust the panning of each track so some tracks are more on the left side and others are more on the right side, but remember to balance the left and right channels.
Tip
If a track will not allow you to adjust volume or panning, open the Automation window for that track by clicking on the down arrow below the track name (see Figure 7.26). Then turn off track automation by clicking the green square next to Track Volume (see Figure 7.27). GarageBand ’11 users note: The Automation icon is now located in the lower-right corner of the track display.
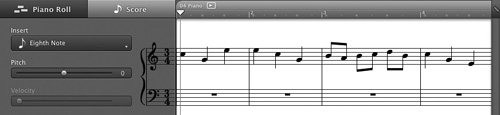
Select the melody region and view it in Score view in the Track Editor (see Figure 7.28).
Print this part by selecting File > Print or pressing Command+P (see Figure 7.29).
Print the remaining parts (harmony, improvised bass, and all improvised drum/ percussion parts).
Tip
If the notation printout is too low for a given instrument, transpose the region by dragging the Pitch slider in the Track Info pane. Try transposing −24, −12, +12, or +24 to make the music playable by the given instrument.
Tip
If the instrument that will perform the part is a transposing instrument, you will need to transpose the pitch of the given region. For Bb instruments, such as trumpet, tenor/soprano saxophone, and clarinet, transpose the region −10, +2, or +14. For Eb instruments, such as alto/baritone saxophone, transpose the region −3 or +9. Note that this tip is for printout purposes only!
Perform the piece with one student on each part.


Create a repeat with dynamic contrast. Loop the regions so the eight-bar phrase occurs three times. Select Track > Show Master Track. Reduce the volume in the middle repetition by clicking nodes on the line in the Master Track (this track is likely displaying the name Master Volume) and dragging the volume down. Bring the volume back to 0.0 dB for the final repeat. See Figure 7.30.
Many minuets have a contrasting section called a trio. Compose a trio section for your minuet. Refer to the Chord Bank Composition project for ideas on composing a new chord progression and developing a melody and bass part for the trio.