For the final practical activities chapter of this book, we have selected two projects that you can create using either Mixcraft or GarageBand:
The Raven Retold, featuring the poetry of Edgar Allen Poe and an accompanying video.
A chance to remix a song by Nine Inch Nails.
For these projects, we will give fewer specific steps and leave more space for creativity and experimentation. You are more on your own, which matches quite accurately the kinds of projects that you might encounter in the real world of digital audio production. Good luck! Refer to all the skills you have already learned, which will help you achieve impressive results with either of these final projects.
2. Performing on instruments, alone and with others, a varied repertoire of music
3. Improvising melodies, variations, and accompaniments
4. Composing and arranging music within specified guidelines
6. Listening to, analyzing, and describing music
7. Evaluating music and music performances
8. Understanding relationships between music, the other arts, and disciplines outside the arts
9. Understanding music in relation to history and culture
Mixcraft or GarageBand
Headphones or monitor speakers
Audio interface
Microphone
MIDI keyboard
Copy of Edgar Allan Poe’s poem “The Raven”
Recording of “The Raven” by the Alan Parsons Project
Notepaper and pen or pencil
Video file from the companion DVD, entitled Video for The Raven.avi
Read Edgar Allan Poe’s poem “The Raven.” You can find it in any collection of Poe’s poems, which you can find in any library or online at www.houseofusher.net/raven.html. Find out about Poe’s life and about the era in which he lived.
Listen to the recording of “The Raven” from the Alan Parsons Project’s Tales of Mystery and Imagination album. You can download it from iTunes, or you can find it at YouTube.com by searching for “Alan Parsons Raven.” Consider the differences between Poe’s poem and the Alan Parsons Project’s song. Both tell the same story and have the same intensity, yet the musical version tells the story in far fewer words. What do you think the point or the message of the story is? You might like to discuss the poem and the song with your music teacher or your English teacher.
Import the video file Video for The Raven.avi into Mixcraft or GarageBand. Watch the video and consider how dark and mysterious the setting of the video is. Can you see the connection between this video and “The Raven?” What similarities and commonalities can you find? In Poe’s poem, the student responds to a sound from outside. It turns out to be a raven, whose presence affects him very deeply. In the movie, the young lady is dreaming heavily and responds to a sound, presumably from outside. At the end of the movie, something frightens her. It is up to you to imagine what that is and how the two different media (the poem and the video) relate to each other.
Using notepaper and a pen or pencil, write out a script to retell the story of “The Raven” to go along with the video. You could write it as a solo recitation or involve some friends to make it into a play. Rehearse your script to make sure that it is shorter than the video. It is perfectly acceptable to have large passages of silence between the lines in your script—this helps to add tension. The presence of music in the final movie will ensure that silence in your script does not seem out of place.
Disable the video playback screen in the Sequencer program. Create an Audio track. Record and edit your script for “The Raven.” Make sure you remember to use good recording techniques and check levels before beginning to read your script. Be prepared to do several takes and to record your script in small sections so you can edit later. Remember to strip the silence from the beginning and end of every recorded section and cross-fade any clips that overlap. Add compression, reverb, EQ, and other effects to your vocal recordings to make your voice sound spooky but still audible.
Re-enable the video screen and listen to your recorded script as you watch the video. Make changes to your recording if you need to. Make sure that your voice is clear and audible all the way through the video.
Add some Instrument tracks to the project. Record some spooky music using your MIDI keyboard (or Musical Typing). Use some of the virtual instruments or software instruments in the computer program and select the weirdest sounds you can find. Make your music frightening and unsettling. Use clusters of notes, unusual intervals, and strange chords. If you have a mod wheel and a pitch-bend wheel, use them! You will really have to let your imagination go crazy to make your composing/improvising effective in the movie. You want to get away from melody and predictability as much as possible.
If you play an acoustic instrument or an electric guitar, add an Audio track to the project and record some weird sounds from your instrument. Play your instrument in strange and different ways. (Just be sure not to break the instrument.) Try to make the instrument sound as different as possible from how one would expect it to sound. Add some effects to the track.
Mix your project. Add some panning to the sounds and automate them so they move between the left and right sides in the mix. This technique can make your listener very uncomfortable and even nauseated. It is a technique that you will hear often if you listen carefully to the soundtracks of professionally made horror movies. Add compression, EQ, reverb, and other effects to your individual tracks; add effects to the master mix fader if you want to apply them to the whole mix. Make sure none of your volume faders goes into the red zone.
Export your final project as a movie. Show it to your teachers and your friends. Look ahead to Chapter 17 for ideas on how to publish your movie online.
Try to find the entire Tales of Mystery and Imagination album by the Alan Parsons Project and listen to the other songs. Read more of Edgar Allan Poe’s poems and other works of fiction. Find some poems or stories that you can retell through music and video. Look at www.archive.org for some scary videos that you can download and use for your projects. Choose videos that are in .avi format. You can edit video on a PC using Mixcraft (editing video is the exact same method as editing audio) or on a Mac using iMovie. Publish your movies online for others to watch.
Singing, alone and with others, a varied repertoire of music
Performing on instruments, alone and with others, a varied repertoire of music
Improvising melodies, variations, and accompaniments
Composing and arranging music within specified guidelines
Reading and notating music
Listening to, analyzing, and describing music
Evaluating music and music performances
Understanding relationships between music, the other arts, and disciplines outside the arts
Understanding music in relation to history and culture
Adjust the tempo and/or key of the song.
Remove audio regions from the song.
Import loops into the song.
Compose and record original musical ideas using the MIDI keyboard.
Compose and record original musical ideas using acoustic instruments or voice.
Add effect plug-ins to alter the sound of various tracks.
Use automation to mix the file.
Add photos or a video to the file.
Export the completed remix.
Remix entry at Wikipedia (en.wikipedia.org/wiki/Remix)
“The Hand That Feeds” by Nine Inch Nails from the album With Teeth
The Hand that Feeds remix file (GarageBand or Raw format) available at remix.nin.com
THTF Raw File Guide.pdf located on the companion DVD
Read the Remix entry at Wikipedia (en.wikipedia.org/wiki/Remix) for background on remixing, its place in electronic and urban music, its influence on the other arts, and its connection with modern society.
Listen to the original version of “The Hand That Feeds” by Nine Inch Nails from the album With Teeth.
Download the file from the iTunes store, or
Listen to the song on YouTube by searching for “Hand That Feeds Nine Inch Nails.”
Visit remix.nin.com and register at the site.
Listen to a variety of user-created remixes of “The Hand That Feeds” on the NIN remix site.
Click on the Listen link at the top of the site, as shown in Figure 16.1.
Click on Search, type “The Hand That Feeds,” and click the Search button, as shown in Figures 16.2 and 16.3.
Click the Play button next to one of the remix files in the Results window, as shown in Figure 16.4.
Download the remix file from the NIN remix site.
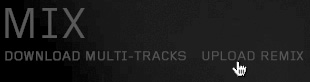
Click the Mix link at the top of the site, as shown in Figure 16.5.
Click the Download Multi-Tracks link, as shown in Figure 16.6.
Scroll down and locate The Hand That Feeds (see Figure 16.7). GarageBand users should download the GarageBand format file; Mixcraft users should download the Raw format file.


Your goal in this project is to create an original remix of the song that sounds quite different than the original NIN version of the song. The steps in the following section will serve as a guide, but you will need to experiment quite a bit to come up with something creative.
The only rule to remixing is that THERE ARE NO RULES!
Open The Hand That Feeds remix file.
GarageBand users: Simply copy The Hand That Feeds GarageBand file to your computer hard drive and open it.
Mixcraft users: Your setup process is a bit more involved—sorry!
Create a new loop/beat-matched project.
Set the key of the song to A and the tempo to 128 bpm.
Import each Raw audio file.
Double-click one of the audio files. In the Sound tab, select Adjust to Project Tempo and set Detected Tempo to 128. Also select Adjust to Project Key and set Detected Key to A.
Use THTF Raw File Guide.pdf to help assemble the loops.
Adjust the tempo and/or key of the song. The original song was recorded at 128 bpm in A minor.
GarageBand users: Click on the Track Info pane and select Master Track. Adjust the tempo slider and/or select a new key.
Mixcraft users: Double-click the green time window that displays the tempo/key and adjust as you wish. As long as you completed Step 1, the loops should tempo/key-stretch to the new project tempo/key.
Remove some audio regions. I suggest removing at least four tracks from the original. I typically remove the drums, percussion, and at least one very identifiable element of the song (for example, the guitar riffs). This will force you to replace those elements with something altogether different, drastically changing the sound of your remix.
Import a variety of loops. Drums and percussion loops are excellent choices, but you can also add pitched loops (such as electric piano, guitar, synths, bass, and so on) to the file.
Create new Software/Virtual Instrument tracks and use a MIDI keyboard to compose and record new musical ideas. I suggest using synth instruments to get an electronic sound or pads to add a layer of texture.
Tip
The A minor pentatonic scale (A-C-D-E-G) works great for this song (see Figure 16.8).
Create new Audio tracks and record new musical ideas using acoustic instruments or your voice. Try recording electric or acoustic guitar, backing vocals, or even a wind instrument (saxophone, trumpet, and so on).
Add effects to the original Audio tracks and any additional tracks that you recorded. Don’t be afraid of using fairly drastic effect plug-ins on the tracks or even adding effect plug-ins to the vocal tracks.
Modify the form of the song.
Consider adding a breakdown section. In this sort of section, you would drop out all audio regions except for one or two and slowly build back up to the full instrumentation. For example, I could create a breakdown by dropping out all audio except for drums. After four bars, I could add in some bass and electric piano loops. After another four bars, I could improvise in A minor pentatonic on electric guitar. Finally, I could bring the rest of the audio material back in eight bars later.
Copy and paste entire sections. GarageBand users can make use of the Arrange Track to help with this process. Simply Option-drag to copy an entire Arrange section.
Remove entire sections. There is no law that says you need to include every part of the song when creating a remix.
Mix the file.
Create a rough mix by setting the volume and panning of each track as you listen to the file. Be sure to make use of panning so some tracks are more to the left and others are more to the right.
Add automation to the volume and panning to bring your mix to life. I suggest panning some tracks left to right and back and forth to get a really interesting panning effect. You can also use volume automation to fade tracks in and out or to simply make a track softer/louder in certain sections of the song.
Explore the Master Track.
GarageBand users: Add a mastering preset and adjust the settings of each effect as needed.
Mixcraft users: Use compressor, EQ, and reverb in the FX chain of the Master Track.
Fade into and/or out of the entire song.
Add photos or a video.
GarageBand users: Do a Google search for appropriate photos and compile them in the remix file.
Mixcraft users: Create a slideshow including pictures in PowerPoint and embed your exported remix to play through the presentation.
Search www.archives.org for video footage, save the file to your hard drive, and import the video. Consider modifying the tempo of the remix or adding/ removing sections to fit the video. Consider compiling a variety of video clips together using iMovie or Windows Movie Maker and exporting them as a single video file. You may also use the video entitled “Video for The Raven” included on the companion DVD for “The Raven” project in this chapter.
Export your finished remix.

Upload your finished mix to the NIN remix website.
At the NIN remix site, click on Mix at the top of the site.
Click Upload Remix and follow the onscreen instructions (see Figure 16.9).
Download and remix additional files from the NIN remix website or Real World Remixed (www.realworldremixed.com).