This chapter contains two lessons to help you get started with MIDI in Mixcraft. Please see the companion DVD for a written tutorial for getting started with MIDI in Mixcraft, as well as a video tutorial.
3. Improvising melodies, variations, and accompaniments
4. Composing and arranging music within specified guidelines
Learn how to use record your own loops in Mixcraft using a MIDI keyboard.
Learn how to arm a track, how to select instrument sounds from the provided sounds within Mixcraft, and how to record MIDI data.
Learn how to find the Notation and Piano Roll views in Mixcraft and how to edit and quantize a loop you have recorded.
Computer with Mixcraft installed.
Internet connection.
Headphones or monitor speakers.
MIDI keyboard preferred (though you can use the Musical Typing option in Mixcraft if you don’t have a MIDI keyboard).
Starter file: Pachelbel Project Starter on the companion DVD.
You will find an example of a completed project on the companion DVD. Look for a file titled Pachelbel’s Loops.mx5 and an MP3 file titled Pachelbel’s Loops Mixdown. mp3.
Navigate to the Pachelbel Project Starter.mx5 file on the companion DVD. Double-click the file name, and the file will open in Mixcraft. You will see a Mixcraft window with just one instrument loaded—a Synth Electric Bass. Click the Play button (or press the spacebar) and listen to the song. You will probably recognize it as the slow-moving bass line from Johann Pachelbel’s famous “Canon in D” (although this version is in the key of C). You’ll also realize that it is the same eight notes repeated (or looped) eight times—they even used loops to compose music back in the 17th century!
Select File > Save As and save the song to your hard drive with a new name. Remember to keep saving every few minutes as you work through this project.
After you have listened to the song, press the Rewind to Beginning button. Turn on the metronome by selecting Mix > Metronome and then listen to the beginning of the song again. You will hear that there are four metronome clicks for every long tone in the music—all of the notes in the bass line are whole notes, so they last the length of four quarter notes. You can adjust the volume of the metronome by selecting File > Preferences and choosing the Metronome tab.
Select the bass line loop by clicking on its name. Now select the Sound tab in the lower part of the screen (the Details section). This is where you can see what the loop looks like in MIDI data and in notation. Two buttons at the lower left will toggle between Piano Roll view (the button has five horizontal lines) and Notation view (the button has a quarter note). Press Play again, and you can watch the notes as Mixcraft cycles through the loop. You can switch between Piano Roll view and Notation view without affecting the music.
You can also change the tempo (or speed) of the music by selecting the Project tab in the Details section. The original speed of the music is 100 beats per minute. If you raise this number, the music will go faster; if you lower it, the music will go slower.
You are going to add a new melody over the bass line. Add a new Instrument track to the song by selecting Track > Insert Track > Virtual Instrument Track. Once the track has been added, you can choose a sound for it by pressing the Piano icon just to the left of the Mute button in the Instrument Name panel. Choose a category of instrument and then choose an instrument preset. If you have a MIDI keyboard, you will be able to hear what the instrument sounds like by pressing some keys on your MIDI keyboard. If you do not have a MIDI keyboard, select Musical Typing, and you will be able to hear the instrument by pressing the appropriate keys on your computer keyboard.
Try some different instrument presets until you find a sound you like and then click on Close Window. Press Play and try improvising a melody over the bass line. Use any white notes on your MIDI keyboard (notes on the ASDF line if you’re using Musical Typing) and play half notes. (This means you will play two notes in the time of one bass line note, or one note every two metronome clicks.) By using white notes only, your melody will always sound “correct” against the bass line.
Press Rewind to Beginning and arm your new Instrument track by pressing Arm in the Instrument Name panel. You’re going to record a segment of melody in Measures 9–16. Press the Record button, and you will hear the bass line begin to play. When it finishes its first loop, it will be at Measure 9. Record a melody for eight measures—use white notes and play just half notes.
After you’ve played 16 notes (one time through the bass loop), you will be at Measure 17. Stop recording and press Stop. If you’re unhappy with what you just played, you can press Ctrl+Z and do another take. Try not to be a perfectionist and do too many takes—you’ll just tire yourself out. After you have a recording you’re happy with, press the Arm button again to disarm the track.
Select the new recording by clicking its name in the Sequencer window. (Its name will be the instrument name you chose.) Select the Sound tab in the Details section and choose Piano Roll view. In the top row, select Snap Measure and then select Quantize.
In the Quantize dialog box that follows, make sure Quantize All is selected and select 1/2 Notes as the option for both Quantize Note Start and Quantize Note Length. Quantize Note Start and Quantize Note Length should be checked; Swing Amount should not be checked. Click OK, and Mixcraft will now snap your recorded notes onto the beat for you. This means that even if you weren’t perfectly on the beat when you recorded your melody, you are now.
Right-click on the recorded loop in the Sequencer window directly under the number 9 and select Split. Do the same at the number 17. You should now have three regions. Delete the outer two by right-clicking on their name bars and choosing Delete. Right-click on the name bar of the remaining loop and select Make into Loop. Now duplicate that loop five times so it fills the timeline between numbers 9 and 57 (to the end of the 56th measure). Listen to your whole song so far.
Add a new Instrument track and find a new sound you like. As you listen to the song, improvise a melody using white notes in quarter-note lengths. This means you will be playing a note on every metronome click. When you are ready, arm the track and record an eight-measure loop beginning at Measure 17. You will play 32 notes in this loop and finish when the Sequencer gets to number 25. When you have a take you like, quantize it in the Sound tab’s Piano Roll Editor, but this time you should select 1/4 Notes as the option for both Quantize Note Start and Quantize Note Length. Trim the loop so it lasts between the numbers 17 and 25 exactly, make it into a loop, and duplicate it three times so it fills the timeline between the numbers 17 and 49 (the end of the 48th measure).
Add a fourth Instrument track and find another new sound. As you listen to the song, improvise a melody using white notes in eighth-note lengths. This means you will be playing two notes in the time of each metronome click. You may find that you are struggling to keep up with the speed of the music, and you may wish you could record this new melody slower. Thankfully, that’s easy when recording MIDI data. Lower the speed in the Project tab and record the notes at a slow speed. When you’re happy with the recording, you can bring the project tempo back to its original speed, and it will seem to the listener that you recorded the notes at a faster speed.
When you are ready to record, arm the track and play an eight-measure loop beginning at Measure 25. You will play 64 notes in this loop and finish when the Sequencer gets to the number 33. When you have a take you like, quantize it in the Sound tab’s Piano Roll Editor, but this time you should select 1/8 Notes as the option for both Quantize Note Start and Quantize Note Length. Trim the loop so it lasts between the numbers 25 and 33 exactly, make it into a loop, and duplicate it once so it fills the timeline between the numbers 25 and 41 (the end of the 40th measure).
When you have finished recording the last Instrument track, you should have four instruments. You can turn off the metronome before you mix the song by selecting Mix > Metronome.
Select the Mixer tab. As you listen to your song, use the volume faders to adjust the relative volume of each track so that each instrument is equally audible. You will notice that you can change the instrument sounds by clicking the Piano icon at the top of the channel strip or in the Instrument panel name in the Sequencer window. This is one of the great advantages of recording MIDI data. With audio recordings, you can’t change the original sound, but you can with MIDI data. That way, if you decide that any of your instruments don’t sound good together, you can change one (or all) of them.
Listen carefully as you mix to make sure each new sound in the music blends with the sounds that are already playing. This means any new sound should be audible but not masking the other sounds. Use the L-R sliders above the volume faders to adjust where your instruments are from left to right in the mix. Imagine where you would like them to be on stage as they would be in live performance and reflect this by mixing them to the appropriate side in the mix. You can adjust the Hi, Mid, and Lo responses in each track by turning the knobs in the EQ section of the Mixer. As you mix, make sure that the volume levels do not light up the red warning light at the top of the volume faders.
Select Track > Show Master Track. Add a reverb unit to the Global Effects for the Master Track. Choose an appropriate reverb preset for your music. You may like to make your music sound as if it is being performed in a big church or a concert hall. Listen to the music again and check to make sure the Master Track volume level does not peak into the red. When you are satisfied that your song is the best that it can be, mix it down to an MP3 using File > Mix Down To > MP3. Make sure to play your song for friends or family members to see whether they like it.
Listen to a recording or a live performance of Pachelbel’s “Canon in D” and see whether you can hear the repeating bass line throughout. You can also try listening to some other music that uses the same (or a similar) bass line. Examples are “Pachelbel’s Frolics” by Eileen Ivers, found on her self-titled Eileen Ivers album, or “Go West” by the Pet Shop Boys, found on their PopArt: The Hits compilation. “Go West” was originally recorded by the Village People, but the Pet Shop Boys’ recording is a good one for listening, as it was made using MIDI sequencers. You should also look ahead to Chapter 17 for ways to put your song online so other people can listen to it.
3. Improvising melodies, variations, and accompaniments
4. Composing and arranging music within specified guidelines
5. Reading and notating music
Learn how to add and delete Virtual Instrument tracks in Mixcraft.
Learn how to record MIDI parts in different takes and merge them into one MIDI clip.
Learn how to quantize (tidy) notes visually, how to edit note velocities, and how to record drum sounds using a MIDI keyboard.
Learn how to add effects to individual tracks during mixdown.
Computer with Mixcraft installed
Internet connection
Headphones or monitor speakers
MIDI keyboard preferred (though you can use the Musical Typing option in Mixcraft if you don’t have a MIDI keyboard)
You will find an example of a completed project on the companion DVD. Look for a file titled That 1970s Thing.mx5 and an MP3 file titled That 1970s Thing Mixdown .mp3.
Launch Mixcraft and select the third option (Build Virtual Instrument Tracks) from the New Project screen. You will see that you are given a template with two Instrument tracks and six Audio tracks. You do not need the Audio tracks for this project, so delete them. Select each one individually and click Track > Delete Track. It’s easier if you scroll down to the last track in the Sequencer and delete them from the bottom up. Add two Virtual Instrument tracks by selecting Track > Add Track > Virtual Instrument Track (or use the shortcut key combination Ctrl+E) twice. Save your work so far. Remember to keep saving every few minutes as you work through this project.
Choose a piano sound for the first track. Click on the Piano icon in the Instrument Name panel (which reads “1 Instrument Track”), choose either the Acoustic Piano or the Electric Piano category, and find a sound you like. Remember, you can audition the sounds by playing your MIDI keyboard (or using Musical Typing) when you highlight an instrument preset.
Enable the metronome by selecting Mix > Metronome. You will need a couple of count-in measures to know when to record, so enable this option in the Metronome tab under File > Preferences.
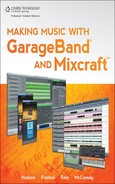
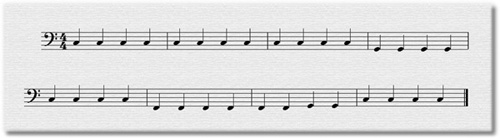
Arm Track 1 (click the Arm button in the panel by the instrument name) and click Record on the transport. You will hear two measures (eight beats) of count-in. After the eighth beat, record the 16 notes shown in Figure 6.1 (one on each beat) and then click Stop.
Click Rewind to Beginning and click Play to listen to what you just recorded. If you are unhappy with that take, press Ctrl+Z to erase it, and you can record it again. If the metronome speed was too fast for you, slow it down in the Project Details section. (You can bring it back to 120 bpm later.)
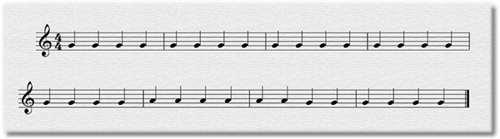
When you are happy with the take, click Rewind to Beginning again and click Record. The track is already armed, so you’ll be able to record the next 16 notes, shown in Figure 6.2, over what you’ve already recorded. You’ll hear the metronome and your previous recording in the headphones. When you listen back to what you’ve recorded, you’ll now hear both sets of notes together. Don’t worry if they’re not quite in time—we’ll fix that later. If you need to go back and re-record the last set of notes, you can press Ctrl+Z to undo your latest take without losing the first set of notes you recorded earlier.
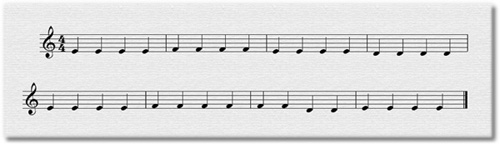
Use the same process to record the third set of notes, shown in Figure 6.3. When you are happy with your recording, click Arm to disarm the track.
The takes you made are now stacked on top of one another on Track 1, and you will only be able to see the most recent one on top. Select the topmost region by selecting its name bar. Then select all the regions underneath it by choosing Edit > Select All or by using the shortcut key combination Ctrl+A. Now select Edit > Merge to New Clip or use the shortcut key combination Ctrl+W to merge all the regions into one clip.
Select the Sound tab in the Project Details section. In the Notation Editor, you will be able to see the notes you recorded as three-note chords. Press Tidy Notes > 1/4 Note above the Notation view to visually quantize your notes. In the Piano Roll Editor, quantize the notes using 1/4 notes for Quantize Note Start and 1/8 notes for Quantize Note Length. Now when you flip back to the Notation Editor, you’ll see your notes are still represented by quarter notes (which is how you would read them); but when you listen, they are eighth notes with eighth-note rests in between. This sounds more like piano stabs, which is the sound we want for the piano part in this project.
Return to the Piano Roll Editor and observe how there is a vertical line underneath every note. This represents the velocity of each note—that is, how hard you pressed the key on the keyboard. As you hover over the lines, your cursor will change to a pencil. You can use the pencil to alter the height of each vertical line so you can even out the velocity of the notes you played. One great feature of Mixcraft is that you can hold the pencil and drag across the tops of the vertical lines to align them. It takes some getting used to, and you may have to go back and edit some parts again, but it’s a very handy way to even out the velocities quickly.
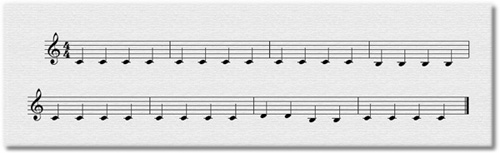
Select the second track and find a bass sound for it. Arm the track and record the 16 bass notes shown in Figure 6.4. When you are happy with your recording, disarm the track and tidy the notes in the Notation Editor using Tidy Notes > 1/4 Note. Quantize them in the Piano Roll Editor of the Sound tab using 1/4 notes for Quantize Note Start and 1/8 notes for Quantize Note Length. Even out the velocities by drawing across the vertical lines underneath the notes.
In the third Instrument track, click the Piano icon and select a drum kit from the Drums category (but not the KIT – SFX Kit preset). Make sure you scroll down to the presets, which begin with the word KIT. Now when you press the notes on your MIDI keyboard or use Musical Typing, you’ll hear different drums on each note. Find the bass drum sound and the snare sound. These are usually on the C and C# one octave below middle C. These are sometimes called C3 and C#3. If you have a 25-note keyboard (or are using Musical Typing), you will need to press the Octave Down button on your keyboard. Then you will find the bass and snare sounds as the lowest two notes.
Arm Track 3 (the drum track) and record 16 bass drum sounds, one on each beat. Then go back and record the snare drum sound on every alternating beat (the even beats 2, 4, and so on). When you are happy with your recording, disarm the track. Select everything in Track 3 and merge the sounds to a new clip using Edit > Merge to New Clip. Tidy the notes as 1/4 notes in the Notation Editor and then quantize them to 1/4 notes in the Piano Roll Editor.
Note that it doesn’t matter whether you select the quantize length as 1/4 notes or 1/8 notes or even 1/16 or 1/32 notes—drum sounds don’t have length, so it only matters that the start of the note (the moment the drum is hit) is on the correct beat. You should, however, even out the velocities of the notes.
Listen to everything you’ve created so far. You now have a 1970s-style rhythm track ready for you to create a guitar solo. Add a guitar sound to Track 4. Arm the track and try a few takes, improvising a guitar solo over the top of the rhythm track. Use just the white notes on the keyboard to be safe, though if you’re feeling adventurous you can add some “blue notes”—Eb and Bb. They’re not actually colored blue—they are just used often as extra scale notes in the blues so we call them blue notes. Blues and rock guitarists play them a lot when they improvise a solo.
When you have a take you like, disarm the track. Do not quantize this track or even out the velocities—it’ll sound much better to leave it just the way you recorded it.
Tidy the end of your tracks by trimming them at the end of Measure 8 (number 9 on the timeline) and deleting the extra at the end. There shouldn’t be any notes there—that was just what was left before you hit Stop every time you recorded. If you previously brought your project tempo down for recording, return it to 120 bpm in the Project Details tab. Enable loop play by clicking the curly arrow near the time code in the center of the screen or using Mix > Loop Playback Mode. Disable the metronome by clicking Mix > Metronome.
Select the Mixer tab. As you listen to your song, use the volume faders to adjust the relative volume of each track so that each instrument is equally audible. Use the L-R sliders above the volume faders to adjust where your instruments are from left to right in the mix. Imagine where you would like them to be on stage as they would be in live performance, and reflect this by mixing them to the appropriate side in the mix.
You can adjust the Hi, Mid, and Lo responses in each track by turning the knobs in the EQ section of the Mixer. As you mix, make sure that the volume levels do not light up the red warning light at the top of the volume faders.
Click the FX button at the top of the Piano track. Add the Acoustica Compressor to the Global Effects menu. Choose a good preset to give your piano sound some punch. Add a different Acoustica Compressor preset to each of the other tracks by using the FX button at the top of each channel strip. Each track now has its own Compressor unit—they are not sharing the same one!
You can also add some guitar effects to your Guitar track by selecting Acoustica Delay, Flanger, Chorus, Distortion, and so on. This will help thicken and define your sound, but don’t go overboard or you’ll end up with an ugly guitar sound instead. Keep checking to make sure your volume faders do not go into the red zone. The compressors may in fact give you room to boost your faders a little.
Add the Acoustica Reverb unit to the FX for the master fader. Choose an appropriate reverb preset for your music. You may like to make your music sound as if it is being performed in a canyon or a gymnasium. Listen to the music again and check that the Master Track volume level does not peak into the red. When you are satisfied that your song is the best that it can be, mix it down to an MP3 using File > Mix Down To > MP3. Make sure to play your song for friends or family members to see whether they like it.
Find other drum sounds on the drum kit you used in Track 3. Add some more drum sounds to the recording and merge them into that track to make your music more exciting. Some drum fills and cymbals might work well. You can also try making up your own chord progression to record for the piano line and bass line in this project. You should also look ahead to Chapter 17 for ways to put your song online so other people can listen to it.