
Everybody can use a makeover from time to time, and Outlook is no exception. Part of using Outlook as your primary productivity tool involves looking at the options for customizing it to the way you work.
This chapter covers a bunch of different ways that you can tailor Outlook to the individual ways you work. Understand, however, that the customizing techniques covered here are only suggestions. If you find that a particular technique suits neither your hardware setup nor the way you use a certain module, by all means ignore it.
The only thing that I'm really keen on having you do when customizing Outlook is to find the screen and option setup that makes you the most comfortable — while at same time, productive — for each of the modules you routinely use (and I hope that eventually includes all of them).
As seasoned Outlook users, you're perfectly aware that when you launch the program, Outlook automatically opens the Inbox folder in the Mail module. Of course, if the e-mail that fills your Inbox is your great stumbling block to peak productivity, this arrangement may not be such a good thing. What you may not know is that you can change which folder opens each time you launch Outlook. This means that you can have another folder in the Mail module as your startup folder (say, Outlook Today) or even make another module such as the Calendar or Tasks module your startup default.
To change the startup folder that Outlook uses, follow these steps:
Launch Outlook as you normally do and then select Tools

Outlook opens the Options dialog box with the first tab selected.
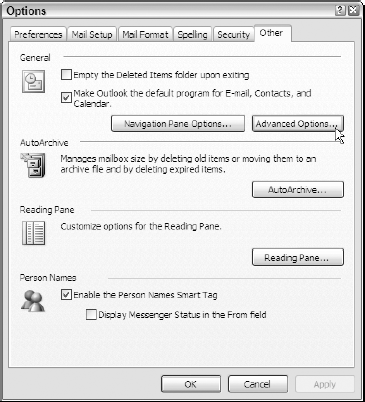
Click the Other tab and then click the Advanced Options button (see Figure 6-1).
Outlook opens the Advanced Options dialog box.
Click the Browse button to the right of the Startup in This Folder text box.
Outlook opens the Select Folder dialog box, where you can select a new folder within the Mail module, such as Outlook Today or even another module such as Calendar.
Click the icon of the folder you want opened in the Start in This Folder list box (see Figure 6-2) and then press Enter or click OK.
If the folder you want opened is hidden because it's a subfolder of another in the list, click its parent's Expand button (+) to display its folder icon.
After the Select Folder dialog box closes, the new startup folder you just selected appears in the Startup in This Folder text box of the Advanced Options dialog box.
Click the OK button twice — first to close the Advanced Options dialog box and then to close the Options dialog box.
Now you're ready to try out the change you made to the startup folder.
Exit Outlook and then relaunch the program, starting it as you normally do.
This time, Outlook should open in the new folder or module you selected.

Assuming that you memorize the essential Outlook shortcut keys that I cover in Chapter 5 for instantly navigating between modules and creating any new item you need, adapting to a different startup module should be a relatively painless process.
When you're considering selecting a new startup module, I suggest you try making the Outlook Calendar module your new home base and see how this works for you. Doing this enables you to glance over both your appointments and tasks for the rest of the day and work week the moment you launch Outlook at the beginning of your workday. That way, you can prepare for the day ahead as you do any last-minute tweaking of your planned activities.
If Outlook isn't already one of the programs that automatically launches each time you boot your personal computer, you should make it one. That way, you'll have your schedule and to-do list right in front of your face. (And if you have the time — and you've digested the techniques for dealing successfully with e-mail in Chapters 7 and 8 — you can go ahead and get your e-mail.)
To have Windows automatically launch Outlook each time you start your computer, follow these steps:
Click the Windows Start button and then position your mouse over the All Programs option.
The All Programs submenu appears on-screen.
Right-click the entry labeled Startup in the All Programs submenu and then select the Open option from the contextual menu that appears.
Windows opens your Startup dialog box on the desktop.
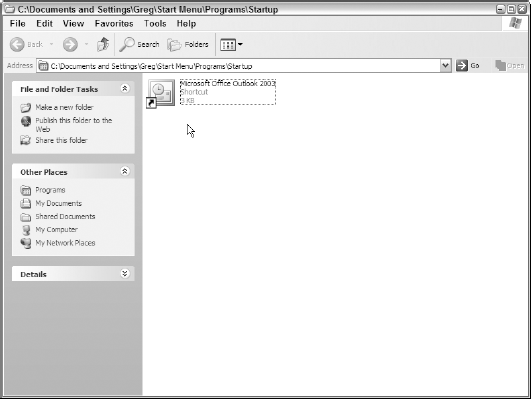
Re-open the All Programs submenu and then right-click the Microsoft Office Outlook 2003 or the Microsoft Office Outlook 2007 item before you select the Copy option from the contextual menu that appears.
Now you're ready to paste the Outlook shortcut into the Startup dialog box.
Click back into the Startup dialog box on the Windows desktop and then press Ctrl+V to paste the Outlook shortcut into this dialog box.
The Microsoft Office Outlook 2003 or Microsoft Office Outlook 2007 shortcut appears in the Startup dialog box (see Figure 6-3).
Click the Close button in the Startup dialog box.
After completing these steps, the next time you restart your computer and every time thereafter, Windows automatically starts up Outlook displaying the folder of the module you've designated as your Start.
Note
Should you no longer want Outlook launched each time you start your computer, re-open the Start dialog box (following Steps 1 and 2 in the procedure) and then click the Microsoft Outlook program icon before you press the Delete key. Next, click the Delete Shortcut button in dialog box to confirm the deletion that Outlook displays before you click the Close button in the Startup dialog box.
For many knowledge workers, Outlook's toolbars, at least the Standard and Advanced toolbars, contain a number of buttons that they just never use when working in particular modules. For others, the toolbars in certain modules simply lack buttons that they would love to have available to save them from having to resort to the slower pull-down menus. Even if you're quite content with preset buttons on the Outlook toolbars, you may find that you'd prefer them in a slightly different order.
No matter what your preference, Outlook makes it easy to tailor the contents of the built-in toolbars. And if that isn't enough, you can construct custom toolbars of your own design.
Customizing the buttons on one of the three built-in toolbars is pretty easy work (a lot easier than filing all those papers you've accumulated on your desk). To add or remove buttons from a toolbar, follow these steps:
Display the toolbar(s) you want to modify at top of the Outlook program window (View
Toolbars). If you're modifying buttons on the Standard or Advanced toolbar, select the module that uses the version of the toolbar you want to change.You can't change a toolbar that's hidden, and because the Standard and Advanced toolbars are fairly context-sensitive, making sure you're in the correct module is always your first step in modifying their toolbars.
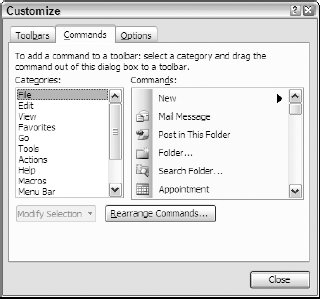
Right-click somewhere on a displayed Outlook toolbar or menu bar at the top of the program window and then click the Customize option at the bottom of the contextual menu that appears.
Outlook opens the Customize dialog box with its Commands tab selected (see Figure 6-4).
To add a new button to a toolbar, click the appropriate category in the Categories list box of the Customize dialog box and then drag its button from the Commands list box up to the toolbar and drop it into the desired position.
Outlook indicates where the new button will be inserted on the toolbar with the I-beam that appears at the front of the mouse pointer. If you drop a new button into the wrong position on the toolbar, simply drag and drop it to the correct place.
To remove a button from a toolbar, drag the button until it's somewhere off the toolbar and then drop it.
Outlook indicates that the button will be deleted when you release the mouse button by displaying an X as the mouse pointer's ScreenTip.
When you finish modifying the toolbars, click the Close button on the Customize dialog box.
As soon as you close the Customize dialog box, the buttons on the toolbars become active again and you can try them out for size.
Sometimes, you just want to move the buttons around on a toolbar so that they're in a more convenient location. This is especially true if you're running Outlook on a computer with a relatively small monitor and two of the toolbars share the same row so that not all the buttons can be displayed. In such a case, you will want to move the buttons that you regularly use toward the beginning of each toolbar so that they are always displayed and you don't have to spend time clicking the Toolbar Options button at the end to display a button you want to use.
Outlook provides two ways to reposition buttons on its toolbars. You can drag and drop the button (after opening the Customize dialog box) or you can open the Rearrange Commands dialog box by clicking the Rearrange Commands button at the bottom of the Commands tab of the Customize dialog box (refer to Figure 6-4).
Figure 6-5 shows the Rearrange Commands dialog box after I clicked the Toolbar option button and selected Standard on the adjacent drop-down list. To move a particular button, click to select it in the Controls list box and then click the Move Up or Move Down button until the button is positioned correctly between the other buttons on the toolbar in the Controls list box.
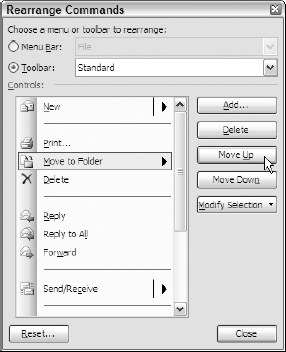
Figure 6-5. Repositioning buttons on the Outlook Standard toolbar using the Rearrange Commands dialog box.
Note that Outlook doesn't actually move the button on the displayed toolbar until after you close the Rearrange Commands dialog box, which you do after you've moved all your buttons to the correct position and have clicked the dialog box's Close button.
Tip
If you make a mess of one of the toolbars, you can restore it to its original "factory" settings by clicking the Toolbars tab in the Customize dialog box and clicking the Reset button. When you click this button, the program displays an alert dialog box asking whether you're sure, and as soon as you press Enter or select OK, Outlook immediately returns the selected toolbar to its pristine condition.
Rather than fool around with customizing the contents and arrangement of the existing Outlook toolbars, you may find it more advantageous to create a custom toolbar. That way, you can assign buttons with just the commands that you use time and time again in a particular Outlook module.
Note
Keep in mind that even the custom toolbars you create in Outlook are contextsensitive, at least in the sense of not displaying buttons in a module where they can't function. For example, if you create a custom toolbar with the New All Day Event button, this button will appear on the toolbar only when you're in the Calendar module (and can actually add such an event). The button simply drops off the toolbar whenever you switch to any of the other modules.
To create your own custom toolbar for Outlook, follow these steps:
If your custom toolbar is particularly module-specific, select that module in Outlook before you open the Customize dialog box. Otherwise, simply open the Customize dialog box in any Outlook module.
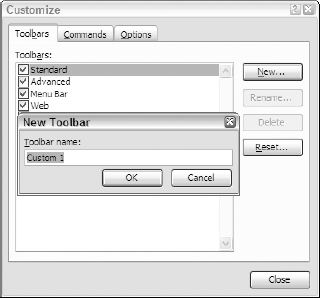
Click the Toolbars tab in the Customize dialog box and then click the New button (see Figure 6-6).
Outlook opens the New Toolbar dialog box.
Replace the provisional name (Custom 1, Custom 2, and so on) with your own descriptive name in the Toolbar Name text box and then press Enter or click OK.
Outlook creates a new blank custom toolbar that displays a few letters of the name you assigned.(It will appear next to the Customize dialog box.)
Click the Commands tab of the Customize dialog box and then drag and drop the buttons you want onto the new toolbar in the order you want them to appear.
Note that you can reposition any button you add to the new toolbar by dragging it and dropping it into place.
When you finish adding all the buttons you want on your new toolbar and you've arranged them in the preferred order, click the Close button in the Customize dialog box.
Outlook closes the Customize dialog box.
Drag the toolbar from the center of the Outlook screen and dock it somewhere at the top of the screen, either on a row that already contains another toolbar or on a new row by itself.
Note
Keep in mind that custom toolbars are the only ones that you can delete in Outlook. Although Outlook lets you modify the contents of the three built-in toolbars, it doesn't allow you get rid of them. To delete a custom toolbar that you no longer need, select it on the Toolbars tab of the Customize dialog box and then click the Delete button. The program displays an alert dialog box asking you whether you're sure, and, as soon as you press Enter or click OK, it permanently zaps the toolbar (meaning the only way to get it back is to recreate it from scratch).
If you adopt the Calendar module as the heart of your personal information manager (as I continue to urge you to do), I want to suggest a companion Outlook toolbar configuration. Create a custom Productivity toolbar that combines some of the most useful tools on the Standard and Advanced toolbars in both the Mail and Calendar module with other buttons that can help you be more productive. You can then try using Outlook with only the menu bar and Productivity toolbar displayed, thus giving other panes a little more screen space.
Initially, consider adding the following buttons to this custom Productivity toolbar (to which you can later add buttons for other special features you routinely use). To add each of these buttons, click the name of the category shown in parentheses after the name of the button in following list in the Categories list box on the left side of the Commands tab of the Customize dialog box. Then, find the button as shown in the following list in the Commands list box on the right and drag its icon up to the Productivity toolbar you're building and drop it into place:
New (File): Enables you to add special items for the current module (as well as standard items for the other modules, in case you forget their shortcut keys).
Print (Standard): Opens the Print dialog box, where you can select the printer and page settings you want to use in printing items in the current module.
Print Preview (Advanced): Opens the Print Preview window so that you can see how a selected item in the current module will print.
Organize (Tools): Opens a special Organize pane at the top of the current module that enables you to customize its look and contents (see "Tailoring the Look of Assorted Outlook Modules with the Organize Pane," later in this chapter, for details).
Current View (View): Enables you to select or define a new view for examining items in the current module.
Arrange By (View): When in the Calendar module, this button enables you to select a new order for your tasks in the TaskPad (Outlook 2003) or To-Do Bar (2007). When in the Mail module, Arrange By lets you select a new order for your e-mail messages. When any other module is current, this button simply disappears from the toolbar.
Categories (Edit): Enables you to assign an existing or new custom category to the selected item in any of the Outlook 2003 modules.
Categorize (Edit): Enables you to assign an existing or new custom category to the selected item in any of the Outlook 2007 modules.
TaskPad (View): Hides and displays the TaskPad in the Calendar module in Outlook 2003.
TaskPad View (View): Enables you to select a new view of the tasks displayed in the TaskPad in the Calendar module of Outlook 2003.
Task List (View): Hides and displays the task list in the To-Do Bar in Outlook 2007.
Daily Task List (View): Enables you to hide, display, and minimize the Tasks pane at the bottom of the Information Viewer in the Calendar module in Outlook 2007.
Bottom (View): Displays the Reading Pane showing details of the selected item in the current module at the bottom of the Information Viewer.
Right (View): Displays the Reading Pane showing details of the selected item in the current module on the right side of the Information Viewer.
Off (View): Hides the Reading Pane when it's displayed on the right side or bottom of the Information Viewer.
Find (Standard): In Outlook 2003, displays or hides the Look For and Search In combo boxes and associated buttons at the top that enable you to search for particular items in the current Outlook module.
Instant Search (Tools): In Outlook 2007, selects the Instant Search combo box at the top of the Information Viewer and positions the cursor in this box so you can search for particular items in the current Outlook module.
Find a Contact (Standard): Enables you to open the record for a contact in your address book from any module either by typing his or her name in the text box or selecting the name from its drop-down list.
Figure 6-7 shows the suggested custom Productivity toolbar as it appears in the Calendar module in Outlook 2003 after its Bottom button is clicked. Clicking Bottom here displays the Reading Pane for the appointment selected on the work week calendar at the bottom of the Information Viewer. To hide this Reading Pane, I simply click the Off button on this custom toolbar.
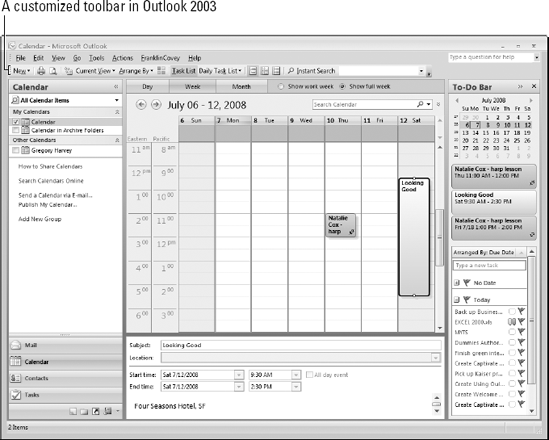
Figure 6-8 shows the suggested custom Productivity toolbar as it appears in the Calendar module of Outlook 2007 after you click the Normal option on the Daily Task List button's drop-down list. Clicking Normal here displays the Tasks pane at the bottom of the Information Viewer, where daily tasks are listed under the date in the work week calendar with which they're associated. To hide this Tasks pane, I select the Off option from the Daily Task List button's drop-down list.

Tip
You can group buttons in your custom Productivity toolbar by demarcating them with vertical bars when the Customize dialog box is displayed. To add a vertical bar to separate a group of buttons on the toolbar, drag the button before which the vertical bar is to appear to the right then release the mouse button to have the vertical bar appear. To remove a vertical bar divider you no longer need, drag the button to the immediate right of the vertical bar to remove; then, drag that button leftward until the vertical bar disappears before you release the mouse button.
Just as Outlook supports the use of several specialized modules in its role as a personal information manager, each of the modules (Mail, Calendar, Contacts, Tasks, Notes, and Journal) supports a number of different preset views.
Selecting a new view in a particular Outlook module can do one of three things:
Group the module's data in a different way, modify the order by sorting the data on some field, or both.
Present just a subset of the module's data by filtering the data using some criteria.
Represent the module's data in a completely different manner.
Figures 6-9 through 6-11 demonstrate these three different types of views. Figure 6-9 shows you my Calendar module after selecting By Category option button in the Current View section of the Navigation Pane. In this view, Outlook groups your appointments into groups depending upon the category to which each is assigned, displaying them in a table format (for more on categories in Outlook, see "Setting Up Categories That Are Just Your Type" later in this chapter).
In this view, you can expand or collapse individual categories (assuming that the Show in Groups option is selected on the Arrange By menu) to display as many or few rows of appointments as you need. You can also instantly sort the appointments displayed in the rows of the table by clicking a particular column (field).
Figure 6-10 shows you the same Inbox folder of my Mail module, this time after selecting Last Seven Days as the current view. In the Last Seven Days view, Outlook actually filters the e-mail messages in the Inbox Calendar module so that only messages that I've received in the last full week are now displayed in the Information Viewer. (To see all the messages in your Inbox, you select the Messages or Messages with AutoPreview view instead.). This filtering situation is indicated by the Filter Applied message that appears in the upper-right corner of the Mail module's Information Viewer in parentheses.
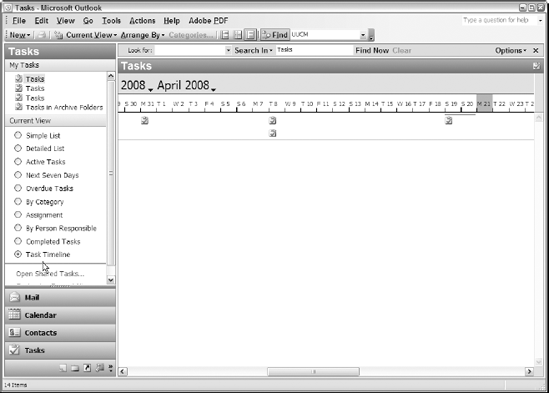
Figure 6-11 shows you my tasks in the Tasks module after selecting Task Timeline as the current view. In this view, Outlook doesn't filter or sort the tasks in your to-do list. Instead, the program represents them in a new way that enables you to see at a glance when tasks start, their duration, and how they overlap.
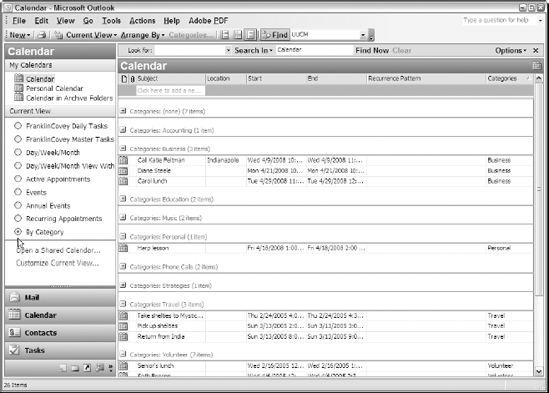
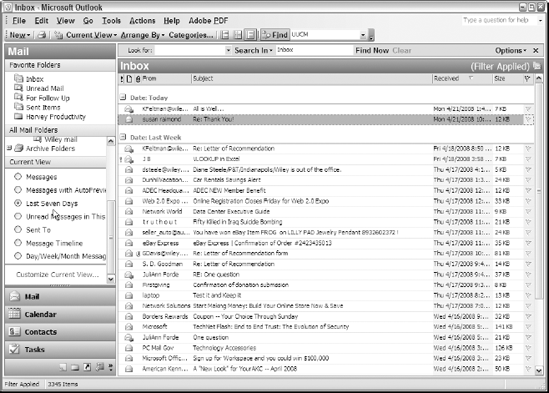
Figure 6-10. Messages in the Inbox of the Mail module after selecting Last Seven Days as the current view.
Although each Outlook module supports several different preset views that you can use as is, as spelled out in the previous section, you can also easily customize any of them. To modify a preset view, make that view current in the module you're using by selecting its name on the drop-down list attached to the Current View button on your custom Productivity toolbar. Then, click the Customize Current View item on this same drop-down list to open a Customize View dialog box named for and containing options tailored to the view you're modifying.
Figure 6-12 shows you the Customize View: Messages with AutoPreview dialog box that opens after you select the Customize Current View menu item when Messages with AutoPreview is your current view.
As you can see in this figure, the Customize View dialog box is full of option buttons that enable you to modify a wide array of settings for this view (anything from determining which fields are to be included to deciding the formatting of the columns containing each field). Note that this customization can include automatically grouping the messages as well as sorting and filtering them.

Figure 6-12. The dialog box for customizing the Messages with Auto-Preview view for the Inbox of the Mail module.
Tip
The great thing about customizing an existing view is that it is actually quite easy to change your mind. If, after changing a bunch of different settings for a view, you discover that you really don't want to retain the changes you've made, you can reset the view to its original settings in a flash. All you have to do is to click the Reset Current View button at the bottom of the view's Customize View dialog box to have Outlook restore the view to all its initial settings.
In addition to enabling you to modify the settings of the views that come with Outlook, the program also enables you to create totally new views for a particular module. You can therefore create views unlike any that come with the program as well as ones that use settings similar to other preset views that you want to retain.
Figure 6-13 illustrates a new view that I created for the Outlook Inbox named Day/Week/Month Messages. In this view, the Subject field of incoming mail messages are listed by date on a calendar pad according to the time they are received.
Note that in this figure, the days for the current, seven-day week are displayed by default in the Information Viewer of the Inbox (the equivalent of selecting View
Day: Selected in the right pane with the Date Navigators by selecting View
Work Week: Selected in right pane with the Date Navigators by selecting View
Month: Selected in the right pane with the Date Navigators by selecting View
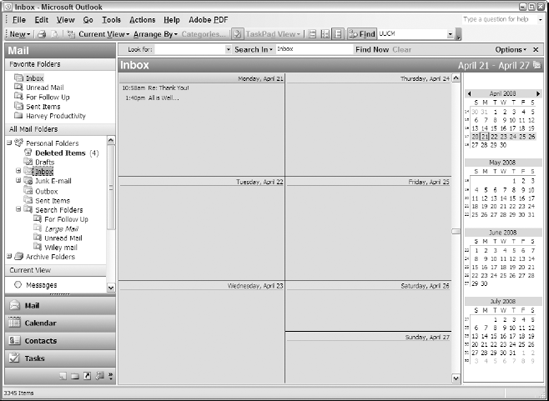
Figure 6-13. The Inbox of my Mail module after applying the newly created Day/Week/Month Messages view as the current view.
To see how easy it is to create new views for Outlook's modules, I want you to follow along with the steps you'd take to create this same custom Day/Week/Month view for the Inbox of your Mail module:
Select the Inbox of the Outlook Mail module, if it's not already current.
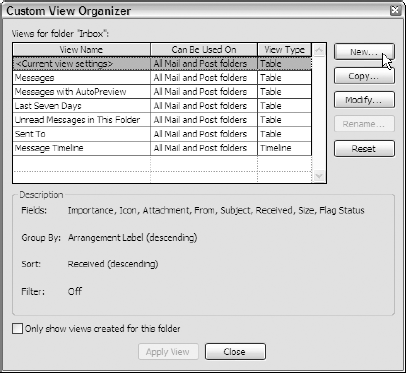
Click the Current View button on your custom Productivity toolbar (or on the Advanced toolbar if you haven't yet created this custom toolbar) and then select Define Views from the button's drop-down list.
Outlook opens a Custom View Organizer dialog box similar to the one shown in Figure 6-14.
Click the New button.
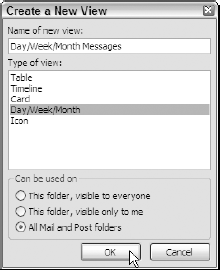
Outlook opens the Create a New View dialog box. shown in Figure 6-15.
Replace the provisional name, New View, by typing Day/Week/Month Messages in the Name of New View text box.
Click Day/Week/Month in the Type of View list box.
Click the All Mail and Post Folder option button before you click OK.
Outlook closes the Create a New View dialog box while simultaneously opening the Customize View: Day/Week/Month Messages dialog box, where you can make further changes to the new view's settings if you want.
Click OK without changing the Fields, Filters, Other Settings, or Automatic Formatting settings for the Day/Week/Month Messages view.
Outlook closes the Customize View: Day/Week/Month Messages dialog box, returning you to the Custom View Organizer dialog box (refer to Figure 6-14) where the new Day/Week/Month Messages view is now listed.
Click the Apply View button.
Outlook closes the Custom View Organizer dialog box while applying the new custom Day/Week/Month Messages view you just created to your Inbox (making it look very similar to my Inbox, shown earlier in Figure 6-13).
Note
Keep in mind that when using Outlook 2007, the Day/Week/Month Messages custom view looks a little bit different when Week is selected. Instead of displaying the days of the week in two columns in the Information Viewer from Monday through Sunday as shown in Figure 6-13, Outlook 2007 displays the days of the week seven sequential columns, Sunday through Saturday.
Outlook Today offers what is often known as a dashboard (or an at-a-glance) that gives you a preview of the day by displaying your Calendar, Tasks, and Messages. You switch to this screen by clicking the folder at the very top of the All Mail Folders section of the Navigation Pane. (It's the folder sporting an icon of a little house.)
Depending on the Outlook configuration you use, the folder following this house icon can have either of the following two names:
When you first install Outlook, the Outlook Today screen displays the current date in the bar at the top of the Information Viewer. Beneath this bar, the main pane contains the following columns:
Calendar: This column displays a list of your upcoming appointments for the current week, arranged by the day of the week (Monday through Sunday).
Tasks: This column displays a list of the most recent tasks on your to-do list, arranged by due date.
Messages: This column displays the number of unopened e-mail messages in your Inbox, the number of draft copies of messages saved in your Drafts folder, and the number of unsent messages still in your Outbox.
Each of the listings displayed in the Calendar and Tasks columns of Outlook Today are hyperlinks that you can click in order to either get more detail about an appointment or task or to modify its settings (by opening its Appointment or Task dialog box).
To display and read the e-mail messages in your Inbox, Drafts, or Outbox folder in the Messages column, click the link associated with the particular folder name in this column.
If you'd like to be able to get a quick overview of the kind of day you're about to face right when you get in the office, make Outlook Today the home base of your personal information manager (rather than the Calendar module).
To make Outlook Today the place that automatically opens each time you launch Outlook, follow these steps:
In the Mail module, click either the Mailbox followed by your name or the Personal Folders folder icon in the Navigation Pane, depending on how Outlook is set up for you.
Outlook displays Outlook Today in the Mail module's Information Viewer.
Click the Customize Outlook Today link in the upper-right corner of the Outlook Today screen.
Outlook displays the Customize Outlook Today screen in the Information Viewer.
Click the When Starting, Go Directly to Outlook Today check box at the top of the Customize Outlook Today screen and then click the Save Changes button on the right of the Customize Outlook Today title bar.
Outlook closes the Customize Outlook Today screen and returns you to Outlook Today.
After following these easy steps to make Outlook Today the startup folder, each time you launch Outlook, the program automatically displays the contents of Outlook Today rather than the contents of your Inbox.
Tip
If you really want to make Outlook Today the very first thing you see each morning as soon as you start up your computer, be sure to follow not only the steps for making Outlook Today the program's startup folder (as outlined in these steps) but also the steps for making Outlook an application that automatically launches each time you start your computer, as outlined in the section "Automatically launching Outlook each time you start your computer," earlier in this chapter.
In addition to making Outlook Today's folder the default for Outlook, you can also easily customize the contents and appearance of its screen. Figure 6-16 shows you the Outlook Today Options screen that appears when you click the Customize Outlook Today button in the upper-right corner of the Outlook Today screen.
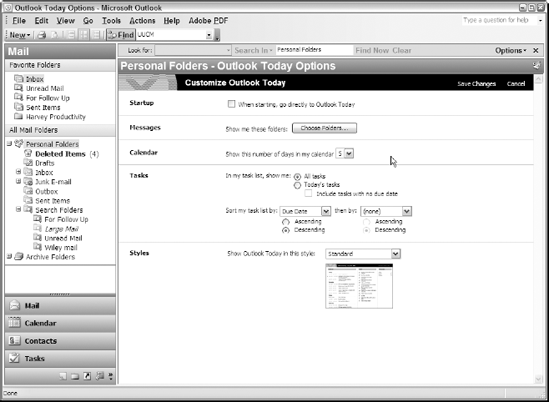
As you can see in this figure, the customization options available here are divided into the following four areas:
Messages: The Choose Folders button enables you to choose which folders are included in statistics listed in Messages column of Outlook Today by clicking the check boxes in the Select Folder dialog box that this button opens.
Calendar: The Show This Number of Days drop-down list enables you to select a new number of days (between 1 and 7) for determining which appointments are to be displayed in the Calendar column.
Tasks: The Tasks options enable you to determine which tasks appear in the Tasks column (All Tasks or just Today's Tasks) as well as how these tasks are ordered in the list. By default, Outlook sorts the tasks in descending order (most recent to least recent) by Due Date. To change this sort order, select a new field on the Sort My Task List By and Then By drop-drop list and the Ascending or Descending option button associated with that field. For example, to sort your tasks first by importance and then by due date, select Importance on the Sort My Task List By drop-down list with its Ascending option button and then select Due Date on the Then By drop-down list with its Descending option button.
Styles: The Show Outlook in This Style drop-down list enables you to select a new look for the Outlook screen. Select the Standard (Two Column) option to display the Calendar information in the first column of the Outlook Today screen with the Messages information above the Tasks in a single second column. Select the Standard (One Column) option to display all the Outlook Today information in a single vertical column. Select the Summer option to display the Outlook information in the same arrangement as the Standard (Two Column) option but with a light yellow background color, or the Winter option to display the same two-column arrangement with a white background.
When you're finished customizing the Outlook Today options in the Custom Outlook Today screen, be sure to click the Save Changes button to put your changes into effect before you return to the Outlook Today display. You click the Cancel button in the Customize Outlook Today screen only when you decide to abandon your changes and not to put them into effect in Outlook Today.
Note
If you're one of those folks whose work week calendars always seems chock-full of appointments that contain lots of explanatory and detail information, be sure to select one of the two-column arrangements — Standard (Two Column), Summer, or Winter — when you make Outlook Today the default view for Outlook your personal information manager. That way, you'll be much more likely to able to read the text of the daily appointments listed in the Outlook Today screen at a glance.
Outlook enables you to associate any of the items stored in the various Outlook modules (e-mail messages in Mail, contacts in Contacts, appointments in Calendar, and so on) with a particular category. You can then use the category you assign to different Outlook items to group and display them together in a list or search (in the case of Mail), making it a great deal easier to compare and find particular items.
For example, you might want to group together the contact information for all key vendors stored in the Contact module by assigning their contact records to the Suppliers category. Likewise, you can differentiate your business appointments from your personal by assigning the former to the Business category and the latter to Personal in the Calendar module.
Now you can quickly get to the contact information for all your key vendors by clicking the By Category option button in the Current View section of the Contacts Navigation Pane and then collapsing all categories in the grouped list except for Suppliers. You can also easily distinguish the personal from the business appointments you've scheduled by clicking the By Category option button in the Current View section of the Calendar Navigation Pane and then collapsing all other categories in the grouped list except for the Business and Personal.
When you install Outlook 2003, the program includes a fair number of preset categories that you can assign to Outlook items right out of the box. To assign one of the categories, select the Outlook item or items you want to assign to that category and then do one of the following:
Click the Categories button on your customized Productivity toolbar.
Right-click the selection and then select Categories from the contextual menu that appears.
Choose Edit
Taking any one of these three actions opens the Categories list box (similar to the one shown in Figure 6-17). Here, you click the check box for each category you want to assign to the items you selected in the Available Categories list box. When finished, simply click the OK button.
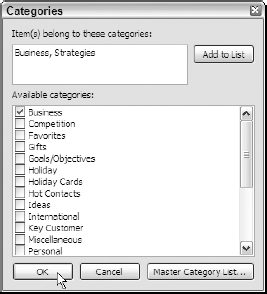
If you want to create a new category, you have the following choices:
Click in the Item(s) Belong to These Categories list box in the Categories text box, type a category name after the semicolon (automatically added when you begin typing), and then click the Add to List button to the immediate right of this list box.
Click the Master Category List button at the bottom of the Categories dialog box to open the Master Category List dialog box (refer to Figure 6-17) and then type its name into the New Category list box before you select OK.
Note
Outlook 2007 handles categories a little differently from earlier versions of Outlook. This version of Outlook adds color coding to its categories. The different colors then enable you to visually differentiate the groups to which you've assigned various items. That way, you have some visual clues about how your items fit together even before you display some type of group listing of them with a custom Search Folder in the Mail module or a By Category view in some other Outlook module.
Warning
Outlook 2007 no longer uses the Master Category list of earlier versions to maintain its categories. This means that all custom categories you add to the Master Category list in earlier versions of Outlook have to be recreated when you upgrade from Outlook 2003 to Outlook 2007. Your custom categories maintained in the Master Category list aren't retained when you install the 2007 version of the program.
In place of a dialog box of category options, Outlook 2007 displays a Categorize drop-down list showing all the colors and names of the current categories when you do any of the following:
Click the Categories button on your customized Productivity toolbar.
Right-click the selection and then mouse over Categorize from the contextual menu that appears.
Click Edit
Figure 6-18 shows how this drop-down list appears on my computer when I click the Categorize button on my customized Productivity toolbar. To assign an existing category to the selected item(s) in the current module, you simply click its color and name on this drop-down list.
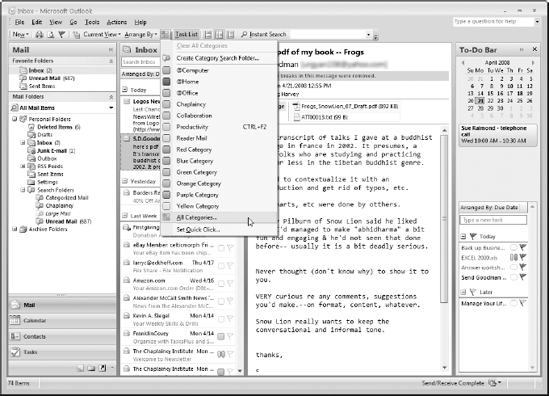
Note that when assigning categories to your e-mail messages in Mail and appointments in Calendar, Outlook 2007 shows the color assigned to the category. In the case of e-mail messages, the category color appears in the column to the immediate left of the flag column in the Information Viewer. In the case of appointments on the Calendar, the program turns them the color of the category (and displays small color cubes within the appointment when you assign the same appointment to more than one category).
To modify a preset color category by giving them more descriptive names than Red Category, Green Category, and so forth or to create a new custom category in Outlook 2007, you need to select the All Categories menu item near the bottom of the Categorize drop-down list.
When you select All Categories, Outlook 2007 opens a Color Categories dialog box similar to the one shown in Figure 6-19. To rename a present category in this dialog box, click to select the category and then click the Rename button, type in the new name, and press Enter.
To create a new category, click the New button in the Color Categories dialog box to open the Add New Category dialog box. There, enter a descriptive name in the Name box and then select the color you want to associate with it from the Color drop-down list before you click OK.

Tip
Outlook 2007 lets you assign shortcut keys to eleven favorite categories using the key combinations Ctrl+F2 through Ctrl+F12. When you assign one of these shortcut keys to a category, you can assign it to selected items in a module simply by pressing the key combination. To associate a particular combination to a category, select it from the Shortcut Key drop-down list when modifying its settings in the Color Categories dialog box or creating it anew in the Add New Category dialog box.
The Organize pane in Outlook offers a great way to organize the information you store in any Outlook module. Depending on which Outlook module is current, the Organize pane can offer any of the following four options:
Using Folders (Mail, Contacts, Tasks, Notes): Enables you to move the e-mail messages you've selected in the current folder to another mail folder. In the Mail module, this tab also contains a Rules and Alerts button that enables you to modify existing rules and create new ones (see Chapter 8 for details).
Using Colors (Mail): Enables you to select a particular font color to be used to demarcate messages that are sent only to you or that are sent from specific senders. Also contains an Automatic Formatting button that enables you to modify the font, style, and color automatically assigned to various types of messages.
Using Categories (Calendar, Contacts, Tasks, Journal): Enables you to add selected items in a module to a particular existing category as well as create a new category to use.
Using Views (Mail, Calendar, Contacts, Tasks, Notes, Journal): Enables you to select a new view for the current module. Also contains a Customize Current View button that enables you to modify the settings for the currently selected view.
Figure 6-20 shows you how the Organize pane appears when the Inbox folder in the Mail module is selected. As you can see in this figure, this Organize pane contains three buttons on the left side of the pane: Using Folders, Using Colors, and Using Views.

Each of these three buttons is connected to a tab that contains the options you can modify in the body of the pane. In addition, each pane contains its own button in the upper-right corner that you can use to open a dialog box that lets you modify additional related options.
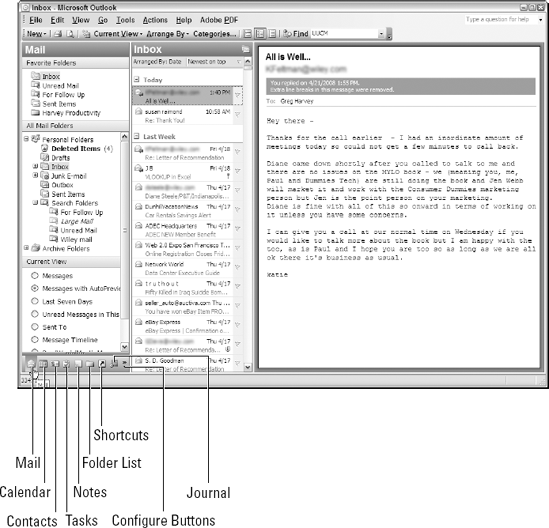
By default, the bottom section of Outlook's Navigation Pane contains large navigation buttons for the big four modules: Mail, Calendar, Contacts, and Tasks. In addition, the very bottom row of this pane also displays smaller navigation buttons (with icons and no labels): the so-called Notes, Folder List, Shortcuts, and Configure Buttons. (The Configure button determines which navigation buttons appear in the Navigation Pane and in what order.)
Note
Because you'll rely mostly on shortcut keys (Ctrl+1 through Ctrl+8, as I outline in Chapter 5) to switch between Outlook modules, you don't need to sacrifice the precious screen space in the Navigation Pane by retaining the four large Mail, Calendar, Contacts, and Tasks buttons. Therefore, I suggest that you reduce these buttons to smaller buttons with icons only in the very bottom row of the pane, right in front of the Notes, Folder List, Shortcuts, and Configure Buttons. To do this, position the mouse pointer on the dotted line at the top of the Mail button and then, when the pointer becomes a double-headed arrow, drag downward until all four buttons are reduced to icons and displayed in the bottom row before you release the mouse. If you later forget what a button does, you can just mouse over the button's icon and read the ScreenTip that appears at the mouse pointer.
Outlook also makes adding or removing navigation buttons from the bottom section of the Navigation Pane easy. For example, if you track your daily activities with the Journal module (see Chapter 14), you may want to add the Journal navigation button to this pane.
To add the Journal navigation button, follow these steps:
Click the Configure Buttons button (the final button on the right — the one with the downward-pointing triangle).
Outlook displays a menu of options to the side of the button.
Mouse over the Add or Remove buttons item at the bottom of this menu.
A submenu listing each of the six modules plus Folder List and Shortcuts appears.
Click Journal at the bottom of this submenu.
Outlook adds the Journal navigation button to the end of the last row of buttons in the Navigation Pane immediately in front of the Configure Buttons button.
Tip
If you want to change the order in which the navigation buttons appear in the Navigation Pane, select the Navigation Pane Options item on the menu that appears when you click the Configure Buttons button. Selecting this item opens the Navigation Pane Options dialog box, where you can move selected module buttons by moving them down or up in the order.
Figure 6-21 shows you the Navigation Pane in the Inbox of my Mail module after I added the Journal navigation button and reduced all the big-four module buttons to just their icons. Note how nicely these sized buttons fit on the last row (all eight navigation buttons can be displayed on my smaller laptop screen). Also note that with the big-four navigation buttons minimized, you can now see the Current View section with options buttons for selecting a new Inbox view.
If your computer uses the Microsoft Vista operating system, you're probably already familiar with gadgets, those various little applications that run in the Windows Sidebar on the right side of the Windows desktop. As part of making Outlook into your full-fledged personal information manager, you may want to check out the available Outlook gadgets and at least entertain the possibility of adding one to your system. You could then use the gadget as a means of keeping an eye on Outlook even when you're working in other applications.
I'm particularly fond of the Outlook Info, Mini Inbox, and Outlook Tasks gadgets shown at the top of the Sidebar on my Windows Vista desktop in Figure 6-22.
The Outlook Info gadget enables you to see the number of unread messages in your Inbox along with the three most recent upcoming appointments on your calendar and tasks on your to-do list. The best part of this Outlook gadget is that you can use it to open the Outlook program to check particular messages, appointments, and tasks. Simply click the envelope, calendar, or to-do list icon to open the Mail module (assuming it's still the default module), Calendar, or Tasks module, respectively.
The Mini Inbox gadget enables you to see a few of the most recent e-mail messages in your Inbox. It also contains two bars beneath the list of messages that scroll to display the appointments and tasks on your daily calendar. To read the text of a particular message in a separate pop-up window (without also opening the Outlook program window), click one of the messages listed in the gadget. And to reply to the message, click the Reply button at the top of this dialog box to open the message for your reply.
The Outlook Tasks gadget enables you to scroll through the tasks in your to-do list. You can also add a new task using the gadget's Type a New Task text box or check off as complete any tasks that you finish.
These gadgets (and others like them, created specifically for Outlook) are available online for free download. To check them out and perhaps add one to your Vista Sidebar, follow these steps:
Right-click somewhere in your Vista Sidebar (outside any of the gad
Click the Get More Gadgets Online link in the lower-right corner of the dialog box.
Vista launches your Web browser (Internet Explorer, in most cases) and goes to the Windows Vista Sidebar Web page.
Type Outlook in the Find More Gadgets text box near the top of this Web page and then click the Search button.
A Web page with the Outlook-specific gadgets appears in your Web browser.
Read about the individual Outlook gadgets and if you find one you want to try, click its Download button.
To get more information about a particular gadget as well as to read other users' comments about the gadget before downloading it, click the hyperlink attached to its name above the Download button.
Depending on the gadget you select to download, Vista may display a pop-up warning dialog box that warns you that the gadget is from a third-party vendor and asking whether you still want to install it. If the gadget is from a verified vendor or Microsoft itself and Internet Explorer is your Web browser, the File Download dialog box opens, asking you whether you want to open or save the gadget.
Click the Install, Open, and Run buttons as they appear in the various alert dialog boxes that are displayed as part of the process of downloading and installing the selected gadget.
Vista downloads and installs the gadget you selected at the top of the Sidebar on the desktop.

After downloading and installing a gadget on your Sidebar, Vista adds the gadget to your Gadgets dialog box. Having the gadget in that dialog box means that you can always re-install the gadget to the Sidebar without having to download it again if you happen to remove it.