PeopleSoft Cloud Manager allows users assigned the necessary roles and permission lists the ability to quickly and easily provision PeopleSoft environments in the Oracle Cloud with just a few clicks. Combining the downloaded database with a topology to create an environment template allows users everything they need to create a working PeopleSoft environment in the cloud. Previous chapters, including Chapters 5, 6, and 7, have focused solely on building the pieces needed to create a new environment.
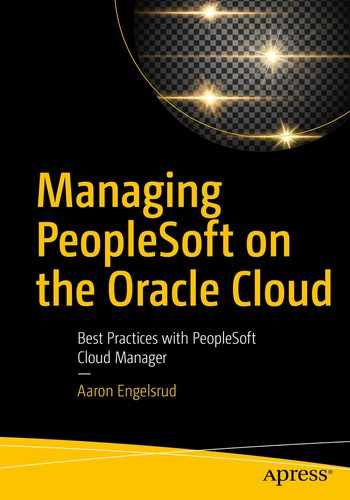
This chapter will use the foundation built in previous chapters to provide you with the knowledge necessary to not only create new PeopleSoft environments but to also manage cloud environments and troubleshoot as necessary when problems arise. Given this, the chapter is broken up into two main sections. The first section will cover all the details required to create a new environment utilizing the topologies and environment template we created previously. The second section of the chapter will provide insight to all the utilities PeopleSoft Cloud Manager provides to manage existing PeopleSoft environments in the Oracle Cloud. All the functionality detailed in this chapter can be accessed by navigating to the PeopleSoft Cloud Manager home page and clicking the Environments tile, as pictured in Figure 8-1.
Figure 8-1
The Environments Tile
After navigating to the Environments page, you will see a list of any environments that have been previously created. If you have not yet created any PeopleSoft environments in the Oracle Cloud, the Environments home page will be empty.
Creating a New Environment
Where creating a new PeopleSoft environment has traditionally proved to be a time-consuming, highly technical, and labor-intensive process, creating a PeopleSoft environment through PeopleSoft Cloud Manager is simple, quick, and nontechnical. PeopleSoft Cloud Manager removes the complexity of the DPK installation process, provides users with a simple interface to provide the details required to provisioning, and allows administrators the ability to hand off the environment creation process to the very people that need the environments provisioned.
To get started creating a new PeopleSoft environment after clicking the Environments tab or the Cloud Manager home page and navigating to the Environments page, simply click the Create Environment button at the top of the page as shown in Figure 8-2. This will open the Create Environment page and user input dialogue.
Figure 8-2
Create a new environment
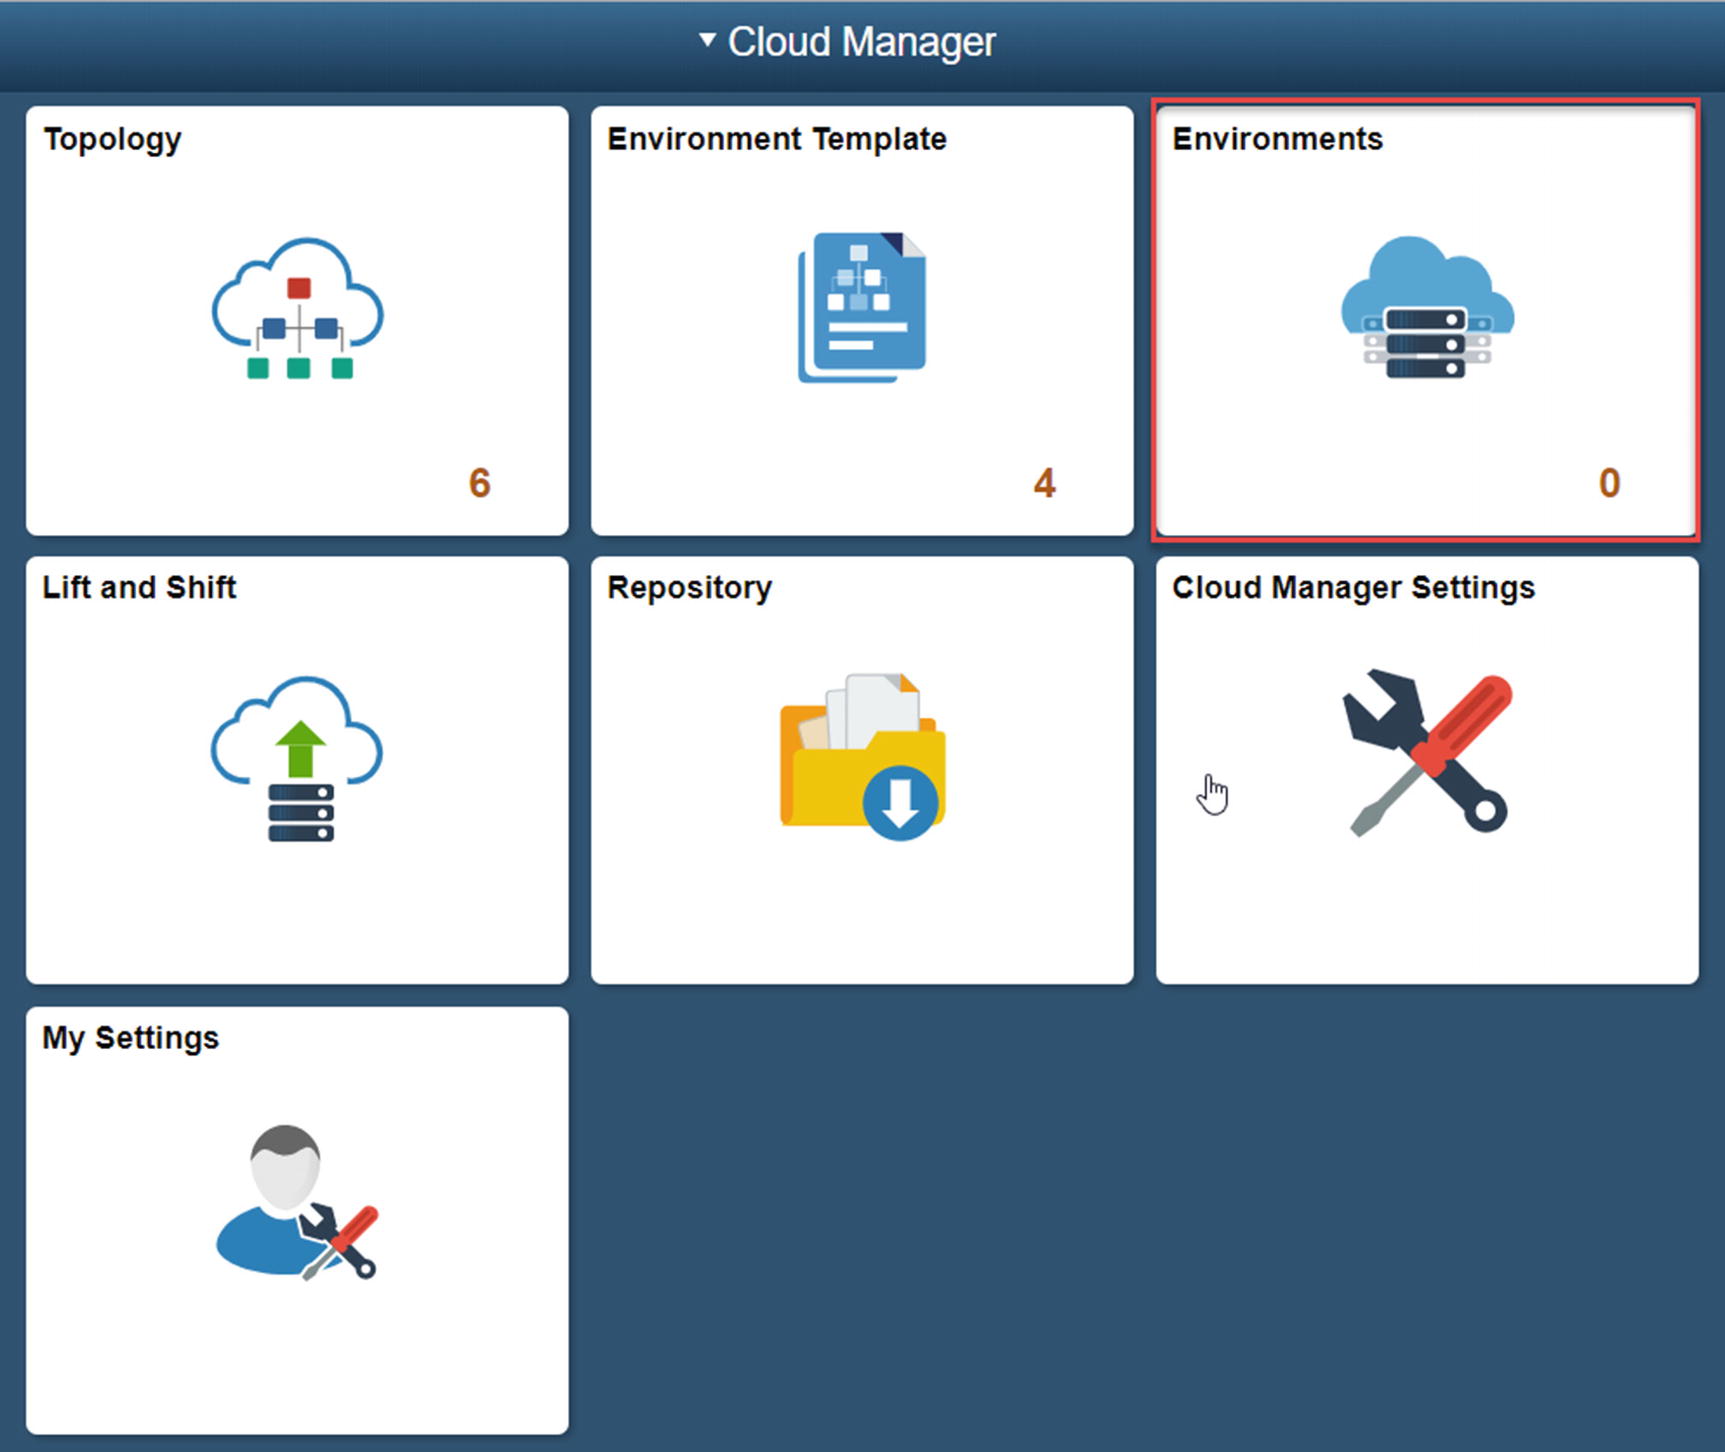
Provide the following information to start provisioning a new PeopleSoft Environment:
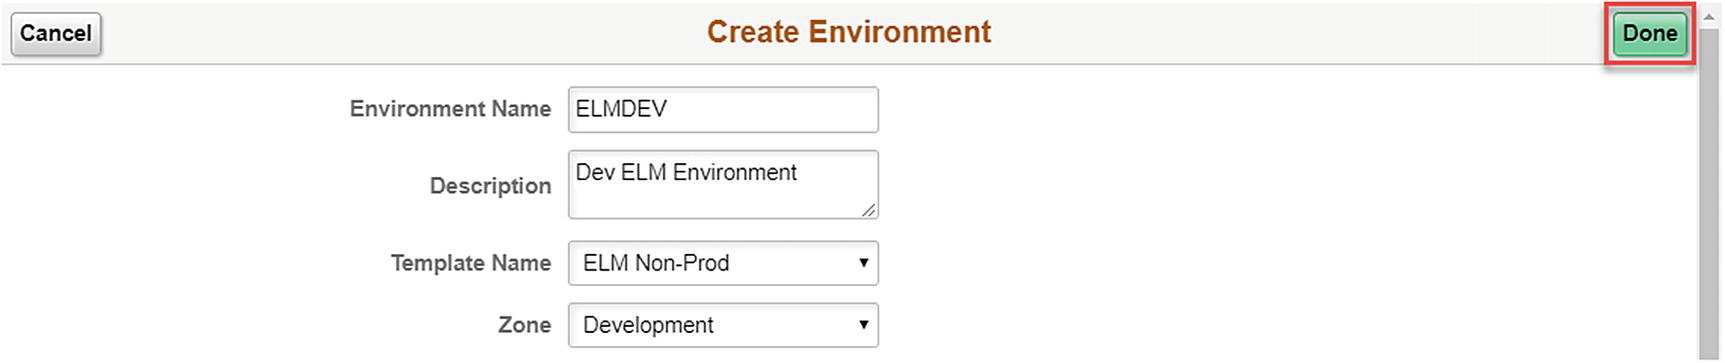
Environment Name: Provide a name for the environment. All users will see this name, so focus on making it something that clearly describes the environment being created. The environment we will be creating here will be named ELMDEV18. ELM is the application, DEV is the type of environment, and 18 is the image that the environment is based on.
Description: Provide a brief description of the environment. This can provide an expanded version of the detail provided in the environment name. A good description for this environment is Development ELM application using ELM PeopleSoft image 18.
Template: Choose the template you want to use to provision the environment. This is a drop-down field and contains a list of all the environment templates you have created in PeopleSoft Cloud Manager. For this environment, we will select the ELM Non-Prod environment template we created in Chapter 7. Once you select the appropriate environment template, more options will build on the page.
Zone: This field will appear once you have selected an environment template. If you have more than one zone available as options in your environment template, you will be able to choose which one you want. For our purposes for this environment, the development zone is the best option to select.
The Create Environment detail can be found in Figure 8-3.
Figure 8-3
New Environment Information
Select a Topology
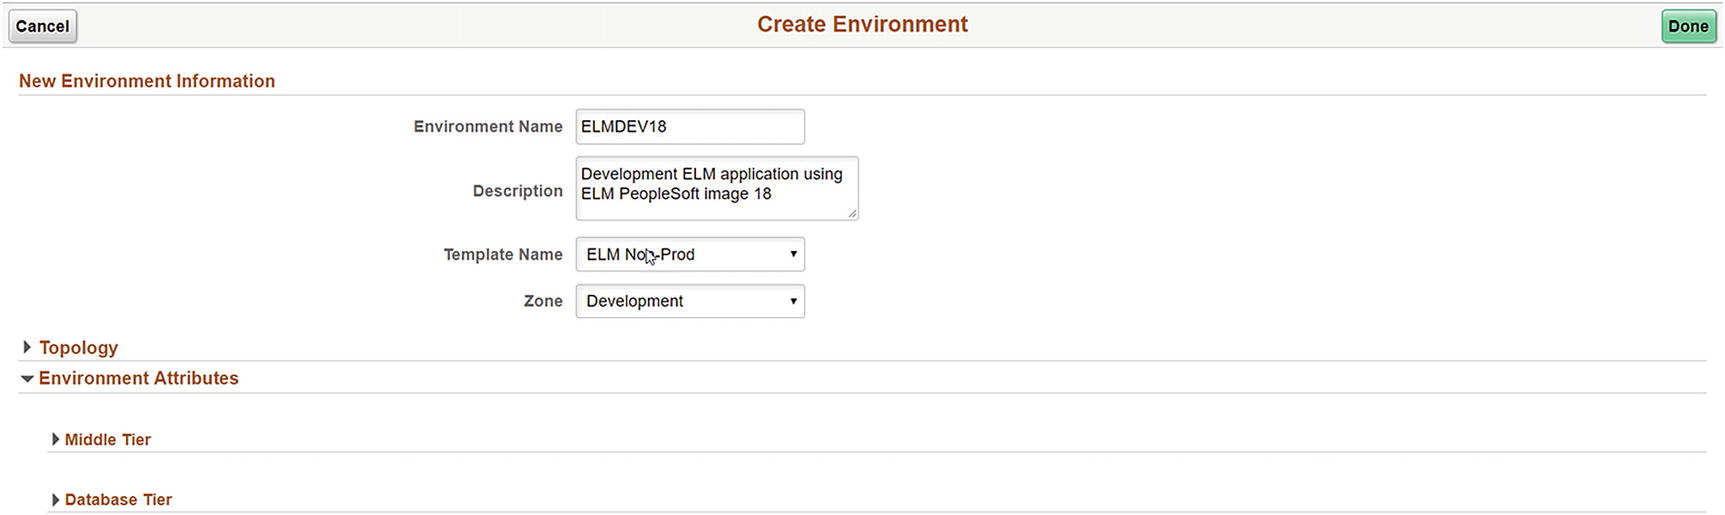
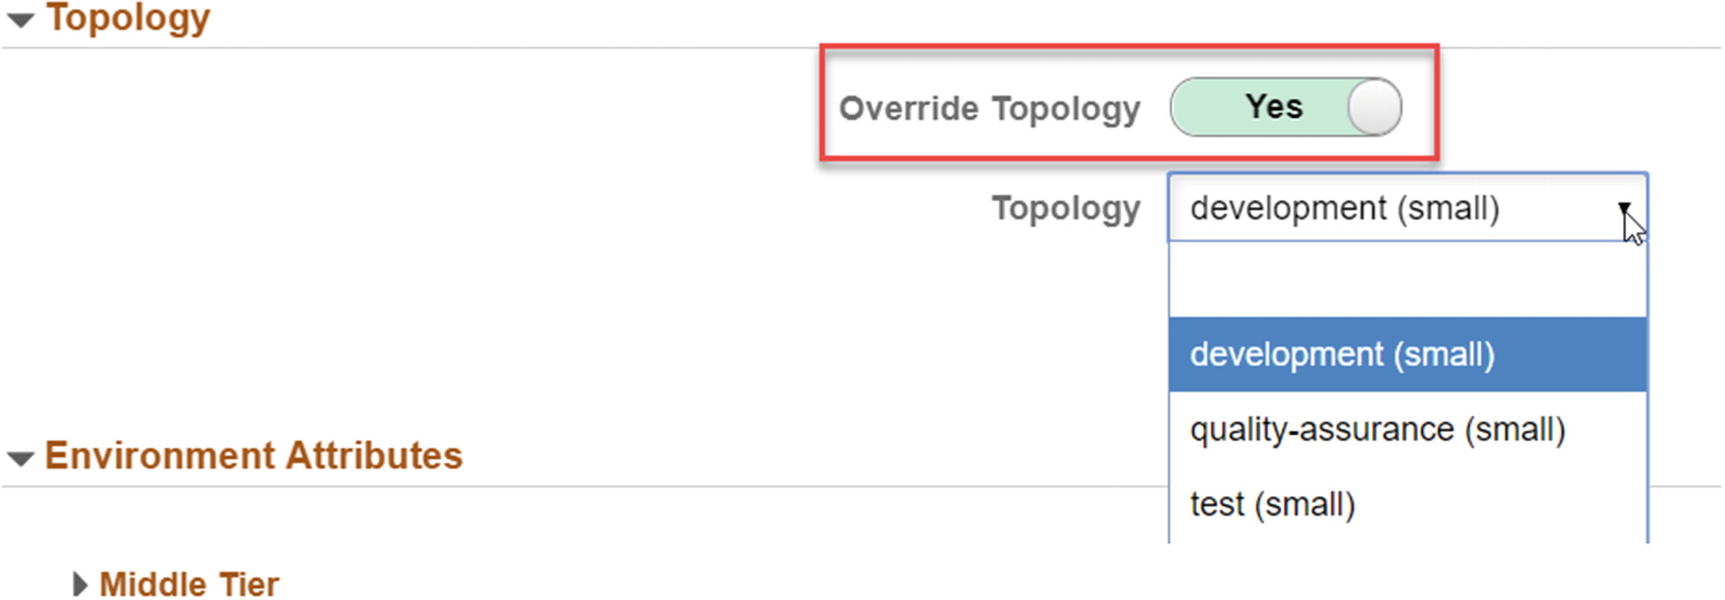
The next step in creating a new environment is to make some decisions about the topology you want to use when the environment is provisioned. To do this, start by expanding the Topology section on the Create Environment page. You can find this section directly below the new environment information you just provided. This section is shown in Figure 8-4. This section allows you to first see which topology is currently selected and second, override the default topology and select a different topology. To override the default topology, change the Override Topology selector to YES, this will allow you to select a different topology from the topology drop-down list. The drop-down will include any of the topologies that are available within the environment template.
Override Topology: This selector switch allows you the option to not override the default topology (NO) or to override the default topology and select a different one (YES).
Topology: If YES is selected it the Override Topology selector switch, this drop-down will provide the topology options available within the environment template. If NO is selected in the Override Topology selector, this drop-down is not editable.
Description: This field is not editable and only provide detail for the topology selected (Figure 8-4).
Figure 8-4
Topology section
Figure 8-5 highlights the section changes and topology options when the Override Topology selector switch is set to Yes.
Figure 8-5
Override Topology and drop-down values
Input Required – Environment Attributes
After selecting the appropriate topology for use in provisioning your new PeopleSoft environment, there is a bit more user input that is required to ensure that all necessary information is provided. Below the Topology section, you will find a section titled Environment Attributes with a series of subsections that closely match what you encountered when setting up the environment template.
Middle Tier – Credentials
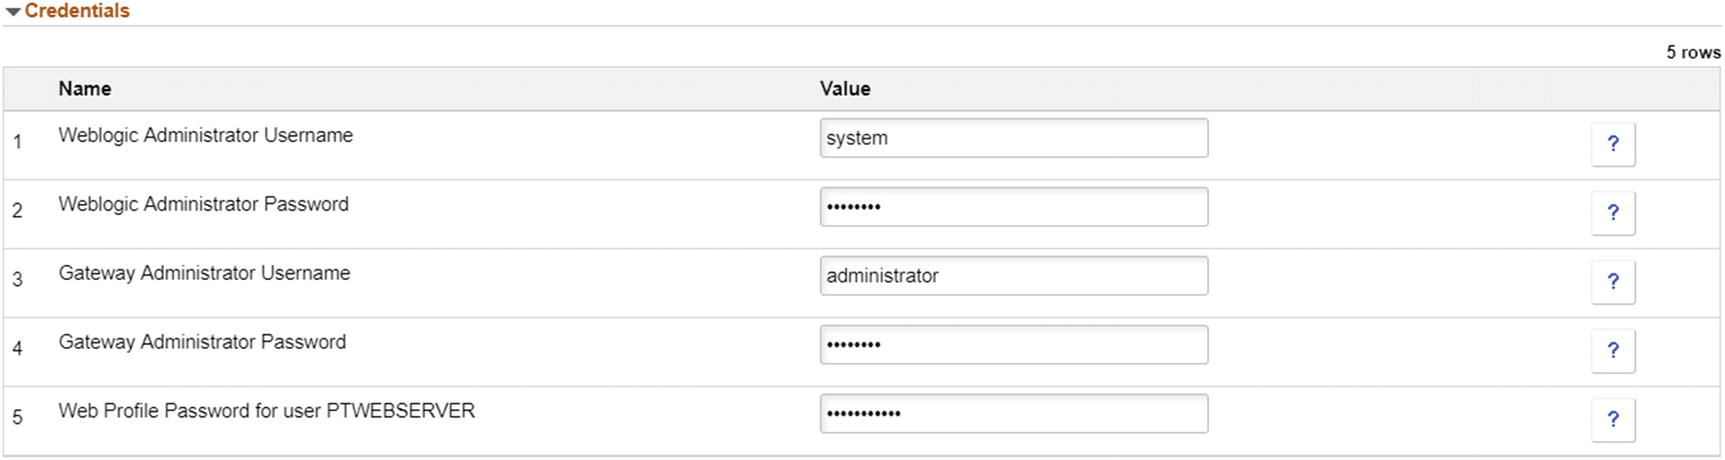
Under Environment Attributes you will find a section for your Middle Tier settings. The first sub-section allows you to enter the password values for the WebLogic Administrator, the Gateway Administrator, and the Web Profile Password for the PTWEBSERVER user. Enter these values per your organizational requirements as shown in Figure 8-6.
Figure 8-6
Middle Tier – Credentials
Middle Tier – General Settings
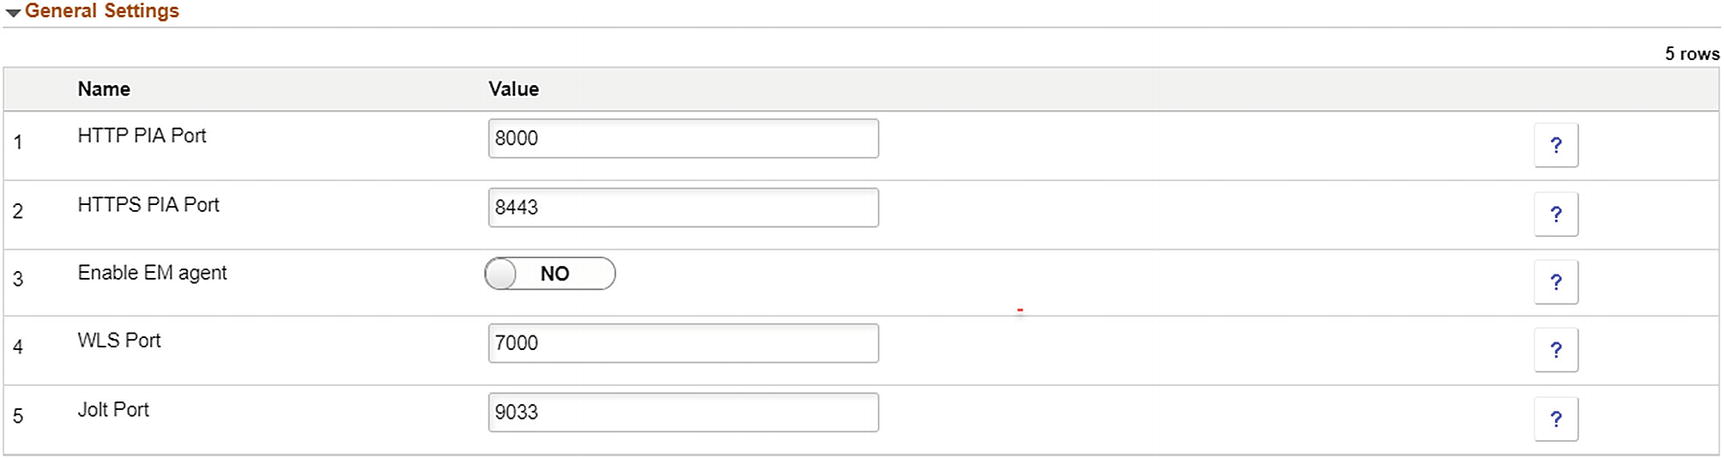
The Middle Tier – General Settings section allows you the ability to change HTTP, HTTPS, WLS, and Jolt Port settings as well as enable the EM agent for the environment you are provisioning. These can be left as they are set in the topology or they can be altered to allow for environment specific settings. This is shown in Figure 8-7.
Figure 8-7
Middle Tier – General Settings
Middle Tier – Domain Settings
The Middle Tier – Domain Settings section of the environment configuration allows you to modify the settings for the appserver, process scheduler, and web server for the environment that you are provisioning.
Appserver Settings
Appserver Settings, shown in Figure 8-8, allows you to modify the following values:
The number of appserver domains created
The number of PSAPPSRV services created per domain
The number of PSQRYSRV services created per domain
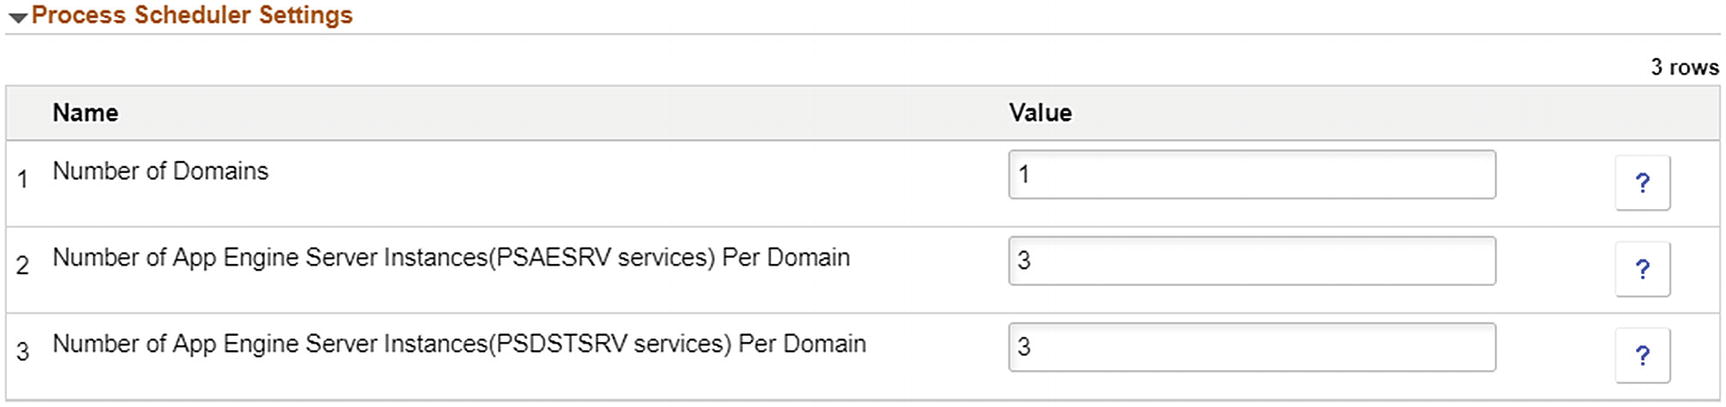
The Process Scheduler Settings section, shown in Figure 8-9, allows you to modify the following settings:
The number of process scheduler domains
The number of PSAESRV services created per domain
The number of PSDSTSRV services created per domain
Figure 8-9
Middle Tier – Domain Settings – Process Scheduler Settings
Process Scheduler Server Definition Parameters
The Process Scheduler Server Definition Parameter section, shown in Figure 8-10, allows you to modify the following settings before creating your environment:
Application Engine
XML Publisher
COBOL SQL
Optimization Engine
SQR Processes
SQR Reports
Max API Aware
Figure 8-10
Middle Tier – Domain Settings – Process Scheduler Server Definition Parameters
Web Server Settings
Once you have completed the Process Scheduler Server Definitions Parameter section, you will need to pay some attention to the Web Server Settings. The Web Server Settings can be viewed in Figure 8-11. This section allows you to modify the following settings:
The number of web server domains to create
Any specific authentication domain you need the environment web server configuration to use
Figure 8-11
Middle Tier – Domain Settings – Web Server Settings
Advanced
The Advanced section in the Middle Tier Environment Attributes section allows you to provide custom YAML data that can be used during provisioning to create the cloud environment. This configuration data needs to be entered as properly formatted YAML data in the provided text box. The YAML input box is shown in Figure 8-12.
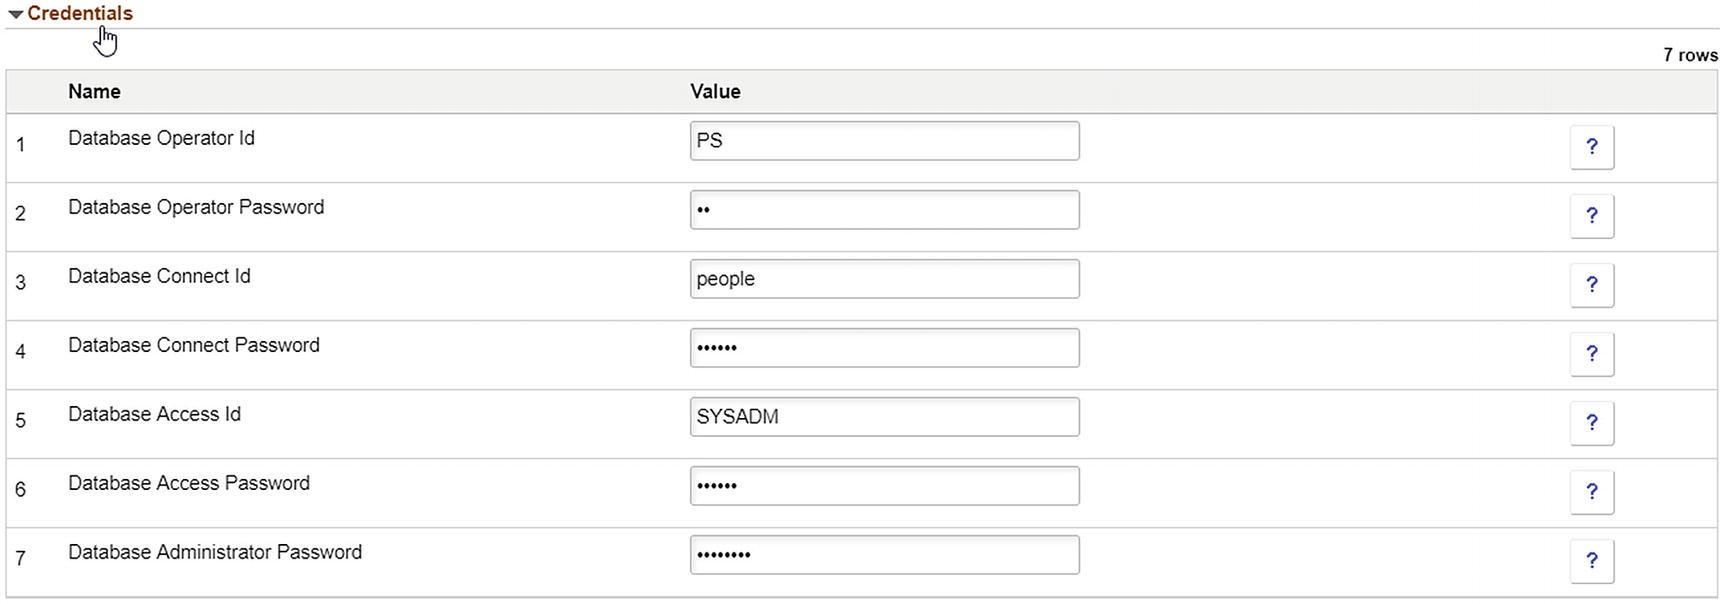
Now that you have all the Middle Tier specific data entered and configured to your liking, next move on to the specifics of the Database Tier settings. This section covers the settings applicable to a typical Database Tier, not a database being created on Database as a Service. To get started, the first setting to be configured is, similar to the Middle Tier section, the necessary credentials. This section, as shown in Figure 8-13, allows you to input/update the following bits of data:
The database Operator ID (Defaults to PS)
The database Operator ID password
The database Connect ID (Defaults to people)
The database Connect ID password
The database Access ID (Defaults to SYSADM)
The database Access ID password
The database Administrator Password
Figure 8-13
Database Tier – Credentials
Database Tier – General Settings
The General Settings in the Database Tier Environment Attributes section, shown in Figure 8-14, allows you to select or modify the following settings:
To enable (YES) or disable (NO) the EM Agent
The name of the database to be created
The database server port
The PeopleSoft deployment path
The type of database being created (DEMO or SYS)
Enable (YES) or Disable (NO) multi-language support
Determine if the database to be created is (YES) or is not (NO) Unicode
Figure 8-14
Database Tier – General Settings
Complete Environment Creation
Once the correct topology is selected and all the Environment Attributes are completed to your satisfaction, you can finish the environment creation process. To finish this, all you need to do is click the Done button in the top right-hand corner of the Create Environment setup page. This button is highlighted in Figure 8-15. This will take you back to the main environment home page, and you will see your new environment listed. It may take some time for the environment to get set up, and during that time, it will be listed in a “provisioning” status.
Figure 8-15
Finish the environment creation
Managing Existing Environments
There are multiple pages within the environment detail section that allow to properly manage most all aspects of the environments you have provisioned within PeopleSoft Cloud Manager. These sections include environment detail, manage attributes, health check, manage PUM connections, apply PeopleTools patch, upgrade PeopleTools, provisioning status, and logs. Each of these pages is available for each provisioned environment and will contain the relevant and environment specific detail that is relevant to the environment you are managing.
Environment Detail
The Environment Detail page, the first menu on the left of the Environment page and also shown in Figure 8-16, contains some very basic information about the environment you are managing. This detail includes the name of the environment, the current status of the environment, the zone within which the environment was provisioned, the name of the topology used to provision the environment, and the URL to the PIA for the provisioned environment. This is all the basic information that will be useful to have at a glance while managing PeopleSoft Cloud Manager environments.
Figure 8-16
Environment Detail page
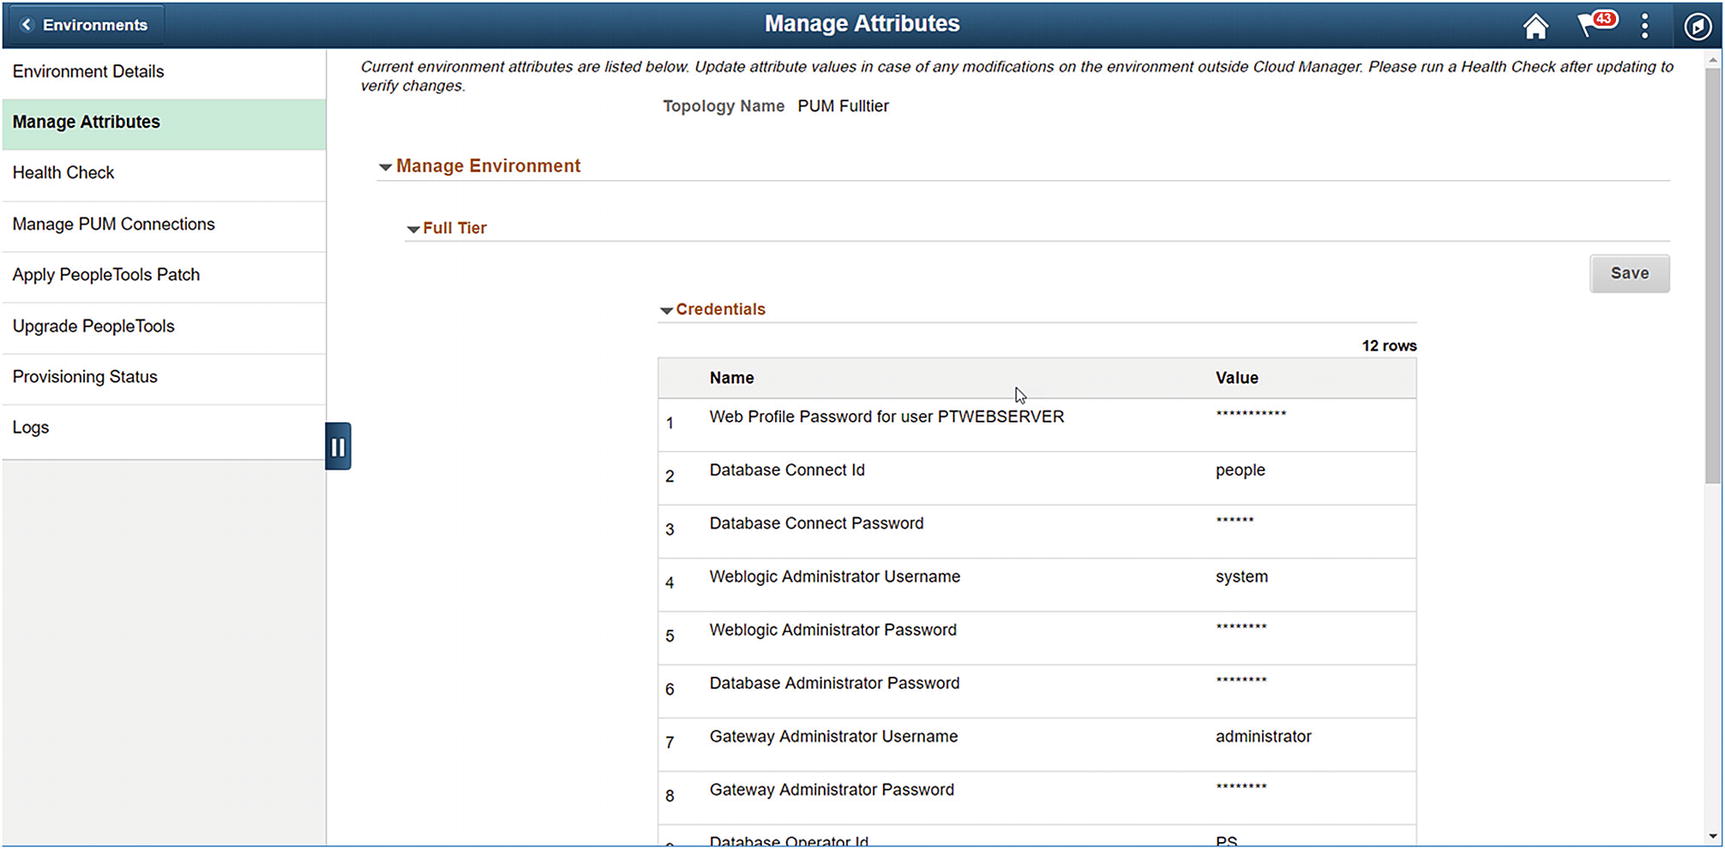
Manage Attributes
The Manage Attributes page allows you to manage all of the Environment Attributes you provided to PeopleSoft Cloud Manager at the time you provisioned the environment. You can change credential information, including passwords for the PTWEBSERVER user (the user used by PeopleSoft to start the PIA), WebLogic, and your Gateway Administrator. Additionally, through this page you are able to manage and update ports used by the application, the database name, and the database type. This level of access allows you the ability to configure and update many of the key attributes within the PeopleSoft application without ever having to access the psadmin console. The information contained in the Manage Attributes page is shown in Figure 8-17.
Figure 8-17
Manage Attributes page
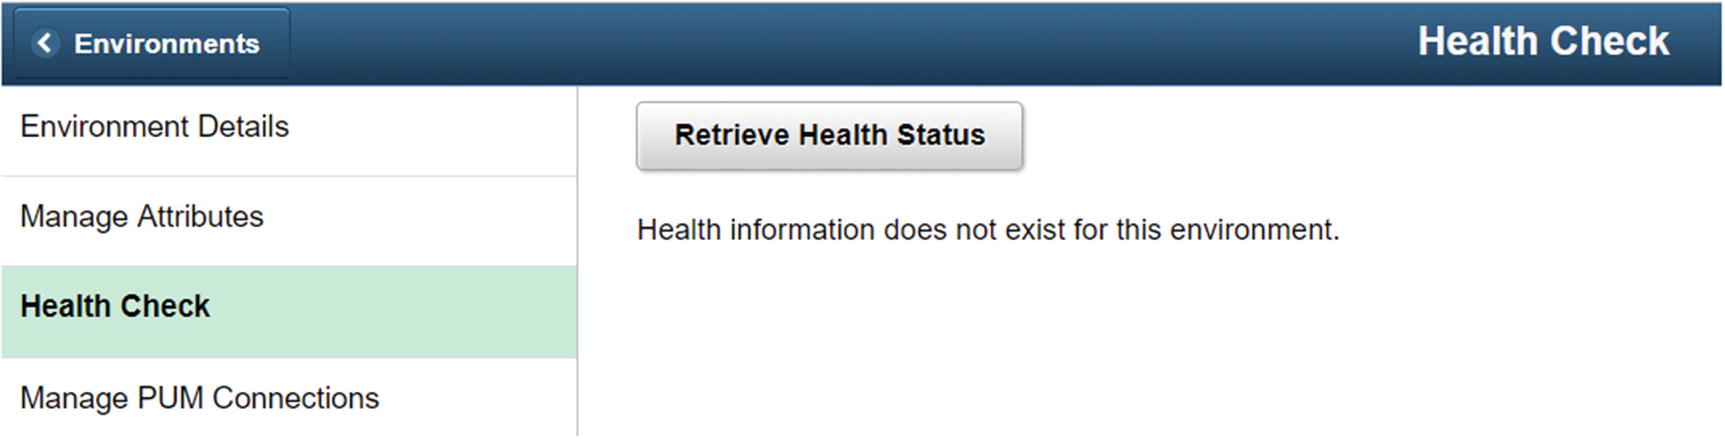
Health Check
With the simple click of the Retrieve Health Check button at the top of the Health Check page, PeopleSoft Cloud Manager will run an automated process to determine the overall status of your provisioned environment. This can help you uncover unknown issues within your environment or determine where your PeopleSoft environment is improperly configured. This button is shown in Figure 8-18.
Figure 8-18
Retrieve Health Status
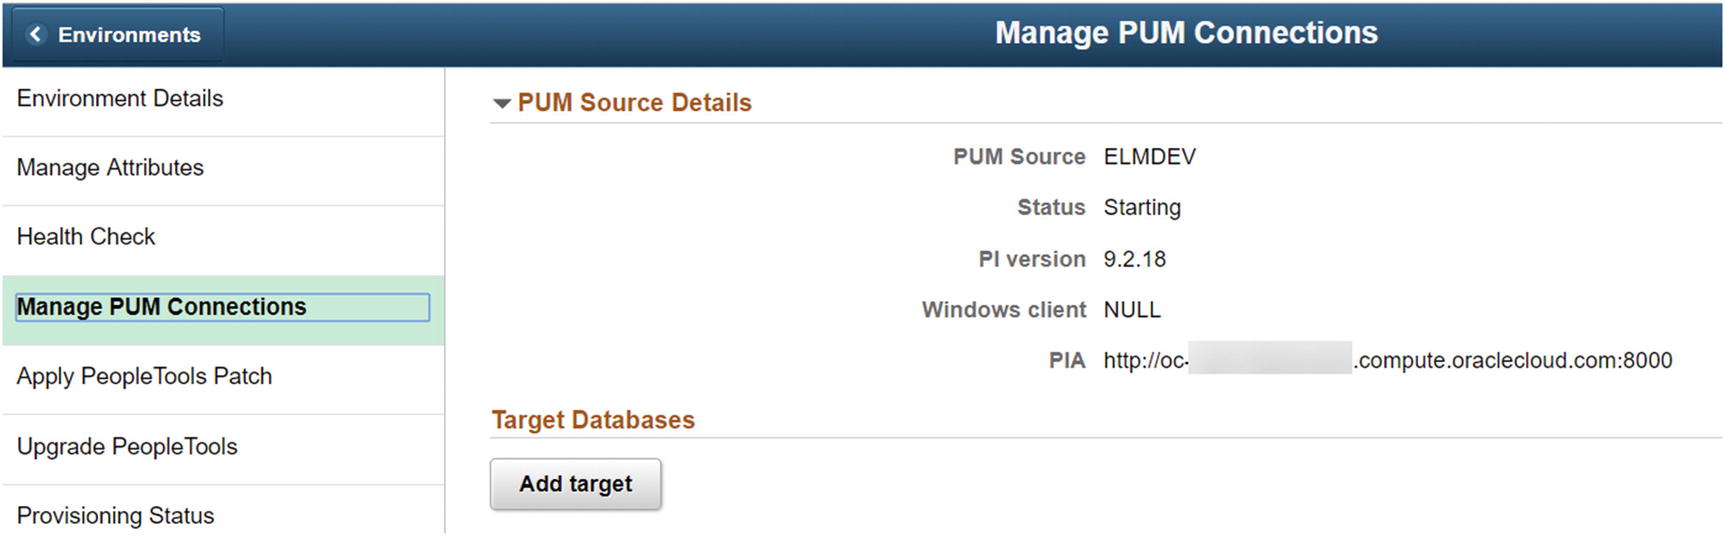
Manage PUM Connections
The Manage PUM Connections page, shown in Figure 8-19, within the Environment Details section, allows you the ability to not only see the details about the PUM Source environment but also allows you the ability to add target databases from your provisioned environments in PeopleSoft Cloud Manager. This provides you one location where you can manage both your PeopleSoft Update Manager image and the environments that image is able to update within PeopleSoft Cloud Manager.
Figure 8-19
Manage PUM Connections page
The Select Target dialogue is shown in Figure 8-20.
Figure 8-20
Add target environment for PUM connection dialogue window
Apply PeopleTools Patch
The Apply PeopleTools Patch page, found in Figure 8-21, allows you the ability to do exactly what you might think it would; the page allows you to select and apply a PeopleTools patch to your PeopleSoft Cloud Manager provisioned environment. Keep in mind, in order to select a particular PeopleTools patch, you must have already subscribed to and downloaded that patch in your repository. The process is simple; select the tools patch you would like applied from the drop-down list of available patches, and then click the Update button. PeopleSoft Cloud Manager takes care of the rest of the work.
Figure 8-21
Apply PeopleTools Patch page
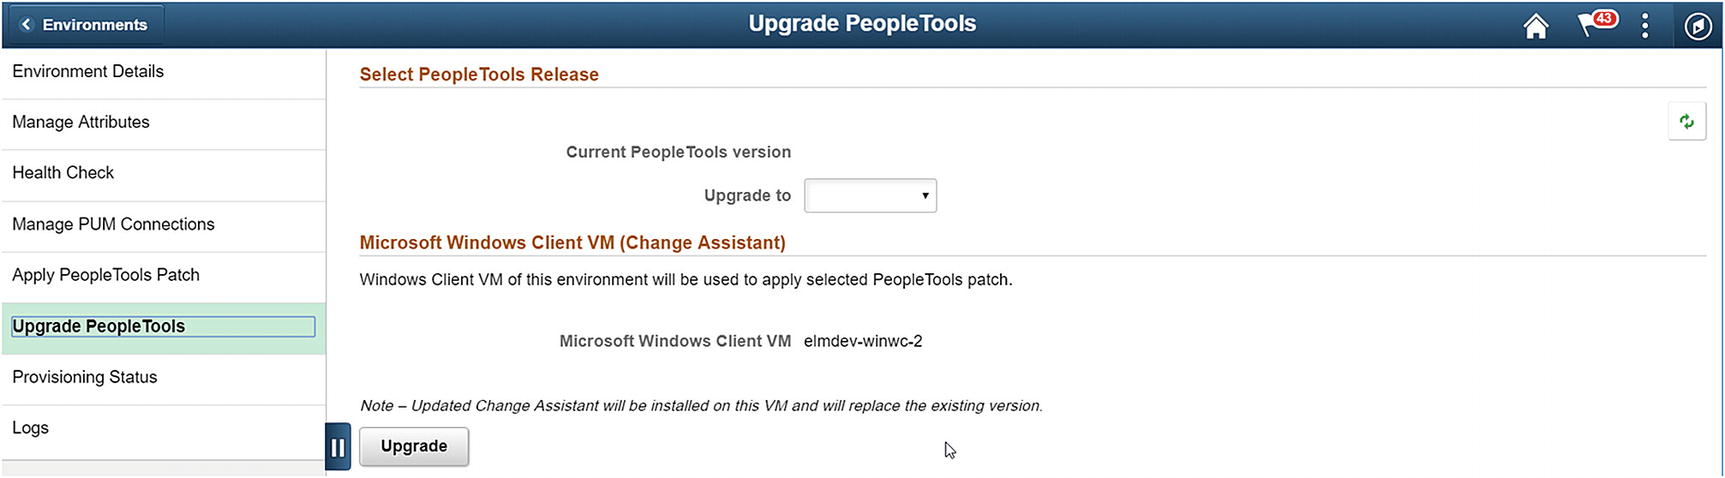
Upgrade PeopleTools
Like applying a PeopleTools patch, PeopleSoft Cloud Manager also allows you the ability to upgrade PeopleTools within PeopleSoft Cloud Manager. The process works exactly the same as the PeopleTools patch process; select the upgrade you would like to apply to your PeopleSoft Environment, and then click the Upgrade button. PeopleSoft Cloud Manager will run the upgrade process in the background. The Upgrade PeopleTools dialogue is shown in Figure 8-22.
Figure 8-22
Upgrade PeopleTools page
Provisioning Status
During and after provisioning, a PeopleSoft Cloud Manager environment, the Provisioning Status page, shown in Figure 8-23, is updated with the current status of each phase of the provisioning process. If provisioning is successful, you will see the success messages here. Likewise, if the provisioning process fails, you are also able to see the failure message and other information to help with the start of the troubleshooting process. The error summary will provide high-level information as to the error, along with possible solutions or resolutions to the encountered problem.
Figure 8-23
Provisioning Status page
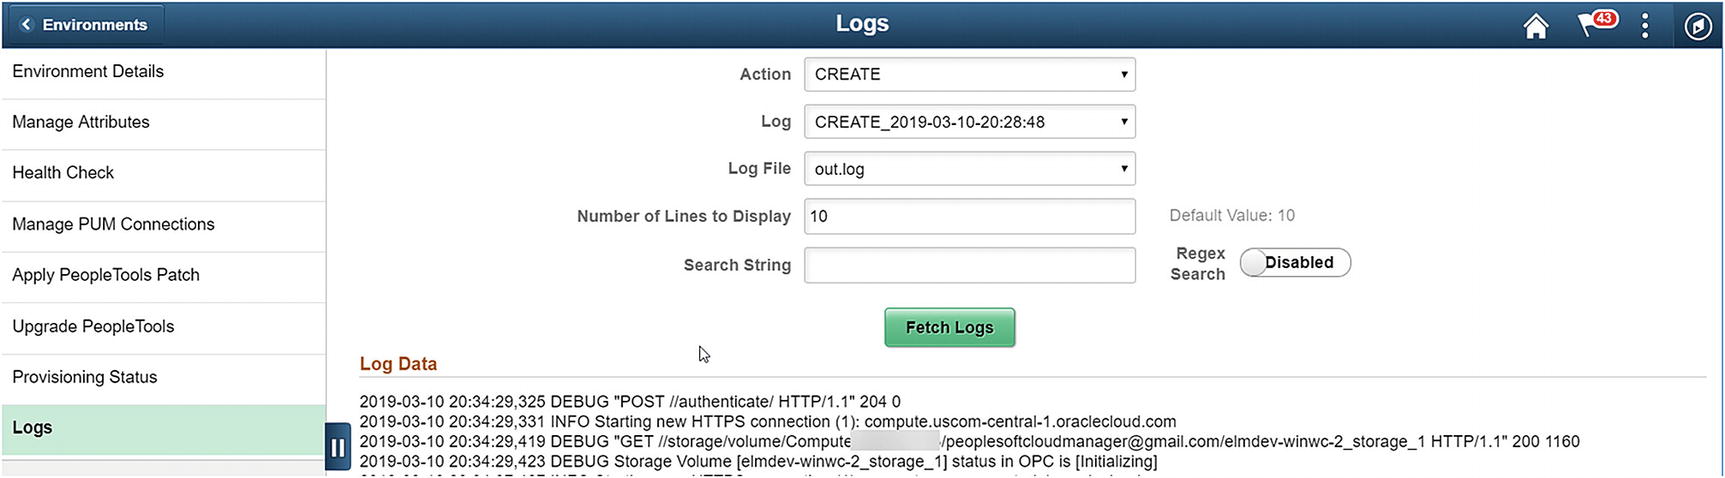
Logs
This page allows you to search and view the log files created during the provisioning process and also during the normal operation of your PeopleSoft environment. This allows you one simple location to go to track down any log information you may need to for troubleshooting issues, improving performance, or understanding the behavior of your environment. The Logs page and the search logs dialogue are shown in Figure 8-24.