Chapter 6: Organizing Requirements
In the previous chapters, we learned how to elicit and discover requirements, analyze them to identify requirement domain entities, model those entities and their relationships with an impact map, and capture system behavior in Feature Scenarios. At this point, we know how to create the following artifacts:
- Our requirements model as one or more impact maps
- Our specification as feature files
- A stakeholder or actor model
- A glossary
In this chapter, we will learn how to organize our existing artifacts and create some new ones. The aim is to increase the transparency and traceability of our methodology's outputs. This will give us the solid basis we need in order to start writing code that delivers the correct system. Specifically, we will look at the following:
- Providing easy access to our requirements model
- Ensuring traceability with entity identifiers
- Creating a specification document
- Creating a product backlog
By making our requirements model easily accessible and by creating a specification document that will be distributed to stakeholders, we are promoting transparency. Transparency builds confidence and is also a core Agile value. By adopting an entity identifier scheme for our requirements model, we are facilitating easy traceability between its entities. By creating a homogeneous and clutter-free backlog, we are promoting a visible list of what needs to be done that can be easily classified and prioritized. Let's start by looking at how to provide easy access to our requirements model.
Providing easy access to our requirements model
As mentioned in Chapter 2, Impact Mapping and Behavior-Driven Development, specifically the Modeling Requirements with Impact Maps section, our model is effectively a four-level tree structure. There are many tools that allow us to visually create tree structures, though I find mind-mapping tools ideally suited to the task. Some of the most popular ones are these:
- Lucidchart (https://www.lucidchart.com/): Online diagramming tool
- Draw.io (https://draw.io): Free, online diagramming tool
- MindMup (https://www.mindmup.com/): Online mind-mapping tool
- XMind (https://www.xmind.net/): Multi-platform mind-mapping tool
- GitMind (https://gitmind.com/): Free, online mind-mapping tool
Feel free to choose the tool you prefer, as long as it has good exporting and publishing functionality. We want to share our model with others, so we need to be able to export or publish it as an image, PDF, and ideally HTML, so that we can host it on a website. Many of these tools also provide cloud-hosting functionality whereby we can send our model on a cloud service such as Google Drive or OneDrive or even host it on a virtual cloud server. Once our model is in the cloud, it is very easy to share with our stakeholders and invite their comments and feedback.
Once we have made sure that our requirements model is visible and accessible to our stakeholders, there is one more thing we need to do to it: adopt an entity identifier scheme.
Ensuring traceability with entity identifiers
Our requirements model tree structure gives us a great way to visually track the relationships between our requirement entities. We can, at a glance, see all the capabilities needed to accomplish a stakeholder goal. We can also focus on a capability in order to immediately see all the Features we need to implement in order to provide it. There are, however, occasions when we need to reference a Feature outside the requirements model context. This could be, for example, in a conversation, an email, or some other document. Accurately referencing a Feature outside the requirements model can be tedious, as we need to use the full Feature name and provide some context to our reader or conversation partner. Similarly, we may mention a capability by its chosen name, but that makes it difficult for the other parties to relate it to a particular set of Features. An easy way to get around this problem is to assign identifiers to our capabilities and Features. The following figure presents a requirements model with assigned identifiers:

Fig. 6.1 – Marking domain entities with identifiers
Now, we can refer to the Share Blog Posts capability simply as C1. Not only is it shorter but it also allows our audience to easily identify all Features related to this capability, since their identifiers will be prefixed with C1. On the flip side, anyone coming across a feature identifier beginning with C1 will know exactly which capability this Feature helps deliver. When it comes to prioritizing and classifying our Features (as we will learn in Chapter 7, Feature-First development, and Chapter 8, Creating Automated Verification Code), having concise, meaningful identifiers can make a huge difference in productivity and avoid unnecessary confusion.
Important note:
You don't have to enumerate every capability identifier as C1, C2, and so on. Use whatever identification scheme is best understood by you and the stakeholders. For instance, instead of C1, we could have identified the Share Blog Posts capability as ShareBlog. Related Features could then be identified as ShareBlog-1, ShareBlog-2, and so on. Use any scheme that makes sense, as long as it's consistent and provides traceability between capabilities and Features.
It's now time to set our requirements model to one side and add some more transparency to our artifacts by creating the specification document.
Creating a specification document
We have written our system specification by fleshing out its behaviors as Scenarios in our Features. These can be seen by anyone who reads our feature files (.feature). The trouble is that our feature files are located in our project directory, alongside our code (see Chapter 3, Writing Fantastic Features with the Gherkin Language, specifically the Knowing why Features are executable specifications section). As our code will usually live on a hosted version control repository, such as GitHub or GitLab, making it accessible to all stakeholders can be challenging. To make our specification visible to anyone who wants to read it, it is a good idea to create a specification document. This document should include the following:
- Revision history: The specification document is a living document. It constantly changes and evolves. If our documentation system doesn't support versioning, then a revision history table is a good way of seeing how our Specification evolves over time.
- Introduction: An introduction explaining the purpose of the document, the intended readership, and any other pertinent information.
- A list of related documents: This should include links or references to any other documentation that may help readers better understand this document. This will usually be the raw requirement sources that were used to produce our specification, such as screenshots, wireframes, documents, diagrams, and so on.
- The specification scope: This would explain which release phase or product version this specification applies to.
- Our glossary: Our ubiquitous language, as discussed in Chapter 5, Discovering and Analyzing Requirements.
- Our stakeholder or Actor model: As well as the diagram, it is good practice to list the stakeholders and describe their roles or type of involvement with our system. This will help clarify any ambiguity and will help the readers better understand the Features.
- A scope and capabilities section: This should clarify the scope of the system (for example, MVP, version 1, and so on) and list the capabilities we are planning to deliver within this scope. These capabilities should be the ones we have captured in our requirements model, albeit only the ones within our current scope.
- Assumptions, warnings, and constraints: Although most of these should be documented within our Features, it is always good to outline the main ones in a separate section. We can also use this section for anything we haven't explicitly captured in the Features. For instance, this is where we can state that our system handles data in a GDPR-compliant manner (https://gdpr.eu/what-is-gdpr), or that our system will be hosted in specific geographic regions.
- Features: These should be a copy of our feature files' content. Nothing more and nothing less.
- Appendices: Sometimes, we may wish to explain a particular business process we captured or expand on a user workflow improvement our system enacts. Basically, anything that may be useful to the reader but is not appropriate for any other section of our Specification goes into an appendix.
Important note:
Features in our specification document and Features in our project code directory must always be synced. This can be achieved either manually or by writing automated scripts that perform the syncing (depending on the abilities of your documentation software or host).
The purpose of the specification document is to have a single, visible, easily accessible source of truth for what our system will do and how it will behave. It should give any of its readers, regardless of their level of technical expertise, a comprehensive idea of what our system does, why it does it, and who is involved in our system and how.
Our specification document doesn't actually need to be a physical document. It could be a hosted website or part of the company's wiki. The important thing is that it's always visible to, and easily accessible by, all our stakeholders. Part of the reason why it should be so is that our stakeholders will need to review and agree to it.
Getting stakeholder agreement on the specification
One of the reasons why we need to make the specification document visible easily accessible is that it needs to be constantly reviewed by the relevant stakeholders. These will usually be our client-side stakeholders, who provided us with the requirements. In this document, we are telling our clients, "We received your requirements, and this is what we are going to do to address them." By reading agreeing to it, our clients are telling us, "We think this specification will realize our requirements, within its scope, and we accept it." Agreement doesn't necessarily have to be given on the whole document. Often, the stakeholders will approve only some of the Features in the specification. Once a feature has been approved, we have the green light to go ahead with its development. The specification forms the basis of our interactions with the stakeholders. It gives both them and the development team the clarity, confidence, and alignment of aims needed to deliver a successful project.
Scoping the specification
In today's agile world, we tend to work in an iterative and incremental manner. That means we tend to release software often. It also means we tend to do phased or versioned releases. That is, we deliver some Capabilities – or part of some – in version 1, and then some more in version 2, and so on and so forth. At the same time, we may also be doing minor releases to our clients, mainly for demonstration and feedback purposes. We should scope our specification document for the major releases, the v1.x versions, and not every little code drop we put out there for show and tell. As a result, we should expect to have multiple specification documents for each major phase, version, or release. Each of these documents will detail the capabilities and Features needed for that particular scope.
At the same time that we are working on the specification document, we should also be thinking about creating a list of all the Features we need in order to deliver a working system. We call this list the product backlog.
Creating a product backlog
A product backlog is simply a list of all the Features that we, the system builders, need to implement in order to successfully deliver the system. In order to understand the role and significance of the backlog, we need to understand how the Software Development Life Cycle (SDLC) works.
The Agile SDLC
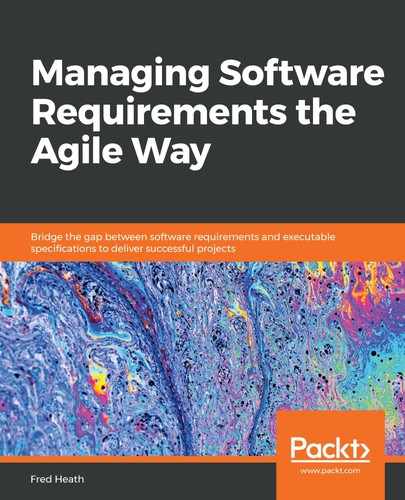
The SDLC consists of three major phases, as depicted in the following diagram:
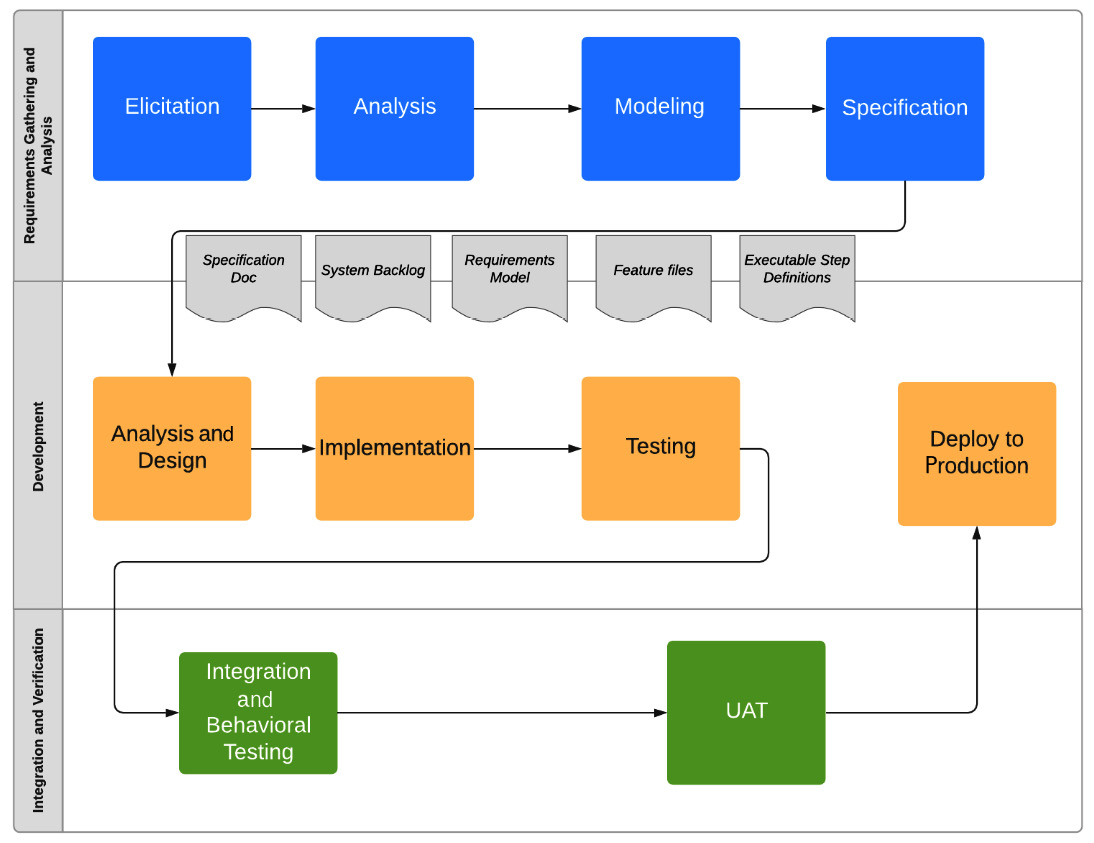
Fig. 6.2 – SDLC
- Requirements gathering and analysis
- Development
- Integration and verification
In Agile development, these three phases are not singular. They are repeated in continuous iterations, each iteration focusing on specific functionality or goals. Neither are they sequential; they can and do occur in parallel. Within the same iteration, a team member may be doing requirements gathering, while a second one writes code for a feature and a third team member verifies a different feature. In short, Agile development happens in an iterative and incremental way. Each iteration implements some features and builds upon what the previous iteration produced.
So far, in this book, we have operated at the requirements gathering and analysis phase. We have learned how to produce the following artifacts:
- A requirements model: An impact map that provides visibility and traceability of our requirements.
- Feature files: A detailed and structured description of our system's behaviors, that is, our specification. Feature files are mainly for the development team's benefit. They are embedded in our system's code base and connect our implementation with our specification.
- Executable step definition files: These are code files that are directly associated with feature files. A step definition file contains code that exercises our system's behavior and verifies it.
- A specification document: Mostly for our stakeholders' benefit, it includes the feature file content, as well as the stakeholder model, the glossary, and other relevant and useful information.
To truly support an iterative and incremental development cycle, we need to be able to prioritize and classify what goes into our iterations and increments. To do that, we need a product backlog. Let's consider how to decide what to put into our backlog.
What goes into the product backlog?
Suppose we are starting work on the first iteration of our project. Using our knowledge from the previous chapters of this book, we have done the following:
- Gathered requirements from our stakeholders
- Used analytical techniques, such as D3, to map the requirements into goals, stakeholder capabilities, and features, that is, a requirements model
- Used our requirements model to validate existing requirements and derive new ones
- Used fundamental principles and applied patterns to correctly sketch out system behaviors (our Feature Scenarios)
- (Optionally) Written step definition code that verifies our Feature
We are now ready to start the development phase of our iteration. This is where the development team looks at Features and decides how to implement them. The first stage of the development phase is the analysis and design stage. This stage results in the creation of a number of tasks. Tasks are usually development-related, but they could also be about infrastructure, logistics, and other things. In short, a task is something needed to be done in order to implement a Feature. Let's take a look at one of our previously demonstrated Features, the Create a Blog Post feature. A quick analysis will result in a number of tasks, such as the following:
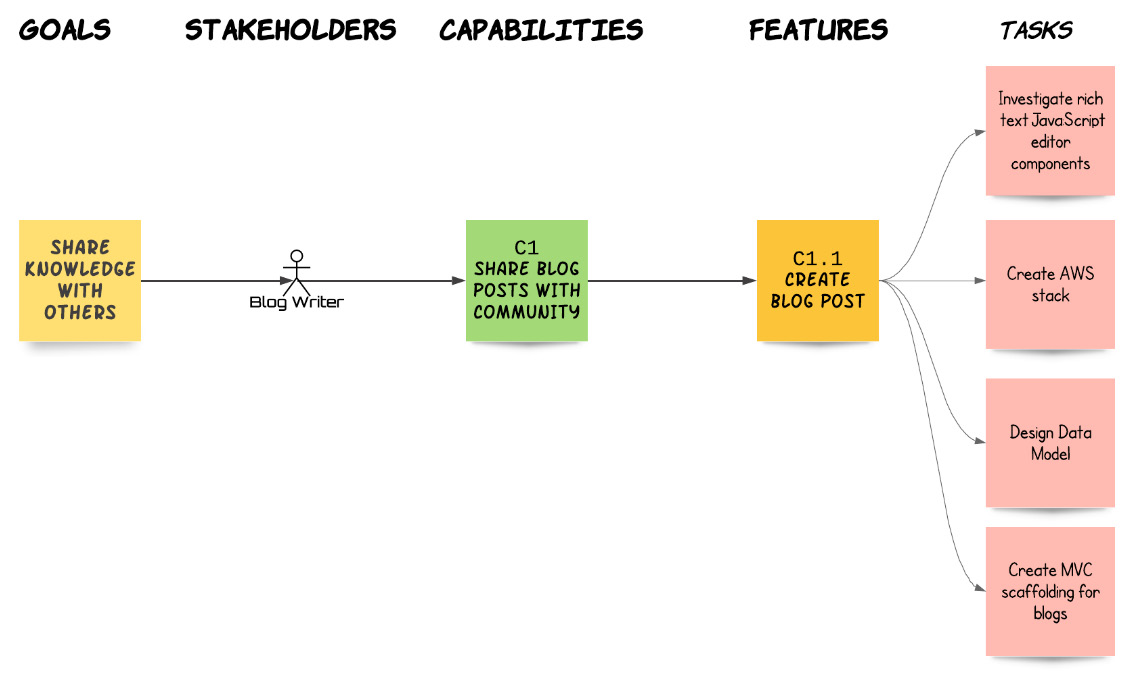
Fig. 6.3 – Feature analysis results in task creation
The important thing to keep in mind about tasks is that they are transient. They are only important while they are incomplete. Once they are done, we don't really care about them much. They have reached the end of their usefulness.
Once we start working on our tasks, implementing our Features' behavior, it is inevitable that we will start getting bugs. Bugs are faults or defects with our system's implementation or design, which cause our system to behave unexpectedly or erroneously. Getting bugs is a normal part of the development process and nothing to be feared or frowned upon. We will examine different ways of dealing with bugs when we look at leveraging different Agile frameworks in Chapter 7, Feature-First Development. For now, though, the important thing is to remember that bugs, like tasks, are transient. Here today, gone tomorrow. What remains is our features. Features drive our development, they describe our system's behavior, they are the distillation of the requirements elicitation and analysis phase, and they remain when tasks and bugs are gone.
When it comes to the crunch, it doesn't matter how many tasks we have completed or how many bugs we have fixed. What matters is how many features we have implemented and, by extension, which capabilities we delivered. This is what our stakeholders expect, and this is what we get paid for. It is therefore fitting that our backlog focuses on and contains only Features. It is wise to prioritize the Features in our backlog, as illustrated in the following example:
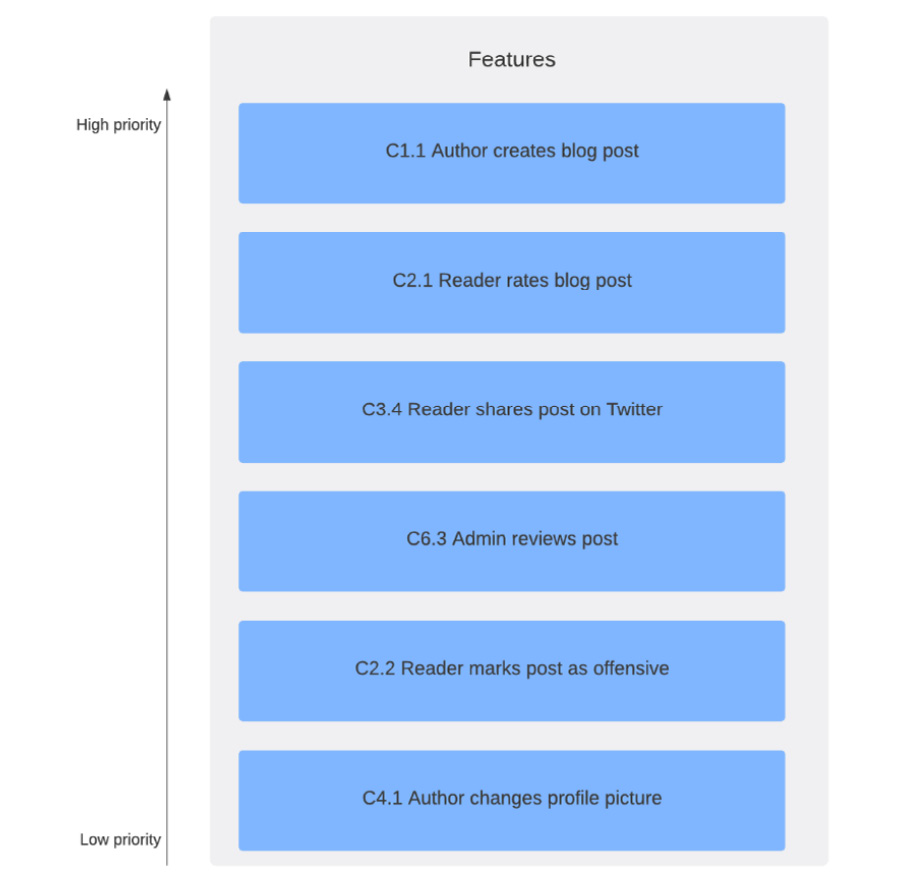
Fig. 6.4 – Product backlog in order of priority
Our backlog is a list of items (also known as cards) representing a Feature. In this diagram, we have placed the highest-priority features near the top of our backlog. We could also classify our backlog features; an easy way to do this is by using different background colors for different categories. We could classify features by difficulty level, related capabilities, benefit to stakeholders, completion level, and many other ways. The important thing is that our backlog should give us all the information we need at a glance.
Tip:
The product backlog is a live artifact. It changes and evolves along with our understanding of the system. Features will constantly be getting added to, or removed from, it. The backlog should be owned and maintained by a person with a good understanding of both the stakeholder's requirements and vision and your organization's mission and resources, such as the product owner (if using Scrum) or someone in a similar role.
It is also imperative that the cards on our backlog lead directly to our feature details. We can achieve that by embedding the feature file within the Feature card itself or just providing a link to it.
Where to keep the backlog
Our backlog will contain all the features we need to implement for our system, and it will help us prioritize and classify them. However, we will also need to track the progress of the features we are working on. For that reason, our backlog list will usually be part of a larger list of lists, such as a Kanban board or a Scrum board, as in the following figure:
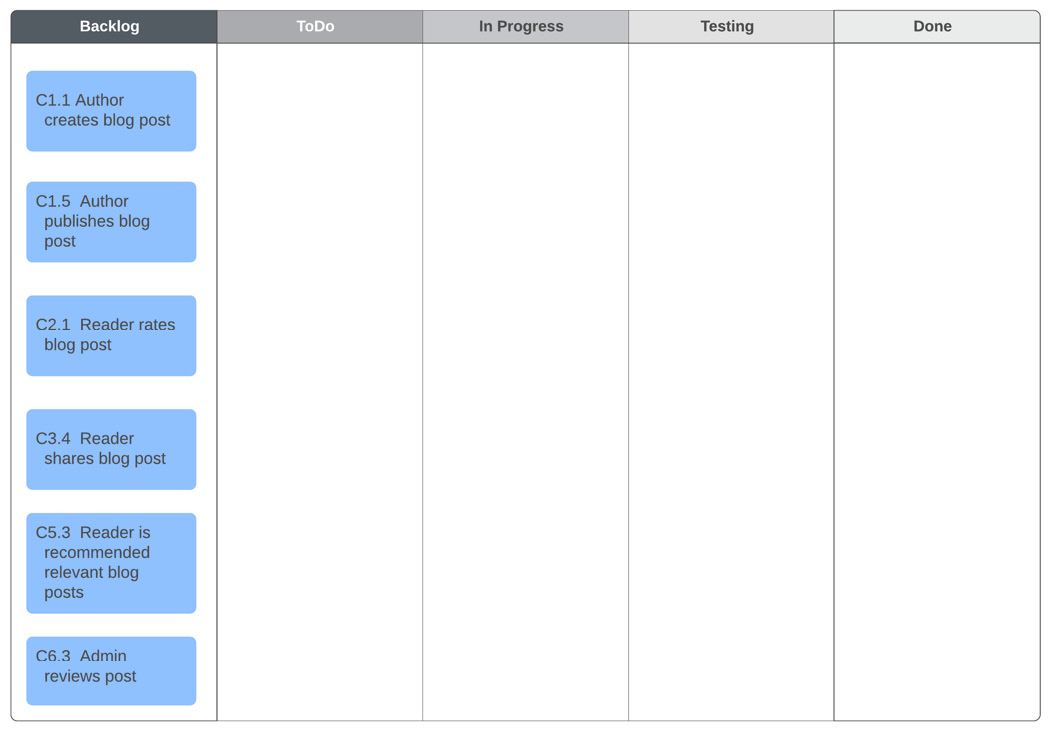
Fig. 6.5 – Product backlog on a task board
This makes it easy to simply drag selected features into the ToDo column, which is the starting point for many Agile methodologies. There are many tools that support the creation and maintenance of task boards, such as Pivotal Tracker, Asana, Jira, Monday.com, Trello, and many, many others. Choose whichever one takes your fancy as long as it matches all your other development needs and fits in with your Agile framework of choice (Scrum, Kanban, Crystal, and so on).
Summary
In this chapter, we learned how to create a specification document and a product backlog. We also learned about some practical and logistical tweaks in order to ensure that our produced artifacts are transparent and provide traceability. The transparency of our outputs is a crucial aspect of delivering a successful system. If our stakeholders find it difficult to understand what we are doing and how our system will behave, then we risk losing their confidence in us and our system as well as the communication channels that provide us with requirements and feedback. The specification document goes a long way toward providing everything the stakeholders need to know about our system in a single, visible, and accessible location.
Traceability is also an essential part of our methodology. One of the many benefits of impact mapping is that we can trace a feature all the way to an underlying stakeholder's goal, and vice versa. Our development team knows exactly what the impact is of a task or a Bug they're working on, on the business and the client. Everyone involved in the project can see the big picture, as well as the small details. Entity identifiers help take this traceability one step further and ensure that we always have a context for our features.
Finally, we saw how having a feature-based product backlog provides a clean way, compatible with an agile SDLC, to track all the important things we need to do in order to realize our stakeholders' goals. In the next chapter, we will see how to leverage our backlog when applying our requirements methodology within some of the most popular Agile methods.