
Chapter 3: Writing Fantastic Features with the Gherkin Language
In the previous chapter, we discussed capabilities and features and we learned how to define and model them using Impact Maps. We also introduced Behavior-Driven Development (BDD) and discussed how it's centered around features. In this chapter, we'll build on this knowledge by talking exclusively about Features. We'll discover how to write them correctly, how to accurately specify system behavior with Scenarios, and what makes our Features executable specifications that can be used to automate our system's verification. Features being written incompletely or inaccurately will mean that our system's behavior will not be properly conveyed to our stakeholders, which is the pre-cursor to ambiguity, misinterpretations, and – ultimately – project failure. In this chapter, we will make sure that this doesn't happen.
In particular, we will cover the following:
- What's in a feature?
- Writing Features with Gherkin
- Scripting Scenarios
- Knowing why Features are executable specifications
After reading this chapter, you will know all about Features: their structure, content, and usefulness.
What's in a feature?
As mentioned in Chapter 2, Impact Mapping and Behavior-Driven Development, specifically the Capabilities and Features section, a feature is a functionality implemented by our system in support of a capability. At a minimum, a feature consists of a Feature Title and a Scenario. A scenario is a look at the feature's functionality from a specific perspective. So, if our feature is titled Bank customer withdraws cash from cash machine, for instance, we could have scenarios such as Not enough cash in machine or Bank note denominations don't match requested amount.
However, having just a title and a scenario doesn't help us describe the whole functionality. A fully formed feature will include the following:
- Feature Title: A brief description of the presented functionality – for example, Bank customer withdraws cash from cash machine.
- User Story: Most people use the following template:
- As an [Actor]
- I want [specific system behavior]
- So as to achieve [a goal contributing to a Capability]
- Impact: A link to the impact map this feature relates to.
- Notes: Any other text that helps the reader better understand the feature.
- Background (if applicable): A prerequisite or condition common across all scenarios.
- Scenarios: A descriptive feature will have several scenarios, which are written in a structured manner:
Given [a Condition]
When [an Action is invoked]
Then [an expected Outcome occurs]
Features serve two purposes:
- They specify system behavior in a clear and structured manner so that they can be read and understood by any and all stakeholders.
- They allow system behavior to be verified against system releases and deployments by using automation tools that match system behaviors to verification code.
Tip
If a stakeholder cannot – or will not – read a Feature because it is too long or complicated, or contains technical jargon, then that feature is useless. The main purpose of a feature is to be read. If the structure or language of the feature hinders or prevents readability, then that feature is not fit for purpose!
Features are not written as free or unstructured text. We write Features using a specific structure and following certain rules. In fact, there is a whole domain language just for writing Features. Let's take a look at it.
Writing Features with Gherkin
We write Features in a structured manner, using a natural language subset called Gherkin (https://cucumber.io/docs/gherkin/reference/). Gherkin documents, such as a feature file, are written in a specific syntax. Most lines in a Gherkin document start with a keyword, followed by our own text. These keywords are as follows:
- Feature
- Rule (as of Gherkin version 6)
- Scenario (or example)
- Given, When, Then, And, *
- Background
- Scenario Outline (or Scenario Template)
- Example
Comments are only permitted at the start of a new line, anywhere in the feature file. They begin with zero or more spaces, followed by a hash sign (#) and some text. Gherkin supports over 70 languages, from Arabic to Uzbek, so we can write our Features in any language we choose.
A Feature's outline is as follows:
Feature: My Beautiful Feature # The Feature title
## We can write anything we want from here until the next keyword
## As suggested in the previous section we should put here the following:## -- User Story: a description of our feature
## -- Impact: a link to our Impact Map for this feature
## -- Notes to help readers understand the Feature
Background: # (optional) a common Condition which applies to all scenarios
Scenario: # a specific behavior of our Feature
Scenario: # another behavior of our Feature
## …more Scenarios
Feature should tell its readers all that they need to know in order to understand how the system will behave when that specific functionality is exercised. Variation in Feature's behavior is described by using different Scenarios.
Scenarios are written in the following manner:
Scenario: The Scenario Title
Given <a Condition>And <another Condition>
And ….
When <an Event or Action takes place>
And <another Event or Action takes place >
And ….
Then <an expected Outcome occurs>
And <another expected Outcome occurs >
And ….
As you can see, Scenario has a title. As Feature may comprise many Scenarios, it is important that each Scenario has a descriptive title. A Scenario specifies system behavior in terms of Conditions, Events, or Actions and Outcomes. Each Condition, Event/Action and Outcome consists of one or more steps, described in a single line of text. Each step is atomic; that is, it specifies a single Condition, Event/Action, or Outcome in its entirety. To specify multiple Conditions, Events/Actions, or Outcomes, we may use conjunctions such as And, Or, and But at the beginning of a new step.
All Scenarios are structured in the same way: Given some conditions, When certain events or actions take place, Then specific outcomes should occur. This structure makes it easy to accurately specify our system's behavior while also facilitating the creation of executable steps, as we shall see in the Features are executable specifications section, later in this chapter.
In the following sections of this chapter, we'll examine good and bad practices when writing Features and Scenarios. Let's begin by digging deeper into writing Scenarios…
Scripting Scenarios
Scenarios are a feature's essence. They reflect the change in the feature's behavior under different circumstances. We call this section Scripting Scenarios as Scenarios are written similarly to a stage play or film script. They are written using prompts and specific actions for particular actors. Before we discuss how to script our Scenarios, let's see how we can discover them first…
Discovering Scenarios
A good way to visualize scenarios is by using the metaphor of a Rubik's cube. Imagine that your feature is a Rubik's cube. You have it in your hands and you turn it around, looking at it from different angles. You notice how each side has different colors in different arrangements. It's the same cube, but each time you turn it, you discover some new image patterns and cell arrangements:

Fig. 3.1 – Feature as a Rubik's cube
When discovering Scenarios, we follow a similar mental process. We look at our Feature from different angles and perspectives. Feature itself doesn't change; it remains a piece of system functionality that contributes toward a capability. What changes is how that functionality adapts to different circumstances. Let's look at an example:
- Feature Title: The author uploads a picture to their profile.
- Notes: The author needs to have a profile picture so that readers can relate to them on a more personal level.
Every Feature will have at least one Happy Path Scenario. This is the Scenario where the Feature's main actor accomplishes the feature's objective without any hindrance. Some people call this the blue sky or best-case scenario. In our Feature example, the Happy Path Scenario may look like this:
Scenario: Happy Path
Given the user is logged in as an Author
And the Author goes to their Profile page
And the Author chooses to upload a picture
When the Author selects an image file from their computer
And the Author uploads the file
Then the Author sees their uploaded image as their Profile picture
This is a Scenario where all our assumptions were correct. "Which assumptions were these? " I hear you ask! Well, in this Scenario, we implicitly assumed the following:
- The Author will be uploading a file stored on their computer.
- The Author can choose any type of image file.
- The system allows any size of image file to be uploaded.
It is now time to twist and turn that Rubik's cube and look at our Feature from different angles, where our assumptions are not valid. After consulting with our development team, we find out that not all image file types can be treated the same way (for various technical reasons). Furthermore, we are told that high-resolution images take up a lot of storage and should be avoided. At the same time, images below a certain resolution will not have enough clarity to be used as a profile picture. If you remember, back in Chapter 2, Impact Mapping and Behavior-Driven Development, we talked about Non-Functional Requirements (NFRs). This is such a case where these NFRs trickle into our features and start influencing our scenarios. In order to reflect these newly found constraints, we re-write our Happy Path Scenario as follows:
Scenario: Successful image upload
Given the user is logged in as an Author
And the Author goes to their Profile page
And the Author chooses to upload a picture
When the Author selects an image file from their computer
And the file is of type:
| file-type |
| jpg |
| gif |
| png |
And the file is of a size less than "5 " MB
And the file is of a resolution higher than "300 " by "300 " pixels
And the Author uploads the file
Then the Author sees their uploaded image as their Profile picture
Tip
When we look at a Happy Path Scenario and try to imagine what happens when our assumptions and constraints do not apply, we say that we invert the Scenario. Scenario inversion is a great way to discover more Scenarios.
You may have noticed that we changed our Scenario's title from the generic Happy Path to the more descriptive Successful image upload. We sometimes get to have more than one Happy Path Scenario within our Feature, so it's good practice to give each scenario a meaningful name. Let's take a look at one other way with which we improved our Feature…
Avoiding repetition with Data Tables
When we specified the file type step in our preceding scenario, we used a list with the acceptable file types. This list is actually a one-column table. The Gherkin language allows us to do that so that we can avoid the repetition of steps. We could have said this:
And the file type is jpg
Or the file type is gif
Or the file type is png
We used a Data Table instead:
And the file is of type:
| file-type |
| jpg |
| gif |
| png |
The first row of our table is the header row. The next three rows are the data rows. Using Data Tables makes our scenario neater and easier to read. Although in this instance we are using a one-column table, in reality, we could have many columns (and rows) in a Data Table.
Adding more Scenarios
In creating our Happy Path Scenario, we identified the necessary constraints in order to successfully upload a profile picture. These are as follows:
- The Author will be uploading a file stored on their computer.
- The Author can choose any type of image file.
- The system allows any size of image files to be uploaded.
Now let's capture our system's behavior when those constraints are broken, by adding some more Scenarios:
Scenario: Wrong type of image
Given the user is logged in as an Author
And the Author goes to their Profile page
And the Author chooses to upload a picture
When the Author selects an image file from their computer
And the file is of type:
| file-type |
| svg |
| tiff |
| bmp |
Then the Author sees a message informing them that the file type is not supported
And the file is not uploaded
In the preceding Scenario, we try to upload some unsupported files. The expected outcome is that the system informs us of the file type incompatibility. Now let's add a new Scenario to capture our system's behavior when trying to upload large files:
Scenario: Image too large
Given the user is logged in as an Author
And the Author goes to their Profile page
And the Author chooses to upload a picture
When the Author selects an image file from their computer
And the file is of type:
| file-type |
| jpg |
| gif |
| png |
And the file is of size greater than "5 " MB
Then the Author sees a message informing them that the file is too big
And the file is not uploaded
In this Scenario, the file type we are uploading is acceptable, but its image resolution isn't, so we expect a system error message. Because we expect the system to refuse uploading a file over a certain size, regardless of its file type, we can actually skip the file type step definition altogether:
Scenario: Image too large
Given the user is logged in as an Author
And the Author goes to their Profile page
And the Author chooses to upload a picture
When the Author selects an image file from their computer
And the file is of size greater than "5 " MB
Then the Author sees a message informing them that the file is too big
And the file is not uploaded
This makes it clear to our Feature readers that, in this specific Scenario, we don't care about file types. The only criterion for failure here is the file size. Now let's take a look at creating a scenario to capture the image resolution constraint.
Avoiding repetition with Scenario Outlines
We were told by our development team that the picture resolution must be a minimum of 300 pixels wide by 300 pixels high; otherwise, the picture won't be clear enough. We can go ahead and write a Scenario that captures this constraint:
Scenario: Resolution too low
Given the user is logged in as an Author
And the Author goes to their Profile page
And the Author chooses to upload a picture
When the Author selects an image file from their computer
And the file is of type:
| file-type |
| jpg |
| gif |
| png |
And the file is of a resolution of 200 x 400:
# anything below 300 pixels won't be clear enough
Then the Author sees a message informing them that the file resolution is too low
And the file is not uploaded
Here, we specified a scenario where we are trying to upload a file of acceptable pixel height but not enough pixel width. This is perfectly okay; ideally, though, we would like to illustrate to our readers that uploading a file of adequate width but not enough height will also result in an error message. So, we proceed and create another Scenario, identical to the preceding one but with the difference that we swap the width and height values so that now the file is of resolution 400 x 200 (instead of 200 x 400). This works fine, but we now have introduced repetition into our Feature by having two virtually identical Scenarios that only differ in two values. Repetition is bad because it makes our Features bloated and unreadable. Luckily, the Gherkin language gives us a mechanism by which we can avoid this. We will use a Scenario Outline to avoid repeating Scenarios that use the same steps but with different parameter values:
Scenario Outline: Resolution too low
Given the user is logged in as an Author
And the Author goes to their Profile page
And the Author chooses to upload a picture
When the Author selects an image file from their computer
And the file is of type:
| file-type |
| jpg |
| gif |
| png |
And the file is of a resolution <width> pixels by <height> pixels
# anything below 300 pixels won't be clear enough
Then the Author sees a message informing them that the file resolution is too low
And the file is not uploaded
Examples:
| width | height |
| 200| 300 |
| 300| 200 |
| 299| 301 |
| 299| 299|
Let's examine what we just did:
- We started our Scenario with the Scenario Outline keyword, instead of the Scenario keyword. This tells our readers (and also any BDD tools such as Cucumber) that this isn't a single scenario but a multi-value scenario.
- At the end of our Scenario, we defined an Examples table, with appropriate headers (width and height). We then defined a combination of different values of width and height that will incur a failure to upload outcome.
- In our steps, we used parameters delimited with <>, which reference the headers in the Examples table.
What that means, in practical terms, is that we compressed multiple Scenarios into one. Cucumber, JBehave, and so on will run this Scenario multiple times, once for each data row in the Examples table. In our specific case, that would be four times, as our Examples table has four data rows. Each time a Scenario is run, the parameters in our steps will be substituted with the values in the appropriate data row. Scenario Outlines are semantically and practically different to Data Tables. Let's re-iterate their difference.
Scenario Outlines versus Data Tables
Scenario Outlines are all about iteration and parameterization. They help us specify Scenarios that must be repeated multiple times, each time with different parameterized values.
As a rule of thumb, Scenario Outlines should be used where we need to illustrate system behavior for a variety of input or output data. They let our readers know that a system behavior (in other words, Scenario) applies within the parameters we specify and the values that these parameters may take are denoted in the Examples table. When we specify image resolution values in an Examples table, as we did previously, we are telling our readers that they should run that Scenario multiple times, each time with a new resolution value combination. Scenario Outlines apply to and affect the entire scenario.
Data Tables, on the other hand, should be used where we want to exemplify data options or constraints for specific steps in a Scenario. So, when we specify the permitted file types in a Data Table, we are telling our readers that our Scenario will work, as long as they use one of the file types we specify. Data Tables apply to and affect only specific steps.
Scenario Outlines and Data Tables are semantical constructs provided by the Gherkin language, which allows us to avoid the repetition and duplication of steps. There is yet another way to avoid duplication.
Avoiding step repetition with Backgrounds
Another way to avoid repetition in our Scenarios is to use a Background. A Background is simply an abstraction of steps that are duplicated across multiple Scenarios. In our example Feature in the previous section, every single Scenario begins with the same steps:
Given the user is logged in as an Author
And the Author goes to their Profile page
And the Author chooses to upload a picture
We can abstract these steps in a Background, so as to avoid repeating them in all our Scenarios:
Background:
Given the user is logged in as an Author
And the Author goes to their Profile page
And the Author chooses to upload a picture
Backgrounds are placed at the top of our Feature, before any Scenarios. Semantically, when we see a Background, we understand that the steps within it will be applied to every single Scenario of our Feature.
So, now that we know how to write Features, let's see what a complete Feature looks like…
Writing a fully formed Feature
In the previous sections, we examined how to fill in our Feature with Scenarios by looking at the same behavior from different angles. We also learned how to write our Feature concisely and descriptively and how to eliminate repetition, by using Data Tables, Scenario Outlines, and Backgrounds. It's time to see what our Feature will look like in its entirety:
Feature: Author uploads picture to profile
User Story: As an Author, I want to publish a nice picture in my Profile, so that readers can relate to me on a human level
Impact: http://example.com/my-project/impacts-map
Screen mockups: http://example.com/my-project/mockups
Notes: Ms Smith, the CTO, really wants the Authors to upload some nice photos of them to their profile as it helps sell more books
Background:
Given the user is logged in as an Author
And the Author goes to their Profile page
And the Author chooses to upload a picture
And the Author selects an image file from their computer
Let's now write our happy path scenario. In this scenario, we are assuming that all our assumptions are correct and no constraints (file type, size, or resolution) have been violated:
Scenario: Successful image upload
When the selected file is of type:
| file-type |
| jpg |
| gif |
| png |
And the file is of a of a size less than "5 " MB
And the file is of a resolution higher than "300 " by "300 " pixels
And the Author uploads the file
Then the Author sees their uploaded image as their Profile picture
Now let's add a scenario that describes system behavior when the file type constraint is broken:
Scenario: Wrong type of image
When the selected file is of type:
| file-type |
| svg |
| tiff |
| bmp |
Then the Author sees a message informing them that the file type is not supported
And the file is not uploaded
We also add a Scenario that describes system behavior when the file size constraint is broken:
Scenario: Image too large
When the selected file is of type:
| file-type |
| jpg |
| gif |
| png |
And the file is of size greater than "5 " MB
Then the Author sees a message informing them that the file is too big
And the file is not uploaded
Finally, the following Scenario describes system behavior when the file resolution constraint is broken:
Scenario: Resolution too low
When the selected file is of type:
| file-type |
| jpg |
| gif |
| png |
And the file is of size less than "5 " MB
And the file is of a resolution:
# anything below 300 pixels won't be clear enough
| width | height |
| 200| 300 |
| 300| 200 |
| 200| 200 |
Then the Author sees a message informing them that the file resolution is too low
And the file is not uploaded
Our Feature has a title and contextual information (Notes, User Story, Impact Map link, and UI mockups). It details a Happy Path Scenario and also its inversions (remember the Rubik's cube analogy?). We say that such a Feature is a fully formed Feature.
So, there we have it: a nicely written Feature that covers all the main behaviors in four distinct Scenarios. Any one of our stakeholders can read this Feature and understand exactly what functionality we are delivering and how our system will behave. The extra value, though, is that our developers can take this Feature and – using a BDD tool such as JBehave or Cucumber – they can write some code that performs the steps specified in our Feature. That way, we can have truly executable specifications, that is, specifications that not only specify the way our system behaves but are also capable of verifying this against our delivered system code. But before we discuss executable specifications, let's examine our Feature and see what we did well and what the good practices to apply when writing Features are.
Tips for writing good Features
Features may seem easy to write but writing good Features requires focus and attention to detail. Let's take a look at one of the Scenarios we defined in the previous section, Discovering Scenarios:
Background:
Given the user is logged in as an Author
And the Author goes to their Profile page
And the Author chooses to upload a picture
And the Author selects an image file from their computer
Scenario: Successful image upload
When the selected file is of type:
| file-type |
| jpg |
| gif |
| png |
And the file is of a of a size less than "5 " MB
And the file is of a resolution higher than "300 " by "300 " pixels
And the Author uploads the file
Then the Author sees their uploaded image as their Profile picture
Here are a few observations about how we wrote this Scenario:
- Title: In our Happy Path Scenario, we indicated what the behavior in this Scenario is about (image upload) and its outcome (successful upload). In the Scenarios that described unsuccessful behaviors, we described the causes of failure (Resolution too low, Image too big) in the titles. Our readers should be able to easily identify the happy path scenario and the causes of unsuccessful outcomes using our titles.
- Actors: One of the first things to do when writing Features is to identify the role our actor has in this particular Feature. In our Background, we clarified the actor's role (Given the user is logged in as an Author). This is very important as system behavior is greatly affected by the actor's role and permissions. It is crucial that throughout our scenarios, we know exactly under what guise the actor-system interactions take place. We should avoid referring to a generic user (for example, the user does something) but instead explicitly specify the Actor's role (for example, the Actor does something).
- Steps (1): We use generic and abstract language to describe our steps. We avoid using technology or interface-specific language. So, we never say that the actor clicks on the submit button to upload a picture. We say instead that the actor chooses to upload a picture. We don't state that the actor brings up the File Dialog to select an image file. We instead say that they select an Image File from their computer. We do that to separate system behavior from system implementation. Today, the actor uploads a picture by clicking on a button. Tomorrow, they will be uploading the picture by selecting it from a sidebar widget. Next week, they may be uploading pictures by voice commands. The point is, the system's implementation of a behavior will change much more frequently than the system behavior itself. Always describe behaviors using generic action verbs rather than specific technical details.
- Steps (2): We use imperative, present tense verbs to show behavior. We say that the author selects an image, not that the Author can select an image or will select an image. When we write our Scenarios, we imagine the actions happening before us; there is no optionality or delay involved.
- Scenarios: Our Scenarios are atomic. This means that each Scenario is executed completely independently from others. Conditions needed for a Scenario must be specified in their entirety in the scenario's condition (When) steps or in the Feature's Background. No scenario should rely on conditions set by a different scenario.
The Gherkin language also offers us another tool we can use to clarify and organize our Features. Let's talk about tags.
Using tags to label, organize, and filter our Features
Tags provide an extremely useful way to denote different contexts for our Features. They can be used to group Features together, indicate scope, filter Scenarios, and provide visual clues to our readers. Tags are just words prefixed by the @ symbol. Let's take a look at the following Feature (shortened for brevity):
@order
Feature: Buyer places order
@important
Scenario: Missing delivery address
Given …
@wip @financial Scenario: Applying discount
Given …
We have applied the @order tag at the beginning of our Feature. This means that the tag applies to all the Scenarios within that Feature. If we ask a BDD tool, such as Cucumber, to run everything tagged with @order, it will execute both the Missing delivery address and Applying discount scenarios. We could apply the same tag to other Features and Scenarios too, if they were referring to order-related functionality.
We have applied the @important tag just before the Missing delivery address Scenario. This means that it applies to that Scenario only. Getting Cucumber to run @important Scenarios will only execute this one Scenario.
We have applied the @wip and @financial tags just before the Applying discount Scenario. This means that both of these tags apply to this Scenario. Cucumber will execute this Scenario when we tell it to run either the @wip or @financial tag (or both).
We can use any permutation of tags in any order we deem useful. Tools such as Cucumber allow the running of multiple tag combinations; they can even negate tags, so we could, for instance, tell Cucumber to run all Scenarios with the @important tag but omit any Scenarios with the @wip tag. In addition to these practical benefits, tags also provide visual contextual information to our Feature's readers.
By using tags and following the tips in the previous section, we will write readable and reliable executable specifications. Speaking of which, let's see exactly how our specifications, that is, our Features, become executable.
Knowing why Features are executable specifications
So far, we've created a Feature that captures our system's Author uploads profile picture behavior. Our Feature is the one and only source of truth for our development team. They can now take this Feature and write and deploy code that implements the behaviors specified in our Feature. But how do we know that the code that our developers will deliver actually makes the system behave as specified? Well, there's an easy way to find out: we write some step definitions for our Scenario steps. A step definition is simply some code that executes the behavior specified in a step. So, in our sample Feature, we have a Background that states the following:
Background:
Given the user is logged in as an Author
And the Author goes to their Profile page
And the Author chooses to upload a picture
And the Author selects an image file from their computer
We then write some code, in our programming language of choice, which sets up and runs our system and does the following:
- Logs in a test user as an Author
- Loads the profile page
- Clicks the Upload photo button
- Selects a file for upload from a specific folder
So, for each step in our Scenario, we have a relevant piece of code that does what the step specifies. We call this a step definition. Our step definitions live in our code base, but in separate files to our Features. We put our Features in files with the .feature extension, while our step definitions reside in files with an appropriate language extension, such as .rb for Ruby, .py for Python, .java for Java, and so on. If our sample feature is saved in the <project-dir>/features/author_uploads_profile_photo.feature file and we use Cucumber for Ruby to verify our specifications, then our step definitions file would be <project-dir>/features/step_definitions/author_uploads_profile_photo.rb.
Tip
The directory structure for our feature and step definitions files is dictated by the BDD tool we use to run our executable specifications. For the purposes of this book, we shall assume a <project-dir>/features/step_definitions structure. Feature files (.feature) go under the features directory, while step definition files (.rb, .py, .java) go under the step_definitions directory.
Let's assume we use Cucumber for Ruby (https://cucumber.io/docs/installation/). Our author_uploads_profile_photo.rb file will contain code that looks like this:
Given( "the user is logged in as an Author ") do
# Some code that turns the phrase above into concrete actions
visit '/sessions/new'
within( "#session ") do
fill_in 'Email', with: '[email protected]'
fill_in 'Password', with: 'password'
end
Given( "the Author goes to their Profile page ") do
# Some code that turns the phrase above into concrete actions
visit '/authors/profile'
end
Given( "the Author chooses to upload a picture ") do
# Some code that turns the phrase above into concrete actions
click_button( "Upload photo ")
expect(page).to have_content 'File path'
end
Given( "the Author selects an image file from their computer ") do
# Some code that turns the phrase above into concrete actions
attach_file('photo-file', 'path/to/myphoto.png)
end
You may have noticed that the Scenario steps in our Feature file are matched in our step definition file. In fact, this is how BDD tools, such as Cucumber, manage to run our executable specifications: they read the steps in the Feature files and then they look for matching steps in our step definitions files and execute the relevant code. This is illustrated in the following diagram:

Fig. 3.2 – How Cucumber reads and verifies Features
As the preceding figure shows, Cucumber will read our Feature file and parse I am logged in as an Author as a Scenario step. It will then scan our step definitions files for a step definition that matches the text of the step. When it finds it, it will execute the Ruby code in the matching step definition. As we can also see in the preceding figure, all the step definition does for that step is go to the login page and enter a valid username and password. If our system behaves the way we described in our Scenarios, then the step definition code will run flawlessly. If not, the code will fail, and Cucumber will report the errors in a readable format. If we tell Cucumber to run our Feature, its output will look like this:
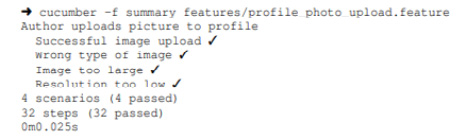
Fig. 3.3 – Output for our Feature
As you can see, Cucumber tells us exactly how many Scenarios and steps were ran successfully. By running a BDD tool such as Cucumber regularly, we can get an accurate picture of our development progress at any given time. This book is not intended to make you a Cucumber (or JBehave or Behat) expert. Instead, we want you to learn how to leverage BDD and how to write solid, verifiable Features. Actually, that is the topic of the next chapter, so stay tuned.
Summary
In this chapter, we learned how to write complete and clear Features. Features are at the heart of requirements management; they are our system's specifications, and they drive our whole development effort. This is why it is so important to be able to write accurate Features that are easy to read, clearly describe our system's behavior, and are easy to verify. By now, you should be armed with the knowledge needed to write a Feature correctly, completely, and accurately.
However, we haven't finished with Features just yet. In the next chapter, you will learn how to craft Features – that is, how to create Features that are not only written correctly but are also high-quality, consistent, and stable. So, read on to become a true Feature craftsperson.
Further reading
- Matt Wynne, Aslak Hellesoy – The Cucumber Book: Behaviour-Driven Development for Testers and Developers, The Pragmatic Programmers, 2nd Edition, ISBN-13: 978-1680502381
- Wayne Ye – Instant Cucumber BDD How-To, Packt Publishing, ISBN-13: 978-1782163480