There are now hundreds of different models of 3D printer on the market. But how do you even start to think about which one to buy? In this chapter, we will look at what 3D printer features are likely to be important for your intended uses, and also discuss how to estimate the long-term cost of ownership.
Because 3D printer models (and even manufacturers) come and go on a pretty regular basis, we will avoid suggesting particular models. Once you know what you are looking for, you can be a more skeptical reader of advertisements. You can also be more confident that you will purchase what you will need.
In Chapter 2 we review different types of 3D printer hardware, and in Chapter 3, of software. Refer back to those chapters if you are not sure about terminology. We cover selected hardware decisions here in the context of deciding what to purchase, but you should read the prior two chapters first for the full details of what part of the printer does what.
In Chapter 5, we talk about what happens when you bring the printer into its new home. That should drive your buying decisions, too. The space your printer will live in, who will maintain it, and how often you intend to move it are things you should think about before settling on a model.
Who Is Your User?
The first thing to consider with a printer purchase is how it will be used. If it is going to be in a home office and used occasionally by one adult, obviously it will not need to be as robust as if it is going to be in a room full of kids.
Most 3D printers are labeled for ages 13 and up, and on average that is probably about when it makes sense to let kids run them. There are a few that are marketed specifically for kids to use directly, but those machines needed to make tradeoffs to be able to do that (limiting functionality) that might or might not make sense. Typically, an adult will manage the printer hardware for the younger set because there are hot moving parts involved.
Before your purchase, imagine a day in the life of the printer and have that scenario in mind as you read through this chapter and Chapter 5. Many academic labs have huge pulses in use around deadlines, so consider both your routine periods and your peak weeks.
3D Printer Resolution
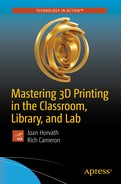
When you buy a conventional printer to print on paper, you can note a few familiar metrics about how good the image quality will be, often stated in dots per inch (dpi). However, in the case of a 3D printer, it is a little more complicated. You are dealing with somewhat different processes in the cross-layer direction (usually vertically, the z-axis) versus the two dimensions in the plane of the build platform (x- and y-axes).
3D printers often quote their resolution in the z-axis (the vertical one) as a number in millimeters (or microns—one millimeter is 1,000 microns); this is equivalent to the thinnest layer the printer can produce. Typically, this number is better (smaller) than the feature size in the x-y plane. It also is a good proxy for how smooth the surface will be. For most filament-based 3D-printing technologies, resolution is typically on the order of 0.1 mm, or 100 microns. For practical reasons, such as the fact that smaller layers require a longer print time, going that low can be challenging. Beyond about 0.1 mm, the print time increase is usually much more noticeable than the difference in quality, so even if your printer claims 0.05 mm resolution or better, for practical reasons, you will usually end up using 0.1 mm or larger layers.
For 3D printers that use plastic filament, that plastic is being heated and squeezed out of a nozzle that is typically about half a millimeter in diameter. This string of plastic can be compressed between the nozzle and the previous layer down to that 0.1 mm thickness (or even smaller) in the z direction, but in the x-y plane it cannot be thinner than the diameter of the nozzle. The printer’s control over the placement of these lines is much finer though—usually significantly better than 0.1 mm.
Comparisons of claims about resolution in the x-y plane for these machines are mostly meaningless because of the way the motors are controlled and how that interacts with extrusion on small scales.
Furthermore, the shape of each layer must be enclosed by a perimeter that is a closed loop, so features need to be at least two extrusion widths thick in that plane, or about 1 mm across. (There are exceptions to this through software that allows you to create single-width sections, but as a practical matter you may not want to.) So, you may find that your “50 micron” printer really is limited to features about 20 times that big, just because that resolution does not really apply in all three dimensions!
Resolution showing effects of layer thickness
Selecting a Printer
Two of the most critical questions when you are thinking about buying a 3D printer are who is going to use it, and what they are going to use it for. Art projects and robotics teams have different materials needs, for example. In later chapters, we go into this in some depth for different types of users, but here we will summarize the aspects that affect a purchasing decision. We have organized this section around the choices of features that you need to make when buying a 3D printer.
Filament vs. Resin
The main choice facing most educational and scientific users is whether to buy a 3D printer that uses spools of plastic as a raw material, or one that uses liquid resin. Filament printers are still far more prevalent and diverse, so we focus on them more here. A filament printer will be more practical for most users because the raw material is relatively easy to store and transport, and there is very little waste. The main drawback with a filament printer is that, as noted in the discussion of resolution, the smallest feature you can print is about twice your nozzle diameter—about a millimeter for typical 0.35 to 0.5 mm nozzles. That is plenty fine enough resolution for many things, but it is usually a little too coarse for jewelry or other delicate structures.
Resin printers (which come in several types, as discussed in Chapter 2) can create prints with smaller feature sizes since they are only really limited by the spot size of a laser or the pixel size of a projector. Print volume, though, also tends to be correspondingly small, and except for exotic, very expensive technologies, resin printing is significantly slower than filament printing (individual layers might be faster, but those layers are usually thinner, requiring more of them to print a given part).
The resin and the cleanup chemicals are messy and will have to be managed and disposed of. If you can handle that and you are looking at doing sophisticated projects that require fine detail, you may want to explore resin printers. If in doubt, buy a low-cost filament printer and get some experience there first.
We are going to assume in this chapter that if you want to go to the more sophisticated technologies described in Chapter 2, you will have good reasons and a specialized problem to solve. We will not explore powder-based, composite, and the more expensive and exotic technologies in the purchase tradeoffs in this chapter.
Time to Print
3D printers build up objects one layer at time. Typically, this layer is about as thick as one or two sheets of paper. This means that 3D prints take a long time. Often 3D printers are purchased by people with little or no exposure to traditional manufacturing, and the expectation is that the print will pop off the platform in the time it takes to print a page with ink. Making anything with a subtractive tool takes surprisingly long, too; precise manufacture of physical things is just inherently slow. Think how long it takes to build a brick wall, or for that matter, to paint a mural on one.
Tip
Print times will drive a lot of your workflow and probably narrow the types of projects that will be feasible in a school or library environment. A fist-sized print may take from several hours to a day to print, depending on a lot of things. As we note later in this section, smaller printers are often faster, if the thing you want to make will fit in the smaller build volume.
Selecting a Filament-Based 3D Printer
For most educational users, the basic decision will be which filament-based 3D printer to purchase, so we will focus most of our analysis on that topic in the following sections. For a discussion of the different types of resin printers on the market as of this writing, see Chapter 3.
Platforms and Nozzles
Whether or not your printer has a heated platform will determine what types of materials you can print. To determine what materials you want to print, consider the intended uses of your 3D prints. The first question is whether you want to create functional parts—parts that will be under some sort of load, like a motor mount on a robot.
Pretty much all the printers that use filament can print in polylactic acid (PLA), the biodegradable corn-based plastic we talk about in Chapter 2. However, PLA deforms at relatively low temperatures by plastic-melting standards (like that of a car dashboard in summer) and so is of limited use anyplace it will both be under load and warm. If a constant load is acting on it, it will deform slowly over time (known as creeping) even at room temperature. Many low-cost printers (and some pricier ones, too) are not designed to handle any materials other than PLA.

A PLA vase
Nylon functional part
Note
Some filaments are very abrasive and will quickly wear out a nozzle. The “filled filaments,” which consist of a PLA or other base polymer mixed with metal or composite materials like chopped carbon fiber, fall into this category, as do glow-in-the-dark filaments. Hardened steel or ruby-tipped replacement nozzles are intended to withstand abrasive filaments.
Some 3D printers can handle more exotic materials like polycarbonate, but these materials can require specialized hot ends, a platform that can be heated to a very high temperature, and a platform surface material that is compatible with the material being printed (see the discussion of materials in Chapter 2).
Higher-temperature materials tend to shrink as they cool if they are not kept continuously warm, hence the need for a heated platform. If the build platform is cold, each layer will shrink as it cools. The hot layer on top will misalign, and over time the corners of a print will warp and peel up from the platform. Having a heated platform mitigates this. There are exceptions. Nylon can be printed on a printer without a heated platform (the piece shown in Figure 4-3 was printed that way), but the platform material needs to be one that nylon will stick to, like Garolite LE.

Hollow cube printed in PETG
So, the bottom line is: if you want to make 3D prints that do something mechanical, you are probably going to need a heated platform and an all-metal hot end. Table 4-1 summarizes this information. Note that you can use a heated bed with some of the materials listed here as not necessarily needing one, but you will need to use a platform surface other than blue painter’s tape, because that tape’s adhesive cannot handle heated bed temperatures.
Tip
There are a few published papers and dissertations on the strength of 3D printed ABS and PLA parts. They have found rather inconsistent results. Joshua Pearce’s lab at Michigan Technical University has done some systematic studies in this sphere—for example, a paper by Nagendra G. Tanikella, Ben Wittbrodt, and Joshua M. Pearce: “Tensile Strength of Commercial Polymer Materials for Fused Filament Fabrication 3-D Printing.” Additive Manufacturing 15: pp. 40–47 (2017). DOI: 10.1016/j.addma.2017.03.005.
Material Effects on Printer Requirements
Material | Heated Bed Required? | Platform Surface | Nozzle |
|---|---|---|---|
PLA | No | Blue tape | PTFE-lined or all-metal |
ABS | Yes | PEI, PET tape, glue | All-metal |
Nylon | No | Garolite LE | All-metal |
PETG | No | Blue tape | All-metal |
Filled PLA | No | Blue tape | Requires hardened nozzle |
Multiple Extruders
Some printers come with two extruders. The purpose of the second one is to let you create prints with two colors or two materials. The best reason to use one of these is to use dissolvable support material. As we discuss in Chapter 2, because prints are created a layer at a time on the platform, anything with a steep enough overhang will require support material. Support material on a single-extruder printer requires that you snap off the material with pliers or other tools.
Dissolvable support is one solution to this, although the material tends to clog nozzles, and when you dissolve it you then need to get rid of the water with the dissolved material. Polyvinyl alcohol (PVA), the commonest material, is a relative of Elmer’s glue, and it is not a great idea to put much Elmer’s glue into your plumbing (and might not be legal). Talk to your waste-management person before creating a lot of gluey water.
High-impact polystyrene (HIPS) is another material used for dissolvable support. It dissolves in limonene, a cleaning solvent made from oranges. Here too you will need to check on local restrictions on getting rid of solvents. See Chapter 2 for more about materials, including these.
Caution
A two-extruder printer will not use both extruders to print something in half the time, although a few two-extruder printers have a limited ability to print two copies of the same object at once, and some offer more ambitious experimentation. Typically, printers will print a lot more slowly in two-material mode because they have to pause on each layer and execute commands to wipe off each nozzle so that it does not drool onto the print while the other extruder is laying down material. In other words, do not buy a dual-extruder printer thinking you will print two objects in parallel. There is no way to do that with printers on the market as of this writing, because you might bang into one object with the opposite extruder.
There are new systems appearing that will analyze your model and in effect print in two colors from one nozzle. As of this writing, they are still a little experimental for most consumer use but are something to watch in the future.
One Big Printer or Several Small Ones?
Libraries and schools often have the impulse to buy the biggest printer their budget will allow. However, 3D prints take a long time. If you have three small printers, they can all be chugging away creating different projects. If you only have one, then you will have a queue.
You can print more than one thing at a time on a print bed, but that has its own issues. First, you need to start them all at once. Second, if one print out of five on the bed has an issue that makes it fall off or fall over, most likely you will need to stop the entire print. It is usually better to have beginner prints run in isolation, one per printer, so that you can kill a print that has problems and send the student back to the drawing board.
Except in the case of tall, thin prints that would require extra cooling time, usually not much time is saved when you try to print multiple things on the same printer plate rather than print one after the other. These longer-running prints are more prone to failure. So this, too, argues that spreading prints across several small printers is often a better idea than plating them all at once on a big printer.
Small printers are easier to move around. Although it is not a good idea to move a printer if you can help it, if you are going to move it much you are better off with something that is, well, moveable. On the flip side, if you are concerned about theft (in a library public room, for example), a big printer is harder to steal, but also more awkward to move and lock up in a closet when a room is unattended. We have run a bicycle cable lock through the metal handle of our portable printer when we needed to leave it unattended at a show, but obviously you need to be sure any locking mechanism does not get in the way when the printer is moving.
There are exceptions, but by and large smaller printers are faster than bigger ones if they are printing something that will fit on either printer. 3D printers have to move the build platform and/or a carriage that is big enough to get to all parts of the print. Whipping around bigger carriages and platforms makes precise movement more challenging, and often you can print at better resolution in less time on a smaller printer. Smaller frames can also be stiffer, with similar positive results.
There are a few special cases when it is nice to have a bigger printer. Obviously, if you want to print something substantial frequently, and you think it would be a bad idea to glue several smaller pieces together, you may want a bigger printer.
Also, if you often print tall, skinny things, remember that printers can only put down material for a new layer when the previous one has cooled enough to hold its shape. This does not take very long, but tall, skinny prints will be limited by this minimum layer time. For these, it may take the same amount of time to print two or three things as it does to print just one (and the quality may be better, since the plastic cools better if the hot nozzle does not remain in contact with it). Of course, if something is tall and skinny, you can probably fit a few on your small print bed, as long as the print area is big enough.
We usually recommend buying a few small printers rather than one large one, unless there is a specific use case that requires a large printer.
Printer Connectivity
In Chapter 3, we talk about the types of software involved in using a 3D printer. Regardless of the printer, one way or another a set of commands to print a model has to get to the printer from a computer somewhere. Printers handle that in one of several ways: they require a USB cable to be connected to the computer that created the file of commands; they accept those commands wirelessly; or they read a file off an SD card or USB flash drive. Depending on your environment, each one of these has advantages.
Printers that require a hard USB connection the entire time they are running are somewhat unusual now. That is a disadvantage, because if the computer sleeps or is otherwise interrupted, the print can fail (not to mention that it ties up a computer). One way around this is to use Octoprint on a Raspberry Pi to control your printer (see Chapter 3’s discussion of Octoprint). A MatterControl tablet (also in Chapter 3) will work as well.
Printers that receive files over wifi work well if you are in a stable wifi environment, but obviously it causes problems if you are not. We are partial ourselves to printers that hold their models on SD cards or other outside storage, since this works everywhere and does not tie up a computer. However, SD cards are small and easily misplaced. Printers often have an LCD screen to choose among the files on an SD card or files transmitted wirelessly.
Open Source Materials vs. Cartridges
Some printer manufacturers require (or at least encourage) you to use their proprietary materials. In some cases, a computer chip in the cartridge will take care of software settings for you automatically. The catch is that these materials will be vastly more expensive than their generic equivalents—sometimes three to five times more expensive. It also may mean you will not be able to try new materials that come along.
Particularly if you are in a cost-conscious environment, it is best to avoid being locked in to one manufacturer for your raw material. If nothing else, if your manufacturer goes out of business or stops supporting your printer, you will not be stuck if you can use open source materials.
That said, if you use generic (often called open or open source) filament, read reviews on Amazon and other popular retail websites. Very cheap filament sometimes has impurities that clog printers, or varies in diameter enough that it can cause printers to jam. Low-cost printers have in a way outsourced their precision to their filament, and if it varies more than a few percent in diameter or composition, you may not be able to use it at all. People become very brand loyal after a time. If you are starting out, you might consider getting recommendations for one or two brands and buy a small amount to be sure that it works well for your printer before stocking up.
Filament Size
Printer filament comes in two standard diameters: 1.75 mm and what is called (for historical reasons) “3 mm” filament but is usually close to 2.85. When you first buy your printer, you will typically buy two or three spools of filament with it. Over time, you will want to try a different color or material, and you will build up a pile of partial spools. It gets very irritating to have a mix of the two kinds, both because of the double storage space and, if you are moving your printers around, the possibility that the filament spool and printer will not match. As of this writing, Lulzbot and Ultimaker were the major manufacturers using 3 mm filament; most others use 1.75.
Tip
Filament should be kept in its original sealed package until first use, and then if at all possible in an airtight container to keep out moisture. Materials that absorb moisture (especially PVA, polycarbonate, and nylon) will tend to outgas and pop when heated, which can make pits in the print or jam the extruder and can weaken the prints. Five-gallon buckets with tight lids are a common solution. Resist the temptation to open and display every colorful spool as it arrives, unless you are in an extremely dry climate.
Enclosed or Open
Some 3D printers have open gantries (like a miniature construction crane), whereas others are completely sealed boxes. If you are printing acrylonitrile butadiene styrene (ABS), there are advantages to an enclosed box to keep the temperature more even. If young kids are around, a closed box will keep their hands away. An enclosure limits the visibility into what is going on, of course. This decision is closely related to the issue of where you are going to put it, discussed in Chapter 5. Some printers also have the option of built-in air filtration, which only makes sense with a closed printer.
Buy Within a Brand
If you are starting out and supplying a new makerspace, you may be tempted to try out several different brands of 3D printer. We recommend against that, because every 3D printer has quirks. If you stick to a particular brand, you will be able to learn and anticipate the issues a little better. It may also make training staff or students a little easier.
Should You Buy a Kit?
A lot of printers still come as kits. If you are confident in your ability to put together an electronic device, building a kit is a good way to really know how the printer works. However, if you have not tried anything like this before, and if there are no hackerspaces around that could help you, it might not be a good idea. Sometimes a high school robotics team is the early adopter and buys the first printer. If coaches and students are up for it, it might be a good off-season project.
Initial Costs, Filament Printing
Smaller printers: $500–$1000 each
Bigger printer: $1500–$2500 each
Tools: Initial purchase of incidental tools such as pliers, spatulas, tape, and glue: $200
Filament: 4–8 kg PLA per month at $30/kg, or $120-$240/month
Miscellaneous supplies: $20/month
Some printer manufacturers provide support contracts but most assume you will be on your own. Chapter 5 talks about living with your 3D printer and discusses facilities, ongoing costs such as training and maintenance, and similar staffing issues that affect lifecycle costs.
Selecting a Resin Printer
Resin printers can be divided into two major categories. The original technology, stereolithography (SLA), is less common today but is still used by some of the most popular manufacturers, including Formlabs. SLA printers use a laser galvanometer to draw out each layer in toolpaths that resemble those used by filament-based printers, though with a smaller spot size and moving much more quickly.
Most newer designs adapt technology used by visual display systems to expose a layer. This usually involves using a Digital Light Processing (DLP) projector, though in an effort to get the price down, some newer designs are using liquid-crystal display (LCD) masking to selectively illuminate the resin. In either case, the light intensity is much lower than with a laser, but these technologies have the advantage that they can illuminate an entire layer at once. The terminology of resin printers is in flux and is used somewhat inconsistently in the marketplace.
Some DLP printers have a built-in projector, and sometimes you have to provide an external one. If you see a suspiciously cheap DLP printer, you probably will have to buy a projector, too. These printers are coming down in price, but are still expensive to purchase and to run relative to filament printers.
Fundamentally, resin printers use a source of light to harden a light-sensitive resin. Some sort of solvent has to be used when the print comes out of the printer to wash off excess resin. The operational tradeoff comes down to whether you have a space that can handle a device that is more at home in a chemistry lab than a computer lab. Of course, if you have a chemistry lab, that is a pretty good place to keep it.
Caution
There have been many new resin printers on crowdfunding sites and exhibiting at maker events. They often use a cell phone as a source of light. Although this makes the “printer” incredibly cheap, there are several fundamental issues. First, your phone will be tied up for many hours for the print. Second, if you get a call or text, it will probably ruin the print. Finally, we will just say that we would not want to put one of our phones under a vat of resin that will harden when exposed to light from the phone.
Cleaning and Curing
Resin prints require cleaning and curing. Cleaning usually means washing them off with alcohol, which leaves you with a solution of alcohol and dissolved resin to dispose of. Curing can mean putting the prints out in the sun or exposing them to some source of UV light.
The resin in the vat must be kept extremely clean. Any stray bits of cured resin floating around can damage a print in progress or even the printer itself.
DLP vs. SLA
DLP printers, as discussed in Chapter 2, illuminate an entire layer at a time and can generate very fine detail. SLA printers move a laser spot. DLP theoretically can produce smaller features but will also show pixelation artifacts in all directions. SLA printers, on the other hand, should show smoother outlines within a layer but have a minimum spot size bigger than a DLP pixel. Relative speed of the technologies depends more on brand and the formulation of the resin being used than on the difference between the technologies. The technique used to peel each layer off the base of the vat makes an even bigger difference.
Proprietary Resins
As with filament printers, there are printers that require you to buy a proprietary resin (or at least highly encourage it) and there are those that allow you to use some types of generic resin. However, the tradeoffs are a little different here. One advantage of resin printing is the materials—it can create dental and other specialized parts, for example.
If you want to do something that requires a specialty material, you might want a printer that uses resin cartridges that communicate with the printer to optimize its settings. Resins optimized for metal casting exist, too, for jewelry making. But if you do not have a specialized technical objective in mind, you may want to buy a printer that can use generic resins.
Initial Costs, Resin Printing
SLA system: $1300–$5000 each
DLP system (with integrated projector): $1400–$5000 each
Resin: 4–8 liters per month at $60–$150/liter
Drying/cleaning devices: Not essential but might save solvent and other materials—around $1000
Replacement trays/vats: Replace every 5–10 liters for low end, more than that for higher end: $50–$100 each
Solvents (IPA, most commonly): Varies—consider disposal costs in your jurisdiction.
Using a Service Bureau Instead
If you want to let your students design objects to 3D print but all these choices sound overwhelming, you can always use a service bureau. That will be far more expensive, of course, than printing yourself. You may be hesitant to pay for printing a student project.
The cheapest bureau is likely to be a shared service, where people who have printers bid on jobs. Two of the big ones are www.3dhubs.com and www.makexyz.com . But even the lowest-cost one will charge many times the materials cost you would have if you did prints yourself. The way it works is that you post an STL file, and a service provider fulfills it—sort of like Uber for 3D printers. It will be a mix of bigger and smaller vendors.
You may want to have some small test part printed as a data point to see the cost, quality, and turnaround time. Remember, though, that many of these providers are one-person shops with a few printers (and may even be a teenager), so if you throw a whole school at them, they may not be the ones who end up handling a sudden large order.
Summary
This chapter discussed some of the major hardware choices that you have to make in selecting a 3D printer, particularly a filament-using one. We went over the different types of materials you might want to use to create objects and the requirements for common filament types. We also gave some rough estimates of startup costs. In the next chapter, we talk about what happens once your printers arrive, and what the facilities and staff issues might be.