In Chapter 4, we talk about how to buy a 3D printer. In this chapter, we discuss what to anticipate when you bring it into its new home and unpack it. You do not need an expensive, special space for it, but knowing a few things about what a 3D printer really does not like might save you a lot of grief.
We cover what physical space makes a printer less prone to fail, what it takes to train typical non-technical staff users, and maintenance requirements. In this chapter, we also talk you through how to create and print a small cube, a 3D printing equivalent of printing “hello world” when learning a new programming language.
Note
The bulk of this chapter focuses on filament-based printers, which are far more common in the school and library environment. We have a short section at the end of this chapter summarizing the issues for a resin printer.
Getting Started with a Filament Printer
When you look at many consumer-level filament-based 3D printers, it is easy to forget that you are looking at a little precision factory. The temperature, airflow, vibration environment, and ambient dust in the room all matter to the quality of your print (and to the lifetime of your printer).
Bigger, enclosed printers are less vulnerable to some of these things, but for the price of one of those you may be able to get several smaller ones that can live tucked into suitable corners. In this chapter, we give you some background you can use to trade off those costs.
Where to Put It
Very often, people do not ask this question until the box arrives. Filament-based 3D printers should be in a room as free of dust as possible. Yet you want them in a ventilated area (particularly if you plan to use ABS). We will go through some of the common options here and talk about pluses and minuses.
3D prints take a long time. Typical print times will range from an hour or two to several days. Most consumer printers cannot be reliably stopped and restarted, but features that allow a printer to recover from a power failure (with varying degrees of reliability) are becoming more common. Without this ability, you cannot unplug it and move it while printing, and even for printers that do have the capability, it is not intended to be used routinely (and will likely leave a visible artifact in the print).
Carts are wobbly and often pretty flimsy, and do not provide a very stable base for the printer. You might have to recalibrate the printer every time you move around if you are jouncing over thresholds and other obstacles when you move the cart.
If you have more than one printer running on a cart, that can end badly if they move around and you neglect to check that they are clear of each other for the whole range of their motion.
Carts can get jounced around during a print, also causing artifacts.
Filament needs to be protected from heat and moisture, which can be hard to do consistently rolling around on a cart.
It can be challenging to think through ventilation issues if the cart will be going many arbitrary places.
In our experience, 3D printers that start off moving on a cart fairly quickly wind up in a permanent home instead. Or the cart gets tucked solidly in some corner and never moved, which defeats the purpose.
Tip
Although it is good for students to see their creations being made, one option is to do some short in-class demonstration prints and then print from an SD card, cloud storage, or whatever your printer supports thereafter. A science room or art room that students pass through on some regular basis can be a home for printers, if there is no “maker space” per se.
That then brings us back to the question: where should I put it? For most printers, a sturdy table or shelf in a reasonably clean room with good ventilation is the best bet. A printer should never be in direct sunlight, and all printers should not be too close to a heat vent or area that gets very hot when the air conditioning is off. One particular early printer of our acquaintance (that had 3D printed parts) turned into a Dali version of itself when left in a sunny window with the air conditioner off on a particularly hot summer weekend.
Caution
If you do have to move a printer frequently, be sure you are picking it up by its frame and not it up by one of its precision parts, like one of the axes, or (worse) by a belt. Printers intended to be portable sometimes have a handle. If yours does not, stop and think about whether you might be bending or otherwise putting unusual stress on a critical part when you pick it up.
Ventilation and Drafts
3D printers are melting plastic, which means it is always prudent to make sure you have adequate ventilation. If you are printing ABS or one of the more exotic filaments in particular, it is wise to have active ventilation (a fan) pulling air away from the printer. A lab or art space that is designed with similar issues in mind can be a good home for a printer for those reasons as well. Some spaces use freestanding filters in addition, and some printers come enclosed with filtration.
One person’s “ventilation” can be another’s “draft.” Drafts can either be a plus or minus, depending on the material. Air flowing across the printer may make the bed struggle to maintain temperature, particularly if the ambient air is chilly. The exception to this is that having a fan blowing on a PLA print can improve print quality, particularly if you are printing on blue tape at ambient temperature (and thus not affecting heated bed temperature).
There are aftermarket “safety enclosures” for some printers that you can consider, and filtration is available for some enclosed printers.
Noise
3D printers vary widely in how much noise they make when running. Your best bet is to see if you can be around whatever one you are going to buy to assess whether it can live in a particular room without bothering the occupants. On the other hand, a 3D printer wants to live in a reasonably low-vibration environment, so you probably do not want to banish it to a loading dock either.
In noisy trade show environments, it is often difficult to hear the noise a printer makes at all. The same printer may be annoyingly loud in an otherwise silent room. Some tables, lightweight wooden ones in particular, may resonate in a way that more than doubles the apparent volume of the noise the printer makes. If your printer sounds significantly quieter when lifted just above the table while printing, you might want to consider special vibration-dampening feet or other means of isolating the printer from the table.
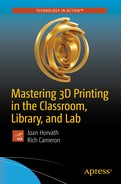
Dust
A DIY dust catcher
If you search on “filament cleaner” you will get other gadgets and folklore on ways to deal with this issue. Some of these advise using a cotton ball or sponge, but a cotton ball can be a source of particles that will cause an even worse clog. Sponges can dry out and lose contact with the filament. We do not recommend either of these methods.
There are also aftermarket enclosures and covers that you can buy to manage these issues. Joan leaves an upside-down large fabric shopping bag (handles down) over her open-frame printer if she is not going to use it for a while.
If, despite all your best efforts, your nozzle clogs, see the section on unclogging a nozzle later in this chapter.
Caution
Do not have 3D printer in a room with woodworking, pottery, or other activities that create fine dust.
Storing Filament
Filament should be stored in a cool, dry place without big temperature swings. Keep them in their original packaging until you are ready to use them. Consumer 3D printers have in some ways outsourced their precision to their filament manufacturers. Filament can absorb water from the air, and this is a bigger problem for some materials than others. For ones that absorb it very easily (notably nylon and PVA), the water will pop and boil off when the filament is heated, which can cause pitting on the surface and poor layer to layer adhesion.
If you live in a humid climate, keep your filament tightly sealed in a plastic bag with desiccant when you are not using it. Avoid leaving your printer and filament outside overnight or allowing water to condense on them. There are also filament-drying devices, but because we live in a mostly arid climate, we have not tried them personally.
PLA filament is the most forgiving of conditions except excessive heat. Do not leave a spool of PLA filament in a hot car on a summer day. Other than that, most reasonably sealed filament will be useable for years.
Tip
Tightly sealed 5-gallon paint containers work well to keep several rolls of filament sealed up. Stacking plastic boxes with tight lids work well too. You can place a renewable dehumidifier in the container with filament to keep its environment dry. These plastic modules contain a desiccant and a heating element that you can use by plugging it in once it has been saturated to remove the absorbed moisture from it.
Your First Print
In Chapter 3, we discuss all the many and varied software settings that come up in the general case of creating a 3D print. Here we give you a short summary of how to print something to get started. Resist the beginner temptation to download something complicated for your first print. Instead, create a small cube. The classic test cube is 20 mm on a side—a little under an inch. (3D printing is a metric world.)
The simplest way to do that is to use the free software package Tinkercad ( www.tinkercad.com .) Tinkercad is web-based and recommends using a Chrome browser, or Firefox in a pinch. You will need to set up an Autodesk account. Then open Tinkercad. It has tutorials, but if you just want to make a simple cube, click Create New Design and drag the cube from the menu of shapes on the side to the workplane.

A 20 mm cube
To save it, click Export ➤ Download for 3D Printing. You should now have a file with a name ending in .stl.
The next step is to load this STL file into software that will turn this model into commands for your printer, usually called a host program or slicing software. Hopefully your manufacturer pointed you to either its own program or one of the open source free options. If not, MatterControl ( www.mattercontrol.com ), Ultimaker Cura 3 ( https://software.ultimaker.com ), and Slic3r ( www.slic3r.org ) are all commonly used. Chapter 3 details how to use these programs to create a file that can control your printer, called a G-code file on most printers (but a proprietary format on others).
Calibrating Your Printer
A critical requirement for good 3D prints is having the printer’s parts align correctly to each other. This requires that the printer be both square and tram . Squaring refers to ensuring that the axes are at right angles to one another, whereas tram and tramming are used specifically to refer to adjustment of the build platform to ensure that it is parallel to the x/y motion of the machine.
A 3D printer that is square but not tram will have the axes at right angles, but the nozzle will not maintain the same distance from the platform as the x and y axes move. A machine that is tram but not square will usually print fine, but the angles will be wrong so that rectangles will become parallelograms and circles will become ovals.
If you suspect that your machine’s axes are out of alignment because prints that should be rectangles are skewed, first check that the axes are square relative to each other (use a carpenter’s square or, in a pinch, any other stiff, accurate rectangular object). If they are not, use whatever adjustments your printer manufacturer provides.
Depending on how your printer is constructed, this may require loosening several screws, nudging parts into alignment, and retightening the screws to lock them in place. Other designs may make this more difficult if the misalignment is due to bad manufacturing tolerances. These issues can be more difficult to fix, but can often be solved with strategic use of shims. If the error is in a part that can be printed and you feel competent to modify your printer, consider making a new one without the error as a more permanent fix (but save the old one, just in case).
If the width of an extruded line is inconsistent from one end of the platform to the other, check the alignment of the build platform relative to the axes, hereafter referred to as tramming the platform. Always check your squareness first, though, because if you have to make any adjustment your frame, you will need to tram the platform all over again.
Caution
Some manufacturers refer to “leveling” a platform, but we try to avoid this terminology because it often leads to confusion about how to go about dealing with a platform that is not “level.” Do not use a bubble level to align your platform. If you have your printer on a table that is not level, but your printer is otherwise square, changing any printer adjustment based on a bubble level would most likely not fix the problem. We use the word tram to draw this distinction about internally consistent alignment of the printer axes relative to the platform versus level relative to gravity. Note that the axes are imaginary lines in space; normally, the printer’s linear motion components will be lined up with the axes, but in principle software can compensate if they are not. Be sure you understand what your printer does and does not compensate for before attempting to fix problems.
If the build platform gets out of tram, either you can wind up printing in air in places where the platform is lower than expected or mashing the first few layers on parts of the platform that are too close to the nozzle. Prints that do not stick in one corner and are a bit mashed (with wider-than-normal extrusion lines) on another part of the platform are symptoms of this problem.
A typical way to fix this for most printers is to home the axes manually (see the section “Manually Controlling Your Printer” in Chapter 3). Then take a piece of paper (we like to use a sticky note by sticking it to our fingers and placing it sticky-side-up on the platform) and move your extruder in x and y near each of the adjustment screws for your platform. For most printers, the piece of paper should be able to get between the platform and the nozzle, but there should be a bit of resistance. There is a device called a feeler gauge that does the same thing, but do not use one—a feeler gauge is made of a metal that is harder than your nozzle and might damage it.
As a quick test, you can print a small item with a big skirt (a skirt that is near the edges of the platform) to check platform tram. If the skirt does not lay down evenly, then you need to try again.
Some machines have “auto-leveling” features. These features use some kind of sensor to probe the height of the platform in various locations to ascertain how it is (mis)aligned and then apply a transformation matrix in software to align the printer’s coordinate system to the platform, rather than vice versa. This can make it a lot easier for a beginner to set up a printer, but it is better not to rely on these features if you can avoid it. In some cases, rounding errors in these calculations can cause unsightly lines in the surfaces of prints, especially if your logical axes end up very close to, but not quite perfectly aligned to, the physical axes of a Cartesian printer. This is less of an issue for non-Cartesian printers, because their physical axes are not straight and they are already doing similar math to translate Cartesian coordinates.
When a Print Starts
When you have successfully sliced a part to create G-code and used a host program to send it to the printer (both of which are described in Chapter 3), what happens next depends on what is in the G-code, and also on the printer’s firmware. If your manufacturer gave you standard settings files, it is likely that there are some G-codes that are added to the beginning of every print to home one or more of the axes (to bring the nozzle to some known point relative to the platform). Homing involves moving the extruder to a predetermined starting point, usually with each of the printer’s physical axes at one of its two extremes, and touching a switch or triggering some other feedback mechanism to let the controller know that it is there. Aside from homing, most printers run their axes open-loop, moving the motors in discrete steps and counting steps to determine their location relative to home. The printer will also need to wait for the extruder and the platform heater (if there is one) to reach the specified temperature(s), and may do this before or after homing, depending on the order of commands in the start code.
Once the extruder and platform reach the right temperature, the extruder will usually drool a little to get some filament melted before the print proper starts. Then the printer will start to print a skirt (if you specified one) and then your print.
The first time you see a 3D printer making an object, it is mesmerizing. There is an in-joke in the community that the second item people print out is a chin rest so that they can watch their prints in comfort.
Tip
Slicing programs give estimates of build times, but the actual build times may vary. This is because the firmware does not move at exactly the speeds specified in the G-code, but rather accelerates and decelerates each time it changes direction, making its average speed lower. These calculations occur in the firmware, so the host program does not know how much this will affect the print time; some hosts offer better estimates than others.
During a Print
Once a print starts successfully, there is not a lot to do except to keep an eye on it in case something goes wrong. It is not a good idea to leave a 3D printer unattended, just as you would not go too far from a turned-on stove or oven. After a while, you will be able to tell from the sounds your printer makes if all is well. 3D prints can take a long time (many hours is common), and in the beginning we recommend small tests of new techniques and materials so you can watch the proceedings actively and intervene if the print does not go as planned.
The commonest failure is having the print come loose and slosh around. The only thing to do in that case is to kill the job (from the host program, or by resetting the printer) and change some of the design to have a bigger footprint on the build platform, or perhaps print at a bit higher temperature. If a print just does not look right, go back to Chapter 3 and consider changing some of the slicing settings; look at Chapter 2 to see if the filament properties might be the problem; and consider troubleshooting ideas in this chapter if you suspect your printer. The platform may not have been adequately aligned and prepared.
When a Print Finishes Normally
When your part finishes printing, ideally the result will be a part sitting on the build platform looking just like you imagined it would. However, you still need to get the piece off the platform without breaking it. How do you get any support, brims, and so on off the part? And what should you do to be sure the printer is ready either to be turned off for the day or to print the next job?
Caution
If your printer has a heated build platform, wait for it to cool down somewhat before you remove the part. Otherwise, the part (which is still a little soft) may bend or warp as you take it off or if it cools too quickly off the platform.
Getting a Part off the Build Platform
Once the print has cooled down (see the preceding Caution), sometimes you can just grasp a part firmly and snap it off the platform. Depending on the combination of platform surface and print material you use, you may find that a print releases almost on its own as the platform cools. Usually, though, you need a little leverage to get it started. You may also find that there is some intermediate temperature at which the print is easier to pry loose, but that it is more difficult once the print and platform have fully cooled. Keeping a part firmly attached while printing but allowing it to be easily removed afterward is one of the more difficult issues in 3D printing. If a print breaks loose too early, it can ruin a print, but sometimes the pieces adhere a little too well.
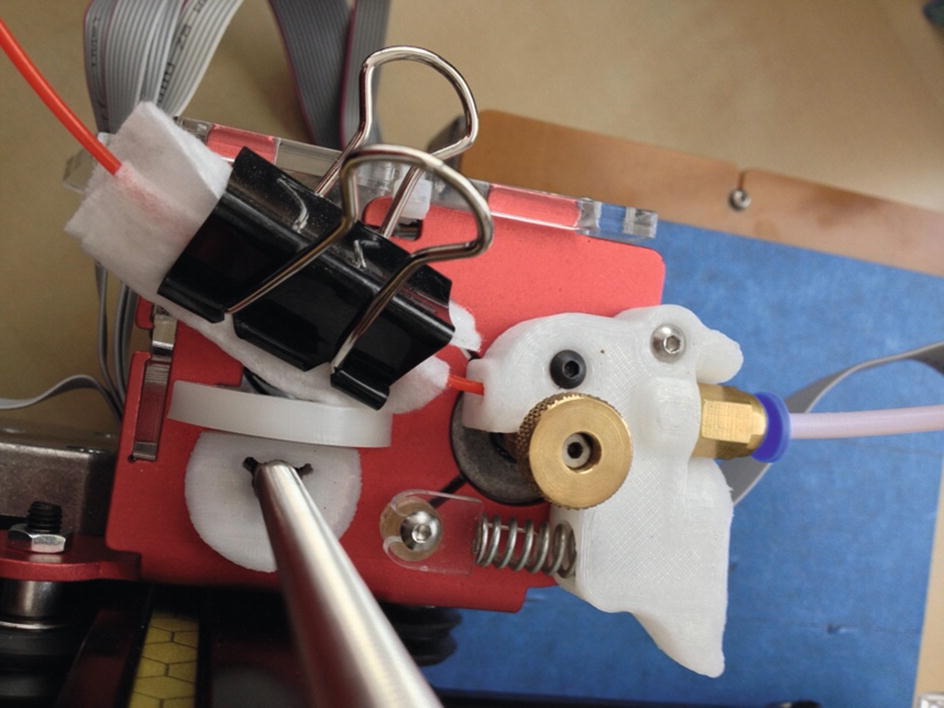
A painting knife is a good tool to remove a part from a tape-covered platform
Any art supply house should carry these tools (for example, Blick’s, at www.dickblick.com ). Very sharp edges should not be necessary, and you particularly want to avoid sharp corners like those of a razor blade that will scrape your platform, as these can damage the surface and force you to replace it more often. Once you get your tool under a corner, try twisting it to lift that corner rather than sliding the tool further under where it may scrape the platform surface.
While we are talking about small, handy tools to have in your kit, you should also get a good pair of tweezers, which are useful for plucking bits of drooled filament out of places they should not be.
Picking Off Support and Cleaning Up the Print
If your part needed support, you now have to pick it off. This can be a painstaking process, and the precise procedure you use will depend on the shape of your print and the tools you have available. Be careful because the plastic can be sharp; protect your eyes with safety glasses from the possibility of small, flying, sharp bits.
Grasping the support with needle-nosed pliers and twisting it sometimes works well for sparse support; experiment and see what works for you. As discussed in Chapter 6, it is best to design your model in the first place to avoid big areas of support because they are very hard to remove. Chapter 8 discusses finishing techniques.
Restarting or Shutting Off the Printer
When you take your print off the build platform, you can either turn off the printer or create your next print. If your manufacturer gave you slicing settings, it is likely that there are some shutdown lines of G-code in the standard setting, or the firmware may take care of some activities.
In general, if a print finished normally, you probably can create or load in another G-code and just run the next job. If you are not planning on using the printer again right away, it is best to turn it off and possibly unplug it.
Manually Controlling Your Printer
From time to time, you may suspect that your printer has a problem, or you may need to manually back out of an awkward failure that left a part skewered on the extruder. In those cases, you will want to use the Print or Control window in one of the host programs to send a G-code single line or two, or use the other manual controls that most host programs provide.
There are measures you may want to take as part of routine printing. For example, what do you do if you want to change filament colors, but you forgot to pull out the previous filament when you turned off the printer (and now it has cooled down and gotten stuck in the nozzle)?
Note
Some printers allow you to perform some or all of the functions we describe here from an LCD interface on the printer rather than in software as we describe here. Check your manufacturer’s directions for the precise steps to take to solve these common issues.
All the procedures that follow use the printer control mode in the host program you are using, as described in Chapter 3’s discussion of host programs. There are variations among the hosting programs, but all of them allow sending a single line of G-code at a time, as well as moving the extruder in any axis, heating the extruder, and heating the platform.
Tip
By default, most printers use degrees Celsius (C) for temperature and millimeters (mm) for length measurements. If you are having trouble thinking in metric, keep in mind that there are exactly 25.4 mm in an inch, 210 degrees C equals 410 Fahrenheit, 115 C is 239 F, and 230 C is 446 F (to pick some commonly encountered temperatures).
Stopping a Print
Sometimes a print does not stick to the platform and starts to slosh around, or the print you thought would be fine without support is not going to work after all, or you just look at what is building and scratch your head about how your lovely computer image could have turned out like that. When a problem like this becomes obvious, the best thing to do is to click the “Kill Job” or “Stop” button, as the case may be in your host program.
If the print got jammed under the extruder somehow, you may want to move the extruder away manually (see “Backing Out of a Bad Situation” later in this chapter) and then retract the filament. Once you get the failed print off the build platform, turn off the printer if you are not going to try again. Note that G-code to turn off heaters and other shutdown activities will not be executed if the job was killed partway through. Your host program’s stop function may shut down the heaters for you, but probably will not do any of those other things.
Typically, it is a good idea to cycle (turn off, wait, then turn back on) power to the printer just in case the partial print left it in some strange mode. If the failure rammed anything into the extruder, you might want to check that the build platform was not thrown out of alignment. Check your manufacturer’s alignment instructions.
Changing Filament
When you finish printing a part, it is a good practice to retract the filament out of the nozzle before it cools completely, so that you will not have to heat it up again to remove it if you want to print with a different one next time. To retract the filament, as soon as the print job finishes, open the printer control panel and type in 10 mm of retraction. You can click the button to extrude 10 mm a few times; the filament should pop out of the input device after an appropriate number.
If you have a Bowden extruder (see Chapter 2), you only really need to get it out of the hot end to have the option of pulling it out easily later. Some printers also add commands to retract after every print job so you do not have to think about it. Even these printers, though, normally do not retract if you kill a job mid-print for some reason.
Type in the temperature appropriate to the filament that is in the nozzle (in this case, ABS, so about 230 degrees; see Chapter 2).
Turn on the extruder heater (typically by clicking a button).
Look at the monitoring display in the host software and wait until the temperature is near the right level (but not all the way there, because then you will just melt more filament into the nozzle).
Retract 10 mm at a time until the filament springs out (or until you can pull it out the rest of the way, for printers that have a release).
Then change the extruder temperature to the level appropriate for the new filament (in this case, PLA, so about 210 degrees). If there is plastic left in the nozzle, purge it by pushing it out with the new filament. This has to be done at the higher of the two extrusion temperatures (in this case, 230 C). If there is a big temperature difference between the two filaments, you may have to use an intermediate filament to purge out the old one, or use the “cold pull” technique described later in this chapter to clean it out.
Start the new filament into the extruder in whatever way is appropriate for your printer once the extruder is at the appropriate temperature (look at the temperature status graph).
Once it is nearly in, type in 40 mm or so and extrude.
Keep extruding an additional 10 mm or so at a time until the filament stops coming out the old color. Using a skirt on your next print will take some of that away too.
You can then run your next print with the new color and material.
Tip
You could, in principle, use the preceding process to change out filament mid-run to have a multi-color or multimaterial print with one extruder. Experts can and do try this (by using “pause”). It is very tricky, though, and results may be unpredictable.
Changing Temperatures During a Print
If a print looks like it may be having trouble sticking to a heated platform, you might want to raise the platform temperature just a few degrees. Your printer might have a way to do this through a touchscreen or other controls on the printer itself. Assuming you are not so lucky but that you have a computer connected while the printer is running, you will need to type a new temperature in a host program (but not a slicing program) under Heated bed. There will be a Set or similar button to click to confirm changing the settings. You can change your extrusion temperature on the fly this way too (by changing extruder temperature and clicking Set) if you decide you should be running a little hotter or cooler.
Basic Hardware Troubleshooting
Sometimes you will want to determine whether a printer is having hardware issues of some type, so it is good to be able to try some basic commands to debug what is going on.
Checking the Motion of One Axis at a Time
If you want to check the motion of one axis in a controlled fashion to see whether something is broken or loose, the printer control panel in the host programs (see Chapter 3) allows you to move the axis in a positive or negative direction by typing in a positive or negative number (or in some cases by clicking buttons with fixed positive and negative increments). In Chapter 2, you saw that the z-axis is the vertical axis; x and y are in the plane of the build platform.
If nothing happens when you enter a value, you may be at an end stop. Try entering a small value to move in the opposite direction. (For example, if nothing happens when you input -10 mm in x, then try +10 mm). Use small values—a few millimeters —if you are trying to debug a problem. Some machines are also configured with software endstops. It is not uncommon for machines to refuse to move in the negative direction past the point where they were when the machine started up until it has been homed, because it thinks that that position is zero.
If no axis will run, you may have a connection problem; be sure your USB connector is firmly attached and that your printer hardware settings are correct for your printer. Some printers may be able to power up their controllers and communicate with a host program using USB power, even if the printer’s power supply is not plugged into the wall or its switch is off. Power to drive the motors and heaters can only come from the printer’s power supply, though, so these functions will not work without it.
Backing Out of a Bad Situation
If you forget to take a previous print off the platform, or otherwise do something you are not supposed to do, you may find the extruder jammed into a print or blocked somehow. Because it is hard to figure out which way is +x and which way is –y under battle conditions, you might want to familiarize yourself now with how your printer is set up in case you need to walk your way out of a problem with the manual controls.
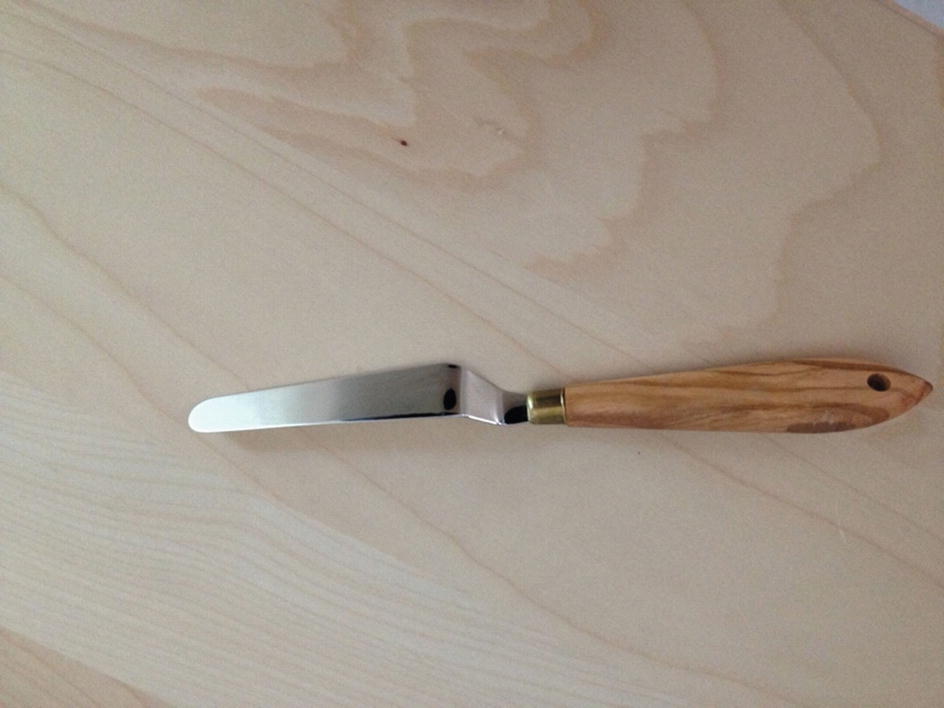
Extruder Not Extruding
If the extruder is moving around but no material is coming out, there are a few possible problems. The extruder nozzle might be jammed, or the extruder motor might not be pushing out filament. To debug this problem, you may have to trick the printer a little to get the information you need.
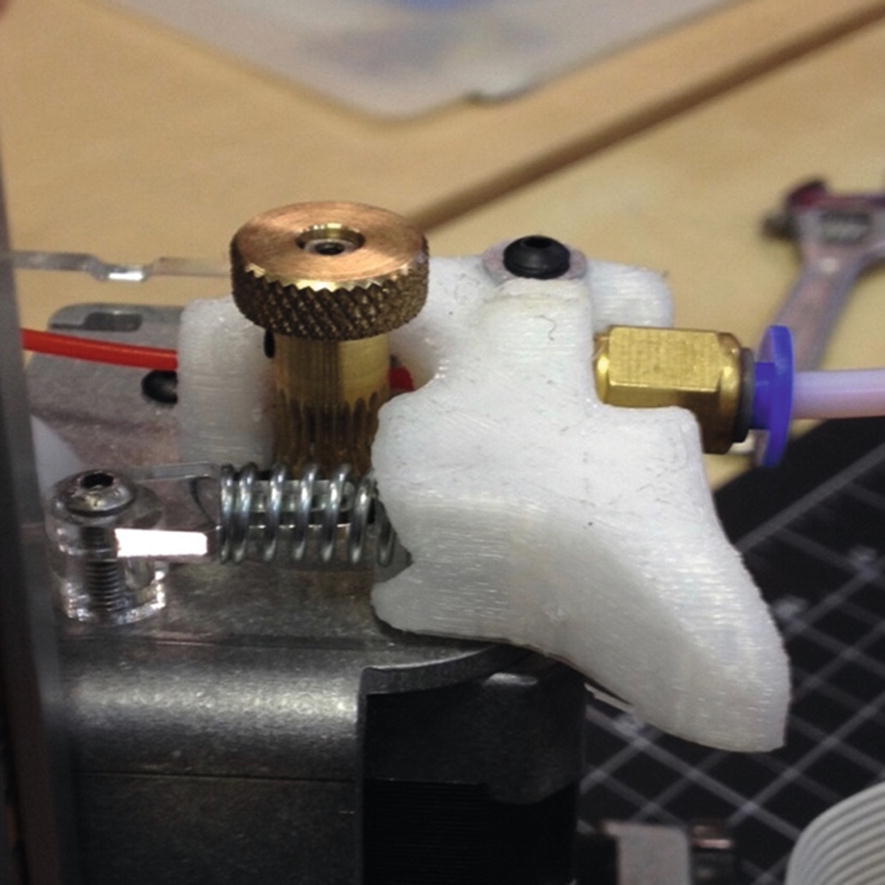
A visible (Bowden extruder) filament drive gear
Heat the extruder a little above what you used for your last print and try manually extruding, as we did for the filament-changing process earlier this chapter. If you have input an M302 command, be careful not to try to extrude any filament until the head is at the appropriate temperature.
If nothing comes out, manually retract the filament. Take a look at the end of it—is there anything burned or strange on it?
If not, try breaking off the end cleanly and extruding again.
If all that fails, try the “cold pull” procedure described in this chapter.
You might also try searching online using the phrase “Unclog extruder <your printer name here>.”
Clearing a Clogged Nozzle
One of the more common problems with a 3D printer is that the printer stops extruding plastic because the extruder nozzle is clogged. The nozzle hole is small and it can fairly easily be blocked with debris that was embedded in the filament, dust, or plastic that got too hot and scorched or burned.
Caution
If your nozzle is not rated to 240 degrees C, you should not try to use nylon for this procedure.
Cold Pull
In the past, the only way to get a clog out of a nozzle was to take the entire hot end (nozzle, barrel, and heater block) apart or take it off and put it in a solvent. Because that is not very convenient, and taking the hot end apart can damage it, the cold-pull technique was developed. Somewhere along the line it also developed the name atomic pull, but we call it by its older name here. A cold pull starts with inserting filament in the nozzle just as if you were going to print with the filament.
Instead of using the usual extrusion temperature, though, which would melt the filament, a cold pull involves pulling the plastic out at a lower temperature. The temperature is warm enough to allow the plastic to stretch enough to pull away from the sides of the barrel so that it does not seize up entirely, but cold enough so that the filament remains solid enough to stay in one piece. Usually, any debris in the nozzle will then come out with the filament. We estimate the best cold-pull temperature in the following description.
The cold-pull technique works best with printers that have polished-smooth stainless steel nozzle barrels. It also works for nozzles that have a polytetrafluoroethylene (PTFE) internal coating if they are rated to 240 C. The cold-pull technique has been successfully done with ABS (cold-pull temperature of about 160–180 C). PLA is much more difficult to work with, but a cold-pull temperature of 80–100 C will sometimes work. Nylon 618 filament (cold-pull temperature of 140 C) is far easier and more reliable to use for this purpose due to its strength, flexibility, and low friction.
The cold-pull technique works as follows: to begin, remove as much of the plastic that you’ve been using as possible. To do this, you can attempt a cold pull with ABS or PLA with the temperatures listed previously. For the rest of the instructions, we will assume that this failed to fully remove the filament.
Next, heat your nozzle to 240 C so that it can thoroughly melt the nylon and push the nylon filament in. If your printer has a Bowden tube, you may find it easier to remove it so that you can push and pull the filament by hand. Attempt to extrude the nylon slowly. Most clogs (especially those caused by accumulated dust) will not actually block the nozzle entirely, but will be pushed into the nozzle and stop it when the nozzle pressure increases and then float up out of the way when left to sit.
If you do not have a hard clog (usually a solid foreign particle lodged in the nozzle), a slow, pausing extrusion should allow you to purge the old printing material.
Once nylon starts coming out of the tip, you can begin cooling your nozzle. See Chapter 3 for information on manually controlling your printer to see how to extrude some filament by hand. You want to keep trying to push the filament slowly into the nozzle as it cools to prevent voids from plastic oozing out.
When your extruder temperature is well below the pull temperature, start heating it again to the specified temperature. When it gets close, start pulling on the filament manually if your printer mechanism allows it, or by retracting it using a host program (this requires the M302 command). Pulling as the temperature is rising allows you to ensure that it releases at the lowest possible temperature, which will make the filament more solid. Nylon should come out solid and nozzle-shaped, which is why it works best. Other materials often will not release until they are soft enough that they will stretch significantly. If this happens, you may still be able to get a successful pull if you are careful not to let the long, thin strand of plastic break.
Note
The temperatures specified in the preceding directions are maximum temperatures—temperatures above which the plastic is unlikely to come out solid. For best results, you should always pull the plastic at the lowest possible temperature.

Burned residue on cold-pulled filament
Tip
You might want to do cold pulls from time to time as a preventative measure if your print quality seems to be degrading.

Nylon with residue of overheated plastic
Dealing with a Hard Clog
Usually a cold pull can remove debris from a nozzle. However, if you cannot get the plastic all the way in to perform one, there is probably a hard bit of debris blocking your nozzle.
One solution is to pluck a bristle from a wire brush and push it into the nozzle using needle-nose pliers. Figures 5-7 and 5-8 show the process of pulling a bristle from a wire brush and pushing it into the nozzle. Once you have poked it through, try a cold pull to see if you can pull the debris out. Note that the nozzle has to be hot for this maneuver to work, because otherwise the nozzle will be clogged with solid plastic. Be careful not to get your fingers near the hot nozzle.
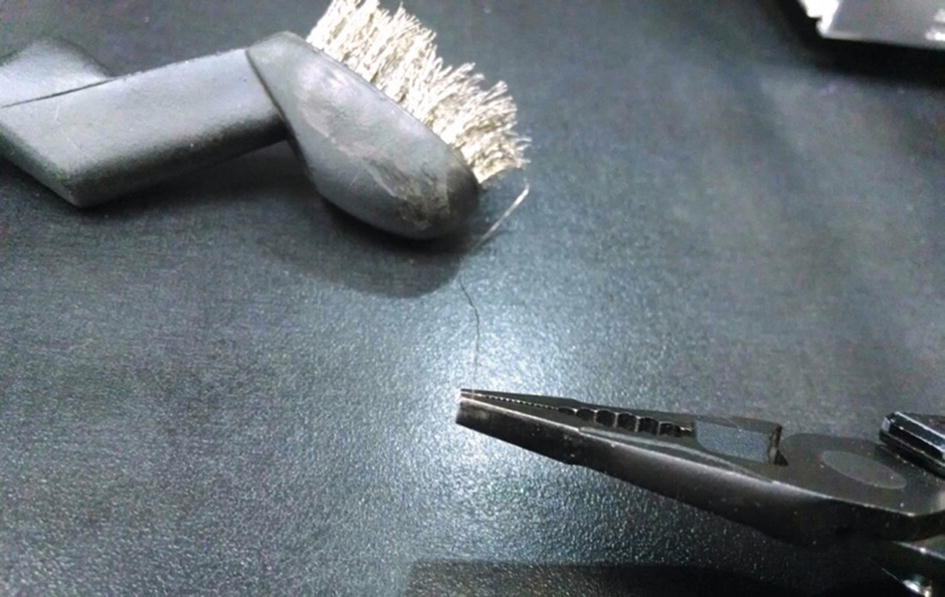
Extracting a single bristle from a wire brush

Using the wire brush bristle to clear out the nozzle
Caution
Some sellers sell tiny drill bits for this purpose, but using these is a bad idea because they are brittle and are likely to break off in the nozzle, making your problem worse. Even if they work, their hard, sharp edges can scrape the softer brass of the nozzle (this is the same type of drill bit that was used to create that hole in the first place) and result in uneven extrusion.
Clicking or Grinding Noises
One of the first signs of trouble with a 3D printer is an unfamiliar noise. You will know you are an experienced 3D printer user when certain noises make you immediately execute a high-speed dive across the room toward your printer. Because prints can take many hours, listening to your printer is often the best way to monitor it (with an occasional glance, of course).
Tip
In addition to being sensitive to abnormal noises, be aware of what a “normal” print run smells like. A burning smell is never a good thing around electronics. Be able to distinguish problems from, say, the smell of ABS printing.
The filament might be hung up on the spool or catching on something.
The nozzle might be clogged, as just discussed.
The filament might not have been seated correctly when it was inserted. (This applies at the beginning of a print; if the ticking starts mid-print, this is unlikely.)
The filament might be too wide to go into the nozzle (check it with calipers as discussed in Chapter 2).
Something might be hitting one of the fans on your printer. Check that the fans are clear.
If your nozzle is too close to the platform, you may have trouble extruding in the early layers because the plastic coming out of the nozzle does not have anywhere to go.
Sudden grinding noises usually mean that the print came loose and is jammed under the nozzle. This warrants a sprint across the room to turn off the printer, because the jammed part can exert some unexpected forces on the platform and its supports. Get your printer into a safe condition by stopping the print job. Then manually walk the extruder back out using the techniques in the section “Backing Out of a Bad Situation.” You may have to re-adjust the build platform as described earlier in this chapter.
Note
If you have been trying to extrude filament into a clogged nozzle, the drive gear may have been digging into the filament and clogging up the gears with ground-up filament. Check this too if you had to clear the nozzle. Otherwise, filament may not feed well, and you might think that the nozzle is still clogged. Pick and/or blow it off carefully and be sure you are not blowing plastic dust someplace where it will cause other problems.
Post-processing Tools and Space
Depending on what you are doing with your 3D prints, you may need some additional tools to use to clean up or otherwise post-process prints. In Chapter 8 we talk about artist studio considerations, which may require gluing, sanding, painting, and similar operations (and thus a facility that can handle those things). Earlier in this chapter we discuss printers needing to be in a clean environment; this may mean that you will want the post-processing to happen away from the printers.
Removing support can be a little messy and result in lots of small bits of plastic everywhere. Doing this over carpet is a bad idea since you will be picking the bits out forever. If the 3D printers are in a computer-lab type environment with carpets and nice tables, you may want to designate a “messy room” for the post-processing activities.
Chapters 8 through 12 address applications of 3D printers in various discipline situations. If you are outfitting a makerspace at a school or catering to teachers, you may want to skim through those chapters to get an idea of what types of materials you might want to keep in stock, beyond filament.
Recycling Prints
People ask us all the time if you can recycle your 3D prints into filament. Many people are working on that. The challenge, though, is that consumer 3D printing has, in a way, outsourced its precision to filament. If the filament diameter is off even a few hundredths of a millimeter, it can cause you problems. So, any local machine would need to produce very high quality and high volume extrusion of plastic.
Parts you make yourself are not currently appropriate to put into recycling streams, because the filament typically is not clearly labeled with an appropriate recycling number, nor are the resulting prints. PLA composts in commercial composting facilities (but will not break down at the temperatures of a typical home compost bin). Whereas bottles made from PET plastics are commonly recycled, PET filaments are different formulations, and are not appropriate for the same recycling stream.
Getting Started with Resin Printers
To this point, most of what we have been talking about is specific to the care and feeding of filament-based 3D printers. Resin printers magnify some of these issues. The printers need to be in a very dust-free environment since they can be damaged by small bits of debris in the wrong place at the wrong time. Treat those as you would treat an equivalently priced microscope in terms of clean and stable environment. Do not ever move a resin printer in mid-print.
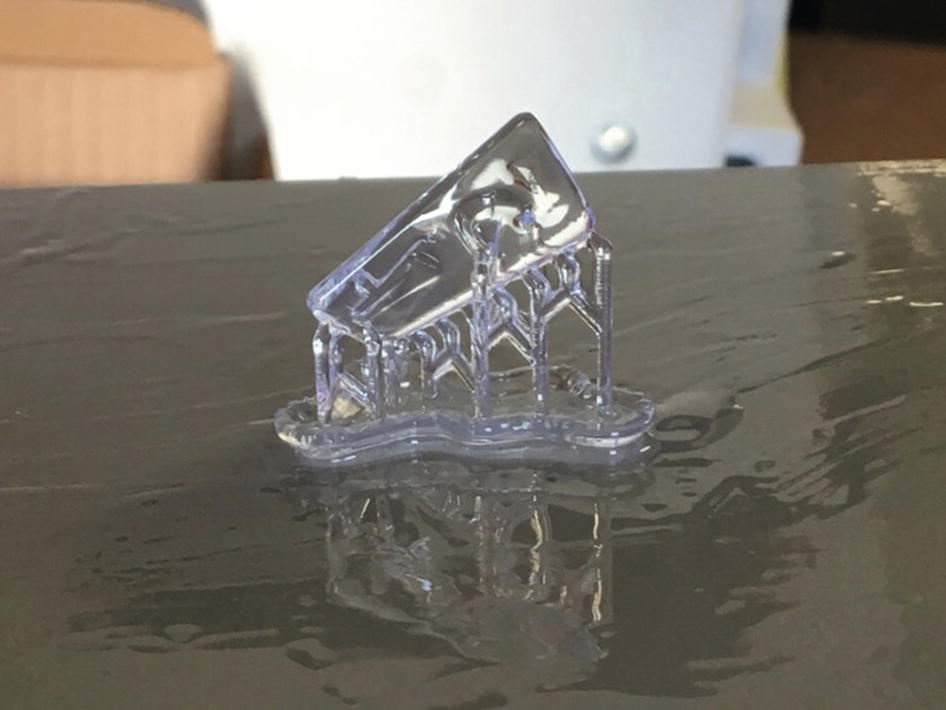
A resin print just out of the printer
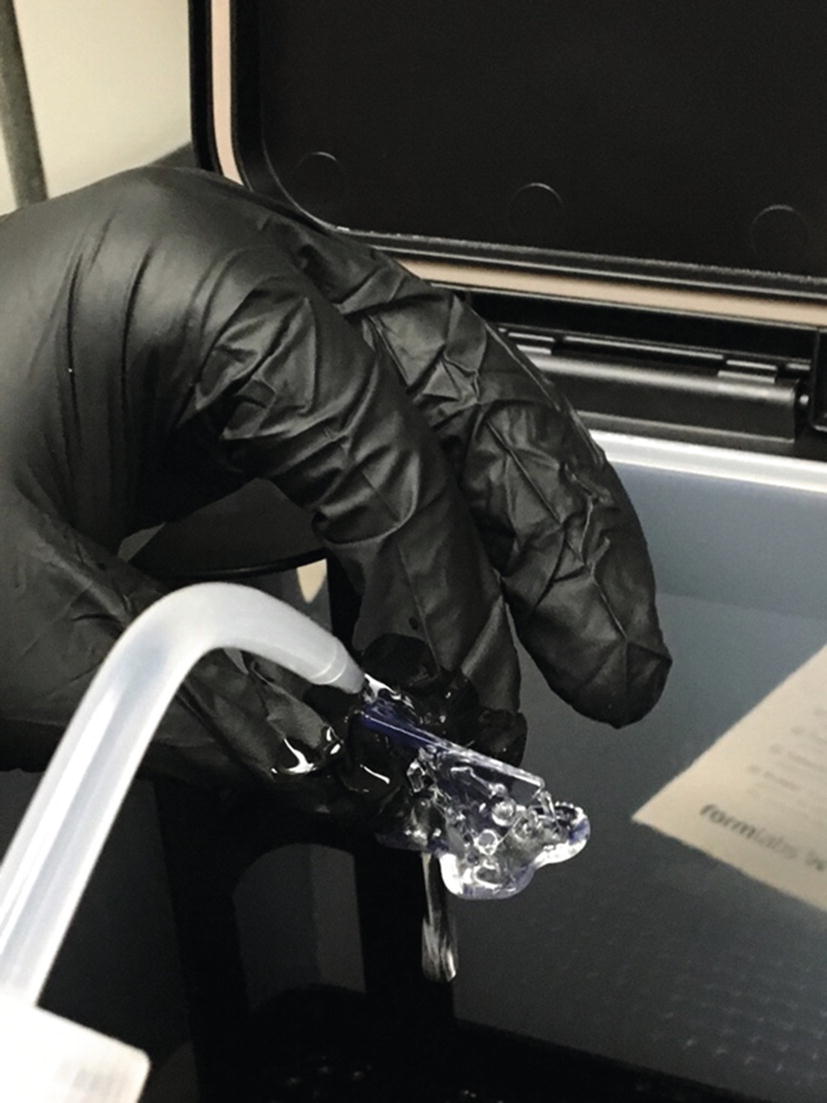
A resin print being washed with alcohol in a Formlabs wash station
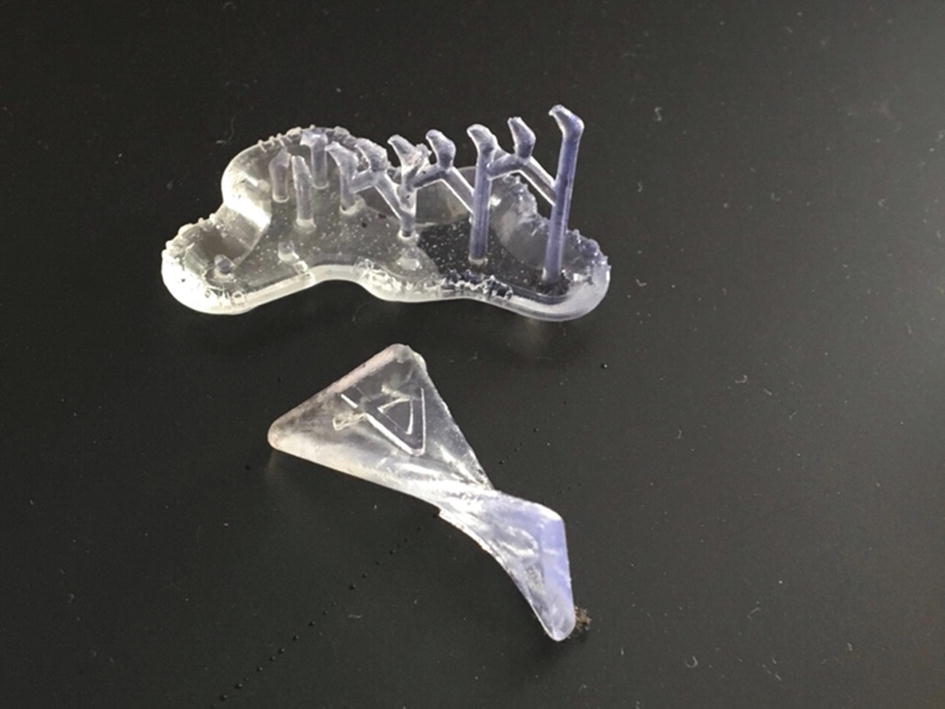
The completed print (and its cut-off supports)
After the prints are done, the alcohol with dissolved resin needs to be appropriately disposed of, which varies from jurisdiction to jurisdiction. Check with your facilities manager on whether they can handle however much material you will generate, and take a careful look at your manufacturer’s instructions.
Also review your manufacturer’s requirements for storing resin and disposing of any unused and expired materials.
Staff and User Training
As should be obvious by now, it is challenging to learn how to use a 3D printer on your own. We hope that our books are a good solution if there are no other options, but it is helpful to most people to take a course. We find that two sessions of two hours each work well.
In the first session, we give an overview of the 3D printers that have been purchased, and an introduction to a basic CAD program that the group thinks they want to use. We get them to the point of making a cube or other simple thing and then leave them to play for a week or two. Then we come back and cover the material in Chapter 3, see what has happened in the interim, and get them started with applicable material for what they want to do.
We and others offer online courses on various platforms, which are an option as well—ours can be found at www.nonscriptum.com . Many schools with ambitious maker plans have systems for training and certifying students to run equipment as well.
Summary
This chapter covered the day-to-day issues of supplying and housing a 3D printer and its supplies and associated tools, with a particular emphasis on 3D printers that use filament. We went over basic calibration, facilities issues, and solutions to common problems. We concluded with a review of the basics of resin printers, and touched on staff and user training issues.