
To build a high-powered web server in Go with just a few hundred lines of code, you should be quite aware of how concurrent Go provides us with exceptional tools for performance and stability out of the box.
Our example in Chapter 6, C10K – A Non-blocking Web Server in Go, also showed how imposing blocking code arbitrarily or inadvertently into our code can introduce some serious bottlenecks and quickly torpedo any plans to extend or scale your application.
What we'll look at in this chapter are a few ways that can better prepare us to take our concurrent application and ensure that it's able to continuously scale in the future and that it is capable of being expanded in scope, design, and/or capacity.
We'll expand a bit on pprof, the CPU profiling tool we looked at briefly in previous chapters, as a way to elucidate the way our Go code is compiled and to locate possible unintended bottlenecks.
Then we'll expand into distributed Go and into ways to offer some performance-enhancing parallel-computing concepts to our applications. We'll also look at the Google App Engine, and at how you can utilize it for your Go-based applications to ensure scalability is placed in the hands of one of the most reliable hosting infrastructures in the world.
Lastly, we'll look at memory utilization, preservation, and how Google's garbage collector works (and sometimes doesn't). We'll finally delve a bit deeper into using memory caching to keep data consistent as well as less ephemeral, and we will also see how that dovetails with distributed computing in general.
Up to this point, we've talked about some of the tools we can use to help discover slowdowns, leaks, and inefficient looping.
Go's compiler and its built-in deadlock detector keep us from making the kind of mistake that's common and difficult to detect in other languages.
We've run time-based benchmarks based on specific changes to our concurrency patterns, which can help us design our application using different methodologies to improve overall execution speed and performance.
The pprof tool was first encountered in Chapter 5, Locks, Blocks, and Better Channels, and if it still feels a bit cryptic, that's totally understandable. What pprof shows you in export is a call graph, and we can use this to help identify issues with loops or expensive calls on the heap. These include memory leaks and processor-intensive methods that can be optimized.
One of the best ways to demonstrate how something like this works is to build something that doesn't. Or at least something that doesn't work the way it should.
You might be thinking that a language with garbage collection might be immune to these kinds of memory issues, but there are always ways to hide mistakes that can lead to memory leakage. If the GC can't find it, it can sometimes be a real pain to do so yourself, leading to a lot of—often feckless—debugging.
To be fair, what constitutes a memory leak is sometimes debated among computer science members and experts. A program that continuously consumes RAM may not be leaking memory by technical definition if the application itself could re-access any given pointers. But that's largely irrelevant when you have a program that crashes and burns after consuming memory like an elephant at a buffet.
The basic premise of creating a memory leak in a garbage-collected language relies on hiding the allocation from the compiler—indeed, any language in which you can access and utilize memory directly provides a mechanism for introducing leaks.
We'll review a bit more about garbage collection and Go's implementation later in this chapter.
So how does a tool like pprof help? Very simply put, by showing you where your memory and CPU utilization goes.
Let's first design a very obvious CPU hog as follows to see how pprof highlights this for us:
package main

import (
"os"
"flag"
"fmt"
"runtime/pprof"
)

const TESTLENGTH = 100000
type CPUHog struct {
  longByte []byte
}

func makeLongByte() []byte {
  longByte := make([]byte,TESTLENGTH)

  for i:= 0; i < TESTLENGTH; i++ {
    longByte[i] = byte(i)
  }
  return longByte
}

var profile = flag.String("cpuprofile", "", "output pprof data to
  file")


func main() {
  var CPUHogs []CPUHog

  flag.Parse()
    if *profile != "" {
      flag,err := os.Create(*profile)
      if err != nil {
        fmt.Println("Could not create profile",err)
      }
      pprof.StartCPUProfile(flag)
      defer pprof.StopCPUProfile()

    }

  for i := 0; i < TESTLENGTH; i++ {
    hog := CPUHog{}
    hog.longByte = makeLongByte()
    _ = append(CPUHogs,hog)
  }
}
The output of the preceding code is shown in the following diagram:
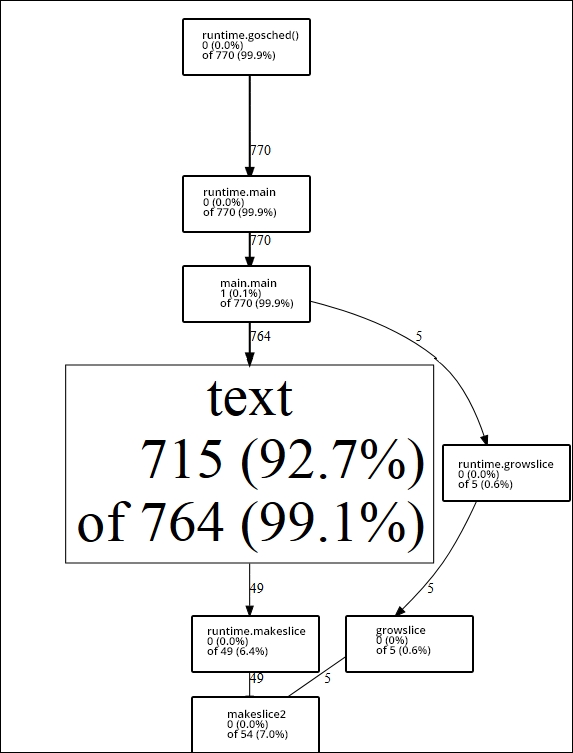
In this case, we know where our stack resource allocation is going, because we willfully introduced the loop (and the loop within that loop).
Imagine that we didn't intentionally do that and had to locate resource hogs. In this case, pprof makes this pretty easy, showing us the creation and memory allocation of simple strings comprising the majority of our samples.
We can modify this slightly to see the changes in the pprof output. In an effort to allocate more and more memory to see whether we can vary the pprof output, we might consider heavier types and more memory.
The easiest way to accomplish that is to create a slice of a new type that includes a significant amount of these heavier types such as int64. We're blessed with Go: in that, we aren't prone to common C issues such as buffer overflows and memory protection and management, but this makes debugging a little trickier when we cannot intentionally break the memory management system.
Tip
The unsafe package
Despite the built-in memory protection provided, there is still another interesting tool provided by Go: the unsafe package. As per Go's documentation:
Package unsafe contains operations that step around the type safety of Go programs.
This might seem like a curious library to include—indeed, while many low-level languages allow you to shoot your foot off, it's fairly unusual to provide a segregated language.
Later in this chapter, we'll examine unsafe.Pointer, which allows you to read and write to arbitrary bits of memory allocation. This is obviously extraordinarily dangerous (or useful and nefarious, depending on your goal) functionality that you would generally try to avoid in any development language, but it does allow us to debug and understand our programs and the Go garbage collector a bit better.
So to increase our memory usage, let's switch our string allocation as follows, for random type allocation, specifically for our new struct MemoryHog:
type MemoryHog struct {
  a,b,c,d,e,f,g int64
  h,i,j,k,l,m,n float64
  longByte []byte
}
There's obviously nothing preventing us from extending this into some ludicrously large set of slices, huge arrays of int64s, and so on. But our primary goal is solely to change the output of pprof so that we can identify movement in the call graph's samples and its effect on our stack/heap profiles.
Our arbitrarily expensive code looks as follows:
type MemoryHog struct {
  a,b,c,d,e,f,g int64
  h,i,j,k,l,m,n float64
  longByte []byte
}

func makeMemoryHog() []MemoryHog {

  memoryHogs := make([]MemoryHog,TESTLENGTH)

  for i:= 0; i < TESTLENGTH; i++ {
    m := MemoryHog{}
    _ = append(memoryHogs,m)
  }

  return memoryHogs
}


var profile = flag.String("cpuprofile", "", "output pprof data to
  file")


func main() {
  var CPUHogs []CPUHog

  flag.Parse()
    if *profile != "" {
      flag,err := os.Create(*profile)
      if err != nil {
        fmt.Println("Could not create profile",err)
      }
      pprof.StartCPUProfile(flag)
      defer pprof.StopCPUProfile()

    }


  for i := 0; i < TESTLENGTH; i++ {
    hog := CPUHog{}
    hog.mHog = makeMemoryHog()
    _ = append(CPUHogs,hog)
  }
}
With this in place, our CPU consumption remains about the same (due to the looping mechanism remaining largely unchanged), but our memory allocation has increased—unsurprisingly—by about 900 percent. It's unlikely that you will precisely duplicate these results, but the general trend of a small change leading to a major difference in resource allocation is reproducible. Note that memory utilization reporting is possible with pprof, but it's not what we're doing here; the memory utilization observations here happened outside of pprof.
If we took the extreme approach suggested previously—to create absurdly large properties for our struct—we could carry that out even further, but let's see what the aggregate impact is on our CPU profile on execution. The impact is shown in the following diagram:
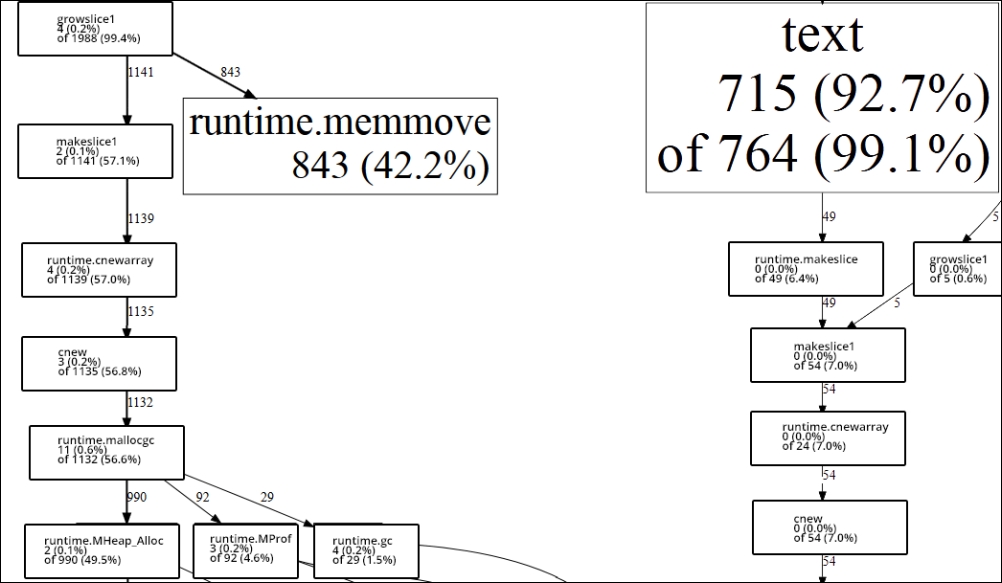
On the left-hand side, we have our new allocation approach, which invokes our larger struct instead of an array of strings. On the right-hand side, we have our initial application.
A pretty dramatic flux, don't you think? While neither of these programs is wrong in design, we can easily toggle our methodologies to see where resources are going and discern how we can reduce their consumption.
One issue you'll likely run into pretty quickly when using pprof is when you've written a script or application that is especially bound to efficient runtime performance. This happens most frequently when your program executes too quickly to properly profile.
A related issue involves network applications that require connections to profile; in this case, you can simulate traffic either in-program or externally to allow proper profiling.
We can demonstrate this easily by replicating something like the preceding example with goroutines as follows:
const TESTLENGTH = 20000

type DataType struct {
  a,b,c,d,e,f,g int64
  longByte []byte
}

func (dt DataType) init() {

}

var profile = flag.String("cpuprofile", "", "output pprof data to
  file")

func main() {

  flag.Parse()
    if *profile != "" {
      flag,err := os.Create(*profile)
      if err != nil {
        fmt.Println("Could not create profile",err)
      }
      pprof.StartCPUProfile(flag)
      defer pprof.StopCPUProfile()
    }
  var wg sync.WaitGroup

  numCPU := runtime.NumCPU()
  runtime.GOMAXPROCS(numCPU)

  wg.Add(TESTLENGTH)

  for i := 0; i < TESTLENGTH; i++ {
    go func() {
      for y := 0; y < TESTLENGTH; y++ {
        dT := DataType{}
        dT.init()
      }
      wg.Done()
    }()
  }

  wg.Wait()

  fmt.Println("Complete.")
}
The following diagram shows the pprof output of the preceding code:
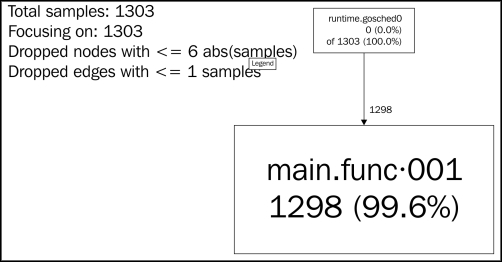
It's not nearly as informative, is it?
If we want to get something more valuable about the stack trace of our goroutines, Go—as usual—provides some additional functionality.
In the runtime package, there is a function and a method that allow us to access and utilize the stack traces of our goroutines:
If we add the following line to our program, we won't see the output in the pprof Go tool, but we can get a detailed analysis of our goroutines in the console.
pprof.Lookup("goroutine").WriteTo(os.Stdout, 1)The previous code line gives us some more of the abstract goroutine memory location information and package detail, which will look something like the following screenshot:

But an even faster way to get this output is by utilizing the http/pprof tool, which keeps the results of our application active via a separate server. We've gone with port 6000 here as shown in the following code, though you can modify this as necessary:
  go func() {
    log.Println(http.ListenAndServe("localhost:6000", nil))
  }()
While you cannot get an SVG output of the goroutine stack call, you can see it live in your browser by going to http://localhost:6060/debug/pprof/goroutine?debug=1.