
12
Introduction to macOS and iOS Threats
Apple Inc. (originally Apple Computer Company) was founded back in 1976 to sell one of the world’s first personal computers (PCs) as we know them now. By now, Apple Inc. is an industry giant with a valuation of many billions of dollars. However, not everybody is aware that its modern operating systems (such as macOS, iOS, watchOS, and tvOS) are primarily based on the NeXTSTEP solution developed by the NeXT, Inc., a company founded by Steve Jobs following his resignation from Apple in 1985 and later acquired by Apple in 1997. All modern Apple operating systems are based on a set of components unified as the Darwin operating system, which is based on the XNU hybrid kernel.
Multiple Apple products became famous for their high quality and reliability, with their users enjoying the feeling of security and often strongly believing that there was no malware for Mac. Indeed, the number of malicious samples successfully targeting this platform is significantly lower than Windows. There are multiple reasons for this, including different security and business models, as well as the different markets of these platforms. However, as long as the number of potential targets that use these systems increases, we will also see an increase in effort to develop malware for Apple-driven platforms. Here, we will look at various threats that target users of macOS and iOS operating systems and will learn how to analyze them.
To streamline our learning, the chapter is divided into the following main sections:
- Understanding the role of the security model
- File formats and APIs
- Attack stages
- Advanced techniques
- Static and dynamic analysis of macOS and iOS samples
- The analysis workflow
Understanding the role of the security model
In many cases, malware uses design weaknesses in the system architecture in order to achieve its goals. Examples could be unauthorized access to sensitive data, tampering with security measures, or modification of system files to achieve persistence or stealth. Thus, the security model plays a vital role in reducing the attack surface, and in this way, reducing the number of techniques available to malware authors.
Now, let’s take a look at security models introduced in macOS and iOS and see why they are important when we talk about malicious code.
macOS
macOS (previously Mac OS X and OS X) has gone through multiple iterations since it was first introduced in 2001. Prior to that, a series of operating systems developed between 1984 to 2001 for the Macintosh family of PC was in use; now, they are known by the colloquial term Classic Mac OS. macOS belongs to the family of Macintosh operating systems derived from NeXTSTEP. This operating system was originally based on Unix (particularly, BSD with the Mach microkernel). Using a Unix-derived architecture was a completely new direction compared to the previous Mac OS solutions.
Apart from traditional C/C++ languages, the main programming languages that Apple supports in their products are Objective-C and Swift (since 2014). Interactions between applications and the OS are possible through the native API, called Cocoa, derived from OPENSTEP; prior to that, the Carbon API was used.
There are multiple mechanisms implemented in the operating system that aim to boost security while always keeping usability in the mind. Let’s go through some of the most important ones.
Security policies
macOS utilizes several security controls derived from BSD. In particular, it utilizes traditional discretionary access restrictions to system resources and files that are based on user and group IDs. In this case, permissions are granted mainly at the level of folders, files, and apps, and are controlled at many levels, including kernel components. In addition, macOS implements mandatory access controls to power multiple important features, such as sandboxing or System Integrity Protection. System Integrity Protection was introduced in OS X 10.11 and enforces read-only access to specific critical filesystem locations, even for the root user, which are applied to all running processes. The following locations are protected:
- /usr
- /bin
- /sbin
- /System
- Apps pre-installed with macOS

Figure 12.1 – No write access for one of the protected directories even with sudo
These paths can be accessed only by the processes signed by Apple as having a reason to work with them, such as Apple software updates. Thus, system files and resources, including kernels, are separated from the user’s app space so that malicious code can’t easily access it. The root user is disabled by default, but it can be enabled in system preferences when necessary.
Tasks and resources are administrated by introducing secure communication channels, called Mach ports. Ports are unidirectional endpoints that connect a client requesting service and a server that provides it, where a resource specified by a port generally has a single receiver and multiple possible senders. Permissions to access a port in particular ways by tasks are called port rights. Ports are an essential part of the macOS inter-process communication (IPC), which includes multiple forms, such as classic message queues, semaphores, or remote procedure calls. Bypassing the associated permissions shouldn’t be possible unless some vulnerability is discovered, such as CVE-2021-30869 used in the DazzleSpy threat.
Filesystem hierarchy and encryption
Let’s take a look at the most common directories that can be found on the modern versions of macOS and learn a bit more about them.
Directory structure
Here are some of the most crucial directories (in terms of malware analysis) and their purpose:
- /Applications: This location is automatically used to install apps shared by all users.
- Library: There are multiple library directories that can be used by apps:
- ~/Library: The directory in the current user’s home directory.
- /Library: A location to store libraries shared between users.
- /System/Library: This location can be used only by Apple.
- /Volumes: Stores subdirectories for mounted disks.
- /System: Contains system-related resources.
- /Users: Contains user home directories. Each contains its own subdirectories, including user-specific Applications and Library folders (the last one is hidden in more recent versions of macOS).
Apart from that, there are various Unix-specific directories, such as /bin, /sbin, /var, /usr, and /tmp.
Encryption
Apple uses its own Apple FileSystem (APFS) that offers multiple modern features, including strong encryption. All Mac computers are shipped with the FileVault disk encryption system, which utilizes the Advanced Encryption Standard (AES) algorithm to protect critical data. It is also possible to encrypt the whole disk and make it accessible only with valid credentials or a recovery key (FileVault 2). Once the user enables the FileVault feature, authentication is required before using the Target Disk mode, where a device can be attached to another machine and become accessible as an external device (making it possible for attackers to access sensitive data). Newer models of Mac computers are shipped with a dedicated Apple T2 chip (or its successors) and have disk encryption enabled by default. In this case, the optional FileVault provides extra protection by requiring credentials to be provided before decryption – otherwise, encrypted SSDs can be decrypted by simply attaching them to the corresponding Mac. In addition, the Apple T2 security chip enables Secure Boot to implement a chain of trust rooted in hardware, where the software integrity is assured at every next step of booting, making bootkit creation extremely hard.
All Macs are also shipped with the built-in Time Machine backup feature, which allows you to restore files once they are lost or damaged, for example, due to a ransomware attack. In this case, it is also possible to encrypt backups for extra security and use external storage to make them inaccessible to malware (especially wipers and ransomware).
Finally, it is possible to create encrypted disk images using Disk Utility and use them as secure containers for sensitive information. In this case, either 128-bit or 256-bit AES encryption is possible.
All these techniques make it more difficult for attackers to get access to sensitive information.
Apps protection
There are several built-in features available in macOS that ensure that only trusted applications are installed on the system.
Gatekeeper
One of the first technologies worth mentioning is called Gatekeeper. It gives users direct control over which apps are allowed to be installed. Thus, it is possible to enforce the policy by allowing only apps from the App Store to be used. All apps aiming to appear on the App Store should be signed with a certificate issued by Apple and reviewed by its engineers to ensure that they are generally free of bugs, up to date, secure, and don’t compromise the user experience in any way.
Default Gatekeeper settings also allow applications from outside the App Store that still have a valid developer ID signature, which means the app is signed using a certificate issued by Apple. In addition, it is possible to submit an app to Apple for notarizing. In this case, the files are checked by automatic malware scanning and signature checking; as a result, the ticket is distributed with the app and available online. So, when the user executes such an app, they get a notification that it has been checked by Apple for the presence of malicious functionality. Unsigned applications will be restricted in rights by mandatory access controls and cause alerts.
Another anti-malware feature implemented in Gatekeeper is Path Randomization, as in App Translocation. When apps appear to be less trustworthy, they are placed in the unknown within their developer system location, which supports at most read-only operations – for example, when the apps are executed from the unsigned disk image or from the location where they have been downloaded and unpacked (but not moved yet). The idea here is to prevent malicious apps from self-updating and from accessing data using relative paths. This feature works closely with another one that involves marking files downloaded using quarantine-aware applications with a special extended attribute, com.apple.quarantine. It will ensure that for particularly dangerous file types, the first time the user attempts to open or execute them, they will be treated in a more secure manner. This attribute can be seen when executing the ls –l@ command:

Figure 12.2 – An extended attribute com.apple.quarantine in action
All apps from the App Store are sandboxed and don’t have access to the data of other apps, other than by using dedicated APIs. For apps distributed outside the App Store, this feature is optional but highly recommended.
A non-sandboxed app has the same access rights as the user executing it, which means if it gets compromised by exploiting some vulnerability, the attacker gets user privileges. The way App Sandbox handles this is by only providing an app with the access rights it needs to perform its tasks; additional access may be explicitly granted by a user:
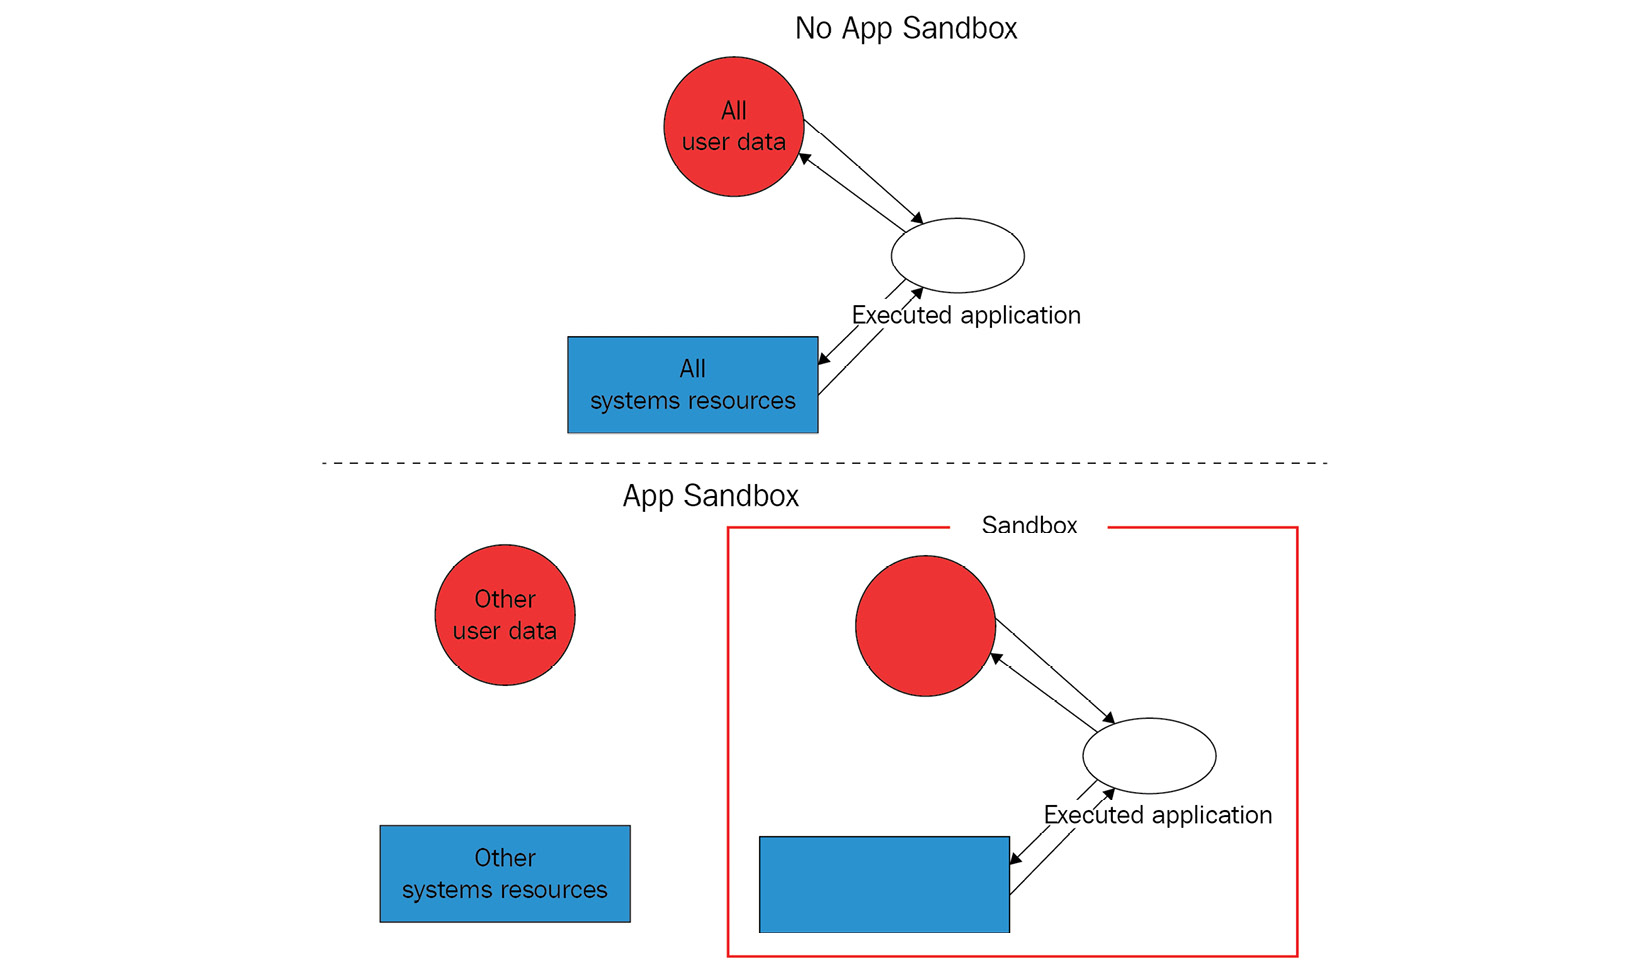
Figure 12.3 – App Sandbox explained
Here are examples of the resources that a sandboxed app has to request explicitly in order to use:
- Hardware (such as a camera or microphone)
- Networks
- App data (such as a calendar or contacts)
- User files
Other technologies
macOS features an embedded antivirus solution called XProtect that detects malware using signatures and can block its installation. This technology aims to prevent infection, but if it happens, another built-in program called the Malware Removal Tool (MRT) is supposed to monitor potential malware activity and remediate infections.
In addition, a built-in firewall can provide network protection. Finally, automatic security updates improve the overall level of system security.
Now, let’s compare it with the iOS setup.
iOS
In contrast with macOS, which is mainly developed for PC use cases, iOS was created later to power mobile devices—and this fact affects the security model introduced with it. Other newer operating systems, such as watchOS and tvOS, are extensively based on it, so we will focus mainly on iOS in this chapter.
Similar to macOS, the development can be done in the Objective-C and Swift programming languages, and the API in this case is called Cocoa Touch, which also includes mobile-oriented features, such as gesture recognition. All iOS-powered devices use ARM-based processors.
Now, let’s take a look at the different layers of protection implemented in iOS.
System security
The first thing that is worth mentioning here is the secure boot chain. This means that all components involved in the system code execution are signed by Apple and thus comprise a chain of trust, including the following:
- Boot ROM: The first code that is being executed once the device is turned on. Located in the read-only memory, it verifies the next stage, either the iBoot bootloader (on newer processors) or the Low-Level Bootloader (LLB). A failure at this stage results in the device entering Device Firmware Upgrade (DFU) mode.
- LLB: Available on older devices shipped with A9 and older A-series CPUs, it is eventually responsible for verifying and loading the iBoot.
- iBoot: Once finished, it verifies the OS kernel before allowing it to be loaded. A failure at either the iBoot or LLB stage results in the device entering recovery mode.
- iOS kernel: After the initialization, a mechanism called Kernel Integrity Protection (KIP) is enabled. The idea behind it is to keep the kernel and driver code in a protected memory region that is not accessible for write operations once the booting completes.
In both recovery and DFU modes, the device can be updated or restored to a valid state of the OS. The difference between them is that the recovery mode works mainly through iBoot, which is essentially a part of the operating system, so it can be updated or modified if necessary. In contrast, the DFU is part of the Read-Only Memory (ROM) and cannot be tampered with.
When available, the secure enclave coprocessor is responsible for cryptographic operations that confirm the integrity and overall data protection. It runs a dedicated updatable Secure Enclave OS that is also verified by the Secure Enclave boot ROM.
As we can see, the startup process ensures that only Apple-signed code can be installed and executed, which serves as protection against bootkits and similar threats. Apart from this, Apple strongly opposes downgrading software to older, less secure versions (either by a user or by an attacker), so it introduces a mechanism called system software authorization that prevents its installation. All system updates can be installed either through iTunes, when a full image of the OS is being downloaded and installed, or through an Over-The-Air (OTA) mechanism, where only components related to updates are used.
Data encryption and password management
In terms of encryption, Apple introduced several important features to make it both extremely robust and highly productive. Each iOS device has its Unique ID (UID) and Group ID (GID) to be used in cryptographic operations, where the UID is unique to the device and the GID is shared across all processors of the same type. These values are fused or compiled into the Secure Enclave and CPU during manufacturing; each device gets its own values that are not accessible directly by either software, firmware, or through debugging interfaces (such as JTAG). Cryptographic keys are generated inside the Secure Enclave utilizing a true Hardware Random Number Generator (HRNG), which are generally more secure than Pseudo-Random Number Generators (PRNGs). In addition, a dedicated technology called Effaceable Storage is responsible for securely erasing saved keys once they are no longer needed. File encryption is implemented based on the technology called Data Protection. It generates a new 256-bit AES key for each file created on the device. On newer devices, AES-XTS encryption mode is used, while older devices feature AES-CBC mode. This per-file key is then wrapped (encrypted) with the corresponding class key, which varies for different types of data and is handled differently according to it. Here are the classes supported at the moment:
- Class A – complete protection: Class keys are wrapped using both a UID and passcode; decrypted keys are discarded after the device is locked.
- Class B – protected unless open: Class keys are used together with elliptic curve cryptography to handle files that should be written when the device is locked.
- Class C – protected until first user authentication: The default class for all third-party app data. It’s pretty much the same as Class A, but the main difference is that the decrypted class keys are not wiped once the device is locked. This provides protection against attacks that utilize a reboot.
- Class D – no protection: Class keys are encrypted using only the UID. They are stored in Effaceable Storage and can be quickly wiped if necessary.
Finally, the wrapped key is stored in the file’s metadata, which is encrypted using the filesystem key. While the class keys are encrypted/wrapped using UID and some of them with the passcode, the filesystem key is wrapped using the effaceable key stored in the Effaceable Storage. Once the effaceable key is deleted (for example, using a remote wipe or the Erase All Content and Settings options), it makes the content of all files inaccessible by any means.
When the user sets a passcode, Data Protection becomes enabled automatically. As it is connected to the device’s UID (which we now know is not accessible), it is impossible to brute-force passcodes without the device being physically present. There are several other mechanisms implemented to complicate brute-forcing, for example, a large count of iterations to slow it down, time delays, or automatic data wiping after entering several consecutive invalid values. Other authentication mechanisms, such as TouchID and FaceID, work closely with this technology.
All sensitive data that belongs to apps can be stored in the iOS keychain, which is an SQLite database where values are encrypted using the AES-256-GCM algorithm. This keychain also introduces its own classes to handle different types of data. This way, developers can prevent access to certain data under particular circumstances, for example, when the device is locked. Keychain items can be shared by several apps, but only when they come from the same developer. Finally, all class keys for file protection and keychain are administrated using keybags. There are several types of them used at the moment in iOS:
- User keybag: This stores wrapped class keys involved in the normal device operation.
- Device keybag: This stores wrapped class keys associated with device-specific data operations.
- Backup keybag: This is used when the encrypted backup is created using iTunes.
- iCloud backup: Similar to the backup keybag, it is used for iCloud backups.
- Escrow keybag: This is used for iTunes syncing and Mobile Device Management (MDM).
Saved user passwords are kept in the dedicated storage, called the Password AutoFill keychain. In addition, the iCloud keychain mechanism is responsible for synchronizing credentials across multiple devices. Together, these technologies provide functionality to generate strong passwords, fill in credentials on the websites and apps of your choosing, and securely share them.
It is impossible for apps to access credentials without explicit user consent. In addition, you may need approval from the application or website developer. This approach makes unsolicited data access much more difficult.
App security
iOS requires all code running on the device to be signed using a valid Apple-issued certificate, to ensure its integrity and that it comes from a trusted source. Unlike macOS, this rule is enforced, and the sideloading of apps outside the App Store is not supported for purposes other than app development. A notable exception to this rule is code signed with Enterprise Program certificates, which mainly aim to allow the distribution of proprietary software for internal use or intra-organization beta testing. Later, we will see how this technology can be misused by malware. Usually, this is done using MDM; in this case, a special enterprise-provisioning profile is created on the device.
Once the developer joins the Apple developer program, their identity needs to be verified before the certificate can be issued. Since 2015, there is also an option for developers to sign their code for free, but it has multiple limitations, such as a short expiration date, lack of access to certain features for apps, and a small number of devices on which the app can be executed. In addition, all app code must be verified by Apple to confirm that it is free of obvious bugs and doesn’t pose a risk to users. While it frameworks can be loaded inside the apps, the system validates the signatures of all loaded libraries at launch time using team identifiers.
It may be quite difficult for the attacker to obtain a full valid certificate, but even in the case of success, Apple has an option to promptly revoke the compromised entry and thus protect the majority of devices.
All apps are sandboxed, so they can only access the resources necessary to perform their function. They run under the non-privileged mobile user and there are no APIs that allow self-privilege escalation. Each app has its own directory to store files and can’t gather or alter information associated with other applications – only apps that belong to the same App Group and come from the same developer can access a limited set of shared items.
The following directories are commonly used by sandboxed apps:
- <app_name>.app: The app’s bundle, available for read-only operations.
- Documents/: This location is supposed to be used to store user-generated content.
- Library/: This can be used to store any non-user files. Some of the most commonly used subdirectories here are Application Support and Caches.
- tmp/: This is used to store temporary files that don’t persist between app launches.
The exact location at which apps are installed varies among the different versions of iOS.
There are dedicated APIs that can be used to allow safe interaction between apps. In addition, the apps’ extensions (signed executables shipped with the app) can be used for inter-process communications as well; in this case, each extension has its own address space. All this makes it very difficult for attackers to access or tamper with sensitive information, or to affect the system.
The way that third-party apps can access sensitive data is controlled by mechanisms called entitlements. These are digitally signed credentials, associated with apps, for handling privileged operations. Beyond this, features such as Address Space Layout Randomization (ASLR), ARM’s Execute Never (XN), and stack canaries are used to provide protection against exploits that leverage memory-corruption vulnerabilities. Finally, the entire partition that stores the operating system is mounted as read-only to prevent tampering.
One last thing worth mentioning is the Apple FairPlay DRM protection, which may also be used to apply encryption to the app once it is downloaded so that the encrypted block can be decrypted only on the approved device that is requesting it. It may complicate the life of reverse-engineers doing a static analysis of the sample, as the decrypted version needs to be obtained first, so this is worth keeping in mind.
Now, it is time to dive deeper into the various file formats widely used in Apple operating systems to manage executables.
File formats and APIs
Knowing about file formats and their structure is important for static analysis, as it becomes possible to know exactly where to search for particular artifacts of interest. In terms of dynamic analysis, knowledge about the structure is particularly useful, as this way, we know how to run the sample properly and the order in which the code is going to be executed, so we won’t miss an important part of the functionality.
Mach-O
This format is the main executable format on macOS and iOS operating systems. It has pretty much the same role as PE on Windows or ELF on Linux-based systems. It is also used to store object code, shared libraries, and core dumps. There are two types of these files: thin and fat.
Thin
This is the most common type of Mach-O file. It is composed of the following parts:
- A header: Contains general information about the file. Here is its structure according to the official source code:
struct mach_header {
unsigned long magic; /* mach magic number identifier */
cpu_type_t cputype; /* cpu specifier */
cpu_subtype_t cpusubtype; /* machine specifier */
unsigned long filetype; /* type of file */
unsigned long ncmds; /* number of load commands */
unsigned long sizeofcmds; /* the size of load commands */
unsigned long flags; /* flags */
};
The difference between 32-bit and 64-bit versions of this header lies mainly in the extra reserved field added to the end of this structure, and the slightly different magic values used: 0xfeedface for 32-bit and 0xfeedfacf for 64-bit.
- Load commands: These can perform multiple actions, most importantly defining the segments present in the file, where each block contains information about a particular segment and the corresponding sections, including offsets and sizes. This data can be used to load the executable correctly in memory. Here is the structure of the command describing a segment:
struct segment_command {
unsigned long cmd; /* LC_SEGMENT */
unsigned long cmdsize; /* size of section structs */
char segname[16]; /* segment name */
unsigned long vmaddr; /* memory address of this segment */
unsigned long vmsize; /* memory size of this segment */
unsigned long fileoff; /* file offset of this segment */
unsigned long filesize; /* amount to map from the file */
vm_prot_t maxprot; /* maximum VM protection */
vm_prot_t initprot; /* initial VM protection */
unsigned long nsects; /* number of sections in segment */
unsigned long flags; /* flags */
};
The same fields are used within 32-bit and 64-bit architectures (LC_SEGMENT and LC_SEGMENT_64 commands, respectively) – the difference will only be the sizes of the fields.
It is followed by a set of structures that describe the sections:
struct section {
char sectname[16]; /* name of this section */
char segname[16]; /* segment this section goes in */
unsigned long addr; /* memory address of this section */
unsigned long size; /* size in bytes of this section */
unsigned long offset; /* file offset of this section */
unsigned long align; /* section alignment (power of 2) */
unsigned long reloff; /* file offset of relocation entries */
unsigned long nreloc; /* number of relocation entries */
unsigned long flags; /* flags (section type and attributes) */
unsigned long reserved1; /* reserved */
unsigned long reserved2; /* reserved */
};
In terms of malware analysis, another load command that might be of interest to an analyst is LC_LOAD_DYLIB, which is responsible for loading additional libraries.
- Segments: Each segment consists of sections that contain actual code and data. As each segment starts on the page boundary, its size is a multiple of 4 KB. The naming convention used here is the following: all uppercase letters are used for segments and all lowercase letters for sections, both prepended by a double underscore, for example, __DATA or __text, respectively. Here are some of the most important segments and sections in terms of malware analysis that can be found in the majority of Mach-O files:
- TEXT: This segment is read-only, as it contains executable code and constant data:
- text: Contains actual compiled machine code
- const: Generic constant data used by the executable
- cstring: Stores string constants
- DATA: This contains non-constant data, so it is available for both read and write operations:
- data: Used to store initialized global variables
- common: Stores uninitialized external global variables
- bss: Keeps uninitialized static variables
- const: Contains constant data available for relocation
- TEXT: This segment is read-only, as it contains executable code and constant data:
The files that implement this format contain machine code associated with one platform only. At the moment, it is ARM for iOS and x86-64 or ARM for macOS; older versions of macOS were based on PowerPC and later, IA-32 architectures.
The format has undergone a few changes with the introduction of Mac OS X 10.6, which made newer executables incompatible with older versions of the OS. These changes included the following:
- Different load commands
- A new format for the link-edit table data used by a dynamic linker (the __LINKEDIT segment)
Fat
Fat binaries (also known as multi-architecture binaries or universal binaries) are quite unique, as they are used to store code for several different architectures. The format includes a custom fat header, followed by a set of Mach-O files:
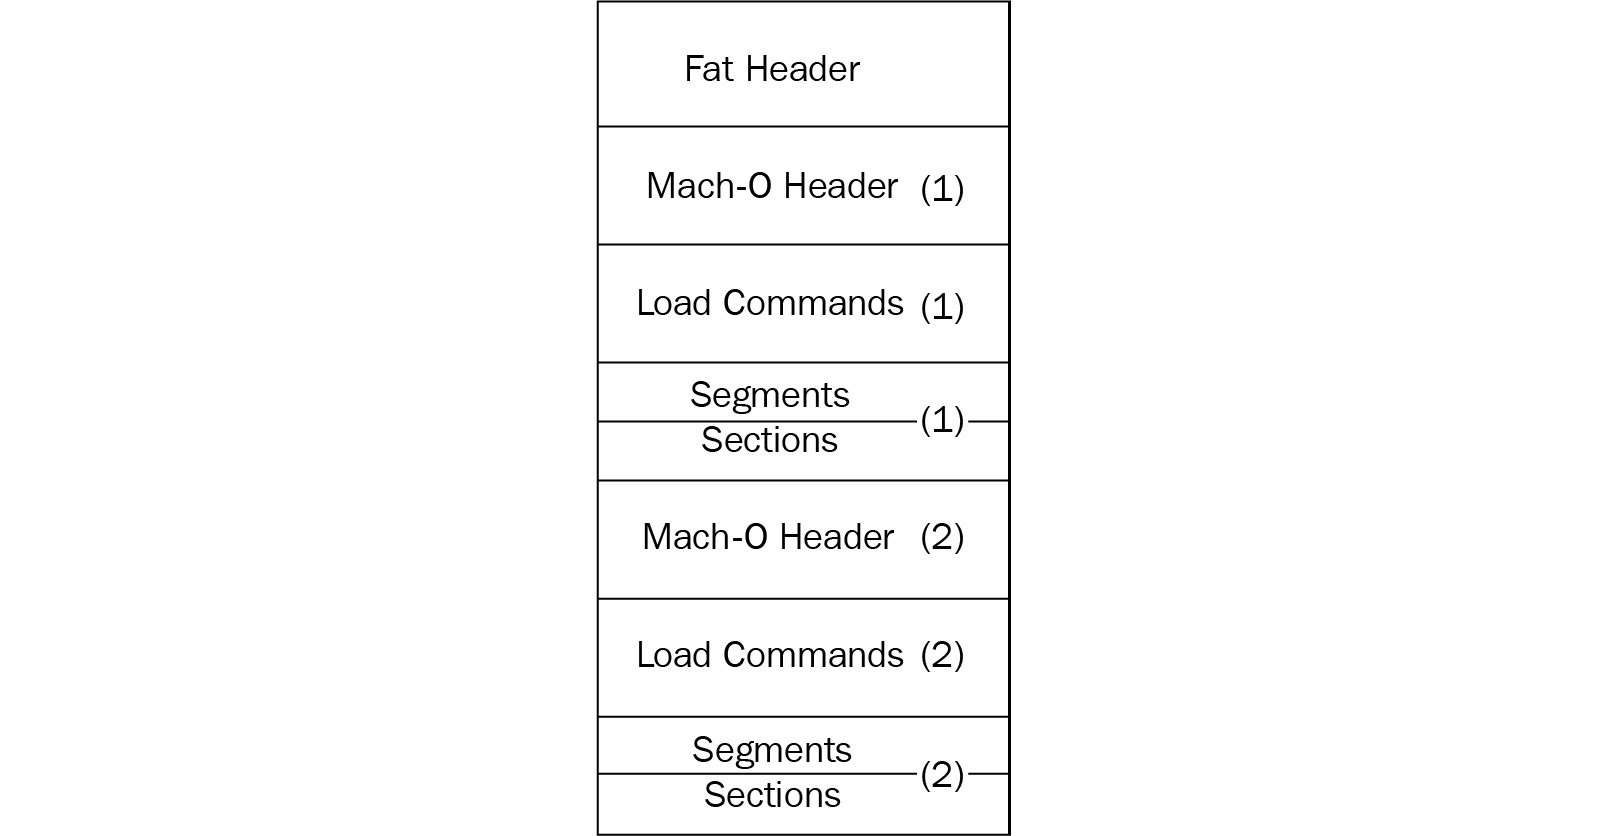
Figure 12.4 – A fat Mach-O executable file
Here is the header structure:
struct fat_header {
  unsigned long magic; /* FAT_MAGIC */
  unsigned long nfat_arch; /* number of structs that follow */
};
The magic value, in this case, is 0xcafebabe.
This header is followed by several fat_arch structures, whose amount is equal to the value specified by the nfat_arch field:
struct fat_arch {
  cpu_type_t cputype; /* cpu specifier (int) */
  cpu_subtype_t cpusubtype; /* machine specifier (int) */
  unsigned long offset; /* file offset to this object file */
  unsigned long size; /* size of this object file */
  unsigned long align; /* alignment as a power of 2 */
};
All these structures can be found in the officially published Apple source code.
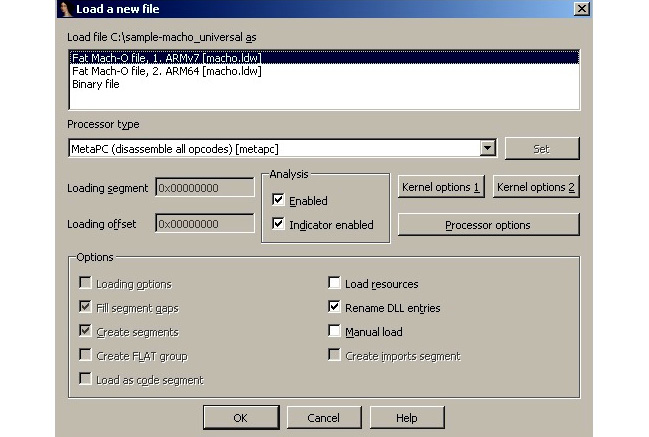
Figure 12.5 – IDA confirming which thin Mach-O file in the fat binary should be analyzed
Usually, it makes sense to stick to the architecture that the engineer is most comfortable working with.
Application bundles (.app)
Bundles are directories that store everything that the app needs in order to successfully perform its operations. It allows related files to be grouped together and distributed as a single entity. In the case of both macOS and iOS systems, they generally include the following:
- An executable: Contains the code that defines the logic behind an application with the main entry point.
- Resources: All data files located outside the executable, such as images, sounds, or configuration files.
- Additional support files: Examples include various templates, plugins, and frameworks.
- Info.plist: This is an obligatory information property list that contains configuration information required by the system.
The most common extension associated with application bundles here is .app. The file hierarchy is slightly different for iOS and macOS; for the former, all required files are located in the root folder, while for the latter, they are located in the dedicated Contents folder, with the code located in the MacOS subdirectory and resources in the Resources subdirectory inside it. Other common standard subdirectories used are PlugIns, Frameworks, and SharedSupport.
Info.plist
As has already been mentioned, Info.plist provides important app-related metadata to the system at runtime. The required values are slightly different for macOS and iOS; let’s go through the most important of them.
macOS
Here is a list of important values with a brief explanation for each:
- CFBundleName: The short name of the bundle
- CFBundleDisplayName: The localized name of the app
- CFBundleIdentifier: A string that identifies an app in the system in reverse Domain Name System (DNS) format (such as com.example.hello)
- CFBundleVersion: The build version number of the bundle
- CFBundlePackageType: Always APPL for applications
- CFBundleSignature: The short code for the bundle
- CFBundleExecutable: Probably the most important field for malware analysis, as it defines the name of the main executable file
iOS
Now, let’s take a look at the fields for iOS apps:
- CFBundleDisplayName: The localized name of the app, displayed underneath the application icon.
- CFBundleIdentifier: The string that identifies an app in the system in reverse DNS format, which is the same as in macOS.
- CFBundleVersion: The build version number of the bundle.
- CFBundleIconFiles: This stores an array with the filenames of the icons used.
- LSRequiresIPhoneOS: A Boolean value indicating whether the bundle should run only on iOS; it is automatically set to True by the Xcode IDE.
- UIRequiredDeviceCapabilities: Defines device-related features required for the app to run.
- CFBundleExecutable: The name of the main executable. It is generally expected to be the same as the application name without the .app extension.
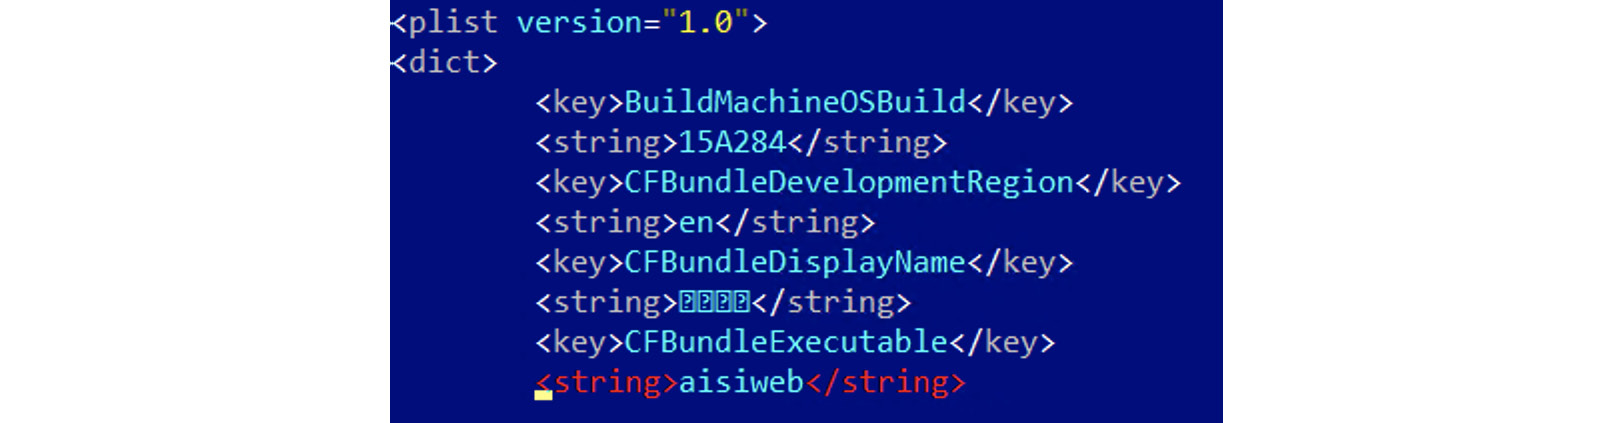
Figure 12.6 – A CFBundleExecutable field in the Info.plist file of an AceDeceiver threat
Besides XML and JSON, .plist files can also be encoded using the binary format. In this case, they will look as follows:
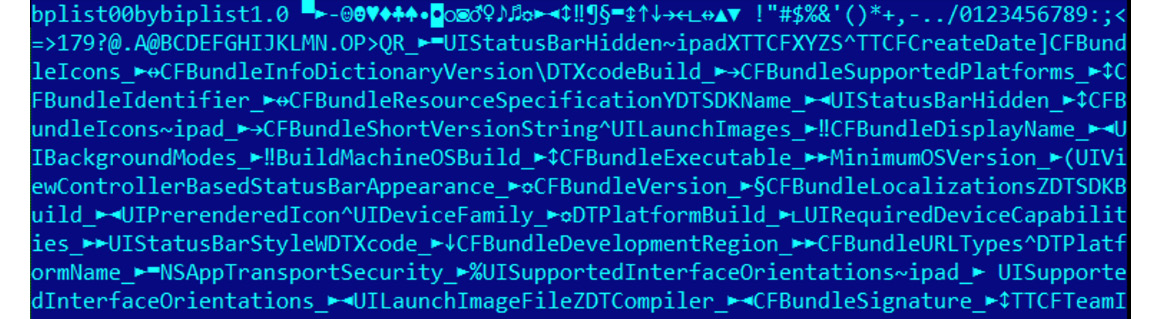
Figure 12.7 – A binary-encoded .plist file of the ZergHelper threat
The standard file tool will display the following message for such files:
Info.plist; Apple binary property list
To convert them to a human-readable format, use the standard plutil tool: plutil -convert xml1 Info.plist.
Installer packages (.pkg)
These files commonly have the .pkg file extension and are used to group and store related files together, preserving the file hierarchy. Then, they can be extracted and installed using the installer application on macOS. Internally, they implement eXtensible ARchive (XAR) format. The content can be explored and extracted using a standard macOS xar tool:

Figure 12.8 – The content of the .pkg file listed using the xar tool
Important note
It is not recommended to use 7-Zip for extraction in this case, as it doesn’t see all the files present in the archive compared to the xar tool, which may lead to some artifacts that are important from the analysis perspective being overlooked. Figure 12.9 is an example of the incomplete data visible when using 7-Zip.
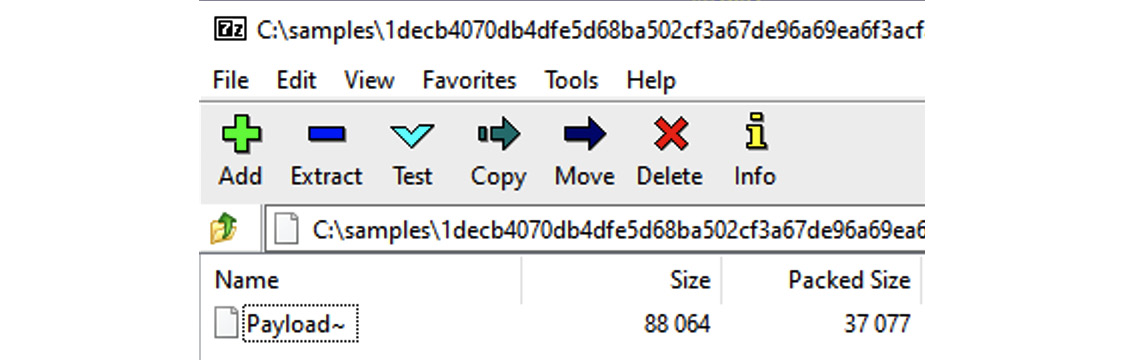
Figure 12.9 – 7-Zip only displaying a subset of the files present in the archive compared to the xar tool
Aside from looking for Mach-O executables in the Payload directory, also check the PackageInfo file, as it may point to scripts that will be executed during the installation, commonly located in the Scripts archive. Another place to check is the Distribution file if present, as it may contain executable JavaScript code.
Apple disk images (.dmg)
This is another common way to distribute applications for macOS; the corresponding disk image files generally have the .dmg file extension. They can be used as a mountable disk or volume for storing files of various types. The native format used for this nowadays is the Universal Disk Image Format (UDIF), but prior to that, the New Disk Image Format (NDIF) was used. It also supports compression and encryption. Rather than a header, they can be recognized by a trailer, which contains a magic four-byte koly value at its start. In order to get access to the files inside, the disk image can be mounted or converted using standard tools bundled with Apple operating systems, such as the hdiutil console. On other operating systems, it is possible to use tools such as dmg2img to convert these files into a non-proprietary disk image format and then mount them as usual. Alternatively, they can be unpacked using tools such as 7-Zip.
iOS app store packages (.ipa)
iOS App Store Package is a format used in iOS to distribute archived apps. The file extension used in this case is .ipa. All .ipa files should contain the Payload directory with the .app bundle directory inside, which may also contain various metadata for iTunes and the App Store. In terms of implementation, the ZIP format is used here, which means that these files can be unpacked using any standard tools able to handle ZIP files.
Now that we are familiar with the most common file types used in Apple systems, let’s explore their APIs.
APIs
Apple provides a rich set of APIs to developers that aim to let them perform any task in a robust and secure way. The NS prefix commonly used in names stands for NeXTSTEP – the platform that they were originally designed for. The CF prefix is an abbreviation of the Core Foundation framework, which is a C API for macOS and iOS. The reason they co-exist and sometimes provide similar functionalities is mainly historical, as this is the result of merging the Classic Mac OS toolbox and OPENSTEP specification. There is even a special term for using the corresponding logic interchangeably: toll-free bridging.
Here are some examples of classes commonly misused by malware:
- Filesystem operations: To begin with, various classes from the File System group of the Foundation framework can be used to perform file operations. Malware can use them for multiple purposes; for example, to relocate its own modules, store malicious configuration, or get access to sensitive data. Examples include NSFileHandle and NSFileManager.
Low-level functionality can also be implemented using classes from the Streams, Sockets, and Ports group, such as InputStream and its counterpart, CFReadStream. Another option is the NSWorkspace class from AppKit, which can be used to manipulate files and access their metadata. Beyond this, it is also possible to work with files using certain NSString methods; for example, stringWithContentsOfFile.
- Working with processes: The classes associated with the Processes and Threads group of the Foundation framework can be used to create new processes and interact with existing ones, for example, to handle another malicious module. An example of this is the NSTask class. The NSWorkspace class, among others, can also be used to iterate through running apps (for example, to search for antivirus solutions) and launch new ones. It is also possible to use the Process class from the Streams, Sockets, and Port group of the Foundation framework.
- Using networks: There are multiple APIs that aim to enable developers to interact with remote machines. In the case of malware, it can use the command and control server to download or exfiltrate data, or maybe contact the victim’s bank to perform unauthorized actions. Here are some examples:
- The URL loading system: An example of the class from this group is NSURLSession.
- Streams, Sockets, and Ports: Some classes from this group can be used to work with the network; for example, NSHost or NSSocketPort.
- CFNetwork: This framework can be utilized to work with network artifacts as well. Some examples of the corresponding classes are CFHTTP and CFFTP.
- CFSocket: This class from the Core Foundation framework can also be used, which represents a communication channel implemented with a BSD socket.
- NSString: This method can be used to access networking functionality as well, for example, stringWithContentsOfURL.
In disassembly, things will look a little bit different. Particularly, the objc_msgSend function will appear quite often, as it is used by the compiler to interact with instances of classes by sending messages and receiving the results. In order to figure out the actual functionality, we need to map selector arguments to the corresponding human-readable values, a job generally done by disassemblers and decompilers. Here is how it may be presented in the debugger:
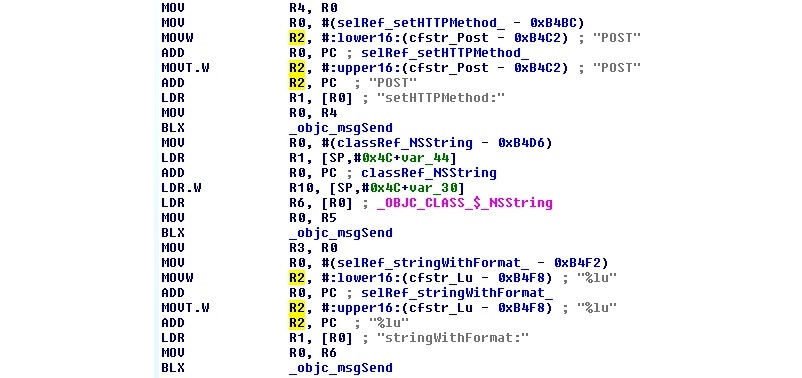
Figure 12.10 – An example of XcodeGhost’s disassembly in IDA preparing a web request
We have already learned enough about how malware samples may look, so now let’s explore what their most common functions would be.
Attack stages
Regardless of the targeted architecture, generally, malware has to go through the same stages in order to achieve its goals; however, the implementation can be quite different. Let’s go through the most important of them.
Jailbreaks on demand
To begin, let’s talk about jailbreaks in greater detail. Jailbreaking generally applies to iOS mobile devices and involves obtaining elevated privileges in order to remove certain software restrictions. There are multiple reasons why users may want to do this to their devices:
- Getting access to extra functionality: In this case, a user becomes able to tweak the operating system appearance or get access to unsupported features.
- Unlocking carrier-locked phones: This may help unlock devices so that they can be used with other mobile carriers.
- Installing unapproved or pirated software: Here, examples include older versions of software, custom input systems (popular in China), or generic App Store software from other markets without paying for it.
While the terms jailbreaking and rooting are often used interchangeably, jailbreaking is actually a broader term, as it also involves unlocking the bootloader in order to modify the operating system, for example, to allow easy app sideloading (that is, the installation of unsigned apps or apps distributed outside the App Store).
There are several common types of jailbreaks for iOS, based on the way the kernel is patched:
- Untethered: The jailbreak is applied after simply rebooting the device, without any need to use a PC during the booting process.
- Tethered: A PC is required to turn on the mobile device each time it is rebooted – otherwise, the device becomes dysfunctional.
- Semi-tethered: The PC is required to run the modified code during the boot, but it can still boot on its own, providing limited access to some basic functionality.
- Semi-untethered: This requires the kernel to be patched every time the device is rebooted. In this case, it can be accomplished without a PC, with the help of a dedicated app installed on the device.
Older jailbreaking tools, such as JailbreakMe, could even be used over the internet by downloading a specifically-crafted PDF exploit that targeted the Safari browser. Newer tools, such as unc0ver and Chimera, are generally distributed as IPA files that can be installed on a device by signing them with a free developer certificate associated with the owner of the device and manually approving them in the device settings. Once the exploit has been successfully applied and elevated privileges are obtained, usually, the Cydia package manager is installed. In addition, many users install OpenSSH in order to be able to get access to a full-fledged console. So, common malware checks for an existing jailbreak involve looking for the presence of Cydia or sshd files in the filesystem.
As we can see, generally, there is no obvious solution for generic malware to silently apply a jailbreak when running either on the device itself or the connected PC without interaction with a legitimate user. Thus, many malware families prefer to either target already-jailbroken devices or rely on other techniques in order to achieve their goals.
Initial access
As we know now, the application-related policies are quite different for macOS and iOS. If macOS still makes it possible for users to install programs outside the App Store, lower their security settings to allow unsigned applications, and create programs that don’t incorporate App Sandbox, all this is not possible on iOS without jailbreaking the device. Thus, the common penetration vectors differ for these operating systems.
As the App Store infrastructure is quite well-protected against malicious apps, especially because of the obligatory signing of quite expensive certificates that can be promptly revoked, therefore deactivating the corresponding threat on the vast majority of devices, mass malware authors rarely follow this path. Still, there are some exceptions to this rule, for example, when malware authors get access to stolen certificates or inject malicious functionality into legitimate software. An example of this could be an XcodeGhost threat that managed to get access to developers’ machines via a compromised Xcode IDE downloaded from a third-party website and injected malicious logic into legitimate iOS apps. Another approach was chosen by the authors of XcodeSpy and XCSSET threats, which embedded into distributed Xcode projects and executed payloads when the developer would build them.
A creative way to bypass the revocation of malicious apps was used by the authors of AceDeceiver, who managed to upload their app to the App Store by checking the physical location and presenting benign functionality to users located outside of China. The attackers managed to intercept the authorization token used by the Apple FairPlay DRM technology, which is unique to each app but the same for all devices. Eventually, this token allowed the attackers to perform FairPlay MITM attacks – when a client running on the connected PC can use it to install an app to non-jailbroken iOS devices, even after the actual app was removed from the App Store. Another app that managed to bypass the Apple review was ZergHelper. In order to install apps on non-jailbroken devices, it implemented a part of the Xcode functionality responsible for automatically obtaining free developer certificates. Originally intended to be used to sign apps that can run only on the personal developer’s device, in this case, they were used to sign unwanted apps on the fly, before installing them on the victim’s device associated with the requested certificate:

Figure 12.11 – ZergHelper dynamically obtaining developer certificates
One more notable example is WireLurker, distributed via Chinese app stores where it trojanized hundreds of apps. In this case, even if the device wasn’t jailbroken, it was possible to collect some basic information about the system and install unwanted apps signed with Enterprise Program certificates.
Overall, many iOS threats primarily target jailbroken devices to be able to get access to sensitive information or required system features – on modern systems, there is no easy way to elevate privileges from the device itself, so users commonly jailbreak their own devices by manually signing jailbreaking apps using their own certificates and allowing them access to the device settings. Cydia repositories are among the most common places where malware authors host their brainchildren. A notable exception to this rule was the Pegasus malware, which leveraged a zero-day exploit that targeted the Safari browser, so it was enough for users to click on the phishing link in order to get infected.
For macOS, attackers these days mainly focus on simpler options, such as hosting malicious apps on third-party websites, application stores, or torrent networks and relying on social engineering techniques to trick users into installing them. In the case of the KeRanger threat, a legitimate website was compromised and the corresponding software was trojanized. The use of exploits that target browsers is quite rare nowadays. In addition, just as with Windows users, it is possible to get infected by opening a Microsoft Office document that contains a malicious macro and allowing it to be executed. In some cases, malware authors may still prefer to propagate through the App Store using stolen certificates to bypass Gatekeeper. This particularly applies to malware families that don’t care whether they are detected and deleted in a day or two, as their aim is to affect as many users as possible in a very short time. A good example is ransomware, whose job is done as long as it manages to encrypt a victim’s files and then deliver instructions on how to pay a ransom.
Execution and persistence
Once the first-stage malware enters the targeted machine, it generally needs to settle down, deliver, and configure additional modules (commonly by downloading or extracting them from its body), and then make sure it will survive the system reboot. That’s what execution and persistence stages are mainly about.The deployment mechanisms vary for macOS and iOS systems. Let’s take a look at each of them in greater detail.
macOS
There are multiple places where malware can hide from the user on the macOS system. Here are some of the most common locations:
- /tmp: One of the most popular locations to put intermediate files, as malware can be sure it will have write access there with pretty much any standard privileges.
- ~/Library and /Library: Another location misused by malware aiming to look benign and hide among legitimate apps. The Application Support subdirectory is commonly used here as well.
- ~/Library/Safari/Extensions: This location is generally used to install unwanted browser extensions for Safari.
- ~/Library/Application Support/Google/Chrome/Default/Extensions: Here, unwanted browser extensions are installed for Chrome.
Persistence is commonly achieved by adding the corresponding .plist file to one of the following locations:
- /Library/LaunchDaemons: System-wide daemons provided by the administrator, which can start without a user being logged in.

Figure 12.12 – Malware establishing persistence by copying its .plist file to /Library/LaunchDaemons/
- /Library/LaunchAgents: Per-user agents provided by the administrator that are invoked when the user logs in.
- ~/Library/LaunchAgents: Per-user agents provided by the user that are invoked when the user logs in.
- /System/Library/LaunchDaemons and /System/Library/LaunchAgents: Per-user agents provided by the OS that are invoked when the user logs in. Here is an example of it being used by malware:
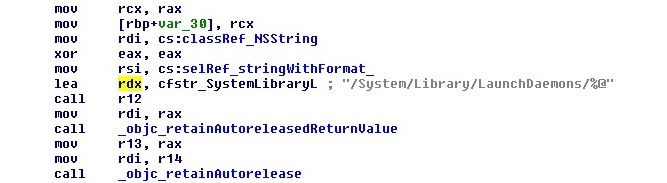
Figure 12.13 – The WireLurker threat using the /System/Library/LaunchDaemons path
Persistence can be also achieved by various other means such as using the cron tool or performing dylib hijacking, where the malicious dynamic library (dylib) is placed in a path that a legitimate victim application searches for and loads at runtime.
Now, let’s take a quick look at how things are organized in iOS.
iOS
For non-jailbroken devices, malware often hides in trojanized legitimate software packages (clean software with inserted malicious code). For the end user, the app looks and behaves as expected, while simultaneously performing malicious actions in the background.
For jailbroken devices, malware has access to multiple locations throughout the system, so in this case, the choice depends mainly on the preferences of the attackers.
As with macOS, persistence can be achieved by placing a .plist file in one of the .../Library/LaunchDaemons directories.
Impact
Now, let’s talk about the actual negative effects that malware may cause. In many cases, the motivation behind the attack can be the same whether it occurs on a mobile device or a PC. Nowadays, both provide access to a large amount of sensitive information and have enough computational power to perform actions that malware authors may be interested in.
macOS
To begin, most of the malware types affecting Mac users strongly resemble the threats targeting Windows users – the difference is mainly in the scope and implementation. Thus, macOS Terminal actually uses Unix shells, so malware can create shell scripts and utilize the various commands that we discussed in the previous Chapter 11, Dissecting Linux and IoT Malware. Here are some of the other commands that are commonly misused on Mac computers:
- curl: As with Linux, this tool can be used to interact with the C&C.
- killall: This allows you to kill particular processes by their names.
- openssl: This can be used to decode next-stage payloads.
- funzip: This standard tool allows attackers to easily chain decompression with other commands supporting both ZIP and GZIP formats.
- sqlite3: Commonly used to parse the history of downloaded files.
- pfctl: This allows attackers to communicate with the Packet Filter (PF), a built-in macOS firewall derived from the BSD world. This component can be used to provide functionality similar to iptables on Linux.
- launchctl: A command-line tool for interacting with services. For example, as we can see in Figure 12.6, malware may attempt to load another payload executing launchctl load functionality.
- pbcopy and pbpaste: This allows the attackers to copy-paste the content of the clipboard.
- chflags: This tool can be used to change a file’s or folder’s flag, for example, to hide or unhide it.
- mdfind: An alternative to the classic find tool that allows the attackers to search for files indexed by Spotlight.
- defaults: This can be used to read and modify system preferences, such as configuration profiles to control the browser’s behavior. For example, the following entries can be used to change the start pages:
- HomePage (Safari)
- HomepageLocation (Chrome)
- NewTabPageLocation (Chrome)
- RestoreOnStartupURLs (Chrome)
Meanwhile, the following entries can be used to set a custom search engine:
- NSPreferredWebServices | NSWebServicesProviderWebSearch (Safari)
- DefaultSearchProviderSearchURL (Chrome)
- DefaultSearchProviderNewTabURL (Chrome)
- DefaultSearchProviderName (Chrome)
In addition, unlike many Linux distributions, modern macOS is shipped with Python, so malware can rely on its presence as well.
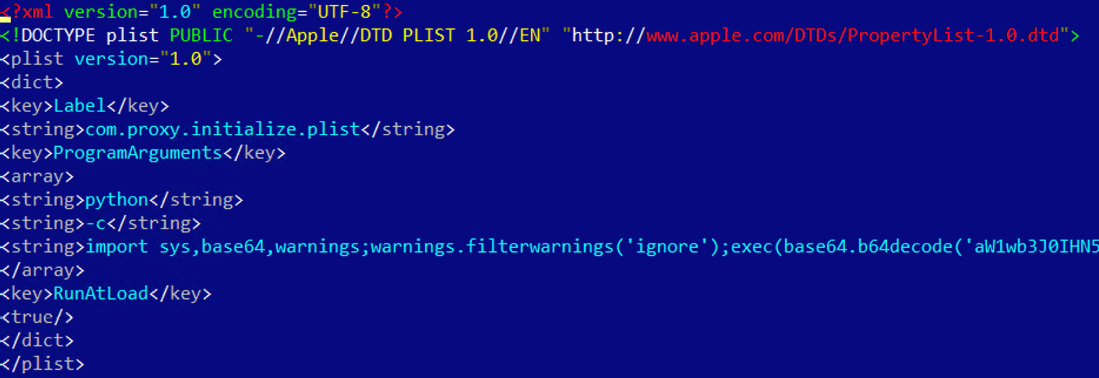
Figure 12.14 – Python code used by the CookieMiner malware
Now, let’s go through some of the recent examples of malware categories commonly targeting Mac users:
- Infostealers: Generally, there is a lot of sensitive information stored on PCs that attackers might be interested in, especially financial information. A good example in this case is the CookieMiner family, which steals browser credentials and cookies to get access to cryptocurrency wallets. In addition, it accesses iTunes backups to access private text messages, as well as saved credentials and credit card details. Another example is MaMi, which installs an additional root CA certificate and incorporates DNS hijacking to intercept victims’ traffic by performing a MITM attack.
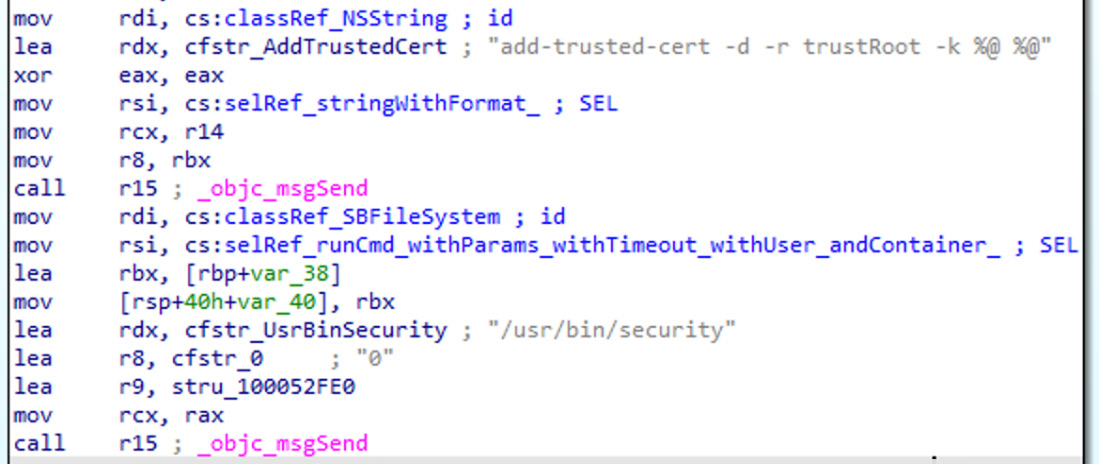
Figure 12.15 – MaMi malware installing a custom root certificate
- Cryptocurrency miners: As with any other platform, this type of malware utilizes the infected system’s resources to mine cryptocurrencies for attackers. Examples of such tools are mshelper and the aforementioned CookieMiner.
- Adware and Potentially Unwanted Programs (PUPs): There are multiple types of programs that don’t perform a truly malicious activity, but still create problems for users. For example, Shlayer (also known as Crossrider) and Bundlore, commonly distributed as cracks, keygens, or Flash Player installers, use shell scripts to deliver various undesirable programs. One of the programs discovered is Advanced Mac Cleaner, which is unique, as it utilizes Siri’s voice to notify users about bogus problems with their machine. Some threats change the homepages or search engines in browsers (such as Smart Search or WeKnow); in many cases, configuration profiles and browser extensions are used for this purpose. PUPs can have quite serious consequences if they are implemented in a particular way. One example is a Pirrit family, which can set up a proxy mainly using the PF to redirect user traffic through it, and in this way, inject ads.
- Backdoors or Remote Access Tools (RATs): A classic example of a full-fledged backdoor is Fruitfly, which managed to remain undetected for several years. It had multiple functions, such as screenshot capturing, controlling the mouse, and executing arbitrary commands. Its propagation involved scanning for specific ports, such as Back to My Mac (BTMM, discontinued in macOS Mojave), the Apple Filing Protocol (AFP), formerly the AppleTalk Filing Protocol, Apple Remote Desktop (based on the VNC protocol), and the traditional SSH port, and then testing them against weak credentials. Some notorious APT actors, such as Lazarus, also develop tools to target Mac users. In this case, their functionality remains identical to the one available for Windows payloads, such as the ability to search for, read, write, and wipe arbitrary files, execute arbitrary commands, as well as carry out self-updating and deleting mechanisms.
- Downloaders: Microsoft Office for macOS re-enabled support for macros back in 2011, and after this, it became possible to target Mac users with bogus documents that also contained malicious macros. In most cases, these macros are used to download and deploy other, more powerful modules. While many attackers nowadays execute PowerShell commands from macros on the Windows platform, for macOS, the Python language is generally used for this purpose.
- Ransomware: macOS users are not immune to ransomware either. A classic example is KeRanger, which encrypts victims’ files and then leaves instructions on paying money in order to get them back.
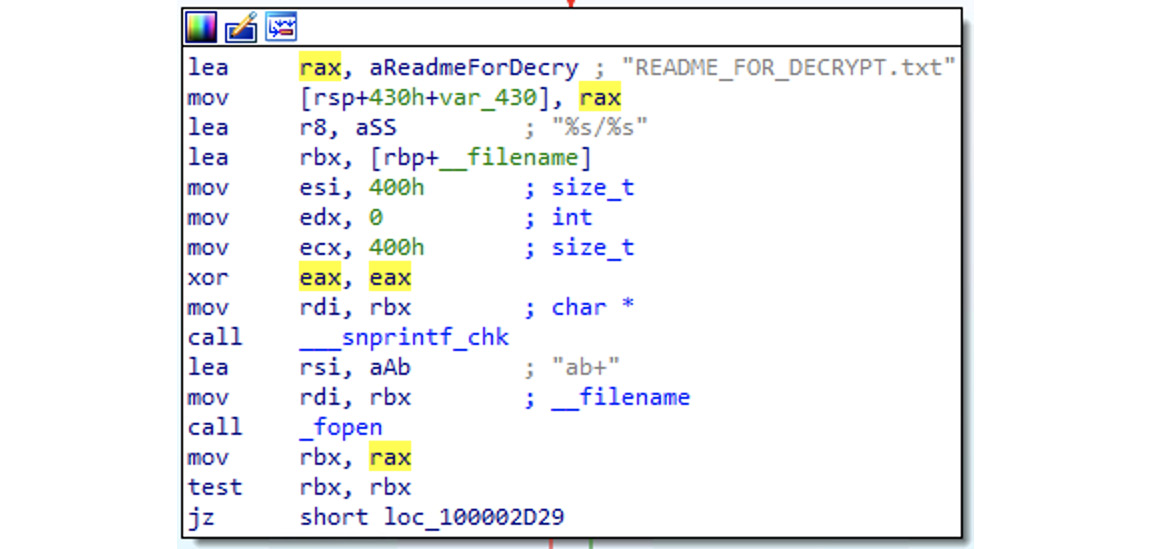
Figure 12.16 – The KeRanger malware preparing a ransom-related note
The KeRanger threat was signed with a valid certificate to bypass Gatekeeper and used a C&C located in the Tor network. A more creative way to do this was used by the Safari-get authors. The idea was to make a system unusable, for example, by opening multiple windows, providing a contact number falsely associated with a legitimate organization (such as Apple), and then charging money to resolve the issue. The interesting part is that all this could be done after the victim just visited a specifically-crafted website, which either created multiple mail drafts or opened iTunes using <a href=”mailto:...” and <a href=”itunes:...” attributes.
A more recent example of ransomware malware is EvilQuest.
iOS
It’s worth mentioning that the number of threats successfully targeting iOS devices is significantly lower than on macOS, thanks to the strong security architecture enforced on it. Over the last few years, there were very few big incidents involving malware for this platform. Here are some of the most notorious ones:
- Droppers or installers: Examples of such threats include YiSpecter and WireLurker, which were able to target both jailbroken and non-jailbroken devices, as the samples were signed with enterprise certificates. Here, private APIs were misused in order to install arbitrary apps. Another example is AceDeceiver, which abused Apple FairPlay DRM tokens, instead of using enterprise certificates in order to install unwanted apps on the victims’ devices.
- Backdoors or RATs: This category of malware is commonly used by surveillance agencies and governments to target particular individuals. Over the past few years, there were multiple reports that mentioned them, including the following:
- FinFisher: Developed by Gamma Group, which sells surveillance tools to governments, this allows access to various types of data on a victim’s jailbroken device, such as communications, including messages, calls, and emails, as well as contacts, arbitrary files, geolocation data, and the ability to eavesdrop on live calls.
- Remote Control System (RCS): A surveillance tool developed by HackingTeam that requires the targeted device to be jailbroken. The platform functionality includes the recording of video and audio communications and accessing the camera and GPS data.
- Inception (also known as Cloud Atlas): Malware involved in this espionage campaign targeted multiple platforms, including implants for jailbroken iOS devices.
- XAgent: This tool is supposed to provide rich functionality, including the retrieval of messages and pictures, contacts lists, and geolocation information, as well as the ability to control a microphone to record audio.
- Pegasus: This was developed by the NSO group. Apart from the usual data collection, this threat also collects users’ credentials and can perform audio and video recording. A distinctive feature of this threat was the ability to silently jailbreak devices using a set of exploits that all leveraged zero-day vulnerabilities at the time of its discovery.
- Infostealers: One of the examples where stolen credentials immediately led to a financial loss for the users was the AppBuyer threat, which was hooking network APIs to get access to victims’ Apple IDs and passwords and using them to buy apps. Another example threat that targeted jailbroken devices and incorporated a similar hooking mechanism is KeyRaider, only in this case, it was used to steal credentials, certificates, and private keys.
- Adware fee stealers: Here, malware generates revenue for the attackers by simulating or hijacking user views or clicks on advertisements. An example of such a threat is AdThief, built on top of Cydia Substrate, which targeted jailbroken devices in order to redirect advertisement revenues to its authors.
Other attack techniques
Apart from using traditional malicious code that executes on the system, there are other attack vectors that can be used to access sensitive information or enable surveillance. While not all of them involve using malicious software as we know it, it is still important to be aware of them, as in many cases, they may be the actual reason for a system compromise. Here is a list of the most notorious examples for macOS and iOS.
macOS
There are multiple types of attack that can be performed once the attacker gets physical access to the device. They are commonly known as evil maid attacks, based on the scenario where a hotel maid can subvert unattended devices left in the room. Many of them have been addressed over the last few years. Let’s have a look at the most common techniques:
- A DMA attack: Attackers can access the content of the RAM that contains sensitive information through the Direct Memory Access (DMA) mechanism. An example of such a threat is ThunderClap, which utilizes Thunderbolt ports.
- A cold boot attack: Attackers rely on the data remanence of the RAM. The target machine is cold-booted (after a hard reboot), using an OS from the removable disk. Then, the attacker dumps the content of the pre-boot physical memory into a file. The firmware password aims to prevent this type of attack by requesting authentication before letting anybody boot from an external drive.
- Direct access to a physical drive: This approach works very well when the hard drive is not encrypted. The attacker may be able to boot from a removable drive or connect it to another machine in order to read the data from it. In the case that the hard drive is encrypted (by FileVault 2 for Mac computers), a possible way to bypass this is to replace the startup disk with a bogus one that displays a lock screen that has the same appearance as the normal one, steal the credentials entered by the user once they return, and then access the hard drive. To address this issue, a firmware password can be enabled. While it is still possible to wipe a firmware password on older devices by connecting directly to the EFI chip with dedicated hardware, the Secure Boot option is supposed to handle this attack vector.
- A network evil maid attack: This can be considered more of a phishing attack, where the whole victim’s device is replaced by an identical-looking one that sends firmware or lockscreen passwords to the attacker, who now owns the original device.
iOS
These techniques generally require physical access to the device. Many of them are known under the umbrella term of malicious charger attacks, as they can be performed once the mobile device is connected (using its physical port) to malevolent hardware:
- Juice jacking: Named after the natural need to “juice up” (as in, charge) devices, this classic attack relies on the USB transfer mode turning on once the device is connected to the attacker’s device simulating a charging socket, which gives attackers access to the phone’s data. To address this issue, Apple now asks the user to confirm whether they trust the connected device.
- Videojacking: In this case, the attacker exploits the fact that the Apple connector can be used as an HDMI connector. Once the device is connected, it becomes possible to monitor everything that happens on the mobile device’s screen.
- Trustjacking: This is a relatively new type of attack that utilizes iTunes Wi-Fi Sync technology. The idea here is that once the user connects their device to a PC or a malicious charger and confirms that they trust it, the attacker can silently enable iTunes Wi-Fi Sync, which allows them to control the device remotely once it is connected to the network. As a result, the attacker has the following powerful remote abilities:
- Viewing the device’s screen by making a series of screenshots
- Accessing a wide range of sensitive information through iTunes backup, including SMS/iMessage history, private photos, and app data
- Installing other apps
Here are some notable exceptions that don’t rely on physical access:
- Malicious profiles: This attack utilizes iOS profiles, generally used by mobile carriers and MDM administrators to set up network settings. There are multiple ways the user may receive such a profile, including through social engineering or via replacing a legitimate profile by utilizing an MITM attack over an insecure connection. This allows an attacker to perform various malicious actions, such as installing root CA certificates and setting up a VPN or proxy, and thus intercepting all of the user’s traffic. To address this issue, newer iOS versions added an extra step for the user to manually approve the installation of a root CA certificate (unless it is done via MDM).
- Activation Lock: This is a Find My iPhone feature that allows users to remotely lock their lost or stolen device, so it can’t be used by thieves. However, once the Apple ID and the corresponding passwords are stolen (for example, through phishing), it becomes possible for the attackers to activate it remotely and demand a ransom for unlocking the device. These are some of the most common attacks affecting macOS and iOS systems. Now, let’s talk about less common techniques.
Advanced techniques
Even though the number of malicious samples targeting macOS and iOS users is significantly lower than for other more prevalent platforms, such as Windows and Android, we can still distinguish between the generic and more advanced techniques implemented. They involve non-standard or difficult-to-implement approaches that usually aim to complicate the analysis and to prolong the infection.
Anti-analysis and detection tricks
Some malware families that target macOS and iOS incorporate universal techniques to complicate analysis and detections that work for most other platforms as well. Here are some examples:
- Detection of protection software: In this case, malware checks for the presence of the corresponding files or processes and generally either terminates itself, or tries to disable them in order to remain undetected. An example is the CookieMiner family checking for the presence of the Little Snitch firewall on macOS. Classic AV checks are also possible, as you can see in the following figure:
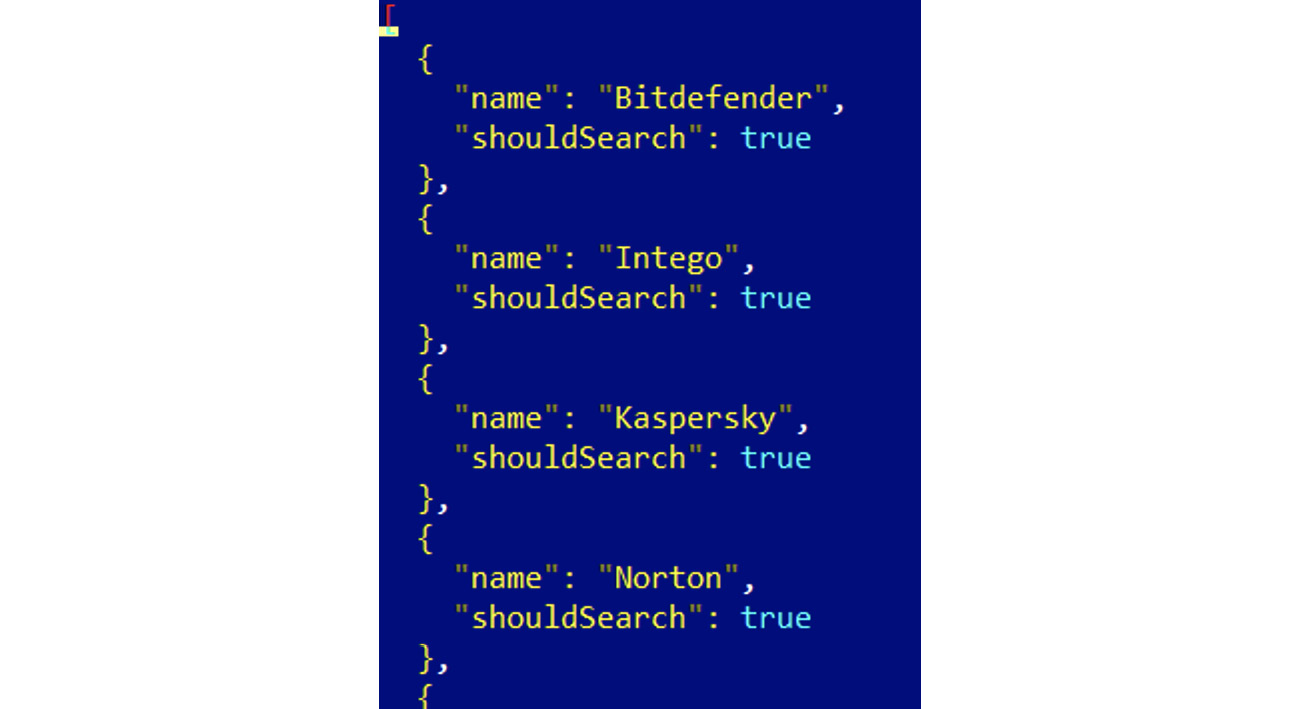
Figure 12.17 – A list of antiviruses to search for in CrescentCore malware
- Code and data obfuscation: The malware tries to complicate the analysis by making itself unreadable in disassembly.

Figure 12.18 – Custom xor-based encryption used in Pirrit malware
- Checks for self-integrity: The malware calculates checksums against its body in order to detect any changes taking place.
- Tampering with a debugging session: An example of this technique is the use of ptrace with the PT_DENY_ATTACH argument.
- Detection of reverse-engineering tools: One of the most common approaches here is the detection of attached debuggers.
- VM detection: As when malware targets other platforms, payloads may behave differently when identifying the presence of virtual machines, presuming that these are researchers attempting to analyze them. There are multiple ways that VMs can be recognized, for example, by parsing the output of standard tools such as ioreg and sysctl, returning information about the system’s hardware, as done by the MacRansom malware family.
- Sandbox evasion: In this case, the malware exploits some limitations of the sandboxing software in order to avoid exposure. The most common approach here would be to start a malicious activity after a certain delay to reach the sandbox’s timeout limit. If a sandbox is aware of this technique and skips the sleep stage, the malware can easily detect it by checking whether the time passed during the sleep stage matches its expectations.
Now, let’s talk about other techniques.
Misusing dynamic data exchange (DDE)
Apart from using macros in MS Office documents, there is another, less common way to execute code. In this case, attackers rely on the DDE functionality. One way to do so is to use the DDEAUTO statement (currently disabled by default). Another option recently used to spread the cross-platform Adwind RAT is to abuse the function logic implemented in Microsoft Excel. Please refer to Chapter 10, Scripts and Macros – Reversing, Deobfuscation, and Debugging, for more information. Attackers can always try to utilize social engineering tricks in order to make the user enable any required functionality.
User hiding
This technique can be used to hide a newly created user from the configuration and login screens. The idea here is to set a Hide500Users property within the /Library/Preferences/com.apple.loginwindow.plist file. In this case, all users with a UID lower than 500 won’t be present on these screens. An example of a threat that uses this technique to hide an illegitimate user is Pirrit malware.
Using AppleScript
AppleScript was originally developed to automate certain tasks within Apple systems. However, its functionality is commonly misused by various malware families as well. For example, the aforementioned Pirrit threat managed to use it to inject JavaScript payloads into browsers. To perform code injection, the osascript command-line tool can be used. Here are snippets with examples for different browsers:
- Safari:
tell application "Safari" to do JavaScript "<payload>" in current tab of first window
- Chrome:
tell application "Google Chrome" to execute front window's active tab JavaScript "<payload>"
Besides this, it is possible to use osascript for other purposes; for example, CookieMiner used it to set up environments before delivering other modules, as you can see in the following figure:

Figure 12.19 – The first-stage payload of the CookieMiner threat misusing the osascript functionality
Finally, malware can use so-called run-only AppleScript scripts, which are the compiled versions of the original scripts without their source code. The standard file extension for them is .scpt. OSAMiner is an example of a malware family utilizing them. Unfortunately, the standard osadecompile tool cannot decompile run-only scripts, so other tools such as applescript-disassembler and aevt_decompile have to be used to present the script’s functionality in a human-readable form.
API hijacking
This technique is found when infostealers target jailbroken iOS devices. The idea here is to intercept certain APIs in order to get access to sensitive data before it gets encrypted or after it has been decrypted. One example could be KeyRaider targeting SSLRead and SSLWrite from the itunesstored process with the help of Cydia Substrate, otherwise known as MobileSubstrate:
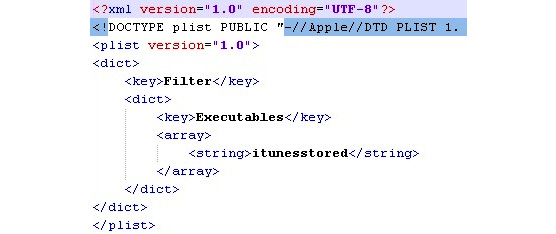
Figure 12.20 – A parsed .plist file from one of KeyRaider’s modules
Other techniques
There are other techniques that are not common among macOS malware developers and serve more as features of certain malware families. For example, while most threats that target Apple systems rely on Bash, AppleScript, and Python for scripting, the Silver Sparrow malware prefers to use JavaScript instead, misusing the installation-check element in the standard Distribution XML file present in .pkg samples:
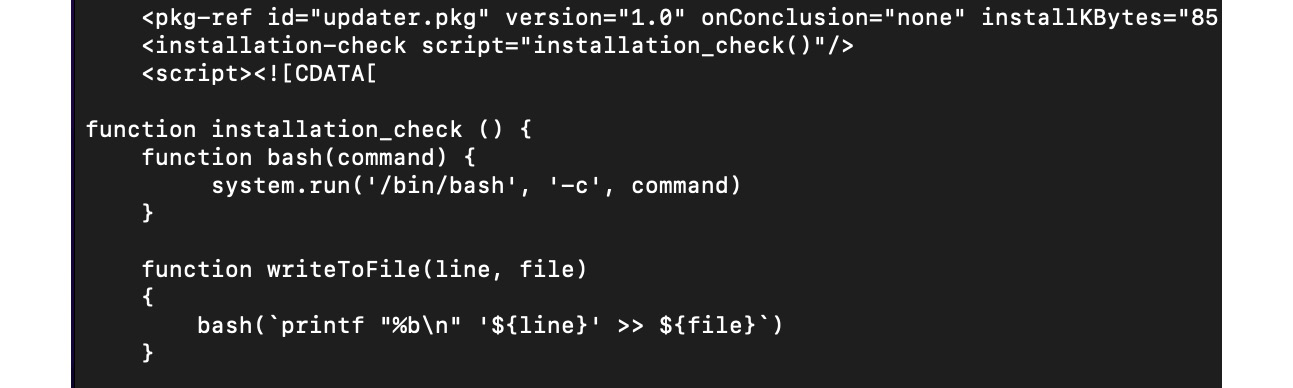
Figure 12.21 – The Silver Sparrow threat using JavaScript code during its installation
Another interesting example is the Bundlore threat, which is distributed in the form of .dmg files that don’t contain executables as they are. Instead, the next-stage payload is dynamically decrypted and loaded using an embedded bash script, as you can see in the following figure:

Figure 12.22 – Bundlore using an embedded script to decrypt the next-stage payload
Sometimes, malware developers get quite creative at introducing new ways to run their malware. For example, the authors of the LoudMiner threat have the whole VM running with the help of QEMU to mine cryptocurrency and utilize their victim’s resources.
Finally, let’s briefly mention the topic of rootkits.
Rootkits for Mac – do they exist?
It might be surprising to some people, but rootkits targeting macOS do exist. One of the most notable examples in this category of threats is the Rubylin rootkit. Among its features is the ability to hide files, directories, and processes, as well as users and ports from particular tools. Most of the techniques used in this case are different implementations of the approaches that we covered in Chapter 7, Understanding Kernel-Mode Rootkits, dedicated to Windows kernel-mode threats, but this time for the XNU kernel. As there are pretty much no notorious malware families that extensively use these techniques for malicious purposes, it falls outside the scope of this book. If you’re curious, you can find more information about its internals by reading the Phrack article, Revisiting Mac OS X Kernel Rootkits, in issue 69.
Now that we know enough about how macOS and iOS are organized and what their executable files look like, let’s talk about how to analyze the malware targeting them.
Static and dynamic analysis of macOS and iOS samples
As we know now, the most common programming languages that are used to write code for Apple platforms are Objective-C and Swift. The disassembly will look different depending on which language the malware author chooses, but in both cases, pretty much the same tools can be used for analysis.
Let’s take a look at the options available on the market in order to facilitate the reverse-engineering of macOS and iOS programs.
Static analysis
For engineers who don’t have immediate access to a Mac computer or a VM available to run malware on, it is beneficial that most of the static analysis tools are available on multiple platforms, so the analysis can be performed on other operating systems as well.
Retrieving samples
Before any actual malicious code can be analyzed, it first needs to be obtained. Here is how it can be done, depending on the way it is distributed:

Figure 12.23 – Looking inside the DMG file
While it is possible to extract some files from .deb packages using this tool, a more reliable way here is to use the standard ar tool with the x argument, ar x <sample>.deb. As we have already mentioned, for .pkg archives, the xar tool is highly recommended over 7-Zip.
- iTunes: If the apps of interest are hosted on the App Store, the easiest way to get them is to use iTunes before version 12.7. It is still available on the official website for certain business needs. Once downloaded, they can be found in the Mobile Applications subdirectory.
- iMazing: This commercial third-party alternative to iTunes can be used to manage apps from the official App Store and get app data from the device without jailbreaks.
Disassemblers and decompilers
Here is a list of tools commonly used to work with the disassembly of samples:
- IDA: As with Windows and Linux, this powerful tool can also be used to analyze Mach-O files.
- Hopper: This product actually started from the Mac platform, so the authors are perfectly familiar with its internals. It features both a disassembler and decompiler and supports both the Objective-C and Swift languages.
- radare2: A strong open source alternative to the previous tools, this framework allows engineers to disassemble and analyze Mach-O files:
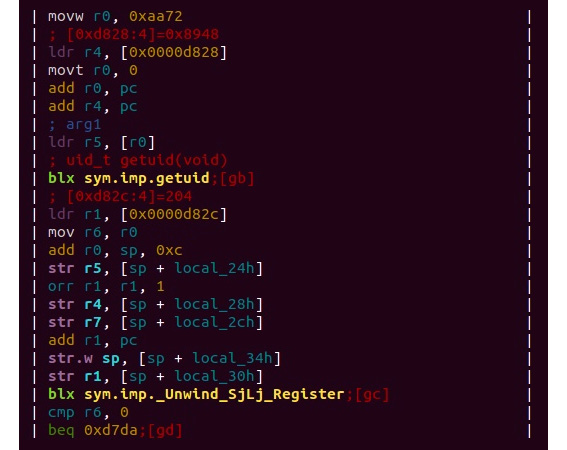
Figure 12.24 – An example of the disassembled Mach-O file for the ARM platform in radare2
In order to load a 64-bit ARM Mach-O sample (either as a standalone thin file or as part of a fat binary), use -a arm -b 64 arguments.
- RetDec: This cross-platform decompiler supports multiple file formats, including Mach-O, for several architectures.
- Ghidra: A newcomer in the arsenal of reverse-engineers, Ghidra also supports Apple executables.
Auxiliary tools and libraries
The following are the auxiliary tools and libraries for static analysis:
- plutil: This tool is very useful when we need to convert the binary version of .plist into readable formats, such as XML. For non-macOS platforms, it is installed together with iTunes.
- otool or MachOView: Mac console tools that allows us to view different parts of Mach-O files.
- class-dump or class-dump-z: These tools can be used to generate Objective-C headers from Mach-O files.
- LIEF: A cross-platform library that can be used to both parse and modify Mach-O executables.
- Capstone: A cross-platform disassembly framework that powers multiple reverse-engineering tools.
Apart from this, many basic universal tools, such as file, strings, or nm, can be used to extract information from executables.
Dynamic and behavioral analysis
While static analysis tools are pretty much the same for macOS and iOS files, the dynamic analysis toolset varies drastically due to different security models implemented in both operating systems. It is possible to install macOS on the virtual machine, but for iOS, having a real device is usually the only reliable option.
macOS
Dynamic analysis of executables for macOS is quite straightforward and doesn’t involve any special extra steps.
Debuggers
Performing step-by-step debugging is extremely useful in many cases, for example, when we have to deal with obfuscated code and understand the logic behind certain operations. Luckily, there are multiple powerful tools available that make this possible:
- IDA: Apart from the fact that IDA has a version for Mac, it is also shipped with the remote debugging server tools, mac_server and mac_server64 (as well as mac_server_arm64 and mac_server_arm64e for ARM-based systems), making it possible to perform debugging on another machine under the OS of preference. When you perform debugging using them, make sure that they are executed on the remote machine with sudo privileges. In the IDA dialog window, after selecting the Remote Mac OS X debugger option, it is necessary to specify the proper hostname, port (which can be taken from the server tool output once it is executed, by default, 23946), and the parameters required by a sample (if there are any).
In case the other fields are incorrect (for example, left untouched and this way, associated with a local file, rather than a remote machine), modern versions of IDA will ask whether it should copy the file specified in the Input file field to the remote computer:
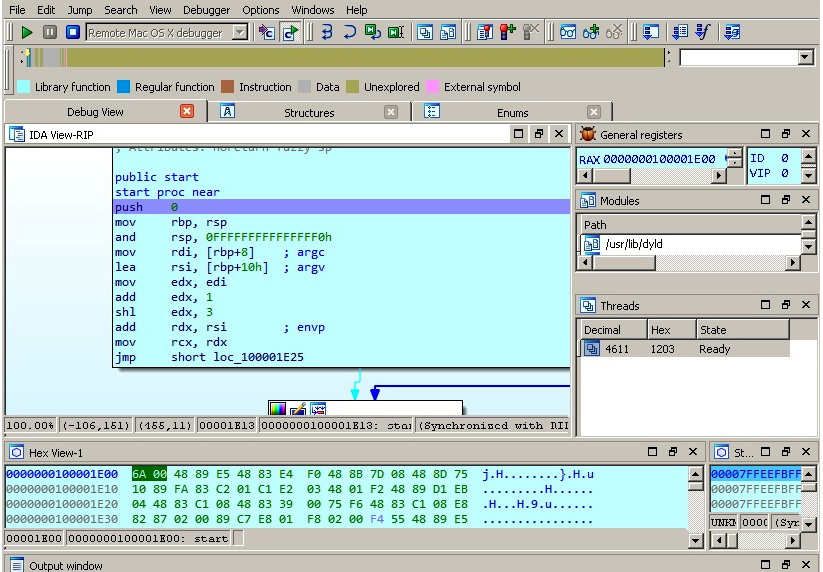
Figure 12.25 – Debugging WireLurker targeting macOS remotely in IDA located on a Windows machine
- radare2: This toolset can also be used for both static and dynamic analysis of Mac executables. For debugging using r2, it is generally required to either run this tool with sudo permissions or sign it.
- GDB or LLDB: It is also possible to debug programs using the GDB debugger or LLDB, which shares many of GDB’s commands.
These tools have already been described in detail in Chapter 11, Dissecting Linux and IoT Malware, and all that knowledge can be applied here as well.
Monitoring and dynamic instrumentation
Commonly referred to as behavioral analysis, running malware in a real or simulated environment with various monitors to track system changes can provide a quick and valuable insight into malware functionality. In addition, it may be useful to change the behavior of the executed sample on the fly. Here are some of the most popular tools that make it possible on macOS:
- DTrace: Shipped with macOS, this framework aims to provide instrumentation for monitoring various system events. Here are some of its most popular tools:
- opensnoop: Allows us to monitor filesystem operations. An alternative to monitoring disk I/O events is iosnoop.
- execsnoop: Can be used to record process activity, for example, executed commands. Particularly useful for monitoring short-living processes.
- dtruss: Allows us to monitor syscall details, as an alternative to strace on Linux.
Important note
In order to make this tool work, you may need System Integrity Protection (SIP) to be temporarily turned off. Follow the latest documentation for your version of macOS (and VM if applicable) to do so correctly and safely. You can run the csrutil status command to check whether it is currently enabled.
Beyond these, there are multiple standard macOS tools that can be used to monitor system activity, such as lsof or fs_usage for file operations.
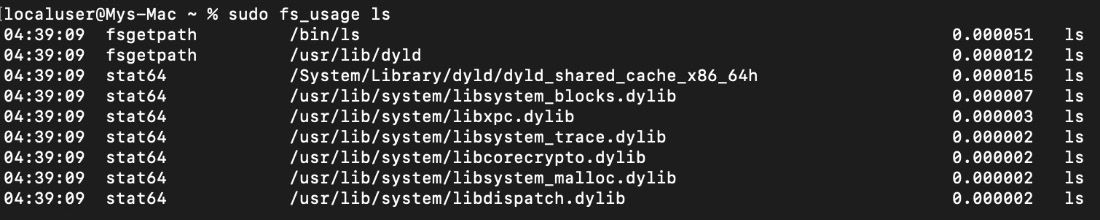
Figure 12.26 – Using the fs_usage tool for behavioral analysis
- Frida: This powerful toolset can be used for multiple tasks, such as modifying the execution process of a specified program on the fly, and method tracing with the help of the frida-trace utility. It understands Objective-C methods, so their names can be passed using the -m argument.
- Cycrypt: Another option for engineers to explore and modify running applications – it utilizes Objective-C++ and JavaScript syntax.
- Mac-A-Mal: Not exactly a monitoring tool, this project extends Cuckoo Sandbox to macOS threats.
- Qiling: This powerful emulation framework supports Mach-O files.
All these tools are pretty easy to set up and start using – just follow the latest official documentation for them.
Network analysis
In terms of network analysis, this can be easily done on the device itself. In this case, popular solutions such as Wireshark and tcpdump can be used. To intercept and decode HTTPS traffic, Fiddler and the commercial Charles proxy can be used. In addition, it is always possible to redirect the traffic of interest (for example, by setting up a proxy or performing DNS hijacking) to a MITM solution, such as Burp Suite.
iOS
More stringent security controls and App Sandbox on iOS generally prevent researchers from performing analysis straight away, so often the use of jailbroken devices with the Cydia package manager installed is preferred here. Its name derives from Cydia pomonella, known as the codling moth, a major pest in the apple industry. Cydia provides an alternative app market with lots of tools that are useful for reverse-engineering purposes.
Besides Cydia, it makes sense to get OpenSSH (if it is not already installed) because it enables the engineer to execute commands on the testing device from the connected PC.
Installers and loaders
The first thing that may be tricky is to deliver malware to the testing system. The following tools should be used on the PC that the jailbroken device is connected to:
- Cydia Impactor: A cross-platform GUI tool to install IPA files on iOS. It doesn’t necessarily require jailbreaking, as it can sign apps using a free developer certificate associated with the device owner:
Figure 12.27 – The interface of the Cydia Impactor tool
In order to use this tool, there is no need to install Cydia Extender; if you don’t have a paid developer account, simply drag and drop the required .ipa file over its interface. Then, the tool will ask for an Apple ID and the corresponding password. Keep in mind that this should be not the main set of credentials used to log in to the Apple website but an app-specific password that can be generated at https://appleid.apple.com.
If the developer certificate hasn’t been recently approved, it should be done on the device by going to Settings | General and then either selecting the Profiles or Device Management option (the exact name may vary depending on the iOS version). There, it is possible to manually approve the loaded app, which requires an internet connection.
- ios-deploy: Designed to work on non-jailbroken devices, this console Mac tool allows the installation and debugging of apps on the connected device.
- iFunbox: A free file-management and app-management tool for iOS devices, it also allows the installation of IPA packages.
- node-applesign: This tool allows the easy signing of .ipa files, relying on the standard codesign tool. These tools are distributed in the form of apps and tools to be executed on the mobile device:
- ipainstaller: This can be used to install and back up (when used with -b argument) apps using the command line.
- iFile: This GUI file manager can be used to install .deb files on iOS devices.
- AppSync Unified: This app allows the installation of unsigned IPA files on iOS devices. Even though anybody can get a free certificate for sideloading, there are multiple limitations, such as a limited number of devices or apps allowed, so the user may want to bypass using it.
Now, let’s talk about debuggers.
Debuggers
The list of the most common debuggers in this case is pretty much the same as for macOS. The main difference here will be in the setup, as iOS is used to power mobile devices, and it is generally more convenient to perform debugging on the PC:
- IDA: Recent versions of IDA have iOS debugging capabilities operating as a client for Apple’s debugserver. In order to use IDA this way, generally, a separate ios_deploy tool should be obtained from its official website.
- radare2: Unsurprisingly, this powerful toolset can be used for both the static and dynamic analysis of iOS samples. For debugging, a r2lldb plugin can be used.
- GDB or LLDB: Just as for macOS, both GDB and LLDB debuggers can be used to debug binaries in iOS. In this case, it is possible to install the debugger on the device itself and use it via SSH, or do it remotely, again via Apple’s debugserver.
Dumping and decryption
As we know now, as part of the copyright protection measures implemented in iOS, apps that come from the official App Store are encrypted. While this technology is supposed to fight piracy, it may also complicate malware analysis. Here are some of the best tools that can be used to decrypt samples:
- Clutch: This tool can be used to dump iOS apps so that they can be disassembled and analyzed. For newer versions of iOS, the entitlements may need to be fixed with a help of the ldid tool available on Cydia.
- frida-ios-dump: A newer IPA dumping script based on the Frida framework.
Now, what about monitoring apps running in memory?
Monitors and in-memory patching
It is also possible to set up monitoring tools for iOS, even though it may require some non-standard approaches. Luckily, there are multiple existing tools that make this possible:
- Cydia Substrate: Formerly called MobileSubstrate, this is a framework for developing runtime patches for system functions on iOS.
- Theos: A suite of development tools for iOS. One of these utilities is logify, which can be used to generate files that allow engineers to hook class methods.
- Cycrypt: A set of tools that enables engineers to modify the functionality of the running app through injections of the required logic.
- Frida: Provides multiple useful features to affect the execution flow through JavaScript injections or to monitor it, for example, through method tracing using frida-trace.
- objection: A runtime exploration toolset based on Frida, it provides a solution to many real-world situations that engineers may face when analyzing iOS samples, such as bypassing SSL pinning.
- fsmon: This open source tool can be used to monitor filesystem events.
- FLEX: A unique set of tools that runs on the device itself and allows in-app exploration, such as network history or the state of App Sandbox’s filesystem.
Alright, what about analyzing network activity?
Network analysis
Apple provides a Remote Virtual Interface (RVI) mechanism for use on the Mac connected to the device via USB. Once created using the rvictl tool, the interface can be used with tcpdump on the Mac to record the mobile device’s traffic. In addition, just as with macOS, it is possible to redirect required network traffic to a MITM solution of your choice and review or modify it if necessary.
Now we know what tools we should use at different stages of the analysis, let’s summarize the steps that we may need to go through to define the workflow.
The analysis workflow
When analyzing malware that is targeting Apple systems (whether it be macOS or iOS), the following workflow can be used:
- Understand the available indicators of a compromise. Is it possible that they are related to an activity that doesn’t involve the usage of malicious code?
- Once the candidate for a malicious sample is identified, start by obtaining it and any related files and performing static analysis.
- If there are multiple files available within one bundle, find out which one is supposed to be executed first. Generally, it is defined in the Info.plist file in the CFBundleExecutable field. Also, check the executable that has the same name as the bundle, but without the .app extension.
- Carefully review the strings and import functions present in binary payloads, as they may offer some insight into the malware’s functionality. Pay particular attention to the import functions mentioned in the File formats and APIs section and their analogous. If there are no valid strings, check for the presence of encryption and obfuscation code.
Continue the analysis using references to strings as landmarks, keeping the markup accurate. Also, carefully review the code close to the sample’s entry point, as it may contain arguments that parse functionality.
- Extract all indicators of compromise, such as contacted IP addresses and URLs, the file paths and names used, and other modules delivered. This information can be used not only to find additional related samples and identify the exact malware family involved but also to better protect already-affected systems and prevent further infections by sharing them with other organizations, security providers, and law enforcement agencies (it may also help track down the attackers).
- If possible, try to understand the full infection chain. How did the malware enter the target system – can it spread further? To answer this question, you may need to perform a forensic analysis on the affected machine(s) or review security logs. This is helpful for securing existing systems and preventing the infection from reoccurring.
All this information will allow you to confirm the exact purpose and type of the malware (at this stage, we already know how they look), which is extremely useful for estimating the risks and losses involved.
- Before performing dynamic analysis, during the static analysis stage, confirm what environment the malware expects and whether any command-line arguments or dependencies are required.
- If the testing system is already set up, run the malware with monitors to confirm the functionality identified during the static analysis (this is usually a quick task to complete).
- If you need to understand some complicated interaction with the system, or decrypt or deobfuscate certain logic, perform a step-by-step dynamic analysis for related code blocks in your debugger of choice.
Choose your analysis strategy depending on the questions that need to be answered, and the time and setup available. Some steps may be modified or completely omitted if they fall outside the scope of the report that needs to be delivered.
Summary
In this chapter, we learned about the security models of macOS and iOS to understand potential attack vectors, and dived deeper into the file formats used on these operating systems to see what malicious samples may look like. Then, we went through the tools available to analyze malware that targets macOS and iOS users and provided guidelines on how they can be used. After this, we put our knowledge into practice and went through all the major attack stages generally implemented by malware, from the initial penetration to the action phase, and learned how they may look in real-life scenarios. Finally, we covered the advanced techniques utilized by more high-profile malware families.
Equipped with this knowledge, you now have the upper hand in analyzing pretty much any type of threat that targets these systems. As a result, you can provide better protection from unwarranted cyberattacks and mitigate further risks.
In Chapter 13, Analyzing Android Malware Samples, we are going to cover another popular mobile operating system, Android, and we will learn how to deal with the malware that targets it. Read on!