
This chapter continues the discussion of object-oriented programming (OOP) and covers some of its more-advanced, but truly useful, concepts: inheritance and polymorphism. Instead of jumping to the topic of inheritance, I'll start with a quick overview of what you learned in the previous chapter and how to apply this knowledge.
Inheritance is discussed later in this chapter, along with polymorphism, another powerful OOP technique, and interfaces. But first make sure you understand the basics of OOP because things aren't always as simple as they look (but are quite often simpler than you think).
In this chapter, you'll learn how to do the following:
Extend existing classes using inheritance
Develop flexible classes using polymorphism
Building classes and using them in your code is fairly simple, but there are a few points about OOP that can cause confusion. To help you make the most of OOP and get up to speed, I'm including a list of related topics that are known to cause confusion to programmers — and not only beginners. If you understand the topics of the following sections and how they relate to the topics discussed in the previous chapter, you're more than familiar with the principles of OOP and you can apply them to your projects immediately.
Classes are templates that we use to create new objects. The class contains code and the local variables, and every time you create a new variable based on a specific class, the compiler generates a new set of local variables, where the object's properties will be stored. The code is always the same for all variables of this type. In effect, classes are the blueprints used to manufacture objects in your code. You can also think of classes as custom types. After you add the class Customer to your project (or a reference to the DLL that implements the Customer class), you can declare variables of the Customer type, just as you declare integers and strings. The code for the class is loaded into the memory, and a new set of local variables is created. This process is referred to as class instantiation: Creating an object of a custom type is the same as instantiating the class that implements the custom type. For each object of the Customer type, there's a set of local variables, as they're declared in the class code. The various procedures of the class are invoked as needed by the Common Language Runtime (CLR) and they act on the set of local variables that correspond to the current instance of the class. Some of the local variables may be common among all instances of a class: These are the variables that correspond to shared properties (properties that are being shared by all instances of a class).
When you create a new variable of the Customer type, the New() procedure of the Customer class is invoked. The New() procedure is known as the class constructor. Each class has a default constructor that accepts no arguments, even if the class doesn't contain a New() subroutine. This default constructor is invoked every time a statement similar to the following is executed:
Dim cust As New Customer
You can overload the New() procedure by specifying arguments, and you should try to provide one or more parameterized constructors. Parameterized constructors allow you (or any developer using your class) to create meaningful instances of the class. Sure, you can create a new Customer object with no data in it, but a Customer object with a name and company makes more sense. The parameterized constructor initializes some of the most characteristic properties of the object.
All variables that refer to objects are called object variables. (The other type of variables are value variables, which store base data types, such as characters, integers, strings, and dates.) In declaring object variables, we usually use the New keyword, which is the only way to create a new object. If you omit this keyword from a declaration, only a variable of the Customer type will be created, but no instance of the Customer class will be created in memory, and the variable won't point to an actual object. The following statement declares a variable of the Customer type, but doesn't create an object:
Dim Cust As Customer
If you attempt to access a member of the Customer class through the Cust variable, the infamous NullReferenceException will be thrown. The description of this exception is Object reference not set to an instance of an object, which means that the Cust variable doesn't point to an instance of the Customer class. Actually, the editor will catch this error and will underline the name of the variable. If you hover over the name of the variable in question, the following explanation will appear on a ToolTip box: Variable Cust is used before it has been assigned a value. A Null Reference exception could result at runtime. Why bother declaring variables that don't point to specific objects? The Cust variable can be set later in the code to reference an existing instance of the class:
Dim Cust As Customer
Dim Cust2 As New Customer
Cust = Cust2
After the execution of the preceding statements, both variables point to the same object in memory, and you can set the properties of this object through either variable. You have two object variables but only one object in memory because only one of them was declared with the New keyword. To set the Company property, you can use either one of the following statements because they both point to the same object in memory:
Cust.CompanyName = "New Company Name"
or
Cust2.CompanyName = "New Company Name"
The Cust variable is similar to a shortcut. When you create a shortcut to a specific file on your desktop, you're creating a reference to the original file. You do not create a new file or a copy of the original file. You can use the shortcut to access the original file, just as you can use the Cust variable to manipulate the properties of the Cust2 object in the preceding code sample.
It's also common to declare object variables without the New keyword when you know you're going to use them later in your code, as shown in the following loop, which creates 20 items and adds them to a ListView control:
Dim LI As ListViewItem
For row = 0 To 20
    LI = New ListViewItem
    LI.Text = "..."
    ' more statements to set up the LI variable
    ListView1.Items.Add(LI)
Next
The LI variable is declared once, and the code initializes it many times in the following loop. The first statement in the loop creates a new ListViewItem object, and the last statement adds it to the ListView control. Another common scenario is to declare an object variable without initializing it at the form's level and initialize it in a procedure while using its value in several procedures.
New KeywordMany programmers are confused by the fact that most object variables must be declared with the New keyword, whereas some types don't support the New keyword. If you want to create a new object in memory (which is an instance of a class), you must use the New keyword. When you declare a variable without the New keyword, you're creating a reference to an object, but not a new object. Only shared classes must be declared without the New keyword. If in doubt, use the New keyword anyway, and the compiler will let you know immediately whether the class you're instantiating has a constructor. If the New keyword is underlined in error, you know that you must delete it from the declaration. The Math class, for example, is shared and you cannot create a new instance of it; instead, you can call its members as Math.Log, Math.Exp, and so on.
As you already know, an object variable may exist but not be initialized. The following statement creates a new variable for storing a Brush object (one of the drawing objects discussed in the tutorial on graphics that accompanies this book):
Dim B As SolidBrush
The B variable's value is Nothing because it hasn't been initialized yet. After executing the following statement, the B variable will have a value and can be used to draw something:
B = New SolidBrush(Color.Blue)
To find out whether a variable has been initialized or not, we use the Is operator to compare the variable to Nothing:
If B Is Nothing Then
    MsgBox("Uninitialized Brush variable")
End If
Alternatively, you can use the IsNot operator before attempting to use the B variable:
If B IsNot Nothing Then
    ' draw something with the brush
End If
When a variable is Nothing, we know that it has not been initialized yet — the variable has no value. In my view, this is a state of a variable: a variable may have a value (any value) or not have a value. Let's consider an Integer and a String variable declared as follows:
Dim Age As Integer
Dim Name As String
The Age and Name variables have not been initialized explicitly, but they do have a value. Integers are initialized to zero and strings are initialized to empty strings. But is this what we really need? In many cases we want to know whether a variable has been initialized or not, and a default value just doesn't cut it. A variable that has no value is not necessarily a numeric zero or an empty string. To differentiate between the default values and the lack of value, the Framework supports the Nullable type, which indicates a variable of any of the basic types that will not be initialized implicitly. The Nullable keyword is followed by a pair of parentheses and the Of keyword, followed by the actual type. The following statement declares an Integer variable that is not initialized:
Dim Age As Nullable(Of Integer)
Unfortunately, strings are not nullable. The advantage of using Nullable types in your code is that this type exposes the HasValue property, which returns True if the variable has been initialized, and the Value property that returns the actual variable type. This is how you would process the Age variable in your code:
Dim Age As Nullable(Of Integer)
' other statements
Dim Qualifies As Boolean
If Age.HasValue Then
    If Age.Value < 16 Then
        Qualifies = False
    Else
        Qualifies = True
End If
There's also a shorthand notation for declaring Nullable types; just append a question mark to the variable's name as in the following statement:
Dim Age? As Integer
As for a practical example of variables that might not have values, there are plenty. Databases use a special value to indicate that a field has no specific value, the Null value. If a product's price is not known yet, or if a book's page count is unknown, this doesn't mean the product will be sold at no cost or that we'll display that the book has zero pages when customers look it up. These fields have a Null value and should be handled differently, as you will see in Chapter 15, "Programming with ADO.NET." The same is true for data we read from external sources. An XML file with customer information may contain one or more entries without a value for the EMail field. This customer's email address is missing (Null or Nothing) and certainly not an empty string. When you set up variables to receive data from a database, you will find the Nullable type very accommodating because it allows you to match not only the usual values, but also the lack of a specific value.
Okay, if the variables that represent objects are called object variables and the types they represent are called reference types, what other variables are there? There are the regular variables that store the basic data types, and they're called value variables because they store values. An integer, or a string, is not stored as an object for efficiency. An Integer variable contains an actual value, not a pointer to the value. Imagine if you had to instantiate the Integer class every time you needed to use an integer value in your code. Not that it's a bad idea, but it would scare away most VB developers. Value variables are so common in programming and they're not implemented as classes for efficiency. Whereas objects require complicated structures in memory, the basic data types are stored in a few bytes and are manipulated much faster than objects.
Consider the following statements:
Dim age1, age2 As Integer
age2 = 29
age1 = age2
age2 = 40
When you assign a value variable to another, the actual value stored in the variable overwrites the current value of the other variable. The two variables have the same value after the statement that assigns the value of age2 to the variable age1, but they're independent of one another. After the execution of the last statement, the values of age1 and age2 are different again. If they were object variables, they would point to the same object after the assignment operation, and you wouldn't be able to set their values separately. You'd be setting the properties of the same object.
Value types are converted to objects as soon as you treat them as objects. As soon as you enter a statement like the following, the age1 variable is converted to an object:
age1.MinValue
You'll rarely use the methods of the base types, except for the ToString method of course, but you can turn value variables into object variables at any time. This process is known as boxing (the conversion of a value type to a reference type).
To better understand how reference types work, consider the following statements that append a new row with two subitems to a ListView control (the control's item is an object of the ListViewItem type):
ListView1.Items.Clear
Dim LI As New ListViewItem
LI.Text = "Item 1"
LI.SubItems.Add("Item 1 SubItem 1.a")
LI.SubItems.Add("Item 1 SubItem 1.b")
ListView1.Items.Add(LI)
After the execution of the preceding statements, the ListView control contains a single row. This row is an object of the ListViewItem type and exists in memory on its own. Only after the execution of the last statement is the ListViewItem object referenced by the LI variable associated with the ListView1 control.
To change the text of the first item, or its appearance, you can manipulate the control's Items collection directly or change the LI variable's properties. The following pairs of statements are equivalent:
ListView1.Items(0).Text = "Revised Item 1"
ListView1.Items(0).BackColor = Color.Cyan
LI.Text = "Revised Item 1"
LI.BackColor = Color.Cyan
There's yet another method to access the ListView control's items. Create an object variable that references a specific item and set the item's properties through this variable:
Dim selItem As ListViewItem
selItem = ListView1.Items(0)
selItem.Text = "new caption"
selItem.BackColor = Color.Silver
(If you need more information on using the ListView and TreeView controls, please refer to the tutorial "The ListView and TreeView Controls," which is available for download from www.sybex.com/go/masteringvb2010.
A final question for testing your OOP skills: What do you think will happen if you set the LI variable to Nothing? Should the control's row disappear? The answer is no. If you thought otherwise, take a moment now to think about why deleting a variable doesn't remove the object from memory. The LI variable points to an object in memory; it's not the object. The New keyword created a new ListViewItem object in memory and assigned its address to the variable LI. The statement that added the LI variable to the control's Items collection associated the object in memory with the control. By setting the LI variable to Nothing, we simply removed the pointer to the ListViewItem object in memory, not the object itself. To actually remove the control's first item, you must call the Remove method of the LI variable:
LI.Remove
This statement will remove the ListViewItem object from the control's Items collection, but the actual object still lives in the memory. If you execute the following statement, the item will be added again to the control:
ListView1.Items.Add(LI)
So to sum up, the ListViewItem object exists in memory and is referenced by the LI variable as well as by the ListView control. The Remove method removes the item from the control; it doesn't delete it from the memory. If you remove the item from the control and then set the LI variable to Nothing, the object will also be removed from memory.
Another way to look at the LI variable is as an intermediate variable. You could add a new row to the ListView control in a single statement without the intermediate variable:
ListView1.Items.Add(New ListViewItem("item header"))By the way, the ListViewItem object won't be deleted instantly. The CLR uses a special mechanism to remove objects from memory, the Garbage Collector (GC). The GC runs every so often and removes from memory all objects that are not referenced by any variable. These objects eventually will be removed from memory, but we can't be sure when. (There's no way to force the GC to run on demand.) The CLR will start the GC based on various criteria (the current CPU load, the amount of available memory, and so on). Because objects are removed automatically by the CLR, we say that the lifetime of an object is nondeterministic. We know when the object is created, but there's no way to know, or specify, when it's deleted. However, you can rest assured that the object will eventually be removed from memory. After you set the LI variable to Nothing and remove the corresponding item from the ListView control, you're left with a ListViewItem object in memory that's not referenced by any other entity. This object will live a little longer in the memory, until the GC gets a chance to remove it and reclaim the resources allocated to it. Moreover, once you have removed the references to the object, there's no way to access the object any more, even though it will exist for a while in memory before the GC gets a chance to destroy it.
Listing 10.1 shows the statements I've used for this experiment.
Example 10.1. Creating and removing objects
' Create a new ListViewItem object
Dim LI As New ListViewItem
LI.Text = "Item 1"
LI.SubItems.Add("Item 1 SubItem 1.a")
LI.SubItems.Add("Item 1 SubItem 1.b")
' add it to the ListView control
ListView1.Items.Add(LI)
MsgBox("Item added to the list." & vbCrLf &
       "Click OK to modify the appearance " &
       "of the top item through the LI variable.")
' Edit the object's properties
' The new settings will affect the appearance of the
' item on the control immediately
LI.Text = "ITEM 1"
LI.Font = New Font("Verdana", 10, FontStyle.Regular)
LI.BackColor = Color.Azure
MsgBox("Item's text and appearance modified. " &
         vbCrLf & "Click OK to modify the " &
         "appearance of the top item through " &
         "the ListView1.Items collection.")
' Change the first item on the control directly
' Changes also affect the object in memory
ListView1.Items(0).BackColor = Color.LightCyan
LI.SubItems(2).Text = "Revised Subitem"
' Remove the top item from the control
MsgBox("Will remove the top item from the control.")
LI.Remove()
MsgBox("Will restore the deleted item")
' The item was removed from list, but not deleted
' We can add it to the control's Items collection
ListView1.Items.Add(LI)
MsgBox("Will remove object from memory")
' Remove it again from the control
LI.Remove()
' and set it to Nothing
LI = Nothing
' We can no longer access the LI object.
MsgBox("Can I access it again?" & vbCrLf &
       "NO, YOU'LL GET AN EXCEPTION WHEN THE " &
       "FOLLOWING STATEMENT IS EXECUTED!")
ListView1.Items.Add(LI)When you set or read a property's value, the corresponding Get or Set segment of the Property procedure is executed. The following statement invokes the Property Set segment of the EMail public property of the class:
cust.EMail = "[email protected]"
As a reminder, even if the EMail property is an auto-implemented property, a Property procedure is invoked behind the scenes and sets the value of a local variable (the _EMail variable). Obviously, every time you call one of the class properties, the corresponding public procedure in the class is invoked. The following statement invokes both the Set and Get Property procedures of the Customer class Balance property:
cust.Balance = cust.Balance + 429.25
Trivial properties can also be implemented as public variables. These variables, which are called fields, behave like properties, but no code is executed when the application sets or reads their value. We often implement properties of the enumeration type as fields because they can be set only to valid values and there's no need for validation code. If the Set method of a property doesn't contain any validation code and simply assigns a new value to the local variable that represents the specific property, there's no difference between the property and a field. If you don't plan to validate the values of certain properties, use auto-implemented properties, which are as simple as fields.
To really understand classes and appreciate them, you must visualize the way classes combine code and data. Properties contain the data that live along with the code, which determines the object's behavior — its functionality. The functionality of the object is implemented as a number of methods and events. The properties, methods, and events constitute the class's interface. Each instance of the class acts on its own data, and there's no interference between two objects of the same type unless they contain shared properties. A shared property is common to all instances of the class. In other words, there's no local variable for this property, and all instances of the class access the same variable. Shared properties are not common — after all, if many of the properties are common to all instances of the class, why create many objects? Shared methods, on the other hand, are quite common. The Math class is a typical example. To calculate the logarithm of a number, you call the Log method of the Math class:
Math.Log(123)
You need not create an instance of the Math class before calling any of its methods (which are the common math functions). Actually, you can't create a new instance of the Math class because the entire class is marked as shared.
Let's say you're building a class to represent customers, the Customer class. This class should expose properties that correspond to the columns of the Customers table in a database. Each instance of the Customer class stores information about a specific customer. In addition to the properties, the Customer class should expose a few methods to get data from the database and commit changes or new customers to the database. The GetCustomerByID method, for example, should accept the ID of a customer as an argument, retrieve the corresponding customer's data from the database, and use them to populate the current instance's properties. Here's how you use this class in your code:
Dim cust As New Customer
cust.GetCustomerByID("ALFKI")
Debug.WriteLine cust.CompanyName
Debug.WriteLine cust.ContactName & "   " & cust.ContactTitle
The GetCustomerByID method can retrieve the customer data from a local database, a remote web service, or even an XML file. The idea is that a single method call gets the data and uses it to populate the properties of the current instance of the class. This method is an instance method because it requires an instance of the class. It populates the properties of this instance, or object.
You could have implemented the GetCustomerByID method as a shared method, but then the method should return an object of the Customer type. The shared method can't populate any object's properties because it can't be applied to an instance of the class. Here's how you'd use the Customer class if the GetCustomerByID method were shared:
Dim cust As New Customer
cust = Customer.GetCustomerByID("ALFKI")
Debug.WriteLine cust.CompanyName
Debug.WriteLine cust.ContactName & "   " & cust.ContactTitle
As you can see, you call the method of the Customer class, not the method of an object. You could also call the method with the following statement, but the code becomes obscure (at the very least, it's not elegant):
cust = cust.GetCustomerByID("ALFKI")The background compiler will detect that you're attempting to access a shared method through an instance of the class and will generate the following warning (the expression will be evaluated at runtime, in spite of the warning):
Access of shared member, constant member,
enum member or nested type through an instance;
qualifying expression will not be evaluated.
Because the class needs to know the database in which the data is stored, you can provide a Connection property that's shared. Shared properties are usually set when the class is initialized or from within a method that's called before we attempt to access any other methods or any of the class's properties. All the methods in the class use the Connection property to connect to the database. There's no reason to change the setting of this property in the course of an application, but if you change it, all subsequent operations will switch to the new database.
In summary, a class may expose a few shared properties if all instances of the class should access the same property value. It may also expose a few shared methods, which can be called through the class name if there's no need to create an instance of the class in order to call a method. In extreme situations, you can create a shared class: All properties and methods of this class are shared by default. To make the most of objects, however, you should create classes that are instantiated with the New keyword and methods that manipulate the current instance of the class.
The data type used most in earlier versions of the language up to VB 6 was the Variant (which was replaced in subsequent versions by the Object type). A variable declared as Object can store anything, and any variable that hasn't been declared explicitly is an Object variable. Even if you turn on the Strict option, which forces you to declare the type of each variable (and you should always have this option on), you will eventually run into Object variables. When you retrieve an item from a ListBox control, for example, you get back an object, not a specific data type. In the previous chapter, we used the ListBox control to store Contact objects. Every time we retrieved a contact from the control's Items collection, however, we got back an Object variable. To use this object in our code, we had to convert it to a more specific type, the Contact type, with the CType() or DirectCast function. The same is true for an ArrayList, which stores objects, and we usually cast its members to specific types.
Variables declared without a specific type are called untyped variables. Untyped variables should be avoided — and here's why. The following expression represents a ListBox item, which is an object:
ListBox1.Items(3)
Even if you add a Customer or a Product object to the list, when you retrieve the same item, it's returned as a generic Object variable. If you type the preceding expression followed by a period, you will see in the IntelliSense drop-down list the members of the generic Object variable, which you hardly ever need. If you cast this item to a specific type, the IntelliSense box will show the members of the appropriate type.
The action of changing a variable's type is known as casting, and there are two methods for casting variable types — the old VB 6 CType() function and the new DirectCast() function:
Dim currentCustomer As Customer
currentCustomer = DirectCast(ListBox1.Items(3), Customer)
From now on, you can access the members of the currentCustomer variable as usual.
There are situations where you can't avoid explicit casting of variable types. The IIf() function, for example, returns a value of the Object type, regardless of the type of its arguments. The following expression returns the string "Unknown" if the variable Age has no value or the value of the Age variable if the variable is not Nothing:
IIf(Age Is Nothing, "unknown", Age)
If you attempt to assign the value returned by the preceding statement to a String variable with the following statements, the code will work fine as long as the Strict option is off:
Dim showAge As String = IIf(Age Is Nothing, "unknown", Age)
If the Strict option is on, however, the compiler will underline the statement and will generate an error message to the effect that the Strict option disallows the conversion of an Object value to a String. You must explicitly cast the IIf() function's value to a string before assigning it to a String variable:
Dim showAge As String = DirectCast(IIf(Age Is Nothing, "unknown", Age), String)
The explicit conversion is necessary only if the Strict option is off and the Age variable must be declared as Nullable or as Object.
Untyped variables can't be resolved at compile time; these variables are said to be late - bound. An expression such as the following can't be resolved at compile time because the compiler has no way of knowing whether the object retrieved from the ListBox control is of the Customer type (or any other type that exposes the LastName property):
ListBox1.Items(3).LastName
The preceding statement will compile (as long as the Strict option is off) and execute fine if the fourth item on the ListBox control is of the Customer type or any other type that provides a LastName property. If not, it will compile all right, but a runtime exception will be thrown. Moreover, you won't see any members of interest in the IntelliSense box because the editor doesn't know the exact type of the object retrieved from the ListBox control.
If you cast the object to a specific type, the compiler won't let you reference a nonexisting member, therefore eliminating the chances of runtime exceptions. The last expression in the following code segment is said to be early - bound because the compiler knows its type and won't compile a statement that references nonexisting members:
Dim currentCustomer As Customer
currentCustomer = CType(ListBox1.Items(3), Customer)
Debug.WriteLine currentCustomer.LastName
If you plan to store objects to a ListBox control, you have to use late binding and convert the items of the ListBox control to the appropriate type. Don't forget to override the ToString method of the corresponding class so that a meaningful string is displayed on the control instead of the default string returned by the generic ToString method.
Casting an object to the desired type won't help you unless you know that the object is of the same type or can be cast to the desired type. Make your code as robust as it can be by using the TryCast() function to make sure that the conversion succeeded before attempting to use the currentCustomer variable in your code. Late binding is not possible when the Strict option is on. As I've mentioned earlier in this book, even when you're working with the Strict option off, you should turn it back on from time to time to spot the statements that may cause runtime errors.
Sometimes you need to figure out the type of a variable in your code. Even if you declare explicitly all the variables in your code, you might have to discover a specific variable's type at runtime.
The Form object exposes the ActiveControl property, which is the control that has the focus. The ActiveControl property returns a Control object, and you will have to find out its exact type (whether it's a TextBox, a ComboBox, or a Button, for example) from within your code.
All classes, including custom ones, expose the GetType() function, which returns the type of the corresponding object. The GetType() function's return value isn't a string; it is an object that exposes a large number of properties. You can call the IsEnum and IsClass properties to find out whether it's been implemented as an enumeration or as a class as well as the Name property to retrieve the variable's type name.
Consider an event handler that handles the same event for multiple controls on a form. The control that raised the event is passed to the event handler through the sender argument, and you can determine the type of the control that raised the event by using a statement such as the following:
If sender.GetType Is GetType(System.Windows.Forms.Button) Then
 ' process a button control
End If
This is a rather awkward syntax, but take it as is: Use the GetType method to request the type of a variable and the GetType() function to request the type of a control. You can also retrieve the type's name with the TypeName() function, which returns a string:
If TypeName(newContact).ToUpper="CONTACT" Then
Because the TypeName() function returns a string, you don't have to use the Is operator, but it's a good idea to convert this value to uppercase before attempting any comparisons.
At times, you may have to iterate through all controls on a form (or on a Panel control) and process the controls of a specific type — update the TextBox controls, for example. The following loop goes through all TextBox controls on the current form and cleans them up by converting their contents to uppercase and trimming them:
For Each ctrl In Me.Controls
    If ctrl.GetType Is GetType(System.Windows.Forms.TextBox) Then
        Dim TBox As TextBox = CType(ctrl, System.Windows.Forms.TextBox)
TBox.Text = TBox.Text.ToUpper.Trim
End If
NextNotice that you can't use the equals operator to compare types. To compare an object's type to another type, you must use the Is and IsNot keywords, as shown in the preceding example.
By now you should have a good understanding of writing code to manipulate objects. In the following sections, you're going to learn about a powerful concept in OOP, namely how to write new classes that inherit the functionality of existing ones.
Here's a scenario you're all too familiar with: You've written some code, perhaps a collection of functions that you want to reuse in another project. The key word here is reuse: write once, use many times. For years, VB developers were reusing code, even sharing it with others, with a very simple method: copying from one project and pasting it into another. The copy/paste approach to code reuse has never really worked because the code was never left untouched at its destination. When you're reusing the original code in another project, you make changes to better accommodate the new project. In the process, you also improve the code. At some point, you decide that you should "return" the improved code to the original project and enhance it. Unfortunately, the improved code doesn't always fit nicely into a different project. Some of the improvements break applications that used to work with the not-so-good code. If this has happened to you, imagine what a mess code sharing can be in a large environment with dozens of programmers. On a corporate level, this form of code reuse is a nightmare.
So what's inheritance? Inheritance is a powerful concept in object-oriented programming that allows you to build classes on top of existing ones. You inherit the functionality of an existing class and then add more functionality to it or overwrite some of its base functionality. Inheritance allows you to build hierarchies of classes that better represent physical entities, and it also enables you to reuse existing code (the holy grail of programming). Most importantly, you can inherit the functionality of an existing class without having access to its code.
Inheritance is a technique for reusing and improving code that doesn't cause the applications that use it to break. The idea is to export the code you want to reuse in a format that doesn't allow editing. If more than two people can edit the same code (or if even a single person is allowed to edit the same code in two different projects), any benefits of code reuse evaporate immediately. The code to be shared must be packaged as a DLL, which exposes all the functionality without the risk of being modified in a haphazard way. Only the original creator of the DLL can edit the code, and it's likely that this person will make sure that the interface of the class doesn't change. However, you should still be able to enhance the code in different projects. That's where inheritance comes into the picture. Instead of getting a copy of the code, you inherit a class. The functionality of the class can't change. The code in the DLL is well protected, and there's no way to edit the executable code; it's the class's functionality you inherit.
However, it's possible to add new functionality to the inherited code or even override some of the existing functionality. You can add new functionality to the code by adding new members to the inherited classes. This doesn't break any existing applications that use the original DLL. You can also override some of the functionality by creating a new method that replaces an existing one. Applications that use the original version of the DLL won't see the new members because they work with the old DLL. Newer projects can use the enhanced functionality of the DLL. The current solution to the problem of code reuse is inheritance. It's not a panacea, but it's a step forward.
Let me give a simple but quite practical example. A lot of functionality has been built into Windows itself, and we constantly reuse it in our applications. The various Windows Forms controls are a typical example. The functionality of the TextBox control, which we all take for granted, is packaged in a DLL (the System.Windows.Forms.TextBox class). Yet, many of us enhance the functionality of the TextBox control to address specific application requirements. Many developers add a few statements in the control Enter and Leave events to change the color of the TextBox control that has the focus. With VB 2010, it's possible to write just two event handlers that react to these two events and control the background color of the TextBox with the focus. These two handlers handle the corresponding events of all TextBox controls on the form.
A better approach is to design a "new" TextBox control that incorporates all the functionality of the original TextBox control and also changes its background color while it has the focus. The code that implements the TextBox control is hidden from us, but we can reuse it by building a new control that inherits from the TextBox control. As you saw in Chapter 9, "Building Custom Windows Controls," this is not only possible, it's almost trivial; you were able to build an enhanced TextBox control with a few lines of code, which I repeat here for the benefit of readers who weren't interested in building custom controls:
Public Class FocusedTextBox
    Inherits System.Windows.Forms.TextBox
    Private Sub FocusedTextBox_Enter(ByVal sender As Object,
                 ByVal e As System.EventArgs) Handles Me.Enter
        Me.BackColor = _enterFocusColor
    End Sub

    Private Sub FocusedTextBox_Leave(ByVal sender As Object,
                 ByVal e As System.EventArgs) Handles Me.Leave
        Me.BackColor = _leaveFocusColor
    End Sub
End Class
The _enterFocusColor and _leaveFocusColor variables are two local variables of the Color type, which must be also be declared. As you understand, the two Color variables are properties of the control (implemented with the usual setters and getters) so that different applications can use different colors for the active TextBox control on the form.
It took just a few lines of code and the keyword Inherits. With the Inherits statement, you include all the functionality of the original TextBox control without touching the control code. Any project that uses the FocusedTextBox control can take advantage of the extra functionality, yet all existing projects will continue to work with the original version of the control. We can easily upgrade a project to take advantage of the enhanced TextBox control by replacing all the instances of the TextBox control on a form with instances of the new control. Some projects may use the new control yet not take advantage of the new functionality and leave the default colors — in which case the enhanced control behaves just like the original TextBox control.
Inheritance is simply the ability to create a new class based on an existing one. The existing class is the parent class, or base class. The new class is said to inherit the base class and is called a subclass, or derived class. The derived class inherits all the functionality of the base class and can add new members and override existing ones. The replacement of existing members with other ones is called overriding. When you replace a member of the base class, you're overriding it. Or, you can overload a method by providing multiple forms of the same method that accept different arguments.
In this section, we'll tackle a very real problem by using inheritance. Consider a structure for storing product information; in most applications, this structure is optimized for a specific product type. In my consulting days, I've seen designs that try to capture a "global" product: a structure that can store products of any type. This approach leads to unnecessarily large database tables, name conflicts, and all kinds of problems that surface after the program has been installed at your customer's computers with different product types. Here's my suggestion for handling multiple types of products.
Every company makes money by selling products and services, and every company has different requirements. Even two bookstores don't store the same information in their databases. However, there are a few pieces of information that any company uses to sell its products: the product's code, its description, and its price. This is the minimum information you need to sell something (it's the information that's actually printed in the invoice). The price is usually stored to a different table, along with the company's pricing policies. Without being too specific, these are the three pieces of information for ordering and selling products. We use these items to maintain a list of orders and invoices and keep track of the stock, customer balances, and so on. The specifics of a product can be stored to different tables in the database, and these tables will be implemented upon request. If your customer is a book seller, you'll design tables for storing data such as publisher and author names, book descriptions, ISBNs, and the like.
You'll also have to write applications to maintain all this information. To sell the same application to an electronics store, you must write another module for maintaining a different type of product, but the table with the basic data remains the same. Clearly, you can't design a program for handling all types of products, nor can you edit the same application to fit different products. You just have to write different applications for different types of products, but the parts of the application that deal with buying and selling products and with customers, suppliers, and other peripheral entities won't change.
Let's look at a custom class for storing products, which is part of the Products sample project, available for download from www.sybex.com/go/masteringvb2010. The application's main form is shown in Figure 10.1.
The most basic class stores the information you'll need in ordering and invoicing applications: the product's ID, its name, and its price. Here's the implementation of a simple Product class:
Public Class Product
    Public Description As String
    Public ProductID As String
    Public ProductBarCode As String
    Public ListPrice As Decimal
End Class
I included the product's bar code because this is how products are usually sold at cash registers. This class can represent any product for the purposes of buying and selling it. Populate a collection with objects of this type and you're ready to write a functional interface for creating invoices and purchase orders.
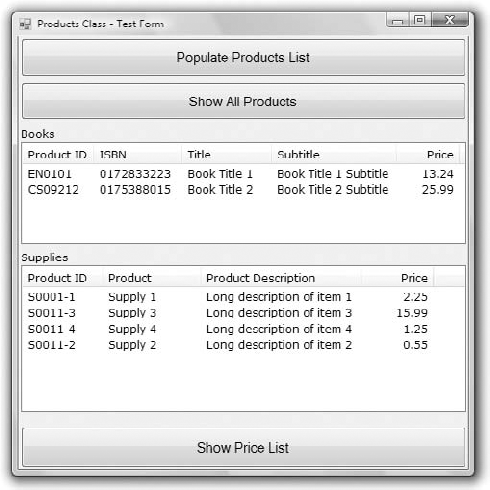
Now let's take into consideration the various types of products. To keep the example simple, consider a store that sells books and supplies. Each type of product is implemented with a different class, which inherits from the Product class. Supplies don't have ISBNs, and books don't have manufacturers — they have authors and publishers; don't try to fit everything into a single object or (even worse) into a single database table.
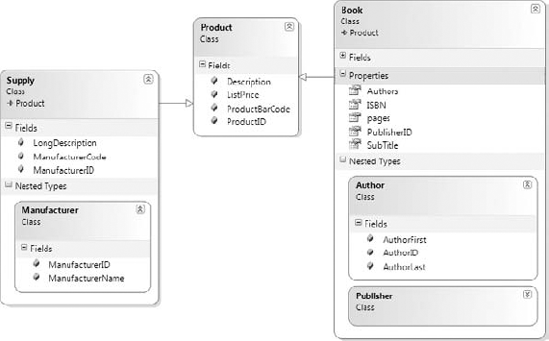
Figure 10.2 shows the base class, Product, and the two derived classes, Supply and Book, in the Class Diagram Designer. The arrows (if they exist) point to the base class of a derived class, and nested classes (such as the Author and Publisher classes) are contained in the box of their parent class.
Listing 10.2 is a simple class for representing books, the Book class.
Example 10.2. Simple class for representing books
Public Class Book
    Inherits Product
    Public Subtitle As String
    Public ISBN As String
    Public pages As Integer
    Public PublisherID As Long
    Public Authors() As Author

    Public Class Author
        Public AuthorID As Long
        Public AuthorLast As String
        Public AuthorFirst As String
    End Class

    Public Class Publisher
        Public PublisherID As Long
        Public PublisherName As String
        Public PublisherPhone As String
    End Class
End Class
In addition to its own properties, the Book class exposes the properties of the Product class. Because the book industry has a universal coding scheme (the ISBN), the product's code is the same as its ISBN. This, however, is not a requirement of the application. You will probably add some extra statements to make sure that the ProductID field of the Product class and the ISBN field of the Book class always have the same value.
The class that represents supplies is shown in Listing 10.3.
Example 10.3. Simple class for representing supplies
Public Class Supply
    Inherits Product
    Public LongDescription As String
    Public ManufacturerCode As String
    Public ManufacturerID As Long

    Public Class Manufacturer
        Public ManufacturerID As Long
        Public ManufacturerName As String
    End Class
End Class
To make sure this class can accommodate all pricing policies for a company, you can implement a GetPrice method, which returns the product's sale price (which can be different at different outlets or for different customers and for different periods). The idea is that some piece of code accepts the product's list (or purchase) price and the ID of the customer who buys it. This code can perform all kinds of calculations, look up tables in the database, or perform any other action and return the product's sale price: the price that will appear on the customer's receipt. We'll keep our example simple and sell with the list price.
Let's write some code to populate a few instances of the Book and Supply classes. The following statements populate a HashTable with books and supplies. The HashTable is a structure for storing objects along with their keys. In this case, the keys are the IDs of the products. The HashTable can locate items by means of their keys very quickly, and this is why I chose this type of collection to store the data. HashTables, as well as other collections, are discussed in detail in Chapter 12, "Storing Data in Collections."
Dim P1 As New Book
P1.ListPrice = 13.24D
P1.Description = "Book Title 1"
P1.ProductID = "EN0101"
P1.ISBN = "0172833223"
P1.Subtitle = "Book Title 1 Subtitle"
Products.Add(P1.ProductID, P1)

Dim P2 As New Supply
P2.Description = "Supply 1"
P2.ListPrice = 2.25D
P2.LongDescription = "Long description of item 1"
P2.ProductID = "S0001-1"
Products.Add(P2.ProductID, P2)
Products is the name of the collection in which the products are stored, and it's declared as follows:
Dim Products As New HashTable
Each item in the Products collection is either of the Book or of the Supply type, and you can find out its type with the following expression:
If TypeOf Products.Item(key) Is Book ...
Listing 10.4 shows the code behind the Display Products button on the sample application's form. The code iterates through the items of the collection, determines the type of each item, and adds the product's fields to the appropriate ListView control.
Example 10.4. Iterating through a collection of book and supply products
Private Sub Button2_Click(...) Handles bttnDisplay.Click
    Dim key As String
    Dim LI As ListViewItem
    For Each key In Products.Keys
LI = New ListViewItem
Dim bookItem As Book, supplyItem As Supply
If TypeOf Products.Item(key) Is Book Then
bookItem = CType(Products.Item(key), Book)
LI.Text = bookItem.ISBN
LI.SubItems.Add(bookItem.Description)
LI.SubItems.Add("")
LI.SubItems.Add(bookItem.ListPrice.ToString("#,##0.00"))
ListView1.Items.Add(LI)
End If
If TypeOf Products.Item(key) Is Supply Then
supplyItem = CType(Products.Item(key), Supply)
LI.Text = supplyItem.ProductID
LI.SubItems.Add(supplyItem.Description)
LI.SubItems.Add(supplyItem.LongDescription)
LI.SubItems.Add(supplyItem.ListPrice.ToString("#,##0.00"))
ListView2.Items.Add(LI)
End If
Next
End SubIt's fairly easy to take advantage of inheritance in your projects. The base class encapsulates the functionality that's necessary for multiple classes. All other classes inherit from the base class and add members specific to the derived class.
As I mentioned earlier, for the purpose of selling products, you can use the Product class. You can search for both books and suppliers with their ID or bar code and use the product's description and price to generate an invoice.
The following statements retrieve a product by its ID and print its description and price:
Dim id As String
id = InputBox("ID")
If Products.Contains(id) Then
    Dim selProduct As Product
    selProduct = CType(Products(id), Product)
    Debug.WriteLine("The price of " & selProduct.Description &
                    " is " & selProduct.ListPrice)
End If
If executed, the preceding statements will print the following in the Output window (assuming that you have specified the ID S0001-1 of course). This is all the information you need to prepare invoices and orders, and it comes from the Product class, which is the base class for all products.
The price of Supply 2 is 5.99
Before ending this section, I should point out that you can convert the type of an inherited class only to that of the parent class. You can convert instances of the Book and Supply class to objects of the Product type, but not the opposite. The only valid type conversion is a widening conversion (from a narrower to a wider type).
You won't be hard-pressed to come up with real-world situations that call for inheritance. Employees, customers, and suppliers can all inherit from the Person class. Checking and savings accounts can inherit from the Account class, which stores basic information such as customer info and balances. Later in this chapter, you'll develop a class that represents shapes and you'll use it as a basis for classes that implement specific shapes such as circles, rectangles, and so on.
So, has inheritance solved the problem of code reuse? In large complex projects, yes, it has helped a lot. Because designing with inheritance in mind has a substantial initial overhead, people don't use it with small projects (not that this is a recommended practice). In my view, the most important advantage of inheritance is that it forces designers and developers to fully understand the business model for the processes they're modeling early in the game and not have to revise their models substantially when they discover faults in their initial design while they're in the implementation process.
The concept of extension methods is not based on inheritance, or even the design of classes, but it's a related topic that was introduced to accommodate Language Integrated Query (LINQ). One of the major advantages of inheritance is that it allows you to extend existing classes by adding your custom members. As long as you design your classes carefully, you can create elaborate structures of classes that inherit from one another. Unfortunately, some of the classes in the Framework as not inheritable (and some of them happen to be the very classes you'd like to enhance). The Array class, for example, can't be inherited and neither can the String class.
If you need to add a few methods to a class that are specific to an application, you can use extension methods. With VB 2010 you can add a method to any class without even inheriting it. You don't have to create a new class, just a module that contains one or more procedures that accept the type of the class you want to extend as their first argument. Let me demonstrate the process of creating extension methods with a trivial example and then I'll show you a more practical extension method.
In this first example I'll add two simple methods to the Integer class, the Inc and Dec methods, which increase and decrease an integer value by one (the older among you will actually recognize the origins of the names of the two methods, you may even reminisce about them). In effect, I'll introduce two methods to replace the statements: i += 1 and i −= 1 (where i is an integer variable). Create a new project and add a module to it. You can call the module anything; for this example I will use the name IntegerExtensions.
First import the following namespace, which will allow you to "decorate" the extension methods with the appropriate keywords:
Imports System.Runtime.CompilerServices
Now you're ready to add the definitions of the extension methods. Each extension method is just a procedure decorated with the following attribute:
<System.Runtime.CompilerServices.Extension()>
or
<Extension()>
if you have imported the System.Runtime.CompilerServices namespace.
You must also make sure that the first argument you pass to the method is of the type you want to extend. A method that extends the Integer class, for example, should accept an integer type as its first argument. This is the instance of the class that your extension method will act upon and it may be followed by any number of additional arguments. Here are the implementations of the Inc and Dec methods:
<Extension()>
    Public Function Inc(ByVal i As Integer) As Integer
        Return i + 1
    End Sub

<Extension()>
    Public Function Dec(ByVal i As Integer) As Integer
        Return i − 1
    End Sub
With these definitions in place, switch to the project's main form and insert the following in a button's Click event handler:
Dim i As Integer = 13
MsgBox(i.Inc.ToString)
MsgBox(i.Dec.ToString)
As soon as you enter the name of an Integer variable and the following period, the Inc and Dec methods will be included in the IntelliSense box, along with the built-in methods of the Integer class (they indeed extend the Integer class). The first message box will display the value 14 (the original value plus 1) and the second message box will display the value 12 (the original value minus 1).
You can also implement the same routines as subroutines, which accept their argument by reference and increase the actual value of the variable instead of returning a new value. Let's call the two new methods Increase and Decrease:
<Extension()>
Public Sub Increase(ByRef i As Integer)
        i += 1
    End Sub
<Extension()>
Public Sub Decrease(ByRef i As Integer)
        i −= 1
    End Sub
To increase/decrease the values by another amount, rewrite the procedures so that they accept a second argument. The methods still apply to the Integer class because their first argument is of the Integer type. Note that when we call an extension method, we don't specify the first argument. This argument is used by the compiler to figure out which class the method extends. The value on which the method acts is the value of the variable to which the method is applied. In other words, extension methods are instance methods.
Now that you have seen the mechanics of implementing extension methods, let's look at a more interesting application of extension methods. Some classes have been heavily extended in version 4.0 of the Framework with this mechanism. A typical example is the Array class. Declare an array variable and then type on a new line the name of the array and a period. In the IntelliSense box you will see the methods of the Array class. Methods are marked with a little cube. Some of them, however, are marked with a cube and a down arrow: These are the class extension methods. These methods were introduced to extend the corresponding classes, and some typical examples are the Sum and Average methods of the Array class, which return the sum and the average of the elements in the array (provided that the array is of a numeric type). The following statement sets up a small array of integers:
Dim integers() = {1, 84, 12, 27, 3, 19, 73, 9, 16, 41, 53, 57, 13}To calculate the sum of its elements you can write a For Each loop to iterate through all the elements of the array, as usual, or call the Sum method:
Dim sumOfIntegers = integers.Sum
Likewise, you can call the Min and Max methods to retrieve the numerically smaller and larger elements respectively and the Average method to retrieve the average value of a set of numeric values.
The extension methods I just mentioned are not unique to the Array class. They apply to all classes that implement the IEnumerable interface — in other words, they apply to all collections. Not only that, but they're quite flexible because they're overloaded. Some of these extension methods can be called with a function as an argument! The Sum extension method iterates through the collection's items and calculates their sum. It can also calculate the sum of any transformation of the same elements. For example, you can calculate the sum of the squares by passing to the method the definition of a function that returns the square of each element. The Sum method will apply this function to every item as it loops through the elements and take the sum of the values returned by the function. The definition of a function that returns the square of a numeric value is trivial:
Function(v As Integer) As Integer
    Return(v * v)
End Function
To pass this function as an argument to the Sum method, you pass the body of the function without the Return statement and without the End Function statement:
Dim sqSum = integers.Sum(Function(v As Integer) v ˆ 2)
The v argument is replaced by the current item's value as the method iterates through the collection's elements. The functions you pass to a method are known as lambda expressions, and you'll find a lot more information on lambda expressions in Chapter 13, "XML in Modern Programming."
Another extension method is the Where method, which also accepts as argument a function that returns a True/False value. This function is also known as predicate and it determines whether an element of the collection will be included in the calculations or not. The function you pass to the Where method has a different role: It selects the value to be summed, and it's called selector. The following expression selects the values that are numerically less than 50:
integers.Where(Function(k) k < 50)
The expression k < 50 is evaluated for each element of the array and, if smaller, the value is selected. Otherwise, it's ignored. Having selected the "small" values in the array, we can apply the Sum method to calculate the sum of the selected values:
Dim smallSum = integers.Where(Function(k) k < 50).Sum
Okay, let's combine predicates and selectors to create an expression that sums the squares of selected elements in the array. To request the sum of the squares of all values that are numerically less than 50, use the following expression:
Dim smallSqSum = integers.Where(Function(k) k < 50).Sum(Function(v) v ˆ 2)
The Where extension method selects the desired values and the Sum extension method acts on them. The Where method returns an IEnumerable type to which you can apply the Sum method. The Sum method returns an integer.
I'm sure you got the idea behind extension methods. In Chapter 12 and then in Chapter 13, you will see how to apply lambda expressions to collections and how extension methods enable a new powerful querying technology known as LINQ.
In addition to inheriting and extending you own custom classes, you can extend many of the classes of the Framework itself. To add a new method to the ArrayList class, all you have to do is create a new class and include this statement:
Inherits ArrayList
All the methods in the class will become methods of the ArrayList class and they will appear in the IntelliSense box along with the built-in methods of the ArrayList class.
However, some of the core classes of the Framework are not inheritable. For example, you can't add new methods to the String class by inheriting it. By adding extension methods, you can easily extend any class, but only in the context of a project. To use the same extension features in another project, you must include the module that contains the extension methods. In the preceding chapter you saw the implementation of a method that converts numeric values to strings. If you copy the code into a new module and prefix the methods with the <Extension> attribute, you can make the Num2String method part of the String class. Another interesting extension for the String class is a method that actually reads out text. The Framework contains the Speech.Synthesis namespace, which provides all the tools for generating a synthetic voice with your computer. To extend the String class with a Speak method, create a new module and import the following namespace:
Imports System.Speech.Synthesis
Before you can import this class in your code, you must reference it in your project, because the Speech namespace isn't referenced by default. Right-click the project name and select Add Reference from the context menu. On the dialog box that opens, select the System.Speech.Synthesis component and then add the following method definition:
<Extension()> _
Public Sub Speak(ByVal s As String)
    Dim synth As New SpeechSynthesizer
    Dim voices As
              System.Collections.ObjectModel.ReadOnlyCollection(
                     Of System.Speech.Synthesis.InstalledVoice) =
                     synth.GetInstalledVoices()
    synth.SelectVoice(voices(0).VoiceInfo.Name)
    synth.Speak(s)
End Sub
Easy enough? The first statement retrieves all installed voices (there's only one voice installed by default) and uses the first of them to read out the text with the Speak method. If you're interested in adding voice capabilities to your application, look up the members of the Synthesis namespace. You can adjust the properties of the voice, call the Speak method asynchronously, and even add voice recognition features to your applications.
A consequence of inheritance is another powerful OOP technique: polymorphism, which is the capability of a base type to adjust itself to accommodate many different derived types. Let's make it simpler by using some analogies in the English language. Take the word run, for example. This verb can be used to describe what athletes, cars, or refrigerators do; they all run. In different sentences, the same word takes on different meanings. When you use it with a person, it means going a distance at a fast pace. When you use it with a refrigerator, it means that it's working. When you use it with a car, it may take on both meanings. So, in a sense the word run is polymorphic (and so are many other English words): Its exact meaning is differentiated by the context. This is a simple definition of the terms polymorphism and polymorphic (both of Greek origin, meaning "many forms"). If you reflect on the essence of polymorphism, you'll realize that it's a characteristic that adds intelligence to languages. And languages, being the primary human tool, should match our intelligence. As you will see shortly, polymorphism adds a degree of intelligence to object-oriented programming.
To apply the same analogy to programming, think of a class that describes a basic object such as a shape. This class would be very complicated if it had to describe and handle all shapes. It would be incomplete, too, because the moment you released it to the world, you'd come up with a new shape that can't be described by your class. To design a class that describes all possible shapes, you build a simple class to describe shapes at large, and then you build a separate class for each individual shape: a Triangle class, a Square class, a Circle class, and so on. As you can guess, all these classes inherit the Shape class. Let's also assume that all the classes that describe individual shapes have an Area method, which calculates the area of the shape they describe. The name of the Area method is the same for all classes, but it calculates a different formula for different shapes.
Developers, however, shouldn't have to learn a different syntax of the Area method for each shape; they can declare a Square object and calculate its area with the following statements:
Dim shape1 As New Square(5)
Dim area As Double = shape1.Area
If shape2 represents a circle, the same method will calculate the circle's area. (I'm assuming that the constructors accept as an argument the square's side and the circle's radius, respectively.)
Dim shape2 As New Circle(9.90)
Dim area As Double = shape2.Area
You can go through a list of objects derived from the Shape class and calculate their areas by calling the Area method. No need to know what shape each object represents — you just call its Area method. Let's say you created an array with various shapes. You can go through the collection and calculate the total area with a loop like the following:
Dim totalArea As Double = 0.0
For Each s As Shape In Shapes   totalArea += CType(s, Shape).Area
End While
The CType() function converts the current element of the collection to a Shape object; it's necessary only if the Strict option is on, which prohibits VB from late-binding the expression. (Strict is off by default, but my suggestion is to turn it on.)
One rather obvious alternative is to build a separate function to calculate the area of each shape (SquareArea, CircleArea, and so on). It will work, but why bother with so many function names, not to mention the overhead in your code? You must first figure out the type of shape described by a specific variable, such as shape1, and then call the appropriate method. The code will not be as easy to read, and the longer the application gets, the more If and Case statements you'll be coding. Not to mention that each method would require different arguments for its calculations.
This approach clearly offsets the benefits of object-oriented programming by reducing classes to collections of functions. Even worse, the code is no longer elegant.
The second, even less-efficient method is a really long Area() function that would be able to calculate the area of all shapes. This function should be a very long Case statement, such as the following one:
Public Function Area(ByVal shapeType As String) As Double
   Select Case shapeType
      Case "Square": { calculate the area of a square }
      Case "Circle": { calculate the area of a circle }
      { . . . more Case statements }
   End Select
End Function
The real problem with this approach is that every time you want to add a new segment to calculate the area of a new shape to the function, you'd have to edit it. If other developers wanted to add a shape, they'd be out of luck. The solution is a method by the name Area that applies to all shapes. Each time we create a new shape by inheriting the base class, we should be able to add a new implementation of the Area method for the specific shape. This way, no matter what a specific shape is, we can calculate its area by calling the polymorphic Area method.
In the following section, I'll show you how to build the Shape class and then extend it with individual classes for various shapes. You'll be able to add your own classes to implement additional shapes, and any code written using the older versions of the Shape class will keep working.
In this section, you'll build a few classes to represent shapes to demonstrate the advantages of implementing polymorphism. Let's start with the Shape class, which will be the base class for all other shapes. This is a really simple class that's pretty useless on its own. Its real use is to expose two methods that can be inherited: Area and Perimeter. Even the two methods don't do much — actually, they do absolutely nothing. All they really do is provide a naming convention. All classes that will inherit the Shape class will have an Area and a Perimeter method, and they must provide the implementation of these methods.
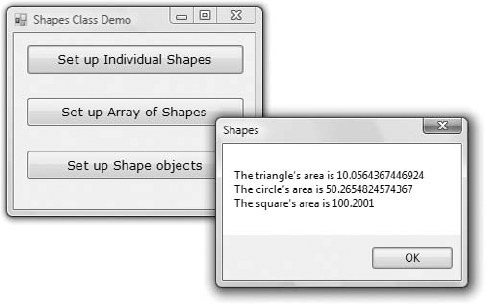
The code shown in Listing 10.5 comes from the Shapes sample project. The application's main form, which exercises the Shape class and its derived classes, is shown in Figure 10.3.
Example 10.5. Shape class
Class Shape
   Overridable Function Area() As Double
   End Function
   Overridable Function Perimeter() As Double
   End Function
End Class
If there are properties common to all shapes, you place the appropriate Property procedures in the Shape class. If you want to assign a color to your shapes, for instance, insert a Color property in this class. The Overridable keyword means that a class that inherits from the Shape class can override the default implementation of the corresponding methods or properties. As you will see shortly, it is possible for the base class to provide a few members that can't be overridden in the derived class. The methods that are declared but not implemented in the parent class are called virtual methods, or pure virtual methods.
Next you must implement the classes for the individual shapes. Add another Class module to the project, name it Shapes, and enter the code shown in Listing 10.6.
Example 10.6. Square, Triangle, and Circle classes
Public Class Triangle
    Inherits Shape
    Private _side1, _side2, _side3 As Double

    Property Side1() As Double
        Get
            Return _side1
        End Get
        Set(ByVal Value As Double)
            _side1 = Value
        End Set
    End Property

    Property Side2() As Double
        Get
            Return _side2
        End Get
        Set(ByVal Value As Double)
            _side2 = Value
        End Set
    End Property

    Public Property Side3() As Double
        Get
            Return _side3
        End Get
        Set(ByVal Value As Double)
            _side3 = Value
        End Set
    End Property

    Public Overrides Function Area() As Double
        Dim Perim As Double
        Perim = Perimeter()
        Return (Math.Sqrt((Perim - _side1) * _
                          (Perim - _side2) * (Perim - _side3)))
    End Function
Public Overrides Function Perimeter() As Double
Return (_side1 + _side2 + _side3)
End Function
End Class
Public Class Circle
Inherits Shape
Private _Radius As Double
Public Property Radius() As Double
Get
Radius = _Radius
End Get
Set(ByVal Value As Double)
_Radius = Value
End Set
End Property
Public Overrides Function Area() As Double
Return (Math.PI * _Radius ˆ 2)
End Function
Public Overrides Function Perimeter() As Double
Return (2 * Math.PI * _Radius)
End Function
End Class
Public Class Square
Inherits Shape
Private _Side As Double
Public Property Side() As Double
Get
Side = _Side
End Get
Set(ByVal Value As Double)
_Side = Value
End Set
End Property
Public Overrides Function Area() As Double
Area = _Side * _Side
End Function
Public Overrides Function Perimeter() As Double
Return (4 * _Side)
End Function
End ClassThe Shapes.vb file, available for download from www.sybex.com/go/masteringvb2010, contains three classes: the Square, Triangle, and Circle classes. All three expose their basic geometric characteristics as properties. The Triangle class, for example, exposes the properties Side1, Side2, and Side3, which allow you to set the three sides of the triangle. In a real-world application, you may opt to insert some validation code because not any three sides produce a triangle. You might also consider defining a triangle with three points (pairs of x-, y-coordinates), but I'd rather not turn this chapter into Geometry 101. You must also insert parameterized constructors for each shape. The implementation of these constructors is trivial, and I'm not showing it in the listing; you'll find the appropriate constructors if you open the project with Visual Studio. The Area and Perimeter methods are implemented differently for each class, but they do the same thing: They return the area and the perimeter of the corresponding shape. The Area method of the Triangle class is a bit involved, but it's just a formula (the famous Heron's formula for calculating a triangle's area).
To test the Shape class, all you have to do is create three variables — one for each specific shape — and call their methods. Or, you can store all three variables into an array and iterate through them. If the collection contains Shape variables only, the current item is always a shape, and as such it exposes the Area and Perimeter methods. The code in Listing 10.7 does exactly that. First, it declares three variables of the Triangle, Circle, and Square types. Then it sets their properties and calls their Area method to print their areas.
Example 10.7. Testing the Shape class
Dim shape1 As New Triangle()
Dim shape2 As New Circle()
Dim shape3 As New Square()
' Set up a triangle
shape1.Side1 = 3
shape1.Side2 = 3.2
shape1.Side3 = 0.94
Console.WriteLine("The triangle's area is " & shape1.Area.ToString)
' Set up a circle
shape2.Radius = 4
Console.WriteLine("The circle's area is " & shape2.Area.ToString)
' Set up a square
shape3.Side = 10.01
Console.WriteLine("The square's area is " & shape3.Area.ToString)
Dim shapes() As Shape
shapes(0) = shape1
shapes(1) = shape2
shapes(2) = shape3
Dim shapeEnum As IEnumerator
Dim totalArea As Double
shapeEnum = shapes.GetEnumerator
While shapeEnum.MoveNext
totalArea = totalArea + CType(shapeEnum.Current, shape).Area
End While
Console.WriteLine("The total area of your shapes is " &
totalArea.ToString)In the last section, the test code stores all three variables into an array and iterates through its elements. At each iteration, it casts the current item to the Shape type and calls its Area method. The expression that calculates areas is CType(shapeEnum.Current, shape).Area, and the same expression calculates the area of any shape.
Depending on how you will use the individual shapes in your application, you can add properties and methods to the base class. In a drawing application, all shapes have an outline and a fill color. These properties can be implemented in the Shape class because they apply to all derived classes. Any methods with a common implementation for all classes should also be implemented as methods of the parent class. Methods that are specific to a shape must be implemented in one of the derived classes.
I should also point out here that you can declare variables of the Shape type and initialize them to specific shapes, as follows:
Dim triangle As Shape
triangle = New Triangle(1.2, 0.9, 1.3)

Dim circle As Shape
circle = New Circle(10)

Dim square As Shape
square = New Square(23)
The circle variable's type isn't Shape; its type is determined by its constructor and the circle variable is of the Circle type. Needless to say that all three variables expose the Perimeter and Area methods and the code is strongly typed (it will work even with the Strict option on).
The Shape base class and the Shapes derived class work fine, but there's a potential problem. A new derived class that implements a new shape may not override the Area or the Perimeter method. If you want to force all derived classes to implement a specific method, you can specify the MustInherit modifier for the class declaration and the MustOverride modifier for the member declaration. If some of the derived classes may not provide their implementation of a method, this method of the derived class must also be declared with the Overridable keyword.
The Shapes project uses the MustInherit keyword in the definition of the Shape class. This keyword tells the CLR that the Shape class can't be used as is; it must be inherited by another class. A class that can't be used as is is known as an abstract base class, or a virtual class. The definition of the Area and Perimeter methods are prefixed with the MustOverride keyword, which tells the compiler that derived classes (the ones that will inherit the members of the base class) must provide their own implementation of the two methods:
Public MustInherit Class Shape
   Public MustOverride Function Area() As Double
   Public MustOverride Function Perimeter() As Double
End Class
Notice that there's no End Function statement, just the declaration of the function that must be inherited by all derived classes. If the derived classes may override one or more methods optionally, these methods must be implemented as actual functions. Methods that must be overridden need not be implemented as functions — they're just placeholders for a name. You must also specify their parameters, if any. The definitions of the methods you specify are known as the methods' signature.
There are other modifiers you can use with your classes, such as the NotInheritable modifier, which prevents your class from being used as a base class by other developers. The System.Array class is an example of a Framework class that can't be inherited.
In the following sections, you'll look at the class-related modifiers and learn when to use them. The various modifiers are keywords, such as the Public and Private keywords that you can use in variable declarations. These keywords can be grouped according to the entity they apply to, and I used this grouping to organize them in the following sections.
These keywords apply to classes that can be inherited, and they appear in front of the Class keyword. By default, all classes can be inherited, but their members can't be overridden. You can change this default behavior with the following modifiers:
NotInheritableThis prevents the class from being inherited (also known as a sealed class). The base data types, for example, are not inheritable. In other words, you can't create a new class based on the Integer data type. The Array class is also not inheritable.
MustInheritThis class must be inherited. Classes prefixed with the
MustInheritattribute are called abstract classes, and the Framework contains quite a few of them. You can't create an object of this class in your code, and therefore, you can't access its methods. The Shape class is nothing more than a blueprint for the methods it exposes and can't be used on its own; that's why it was declared with theMustInheritkeyword.
The following keywords may appear in a derived class; they have to do with the derived class's parent class:
InheritsAny derived class must inherit an existing class. The
Inheritsstatement tells the compiler which class it derives from. A class that doesn't include theInheritskeyword is by definition a base class.MyBaseUse the
MyBasekeyword to access a derived class's parent class from within the derived class's code.
These keywords apply to the members of classes that can be inherited, and they appear in front of the member's name. They determine how derived classes must handle the members (that is, whether they can or must override their properties and methods):
OverridableEvery member with this modifier can be overwritten. If a member is declared as
Publiconly, it can't be overridden. You should allow developers to override as many of the members of your class as possible, as long as you don't think there's a chance that they might break the code by overriding a member. Members declared with theOverridablekeyword don't necessarily need to be overridden, so they must provide some functionality.NotOverridableEvery member declared with this modifier can't be overridden in the inheriting class.
MustOverrideEvery member declared with this modifier must be overridden. You can skip the overriding of a member declared with the
MustOverridemodifier in the derived class as long as the derived class is declared with theMustInheritmodifier. This means that the derived class must be inherited by some other class, which then receives the obligation to override the original member declared asMustOverride.The two methods of the Shape class must be overridden, and we've done so in all the derived classes that implement various shapes. Let's also assume that you want to create different types of triangles with different classes (an orthogonal triangle, an isosceles triangle, and a generic triangle). And let's assume that these classes would inherit the Triangle class. You can skip the definition of the
Areamethod in the Triangle class, but you'd have to include it in the derived classes that implement the various types of triangles. Moreover, the Triangle class would have to be marked asMustInherit.PublicThis modifier tells the CLR that the specific member can be accessed from any application that uses the class. This, as well as the following keywords, are access modifiers and are strictly inheritance related, but I'm listing them here for completeness.
PrivateThis modifier tells the CLR that the specific member can be accessed only in the module in which it was declared. All the local variables must be declared as
Private, and no other class (including derived classes) or application will see them.ProtectedProtected members have scope between public and private, and they can be accessed in the derived class, but they're not exposed to applications using either the parent class or the derived classes. In the derived class, they have a private scope. Use the
Protectedkeyword to mark the members that are of interest to developers who will use your class as a base class, but not to developers who will use it in their applications.Protected FriendThis modifier tells the CLR that the member is available to the class that inherits the class as well as to any other component of the same project.
The Overrides keyword applies to members of derived classes and indicates whether a member of the derived class overrides a base class member. Use this keyword to specify the member of the parent class you're overriding. If a member has the same name in the derived class as in the parent class, this member must be overridden. You can't use the Overrides keyword with members that were declared with the NotOverridable or Protected keywords in the base class.
A few examples are in order. The sample application of this section is the InheritanceKeywords project, and it contains a few classes and a simple test form. Create a simple class by entering the statements of Listing 10.8 in a Class module, and name the module ParentClass.
Example 10.8. InheritanceKeywords class
Public MustInherit Class ParentClass
   Public Overridable Function Method1() As String
      Return ("I'm the original Method1")
   End Function
   Protected Function Method2() As String
      Return ("I'm the original Method2")
   End Function
   Public Function Method3() As String
      Return ("I'm the original Method3")
   End Function
   Public MustOverride Function Method4() As String
' No code in a member that must be overridden !
' Notice the lack of the matching End Function here
   Public Function Method5() As String
      Return ("I'm the original Method5")
   End Function
   Private prop1, prop2 As String
   Property Property1() As String
      Get
         Property1 = "Original Property1"
      End Get
      Set
         prop1 = Value
      End Set
   End Property
   Property Property2() As String
      Get
         Property2 = "Original Property2"
End Get
Set
prop2 = Value
End Set
End Property
End ClassThis class has five methods and two properties. Notice that Method4 is declared with the MustOverride keyword, which means it must be overridden in a derived class. Notice also the structure of Method4. It has no code, and the End Function statement is missing. Method4 is declared with the MustOverride keyword, so you can't instantiate an object of the ParentClass type. A class that contains even a single member marked as MustOverride must also be declared as MustInherit.
Place a button on the class's test form, and in its code window attempt to declare a variable of the ParentClass type. VB will issue a warning that you can't create a new instance of a class declared with the MustInherit keyword. Because of the MustInherit keyword, you must create a derived class. Enter the lines from Listing 10.9 in the ParentClass module after the end of the existing class.
Example 10.9. Derived class
Public Class DerivedClass
   Inherits ParentClass
   Overrides Function Method4() As String
      Return ("I'm the derived Method4")
   End Function
   Public Function newMethod() As String
      Console.WriteLine("<This is the derived Class's newMethod " &
                        "calling Method2 of the parent Class> ")
      Console.WriteLine("    " & MyBase.Method2())
   End Function
End Class
The Inherits keyword determines the parent class. This class overrides the Method4 member and adds a new method to the derived class: newMethod. If you switch to the test form's code window, you can now declare a variable of the DerivedClass type:
Dim obj As DerivedClass
This class exposes all the members of ParentClass except for the Method2 method, which is declared with the Protected modifier. Notice that the newMethod() function calls this method through the MyBase keyword and makes its functionality available to the application. Normally, we don't expose Protected methods and properties through the derived class.
Let's remove the MustInherit keyword from the declaration of the ParentClass class. Because it's no longer mandatory that the ParentClass be inherited, the MustInherit keyword is no longer a valid modifier for the class's members. So, Method4 must be either removed or implemented. Let's delete the declaration of the Method4 member. Because Method4 is no longer a member of the ParentClass, you must also remove the entry in the DerivedClass that overrides it.
The MyBase and MyClass keywords let you access the members of the base class and the derived class explicitly. To see why they're useful, edit the ParentClass, as shown here:
Public Class ParentClass
   Public Overridable Function Method1() As String
      Return (Method4())
   End Function
   Public Overridable Function Method4() As String
      Return ("I'm the original Method4")
   End Function
Override Method4 in the derived class, as shown here:
Public Class DerivedClass
   Inherits ParentClass
   Overrides Function Method4() As String
   Return("Derived Method4")
End Function
Switch to the test form, add a button, declare a variable of the derived class, and call its Method4:
Dim objDerived As New DerivedClass()
Debug.WriteLine(objDerived.Method4)
What will you see if you execute these statements? Obviously the string Derived Method4. So far, all looks reasonable, and the class behaves intuitively. But what if we add the following method in the derived class?
Public Function newMethod() As String
   Return (Method1())
End Function
This method calls Method1 in the ParentClass class because Method1 is not overridden in the derived class. Method1 in the base class calls Method4. But which Method4 gets invoked? Surprised? It's the derived Method4! To fix this behavior (assuming you want to call the Method4 of the base class), change the implementation of Method1 to the following:
Public Overridable Function Method1() As String
   Return (MyClass.Method4())
End Function
If you run the application again, the statement
Console.WriteLine(objDerived.newMethod)
will print this string:
I'm the original Method4
Is it reasonable for a method of the base class to call the overridden method? It is reasonable because the overridden class is newer than the base class, and the compiler tries to use the newest members. If you had other classes inheriting from the DerivedClass class, their members would take precedence.
Use the MyClass keyword to make sure you're calling a member in the same class and not an overriding member in an inheriting class. Likewise, you can use the keyword MyBase to call the implementation of a member in the base class rather than the equivalent member in a derived class. MyClass is similar to MyBase, but it treats the members of the parent class as if they were declared with the NotOverridable keyword.
Inheritance isn't just a theoretical concept that can be applied to shapes or other entities that have no relation whatsoever with business applications. I've used a simple example to demonstrate that there are entities that can be modeled quite naturally with inherited classes. Now that you have learned the mechanics of designing parent and derived classes and the keywords that affect inheritance, it's time to explore a business-like scenario where inheritance may come in handy.
An interesting type of business application deals with reservations — be it hotel reservations, flights reservation, car rentals, you name it. The same company usually provides all types of reservations, and chances are you have used their services on the Web, either to make reservations or to simply look up hotels near certain attractions or conventions. Expedia.com and Bookings.com are probably the most popular reservation sites for the retail market. There are also many sites addressed to travel professionals.
Before designing the interface of an application, architects must come up with a model that reflects the business objects and embeds the required business logic into them. They must also design a database that reflects the hierarchy of the business objects. I will not show you an enormous data model for all entities you may run into while designing the model for a reservation system, just a simplified (if not oversimplified) object hierarchy for storing bookings.
There are several types of bookings a reservation system should accommodate, and each type has its own structure. However, there are a few fields that are common to all bookings. A booking must have a name (the name of the person staying at the hotel or flying), a price, a confirmation number, and so on. Then there are fields that are unique to each type of booking. Hotel bookings have a hotel name and a destination, a check-in date and a check-out date. Car rental bookings share the same information, but no hotel name, and the destination is not a city, but a car pickup location. They also have a car drop location, which may or may not be the same as the pickup location.
I'm sure you've got the idea; we'll design a base class to represent a booking at large and a number of classes, one for each type of booking, all inheriting the same base class. Although there are many ways to design classes for storing data related to bookings, the starting point should be the observation that all types of bookings share some common fields. If we collect the information that's common to all bookings, we can build a parent class from which all types of bookings will derive.
First thing's first. Since we must be able to differentiate several booking types, we must create an enumeration with a member for each different booking type, as follows:
Public Enum ReservationType
    HotelReservation
    CarReservation
    FlightReservation
End Enum
Every time a new booking is created, its type should be set to the appropriate member of the ReservationType enumeration. If the need for a new type of booking arises, you can update the ReservationType enumeration and create a new derived class to represent the attributes that are unique to the new booking type.
We'll now turn our attention to the parent class, which contains all the standard fields of a booking. Listing 10.10 shows a possible implementation of the Booking class:
Example 10.10. The Booking parent class
Public MustInherit Class Booking
    Protected Property Type As ReservationType
     Public ReadOnly Property BookingType As ReservationType
        Get
            Return Type
        End Get
    End Property
    Public Property BookingRequestDate As Date
    Protected Property BookingStartDate As Date
    Protected Property BookingEndDate As Date
    Public Property BookingName As String
    Public Property BookingNumber As String
    Public Property ProviderName As String
    Public Property Price As Decimal
End Class
Note that all properties are auto-implemented (I'll leave it up to you to introduce reasonable validation, such as to reject inappropriate starting and ending dates, future request dates, and so on). Some of the properties are marked as Protected. These properties are internal to the class and not visible from the project that uses the Booking class. The Type property, for example, shouldn't be visible outside the class. We don't want users to create a new hotel booking and set its Type property to any other value other than HotelReservation (you'll see shortly how we can do that). However, users of the class should be able to request the type of a booking, so I've included the read-only property BookingType, which returns the value of the Type protected property.
Note also that the BookingStartDate and BookingEndDate properties are also Protected. All bookings have a starting and an ending date (with a few exceptions, such as event bookings), but they have different names. Why use a generic names for the two dates when we can call them CheckinDate and CheckoutDate for hotels, PickupDate and DropoffDate for cars, and so on?
Note that the Booking class is prefixed with the MustInherit modifier so that the applications that use the derived classes can't create generic objects. This keyword makes the Booking class an abstract one.
Let's design now the HotelBooking class, which derives from the Booking class and adds a few properties to describe the hotel (the HotelName, DestinationCity, and DestinationCountry properties). In a production application, you'd have a Destination class with a city code and a country code, but I've decided to keep the complexity of the class to a minimum.
Note the properties CheckinDate and CheckoutDate. These two properties are mapped to the BookingStartDate and BookingEndDate of the parent class. I'm using the Protected modifier along with the MyBase object to hide the names of the parent class and name them differently in the derived class. Other than that, the code is almost trivial, as you can see in Listing 10.11.
Example 10.11. The FlightBooking class based on the Booking class
Public Class HotelBooking
    Inherits Booking

    Public Property DestinationCountry As String
    Public Property DestinationCity As String
    Public Property HotelName As String
    Public Property CheckInDate As Date
        Get
            Return MyBase.BookingStartDate
        End Get
        Set(ByVal value As Date)
            MyBase.BookingStartDate = value
        End Set
    End Property

    Public Property CheckOutDate As Date
        Get
            Return MyBase.BookingEndDate
        End Get
        Set(ByVal value As Date)
            MyBase.BookingEndDate = value
        End Set
    End Property
End Class
The FlightBooking class is even simpler. The two dates are now called DepartureDate and ArrivalDate. In flights, we first depart, then we arrive, while at hotels we first arrive (check in) and then depart (check out). Take a look at Listing 10.12.
Example 10.12. The FlightBooking Class based on the Booking class
Public Class FlightBooking
    Inherits Booking
    Public Property OriginCode As String
    Public Property DestinationCode As String
    Public Property DepartureDate As Date
        Get
            Return MyBase.BookingStartDate
        End Get
        Set(ByVal value As Date)
            MyBase.BookingStartDate = value
        End Set
    End Property

    Public Property ArrivalDate As Date
        Get
            Return MyBase.BookingEndDate
        End Get
        Set(ByVal value As Date)
            MyBase.BookingEndDate = value
        End Set
    End Property
    Public Property ConfirmationNumber As String
End Class
We're almost done, except for a crucial detail. Every time the user declares a variable of the derived type (HotelBooking, FlightBooking, or CarBooking), we must set the Type property to the appropriate member of the ReservationType enumeration. You can't rely on other developers to ensure the integrity of your data because they may create a HotelBooking object and set its Type property to an inappropriate member of the enumeration.
The proper place to set the Type property is the constructor of each of the derived classes. The constructor of the HotelBooking class should be as follows:
Public Sub New()
    Type = ReservationType.HotelReservation
End Sub
There are similar constructors for the other derived classes, which I need not repeat here.
Let's see now how to use the Booking class in an application. Switch to the project's main form and enter the statements of Listing 10.13 in the Click event handler of a Button control. These statements create a hotel booking and a car booking. You should enter some of these statements in the editor and see how the members of each of the derived classes appear in the IntelliSense list. You will see that you can't set the BookingStartDate and BookingEndDate properties because they're hidden in the derived classes.
Example 10.13. Exercising the members of the Booking derived classes
Dim htlBooking As New Reservation.HotelBooking
htlBooking.BookingName = "Joe Taveller"
htlBooking.BookingNumber = "PRN01202148"
htlBooking.BookingRequestDate = Now
htlBooking.checkInDate = #5/19/2010#
htlBooking.checkOutDate = #5/22/2010#
htlBooking.DestinationCountry = "Spain"
htlBooking.DestinationCity = "Barcelona"
htlBooking.HotelName = "Tower Hotel"
htlBooking.Price = 680.99

Dim fltBooking As New Reservation.FlightBooking
fltBooking.DepartureDate = #5/19/2010 7:30:00 AM#
fltBooking.ArrivalDate = #5/19/2010 9:45:00 AM#
fltBooking.DestinationCode = "BCN"
fltBooking.OriginCode = "JFK"
fltBooking.BookingName = "Joe Traveller"
fltBooking.BookingNumber = "PRN01202149"
fltBooking.ConfirmationNumber = "008-9823118 CA11"
fltBooking.Price = 1099.0
If you want to process bookings of a specific type, just use the Type property to find out the exact type of a booking, as in the following loop that iterates through hotel bookings and prints out the hotel names for each booking:
For Each bk In Bookings
    If bk.Type = Reservation.ReservationType.HotelReservation Then
        Dim hotelBk As Reservation.HotelBooking =
                            CType(bk, Reservation.HotelBooking)
        TextBox1.AppendText("Reservation # " &
                            hotelBk.BookingNumber & "    " &
                            hotelBk.HotelName & vbCrLf)
    End If
Next
You can also iterate through the Bookings collection and access the members of the base class with a control variable of the Booking type. The following loop goes through all bookings and calculates their total value:
Dim totalPrice As Decimal = 0
For Each bk In Bookings
    totalPrice += bk.Price
Next
The classes I've presented here are adequate for demonstrating how to apply inheritance and polymorphism in your code, but they're quite trivial. You can expand the functionality of these classes by adding new properties on your own. You can add one or more room types in a hotel booking (whether the booking is for a single room or a twin and a double, and so on). Flights are not always a single segment. Flying from New York to Barcelona may include a layover in Madrid, and this information (along with the arriving and departing time) must also appear in a flight booking.
The sample code presented in this section was written to demonstrate the basic principles of designing with inheritance, and it's not the type of code you'd use in a real application. For example, you can't maintain the list of bookings at the client — there may be multiple clients using the same application. The class should also be responsible for maintaining the list of bookings as well as for persisting them. A reservation application uses a database to store bookings (as well as other static information, such as destinations, hotels, and prices).
The Bookings project, which you will find at www.sybex.com/go/masteringvb2010, contains additional code that's closer to a real-world application. The Booking class maintains the list of bookings in a List collection. The topic of collections is discussed in Chapter 12, but you can think of them as arrays. The client instantiates a booking (an instance of the HotelBooking, FlightBooking, or CarBooking class) and then calls the CreateBooking method to add the booking to the list. The class's code is responsible for adding the booking to the collection or submitting it to the database. It's also the class's responsibility to retrieve a booking by its ID, the name of the traveler, or any other combination of criteria. I have added the GetBookingByID and GetAllBookings methods to all the classes. If you call the GetBookingByID method of the Booking class, you'll get back a Booking object. If you call the same method of a derived class, you'll get back an object of the same class (a HotelBooking object, for example).
If you look up the code of the application, you'll see that I have used some queries you have not seen before in this book to select bookings by their type or their IDs. These queries are LINQ statements. LINQ is discussed in detail in Chapter 14, "Introduction to LINQ," but I didn't want to write loops that go through every element in a collection to select the desired one. LINQ is much more expressive and elegant. After reading Chapter 14, I don't think you'll go back to arcane querying techniques that involve loops and multiple comparisons.
As you will see, the client's code doesn't change. It's the class that determines where the bookings are stored and how they will be recalled. The sample application uses a List collection to store the bookings, but you can modify it so that is uses a database to store and retrieve bookings without touching the client code.
Classes are quite simple to build and use, and so is OOP. There are even tools to help you design and build your classes, which I'll describe briefly here. You can use the Class Diagram Designer available in Visual Studio to build your classes with point-and-click operations, but you can't go far on this tool alone. The idea is that you specify the name and the type of a property and the tool emits the Get and Set procedures for the property (the getters and setters, as they're known in OOP jargon). The default implementation of getters and setters is trivial, and you'll have to add your own validation code. You can also create new methods by specifying their names and arguments, but the designer won't generate any code for you; you must implement the methods yourself. Tools such as the Class Diagram Designer and Visio allow you to visualize the classes that make up a large project and the relations between them, and they're a necessity in large projects. Many developers, however, build applications of substantial complexity without resorting to tools for automating the process of building classes. You're welcome to explore these tools.
Right-click the name of a class in the Solution Explorer and choose View Class Diagram from the context menu. You'll see a diagram of the class on the design surface, showing all the members of the class. You can add new members, select the type of the properties, and edit existing members. The diagram of a trivial class like the Contact class is also trivial, but the class diagram becomes more helpful as you implement more interrelated classes.
Figure 10.2, from earlier in the chapter, shows the Product, Book, and Supply classes in the Class Diagram Designer. You can use the commands of each class's context menu to create new members and edit/remove existing ones. To add a new property, for example, you specify the property name and type, and the designer generates the outline of the Set and Get procedures for you. Of course, you must step in and insert your custom validation code in the property setter.
To add a new class to the diagram, right-click on the designer pane and choose Add
To add members to a class, right-click the box that represents the class and choose Add from the context menu. This will lead to a submenu with the members you can add to a class: Method, Property, Field, and Event. You can also add a constructor (although you will have to supply the arguments and the code for parameterized constructors), a destructor, and a constant. To edit a member, such as the type of a property or the arguments of a method, switch to the Class Details window, where you will see the members of the selected class. Expand any member to see its parameters: the type of a property and the arguments and the return value of a method.
Experiment with the Class Diagram Designer tools to jump-start the process of designing classes. At the very least, you should use this tool to document your classes, especially in a team environment.
- Use inheritance
Inheritance, which is the true power behind OOP, allows you to create new classes that encapsulate the functionality of existing classes without editing their code. To inherit from an existing class, use the
Inheritsstatement, which brings the entire class into your class.- Master It
Explain the inheritance-related attributes of a class's members.
- Use polymorphism
Polymorphism is the ability to write members that are common to a number of classes but behave differently, depending on the specific class to which they apply. Polymorphism is a great way of abstracting implementation details and delegating the implementation of methods with very specific functionality to the derived classes.
- Master It
The parent class Person represents parties, and it exposes the
GetBalancemethod, which returns the outstanding balance of a person. The Customer and Supplier derived classes implement theGetBalancemethod differently. How will you use this method to find out the balance of a customer and/or supplier?