
A web service is a program capable of communicating across a network by using a combination of the open standard Simple Open Access Protocol (SOAP) and XML technologies.
Web services are ideal for creating data-, content-, or processing-related services that can be made available to associated or third-party applications and clients across distributed networks such as the Internet. There are two flavors of web services, the ASP.NET web services and the newer WCF services, which are based on the Windows Communications Foundation component of the Framework.
In this chapter, you will see how to create a simple ASP.NET web service and a client application to consume (use) the web service. You'll also learn how to build, configure, and consume WCF services.
In addition, this chapter covers the technologies associated with ASP.NET web services, such as SOAP and the Web Services Description Language (WSDL). The chapter briefly covers Microsoft's latest addition to the web service stable—the Windows Communication Foundation (WCF)—and you will see how to use Asynchronous JavaScript and XML (AJAX) technology to create seamless interactions between web services and their consuming applications.
In this chapter, you'll learn how to do the following:
Create a simple ASP.NET web service
Consume an ASP.NET web service
Create and consume WCF services
Create and consume ADO.NET Data Services
Microsoft offers two flavors of web service technology:
ASP.NET web services
Windows Communication Foundation (WCF)
ASP.NET web services (also known as XML web services) have been around through all the incarnations of ASP.NET and offer a simple and effective methodology for making software components and other resources available over the Internet.
WCF is a recent inclusion into the .NET Framework and is built around the web services architecture. WCF enables broader integration and interoperability with all the .NET Framework distributed system technologies, including Microsoft Message Queuing (MSMQ), Common Object Model Plus (COM+), ASP.NET web services, and .NET Framework Remoting. WCF also offers improved performance and secure data transmission.
Modern software is moving away from stand-alone applications into distributed applications. Users can interact with web applications that run on a remote server. The interface is hosted in the browser, known as a thin client, but the bulk of the processing takes place on a remote computer. Some logic is implemented at the client to minimize the trips to the client. Unfortunately, the client can execute only scripts written in JavaScript. You can also create SilverLight applications, which are basically web applications that execute VB code at the client. SilverLight applications are not nearly as common as web applications because they require users to install the SilverLight runtime on their computers.
The problem with web applications is that users are confined by the application's interface. The information is processed at a remote site, but users can interact with it only through a predefined interface. In the early days of the Web, developers used to write code to download web pages and "scrape" data off the HTML document transmitted by the server to the client. Actually, data scraping is used today a lot because people need access to raw information, which they can use as they see fit in their applications.
Consider sites like Booking.com and Expedia.com that allow users to make hotel and flight reservations. You connect to these sites, specify the dates of your trip, retrieve numerous options (flights and/or hotels), and make your selection. While all this works fine on your browser, you're restricted to the existing interface. What if you could submit the same requests to the remote server but instead of a static page you could get back the raw information? You could implement your own interface, which could be a different web application, a rich client application, even a mobile application. This would offer more power to you, but how about the provider of the information? In effect, the provider of the information also wants to furnish the same information through a programmatic interface and sell its products through additional channels. Amazon.com does so already—and very successfully. Web services allow companies to make their services available to all consumers, and it's up to the consumers to exploit these services. To get a better idea of how services are being used and how they enable distributed computing, let's start by looking at an example of consuming an existing, public web service.
Before we explore the server side of a web service, let's see how easy it is to consume existing web services. Perhaps you'll never develop your own web service, but it's very likely that you will use other people's services in your code. In a corporate environment, for example, you might be asked to develop data-driven applications based on a data model that's hosted as a web service. Instead of talking directly to a database, you will be invoking methods of a web service that exposes the company data. Or, you might be asked to write an application that consumes information from web services published on the Internet. Calling a web service that performs automatic text translation and adding weather data on a travel site are two trivial examples. Business examples include services that provide hotels and flights. These services are quite popular these days, and they allow consumers to search for prices and availability and make reservations on a remote computer. There are currently many travel sites on the Internet, and they're all using the services of a few large providers. Let's look at a less-ambitious yet quite useful web service you can incorporate in many types of applications. It's a service that provides weather forecasts, and there's no charge, or even a registration requirement, to use it.
Many sites provide weather forecasts, and I've chosen one that exposes a few simple methods to retrieve the forecasts to present in this section. The URL that follows takes you to a site that hosts a small number of web services, which you may find interesting:
http://www.webservicex.net/WCF/ServiceDetails.aspx?SID=44
One of the services hosted at this site provides weather forecasts; you will find it by clicking the Web Services link at the top of the page and choosing the Utilities category. Once you switch to the USA Weather Forecast service's site, you'll see that the service exposes two methods:
GetWeatherByPlaceName, which gets a week's forecast for a place by name (USA)
GetWeatherByZipCode, which gets a week's forecast for a valid zip code (USA)
Click the GetWeatherByPlaceName link and you'll see a page prompting you to enter the name of a place. Enter your favorite destination here (I used the city of Santa Barbara) and you'll see a weekly weather forecast for that destination in XML format, as shown in Figure 21.1. This is straight XML, and you can contact the same site from within a VB application using the HttpWebRequest/HttpWebResponse classes, read the XML document, and process it with LINQ, as we discussed in Chapter 14, "An Introduction to LINQ."

As you will recall from Chapter 19, "Accessing the Web," it is feasible (and nearly trivial) to contact a remote server, request a XML document, and process it with LINQ. One method of contacting the weather forecast service is to place a request through a WebRequest object and read the server's response through a pair of WebRequest/WebResponse objects, as shown here:
Dim rq As System.Net.WebRequest = System.Net.WebRequest.Create(
                       http://www.webservicex.net/WeatherForecast.asmx/ &
                       GetWeatherByPlaceName?PlaceName=Santa Barbara")
Dim rs As System.Net.WebResponse = rq.GetResponse
Now that you have the service's response, you can read it as a long string into a variable, the xmlData variable:
Dim strm As IO.Stream = rs.GetResponseStream
Dim rdr As New IO.StreamReader(strm, System.Text.Encoding.UTF8)
Dim xmlData As String = rdr.ReadToEnd
rdr.Close()
strm.Close()
Finally, you can load the data into an XElement variable and process the data with LINQ. The following few statements generate a list of data and min/max temperatures:
Dim xml As XElement = XElement.Parse(xmlData)
Dim ns As XNamespace = "http://www.webservicex.net"
For Each forecast In xml.Descendants(ns + "Details").
                  Descendants(ns + "WeatherData")
    Debug.WriteLine(forecast.Descendants(ns + "Day").Value & vbTab &
                    forecast.Descendants(ns + "MinTemperatureF").Value &
                    " - " & forecast.Descendants(ns + "MaxTemperatureF").Value)
Next
The code is very simple, but you can't process it without knowing, or figuring out, the structure of the XML document returned by the service. As you have undoubtedly noticed, Microsoft likes to simplify things and Visual Studio can take care of all the plumbing necessary to contact the web service and retrieve its results. Instead of contacting the web service through HTTP from within your code, you can add a reference to the web service and then use it as if it were a local method. Let's follow the process step by step.
Start a new project, the WeatherService project, which you can download from www.sybex.com/go/masteringvb2010. Right-click the project name, and from the context menu, select Add Service Reference. When the Add Service Reference dialog box appears, you can specify a remote web service, as shown in Figure 21.2. In the Address box, enter the URL of the WeatherForecast web service, which is as follows:
http://www.webservicex.net/WeatherForecast.asmx?WSDL
(The extension WSDL stands for Web Service Discovery Language and it's a parameter that instructs the web service to return its methods.) Then, click the Go button to locate the web services at the specified URL; these services will appear in the left pane of the dialog box. If you double-click a web service on this pane, the components of the selected web service will appear under the service's name. Double-click the WeatherForecastHttpGet class to see the names of the methods it exposes in the right pane, as shown in Figure 21.2.
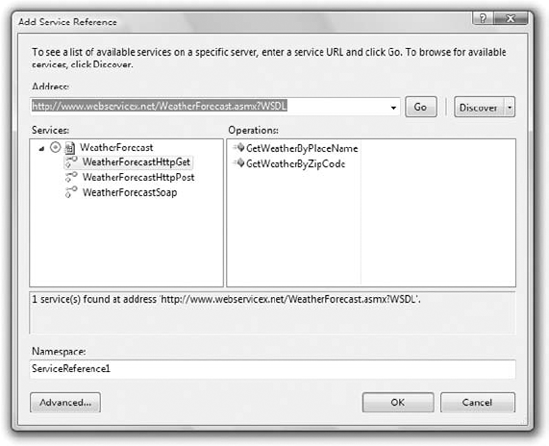
The web service exposed by the remote server can be accessed using three different protocols: HTTP Get, HTTP Post, and SOAP. All three classes expose the same methods: GetWeatherByPlaceName and GetWeatherByZipCode. The names are quite descriptive, and you'll see shortly how to call them. Finally, in the Namespace box, enter a meaningful name for the reference, such as WeatherService, and click the OK button to close the dialog box.
To use the WeatherService web service in your code, you simply treat it as a class, regardless of whether it resides on the local machine or a remote server. Create a new instance of the class with a statement like the following:
Dim client As New WeatherService.WeatherForecastSoapClient
Now, you can use the methods of the service through the client variable. Enter the name of the client variable followed by a period and you'll see names of the methods it exposes, including the GetWeatherByPlaceName method. If you select this method, you will see that it accepts a string argument, which is the name of a place (such as a city) in the U.S. (and a few major cities in Europe). To retrieve the forecast for the next six days for Santa Barbara, enter the following statement:
Dim forecast = client.GetWeatherByPlaceName("Santa Barbara")The forecast variable type is WeatherService.WeatherForecast. This type is exposed by the web service along with the methods and several properties. Enter the name of the forecast variable followed by a period to see the members of the WeatherForecast class. One of them is the Details property, which is an array of WeatherData objects, and there is one WeatherData object for each of the following days. The WeatherData property is a complex one, which exposes a number of properties on its own. These properties include the Day property (the date for which the forecast is given); the MaxTemperatureC, MaxTemperatureF, MinTemperatureC, and MinTemperatureF properties; and the WeatherImage property, which is the URL of an image describing the day's weather.
I've designed a simple interface to display the forecast for the selected location based on Label and PictureBox controls, and it's shown in Figure 21.3. The application's code is quite trivial; it retrieves the forecast with the two statements shown earlier and then assigns values to the various controls. Here are a few statements that display the forecast for the second day (the first day of the forecast being today):
lblDate2.Text = forecast.Details(1).Day
PictureBox2.ImageLocation = forecast.Details(1).WeatherImage
lblMax2.Text = forecast.Details(1).MaxTemperatureF.ToString
lblMin2.Text = forecast.Details(1).MinTemperatureF.ToString
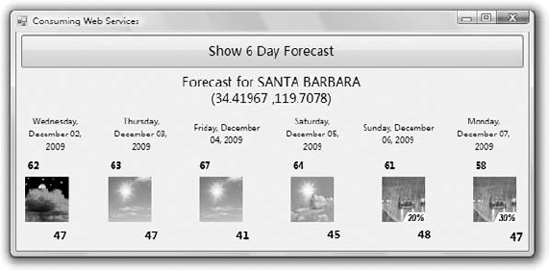
Figure 21.3. A Windows application that displays a weather forecast based on data it retrieves from a remote server
The two numbers under the city name are the geocoordinates (or geographic coordinates) of Santa Barbara (its longitude and latitude, which are also returned by the GetWeatherByPlaceName method).
As you can see, using a web service from within your application is straightforward and very similar to using any other component, such as the Framework or a custom class. The web service is a class that resides on a server and applications can contact it. The web service itself is nothing but a class with methods that can be called remotely. The service's code is executed on the computer on which the service resides. No code is downloaded to the client, and you don't have to worry about the origin of the data. To you, the developer, a web service looks like any other class you reference in your project. As for the providers of the web services, they provide a software service — a way to request specific data that are maintained and serviced on a remote computer. The service provider allows you to perform specific requests without exposing its raw data.
ASP.NET web services are software resources and components through which you can expose certain functionality and/or deliver data over a network such as the Internet by using a combination of XML and SOAP. You can restrict a component so that it's available to only certain applications or specific users, or you can make it available to many users. The component can be limited to the local computer or the local network or be made available across the Internet. Services can be delivered free of charge or for a fee.
Virtually any program that can be encapsulated as a component can be expressed as an ASP.NET web service. For production purposes, you will need a web server to deliver your ASP.NET web service. However, for development purposes, the built-in ASP.NET Development Server that ships with Visual Studio 2010 is quite sufficient.
The advantages of using ASP.NET web services are as follows:
Data and commands are communicated across the standard Internet port: port 80. This greatly simplifies passage around the Internet and most networks.
The common standards of XML and SOAP are widely supported.
Early problems with web services, such as lack of a robust security model, have been resolved.
Visual Studio provides a simple and straightforward environment in which to create and consume web services.
Windows Communications Foundation (WCF) is built on ASP.NET web services and extends their functionality by integrating with a number of distributed .NET Framework technologies.
WCF offers an integrated approach to situations in which you would previously have employed a range of different distributed .NET Framework technologies. Typically, you use WCF as a unified solution that enables you to avoid having to employ different distributed technologies for each requirement of a distributed application. For example, you may have employed message queuing for use with portable devices that are not permanently connected, ASP.NET web services for communication across the Internet, and .NET Framework Remoting for tightly coupled communication within the local network. Employing multiple technologies in this manner results in a complex and potentially unwieldy solution. WCF offers a method of achieving a simpler unified approach. The weather forecasting web service used in the first example of this chapter contained three subclasses to support three different data exchange protocols: HttpGet, HttpPost, and SOAP. With WCF services, the same service can support multiple protocols. You don't have to write any additional code, you just edit the service's configuration file.
Several technologies underlie and support ASP.NET web services. They include SOAP, WSDL, SOAP Discovery, and Universal Description, Discovery, and Integration (UDDI).
SOAP stands for the Simple Object Access Protocol and it's a lightweight protocol for exchanging XML messages over Hypertext Transfer Protocol/Secure Hypertext Transfer Protocol (HTTP/HTTPS). It forms the basis of the web services stack, which is the set of protocols used to define, locate, and deliver web services.
SOAP is an open standard, enabling web services to be developed and supported across a range of platforms and environments. There are other services attached to SOAP, including WSDL and SOAP Discovery. Although you are no longer required to work directly with SOAP when developing ASP.NET web services in Visual Studio, you will continue to encounter references to the protocol because it underlies the whole web service creation, delivery, and consumption process.
A SOAP tutorial can be found at www.w3schools.com/soap/.
Web Services Description Language (WSDL) is the language used to create an XML document that describes a web service. Specifically, the document describes the location of the service and the methods exposed by the service. When you connect to a site that provides one or more web services, applications read the WSDL file to discover the methods supported by each service.
You can create and edit WSDL documents directly by using a text editor, but they can usually be generated automatically by Visual Studio when you add either a web reference or service reference to your ASP.NET web service.
SOAP Discovery is used to locate the WSDL documents that provide the descriptions for ASP.NET web services. Use SOAP Discovery when you want to make your web service publicly available for consumption by third-party applications. For example, you might be providing a weather service for third-party providers to incorporate into their websites. There are two types of discovery: static discovery and dynamic discovery.
In the case of static discovery, an XML document with the .DISCO filename extension is used. This file contains information about the location of the WSDL documents.
If you wish to enable dynamic discovery for your website, you add a specific reference into the Web.config file. Dynamic discovery enables users to discover all web services and discovery files beneath the requested URL.
Discovery files (and particularly dynamic discovery) can be a security risk on a production server because they potentially allow users to search the entire directory tree. Static discovery files are the safer of the two types because they allow the user to search only those resources that you choose to nominate. In Visual Studio 2010, you can explicitly generate a static discovery file by adding a web reference or a service reference.
Universal Description, Discovery, and Integration (UDDI) was originally created as part of the web service specification to act as a form of yellow pages for web services. Several major players in developing the web services specification (including Microsoft, IBM, SAP, and OASIS) combined to develop an XML-based registry for businesses to promote themselves and their web services to both the public and the corporate world. In 2006, Microsoft, IBM, and SAP closed their public UDDI nodes. However, you can still create UDDI servers on your local network to provide directory services for web services available within your network.
Creating and consuming web services in Visual Studio 2010 is a relatively simple and straightforward process. In this example, you will create a simple Hello World–style ASP.NET web service within a website entitled HelloWebServiceDemo. You will then see how to consume the web service from within the same website.
This simple web service will have one service, HelloWorld, with a single method, Hello. To set up the web service, complete the following steps:
Launch Visual Studio and choose File

From the New Web Site dialog box, choose ASP.NET Web Site. In the location text box, name the website HelloWebServiceDemo. Click OK.
Right-click the solution, choose Add New Item from the context menu, and select the web service template. In the Name text box, delete the default
WebService.asmxand rename the web serviceHelloWorld.asmx. Click the Add button. This opens theApp_Code/HelloWorld.vbpage, where default code for a Hello World–style web service is already set up.Make one minor change to the default code. In the
<WebMethod()>section of the code, change the function name fromHelloWorld()toHello(). This enables you to distinguish between the service name and the method. The code should now read as shown in the following snippet:<WebMethod()> Public Function Hello() As String Return "Hello World" End FunctionSave your work.
Next, you will run and test the web service.
After you have created your web service, it is a good idea to test the service to ensure that it behaves as expected. This presentation of the testing process lacks the polish that you might wish for your web service after it is utilized or consumed by a client application, but it will demonstrate the service's inherent functionality. The product of the test is returned as straight XML. But don't worry — when you finally consume the service, the XML markup will be stripped away from the returned data. Follow these steps:
In the Solution Explorer window, right-click
HelloWorld.asmxand choose the Set As Start Page option.Click the green arrow in the Standard toolbar (or press F5) to start the web service in debugging mode. Click OK in the Debugging Not Enabled dialog box to automatically modify the
Web.configfile to enable debugging.
The ASP.NET web service should now open in your web browser as shown in Figure 21.4.
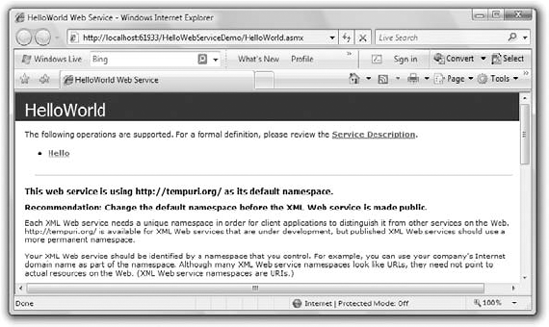
You can check the service description for HelloWorld by clicking the Service Description link. This opens a WSDL description for the web service.
You will also see a warning about using the default namespace of http://tempuri.org. This is the default Microsoft namespace, and you would usually replace it with a reference to a URL that you control before publicly deploying the web service.
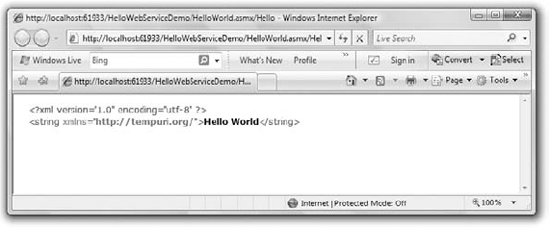
To call the Hello method, click the Hello link. This opens a new page, which displays information concerning the Hello method. To run the Hello method, click the Invoke button. This opens the full XML page returned by the method, as shown in Figure 21.5.
The next step is to consume the HelloWorld web service from within a standard ASPX page. Close any running instances of the HelloWorld web service to stop debugging and return to the HelloWebServiceDemo website in Visual Studio. Complete the following steps:
In Solution Explorer, double-click
Default.aspxto open the page in design view.From the Toolbox, drag and drop a Button control into the default Div control on the form.
Click the Enter button twice to introduce two line breaks, and add a Label control from the Standard toolbox.
In the Properties window for the Label control, delete the default Label text from the
Textproperty.Double-click the Button control to open the code skeleton for the
Button1_Clickevent in code-behind.Complete the
Button1_Clickevent with the following code:Protected Sub Button1_Click(...) Handles Button1.Click Dim myHello As New HelloWorld Label1.Text = myHello.Hello() End SubIn this example, I declared a local instance of the HelloWorld service and tied the
Textproperty of the Label control to theHellomethod.In Solution Explorer, right-click
Default.aspxand choose the Set As Start Page option.Run the application.
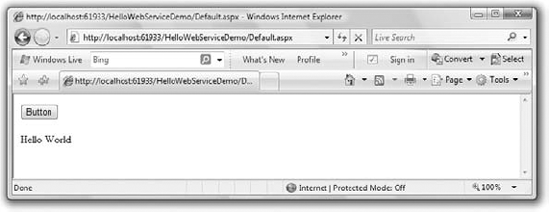
Default.aspxshould render initially as a page displaying a single button. Clicking the button should display the Hello World text. Figure 21.6 shows the running application.
Web services are designed to run separately from their consuming applications. In this example, you will see how to build a slightly less-trivial example of an ASP.NET web service as a stand-alone application. You will then see how to consume the web service from a separate web application.
The example involves building a web service that performs two operations. It returns the current server time and also provides a tool for calculating a percentage. The web service is named MyWebService, and the two methods are named ServerTime and CalculatePercentage.
Later in this chapter, you will see how to create a simple AJAX implementation that enables the client to automatically and asynchronously update the displayed server time from the web service.
You will begin by creating the web service. Unlike the previous example, in which the web service and consuming application were built within the same project, this web service is a stand-alone project. Follow these steps:
Open Visual Studio 2010 and choose File
In the Location text box of the New Web Service dialog box, keep the default path but change the name of the web service to MyWebService. Click the OK button to exit the dialog box.
The web service should now be opened to the
App_Code/Service.vbpage in the Visual Studio designer. Look through the default code and change the Namespace entry fromhttp://tempura.org/to either a URL that you control or, for the purposes of this example,http://mywebservice.org. This will prevent the warning message about using the default Microsoft namespace from appearing when you run the web service. The line of code should now read as follows:<WebService(Namespace:="http://mywebservice.org/")>
Move down to the
<WebMethod()>section of the code skeleton. Delete the following defaultHelloWorld()public function:Public Function HelloWorld() As String Return "Hello World" End Function
Add the following code to the
<WebMethod()>section. This method will return the current server time as the time of day in hours, minutes, and seconds:<WebMethod()> Public Function ServerTime() As String ServerTime = Left(Now.TimeOfDay().ToString(), 8) End Function
Now, create the percentage calculator method (
CalculatePercentage). Underneath theServerTimemethod, add the following code:<WebMethod()> Public Function CalculatePercentage( ByVal myTotal As Integer, ByVal myValue As Integer) As Integer CalculatePercentage = CInt(myValue * 100 / myTotal) End FunctionThis method calculates a percentage based on the
myValueandmyTotalparameters. The calculated percentage is returned as an integer.
This completes the code for the MyWebService web service. Listing 21.1 gives the full code for the web service as it should appear in App_Code/Service.vb.
Example 21.1. Full code listing for MyWebService
Imports System.Web
Imports System.Web.Services
Imports System.Web.Services.Protocols
' To allow this Web Service to be called from script, using ASP.NET AJAX
' uncomment the following line.
' <System.Web.Script.Services.ScriptService()>
<WebService(Namespace:="http://mywebservice.org/")>
<WebServiceBinding(ConformsTo:=WsiProfiles.BasicProfile1_1)>
<Global.Microsoft.VisualBasic.CompilerServices.DesignerGenerated()>
Public Class Service
Inherits System.Web.Services.WebService
<WebMethod()>
Public Function ServerTime() As String
   ServerTime = Left(Now.TimeOfDay().ToString(), 8)
End Function
<WebMethod()>
Public Function CalculatePercentage(ByVal myTotal As Integer,
ByVal myValue As Integer) As Integer
CalculatePercentage = CInt(myValue * 100 / myTotal)
End Function
End ClassTo make this the default start page, right-click Service.asmx in the Solution Explorer and choose Set As Start Page from the context menu.
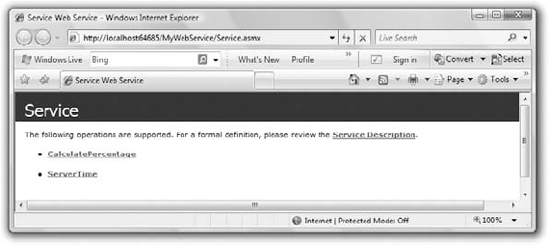
Test the web service by clicking the green arrow on the Standard toolbar or by pressing F5. The web service should display links to the two web methods, as shown in Figure 21.7. Test the two web methods by clicking the links and then clicking the Invoke button on each of the respective service information pages. ServerTime should return the current time of day in 24-hour format (as an XML page). The service information page for CalculatePercentage should provide you with input boxes to enter values for MyValue and MyTotal before you invoke the service. Entering values such as 20 for MyValue and 50 for MyTotal should return a value of 40 (within an XML page) when you click Invoke.
In a production environment, you typically deploy the web service to Microsoft's Internet Information Services (IIS) web server. In order for the web service to run on IIS, you need to have .NET Framework 4.0 registered with IIS. You can also set up appropriate security and access privileges such as Windows authentication, secure socket encryption (HTTPS), and so forth on IIS. For further information on setting up and working with IIS, see Microsoft IIS 7 Implementation and Administration by John Paul Mueller (Sybex, 2007) which gives thorough coverage. You can also refer to Microsoft's community portal for IIS at www.iis.net.
Before you can deploy your web service, you must have all the relevant files and directories assembled into a suitable directory without the various development and debugging files. The easiest way to create a folder containing all the production files necessary for a deployment of your web service is to use the Publish Web Site option from the Build menu. This opens the Publish Web Site dialog box, where you can choose to publish to a specific location (including an FTP location) or keep the default location and move the folder later.
Visual Studio 2010 comes equipped with its own built-in web server for testing web applications: the ASP.NET Development Server. Although the ASP.NET Development Server is ideal for testing web applications as you develop them, it does have its limitations. One of those limitations is that you need to have a separate instance of the web server running for each web application running concurrently on your development machine.
Thus, to consume MyWebService from another application, you need to have opened MyWebService in Visual Studio 2010 and run the application to fire up the ASP.NET Development Server. You can close the web browser running the web service, but you must keep Visual Studio open to MyWebService. To create a separate project to consume MyWebService, you must open another instance of Visual Studio 2010 from the Start menu.
An advantage of using the ASP.NET Development Server is that you do not need to publish or physically deploy your application to a web server before you have tested it.
As discussed in the previous section, unless you are using IIS to test your web applications, you must have MyWebService open in Visual Studio 2010 and have run the web service at least once to open an instance of the ASP.NET Development Server so that you can link to the web service from another application.
Keep this instance of Visual Studio open and use the Start menu to open another instance of Visual Studio. Depending on the account restrictions on your machine, it may be necessary to open the second instance of Visual Studio in Administrator mode so you can connect to the web service.
After Visual Studio opens, complete the following steps:
Choose File
MyConsumer should open to
Default.aspxin design mode. (If you last used the editor in a different mode, switch to design mode.) Drag aTextBoxfrom the Standard toolbox onto the form. In the Properties window, set theIDproperty for the TextBox to tbMyValue.From the Standard toolbox, drop a Label control on the form to the right of tbMyValue. Set the
Textproperty of the Label control to My Value. Click to the right of the Label and press the Enter key to drop to the next line.Drop a second
TextBoxcontrol onto the form immediately undertbMyValue. Set theIDproperty for the secondTextBoxcontrol to tbMyTotal.Place a Label control immediately to the right of
tbMyTotal. Set theTextproperty of the Label control to My Total. Click to the right of the Label control and press the Enter key twice to drop down two lines.From the Standard toolbox, drop a Button control onto the form two lines below the tbMyTotal control. In the Properties window for the Button, set the
IDproperty to btnCalculate. Set theTextproperty to Calculate. Press the Enter key to drop down one more line.Immediately beneath btnCalculate, place a Label control and set its
IDproperty to lblPercentage. Delete the default contents of theTextproperty for the control.Place another Label control to the right of lblPercentage. Set the
IDproperty to lblPercentageLabel. Set theTextproperty to = Calculated Percentage and set theVisibleproperty to False. Click to the right of this control and use the Enter key to drop down two more lines.Place a Label control two lines beneath lblPercentage. Set the
IDproperty to lblServerTime and delete the defaultTextproperty entry.Place a final Label control to the right of lblServerTime. Set the
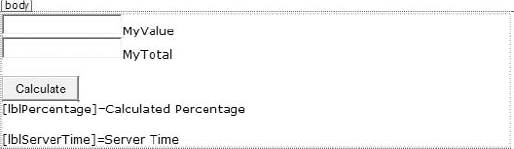
Textproperty to = Server Time.
Figure 21.8 illustrates how the final page should look with all the controls in place.
Use a web reference created in the Solution Explorer to provide the connection to the web service. For web services within the local domain, you could also use the Service Reference option available in the Solution Explorer. Using a service reference is an advantage when you want to fully exploit the AJAX potential in connecting to a web service because a service reference allows you to call the web service methods by using JavaScript functions from within the consuming application. Using a client script to call web service methods is entirely asynchronous and prevents your page or portions of your page from being locked out from user interaction while waiting for the web service to respond.
For this example, you will add a web reference to the MyWebService web service created in the previous section. Unless you are using IIS to test your web applications, you must have an instance of the ASP.NET Development Server running the MyWebService web service. (Refer to the sidebar "Using the ASP.NET Development Server" earlier in this chapter for details.)
Complete the following steps:
In the Solution Explorer, right-click the project heading (and path) at the top of the Solution Explorer tree. From the context menu, choose Add Web Reference to open the Add Web Reference dialog box.
If you are using IIS and have appropriately placed discovery documents, you could use the Browse To: Web Services On The Local Machine option. You will also see a link that enables you to refer to any UDDI servers set up on your network. However, because this exercise uses the ASP.NET Development Server, you will need to switch to the instance of Visual Studio that is running MyWebService and open the web service in Internet Explorer. Copy the URL for the MyWebService web service from the address bar of Internet Explorer.
Switch back to your MyConsumer build and paste the URL of MyWebService into the URL text box of the Add Web Reference dialog box. The URL should be something like this:
http://localhost:49733/MyWebService/Service.asmxIf you are using the sample project to follow along, delete the existing web reference and add it again, using the port chosen by your ASP.NET Development Server. When you start the web service project, the URL of the service is displayed in the address bar of Internet Explorer. Copy the service's address from the address box onto the Add Reference dialog box and the client application (MyConsumer) will see the service as long as it's running on the same machine.
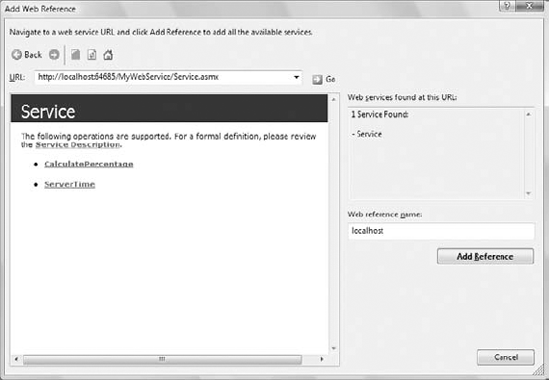
Click the Go button. This should now establish a connection to MyWebService, as shown in Figure 21.9. Click the Add Reference button to exit the dialog box. Solution Explorer should now feature an App_WebReferences folder with appropriate entries for MyWebService. Included in these are a discovery (DISCO) and a WSDL file that you can copy, edit, and employ in your deployment of MyWebService.
The DISCO document created by adding a web reference can be used to enable static discovery of your web service by placing it in a suitable location in your folder hierarchy for the site. If you examine the code in the automatically generated file, you can see how to add and remove XML entries. You can then add a link to the page from some point in your site. If you do not wish to set up static discovery files, you can enable dynamic discovery by editing the Machine.config file for your web server. Remember that dynamic discovery potentially allows users to browse your directory tree; unless your web server is suitably protected, dynamic discovery is not recommended for production servers.
For precise details on enabling dynamic discovery, please refer to the relevant Help topics in Visual Studio 2010. Type dynamic discovery in the Search field.
The next step is to add the code to make the application work. From design mode, double-click the btnCalculate control to enter code-behind and complete the following steps:
Begin by declaring a local instance of the web service. At the top of the page, directly under the
Inherits System.Web.UI.Pageentry, add the following:Dim MyWebService As New localhost.Service
Next is the code to call the
ServerTimemethod. In the code skeleton forForm1_Load, add the following line of code:lblServerTime.Text = MyWebService.ServerTime
Next is the code to collect the input values from the user and call the
CalculatePercentagemethod. The code also attaches a percentage sign onto the displayed percentage value and unhides lblPercentageLabel. In the code skeleton for thebtnCalculate Clickevent, add the following code snippet:Dim myValue As Integer = CInt(tbMyValue.Text) Dim myTotal As Integer = CInt(tbMyTotal.Text) lblPercentageLabel.Visible = True lblPercentage.Text = MyWebService.CalculatePercentage(myTotal, myValue) & "%"
The final code should appear as shown in Listing 21.2.
Example 21.2. Full code listing for Default.aspx.vb
Partial Class _Default
Inherits System.Web.UI.Page
Dim MyWebService As New localhost.Service
Protected Sub form1_Load(...) Handles form1.Load
lblServerTime.Text = MyWebService.ServerTime
End Sub
Protected Sub btnCalculate_Click(...) Handles btnCalculate.Click
Dim myValue As Integer = CInt(tbMyValue.Text)
Dim myTotal As Integer = CInt(tbMyTotal.Text)
lblPercentageLabel.Visible = True
lblPercentage.Text = MyWebService.CalculatePercentage(myTotal, myValue) & "%"
End Sub
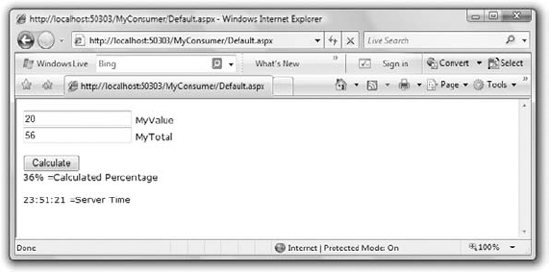
End ClassSetting up this part of the project is now complete. In Solution Explorer, right-click Default.aspx and choose Set As Start Page. Run the application and test the methods.
Figure 21.10 illustrates the running application after 20 has been entered as MyValue and 56 has been entered as MyTotal.
ASP.NET 3.0 and 3.5 integrate AJAX to enable developers to easily perform partial updates of web pages accessing ASP.NET web services. These updates not only do not require a full refresh of the page, they also can be performed asynchronously so as not to interfere with other operations on the page.
In this example, I will use a simple combination of the AJAX controls to enable the ServerTime method from MyWebService to be continuously updated on a page in MyConsumer. A more sophisticated implementation enables the developer to access the methods in the web service from client script (JavaScript). This latter implementation is fully asynchronous, whereas our example will have some limitations that are explained later in this section.
Open MyWebService in Visual Studio and run the application to open an instance of the ASP.NET Development Server. Next, open a separate instance of Visual Studio 2010 from the Start menu and open the MyConsumer website. Complete the following steps:
From the Website menu, click Add New Item. From the Add New Item dialog box, select AJAX Web Form and rename it
myAjax.aspx. Click the Add button.When
myAjax.aspxopens in design mode, you will see that it has a default ScriptManager control on the page. Do not delete this control because it is necessary for the AJAX functionality to work. From the AJAX Extensions toolbox, drop an UpdatePanel control onto your page underneath the ScriptManager control. The UpdatePanel control acts as an area that can be partially refreshed without involving an entire page refresh. Keep the defaultIDproperty of UpdatePanel1.From the AJAX Extensions toolbox, drop a Timer control into UpdatePanel1. In the Properties window, set the
Intervalproperty to 1000 (1 second). When you place the Timer control inside the UpdatePanel control, UpdatePanel1 automatically responds toTickevents from the Timer. You can also set the UpdatePanel control to respond to events from external controls by using theUpdatePanel Triggersproperty.From the Standard toolbox, drop a Label control into UpdatePanel1. Set the
IDproperty tolblServerTimeand delete the default entry in theTextproperty.Double-click Timer1 to enter code-behind for the application. This should open
myAjax.aspx.vb.MyConsumer already has a web reference for MyWebService, so at the top of the page, directly under the
Inherits System.Web.UI.Pageentry, add the following:Dim MyWebService As New localhost.Service
In the code skeleton for the
Timer1_Tickevent, add the following line of code:lblServerTime.Text = MyWebService.ServerTime
This part of the application is now complete. Listing 21.3 gives the full code listing for myAjax.aspx.vb.
Example 21.3. Full code listing for the myAjax.aspx.vb partial class myAjax
Inherits System.Web.UI.Page
Dim MyWebService As New localhost.Service
Protected Sub Timer1_Tick(...) Handles Timer1.Tick
        lblServerTime.Text = MyWebService.ServerTime
    End Sub
End Class
Right-click the entry for myAjax.aspx in the Solution Explorer and choose Set As Start Page from the context menu. Click the green arrow or press F5 to run the application. The running page should display the current server time, which is automatically updated every second.
You can now add to the page further controls and functionality that are separate from the UpdatePanel control. These controls will not be affected by the partial page refreshes performed by the UpdatePanel control. The main limitation of this approach is that any other control placed inside the UpdatePanel (or any other UpdatePanel control on the page) will be locked out while waiting for MyWebService to complete its business (every second!).
You can test this behavior by adding a second UpdatePanel control to the page and dropping a TextBox control into it. Drop a second TextBox control onto the page, but not inside the UpdatePanel. Run the application and try typing into the TextBoxes. You will find that it is difficult to type text into the TextBox inside the UpdatePanel.
Now that you have seen how to build a basic web service, we'll switch our attention to Windows Communication Foundation (WCF) services. WCF is a well-structured approach to building web services, and the process is straightforward, but there are a few rigid steps you have to follow.
A WCF service encompasses three basic principles, known as the ABC of WCF:
- A is for address
Each service has an address (a URL) where it can be found. You can move the service to a different computer and all you have to do is change the configuration file of the client to see the same web service at its new host.
- B is for binding
There are many protocols you can use to talk to the service, and the client must specify the binding to the service. The same service can talk to multiple clients using different bindings: some clients may use Basic HTTP, other might use Named Pipes (if the web services are running on the same machine as the service).
- C is for contract
The contract describes the data types and messages that can be exchanged between the client and the server. The service tells the client its capabilities.
Visual Studio will configure these settings almost automatically for you; all you have to do is edit the service configuration file. The service is written once and it will support multiple bindings. Moving the service to another computer is also very simple because you can specify the new endpoint by editing the configuration file.
To demonstrate the steps to build a WCF service, we'll build a simple service to manipulate products and categories. The service will maintain two lists, one with categories and another with products. Each product has a field that points to a row in the categories table. For the purpose of this sample application, we'll store our data in two List collections. If you want to modify the application to work with a database, you'll only have to change the implementation of the service's methods; instead of using the collections as its data source, the service will contact a database. In between sessions, you can persist the collections to an XML file, as discussed in Chapter 13, "XML in Modern Programming."
Start a fresh instance of Visual Studio and select File
The first step is the design of a class that represents the entities our service knows about. Obviously, we need a Product and a Category class and I have nested the Category class within the Product class. Both classes contain just a few properties to identify products and categories. Add the Product class to the WCF project and insert in it the code of Listing 21.4.
Example 21.4. The Product.vb class
<DataContract()>
Public Class Product
    <DataMember()> Public ProductID As Integer
    <DataMember()> Public ProductName As String
    <DataMember()> Public ProductPrice As Decimal
    <DataMember()> Public ProductCategoryID As Integer

    Public Overrides Function ToString() As String
        Return ProductName & " (" & ProductID & ")"
    End Function

    <DataContract()> Public Class Category
        <DataMember()> Public CategoryID As Integer
        <DataMember()> Public CategoryName As String
        Public Overrides Function ToString() As String
            Return CategoryName & " (" & CategoryID.ToString & ")"
        End Function
    End Class
End Class
This is a very simple class that describes products and categories, if you ignore the decorations of the various members. The entire class is marked with the DataContract attribute, which tells the compiler that the following class contains the service's contract: the entities our service knows about. The clients of the service will communicate with our class by submitting objects from the Product and Product.Category classes, and the service will return data to the client application using instances of these two classes. The DataMember attribute tells the compiler that the corresponding property is a member of the contract and that it should be exposed to the clients. If you have properties that you want to use in your code but not expose to clients, just don't mark them with the DataMember attribute.
The next step is the definition of the methods that the clients will use to contact our service. The methods must be defined in an interface class, which contains the method definitions but not their actual implementation. This interface class contains the service's metadata — the information required by a client to figure out the service's capabilities. Add the IProduct class to the project and insert the statements shown in Listing 21.5 in it (the IProduct.vb file).
Example 21.5. Describing the Product class with an interface
Imports System.ServiceModel
<ServiceContract()>
        Public Interface IProduct
    <OperationContract()> Function
                 GetAllCategories() As List(Of Product.Category)
    <OperationContract()> Function
                 GetAllProducts() As List(Of Product)
    <OperationContract()> Function
                 AddProduct(ByVal prod As Product) As Product
    <OperationContract()> Function
                 RemoveProduct(ByVal ID As Integer) As Boolean
    <OperationContract()> Function
                 GetCategoryProducts(ByVal ID As Integer)
                          As List(Of Product)
End Interface
This is another trivial class, except that it's marked with the ServiceContract attribute, which tells the compiler that the class contains the service's operations (as opposed to the service's data structure, which was defined in the Product class). The methods are also marked with the OperationContract attribute, which makes them available to clients. Without this attribute, the procedures would be internal methods and clients wouldn't be able to see them.
If the service exchanges simple data types with the client, this interface would be adequate. However, practical services are not limited to simple data types like integers and strings. They communicate with the client using business objects, which are based on custom classes. These objects represent customers, products, invoices, and the like. If you want to make use of custom objects, you must declare them in a separate class like the Product class shown earlier.
Finally, you must add yet another class to the project — this time a class that contains the actual code and implements the service. This is the ProductService class in the sample project, and its code is shown in Listing 21.6. The ProductService class implements the IProduct interface, taking into consideration the classes defined in the Product class.
Example 21.6. The implementation of the ProductService class
<ServiceBehavior()> Public Class ProductService :
                                 Implements IProduct
    Shared _products As New List(Of Product)
    Shared _categories As New List(Of Product.Category)
Public Function AddProduct(ByVal prod As Product) As Product
Implements IProduct.AddProduct
' grab the next ID in _products list
prod.ProductID =
(From p In _products
Select p.ProductID
Order By ProductID Descending).
FirstOrDefault + 1
' If category field is not set to a valid category, ignore it
If (From c In _categories
Where c.CategoryID = prod.ProductCategoryID).Count = 0 Then
prod.ProductCategoryID = Nothing
End If
products.Add(prod)
Return prod
End Function
Public Function GetAllCategories() As
System.Collections.Generic.List(
Of Product.Category)
Implements IProduct.GetAllCategories
Return _categories
End Function
Public Function GetAllProducts() As
System.Collections.Generic.List(Of Product)
Implements IProduct.GetAllProducts
Return _products
End Function
Public Function RemoveProduct(ByVal ID As Integer)
As Boolean Implements IProduct.RemoveProduct
products.Remove(_products.Find(Function(p) p.ProductID = ID))
End Function
Protected Overrides Sub Finalize()
MyBase.Finalize()
End Sub
Public Function GetCategoryProduct(
ByVal categoryID As Integer)
As List(Of Product)
Implements IProduct.GetCategoryProducts
Return (From p In _products
Where p.ProductCategoryID = categoryID).ToList
End Function
Public Sub New()_categories.Add(New Product.Category With
{.CategoryID = 101, .CategoryName = "Electronics"})
_categories.Add(New Product.Category With
{.CategoryID = 102, .CategoryName = "Cameras"})
_categories.Add(New Product.Category With
{.CategoryID = 103, .CategoryName = "Software"})
End Sub
End ClassThe data are stored in the _products and _categories collections, which are private to the class, and no client can manipulate these collections directly. This is the essence of the service: It allows clients to view and manipulate the data through a well-defined interface, and the service itself is in charge of maintaining the integrity of the data. Since we don't have a database at the back end, we're also responsible for maintaining the IDs of the various entities. Every time a new product is added, the code retrieves the largest product ID from the _products collection, adds 1 to it, and forms the ID of the new product. The same is true for the IDs of the categories. Notice also that every time the service is initialized, it adds three rows to the _categories table. It goes without saying that you can change the implementation of the service so that it interacts directly with the Northwind database instead of custom collections. To do so, you will change the implementation of the ProductService class without having to touch the other two classes. As a consequence, client applications will continue using your service, but with the new implementation of the service, they will be seeing the data of the Northwind database.
The two collections must be declared with the Shared keyword so that all instances of the service will see the same data. Had we declared the two collections with a Dim statement, a new set of collections would be created for each instance of the class invoked by a client. In other words, every client application would see its own data source.
Your WCF service is ready to service clients. To test it, press F5 and you will see an icon in the lower-right corner of your screen informing you that the WcfSvcHost utility has started. This utility, which comes with Visual Studio, hosts the service and makes it available to clients at a specific IP address and port. Since WcfSvcHost is meant for testing purposes, only applications running on the same machine can connect to it. Once the service has been debugged, it can be deployed as an IIS application.
A few moments later you will see another window, the WCF Test Client utility, which allows you to test your new service without writing a client application. The first time you run the project you'll see an error message to the effect that the service doesn't expose any metadata. This happened because you haven't configured your application yet. Right-click the App.config file in the Solution Explorer, and from the shortcut menu, select Edit WCF Configuration. The Configuration Editor window appears, as shown in Figure 21.11.
A WCF service is defined by three parameters: an address where it can be reached (the endpoint), a binding protocol, and a contract. All three parameters are configurable, and you need not edit the service code to redeploy it or to support additional bindings. You only need to edit the configuration file.
The address is an IP address or URL that specifies where the service is located. It's the address of the machine on which the service is running and, consequently, the address to which clients must connect to make requests. The binding determines how the clients will talk to a service and WCF supports multiple bindings. The contract, finally, specifies what the service does; in other words, the methods it provides. The contract is the service interface, much like the classes and methods of a namespace. If you want to totally abstract a WCF service, think of it as a namespace that's being hosted on a remote computer. Just as you can call a method in a namespace, you can call a method of a WCF service. As you saw in the first example of this chapter, you can access a remote service from within your project by adding a reference to the service. With that reference in place, Visual Studio will take care of the housekeeping needed to connect to the remote service (what's also known as the plumbing).
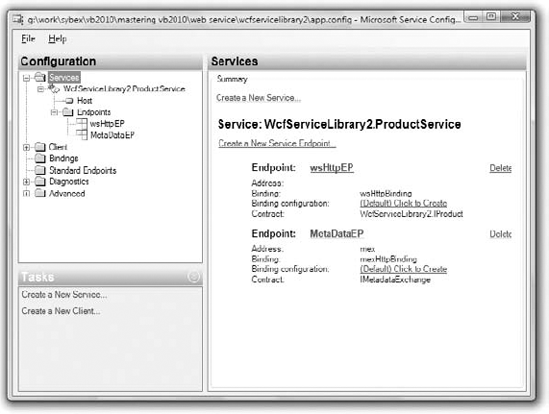
Figure 21.11. The Configuration Editor's window allows you to configure the parameters of a WCF service.
The binding tells the client how the messages will be transmitted between the client and the service. Web services use HTTP to exchange data with the clients. This, however, is not perfect for all cases. HTTP is a universal protocol, and it's been implemented on every operating system, but it's the most generic protocol. Windows, as well as other operating systems, support messaging: a mechanism for reliably transmitting information between two computers, even if one of them is offline. When the receiving computer is connected, the message will be delivered and processed. This mechanism, which relies on Microsoft's Message Queues, is the most reliable mechanism for exchanging data between two computers, but this type of communication isn't synchronous.
There are situations where the WCF service and its client are deployed on the same local area network. For these cases, there are protocols, such as Named Pipes, that perform much faster than HTTP. I can't discuss the merits of all available bindings in this chapter. This is an advanced topic, and the goal of this chapter is to introduce you to a technique for writing applications as services. The basic techniques are within the reach of the average VB developer, and I will limit the discussion to the basic techniques for building WCF services and deploying them on a web server. WCF allows you to build a service following the steps discussed so far and then configure them. The configuration involves the specification of the endpoint (the service's address) and the binding protocol. You can even implement multiple bindings on the same service so that different clients can contact the same service using different protocols.
To configure the sample WCF service, you must first change the name of the service. Although you changed the default name of the service, the configuration file still remembers the original name, Service1, which was the name of the sample class that was generated automatically and that we removed from the project. Click the WCFProducts.Service1 item in the left pane of the Configuration Editor, which was shown in Figure 21.11, and then select the Name property in the right pane. Click the button with the ellipsis next to the service's name and the Service Type Browser dialog box will open, as shown in Figure 21.12. This dialog box is similar to the Open dialog box, which allows you to select a file. Navigate to the project's Bin/Debug folder and select the WCFProducts.dll file. Click open, or double-click the file's name to see the names of all services implemented in the DLL. You will see a single service name, the WCFProducts.ProductService name. Select it and the close the dialog box by clicking the OK button.

You will notice that the new service has two predefined endpoints. Click the first one and the endpoint's properties will be displayed on the editor's right pane. The first endpoint uses the wsHttpBinding binding and implements the contract WCFProducts.Service1 service. There's no Service1 service, so you must change the name of the service with the same process described earlier. Locate the project's DLL and set the endpoint's contract to WCFProducts.IProduct interface. While configuring the first endpoint, set its name to HTTPBinding.
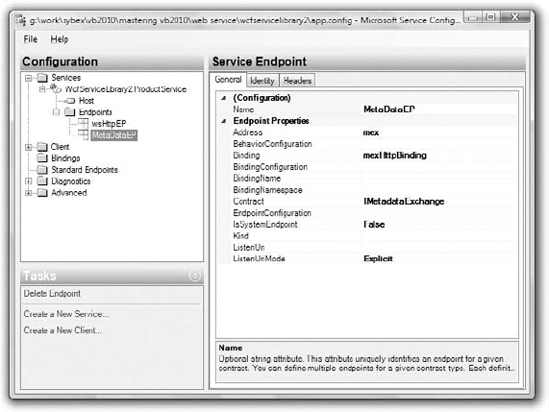
Now select the second endpoint and you'll see that it implements the mexHttpBinding, as shown in Figure 21.13. This binding provides the service's metadata and you need not change its settings. Just set its name to MEXBinding, so that it won't be displayed as (Empty Name).
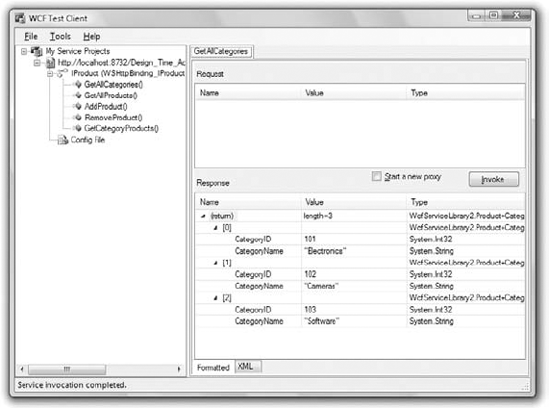
Save the configuration with the Save command from the File menu and close the Configuration Editor. Now you're ready to test the service. Press F5 again and this time the WCF Test Client window appears, as shown in Figure 21.14. The WCF Test Utility window consists of two panes: on the left pane you see all the methods of the service (you must expand the service's interface to see the names of the methods), and on the right pane you can call the selected method and see the results. To see the categories shown in Figure 21.14, for example, I double-clicked the GetAllCategories item in the left pane and then I clicked the Invoke button. The utility called the GetAllCategories method and displayed the results in the lower part of the pane.
You can use the WCF Test Client utility to test the methods of your new service, but eventually you must host your service to a web server, or an application, and call it from another Windows or web client.
You can also test the methods that submit data to the service. If you double-click the AddProduct method name, a new tab will open in the right pane, as shown in Figure 21.15, and you'll be prompted to enter values for the method parameters. Specify the parameter values (you don't have to provide a value for the ProductID parameter; this value is assigned automatically by the service) and then click the Invoke button. The utility will call the AddProduct method, and if executed successfully, it will display the new product in the lower half of the tab, as shown in the figure.
Note that the new product's ID is included in the result of the method because the method returns an object of the Product type that represents the newly inserted row.
Implementing a web or WCF service is no different from implementing a class that exposes certain functionality through a set of methods and communicates with another application by exchanging specific types. The only difference between a class you'd use in a Windows application and a service is that the members of the service are marked with special attributes. Moreover, when it comes to WCF services, you must also configure them with the Configuration Editor.

Before ending this chapter, I'd like to show you briefly how to create services that expose an entire database. This type of service comes as a special project component of Visual Studio, the ADO.NET Data Services component. An ADO.NET Data service is a web service that exposes an entire database, or part of it, as a web service. What's special about this component is that it's generated automatically for you; all you have to do is specify the tables you want to expose and a wizard will generate the service for you. The data source can be a database, an Entity Data Model (EDM), or a collection of custom objects. There's nothing new to learn and you can create and use data services immediately, with the exception of some techniques for securing your data. The data service will expose methods to both query and update the data source, but you obviously don't want to give access to your database to anyone on the Web.
Let's start the exploration of data services by building a new project, the DataService project; you can download it from this URL: www.sybex.com/go/masteringvb2010. Create a new project of the ASP.NET Web Site type, since your data will be exposed over HTTP. As you will see, you have no need for a website per se, just a web service that will expose the data of a specific database (or part of it). As soon as the project is created, delete the ASPX page that Visual Studio adds by default to any project of this type.
First, you must create a data source. For the purpose of this example, you'll expose data from the Northwind database, and to do so, you'll create an ADO.NET Entity Data Model by adding a new component of this type to the project. Keep the default name, which is Model1.edmx. When the wizard starts, select all of the tables in the database, as you learned in Chapter 19. For this example, I've included all 12 tables of the Northwind database. I just dropped them on the EDM design surface and Visual Studio generated the Model1.edmx data model.
Now that you have the data source, you can add an ADO.NET Data Service component to your project to expose the selected tables through a web service. Right-click the project name and select Add New Item. When the Add New Item dialog box opens, select the ADO.NET Data Service. Name the new service NWWebDataService. Visual Studio will create the NWWebDataService.svc file for you and will open the new data service's code window. You will see that the new class contains just a few lines of code:
Imports System.Data.Services
Imports System.Linq
Imports System.ServiceModel.Web

Public Class NWWebDataService
    ' TODO: replace [[class name]] with your data class name
    Inherits DataService(Of [[class name]])

    ' This method is called only once to initialize service-wide policies.
    Public Shared Sub InitializeService(
                  ByVal config As IDataServiceConfiguration)
        ' TODO: set rules to indicate which entity sets
        ' and service operations are visible, updatable, etc.
        ' Examples:
        ' config.SetEntitySetAccessRule("MyEntityset", EntitySetRights.AllRead)
        ' config.SetServiceOperationAccessRule(
        '        "MyServiceOperation", ServiceOperationRights.All)
    End Sub
End Class
The NWWebDataService inherits from another class, whose name you must supply by replacing class name in the code line that reads: Inherits DataService(Of [[class name]]). The class it derives from should be NorthwindEntities, which is the name of the Data Entity class you created as the project's data source. Technically, you didn't specify the NorthwindEntities name, but Visual Studio created this class and named it after the database.
The statements that are commented out specify the data you want to expose through your data service. By default, the data service won't expose any data unless you tell it to do so. Replace the last two statements of the InitializeService routine with the following:
config.SetEntitySetAccessRule("*", EntitySetRights.All)This statement instructs the service to expose all resources. Obviously, this is the last thing you want to do with a real service that will be accessed from outside your test machine, and I'll come back to the issue of security, but for now let's grant unconditional access to all tables through your service. For the purpose of this chapter, the service will be hosted by the ASP.NET Development Server, which can be accessed from the same machine only.
You're probably thinking it's time to add some real code, or look at a few thousand lines of code generated by the wizard. This isn't the case; your data service is complete. Right-click the NWWebDataService component name, and from the context menu, select View In Browser. A few seconds later you will see a new Internet Explorer window displaying a list of all tables in the database, as shown in Figure 21.16.
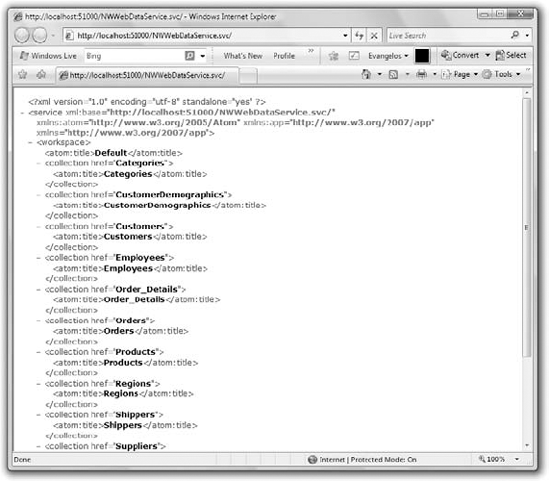
Each table, which is an EntitySet in the data source, is exposed as a collection. By appending the entity name to the base URL of the service, you can view the rows in the corresponding tables. Change the URL in the browser address bar to any of the following to see the products, categories, and customers in the Northwind database:
http://localhost:51000/NWWebDataService.svc/Products
http://localhost:51000/NWWebDataService.svc/Categories

http://localhost:51000/NWWebDataService.svc/Customers
As you will recall from our discussion of the Entity Framework in Chapter 17, "Using the Entity Data Model," the Products table is translated into the Products EntitySet, which is made up of Product entities. The port will be different on your machine, but you will see it on your browser's address bar as soon as you open the service in the browser. This port number will be different every time you start the application, so it wouldn't be a bad idea to set a specific port for the service. Select the DataService project in the Solution Explorer, open the Project menu, and select DataService Properties. On the Project Properties window that opens, select the Web tab, which is shown in Figure 21.17. On this tab, you can set the start action (what happens when you start the project) as well as the server that will host your server. For now, select the Specific Port option and set its value to the number of an unused port (I've used the port number 51000). If you decide to make the service public, don't forget to limit the access to the service (you don't want people changing your data at will). You'll see shortly how you can restrict access to specific tables and even how to intercept certain operators, like insertions, modifications, and deletions, and determine whether to allow or block them from within your code.
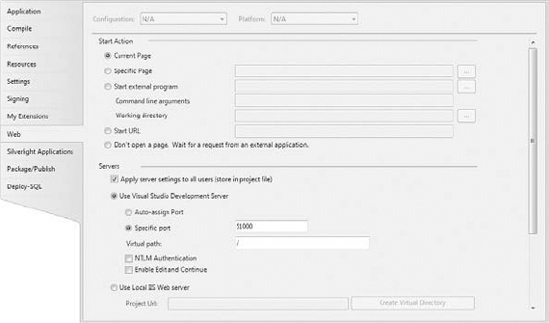
Figure 21.18 shows how the first customer, the ubiquitous ALFKI customer, is displayed. The output of the service is just XML, and you can write a client application to access the service and process the selected rows with LINQ. Notice the links to the related tables. Each customer has two related tables with the following relative URLs:
Orders:
Customers('ALFKI')/OrdersCustomerDemographics:
Customers('ALFKI')/CustomerDemographics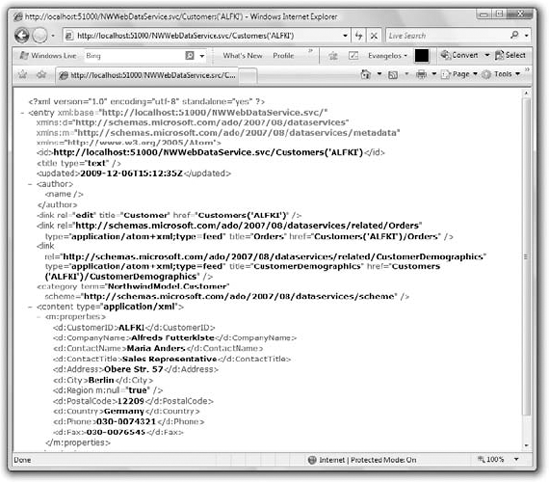
Figure 21.18. Requesting a specific customer through a URL made up of the service's URL and the table name
To view the orders of the customer ALFKI, enter the following URL in your browser:
http://localhost:51000/NWWebDataService.svc/Customers('ALFKI')/OrdersTo isolate a specific column, append it to the table's URL. The following URL will return the city of the ALFKI customer:
http://localhost:51000/NWWebDataService.svc/Customers('ALFKI')/CityThe service will return it as an XML element:
<City xmlns="http://schemas.microsoft.com/ado/2007/08/dataservices">Berlin</City>
You can also request just the value (in this case, Berlin) by appending a dollar sign followed by the keyword value:
http://localhost:51000/NWWebDataService.svc/Customers('ALFKI')/City/$valueAnd you can navigate through related rows using this URL syntax. To view the IDs of the orders placed by the customer BLAUS, connect to the following URL:
http://localhost:51000/NWWebDataService.svc/Customers('BLAUS')/OrdersHere I used the URL that retrieves the customer and appended the name of the related tables (the Orders table). The URL so far returns the orders of the specified customer. You can select a specific order by its ID and request its detail lines. The following URL does exactly that (the URL should be entered as a single line; it's been broken here to fit the printed page):
http://localhost:51000/NWWebDataService.svc/Customers('BLAUS')/
Orders(10501)/Order_Details
The service will return the following XML document:
<?xml version="1.0" encoding="utf-8" standalone="yes" ?>
- <feed xml:base=http://localhost:51000/NWWebDataService.svc/
 xmlns:d=http://schemas.microsoft.com/ado/2007/08/dataservices
 xmlns:m=http://schemas.microsoft.com/ado/2007/08/dataservices/metadata
 xmlns="http://www.w3.org/2005/Atom">
  <title type="text">Order_Details</title>
  <id>http://localhost:51000/NWWebDataService.svc/Customers('BLAUS')
/Orders(10501)/Order_Details</id>
  <updated>2009-11-30T22:59:21Z</updated>
  <link rel="self" title="Order_Details" href="Order_Details" />
- <entry>
  <id>http://localhost:51000/NWWebDataService.svc/
Order_Details(OrderID=10501,ProductID=54)</id>
  <title type="text" />
  <updated>2009-11-30T22:59:21Z</updated>
- <author>
  <name />
  </author>
  <link rel="edit" title="Order_Detail"
 href="Order_Details(OrderID=10501,ProductID=54)" />
  <link rel="http://schemas.microsoft.com/ado/2007/08/
  dataservices/related/Order" type="application/atom+xml;
  type=entry" title="Order"
  href="Order_Details(OrderID=10501,ProductID=54)/Order" />
  <link rel=http://schemas.microsoft.com/ado/2007/08/dataservices/related/Product
 type="application/atom+xml;type=entry" title="Product"
 href="Order_Details(OrderID=10501,ProductID=54)/Product" />
  <category term="NorthwindModel.Order_Detail"
 scheme="http://schemas.microsoft.com/ado/2007/08/dataservices/scheme" />
- <content type="application/xml">
- <m:properties>
  <d:OrderID m:type="Edm.Int32">10501</d:OrderID>
  <d:ProductID m:type="Edm.Int32">54</d:ProductID>
  <d:UnitPrice m:type="Edm.Decimal">7.4500</d:UnitPrice>
  <d:Quantity m:type="Edm.Int16">20</d:Quantity>
  <d:Discount m:type="Edm.Single">0</d:Discount>
  </m:properties>
  </content>
  </entry>
  </feed>
If you examine it, you'll see that it includes two related entities: the Order entity (the order to which all detail lines belong) and the Product entity (the product listed in each detail line).
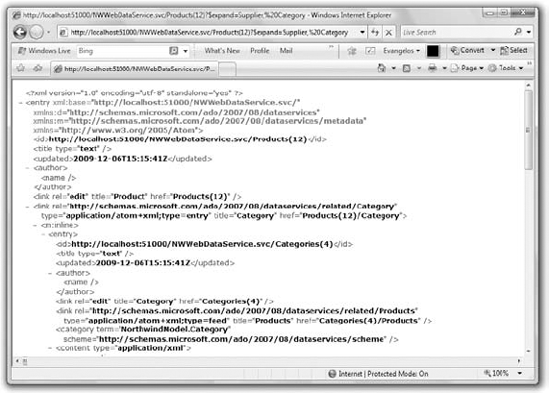
By default, the data service doesn't move the related rows from the database to the client. If you want to view the related data, you must use the expand keyword followed by the name(s) of the entities you wish to retrieve along with each product. The following URL will bring a single product, along with its category and supplier:
http://localhost:51000/WebDataService1.svc/
Products(12)?$expand=Category,%20Supplier
If you examine the XML returned by this query, you'll see that it has three <link> elements, which represent the related rows in other tables: the Order Details, Categories, and Suppliers tables. The links to the Categories and Suppliers tables have a plus symbol in front of them, and if you click it to expand the corresponding entity, you'll see the details of the product's category or supplier, as shown in Figure 21.19.
Likewise, the following statement will bring up an order along with its detail lines and a product for each detail line:
http://localhost:51000/WebDataService1.svc/Customers('BLAUS')/
Orders(10501)/Order_Details?$expand=ProductQuerying your data through a URL may seem odd at first, but it's sure easy to understand the notation of querying through URLs. You can also filter the results returned by the query with the filter keyword, which must be followed by a filtering expression. The following statement will return all products with a price that exceeds $100:
http://localhost:51000/WebDataService1.svc/Products?$filter=UnitPrice gt 100
Note that the comparison operator is not the greater than sign (>) but the gt operator. The filtering expressions can get quite complicated because the URL syntax isn't flexible enough for expressing multiple criteria, joining tables together, and so on. The data service allows us to get the data we need with a simple HTTP request, but for many operations you'll have to download the desired data at the client and process them locally with LINQ.
The data service works very nicely, and it took us no time at all to write. You'll see shortly how to write client applications against this service and how to submit updates to the database as well. For now, keep in mind that an ADO.NET Data service exposes (or "surfaces") the data in a data source. We have used a Data Entity Model as our data source in this example, but you can use any data source such as LINQ to SQL, or even a collection of custom objects. No matter how you specify the data source, the data service will expose it through HTTP requests.
For those of you who are interested in exploring the notation for URL querying further, Table 21.1 provides a quick overview of the various operators.
Table 21.1. Basic query operators
Type | Operators |
|---|---|
Logic operators |
|
Arithmetic operators |
|
String operators |
|
Date/time operators |
|
Type operators |
|
Here are a few simple examples of the operators you can use in your filtering expressions. (I'm only showing the part of the URL that follows the service's address, which is http://localhost:51000/WebDataService1.svc/)
Products?$filter=startswith(ProductName, Sir')
Orders?$filter=month(OrderDate) eq 2
Orders?$filter=endswith(ShipName,'markt')
ADO.NET Data Services allows you to expose (or surface) an entire database and build client applications that use the service as the data source. The database has already been exposed, and you can write code to exploit the data using the HttpWebRequest/HttpWebResponse objects, as you saw in the preceding chapter. The data are exposed through the simplest possible mechanism, namely through HTTP. But expressing conditions and statements to retrieve our data using the URL syntax is rather awkward. There are more structured tools, LINQ being one of them. Can you access the data exposed by your service with LINQ? The answer is Yes! And LINQ can translate the standard query operators into the equivalent URL syntax. This URL querying syntax is convenient for testing the service, but no one expects you to write applications using the query syntax (not in this day and age, at least). There are tools to use the same data as business objects from a client application, and this is what you're about to do next.
In this section, I'll guide you through the process of building a Windows client that consumes the data of the data service. As you can guess, Microsoft didn't go to the trouble of developing ADO.NET Data Services so we would have to process the XML returned by the queries on our own. There are tools that simplify the process enormously, and you'll see them in this section.
The tool that will allow us to see the entities of the new Entity Data Model at the client is a command-line tool. This tool is the DataSvcUtil.exe utility, which reads the service's metadata and creates a class that encapsulates the functionality of the service. Open a command prompt window and run the DataSvcUtil.exe utility, which resides in the folder WindowsMicrosoft.NETFramework.NETv.4.0.xxx, where xxx is the latest revision of the framework. This value as of this writing is 4.0.30138, but it will most likely be a little different by the time Visual Studio 2010 is released. Choose the most recent version of the Framework and switch to that folder. In this folder you'll find the DataSvcUtil.exe utility, which you must execute, passing as an argument the URL of the data service for which you want to generate a proxy (a proxy is a class that exposes the data model and the appropriate methods to access the service's data).
To generate the proxy, start the DataSvcUtil.exe utility with a statement similar to the following in the command prompt window:
DataSvcUtil.exe /out:"C:ProjectDataServicesNWProxy.vb"
 /uri:"http://localhost:51000/NWWebDataService.csv" /language:vb
This creates the proxy file in the root folder of one of my drives, so I can locate it easily later. Be sure to change the path to a folder that's easy for you to locate later because you will have to include this file with your solution.
Before you execute this command, however, you must start the service for the new port to take effect. Open the service in the browser as usual, and as soon as you see the list of tables exposed by the service, close the browser. The service will continue to run in Visual Studio and the browser is not required. The DataSvcUtil.exe utility will generate the file NWProxy.vb in the specified folder. Move this file to the folder that contains the Windows project you're building, and then add it to the same project with the Add
To simplify matters, I've added a Windows project to the solution, and its main form is shown in Figure 21.20. This is the client application that will contact the data service to interact with the Northwind database. To see the newly created data model in action, you must add the auto-generated proxy file to the Windows project by copying the NWProxy.vb file into the folder of the Windows application. Then place a button on the main form of the test project, the Read Data From Service button, and create a variable to reference the proxy class with the following declaration in your code (just make sure to change the port to the appropriate value):
Dim service As New NorthwindModel.NorthwindEntities(
New Uri("http://localhost:51000/NWWebDataService.svc"))
Now you're ready to access the tables in the Northwind database through the service. Your Windows application is a client that connects to the service through the URL of a web service. It has no direct access to the database, which means you don't have to open any ports to SQL Server on your database server and no credentials are stored at the client application. All it needs is a so-called HTTP stack (basically, any computer that can access the Internet can host the application). You can view the methods exposed by the NWProxy server (which are the same as the methods of the underlying service) by entering the name of the service variable and a period.
You probably recall that you granted access to all tables for all users. I'll come back to this topic shortly and show you how to limit the access to your service, but let's see how the proxy allows you to access the data. With the service variable in place, you can access the tables in the Northwind database as collections of typed objects.
To access a table, use a loop like the following, which iterates through the rows of the Customers table:
For Each p In service.Products
    Debug.WriteLine(p.ProductName)
Next
As you can see, the collections returned by the service are typed and so the p variable exposes the names of the columns of the Customers table as properties.
In a similar manner, you can iterate through the Categories table:
For Each c In categories
    Debug.WriteLine(c.CategoryName)
Next
If you want to access the products in each category, you must explicitly request these rows of the Products table as you iterate through the categories. The data service doesn't move all data to the client. To request the matching rows of a related table, use the LoadProperty method, which accepts two arguments: an entity name, which is a row of the current table, and the name of the related table. To iterate through the categories and their related products, write two nested loops like the following:
For Each c In categories
    Debug.WriteLine(c.CategoryName)
    service.LoadProperty(c, "Products")
    For Each p In c.Products
        Debug.WriteLine(p.ProductName & vbTab & p.UnitPrice.ToString)
    Next
Next
Since you're working with typed collections, you can use all LINQ operators to process your data. The following loop selects the customers from Germany and then the orders they have placed:
For Each c In service.Customers.Where(Function(cust) cust.Country = "Germany")
    service.LoadProperty(c, "Orders")
    Debug.WriteLine(c.CompanyName)
    For Each o In c.Orders
        Debug.WriteLine(vbTab & o.OrderID)
    Next
Next
To use the data service efficiently, you must execute the appropriate queries and retrieve only the relevant data and not entire tables or even related rows that aren't needed. Let's say you want to retrieve the orders from all customers in Germany that were placed in a specific year. Instead of using the LoadProperty method to move all related rows from the Orders table on the server to the client, you can use the CreateQuery method to pass a query to the server. You'll specify your query in LINQ, but the data service will translate it to the appropriate SQL query and execute it against the server. The following expression retrieves the rows of the Orders table as a DataServiceQuery object, which is a typed collection:
service.CreateQuery(Of NorthwindModel.Order)("Orders")Then you can apply any filtering on this query to limit the number of rows with the Where operator:
Dim selOrders = service.CreateQuery(Of NorthwindModel.Order)("Orders").Where( _
                         Function(o) Year(o.OrderDate) = 1998 And
                                     o.Customer.CustomerID = c)
Let's say you need all customers in Italy ordered by their company name. To request this information from the database, you'd write a query like the following:
Dim ItalianCustomers = From c In service.Customers
                       Where c.Country = "Italy"
                       OrderBy c.CompanyName
                       Select c
The preceding LINQ expression was translated into the following URI query:
{http://localhost:51000/NWWebDataService.svc/
Customers()?$filter=Country eq 'Italy'&$orderby=CompanyName}
Your regular LINQ statements are being automatically translated into URIs that can be processed by the service. It looks like a new variation of LINQ, LINQ to URI, but I haven't seen this term being used in the documentation. Anyway, the LINQ component knows how to talk to ADO.NET Data Services, but not always with success because not all expressions you can use with LINQ have a counterpart in SQL. To retrieve the orders with a freight charge of more than $20, use the following trivial LINQ query:
Dim q = From o In service.Orders
             Where o.Freight > 20
             Select o
The preceding LINQ query is translated into the following URI by the service:
http://localhost:51000/NWWebDataService.svc/
Orders()?$filter=cast(Freight gt 10M,'Edm.Boolean')
In general, it's much simpler to write queries using LINQ than to try to construct the proper URL for any given query. The following LINQ query retrieves the products that contain the word sauce in their name, regardless of spelling:
Dim q = From p In service.Products
        Where p.ProductName.Contains("sauce")
        Select p
When this query is translated into a URI query, the service makes use of the substringof operator, as shown here:
{http://localhost:51000/NWWebDataService.svc/Products()?$
     filter=substringof('Sauce',ProductName)}
If you're wondering how I found the URI query for these LINQ queries, it's really simple. Place a breakpoint before the LINQ query you want to monitor, and when the program breaks, add a new watch on the variable that represents the result of the query (the q variable in most of this section's examples). As soon as the LINQ statement is executed, the SQL statement that will be executed against the database will appear in the Watches window.
Using an ADO.NET data service to explore the data in a database is a fairly straightforward approach. Surfacing your data with a data service is ideal for reporting and other applications that need not modify the database. Of course, the data service allows you to submit updates as well, although this isn't the best implemented feature of an ADO.NET data service — not yet, that is. My main objection to updating a database through a data service is that the methods that perform the updates do not return the error messages generated by the database. What you get back is a generic error telling you that "an error occurred while processing this request." Whether the error occurred because the data violated some constraint or whether it occurred because a field value was inappropriate for the corresponding column, the error message is the same. If you decide to use a data service to submit updates to the database, be prepared to validate the data as best as you can at the client, because the server won't help you determine the source of the update errors.
Since it's only a question of time before Microsoft brings ADO.NET Data Services up to par with the other data access technologies, let's look at the process of submitting updates to the database. Since the underlying data source is an Entity Data Model, the process of submitting data to the service is more or less familiar to you. To insert new rows, you create new entities at the client and submit them to the server with the service's SaveChanges method. To update existing rows, you just change the desired fields and then call the same method. To delete rows, you delete entities at the client and then call the SaveChanges method.
To create a new product, for example, you must first create a Product object:
Dim prod As New NorthwindModel.Product
And then set the object's properties with statements like the following:
prod.ProductName = "NEW PRODUCT NAME"
prod.UnitPrice = 11.2
prod.UnitsInStock = 1
prod.UnitsOnOrder = 12
Some of the properties are also entities, and they must be set to the appropriate entity. The product category is specified in the database with the CategoryID field, but the entity Product is related to the entity Category, so you must create a new Category entity and assign it to the Category property of the prod variable. The same is true for the product's supplier: You can set the prod.SupplierID field; you must set the Supplier property to an entity of the Supplier type. The following statements create the Category entity by reading a row from the Categories table and set up the Category property of the new product:
Dim cat = service.Categories.Where(Function(c) c.CategoryID = 4).First
prod.Category = cat
For the product supplier, I followed a different approach to better demonstrate the process of updating the Data service. This time I created a new Supplier entity, which provides only scalar properties, and then I set the new product's Supplier property to this value:
Dim supplier As New NorthwindModel.Supplier
supplier.CompanyName = "New Supplier"
supplier.ContactName = "Contact name"
supplier.ContactTitle = "Contact title"
supplier.Address = "Supplier address"
supplier.City = "City"
supplier.Country = "Country"
service.AddToSuppliers(supplier)
service.SetLink(prod, "Supplier", supplier)
Note that this time the new entity is added to the Suppliers entity set at the client with the AddToSuppliers method. The last statement associates the product with its supplier. This link does not exist at the client and must be added explicitly. Note that you don't have to specify the fields that take part in the relationship.
At this point you can submit the new product to the database by calling the SaveChanges method. The SaveChanges method doesn't accept any arguments; it submits all changes to the data service. Obviously, it will first submit the new supplier and then the new product. But this isn't something you have to worry about; the data service knows how to insert the rows in the correct order.
You may have noticed that the code didn't set the IDs of the two new rows. The IDs are assigned by the database and the client has no way of knowing the next available ID in the database. Other users may have inserted rows into any table and the client can't make any assumptions as to the next available ID. You could also use globally unique identifiers (GUIDs) as primary keys, which would allow you to generate the primary key values at the client, but for most databases in use today this isn't the case. Windows generates a long string that's unique every time you create one (as the term suggests, it's a globally unique identifier, not in your computer or your network).
After the SaveChanges method is called, the properties prod.ProductID and supp.SupplierID will have the correct values, which will be transmitted to the client by the data service. This is why we had to explicitly add the appropriate links between the entities at the client with the SetLink method. As a reminder, this is necessary for new rows only. If the ID of the related row is known, as was the case with the Category entity, there's no need to call the SetLink method.
The Simple Updates button of the sample application contains the statements presented so far in this chapter. Open the project to see the code that implements the simple operations, like updates and deletions.
Real data-driven applications perform updates in a transactional manner. As you will recall from Chapter 15, "Programming with ADO.NET," an order has to be committed to the database in a transactional manner; the entire order must fail if a single row fails to be committed to the database. Data services allow you to perform multiple updates in the context of a transaction as long as all the updates that belong to the transaction are submitted with a single call to the SaveChanges method. In addition, you must set the SaveChangesDefaultOptions property of the entity set to Batch.
Let's consider the example of committing an order to the Northwind database, a rather familiar example in this book. You have seen how to perform transactions with ADO.NET as well as with data entities. To perform a transaction with a data service, you first create all the objects that take part in the transaction: the order's header and its detail lines. You should not call the SaveChanges method until all entities have been created at the client, as discussed in the preceding section. When the entire order has been set up at the client, you can submit it to the database by calling the SaveChanges method.
Let's review the actual code that submits a new order to the database. You can find the code discussed in this section in the Transactional Updates button of the DataServices project. As usual, start with a reference to the data service, the service variable:
Dim service As New NorthwindModel.NorthwindEntities(
                  New Uri("http://localhost:51000/NWWebDataService.svc"))
Then, create a new Order object, the newOrder variable, and add it to the Orders table. The new row is appended to the Orders entity set at the client. Moreover, the new order has no ID yet. The OrderID value will be assigned by the database when the transaction is submitted to the database. Here are the statements that create the newOrder object:
Dim newOrder As New NorthwindModel.Order
service.AddToOrders(newOrder)
Now create a customer object that represents the customer that placed the order. In a real application, the user will most likely select the customer from a list, but since this application doesn't have an elaborate user interface, I retrieve a row from the Customers entity set at the client. You can't simply set the newOrder.CustomerID property, even though the newOrder variable exposes the CustomerID property. The newOrder object has a Customer property too, and there's a relationship between the Orders and Customers tables. To associate a customer with the new order, we must set the order's Customer property to a Customer object and then establish a relationship between the two. The following statement creates the Customer object that represents the Customer ANTON:
Dim cust = service.Customers.Where(Function(p) p.CustomerID = "ANTON").First()
Next, assign the cust object to the new order's Customer property and then create a link between the order and the customer:
newOrder.Customer = cust
service.SetLink(newOrder, "Customer", cust)
Follow similar steps to associate an employee with the order:
Dim emp = service.Employees.Where(Function(p) p.EmployeeID = 3).First
newOrder.Employee = emp
service.SetLink(newOrder, "Employee", emp)
And then you can set the remaining (scalar) properties of the order with simple statements like the following:
newOrder.OrderDate = Now
newOrder.ShipAddress = cust.Address
newOrder.ShipCity = cust.City
Now you can create the order details. Each detail is a variable of the Detail type, and each must be added to the Order_Details property of the newOrder object. The Order_Details property is a collection, and as such it provides an Add method. The following statement creates a new variable, the dtl variable, that represents an order detail:
Dim dtl As New NorthwindModel.Order_Detail
This variable must be added to the Order_Details entity set:
service.AddToOrder_Details(dtl)
You must also associate the new detail line with the new order:
dtl.Order = newOrder
Now you can set the properties of the detail line with statements like the following. Again, the product is selected from the Products table by its ID, while in a real application you'd probably allow the user to select it from a list or another lookup mechanism:
Dim dtlProd = service.Products.Where(Function(p) p.ProductID = 31).First
Set the Product property of the new order to the dtlProduct object:
dtl.Product = dtlProd
And create a link between the detail line and the corresponding row in the Products entity set:
service.SetLink(dtl, "Product", dtlProd)
Then, you can set the remaining properties of the detail line with simple statements like the following:
dtl.Product = dtlProd
dtl.UnitPrice = 11.2
dtl.Quantity = 9
And finally, associate the new detail line with the new order:
service.SetLink(dtl, "Order", newOrder)
Let's add a second detail line to the order with the following statements:
dtl = New NorthwindModel.Order_Detail
dtlProd = New NorthwindModel.Product
dtlProd = service.Products.Where(Function(p) p.ProductID = 56).First()
dtl.Order = newOrder
dtl.Product = dtlProd
dtl.UnitPrice = dtlProd.UnitPrice * 0.9
dtl.Discount = 0.1
dtl.Quantity = −5
service.AddToOrder_Details(dtl)
newOrder.Order_Details.Add(dtl)
service.SetLink(dtl, "Product", dtlProd)
service.SetLink(dtl, "Order", newOrder)
This time I've chosen to include a discount as well. Other than that, the process of creating a new detail line is the same. The new detail line is linked to a Product entity because it contains the ID of a product and to the Order entity to which is belongs.
At last, you can commit the new order to the data service by calling the SaveChanges method of the service variable. All the objects you have created at the client will be submitted to the database in the proper order by the data service. To ensure that all rows will be inserted in a transactional manner, you must also set the service.SaveChangesDefaultOptions property to the value shown in the code:
service.SaveChangesDefaultOptions = Services.Client.SaveChangesOptions.Batch
Try
service.SaveChanges()
Catch ex As Exception
            MsgBox("FAILED TO COMMIT NEW ORDER")
End Try
To see for yourself that the order is submitted in a transactional manner, set the price of the product of the first detail line to a negative value. The database will reject this value and the entire transaction will fail. The error that will be raised by the data service will have a very generic description, which won't help you locate the bug in your code. With a straight ADO transaction, you get back the error message generated by the database, which clearly states the value that the database couldn't accept.
Once the transaction has been committed, the data service will return the ID of the order as well as the IDs of all entities involved in the transaction. In this case, there's only one ID value to be set by the database.
Through the examples in this section, it's clear that a data service is quite trivial to build and very easy to use for selection queries. When it comes to updating the database, however, the data service doesn't provide all the mechanisms you've come to expect with other data access technologies. You must establish relationships between entities in your code and you can't rely on meaningful error descriptions to debug your code.
Exposing a database as a web service on the Internet is not the best idea. To secure the database from malicious users, you must set up some security measures. As you recall, the SetEntitySetAccessRule method sets the access rule for the various entities exposed by the service. So far, you allowed users to access all entities for all operations with the following statement:
config.SetEntitySetAccessRule("*", EntitySetRights.All)The first argument is the name of an entity and the second argument is a member of the EntitySetRight enumeration: None, All, AllRead, AllWrite, ReadMultiple, ReadSingle, WriteAppend, WriteDelete, WriteMerge, WriteReplace. The names of most members are self-descriptive. The ReadMultiple and ReadSingle members determine whether users can read multiple rows or a single row of the corresponding entity set.
Whenever possible, you should limit the number of rows a client application can request because sloppy developers will retrieve an entire table to select a few rows at the client. The following method call enables clients to read all rows, insert new rows, and replace existing rows in the Orders entity set:
config.SetEntitySetAccessRule("Orders", EntitySetRights.AllRead Or
                EntitySetRights.WriteAppend Or EntitySetRights.WriteReplace)
Notice that multiple options are combined with the Or operator.
The SetServiceOperationAccessRule specifies the access rules for the various operations. The first argument is a method name and the second argument is a member of the ServiceOperationRights enumeration: All, AllRead, None, OverrideSetEntityRights, ReadMultiple, or ReadSingle.
The two methods are quite useful for specifying simple access rules but not nearly adequate enough for implementing more advanced security rules. Typical access rules, such as allowing users to view their own orders only, must be implemented with the appropriate procedures. These procedures are called interceptors because they intercept a query and alter the query's default behavior. To intercept a selection query, for example, use the QueryInterceptor attribute followed by the name of an entity set in parentheses:
<QueryInterceptor("Orders")>
Public Function OnQueryOrders() As Expression(Of Func(Of Orders, Boolean))
   ' statements
End Function
The OnQueryOrders function will be called every time a client selects one or more rows from the Orders table and it's implemented as a lambda expression that accepts as arguments a collection of the Orders entity set (the original result of the query) and a Boolean variable. The function's body should set the second argument to True or False for each member of the collection, depending on whether the member should be included in the result or not. Note that the interceptor applies to all queries to the specific table, whether they query the Orders entity set directly or they query the same set indirectly — for example, a query to the Customers table that expands the customer's orders.
The following interceptor for the Orders entity set eliminates all orders except for the ones placed by the customer that makes the request. It assumes that the service is hosted as an IIS application with authentication and the user has connected to the service with the same username as the company name, which is rarely the case. In a realistic scenario, the service would look up the user's company name in a table and then use it to filter the results of the query:
<QueryInterceptor("Orders")>
Public Function OnQueryOrders() As Expression(Of Func(Of Orders, Boolean))
    Return Function(o) o.Customers.ContactName =
        HttpContext.Current.User.Identity.Name
End Function
You can implement interceptors for all types of queries, including insertion, modification, and deletion queries. To define a change interceptor for the Products entity set in the Northwind data service project, open the Northwind.svc file and define a service operation method named OnChangeProducts as follows:
<ChangeInterceptor("Products")>
Public Sub OnChangeProducts(ByVal product As Products,
                            ByVal operations As UpdateOperations)
The interceptor for operations that submit edits to the database includes an argument that determines the update operation that fired the interceptor. You can determine the type of operation from within the interceptor code and react differently to different operations. You may reject a delete operation, for example, but accept insertions and updates. The method that intercepts all modifications is the ChangeInterceptor, and it provides two arguments: the row that's about to be modified and the operation. The operation is a member of the UpdateOperations enumeration, whose members are Add, Update, Change, and Delete. What makes this type of interceptor especially useful is that you can access the fields of the row being modified and reject certain operations based on the value of the row's columns. This information is passed to the method as a row of the corresponding table and it's the first argument of the ChangeInterceptor interceptor.
The Products table of the Northwind database, for example, has a column that specifies whether a product has been discontinued or not, the Discontinued column. It probably doesn't make a lot of sense to create a new product that's already discontinued. This is a business decision, of course, but here's an interceptor for the Add operation that disallows the insertion of a product that has its Discontinued column set to True:
<ChangeInterceptor("Products")> _
Public Sub OnChangeProducts(
ByVal product As Products, ByVal operation As UpdateOperations)
If operation = UpdateOperations.Add Then
If product.Discontinued Then
Throw New DataServiceException(
400, "Can't modify a discontinued product!")
End If
End If
End SubIf this exception is raised, the service will return an error message with the specified description. If the same error were raised while testing the service from the browser, the error would have been a 400 error (the "page not found" error).
- Create a simple ASP.NET web service.
Creating ASP.NET web services is straightforward with Visual Studio. ASP.NET web services provide a great method for delivering data and functionality within a distributed environment, including the Internet.
- Master It
Develop an ASP.NET web service that enables the user to add two numbers.
- Consume an ASP.NET web service.
Adding a web reference or service reference to a web service is a key element to creating an application that can consume the web service.
- Master It
Create a new website and add a service reference to a web service on your machine.
- Create a WCF service.
WCF services are similar to web services, but they give developers more options for deployment and they support more data exchange protocols.
- Master It
Outline the steps involved in building a WCF service.
- Work with ADO.NET Data Services.
ADO.NET Data Services is a project component that exposes, or surfaces, data as a service through HTTP. Data services are built automatically by Visual Studio based on any data source, and you can access them through URI requests.
- Master It
How do you access the methods of an ADO.NET data service?